The documentation set for this product strives to use bias-free language. For the purposes of this documentation set, bias-free is defined as language that does not imply discrimination based on age, disability, gender, racial identity, ethnic identity, sexual orientation, socioeconomic status, and intersectionality. Exceptions may be present in the documentation due to language that is hardcoded in the user interfaces of the product software, language used based on RFP documentation, or language that is used by a referenced third-party product. Learn more about how Cisco is using Inclusive Language.
The Cisco CWM user interface allows you to access all of the product's core functions. You can access them through four main
menu selection paths:
Dashboard: Add customizable dashboards with dashlets that monitor the status of many CNC functions, including CWM workflows, adapters,
workers, and active tasks.
Design: Add, manage, and delete workflow definitions, and forms.
Operate: Run new workflows, check the status of particular workflow executions (jobs), view schedules, or manage manual tasks that
are triggered by workflow execution callback states.
Administration > Workflow Administration: Add and manage workers, adapters, secrets, resources, event types, and system settings.
Workflows
The main Workflows view consists of a list of workflows added to CWM with details and possible actions.
Workflows table
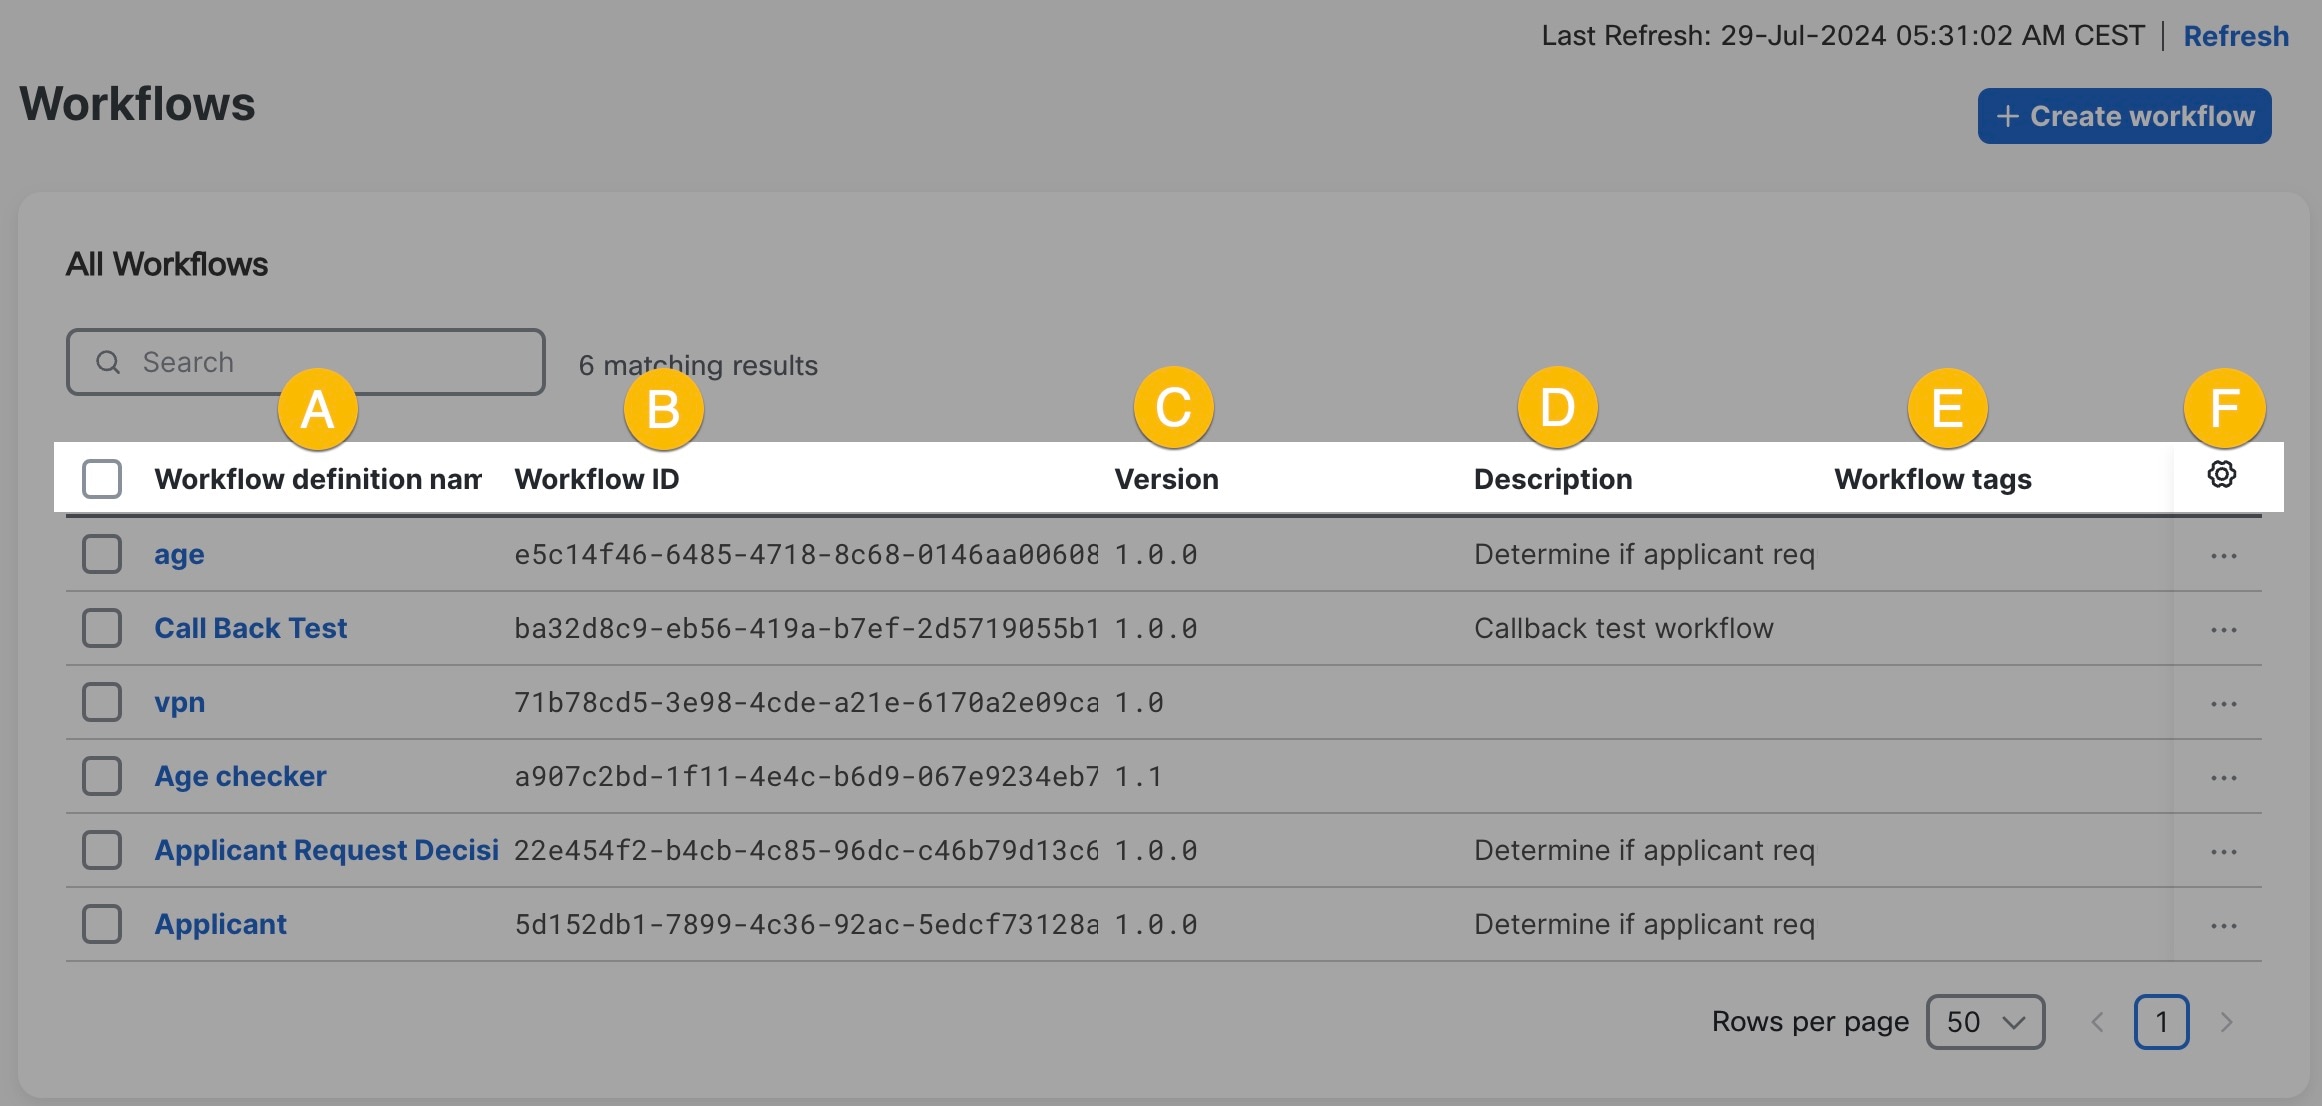
Figure 1. All Workflows tab
The Workflows table consists of the following columns:
A) Workflow definition name: unique name of the workflow.
B) Workflow ID: unique identifier assigned automatically after workflow creation.
D) Version: indicates the current workflow version number, allows keeping track of the workflow versioning.
C) Description: optional field used for describing your workflow functionality.
E) Workflow tags: shows tags assigned to a given workflow.
F) Actions: shows possible actions for a given workflow:
Run: starts a single execution of a given workflow (job).
Delete: removes an added workflow from CWM (this action is irreversible).
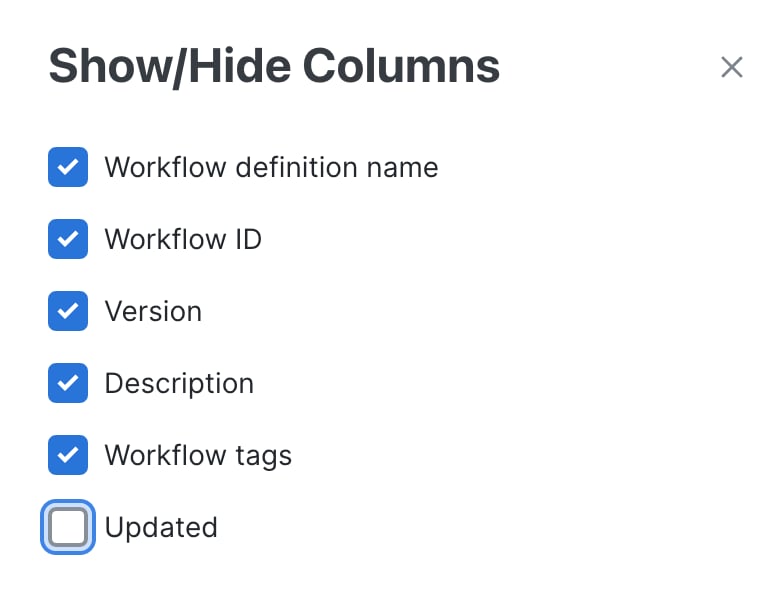
Figure 2. Gear icon
To show/hide the columns displayed in the table, use the gear icon on the right side above the table.
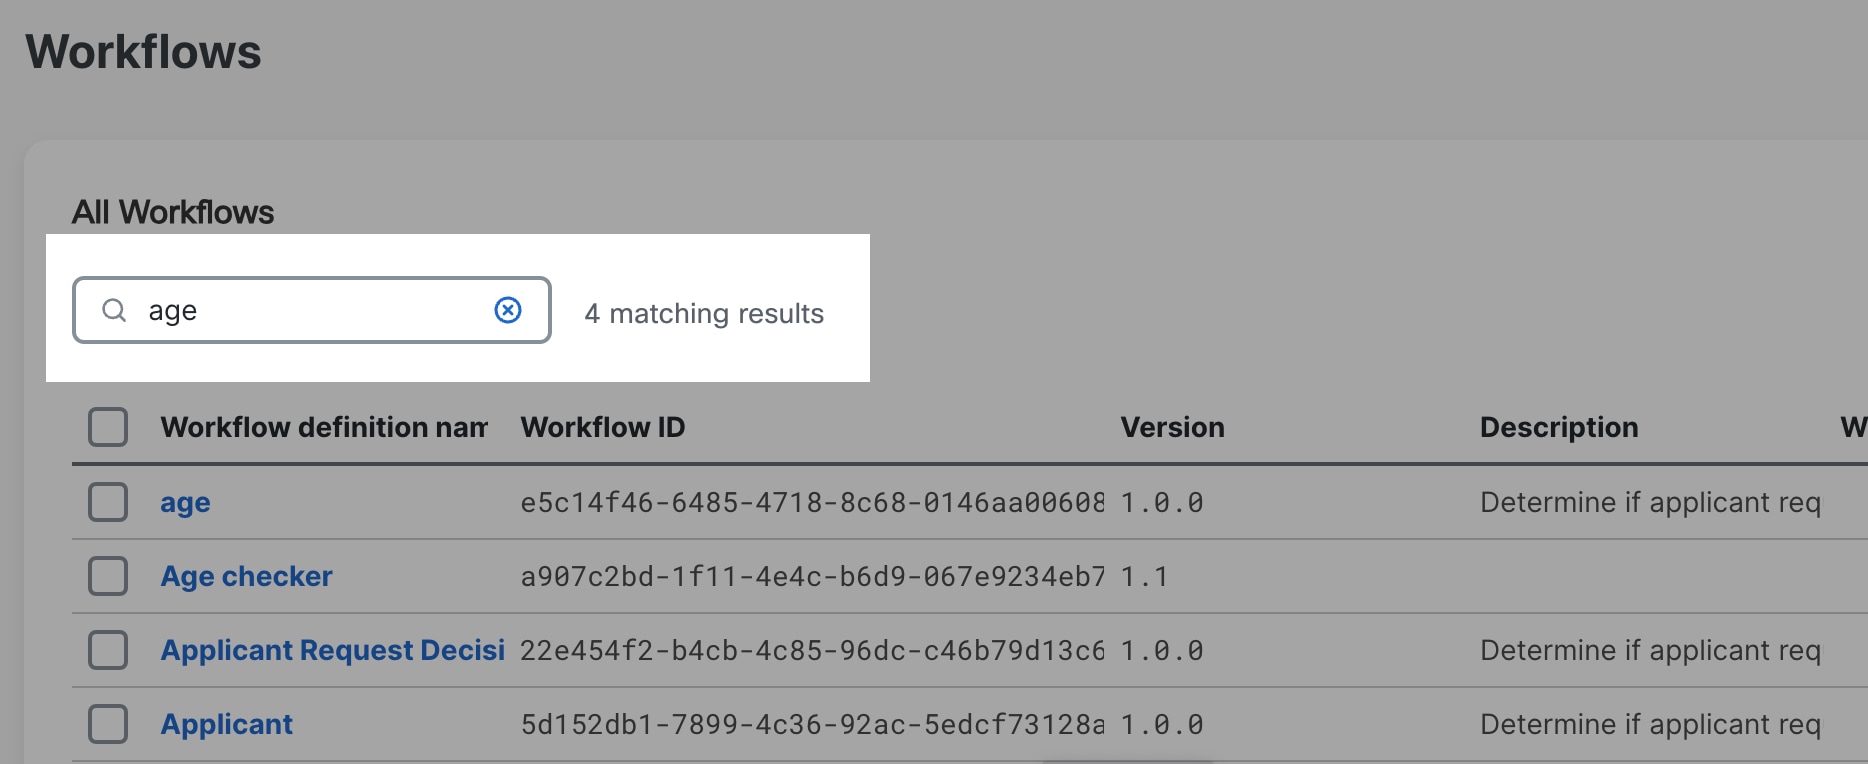
Figure 3. Filter option
To search the table for the specified value(s), provide your input in the Search field above the table. The search is performed in all the columns, whether they are currently displayed in the table .
Bulk actions on workflows
You can perform bulk actions on multiple workflows at once. To select a workflow, tick the checkbox on the right-side of the
All Workflows table. You have three possible bulk actions:
Edit tags: modifies tags for selected workflows by adding one or more or resetting them.
Delete Selected: removes selected workflows from the list and CWM (this action is irreversible).
Export: exports selected workflow entries to a CSV file.
Figure 4. Bulk actions
Jobs
The Jobs view lets you monitor job statuses and rerun or cancel jobs (workflow executions).
Job Tabs
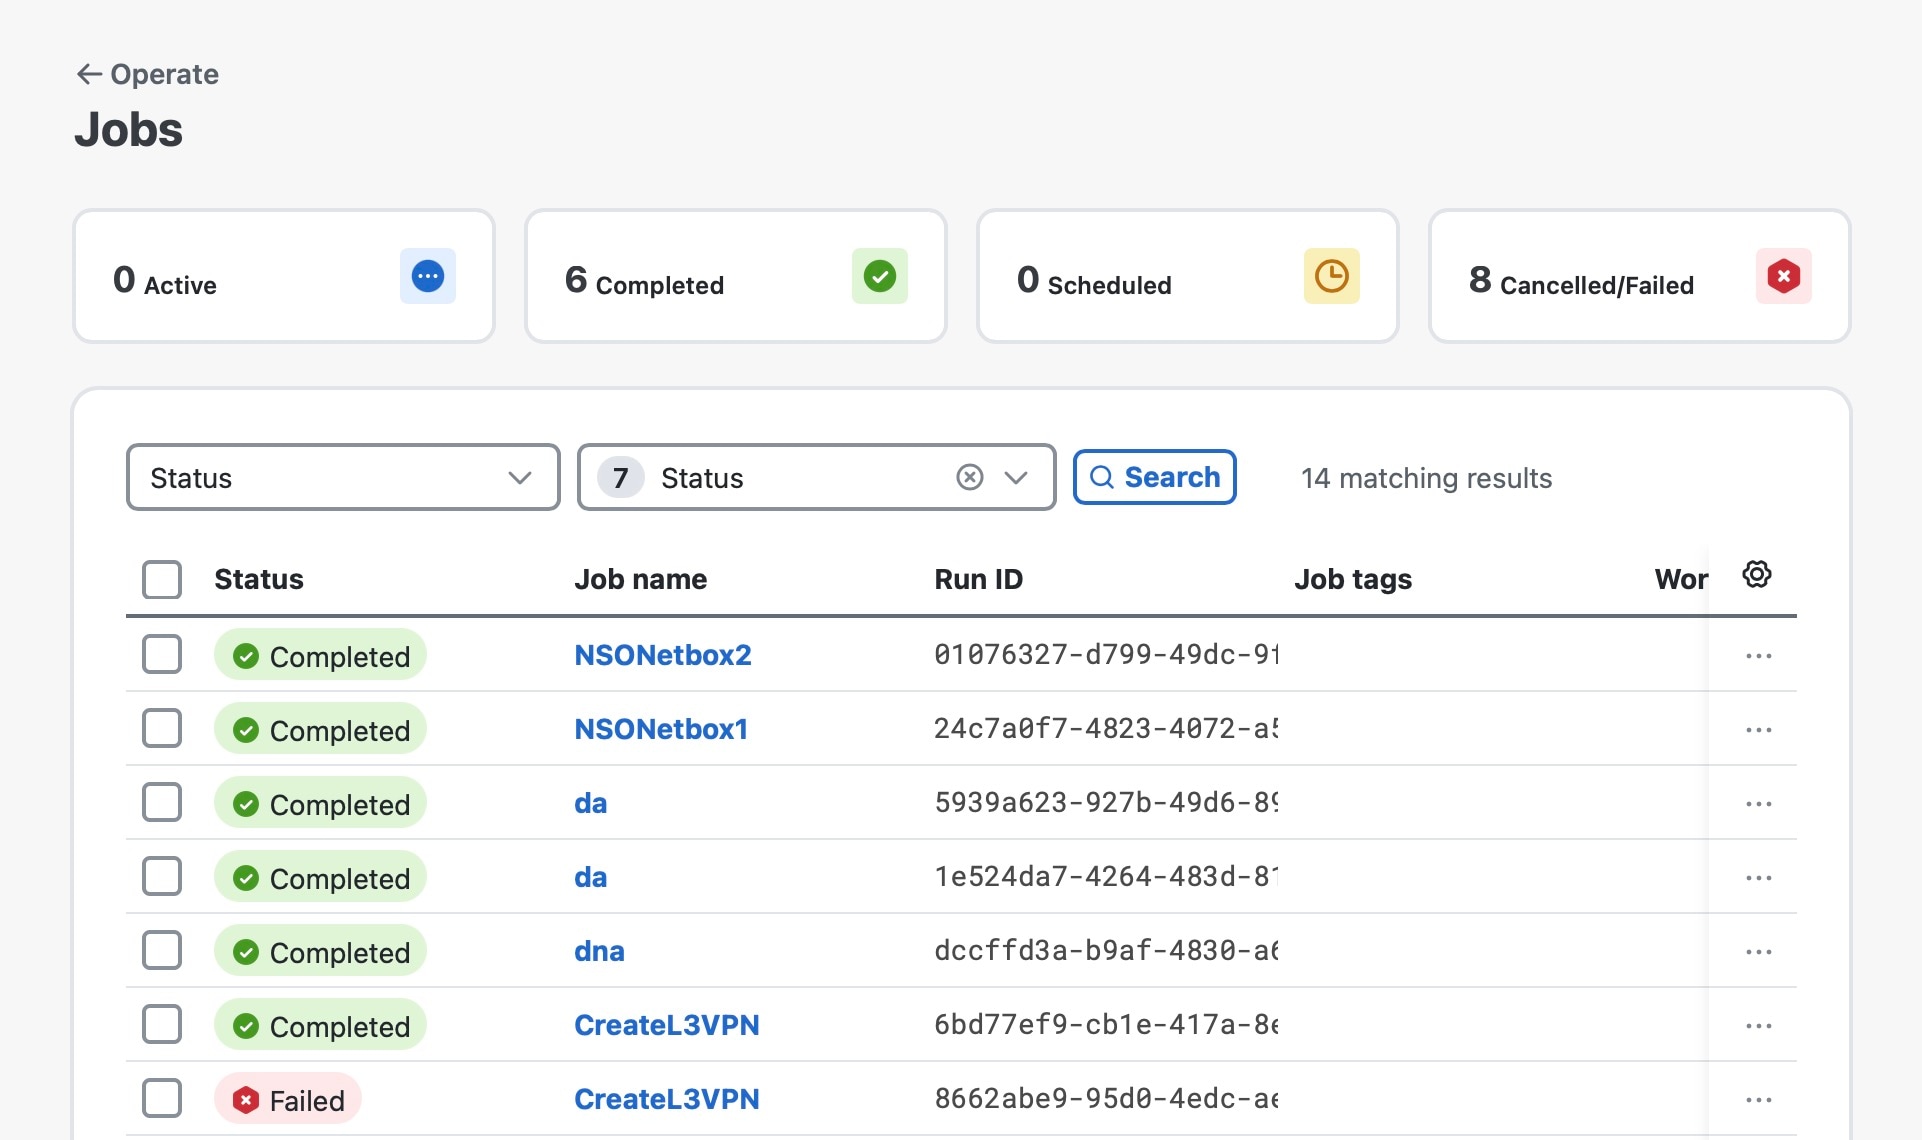
At the top of the Jobs view, status tabs display an overview of the number of jobs and serve as status filters.
There are four available status tabs:
Figure 5. Jobs status tabs
Active: The number of jobs currently running.
Completed: The number of jobs that have completed successfully.
Scheduled: The number of jobs currently scheduled to run.
Cancelled/Failed: The number of jobs that were manually terminated by users or that failed during execution.
To see all the jobs with a particular status, click on the appropriate status tab. For example, to see all the active jobs,
click on the Active status tab. The Active jobs will then be shown in the table below the tabs.
The Scheduled status tab will display only scheduled jobs and their details in the table. You may also find particular jobs on a given
schedule under other tabs, according to their completion status (for example, a Scheduled job may also be Active or Completed).
The Jobs view shows all jobs (workflow executions) run in the last 24 hours. You can also use the filter table option to search the
table for specified values.
While filtering based on tags, you can filter on only one tag at once. You can filter on multiple job tags only while using
the API.
Bulk actions on jobs
The Jobs view enables you to perform bulk actions on many jobs at once.
To select one or more jobs, first click one of the four job status tabs, then click the checkbox next to the jobs you want.
Then click the more icon (…) on the right side of the table.
The actions available to you will vary depending on the job status tab you have currently selected:
Export Selected: Exports all the selected job entry details to a CSV file. Available for Active, Completed, Scheduled, and Cancelled/Failed jobs..
Cancel Selected: Terminates the selected jobs that are currently running. Available only for Active jobs.
Delete Selected: Deletes the selected scheduled jobs from the list and from the database. Available only for Scheduled jobs; this action is irreversible.
Job details
To check the details of a job, in the Job Manager choose the appropriate tab (Active, Completed, Cancelled ). In the table, click on the name of the job entry you want to check.
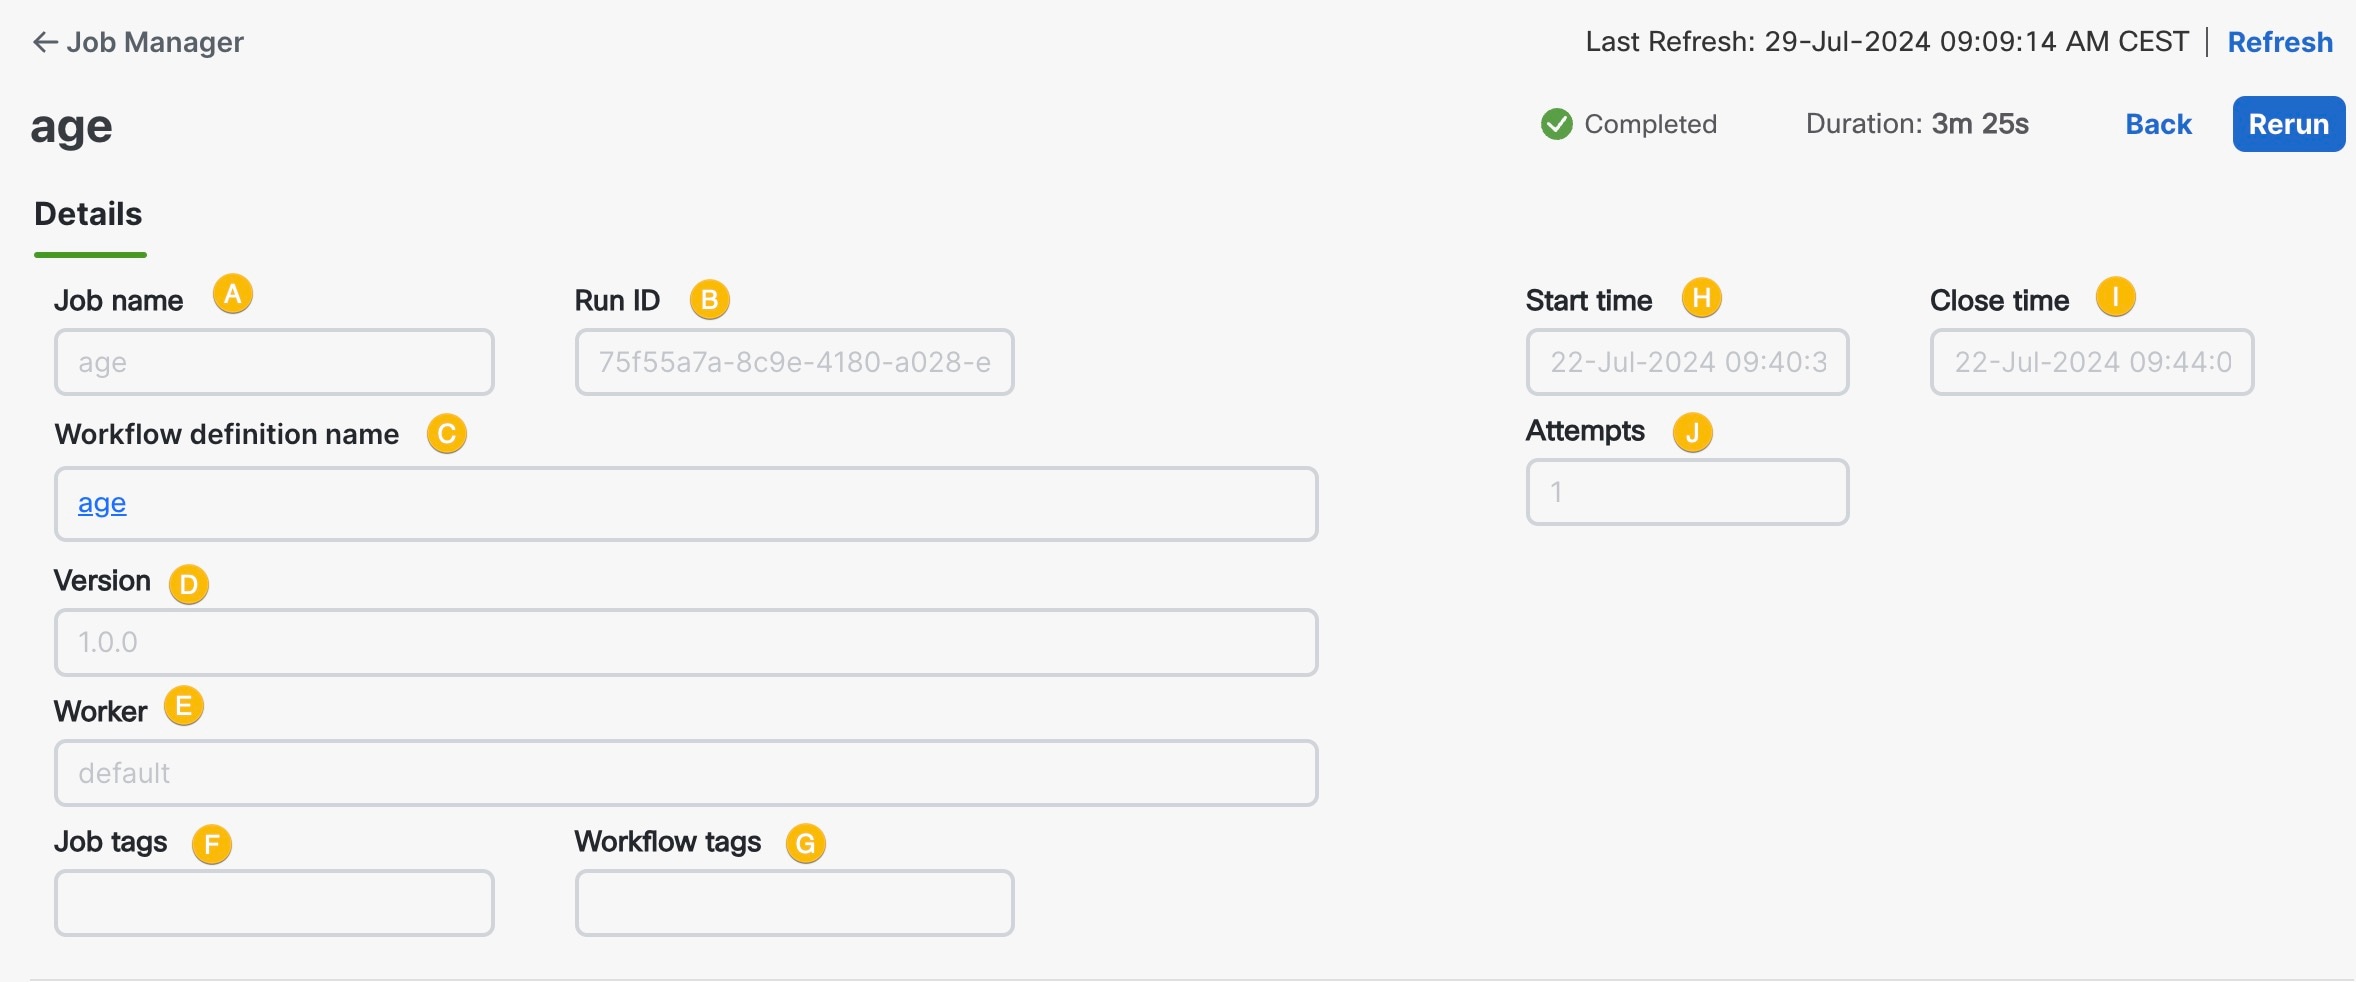
Figure 6. Details tab
The Details tab lets you check the following data for the selected job:
Job name: name of the particular workflow execution; by default, it is the workflow definition name.
Run ID: unique identifier for workflow execution.
Workflow definition name: name of the workflow definition used to run a particular job.
Version: version of the executed workflow definition.
Worker: worker assigned to the workflow definition.
Job tags: keyword(s) assigned to the job that allows filtering/sorting jobs based on them.
Workflow tags: keyword(s) assigned to the workflow definition used to run a particular job.
Start time: date and time when workflow execution started, for example 05-May-2023 02:59:25 PM CEST.
Close time: date and time when workflow execution ended, for example 05-May-2023 03:59:25 PM CEST. If the execution is still running
or it was failed/canceled, the appropriate status is displayed instead.
Attempts: indicates the number of tries needed to execute the workflow successfully; the maximum number of attempts can be limited
by the workflow definition.
The Parent Run ID field may be displayed if your job was executed as a child workflow.
Job summary, results and event history
The Job summary presents the details of the execution of a particular job, along with the workflow input and final result. It also lists
the series of events that the workflow engine has performed while executing the workflow definition.
Figure 7. Job Event Log
The Job summary panel displays the following data:
Execution status: event execution status.
Start Time: date and time when job execution started, for example 05-Jan-2025 03:59:25 PM CEST
Job tags: lists tags attributed to this particular job when running the workflow.
Close Time: date and time when job execution ended.
Run ID: unique ID of this particular job run.
Duration: total time of the job run from start time to close time.
Definition Name: name of the workflow definition used for this job run.
Attempts: number of attempts performed for completion of the task.
Definition version: the version of the workflow definition used for this job run.
Start user: name of the user performing the job run.
The Input and results panel presents the input data (on the left) provided on the workflow definition run and the final output data returned from
by the workflow upon completion of the workflow events.
Event history is a comprehensive, ordered log of all Events generated during a workflow execution. These events are produced in response
to external occurrences and actions issued by the workflow. The Event history serves as the definitive record of a workflow
lifecycle, capturing every state transition and action taken.
Tasks
Tasks allow operators to intervene manually during workflow execution. You configure tasks using the Forms view in the Design menu, and refer to them as part of the Callback state inside the workflow definitions.
The Task List displays tasks that are currently pending for input by the operator.
To use the task list:
Click on a task name to see the task prompt and provide input.
Use Search to find a specific task or the Status filter to filter out tasks according to their status.
Select task(s) to export them to a CSV format.
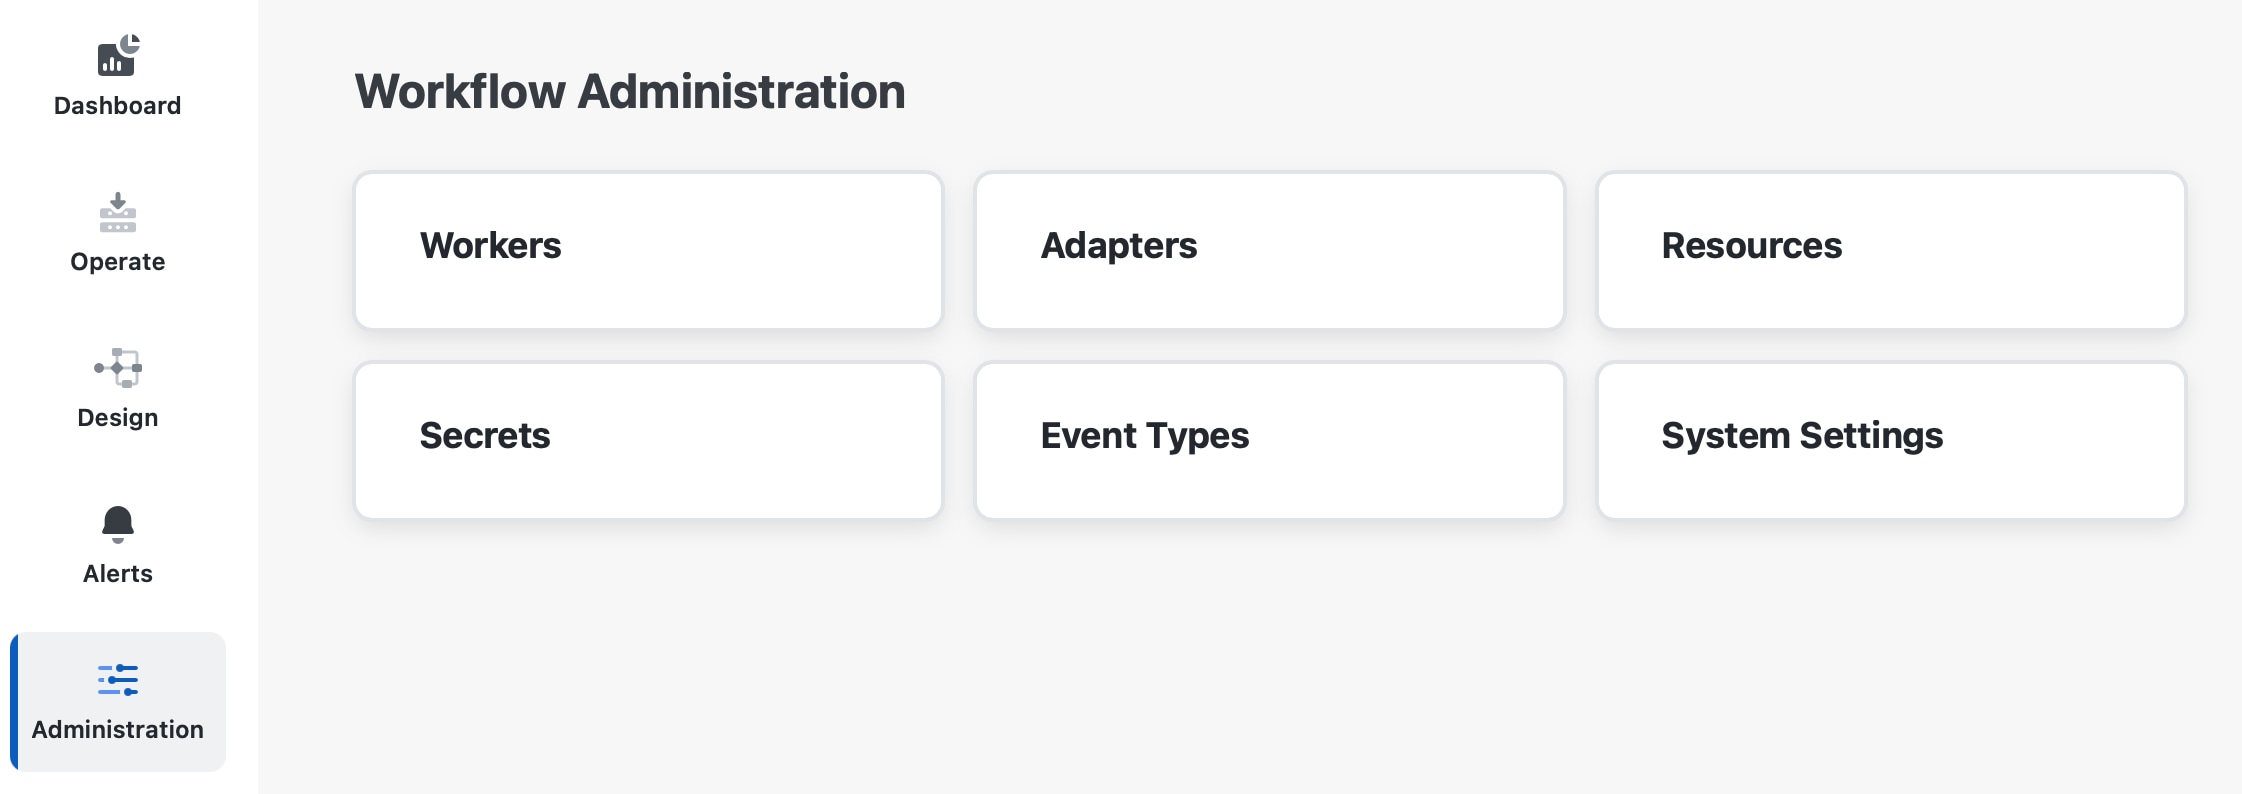
Workflow Administration
The Workflow Administration view allows you to manage adapters, workers, secrets, resources, event types and system settings through dedicated tabs.
Figure 8. Workflow Administration view
Adapters
The Adapters tab displays a table listing all uploaded adapters. Above the table, there is the Add adapter action button that allows you to upload adapter to CWM and and install it.
To export all details of selected adapter(s) to a CSV file, check them in the list and click the Export action button.
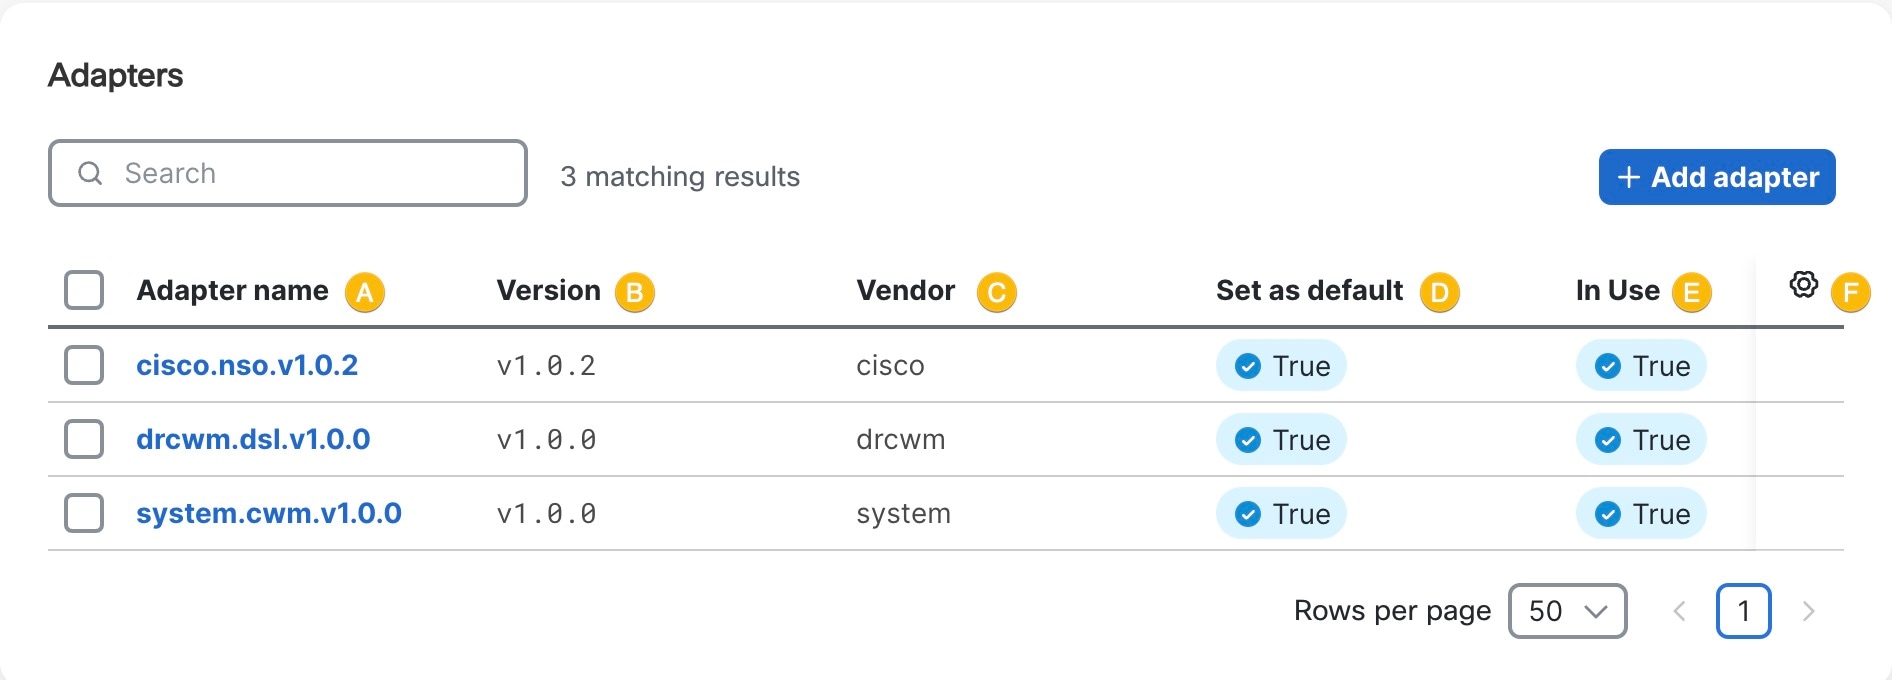
Figure 9. Adapters table
The Adapters table has the following columns:
A) Adapter name: unique adapter name.
B) Version: version of the added adapter.
C) Vendor: vendor name, as specified in the adapter properties.
D) Set as default: in this column, the adapter can have one of two possible statuses, depending on whether it is set as a default adapter to
be used by workflow.
True: indicates the adapter is the default one for accociated activities.
False: indicates the adapter is not set as the default one.
E) In Use: in this column, the adapter can have one of two possible statuses, depending on whether it is currently in use, which determines
if it can be deleted.
True: indicates the adapter is currently in use by one or more workflows and therefore cannot be deleted.
False: indicates the adapter is not in use by any workflow and can be deleted.
F) Actions:
Delete: deletes the uploaded adapter from CWM.
Install installs the already uploaded adapter to CWM.
Workers
The Workers tab displays a table listing all existing workers.
Figure 10. Workers action buttons
When you check worker(s) in the table, various action buttons appear:
Add Worker: allows you to create a new worker and assign to it activities from already installed adapters.
Start Worker: starting the worker allows it to execute assigned tasks and changes the worker's status to running.
Stop Worker: stopping the worker allows it to execute pending actions but blocks its ability to accept new tasks. After clicking on the
Stop Worker button, the confirmation modal Stop worker(s) appears. If the worker actively executes an ongoing task, you won't
be able to stop it, unless you tick the checkbox Force stop. This action stops the worker regarding whether it performs any
task and might cause the failure of ongoing jobs.
Delete: deletes the worker permanently (this action is irreversible). If the worker is running, it's force stopped before deleting.
Export selected: downloads the CSV file with the details of the selected workers, including worker name, status and nr of activities.
The Workers table has the following columns:
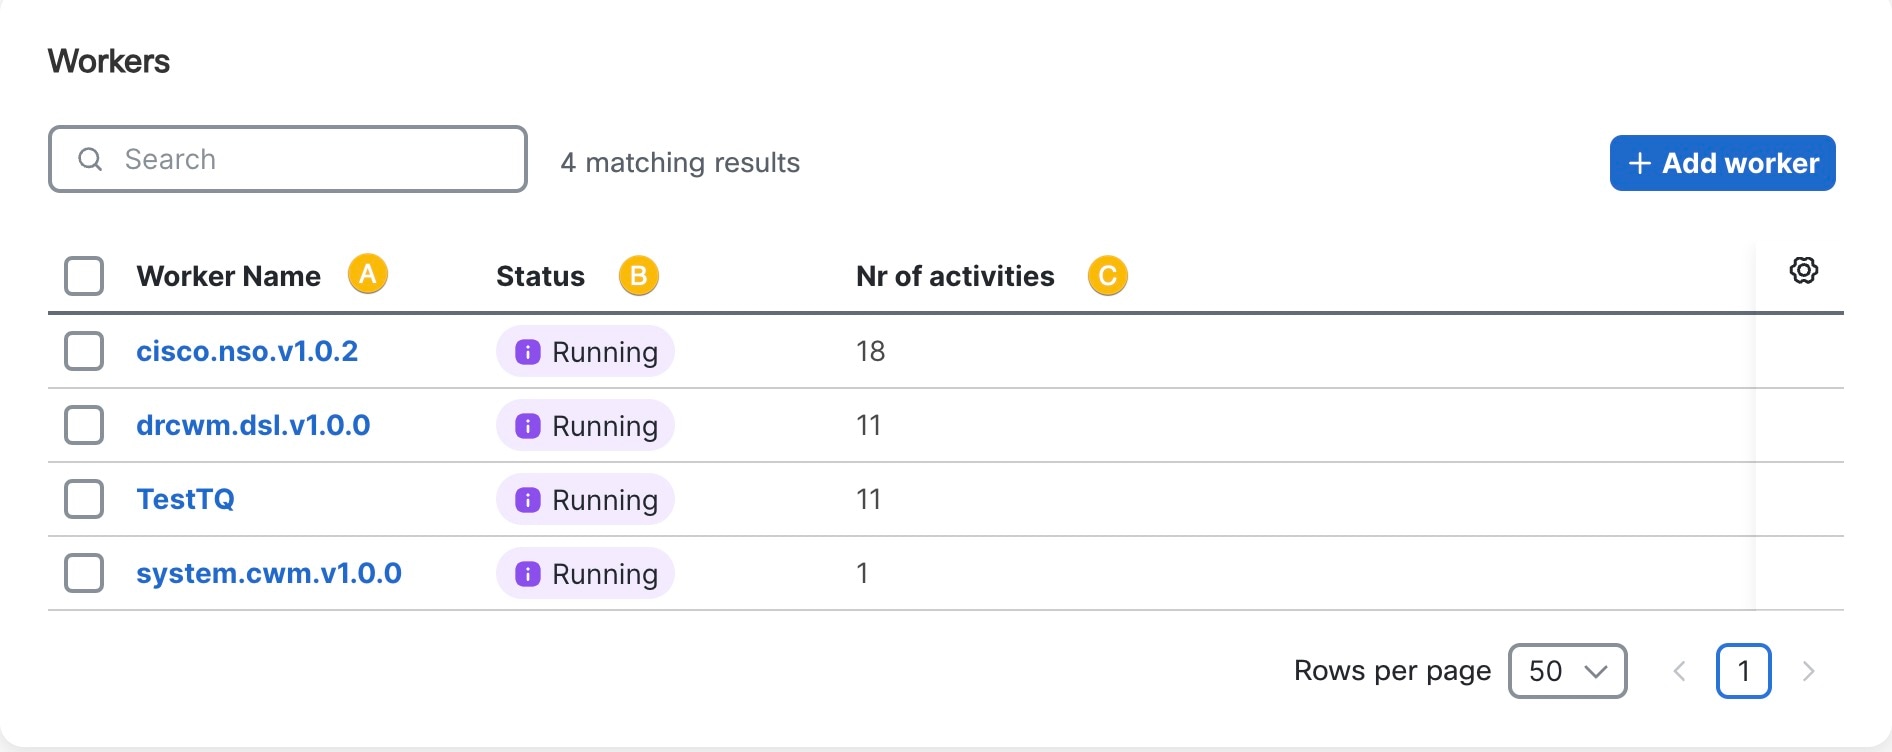
Figure 11. Workers table
A) Worker Name: unique worker's name. Once created, it cannot be modified.
B) Status: worker has three possible statuses visible in the CWM UI:
Initialized: worker status after creation, if you don't choose to start it immediately.
Running: indicates started worker available to execute tasks.
Stopped: indicates stopped worker unavailable for task execution.
C) Nr of activities: shows how many adapters' activities are assigned to the worker.
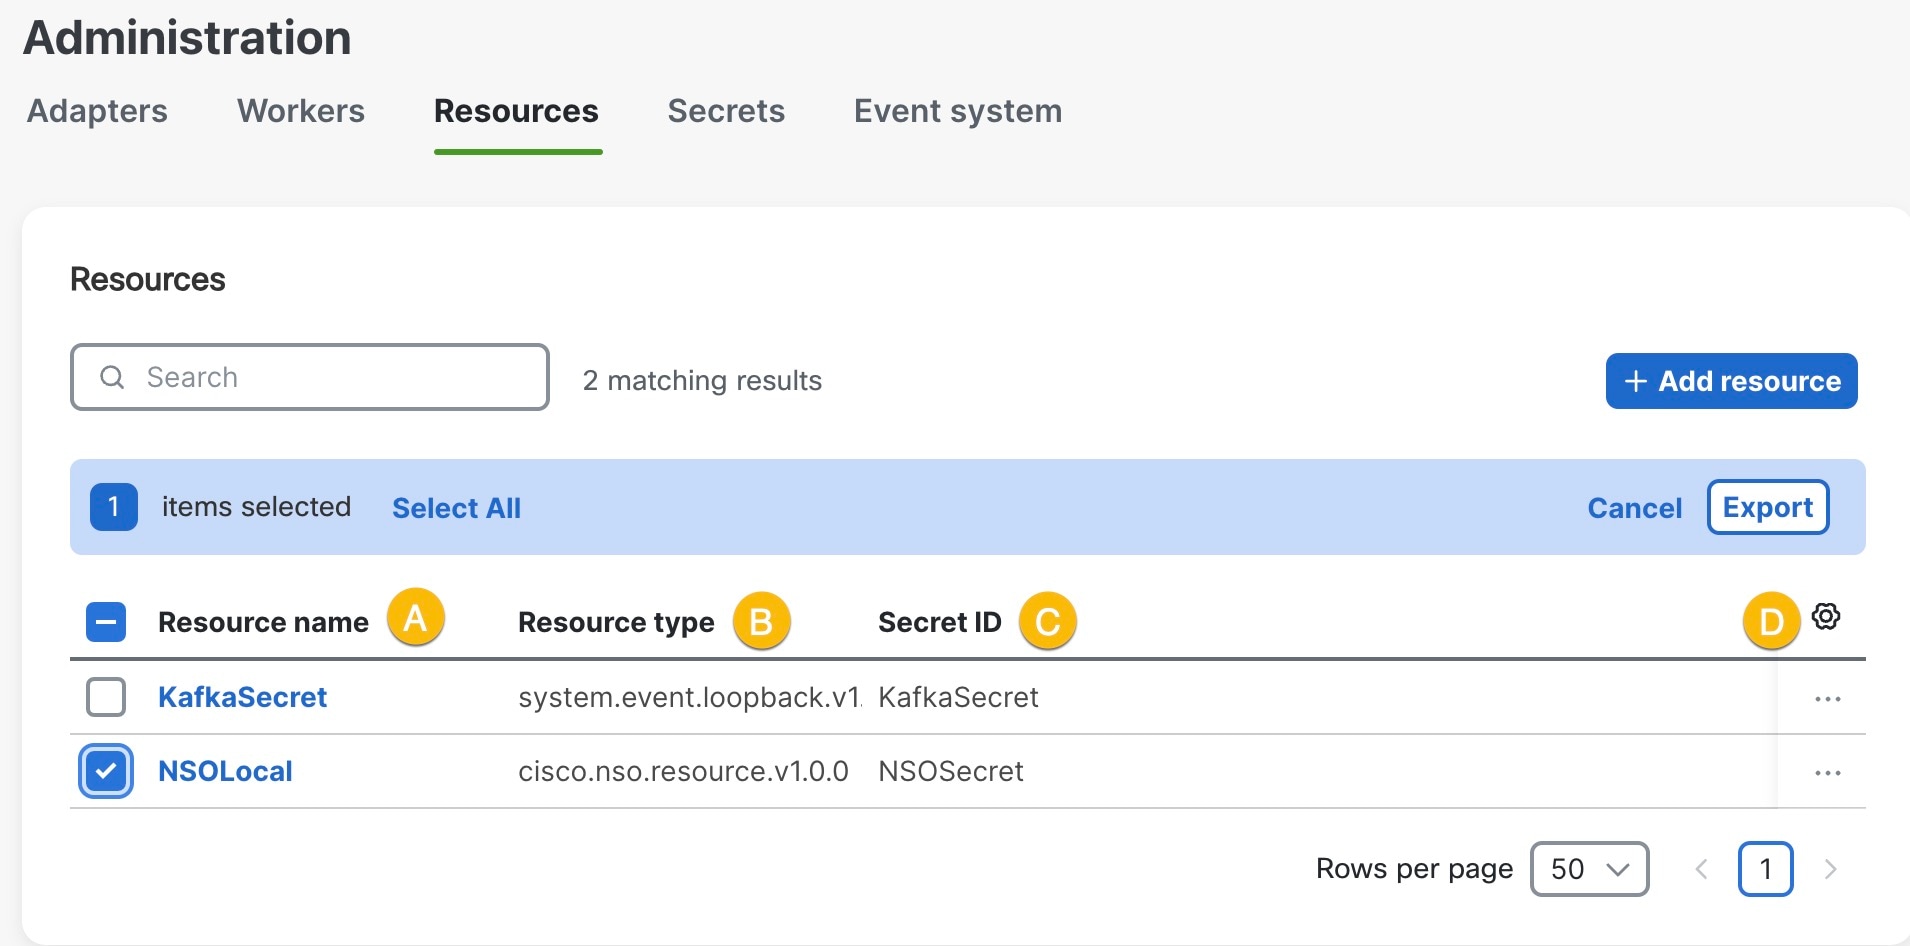
Resources
The Resources tab displays a table listing all existing resources. Above the table, there are various action buttons:
Add Resource: allows you to add resource to CWM.
Export: downloads the CSV file with all details of selected resources.
Figure 12. Resources table
The Resources table has the following columns:
A) Resource name: unique resource name.
B) Resource type: resource type specified in the adapter files.
C) Secret ID: associated secret ID.
D) Actions:
Delete: removes resource from CWM
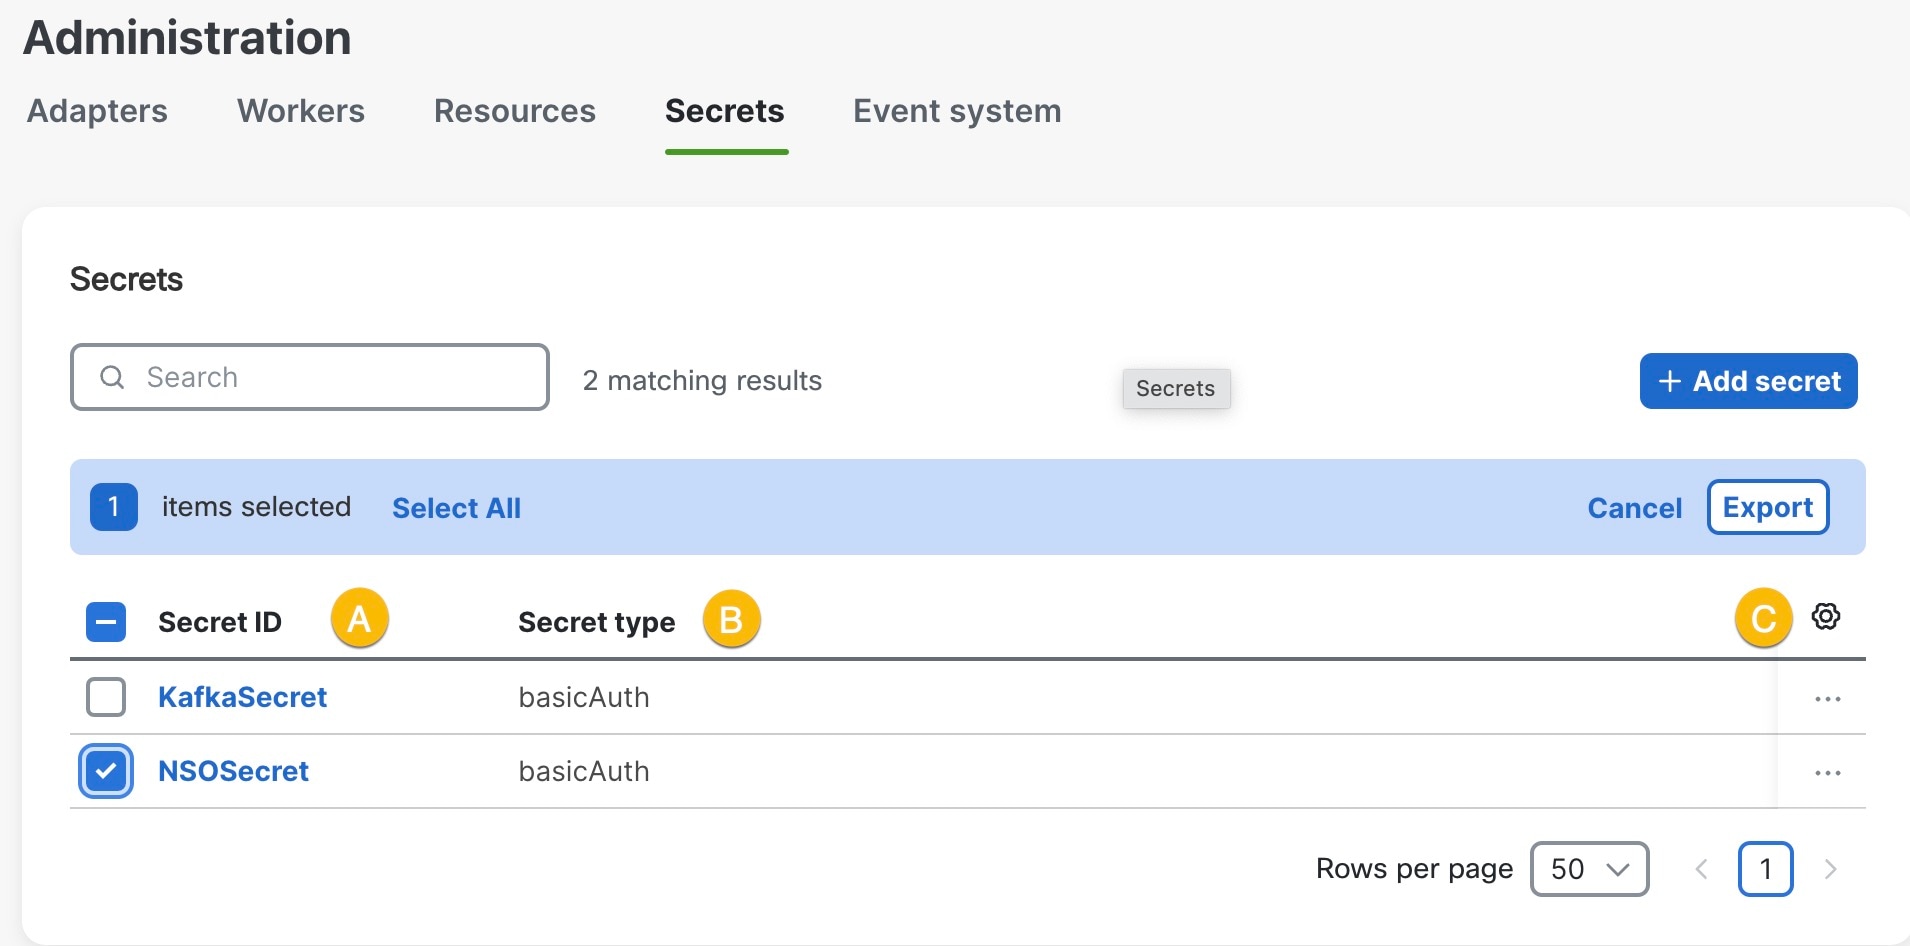
Secrets
The Secrets tab displays a table listing all existing secrets. Above the table, there are various action buttons:
Add Secret: allows you to add secret to CWM.
Export: downloads the CSV file with all details of selected secrets.
Figure 13. Secrets table
The Secrets table has the following columns:
A) Secret ID: unique secret name.
B) Secret type: secret type specified in the adapter files.
C) Actions:
Delete: removes secret
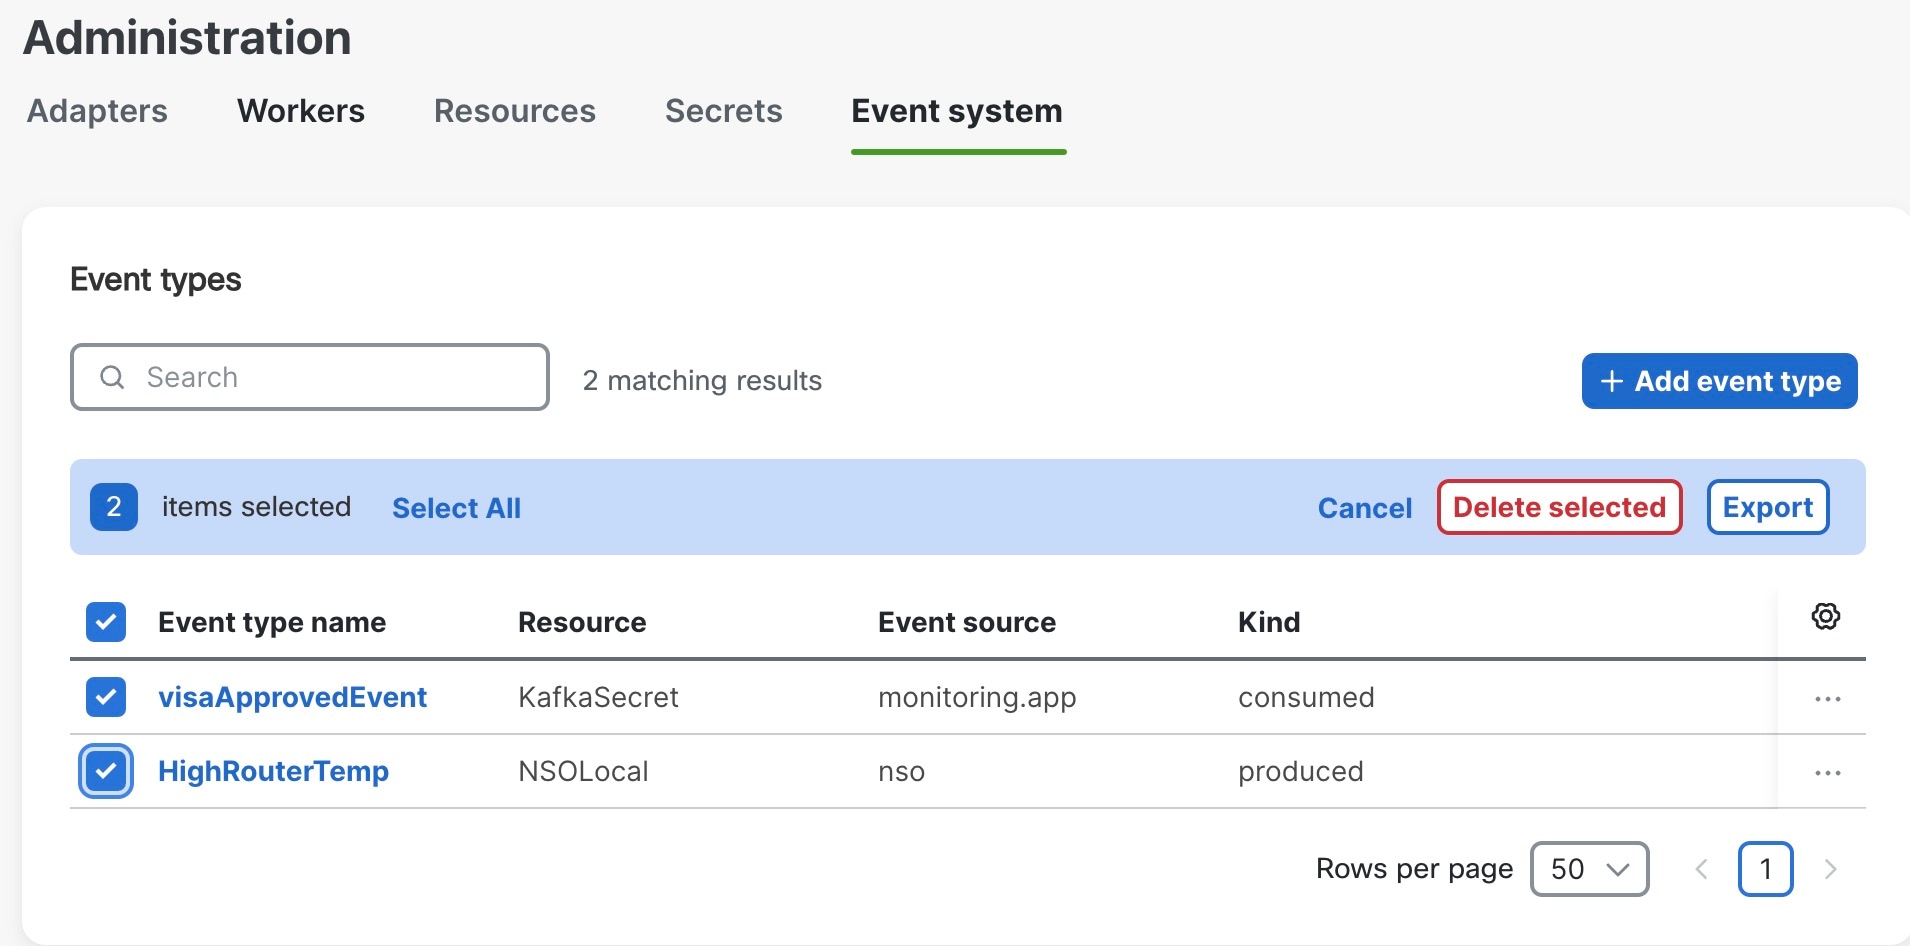
Event system
In the Event system tab, you define Kafka events that your workflows will consume or produce.
Figure 14. Event system
Add event type: allows you to define a new Kafka (or other) event in CWM. They can be of either consume or produce kind.
Delete Selected: deletes selected event types from the list and from CWM (this action is irreversible).
Export: downloads the CSV file with all details of the selected event types.
System Settings
With the System settings tab, you can manage job retention, retry policies, and timeouts. It controls how long completed jobs are kept, retry behavior
(delay, jitter, max attempts), and various timeout settings for actions, events, states, system activities, and workflows.


 Feedback