Initial setup
This section provides instructions to guide you through your first steps in using CWM. This initial setup allows you to prepare your workplace and start executing workflows.
Use these guidelines to accomplish the following:
Procedure
| Command or Action | Purpose | |
|---|---|---|
|
Step 1 |
Install adapters and create workers. |
First, you need to add and install adapters that allow workflows to interact with external systems. In this guide, it's assumed that you will use the default adapters shipped with CWM, or that you have custom adapters developed and ready to use. For execution of your adapter activities and code, you need workers. You can create a worker directly during adapter installation. |
|
Step 2 |
Configure secrets and resources. |
Adapters mostly communicate with external entities via APIs, and they need to have connection data, like port or host, and authentication data, like username with password. This information is kept in secrets and resources. The structure and schema for each resource and secret type are defined in the adapter files. As an operator, you can add secrets and resources to CWM. Once created, they can be reused by different workflow definitions and passed on when needed. |
|
Step 3 |
Add your workflow definition. |
Workflow definitions, often referred to as workflows, are pieces of code intended to automate operations. They are written in JSON or YAML and follow the Serverless Workflow Specification. Before workflows can be executed, they must be to be added to CWM. When you complete this setup you are ready to run your first job. |
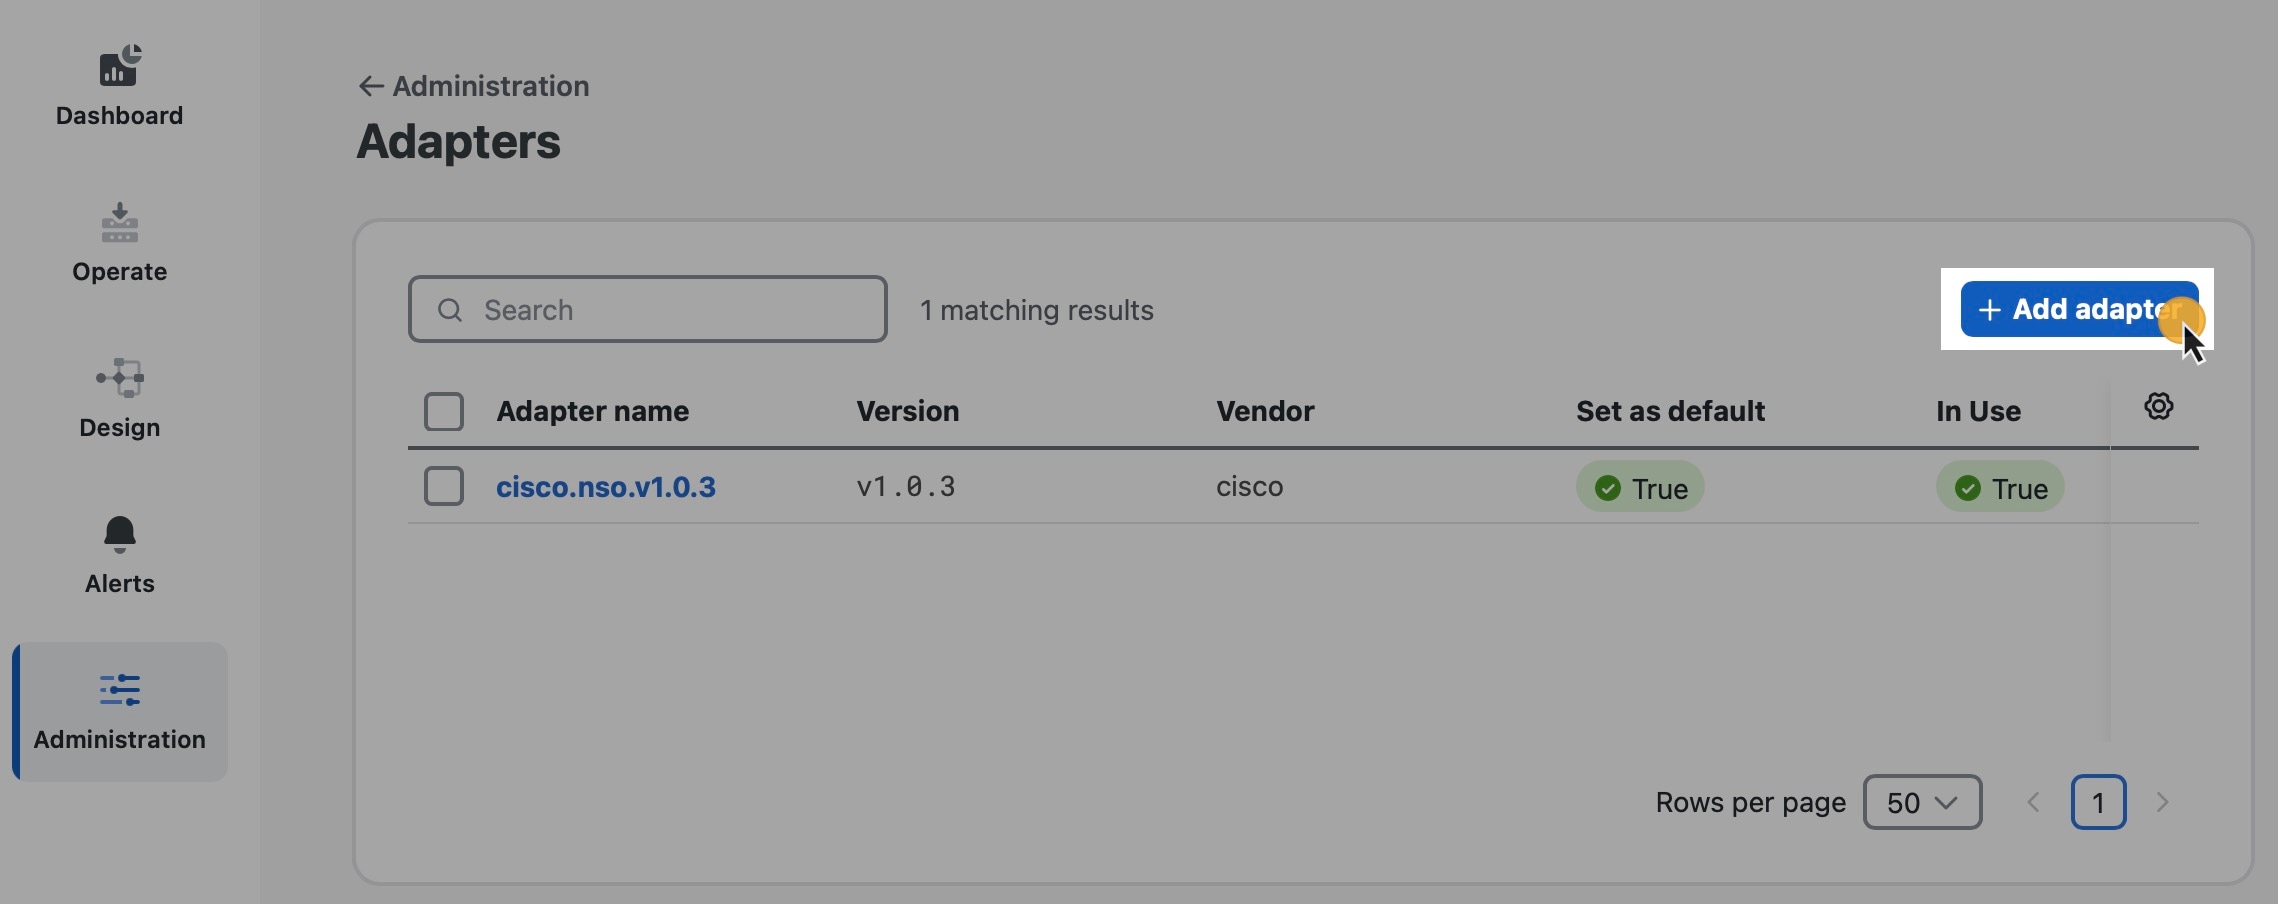
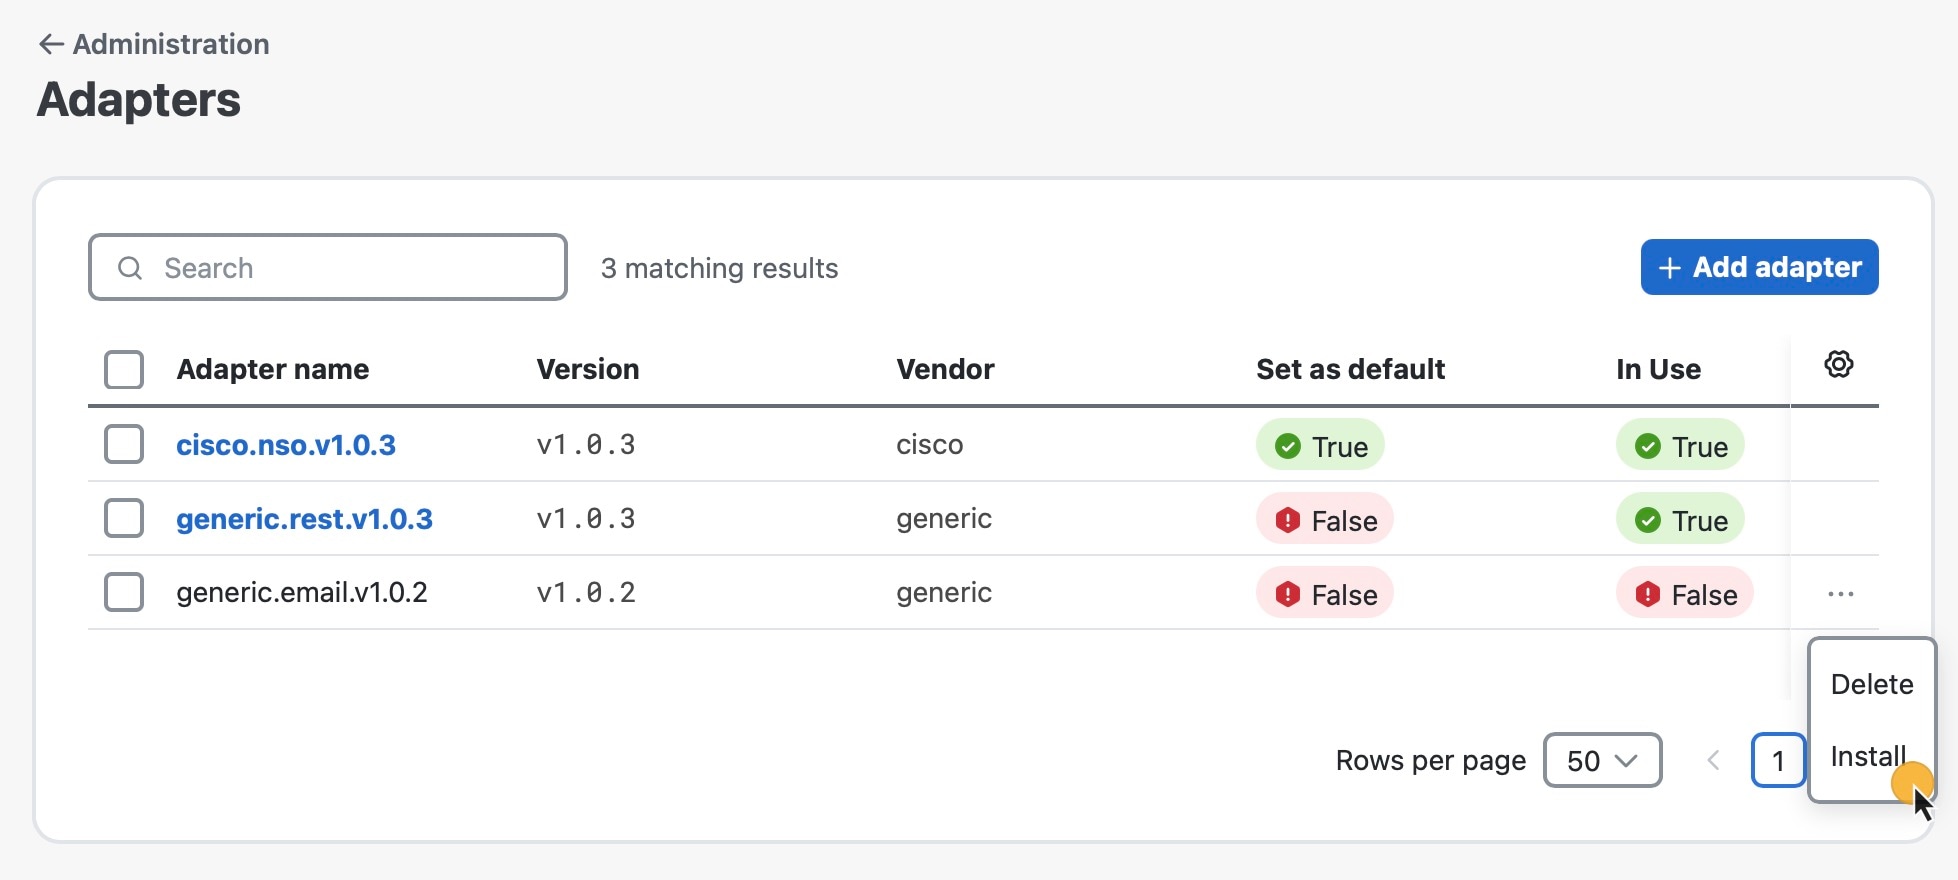
Install an adapter
Follow these steps to upload an adapter file and then install (deploy) it.
Procedure
| Command or Action | Purpose | |||
|---|---|---|---|---|
|
Step 1 |
In CWM, choose . |
|||
|
Step 2 |
Click the Add adapter button. |
 |
||
|
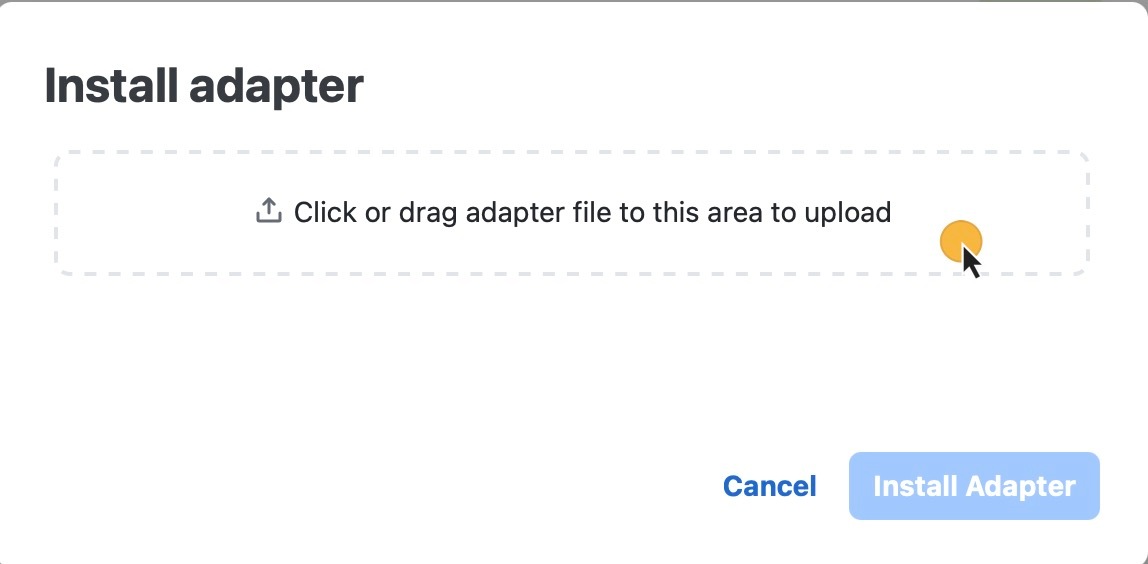
Step 3 |
In the Install adapter window, click on or drag an installable adapter file to the file uploader area and then click Install Adapter. You can find adapter files in the CWM software package. |
 |
||
|
Step 4 |
After the adapter file is uploaded to the CWM database, optionally tick Automatically create worker for this adapter checkbox if you want to create one, then click Install Adapter to finish the installation process. |
If the installation is interrupted or you chose Cancel, the adapter will be added to the CWM database and visible in the adapters list, but will not be installed and will be unusable by workflows. If you canceled the installation intentionally and want to remove the adapter from the list, click Delete under the Actions column. 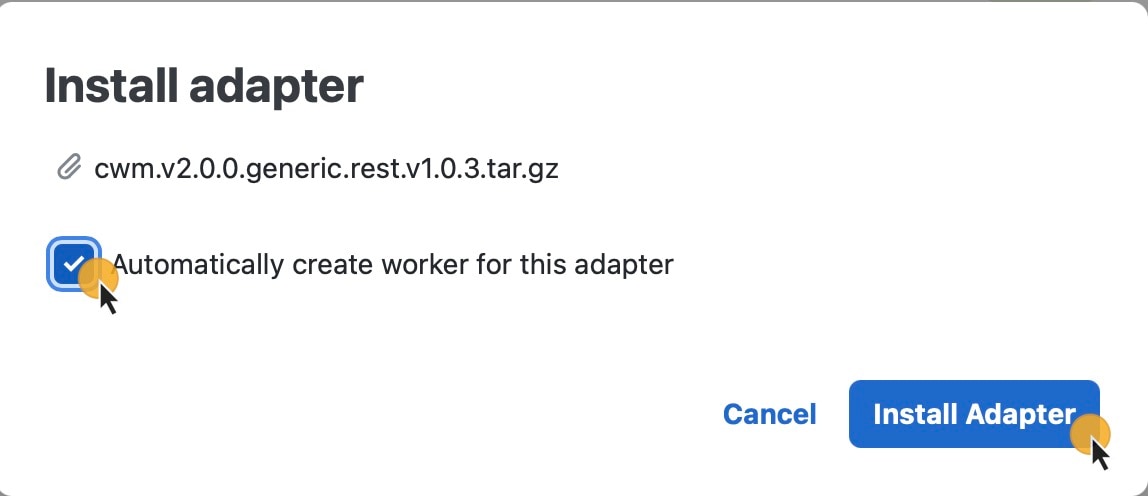 |
||
|
Step 5 |
If your adapter was installed, you should see the message "Your_adapter's_name has been fully installed!". Click Done. |
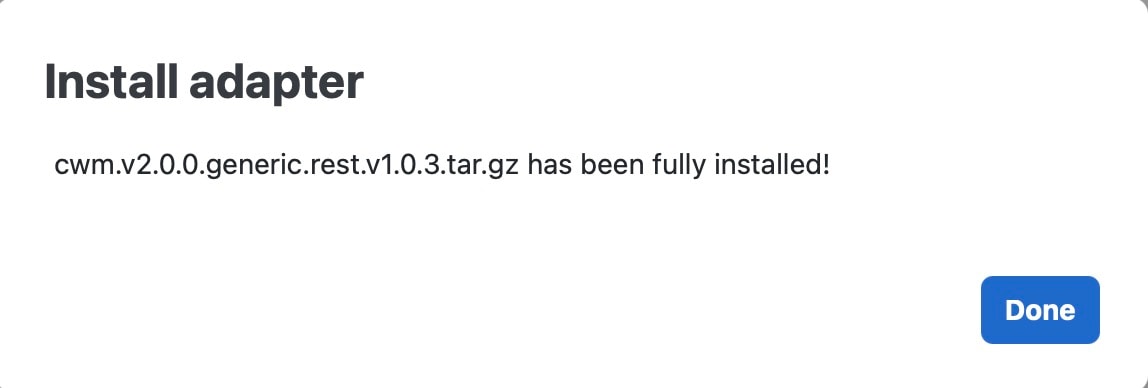 Adapter not installed: If the process failed or was interrupted, you can finalize it later by clicking the Install button under the Actions column. |
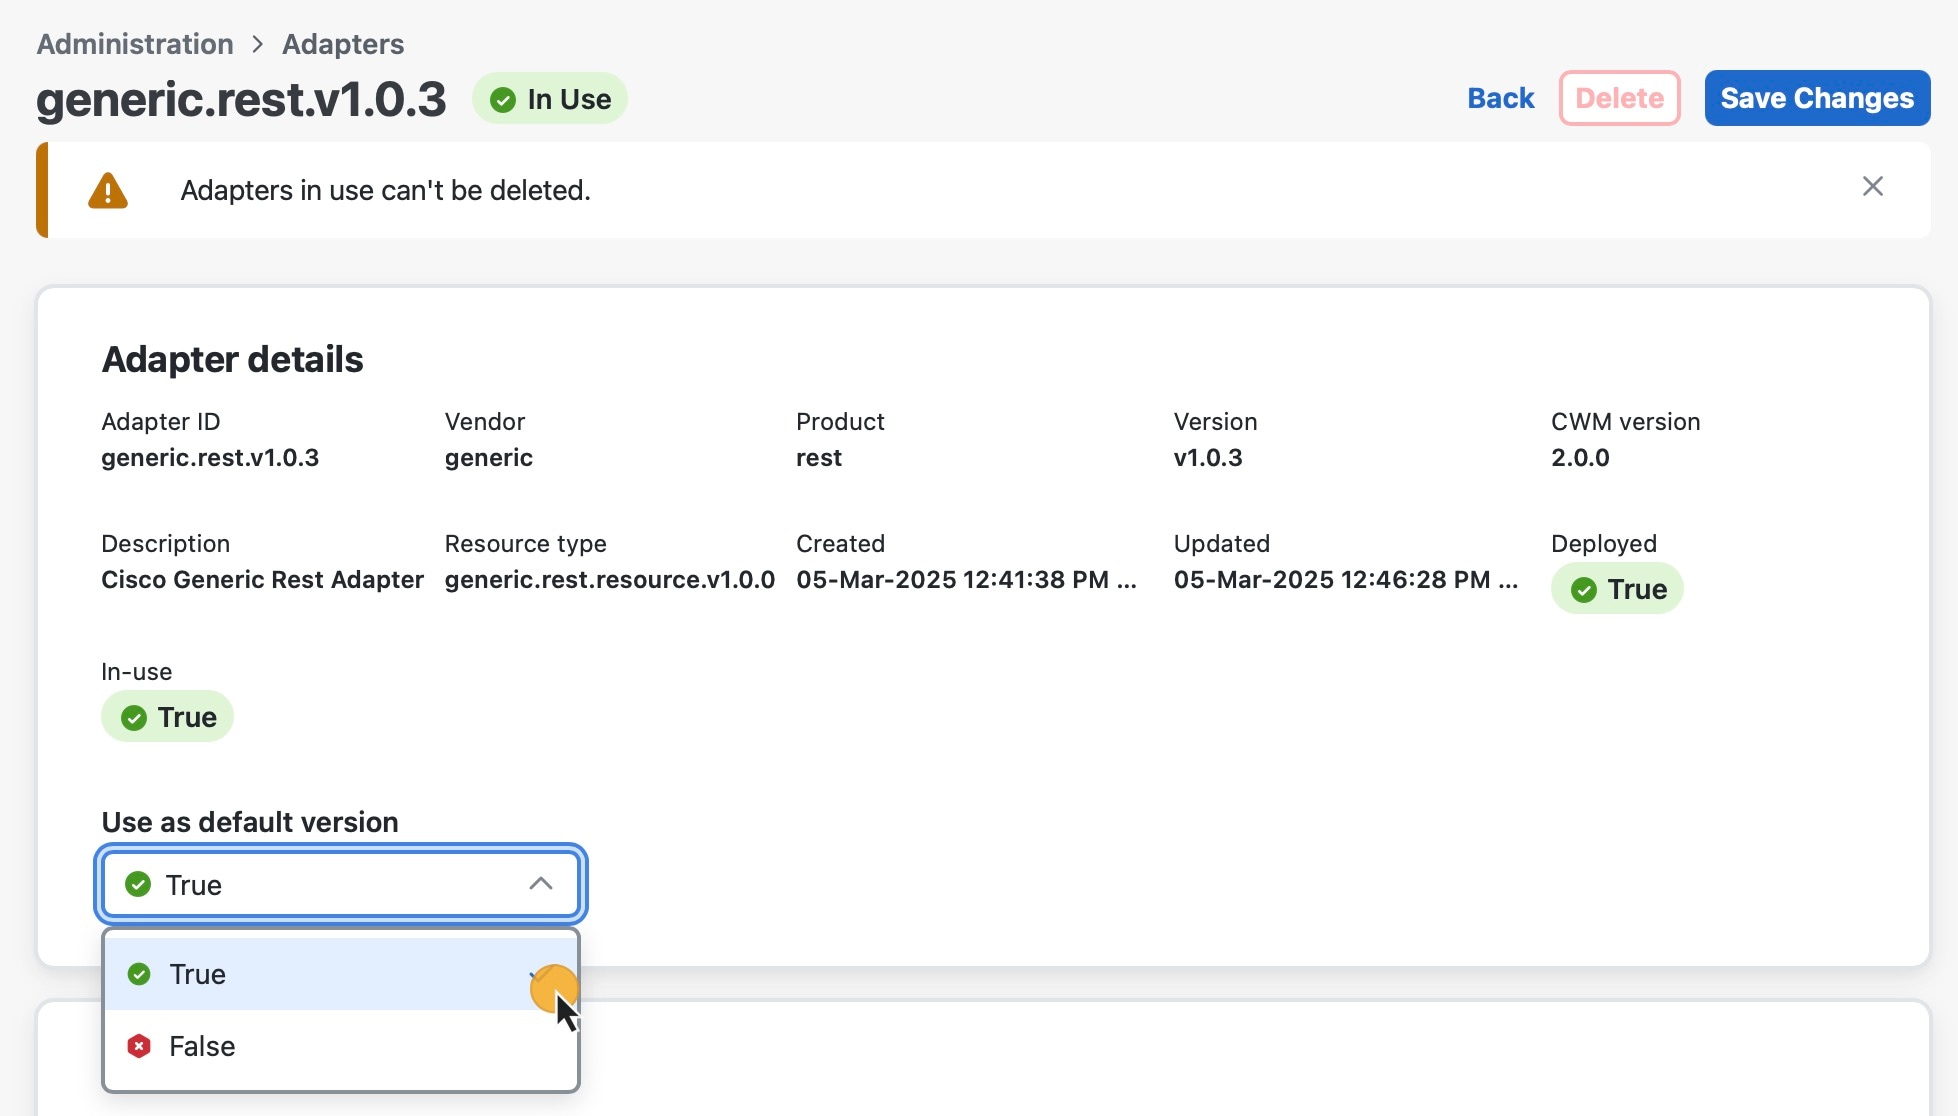
Set adapter as default for associated activities
You can set which adapter should be the default one for associated activities. To do so, follow the steps below.
Procedure
| Command or Action | Purpose | |
|---|---|---|
|
Step 1 |
In CWM, choose |
|
|
Step 2 |
In the Adapters list, click the name of the chosen adapter to open the adapter's details view. |
|
|
Step 3 |
In Use as default version, select True. |
 |
|
Step 4 |
Click Save Changes. |
After setting the adapter as the default one, you should see a relevant status under Set as default column on the adapters list. |
Delete adapter
You can delete an adapter if it has the status Not in use under the In Use column in the adapters list.
You cannot delete an adapter that is in use by one or more running workflows. The adapter will be shown with an In use status and the Delete button will be disabled. To delete the adapter, you must first terminate the running workflows and remove the associated workers.
Procedure
| Command or Action | Purpose | |
|---|---|---|
|
Step 1 |
In CWM, choose . |
|
|
Step 2 |
In the Adapters list, find the adapter you want to remove and click the Delete button in the same row under the Actions column. |
|
|
Step 3 |
In the Delete Adapter window, confirm by clicking the Delete Adapter button. |
Add worker
This topic explains how to create a worker in CWM.
Before you begin
Be sure to add and deploy one or more adapters.
Procedure
| Command or Action | Purpose | |
|---|---|---|
|
Step 1 |
In CWM, choose . |
|
|
Step 2 |
In the Workers view, click Add worker. |
|
|
Step 3 |
In the Create new worker window, provide the required input: |
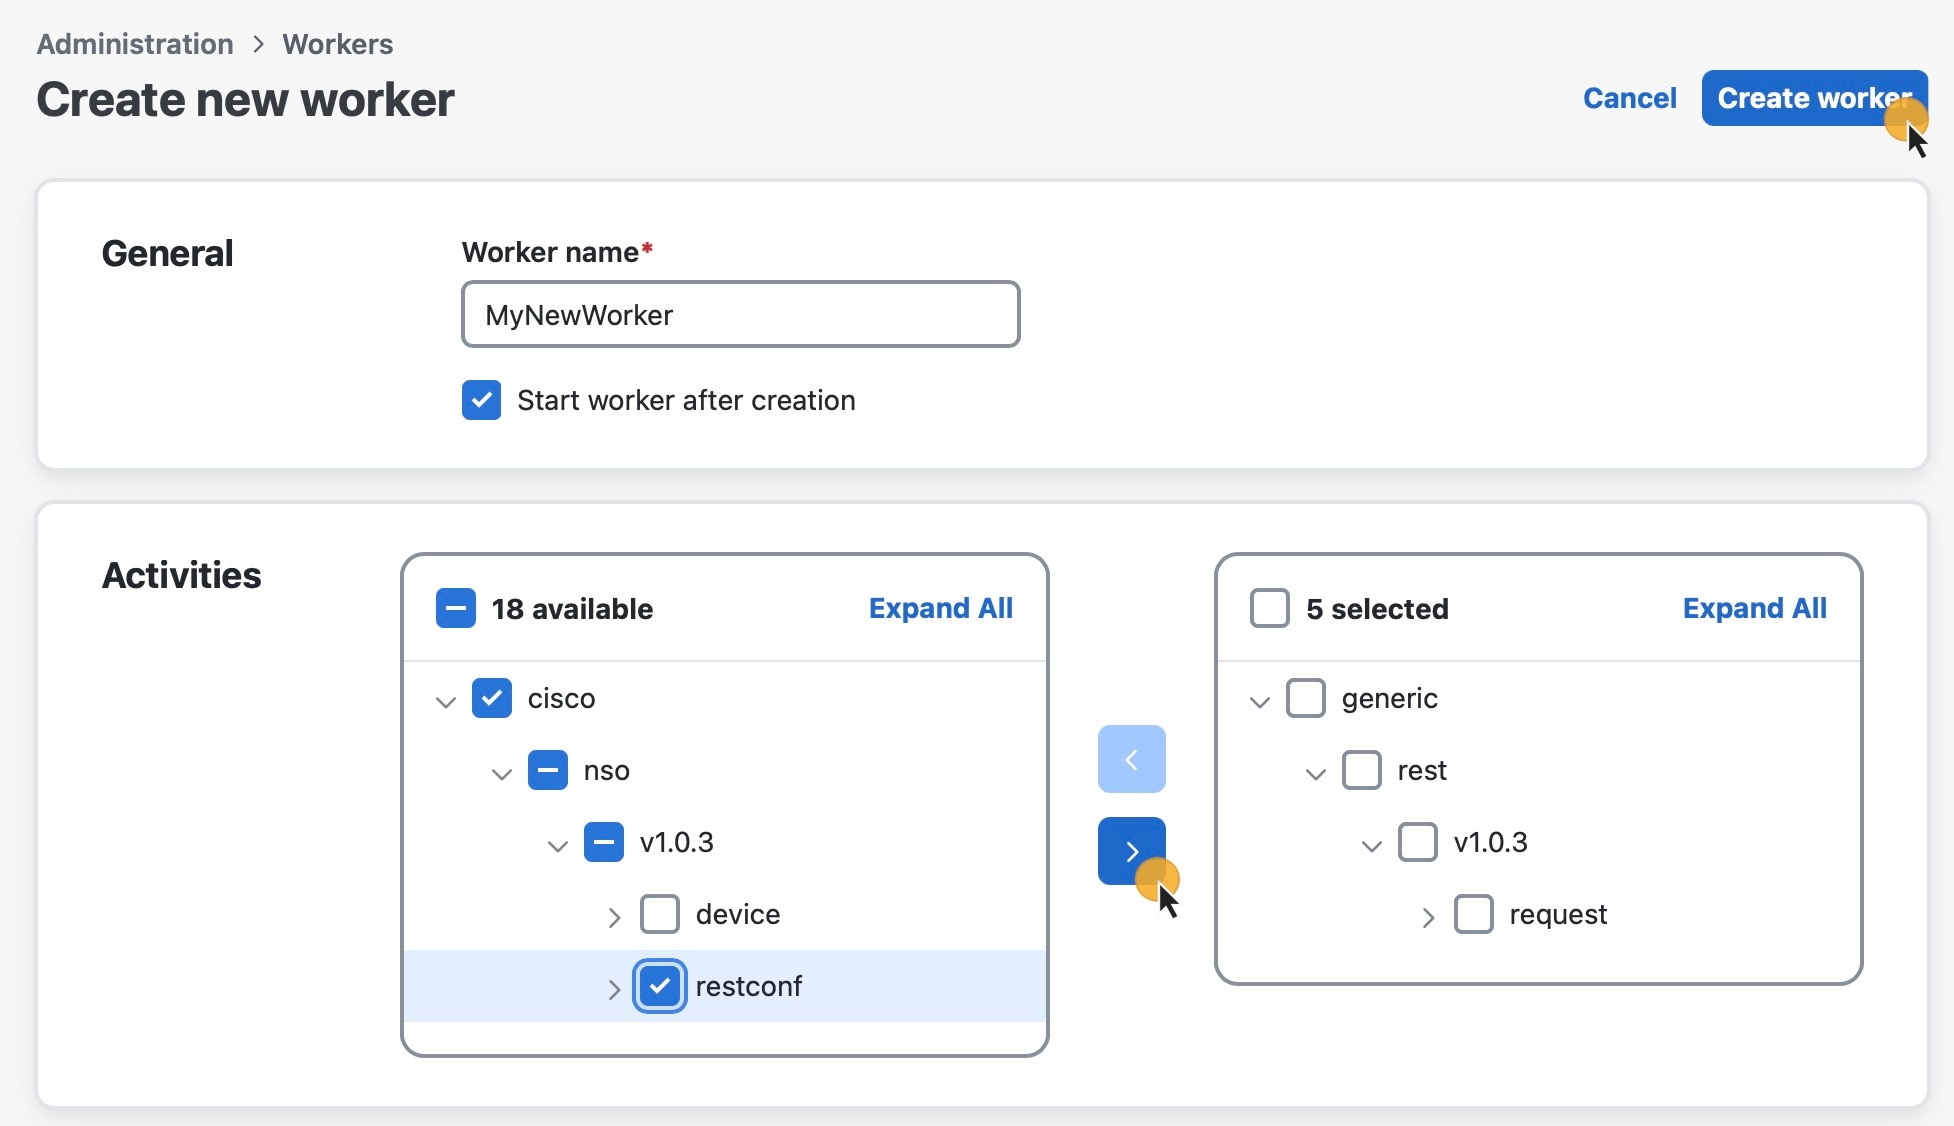
If you want to remove any of the previously selected activities from the worker, check the checkbox next to each selected activity you want to remove and then use the left-pointing arrow to remove it. |
|
Step 4 |
Click Create worker. |
Create secrets and resources
The following topics explain how to add secrets and resources to CWM. Be sure to upload adapters with workers, and add secrets before adding resources, as resources use secrets.
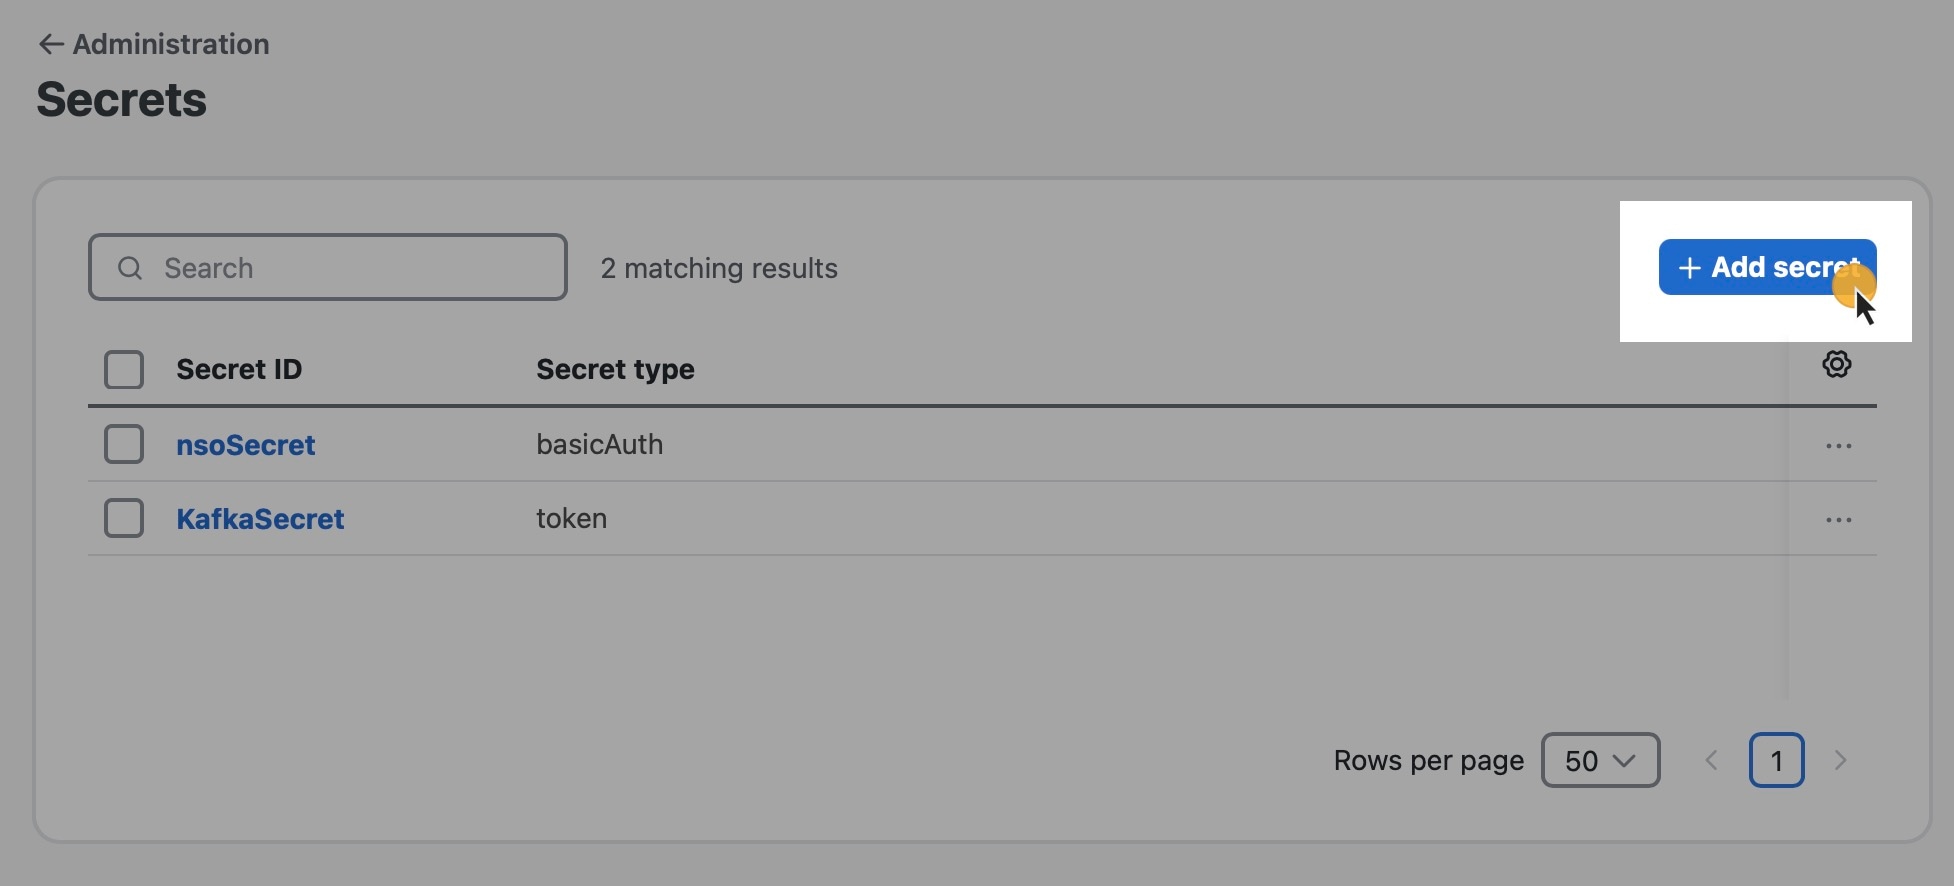
Add a secret
Procedure
| Command or Action | Purpose | |
|---|---|---|
|
Step 1 |
In CWM, choose |
|
|
Step 2 |
In the Secrets view, click Add secret. |
 |
|
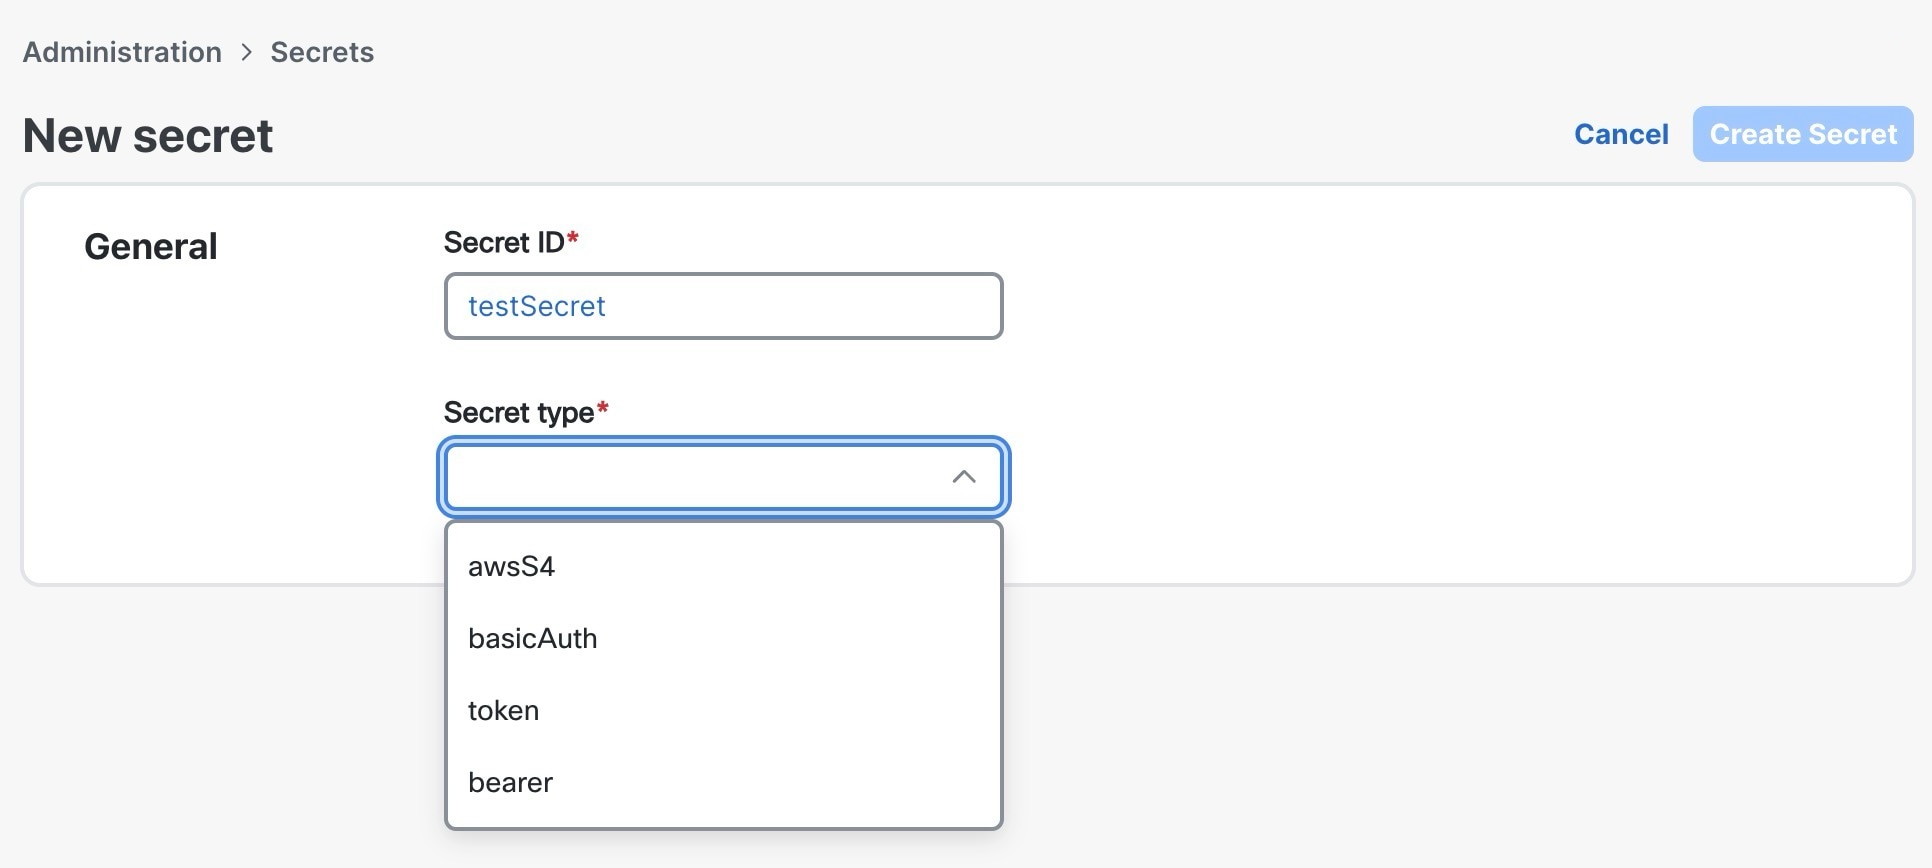
Step 3 |
In the New secret view, provide the required input: |
|
|
Step 4 |
After selecting the secret type, CWM displays a set of additional fields (for example, Username and Password) in the Secret type details section. The adapter specifies these detail fields, and they will vary with the adapter and secret type. Fill in the fields with values, as appropriate. |
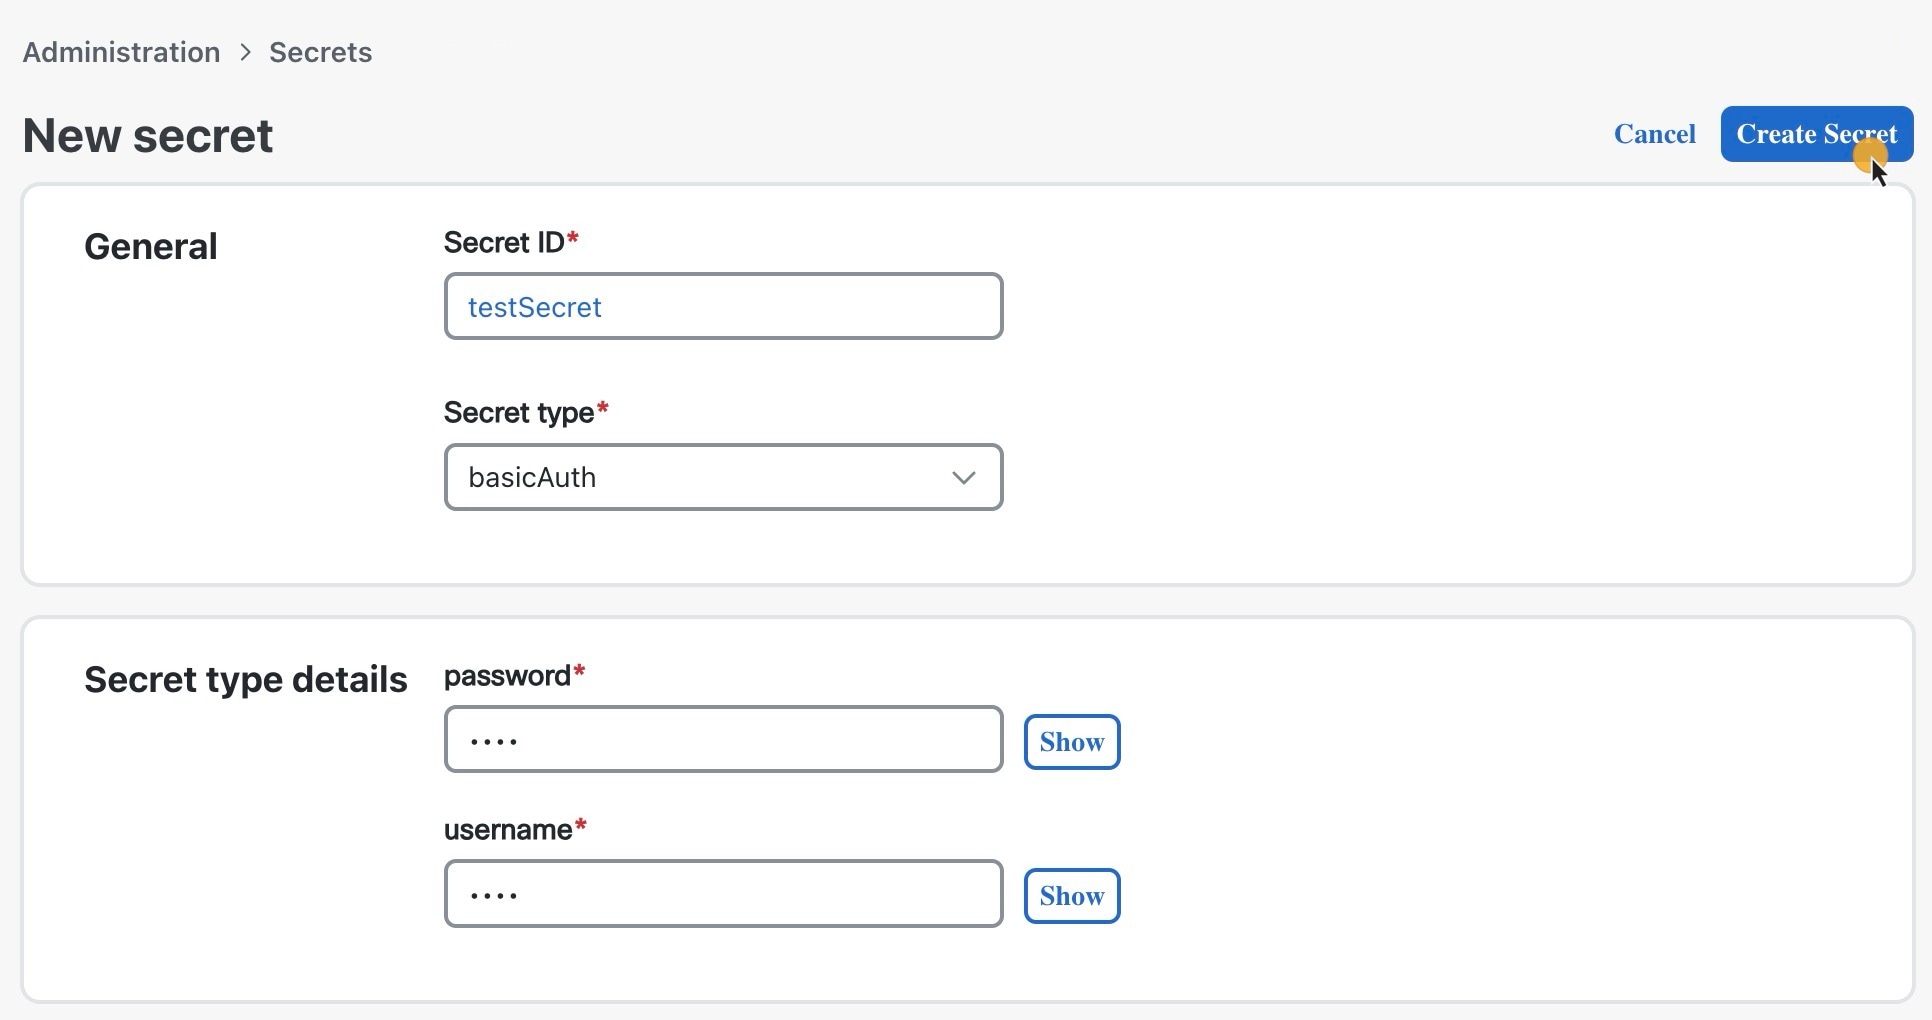 |
|
Step 5 |
Click Create Secret. |
Once you've added a secret and its details, create a resource in CWM and associate it with the secret, as explained in Add a resource. |
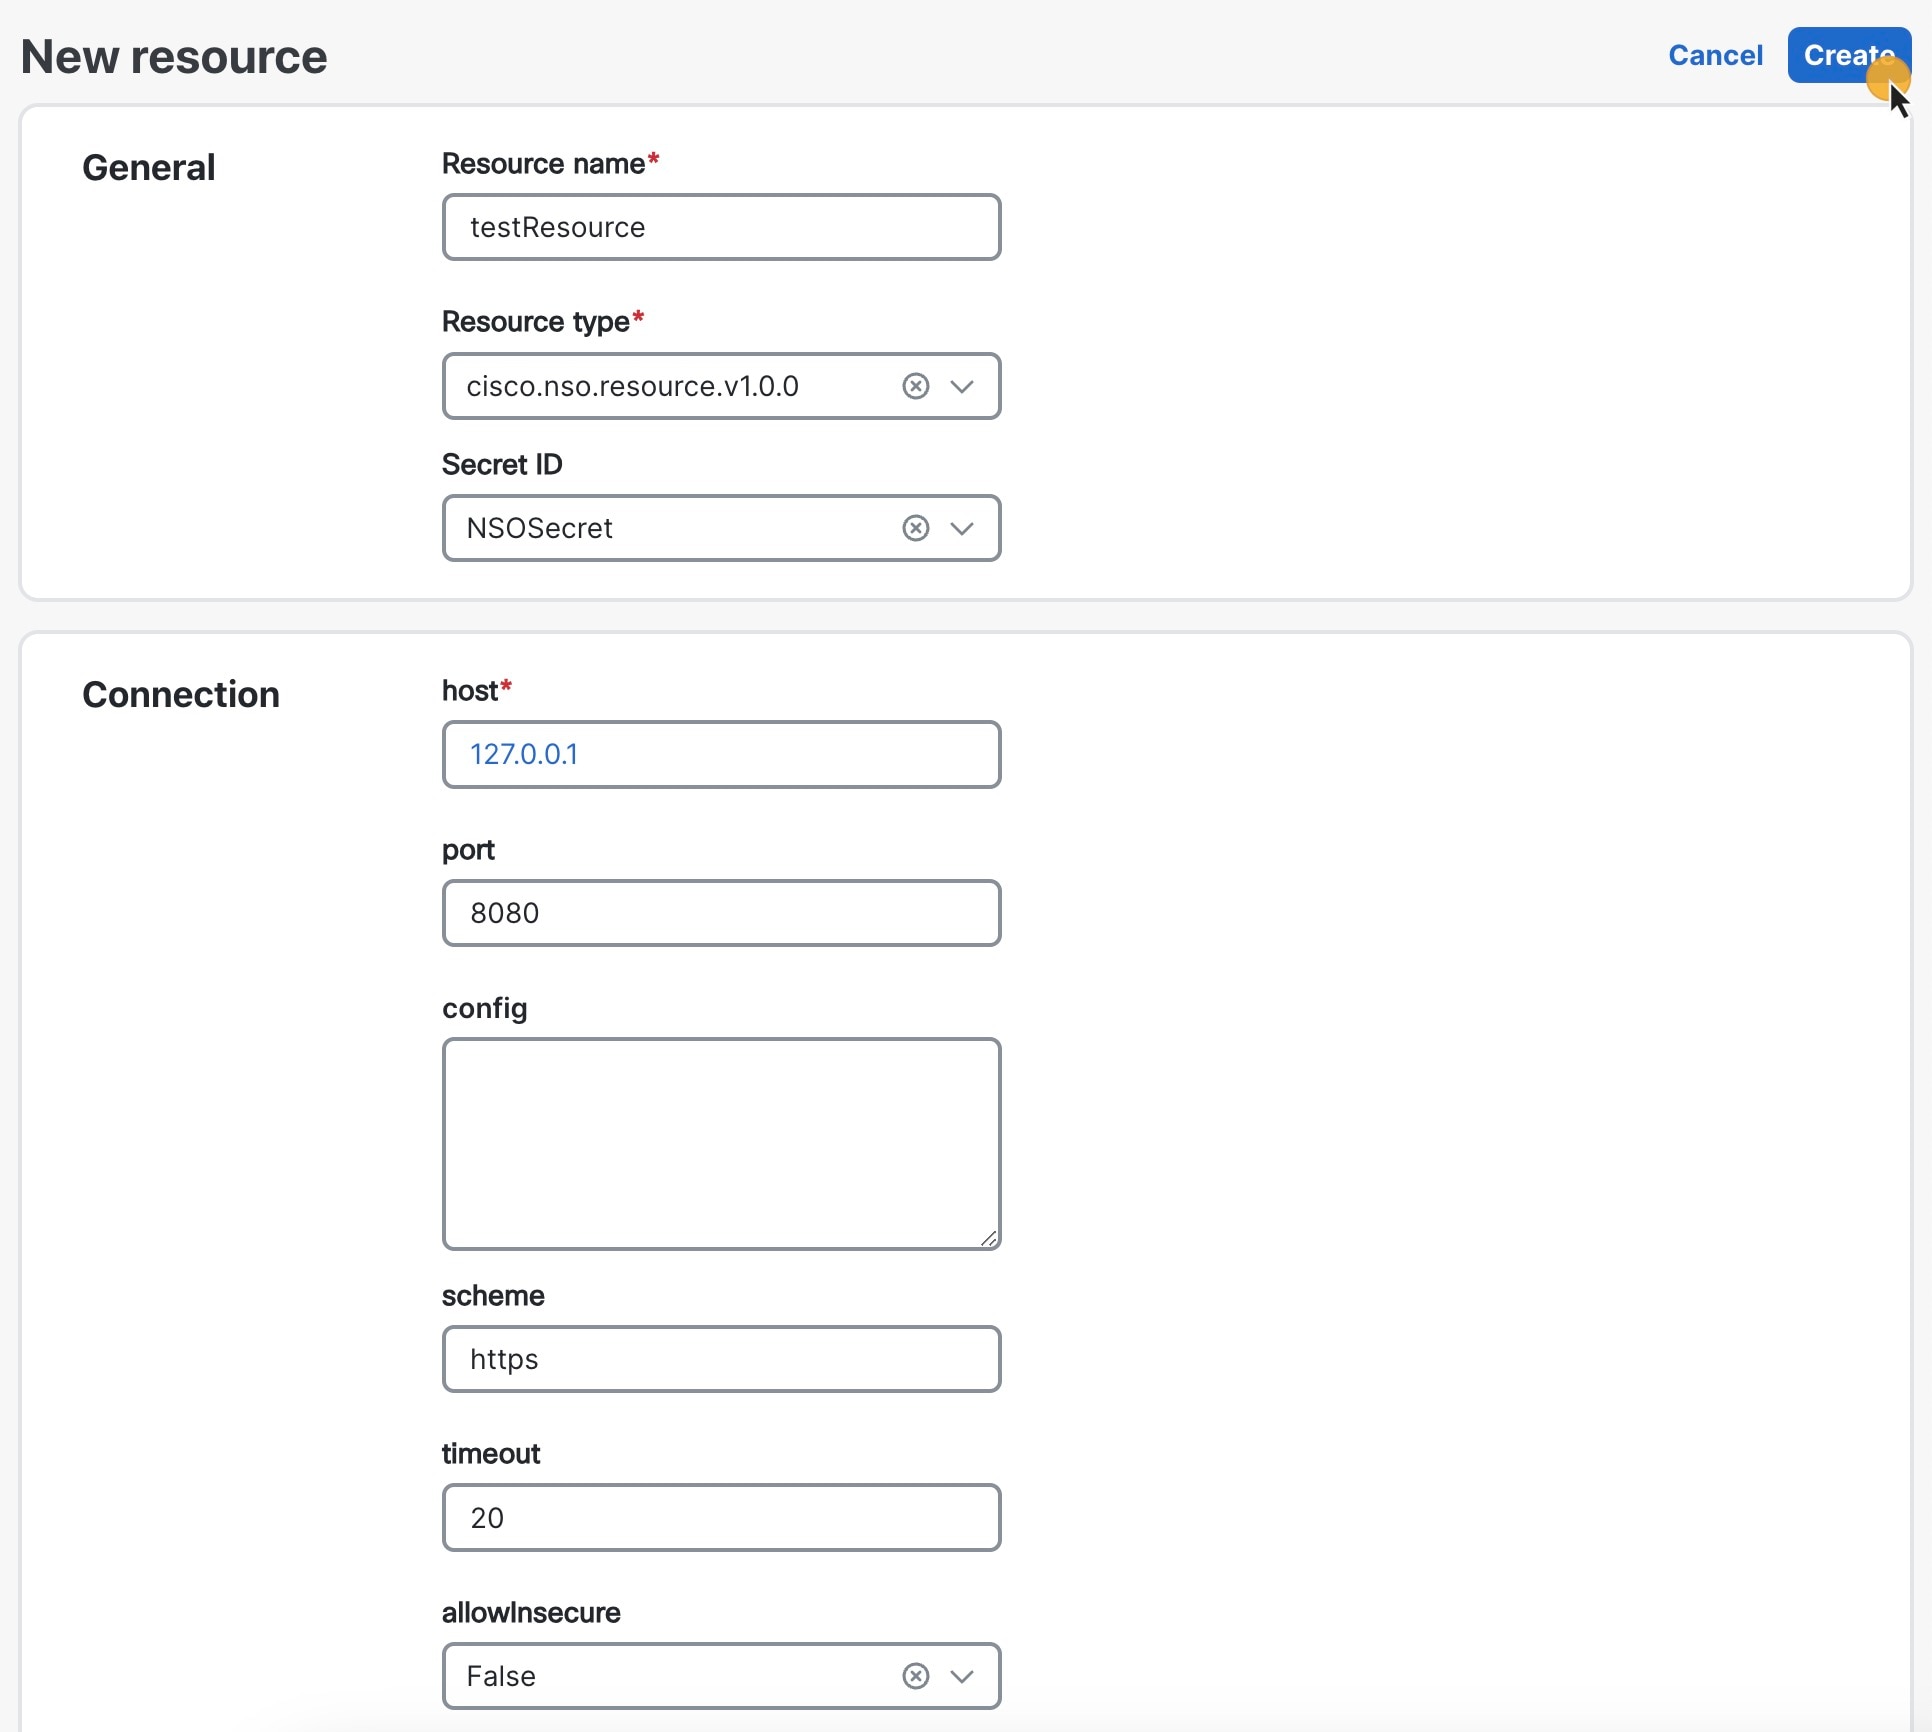
Add a resource
Before you begin
Ensure that you have already created a secret, as explained in Add a secret
Procedure
| Command or Action | Purpose | |
|---|---|---|
|
Step 1 |
In CWM, choose |
|
|
Step 2 |
In the Resources view, click Add resource. |
 |
|
Step 3 |
In the New resource view, provide the required input: |
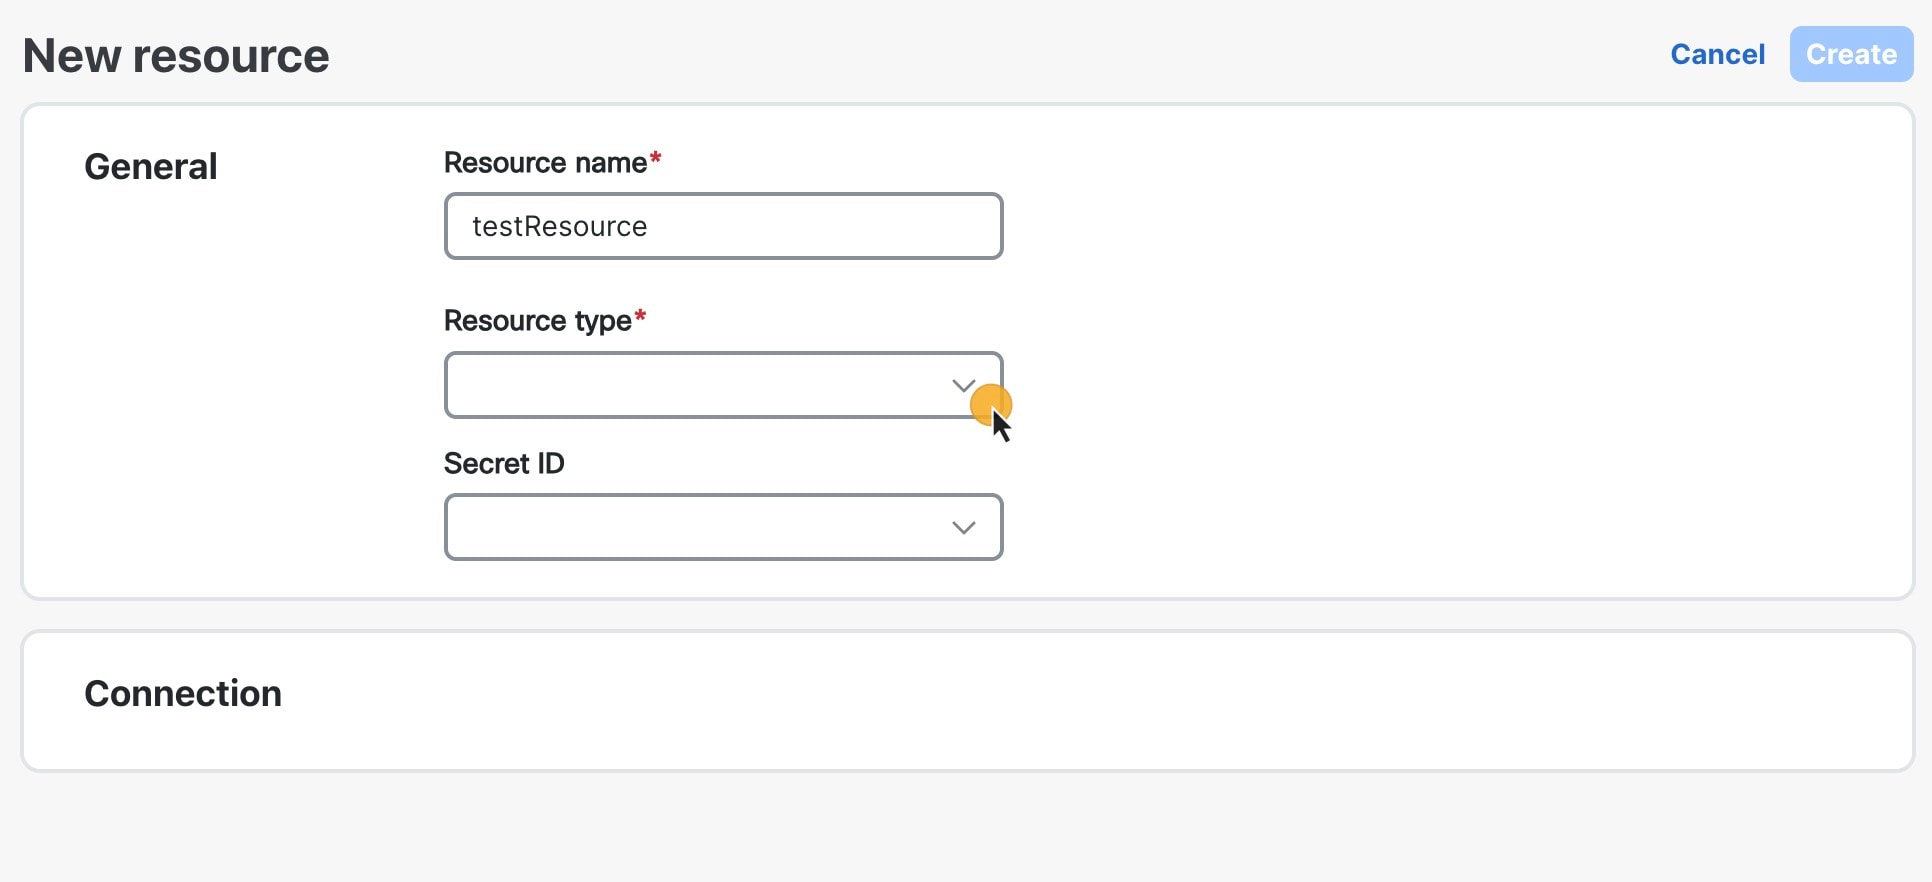 |
|
Step 4 |
After selecting the Resource type, the Connection section displays a set of additional fields (for example, host and port) . The adapter specifies these extra fields, and they will vary with the adapter and resource type. Fill in the fields with appropriate information. |
|
|
Step 5 |
Select a Secret ID from the drop-down menu to associate a previously created secret with this resource. |
 |
|
Step 6 |
Click the Create resource button. |
You are not required to fill in the Secret ID and Connection details when creating the resource. You can insert the proper values later, but you must fill them in before attempting to use the resource or it will not work properly. Once created, your resource is displayed on the list in the main Resources view. |
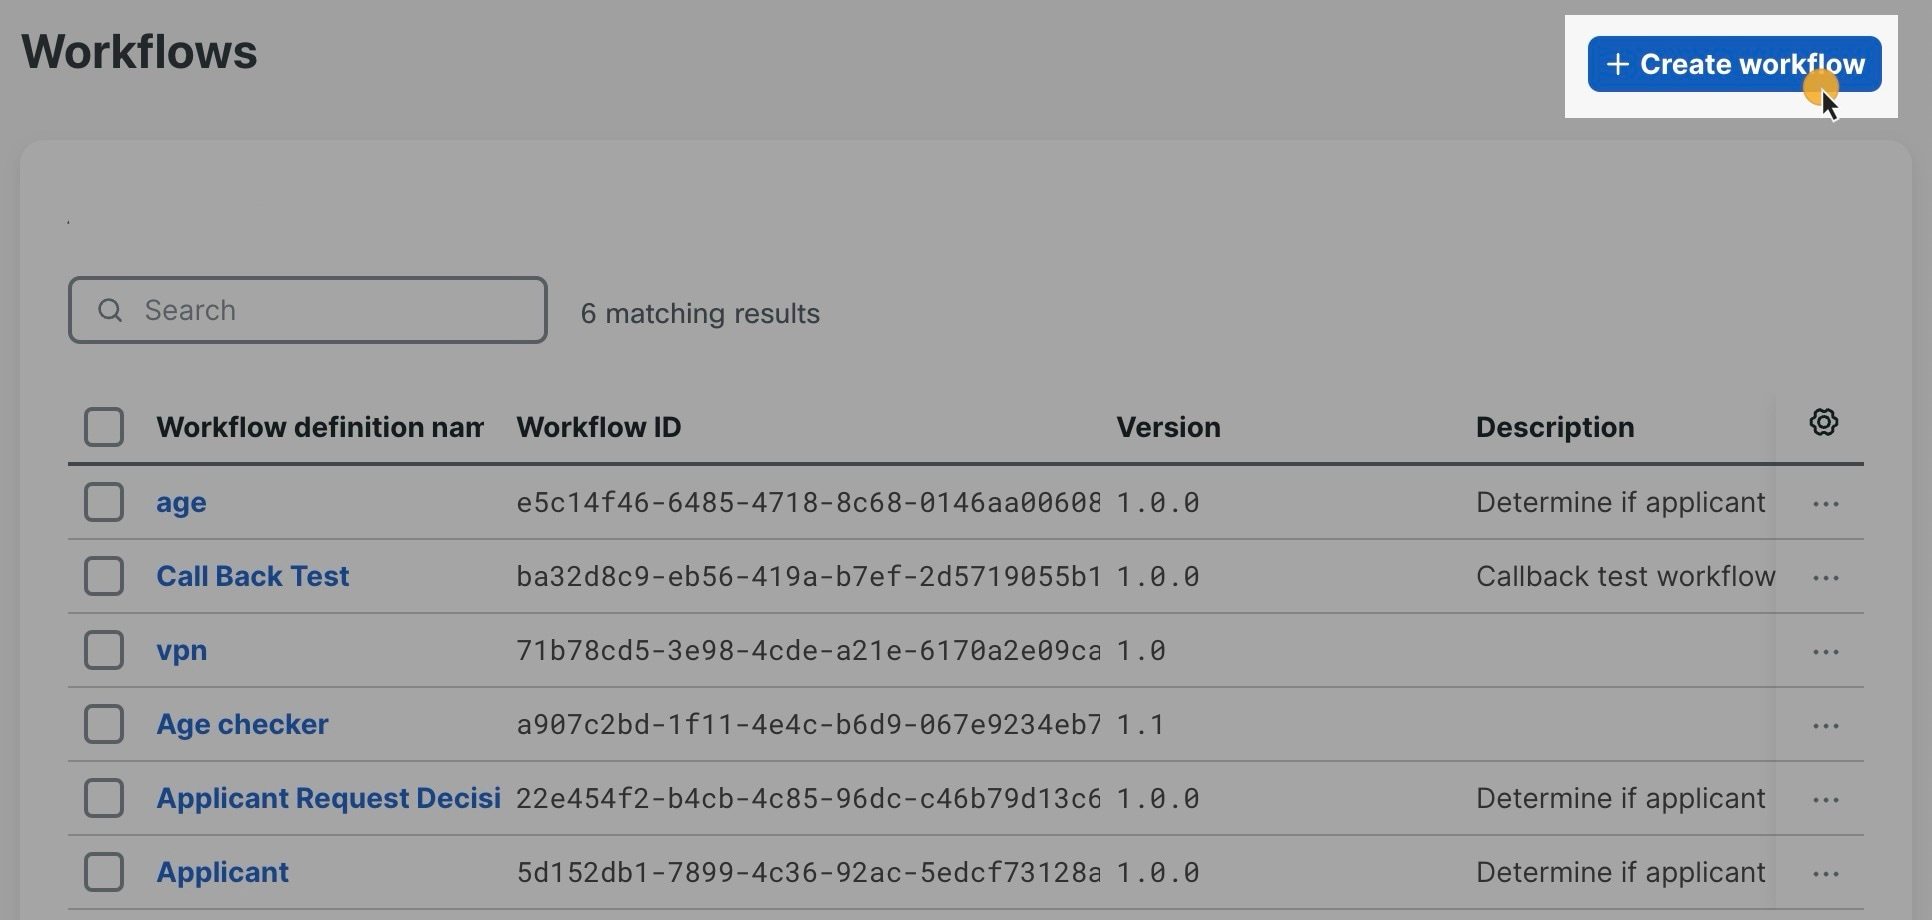
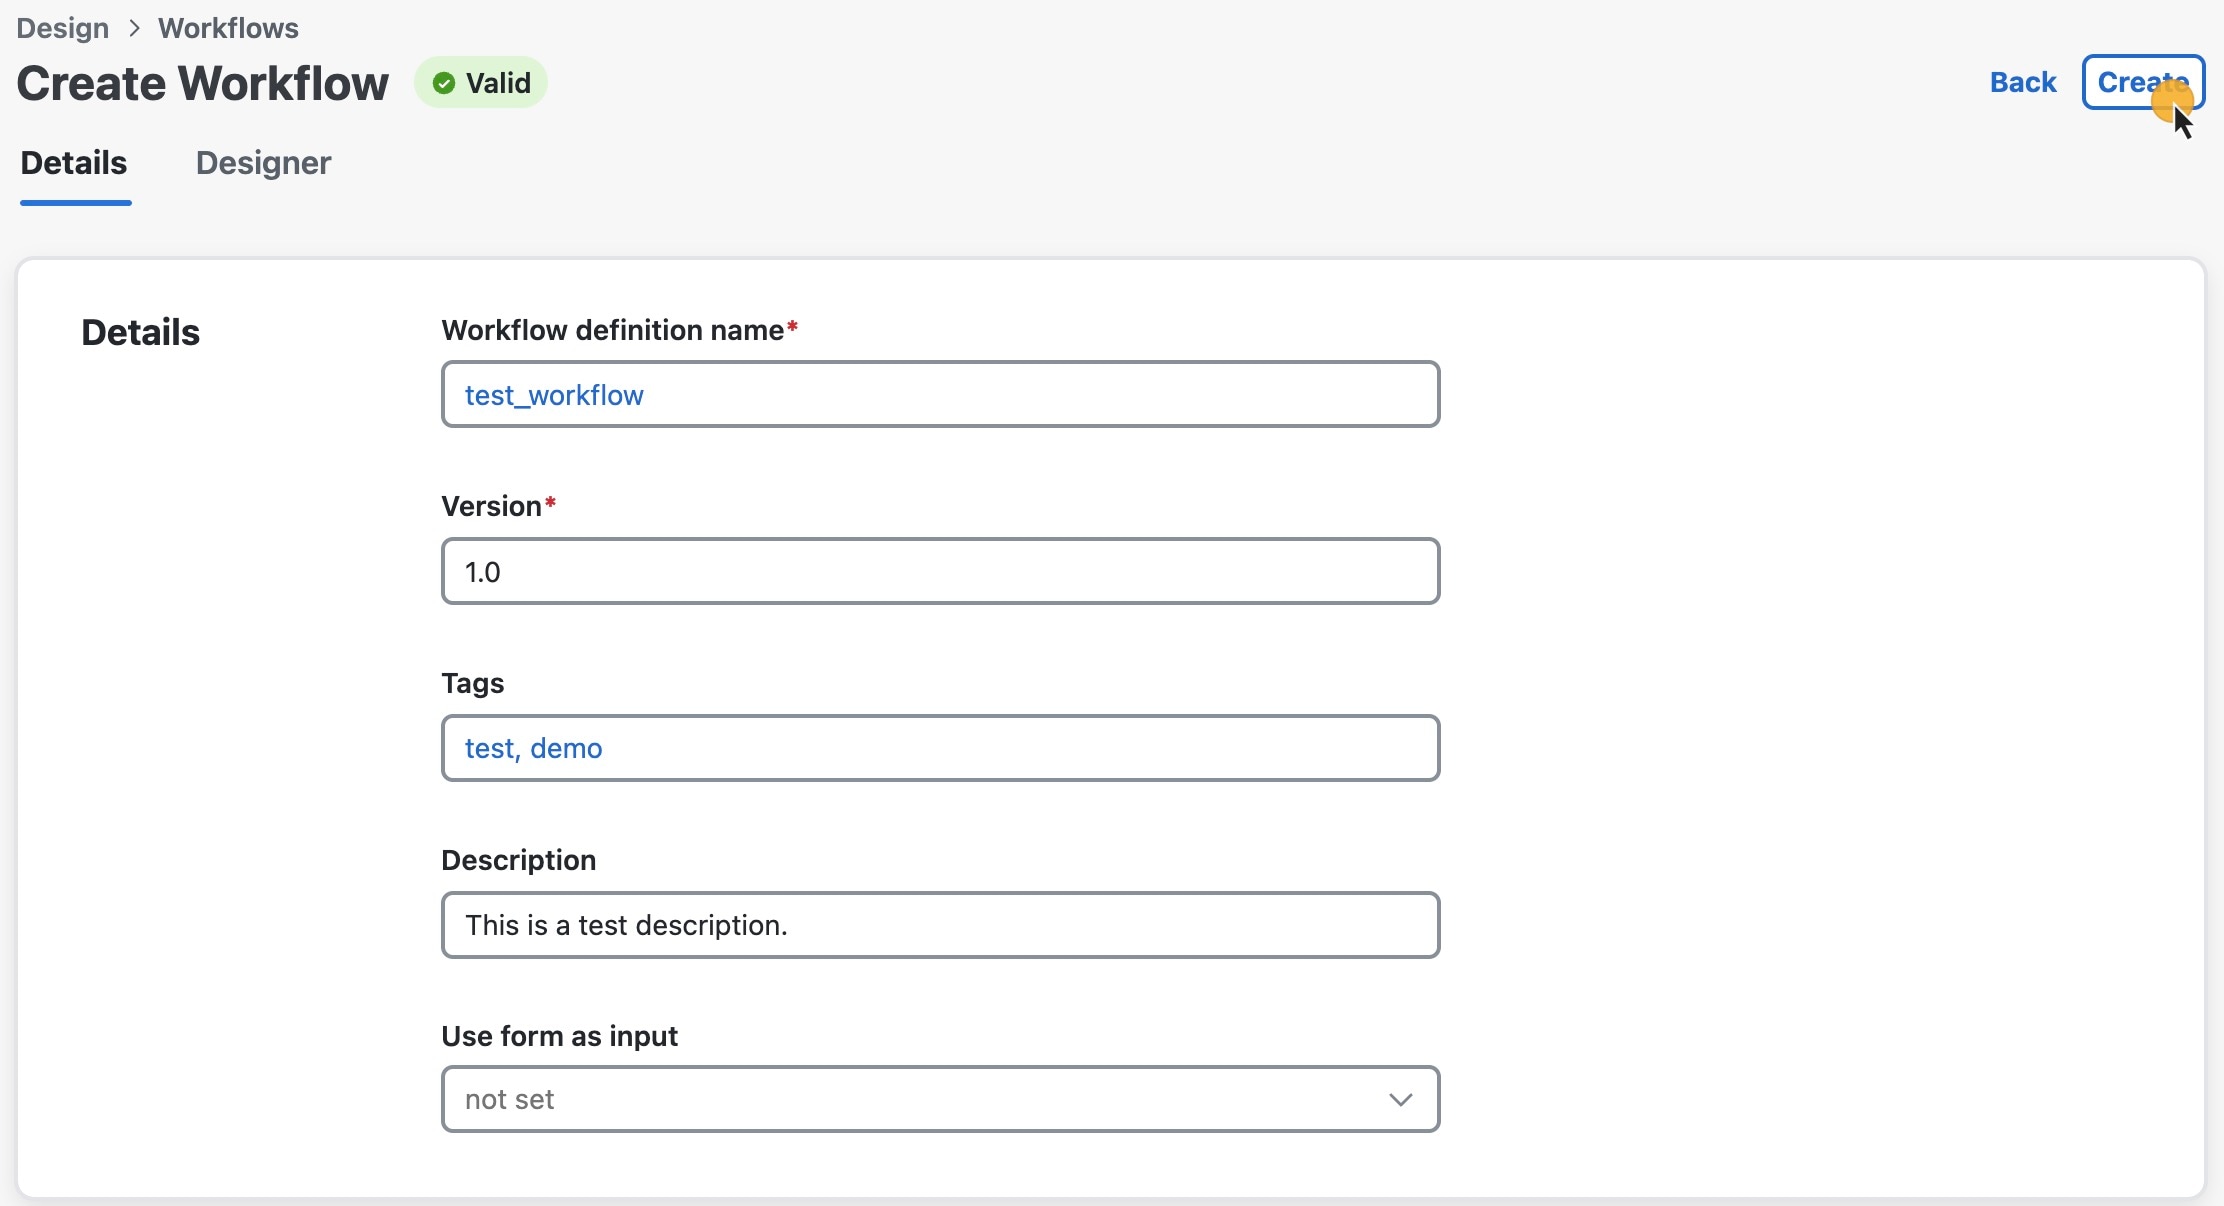
Add workflow
This topic explains how to add a workflow definition to CWM.
 Note |
These steps create a workflow entry in CWM with dummy code that needs further editing. After you create the workflow, go to the Designer tab to insert your workflow definition. |
Procedure
| Command or Action | Purpose | |
|---|---|---|
|
Step 1 |
In CWM, choose . |
|
|
Step 2 |
Click Create workflow. |
 |
|
Step 3 |
In the Create workflow page, provide the required input: |
|
|
Step 4 |
Click Create. |
 |
Workflow editing
Procedure
| Command or Action | Purpose | |||
|---|---|---|---|---|
|
Step 1 |
To edit an existing workflow, first choose to display the Workflows list. |
|||
|
Step 2 |
In the list, find the workflow definition you want to edit. Then click on that definition's Workflow name to display the workflow's Details tab. You can then: |
|
||
|
Step 3 |
To edit the workflow definition itself, click the Designer tab By default, after creating a new workflow, the Code view contains a dummy piece of code that you need to replace with the actual developed workflow definition in JSON format, based on the Serverless Workflow Specification. |
|||
|
Step 4 |
After making your changes, you can: |

|
Workflow designer
With Designer, you can view a graphic representation of your workflow code.
To use the Designer, choose , click on any workflow to see its details, then click the Designer tab.
The Designer provides multiple viewing options for your workflow:
-
View modes: Use the toggle buttons at the top to switch between:
-
Code view: displays the workflow's code.
-
Graph view: visualizes the workflow as a graph.
-
Split view: shows both the code and graph side by side.
-
-
Graph controls:
-
Click the magnifying glass icons to zoom in or out.
-
Enable dark mode by clicking the brush icon.
-
-
Top-Right controls:
-
Errors: Show or hide
OnErrorsdefinitions. -
Compensation: Show or hide compensation actions.
-
Validate definition: Check for syntax errors, missing required fields, and other issues in the workflow.
Successful validation is required in order to save the workflow definition.
-
Inside a node
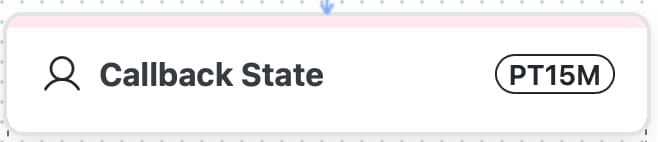
Nodes are the visualized steps of a workflow. The main element of a node is the state. States are represented inside state headers along with a label denoting the timeout defined for the particular state (if timeout is given):
If an action is defined inside the state, it is displayed under the state header along with the name of the adapter that is assigned to perform it:
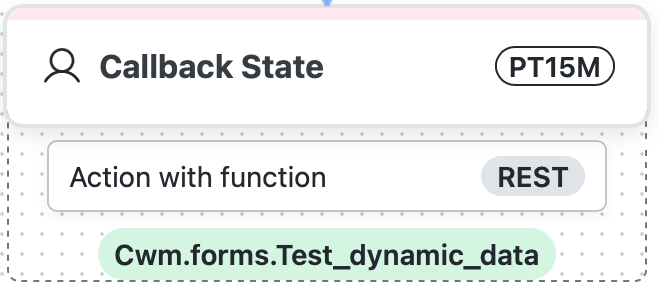
An event might be assigned to an action. In this case it will be represented by a green tag under the action element.
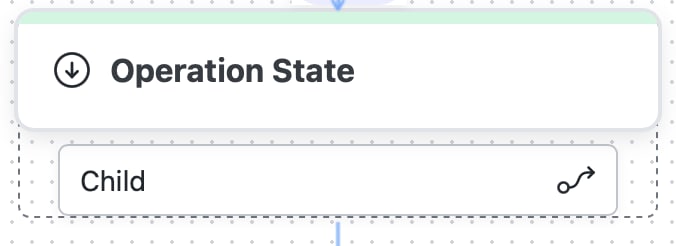
If a child workflow is defined inside a state, it is displayed as an action element under the state header with an icon:
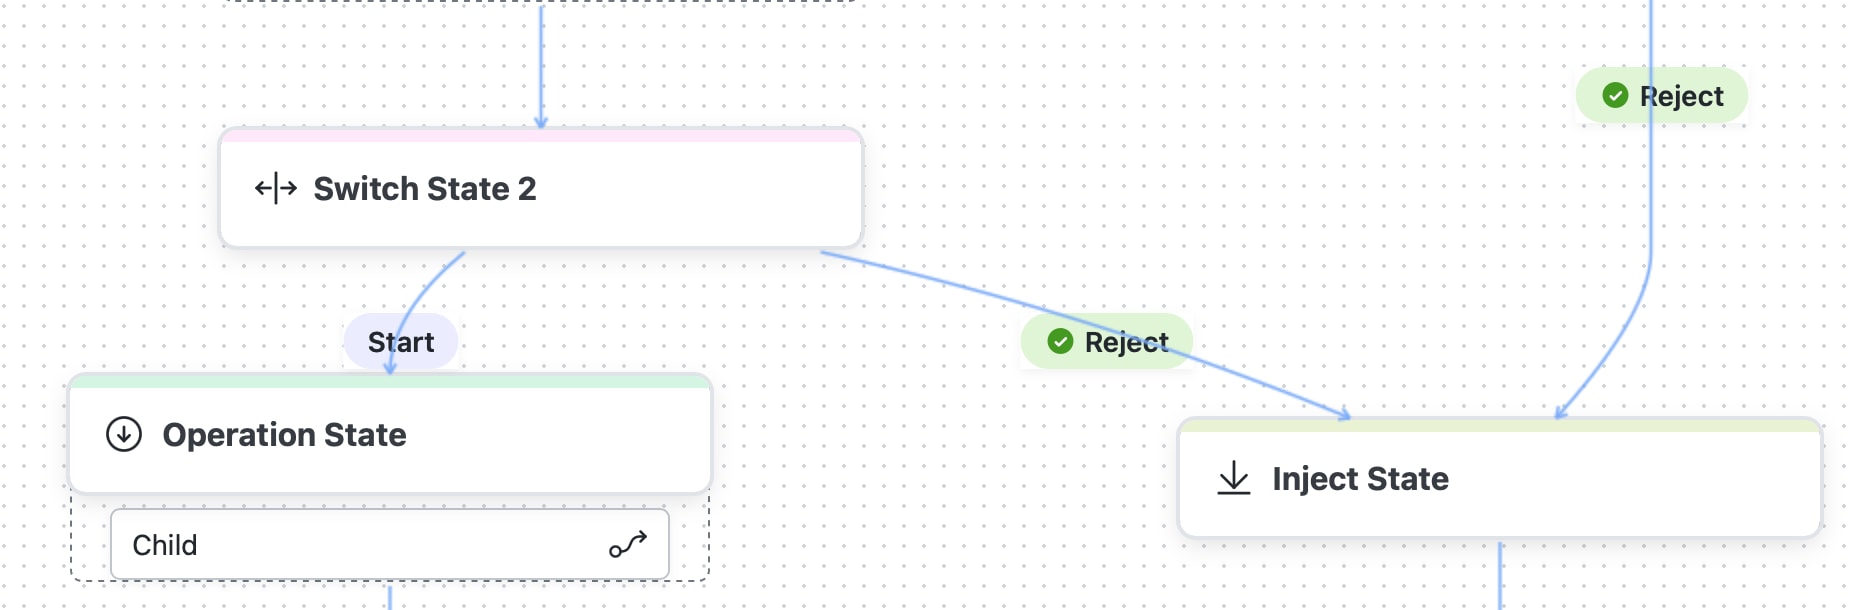
Data conditions are represented as decision points, displayed along the arrows branching down from one node to another within the tree. If
a condition is marked as default, it will be shown inside a green label with a green checkmark icon.
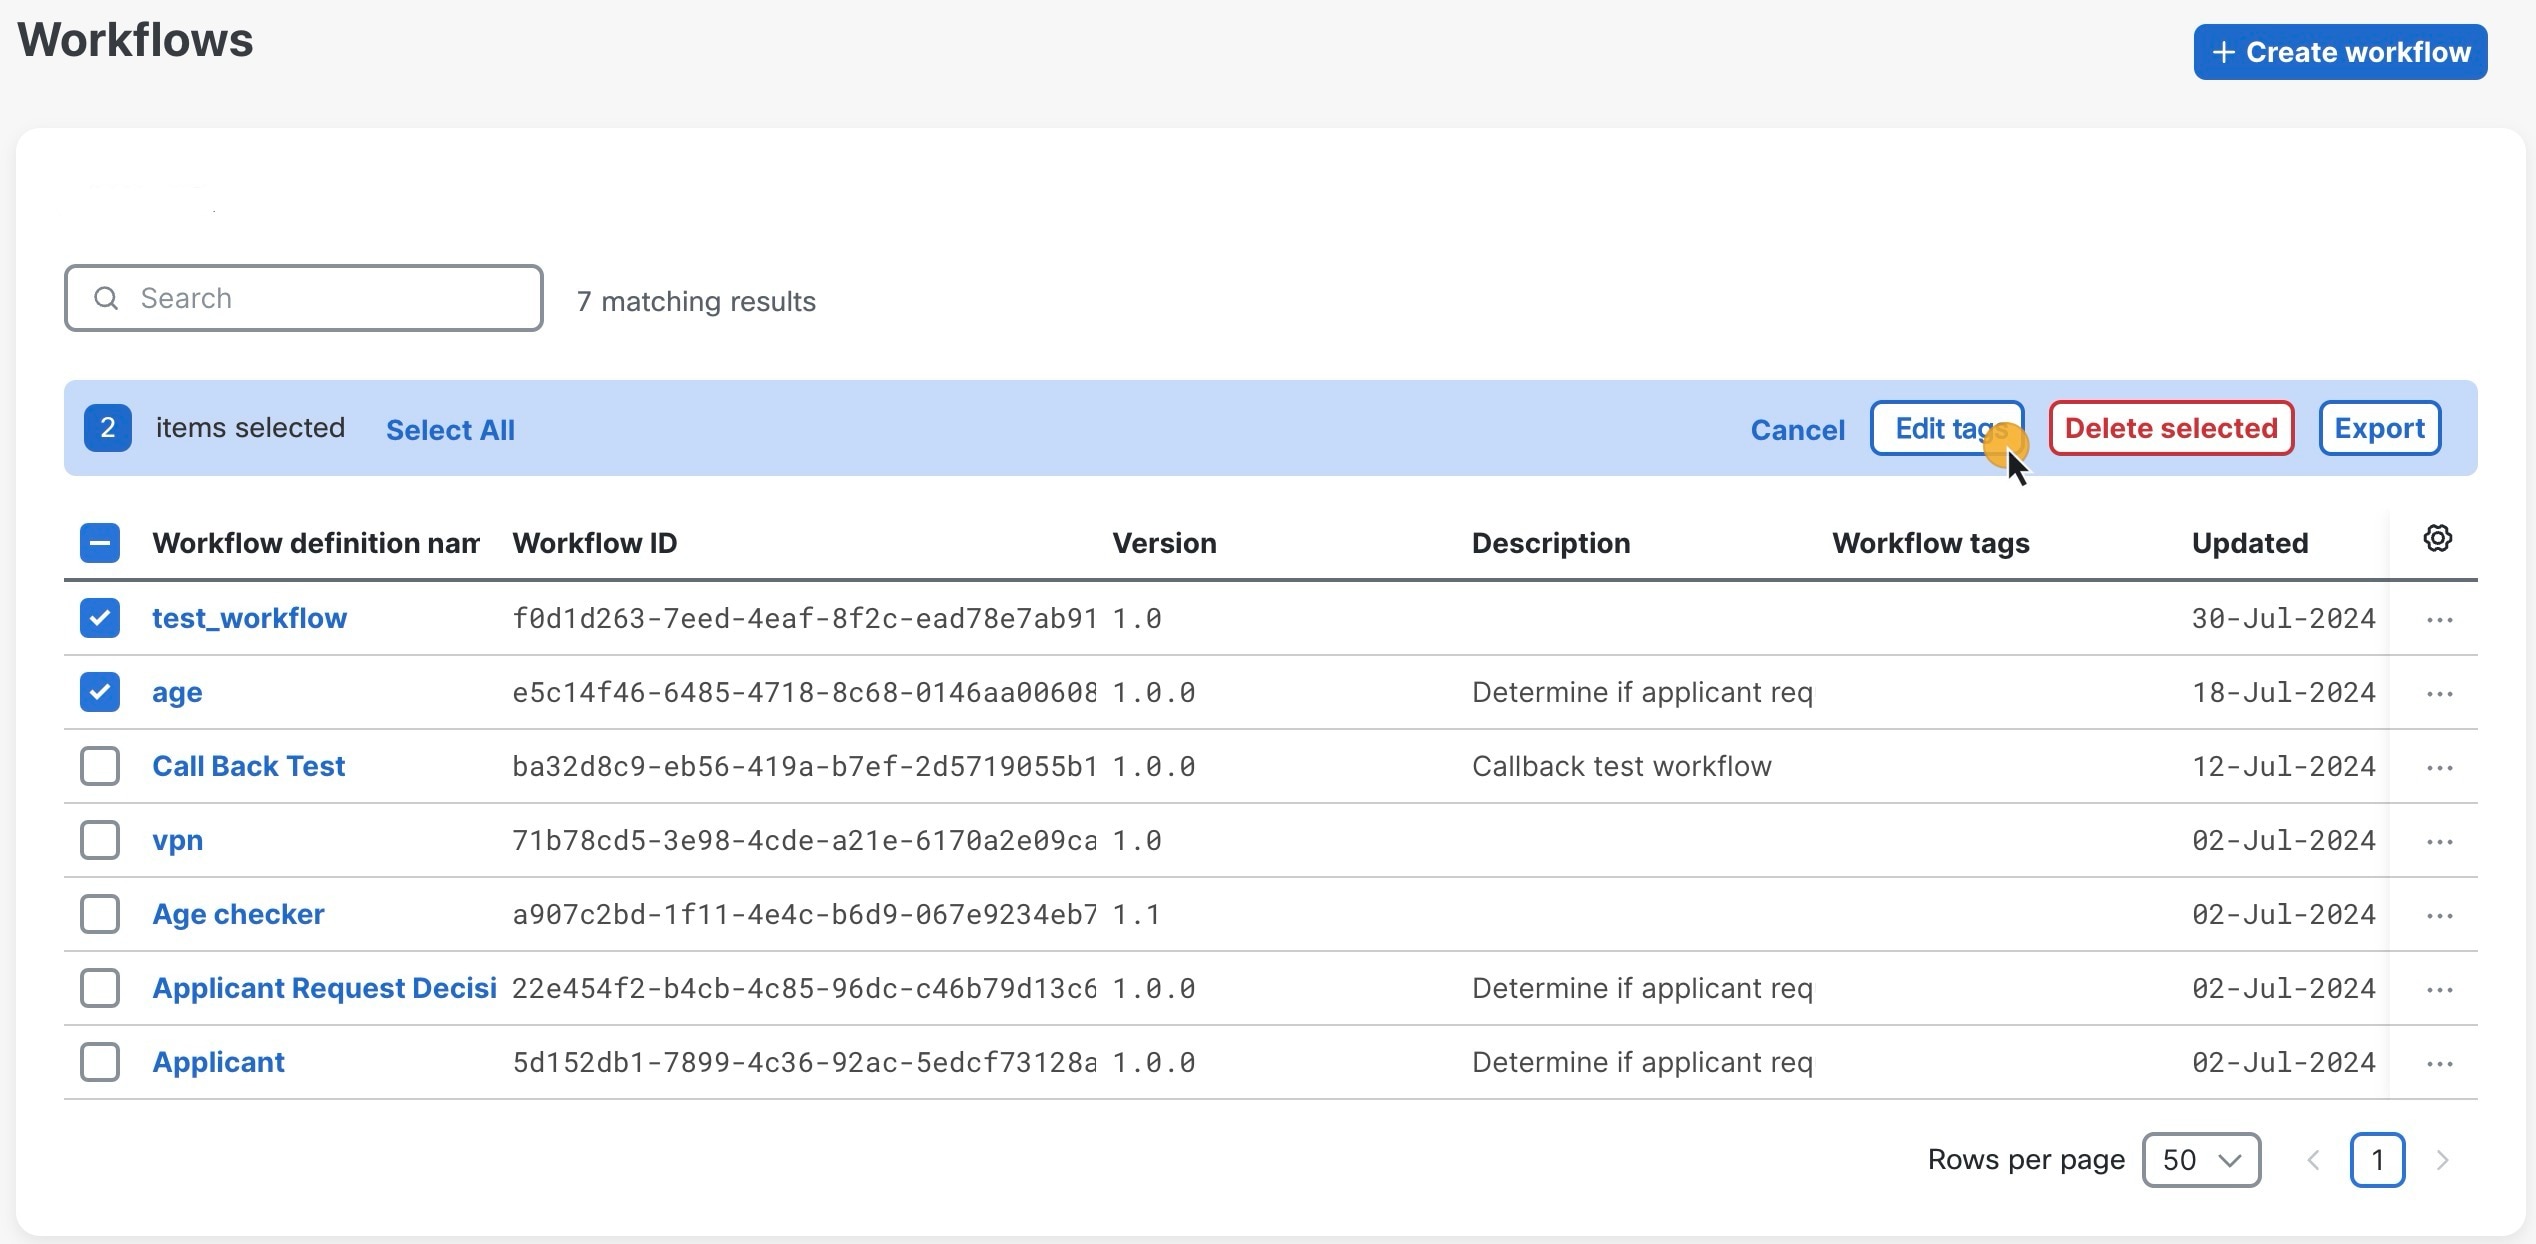
Bulk tags editing
You can edit Tags for many workflow definitions at once. You can also add one or more Tags to all selected workflows or remove all Tags by resetting them.
Procedure
| Command or Action | Purpose | |
|---|---|---|
|
Step 1 |
In CWM, choose . |
|
|
Step 2 |
Select chosen workflows by checking the checkbox on the left side of the Workflows table, then click on the Edit tags button. |
 |
|
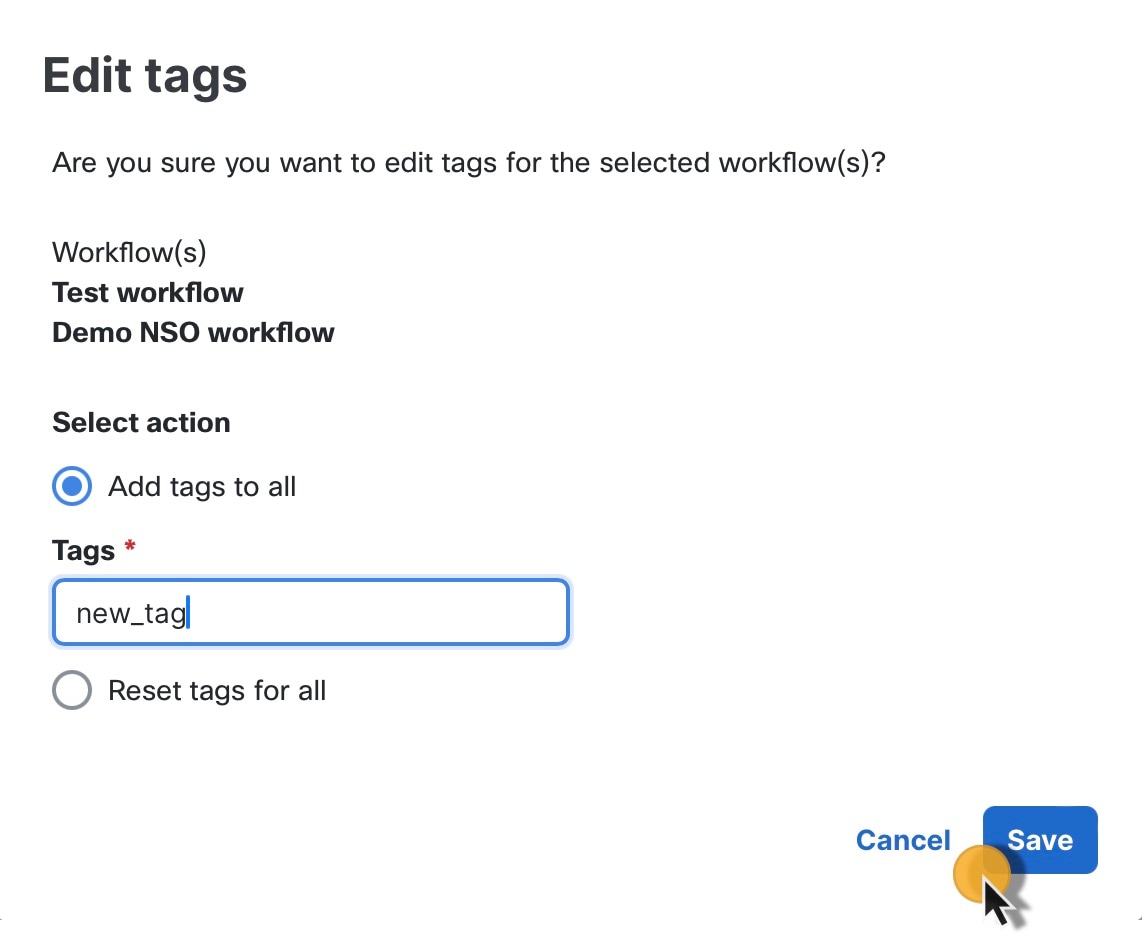
Step 3 |
In the Edit tags window, under the Select action section, click on the chosen radio button, depending on whether you plan to add tags or reset them: |
 |
|
Step 4 |
Click Save. |
You can see the result under the Workflow tags column. 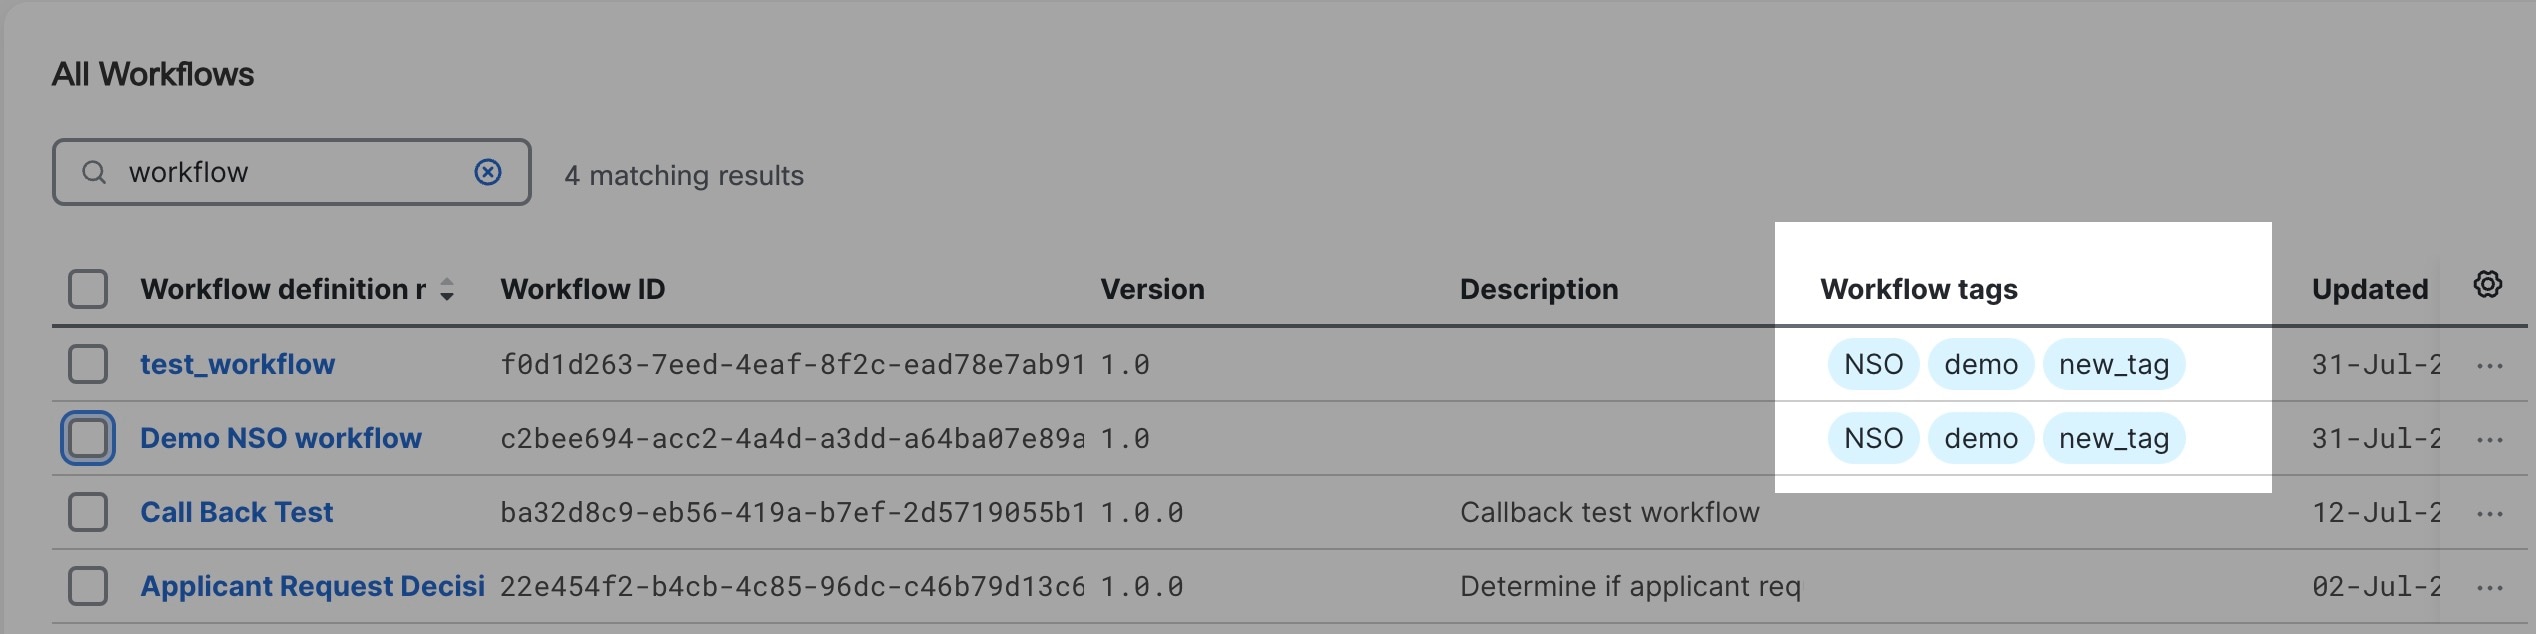 |
 Feedback