Guided tasks

This section covers the following topics:

Forms and guided tasks

Forms are customizable templates that are used to create what we can call guided tasks. These forms serve to introduce an element of human intervention into an automated workflow. They are configurable using the drag-and-drop Forms Designer in the CWM user interface. Forms can contain a number of different optional input components (such as text, dropdowns, radio buttons, and checkboxes) and layout components (such as tabs, columns, cards, HTML elements, and more).

With forms, you define what kind of input you want to include in your manual task and how it will be laid out in the task prompt itself. Forms can be set to contain static form elements (set values) or dynamic data elements (where values can be set using jq expressions).

Forms list

Choose Design > Forms to access Forms view. Here, you can view, edit, export, and delete all the existing forms, or access the Forms Designer by clicking Create form.

To export forms to a CSV file, check one or more of the check boxes shown next to the Form names in the list and then click Export.

Forms Designer

The Forms Designer is a user-friendly drag-and-drop editor accessible via the Forms in the CWM UI. To get started, simply click the Create form button. The designer consists of three main panels:

  • Basic configuration: Here, you provide a name and a description for your form. Those are required fields.


    Note


    Important: The name you provide for your form determines the Form ID that you will need to provide inside your workflow. To retrieve the Form ID, click on the name of the newly added form in the forms list.


  • Submit button: You can customize the Submit button label here. The button is automatically added to every form you create.

  • Form elements: This is where you design and preview your form.

Within the Form elements panel, the Designer field is where you craft the input, structure, and visual layout of your form.

The Forms Designer's components are grouped into four categories:

  • Basic

  • Advanced

  • Layout

  • Data

Input components

The Basic and Advanced categories contain customizable input components. Using those components you can define how you would like to structure your task and what type of input(s) would be required to proceed. It can be:

  • text fields or areas,

  • numbers,

  • passwords,

  • checkboxes or select boxes,

  • drop-down lists (called selects in the UI),

  • radio buttons,

  • email fields,

  • date and time fields, and

  • signatures.

Inside a component

To add and customize a component, drag and drop it onto the blue rectangle inside the Designer field. A panel will appear containing a few tabs and a Preview field.

  • The Display tab is where you customize your input field. It features options like placeholder, description, tooltip and others. Those options may differ depending on the type of component that you selected, but there is one that is required:

    • Label: provide a name for the field that will appear next to it in the task prompt. The name you provide in the the Label field will be used for the Property Name field in the API tab of the component.

  • The Data tab allows you to add default values in the input and modify the way those values are handled. This tab is available for selected components.

  • The Validation tab features a number of options that you can use to enforce input rules for your component:

    • Required: ensures that input field will not be left empty before submission. The form will not submit unless a value is provided.

    • Minimum Length: Sets the minimum number of characters required in the input.

    • Maximum Length: Limits the number of characters allowed in the input.

    • Regular Expression Pattern – Uses a regex pattern to enforce specific formatting or constraints.

    • Error Label – Specifies the label for this field when an error occurs.

  • The API tab features the Property Name field which you need to provide as the component name inside your workflow.

  • The Conditional tab lets you configure the behavior of the component in relation to the input provided in any other component inside yur task prompt.

To edit an added component, hover over the component and click the cogwheel icon.

Layout components

Use a Layout component to change the general layout and position of fields on a form. It allows you to add logos, headers, or static contextual language to your form.

Data components

Data components are special components that are used to not only visually show the data being collected in a data structured way, but will also change the data structure of the submissions being produced by the rendered form.

Sample form

Let's create an advanced form with headlines, graphics, and data inputs that would allow the workflow operator to validate or update specific VPN endpoint attributes in Cisco NSO.

Go through the elements of the form one by one to see how you can set it up:

  • Header: use the HTML element (Layout tab). Type your title and provide the relevant HTML tag (h3 in the example).

  • Image: use the HTML element (Layout tab). Type img in the HTML tag field and use the Attributes for defining image source, description, and other properties. Alternatively, provide your image address inside the img HTML tag in the Content field (for example: <img src="https://your-image-url.com/image.jpg" alt="Description" width="300" > ).

  • Description: use the HTML element (Layout tab). Provide your description. You may want to use HTML formatting like </br></br> for better text layout.

  • VPN details panel: use the Panel element (Layout tab). It will serve as a container for other elements.

    • Read-only VPN name and RD fields: use the Columns element (Layout tab). Note that these fields will be populated with workflow data and are therefore read-only.

      • VPN Name field: use the Text field component. Label position is Left-aligned in the example. Check the Disabled box to make the field read-only. In the Data tab, click on Custom Default Value and provide dynamic value for the field so that it can be populated by the workflow input (value = form.dynamicData.input.vpnName).

      • Route Distinguisher field: use the Number component. Label position is Left-aligned in the example. Check the Disabled box to make the field read-only. In the Data tab, provide dynamic value for the field so that it can be populated by the workflow input (value = form.dynamicData.input.rd).

    • Endpoint information grid: Use the edit grid component (Data tab). Edit grid is for capturing endpoint details, where you can view and edit information about endpoints. Note that the read-only fields will be populated with workflow data, so be sure to provide dynamic value in the Custom Default Value field of the Data tab inside the component (value = form.dynamicData.input.endpoint).

      • Endpoint Id, Location, Bandwidth fields: use the Text field component. Label position is Top in the example. Check the Disabled box to make the field read-only.

      • Device name and IP Network: use the Text field component. Label position is Top in the example. Keep the Disabled box unchecked so that the operator can pass the data once the task is triggered. In the Validation tab, check the Required box.

To learn how you can use dynamic data in forms, see:

Dynamic data: Create a form with custom component values

You can use jq expressions to display data accessed by the workflow within a guided task, then filter or modify the data before passing it to the task prompt.

One example might be populating the Select component options for a workflow with custom values by means of form.dynamicData. Here is how you configure the use of dynamic data for this case when creating a form.

Procedure

  Command or Action Purpose

Step 1

In Forms Designer, click Basic to expand it. From there, drag and drop the Select component.

Step 2

Go to the Data tab and in Data Source Type, select Custom.

Step 3

In the Custom values field, provide the following: values = form.dynamicData.options;

Step 4

Click Save.

Step 5

Now let's configure the workflow side of the dynamic data: In your workflow definition, find the callback state.

Step 6

Inside the callback state, add the metadata key. Then, inside it, add formData and provide a value in the following format: "${ { options : .options } }".

Step 7

A sample workflow with the dynamic data part configured may look like this:

      {
          "name": "decision",
          "type": "callback",
          "action": {
              "name": "decision_point",
               ....
              "actionDataFilter": {
                  "toStateData": "${ .result }"
              }
          },
          "eventRef": "cwm.forms.Options",
          "metadata": {
              "formData": "${ { options : .options } }",
              "taskName": "Select option"
          },
      }

Step 8

To provide the option labels and values for the Select component, use the Input when running the workflow:

    {
    "options": [
        {
        "label": "First option",
        "value": "Value1"
        },
        {
        "label": "Second option",
        "value": "Value2"
        }
    ]
    }

Dynamic data example: Create a dry-run approval form

You can use jq expressions to display data accessed by the workflow within a guided task, then filter or modify the data before passing it to the task prompt.

Here's an example: Let's say we want to retrieve the dry run of a network configuration change in Cisco NSO and present its payload for approval or rejection by a network operator. The following steps show how to use dynamic data when creating a form to use in this case.

Procedure

  Command or Action Purpose

Step 1

In Forms Designer, click Layout to expand it. From there, drag and drop the HTML element component.

Step 2

In the Content field, provide the jq expression inside the code brackets, for example: <code>${ .dryrunPre }</code>.

Note

 
The expression begins with a $ and is enclosed in curly brackets. The text inside the brackets can be custom, but it needs to be a jq expression. You will later reference it in the workflow definition and the input from the workflow will be presented inside the HTML element once the task is prompted. For more about how to build jq expressions, refer to the jq manual.

Step 3

Click Save.

Step 4

Now let's configure the workflow side of the dynamic data: In your workflow definition, find the callback state.

Step 5

Inside the callback state, add the metadata key. Then, inside it, add formData and provide a value in the following format: "${ { dryrunPre : .result.data } }".

Note

 
Note that dryrunPre refers to the expression defined within the HTML element inside the form, whereas the other part refers to the value of the toStateData key inside actionDataFilter. In this case, actionDataFilter handles and filters the payload provided by NSO during the execution of a dry run for the Create L3VPN operation. Be sure to customize the provided example according to your specific use case.

Step 6

A sample workflow with the dynamic data part configured may look like this:

{
  "name": "decision",
  "type": "callback",
  "action": {
      "name": "show-dry-run",
       ....
      "actionDataFilter": {
          "toStateData": "${ .result }"
      }
  },
  "eventRef": "cwm.forms.NSO_dry_run",
  "metadata": {
      "formData": "${ { dryrunPre : .result.data } }",
      "taskName": "Create L3VPN with dry run"
  },
}

Step 7

Once you start the workflow and the task is invoked, you will see the payload presented inside the prompt.

Use a form as workflow input

Use form as input is an option that allows you to provide initial input for a workflow by selecting a prebuilt form instead of manually entering JSON data. It helps to standardize input collection by providing a structured interface for initial workflow data.

To use this option, select the Use form as input option when creating a workflow and choose an existing form. When running the workflow, you will be able to submit data so that it is automatically mapped to the workflow’s input, ensuring consistency and reducing manual errors.

Guided task: Check an applicant's age

About this example

In this example, we create a simple employment application form that check's an applicant's age.

Click here to download and extract the Check Age Workflow file, including the JSON form file.

Step 1: Create a form

There are two ways you can create a form in CWM. To create the form without Forms Designer, use the POST/form API endpoint to send a JSON object that defines the form schema. The other option is to use the CWM user interface and create the form in a step-by-step process. Follow the steps below to create the form using the user interface.

  1. In CWM, select Design > Forms, then click Create form.

  2. In Basic configuration, enter:

    • Form name: type Check applicant age.

    • Submit button: A label for the Submit button.

    • Description: A short description, such as "Applicant form".

Step 2: Add Number component

The number component will add a field in the guided task that the operator will use to type the applicant age.

  1. In Form elements, click the Designer to expand it.

  2. In Basic components, locate the Number component and drag and drop it onto the blue rectangle in the center space. This will open a new dialog.

  3. n the Label field, change the default name to Provide applicant age:.


    Note


    In the API tab of the component, you'll find the Property name which will be needed later when defining the task on the workflow side.


  4. Click Save to create the component.

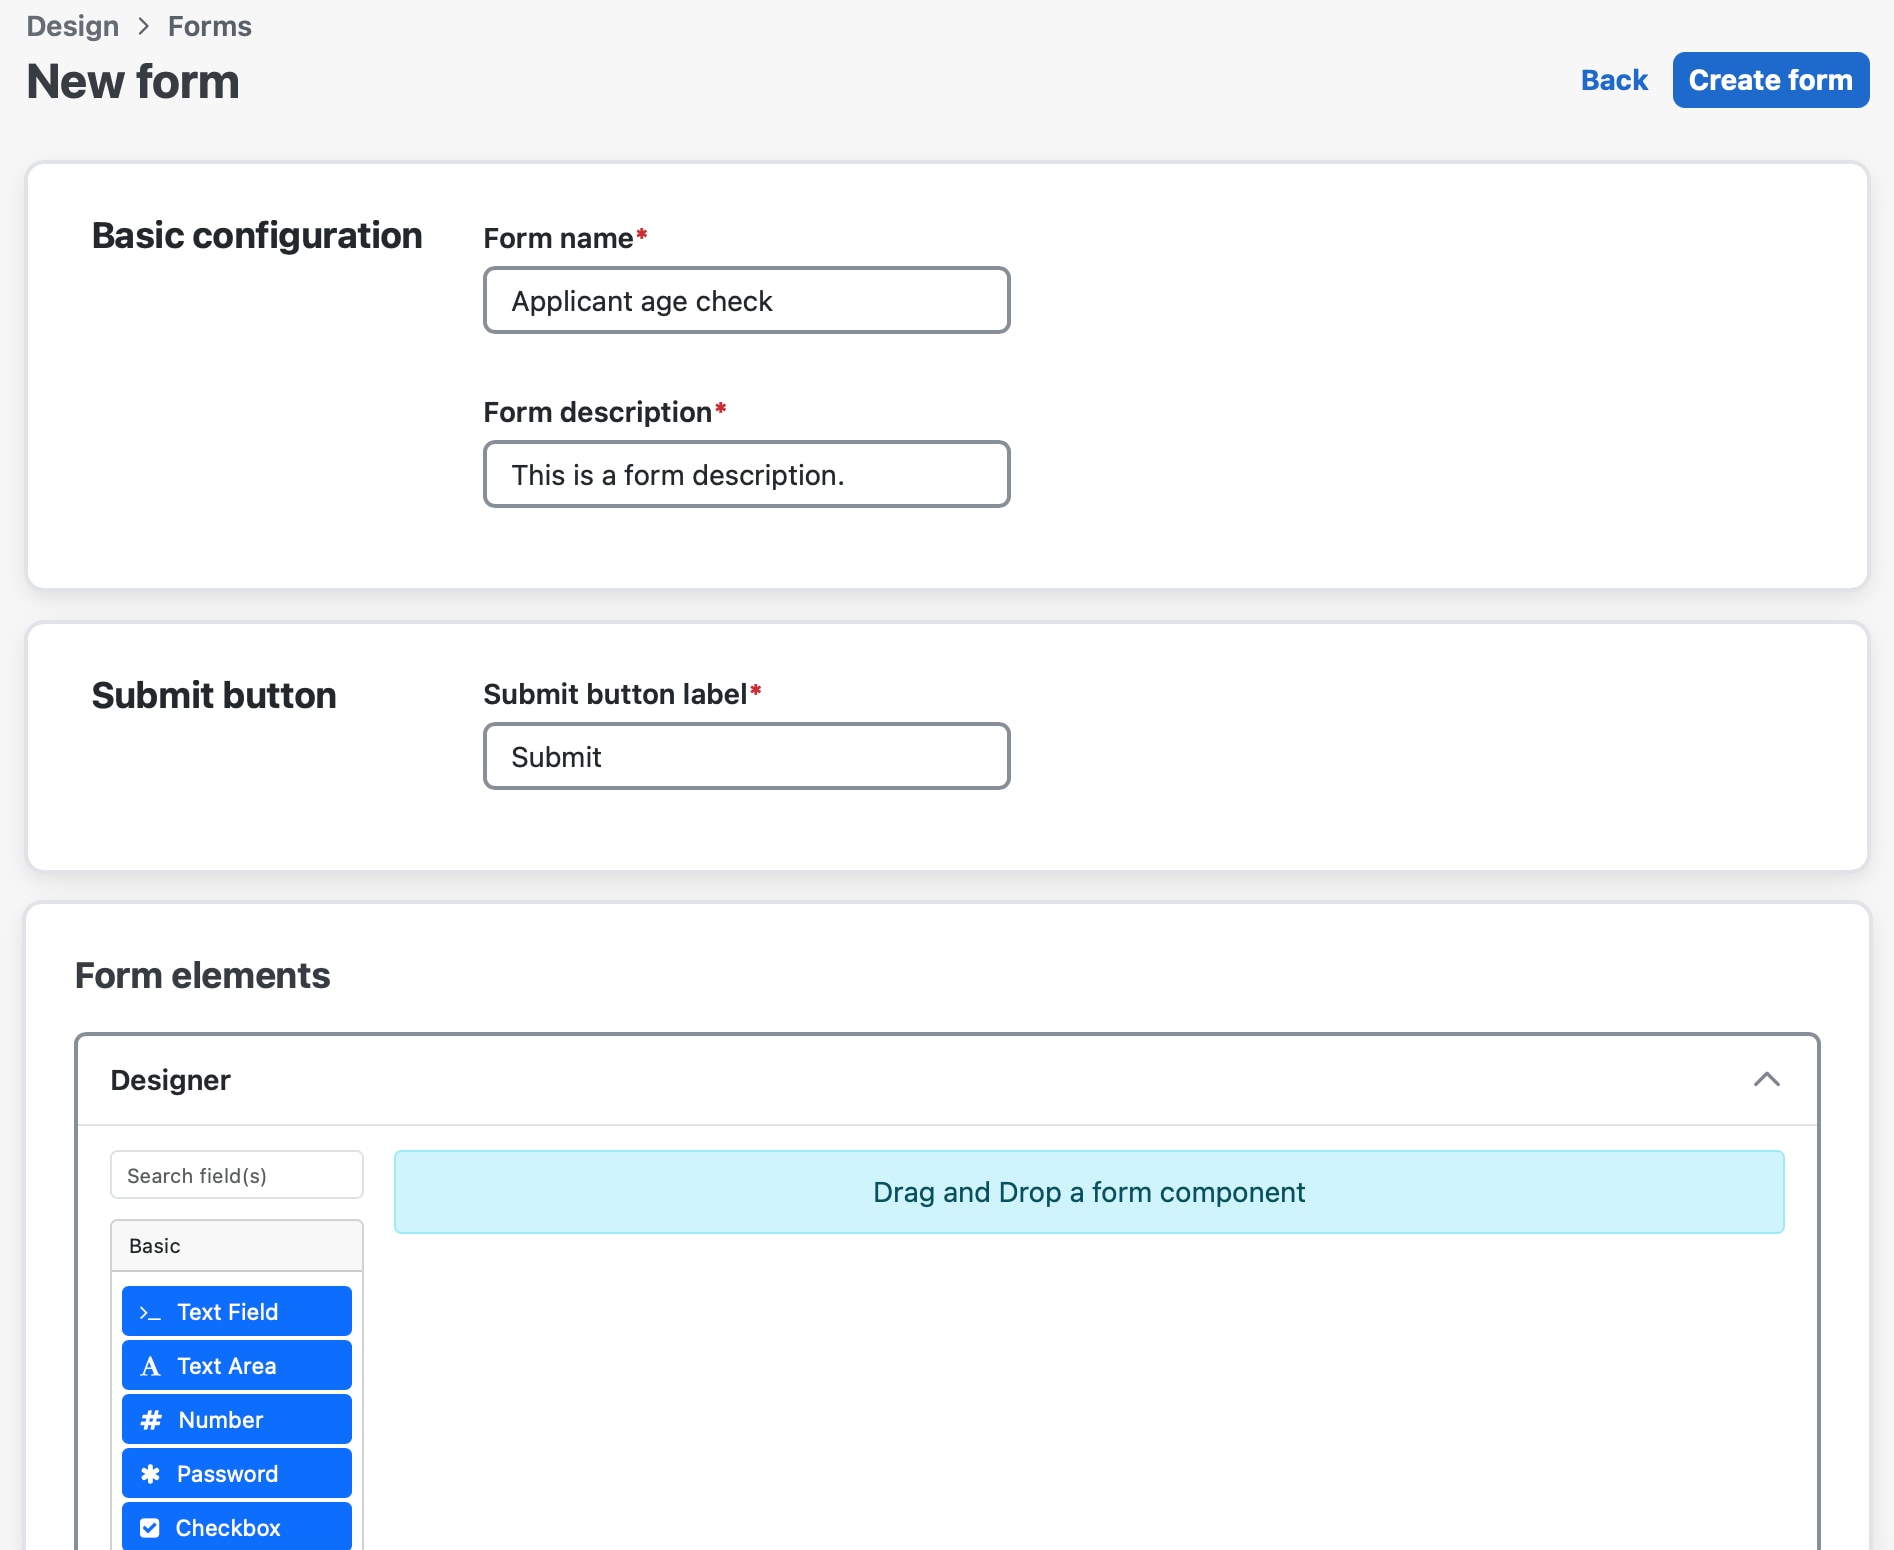
Step 3: Define a task in the workflow

After you create a form, you can proceed to define how it will be employed by the workflow. The workflow that will serve as an example consists in a simple action: checking applicant age using the guided task feature and then rejecting or accepting an application based on the provided input. In the workflow definition, let's start by setting up the events parameter with the data of the form we created.

"events": [
    {
      "kind": "consumed",
      "name": "cwm.forms.Check_applicant_age",
      "type": "cwm.forms.Check_applicant_age",
      "source": "system.internal.cwm"
    }
  ], 

The key values here are:

  • kind: The event is consumed, since the input provided in the task is treated as external and will be consumed by the workflow.

  • name: It's the Form ID which you can find in the form details when selecting it from the Forms list.

  • type: It takes the same value as the name key.

  • source: It needs to be system.internal.cwm as the source

Next, we want to enter a callback state into the workflow and refer to the event (the form ID) that it will use to invoke the task.

"states": [
    {
      "name": "start",
      "type": "callback",
      "action": {
        "name": "no operation",
        "functionRef": {
          "refName": "noop",
          "arguments": {}
        }
      },
      "eventRef": "cwm.forms.Check_applicant_age",
      "metadata": {
        "formData": "${ {user : .user} }",
        "taskName": "Provide applicant age"
      },
      "timeouts": {
        "eventTimeout": "PT15S",
        "stateExecTimeout": "PT15M",
        "actionExecTimeout": "PT15S"
      },
      "transition": "evaluate"
    },
    ...
 ] 

The callback state requires the action parameter to be stated. The name and functionRef keys need to have values provided even if no action is expected to happen during this state. Therefore, a mock action needs to be provided. For this, you can use a utility function, like noOp, or any activity of your custom adapter, but keep in mind that the action needs to complete successfully for the workflow to pass to another step.

The key values here are:

  • eventRef: provide the ID of the form.

  • taskName: this can be an arbitrary name that refers to the task.

The next state in the example workflow is a switch state. It is where you provide conditions for the task input. If the age of the applicant is stated to be under 18, the application is rejected. If it is 18 or more, the application is approved.

       {
      "name": "evaluate",
      "type": "switch",
      "dataConditions": [
        {
          "name": "adult",
          "condition": "${ .provideApplicantAge = 18 }",
          "transition": "approve"
        },
        {
          "name": "underage",
          "condition": "${ .provideApplicantAge  18 }",
          "transition": "reject"
        }
      ],
      "defaultCondition": {
        "transition": "reject"
      }
    }, 

The key value here is condition. Here is where you refer to the Property name of the component that you can find under the API tab inside the component. The component property name needs to be referred to inside a jq expression that starts with $. The condition is stated in form of an inequality: .provideApplicantAge = 18.

The last two states would be the inject states where the workflow either accepts or rejects the application and prints the result in the job execution logs.

    {
      "end": true,
      "data": {
        "application": "approved"
      },
      "name": "approve",
      "type": "inject"
    },
    {
      "end": true,
      "data": {
        "application": "rejected"
      },
      "name": "reject",
      "type": "inject"
    }

Step 3: Run the workflow and submit task

If you have created a workflow definition based on the example, you may want to test it against the system. To do that, follow the steps below.

  1. In CWM, choose Design > Workflows.

    Click Create workflow, provide a Workflow definition name and Version for the new workflow, and click Create.

    Click the Designer tab and, in the Code tab, paste your workflow definition. Click Save.

  2. Find your workflow in the list of workflow definitions, enter it and click Run. In the dialog, click Run job.

  3. Choose Workflow Automation > Operate > Tasks and look for the Applicant age check task (or whatever custom name you assigned to this task).

  4. Click the task, provide input (in this example, it will be a number) in the field and click Submit.

  5. The workflow will process the input given in the task and finish execution.

    You can see the result by selecting to Workflow Automation > Operate > Jobs and looking up the logs of your job.

Guided task: Create an L3 VPN

About this example

To complete and test the following example, you will need to have a running instance of Cisco Network Service Orchestrator (NSO).

This example creates an L3 VPN with the given parameters in Cisco NSO. Before executing the operation, CWM performs a dry run to simulate the configuration. During execution, the dry-run payload is displayed in the task prompt, allowing the user to either accept or reject the operation based on the previewed results.

Click here to download and extract the Create NSO L3VPN file, including the JSON form file.

Step 1: Create a form

For the purpose of this example, we will focus on creating the example form using the POST/form API endpoint.

  1. Go to the CWM API in Postman and use the POST/form endpoint.

  2. Copy the content of the JSON form file from the download and paste it into the request field.

  3. Click Send. The form has been created in CWM.

Step 2: Define task in the workflow

Let's see how the task that will employ the created form is defined inside the workflow definition. In the workflow definition, let's start by setting up the events parameter with the data of the form we created.

  "events": [
    {
      "kind": "consumed",
      "name": "cwm.forms.NSO_dry_run",
      "type": "cwm.forms.NSO_dry_run",
      "source": "system.internal.cwm"
    }
  ], 

The key values here are:

  • kind: The event is consumed, since the input provided in the task is treated as external and will be consumed by the workflow.

  • name: It's the Form ID which you can find in the form details when selecting it from the Forms list.

  • type: It takes the same value as the name key.

  • source: It needs to be system.internal.cwm as the source.

Next, we want to include the callback state into the workflow and refer to the event (the form ID) that it will use to invoke the task. For this, we need to add the eventRef key and its accompanying metadata: formData, where you refer to the variable used to retrieve the result of the dry run operation.

Note that inside the callback state, we need to state the action parameter. Inside the functionRef key we state refName and give the name of the NSO adapter activity there: NSO.restconfPost.

"states": [
        {
            "name": "decision",
            "type": "callback",
            "action": {
                "name": "show-dry-run",
                "functionRef": {
                    "refName": "NSO.restconfPost",
                    "arguments": {
                        "input": {
                            "data": {
                                "l3vpn": [
                                    {
                                        "name": "${ .vpnName }",
                                        "endpoint": "${  [range( .endpoint | length) as $i | {id: .endpoint[$i].name, 
\"ce-device\":.endpoint[$i].device, \"ce-interface\":\"GigabitEthernet0/2\" , \"ip-network\":.endpoint[$i].ipNetwork, 
bandwidth: .endpoint[$i].bandwidth, \"as-number\":65002 }] }",
                                        "route-distinguisher": "${ .rd }"
                                    }
                                ]
                            },
                            "path": "restconf/data/l3vpn:vpn",
                            "queries": {
                                "additional": {
                                    "dry-run": "cli"
                                }
                            }
                        },
                        "config": {
                            "resourceId": "${ .nsoResource }"
                        }
                    }
                },
                "actionDataFilter": {
                    "toStateData": "${ .result }"
                }
            },
            "eventRef": "cwm.forms.NSO_dry_run",
            "metadata": {
                "formData": "${ { dryrunPre : .result.data } }",
                "taskName": "Approve/reject dry run operation"
            },
        },
    ]
     

The key values here are:

  • eventRef: provide the ID of the form.

  • metadata: use this key to decide what data will be presented in the task:

    • formData: build a jq expression to make the dry run result appear inside the task prompt. Note that the first element of the expression, dryrunPre, is what is provided in the HTML component in the form so that whatever the dry run result is, it will be displayed in the task. The other element is the part of the expression that specifies what data exactly is to be shown out of the whole payload of the dry run operation collected by the toStateData key inside actionDataFilter.

    • taskName: this can be an arbitrary name that refers to the task.

The next state in the example workflow is a switch state. It is where you provide conditions for the task input. If the configuration shown by the dry run result is correct, the operator approves the operation. If it is not correct, the operator rejects the change.

"name": "evaluate-decision",
"type": "switch",
"dataConditions": [
        {
            "name": "start-application",
            "condition": "${ .approve == true }",
            "transition": "commit-service"
         },
        {
            "name": "reject-application",
            "condition": "${ .approve == false}",
            "transition": "abandon-service"
        }
    ],
"defaultCondition": {
        "transition": "abandon-service"
    } 

The key value here is condition. Here is where you refer to the Property name of the component that you can find under the API tab inside the component. The component property name needs to be referred to inside a jq expression that starts with $. The condition is stated in form of an equality: .approve == true.

The last two states would be the operation states where the workflow either creates the VPN or rejects the operation and prints the result in the job execution logs.

Step 3: Run workflow and submit task

If you have created a workflow definition based on the example, you will want to test it against the system.

  1. In CWM, choose Design > Workflows.

    Click Create workflow, provide a Workflow definition name and Version for the new workflow, and click Create.

    Click the Designer tab and, in the Code tab, paste your workflow definition. Click Save.

  2. Find your workflow in the list of workflow definitions, enter it and click Run. In the dialog, click Run job.

  3. Choose Operate > Tasks and look for the Approve/reject dry run operation task (or whatever custom name you assigned to this task).

  4. Click the task, provide your signature and click Approve.

    The workflow will process the input given in the task and finish execution. To see the result, choose Workflow Automation > Operate > Jobs and look up the logs of your job.