Install CWM using Docker Installer Tool
The CWM 2.0 is installed on the Cisco Crosswork platform by first deploying the Crosswork OVA file using a Docker image on the VMware vCenter 7.0 (or higher) and then installing the CWM CAPP file using the installation script.
Prerequisites
-
VMware vCenter Server 7.0 (U3p or later) and ESXi 7.0 (U3p or later). Refer to the Crosswork Network Controller 7.1 installation requirements for more details.
-
Docker version 19 or higher.
-
sshpassinstalled. For Mac, you can usebrew install sshpass. -
jqinstalled. For Mac, you can usebrew install jq.
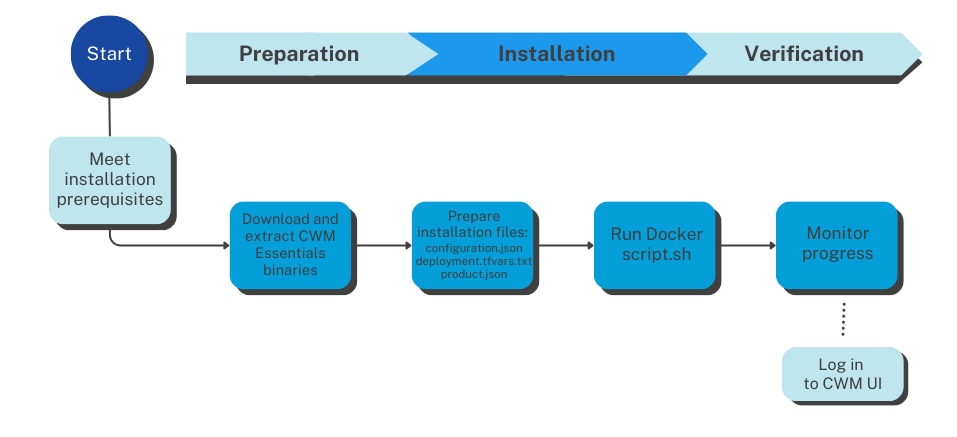
Installation flowchart
The following flowchart outlines the high-level sequence of tasks for installing CWM Essentials in a VMware environment.
Download CWM package
To download the CWM 2.0 package, go to https://software.cisco.com/download/home/286340306/type/286332171/release/2.0.0.There are four downloadable files there, based on two factors:
-
Virtualization format:
-
OVA files are for VMware
-
QCOW2 files are for KVM
-
-
Product edition:
-
Either CWM Essentials or CWM Advantage (indicated in the file name).
-
To install CWM 2.0 Essentials on VMware, download the file with the OVA extension that is labeled for Essentials.
 Note |
These instructions are specifically for the CWM Essentials package using the OVA file format. If you're using a different edition or format (e.g., CWM Advantage or QCOW2), please refer to the appropriate set of instructions. |
Extract CWM Essentials package
Before installing CWM, the software package must be extracted on a system that can access the VMWare environment where CWM will be deployed. This system can be either a local machine or a VM capable of running the installer binaries. For this documentation, we use a Mac laptop for the extraction process.
Note |
Alternatively, a Linux-based VM within the same VMWare setup as the target CWM deployment can be used. |
Procedure
|
Step 1 |
Download the CWM package file named |
||
|
Step 2 |
Open |
||
|
Step 3 |
Run the binary to extract its contents:
|
||
|
Step 4 |
After extraction, the folder will contain:
|
||
|
Step 5 |
Untar the This will create a new folder named CW-CWM-Standalone-2.0.0-14-SVM-7.1.0-48-ova. Rename the folder for convenience. |
Use script to Deploy Crosswork and CWM
Procedure
|
Step 1 |
In your Docker-capable machine, create a directory where you will store all the files you will use during this installation.
|
||
|
Step 2 |
The downloaded file containing the Crosswork Network Controller package from cisco.com includes the following files:
|
||
|
Step 3 |
Load the Docker installer image by running the command: |
||
|
Step 4 |
Inside the directory, create a
|
||
|
Step 5 |
Edit the parameters to match your deployment.
|
||
|
Step 6 |
Inside the directory, create another file named
|
||
|
Step 7 |
Open the
|
||
|
Step 8 |
From the directory, run the installer script: This will start the installation process for the Crosswork platform and then for CWM once the platform is deployed. |
||
|
Step 9 |
To monitor the progress of the installation, access the Grafana dashboard which provides a visual summary of each stage (e.g., image unpacking, VM deployment, configuration). The dashboard is typically accessible at: |
||
|
Step 10 |
Once the installation script is done and the deployment status reaches 100%, go to http://your_mgmt_vipx:30603 and log in
with the default |
Upgrade CWM with the 2.0.1 patch
To download the CWM 2.0.1 package, go to https://software.cisco.com/download/home/286340306/type/286332171/release/ and locate the 2.0.1 patch package in the available releases.
Patch installation prerequisites
This section describes the prerequisites needed to install the Crosswork Workflow Manager 2.0.1 patch.
-
Install Crosswork Network Controller version 7.1.0. See the Cisco Crosswork Network Controller 7.1 Installation Guide for installation instructions.
-
Download and install Crosswork Network Controller Essentials package.
-
Ensure you have Cisco Crosswork Controller Administrator user credentials.
-
Identify the Management IP address (either a physical IP address or the Virtual IP address) used for your Crosswork VM deployment.
-
Back up your data. For more information, see Manage Crosswork Network Controller Backup and Restore.Additionally, the server being patched should have sufficient space to unarchive and copy the files.
-
At least 5GB of free space in the
/home/cw-admin/directory. -
At least 1GB of free space in the
/tmp/directory.
Extract and validate patch files
This section explains how to extract and validate the downloaded patch files.
-
Navigate to the folder where the tar file was downloaded. Example:
cd <folder where the tar file was downloaded>Consider the Crosswork Infrastructure signed patch image
signed-cw-na-infra-patch-7.1.1-28-release-250922.tar.gzfor this procedure. -
Extract the signed file using this command:
tar -xzvf <signed image file>The signed image package contains the patch file (
.tar.gz) and relevant certificates for validation. Example:tar -xzvf signed-cw-na-infra-patch-7.1.1-28-release-250922.tar.gzOutput:
README cw-na-infra-patch-7.1.1-28-release-250922.tar.gz cw-na-infra-patch-7.1.1-28-release-250922.tar.gz.signature CW-CCO_RELEASE.cer cisco_x509_verify_release.py3 cisco_x509_verify_release.py -
Validate the extracted patch file using this command (single line):
python3 cisco_x509_verify_release.py3 -e <.cer file> -i <.tar.gz file> -s <.tar.gz.signature file> -v dgst -sha512Example:
python3 cisco_x509_verify_release.py3 -e CW-CCO_RELEASE.cer -i cw-na-infra-patch-7.1.1-28-release-250922.tar.gz -s cw-na-infra-patch-7.1.1-28-release-250922.tar.gz.signature -v dgst -sha512Output:
Retrieving CA certificate from http://www.cisco.com/security/pki/certs/crcam2.cer ... Successfully retrieved and verified crcam2.cer. Retrieving SubCA certificate from http://www.cisco.com/security/pki/certs/innerspace.cer ... Successfully retrieved and verified innerspace.cer. Successfully verified root, subca and end-entity certificate chain. Successfully fetched a public key from CW-CCO_RELEASE.cer. Successfully verified the signature of cw-na-infra-patch-7.1.1-28-release-250922.tar.gz using CW-CCO_RELEASE.cer -
Repeat these steps for each patch file you plan to install.
Add and install system OS patch
-
Create a new backup if you do not already have one.
-
From the main menu, choose Administration > Crosswork Manager. The Crosswork Summary page is displayed with Crosswork Cluster and Crosswork Platform Infrastructure tiles.
-
Click the System Management tab.
-
Click Add OS patch. In the popup window choose either URL or SCP as your preferred protocol. Based on your selection, fill in the additional fields with the required information. Click Add to proceed. Individual jobs are created to add the patch to the repository and to apply the package to each VM in your cluster.
-
Click System Management > Job History to monitor the status of each job. For details on each node’s operation, open the Job Details page.
-
Once jobs complete successfully, check that the newly added OS patch is listed under the System updates tab.
-
To upgrade an installed OS patch, use the Upgrade button in the System updates tab.
-
(Optional) To see patch details, select the patch file and click Package details. You’ll see information such as package name, version, and description.
-
(Optional) After all jobs are completed successfully, verify the updated package list for each node by navigating to Administration > Crosswork Manager > System Summary > > View details > Package details tab.
Add and install 2.0.1 patch files
-
Check the health status of your system. If any components are unhealthy or degraded, resolve the issues or contact your Cisco Customer Experience representative before proceeding.
-
Click Administration > Crosswork Management > Application Management tab. The Platform Infrastructure and any applications that are added are displayed here as tiles.
-
Click the Add File (.tar.gz) option to add the CNC infrastructure patch file that you extracted. For example:
cw-na-infra-patch-7.1.1-28-release-250922.tar.gz. The Add File (.tar.gz) via Secure Copy popup window is displayed. -
Enter the relevant information and click Add.
-
Once the patch file is added, the existing application tile displays an upgrade prompt. Click the upgrade prompt to install the patch file.
-
In the Upgrade popup screen, select the new version that you want to upgrade to, and click Upgrade. Click Job History to see the progress of the upgrade operation.
-
Repeat steps from 2 to 6 to install the extracted CWM 2.0.1 patch tar.gz file. For example:
cw-na-cwm-2.0.1-9-releasecwm-201-250911.tar.gz. -
After the installation is complete, go to Administration > Crosswork Manager and confirm all of the applications are reporting a Healthy status.
 Feedback