Cisco NSO adapter workflow
This quick start uses a locally installed Cisco Crosswork Network Service Orchestrator (NSO) application and CWM with the Cisco NSO adapter to show you a basic use-case scenario for creating and running a successful workflow. It will guide you on installing an adapter, creating a worker for the workflow execution, and running the created workflow to quickly get tangible results in Cisco NSO.
NSO VPN Service Workflow overview
The purpose of this example workflow is to automatically create a VPN service for two NSO devices.
First, we point to the devices in the data input and then try to perform the NSO check-sync operation on them. Then, depending on the result:
-
If not in sync, we push a device to perform a
sync-from, and only then try to create a VPN for it; -
If in sync, we don't perform
sync-frombut directly create a VPN for the device.
If all the steps are executed successfully, the execution engine reports workflow execution completion and displays the final
data input. The results are visible in NSO too. If the engine encounters errors while performing a step, it uses the specified
retry policy. In case errors persist beyond the retry limits, the engine ends the execution with a Failed status.
Go through the following topics to learn the details of how data input, functions, states, actions, and data filters are defined.
Prerequisites
-
Cisco NSO 6.1.0 install. If you do not have it, follow the installation instructions.
-
CWM 2.0 installed on Cisco Crosswork Network Controller 7.1.0 or later.
Step 1: Install NSO adapter
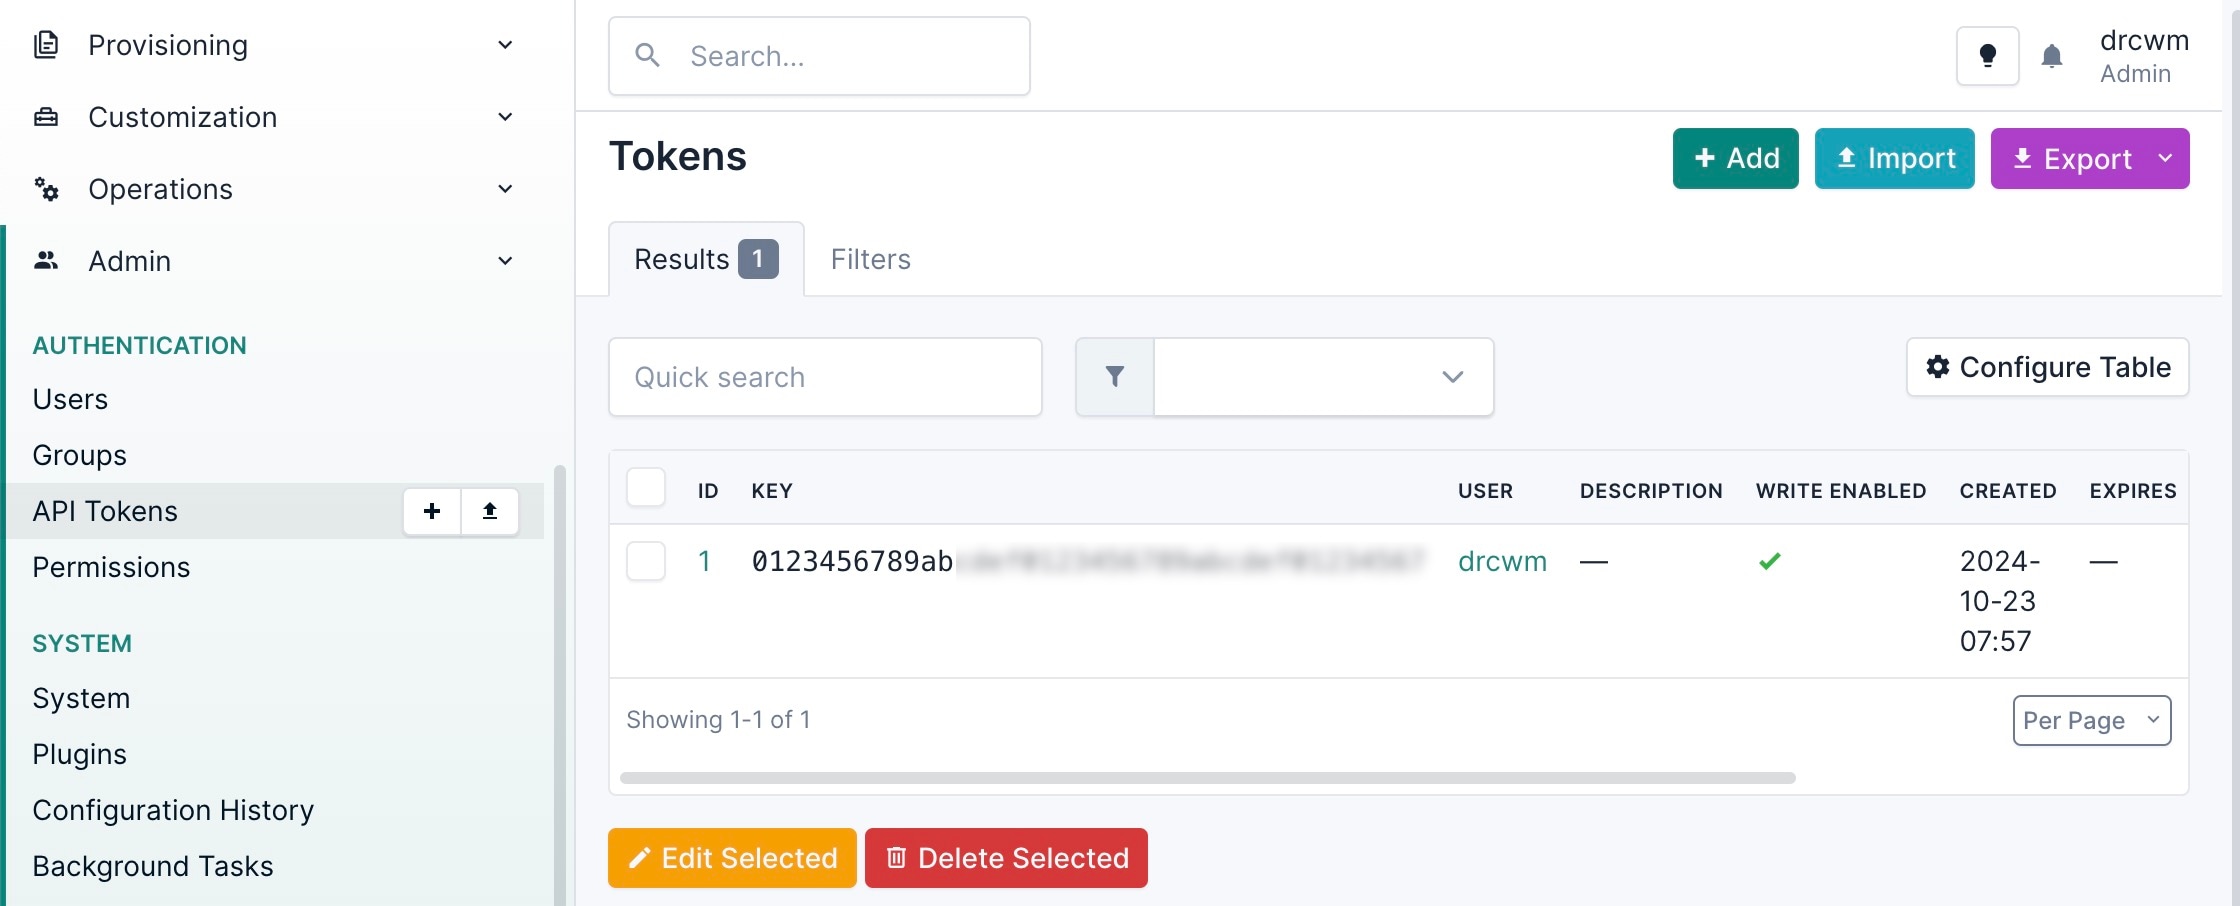
To interact with Cisco NSO, CWM needs a dedicated Cisco NSO adapter. Here is the process to install it using the CWM API:
Upload NSO adapter file
Procedure
| Command or Action | Purpose | |
|---|---|---|
|
Step 1 |
Get the latest NSO adapter installation file from the CWM software package. |
|
|
Step 2 |
In CWM, choose . |
|
|
Step 3 |
Click Add Adapter. |
|
|
Step 4 |
In the Install adapter window, click on the file uploader to select a |
|
|
Step 5 |
After the adapter file is uploaded to the database, check the Automatically create worker for this adapter checkbox if you want to create a worker, and click Install Adapter to finish the installation process. |
|
|
Step 6 |
In the adapter list, click on the name of your adapter to enter its details. Set the Use as default version option to True. |
Step 2: Create secret and resource
To define the resources and secrets to pass securely to the Cisco NSO adapter, create a secret and resource using the CWM API.
Create a secret
Procedure
| Command or Action | Purpose | |
|---|---|---|
|
Step 1 |
In CWM, select . |
|
|
Step 2 |
Click Add Secret. |
|
|
Step 3 |
In the New secret view, specify the following: |
|
|
Step 4 |
After selecting the secret type, a set of additional fields is displayed in the Secret type details section. Fill in the fields with the following: |
|
|
Step 5 |
Click Create Secret. |
Create a resource
Procedure
| Command or Action | Purpose | |
|---|---|---|
|
Step 1 |
In CWM, select . |
|
|
Step 2 |
Click Add Resource. |
|
|
Step 3 |
In the New resource window, specify the following: |
|
|
Step 4 |
Click Create resource. |
Step 3: Set up the NSO example service
In this workflow example, we set up a Layer3 VPN in a service provider's MPLS network using two NSO-simulated devices.
Procedure
| Command or Action | Purpose | |
|---|---|---|
|
Step 1 |
In a terminal, open your main NSO directory and go to |
|
|
Step 2 |
Execute the makefile by running: |
This command will start your local NSO instance and the sample netsim devices. |
|
Step 3 |
For the example workflow to execute successfully, execute a sync-from on all the netsim devices beforehand: |
Step 4: Run the workflow
Now that we have the NSO adapter, the worker, and the NSO example all up and running, we can create a workflow in the CWM user interface and run the job.
Add new workflow
Procedure
| Command or Action | Purpose | |
|---|---|---|
|
Step 1 |
In CWM, select . |
|
|
Step 2 |
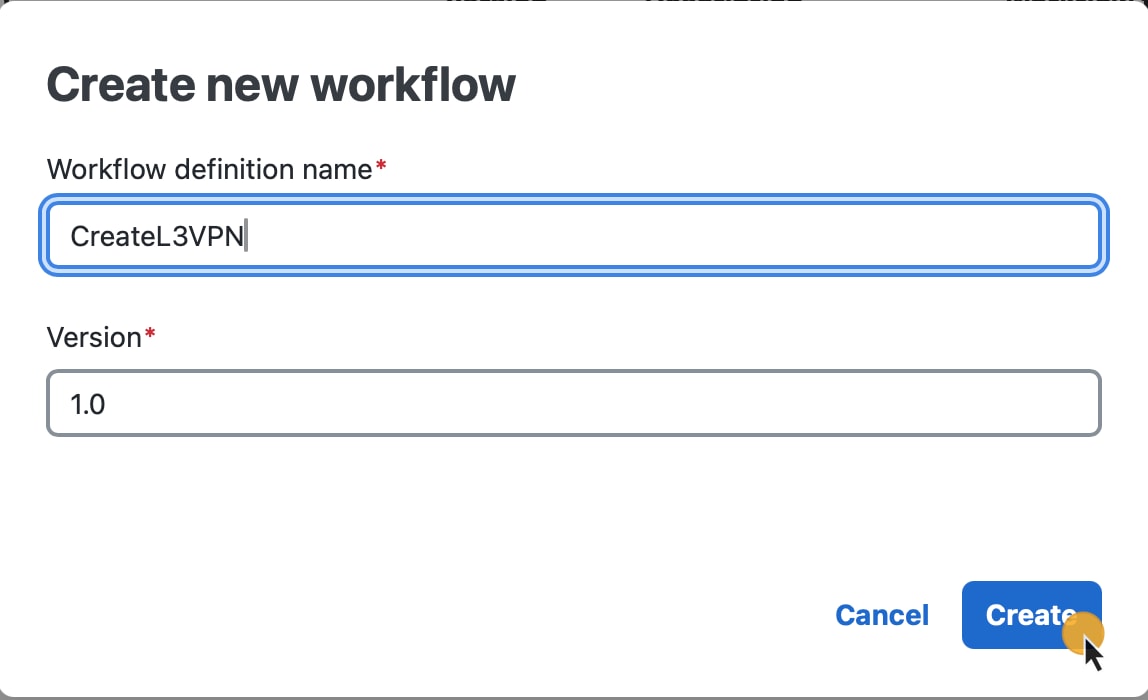
Click Create new workflow. |
|
|
Step 3 |
In the Create workflow window, provide the required input: |
|
|
Step 4 |
Click Create workflow. |
 |
Run job
Procedure
| Command or Action | Purpose | |
|---|---|---|
|
Step 1 |
In the Workflows panel, enter the newly created workflow definition by clicking its name. |
|
|
Step 2 |
Click the Designer tab, select Code and delete the sample content from the Code field. |
|
|
Step 3 |
Copy the workflow definition from the codeblock below and paste it inside the Code field, then click Save changes. |
|
|
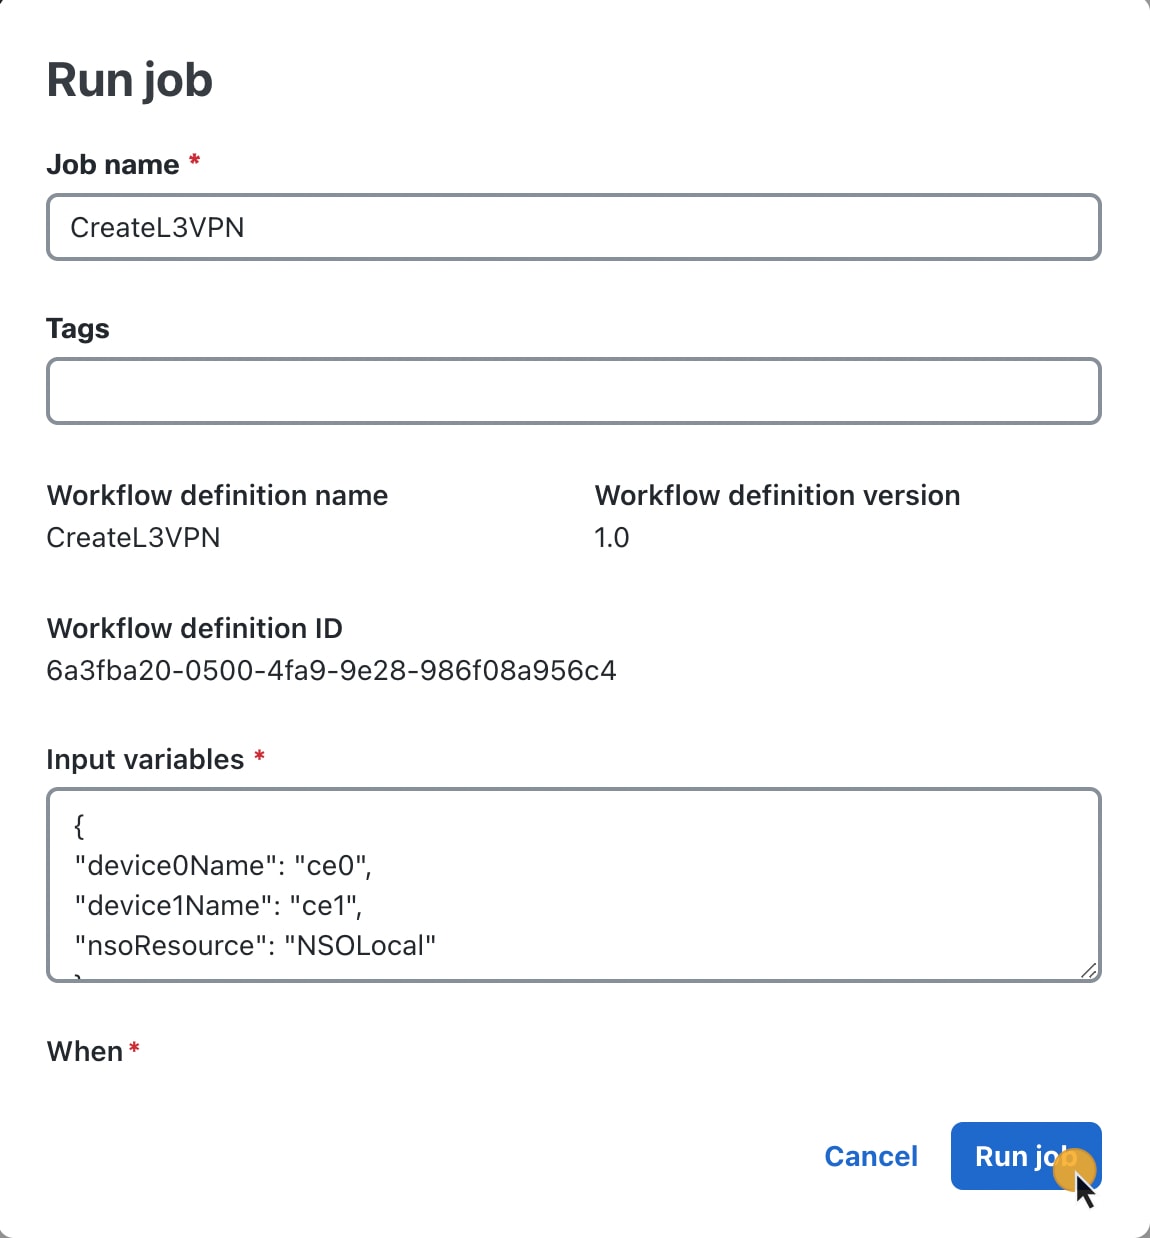
Step 4 |
Click Run. |
|
|
Step 5 |
In the Run job view, provide a name for the job and in the Input field, paste the data input from the section below inside the brackets: |
|
|
Step 6 |
Click Run job. |
 |
Step 5: Check results
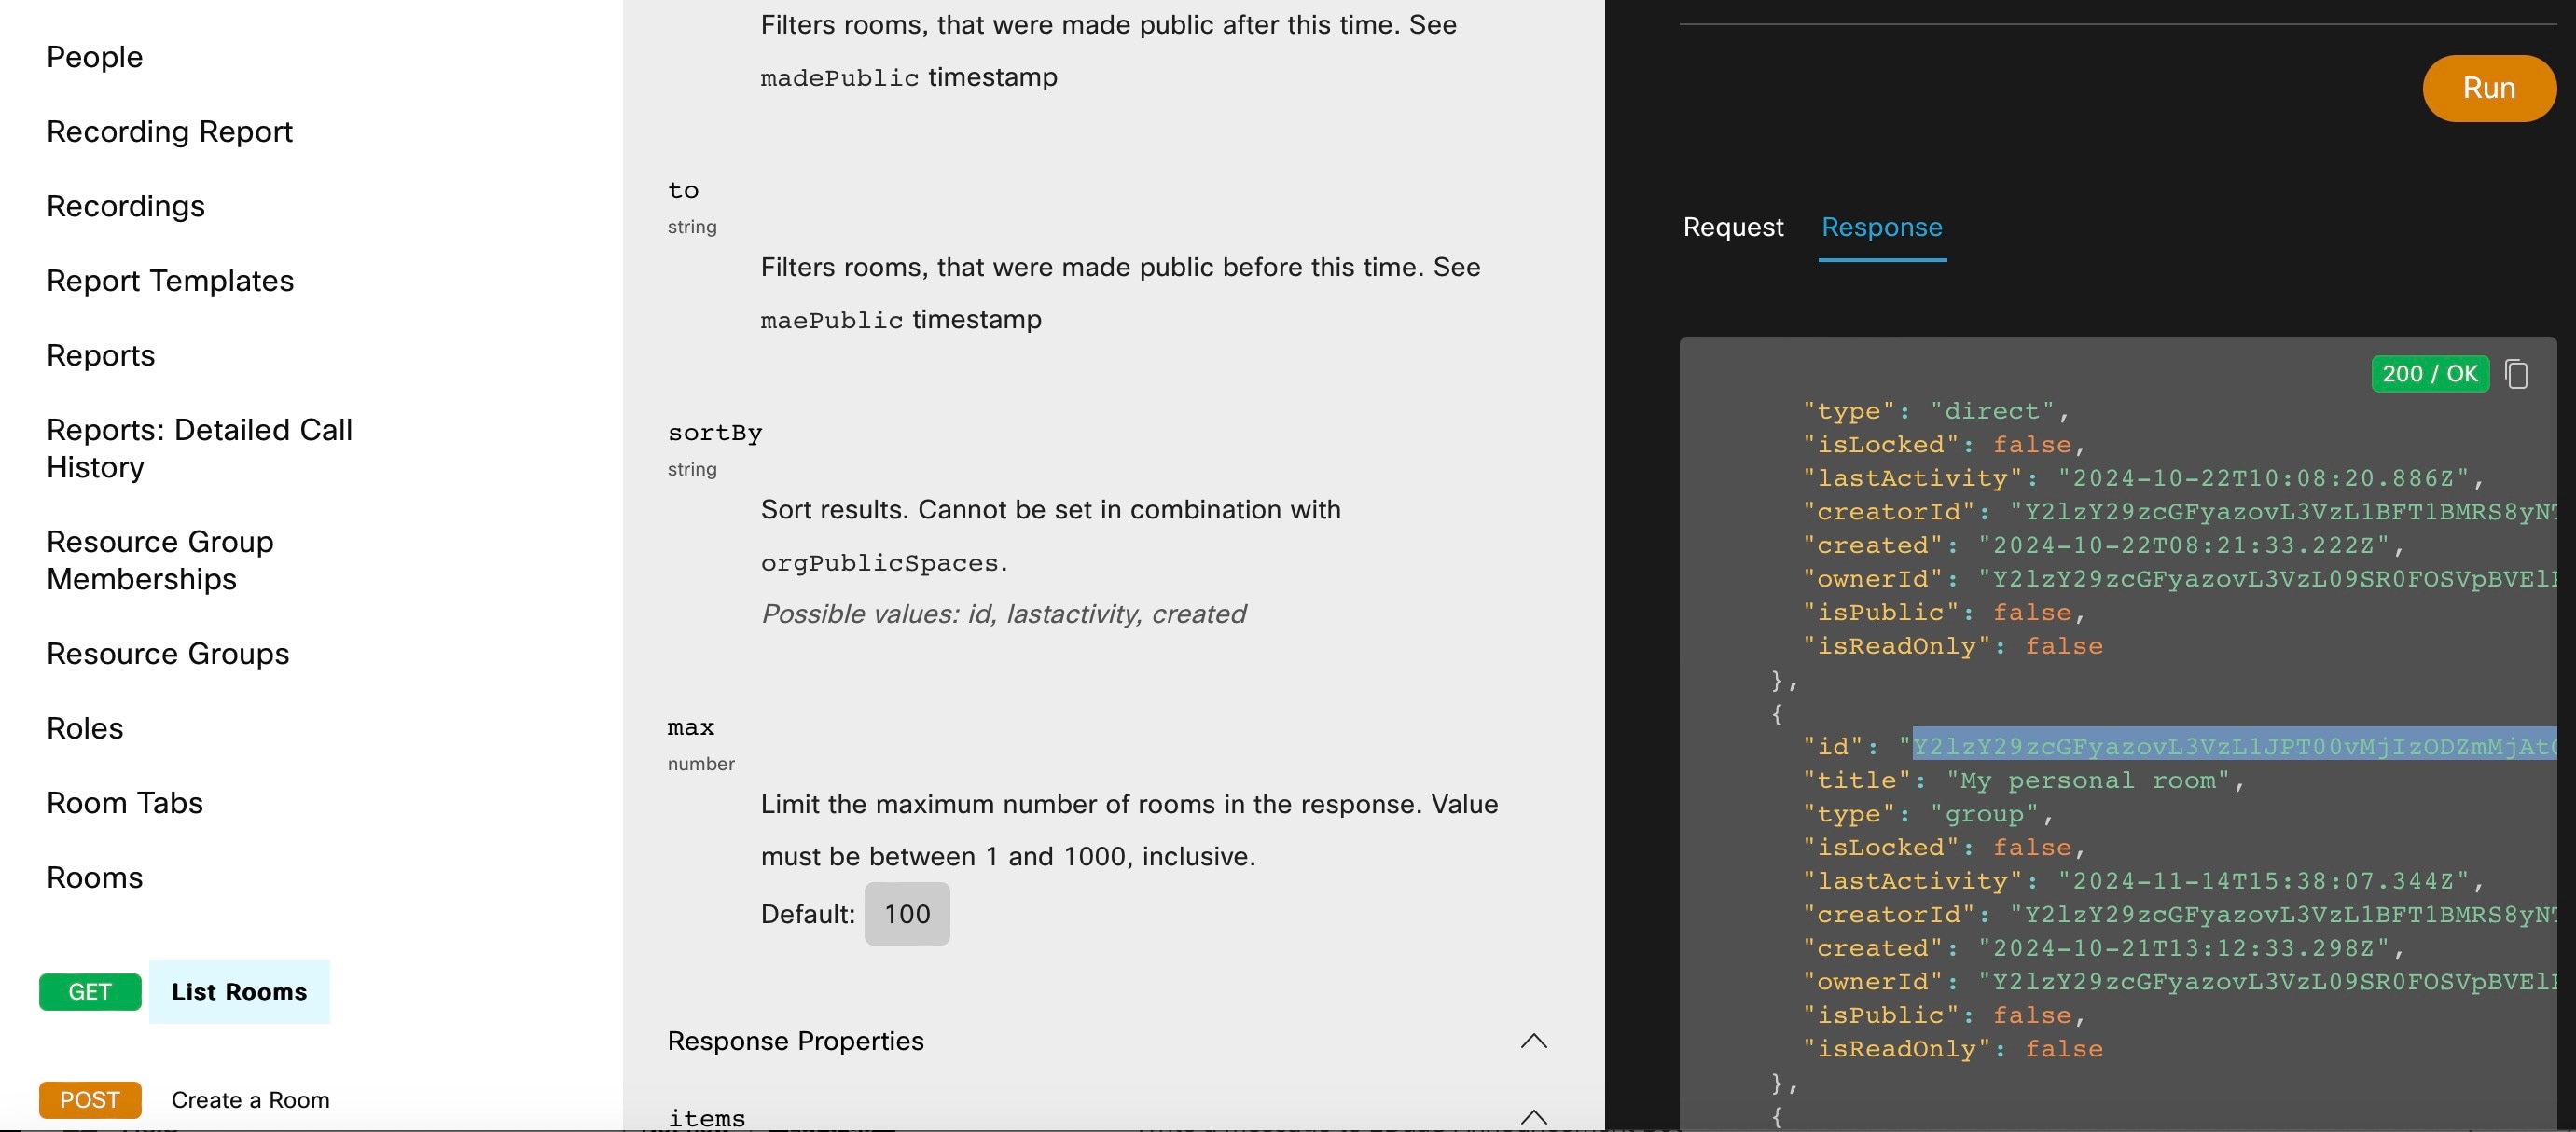
Workflows, by nature, bridge systems and applications. You can verify the results of this workflow by checking your results in two places:
-
in CWM UI, or
In the CWM User Interface
Procedure
| Command or Action | Purpose | |
|---|---|---|
|
Step 1 |
In CWM, select . |
|
|
Step 2 |
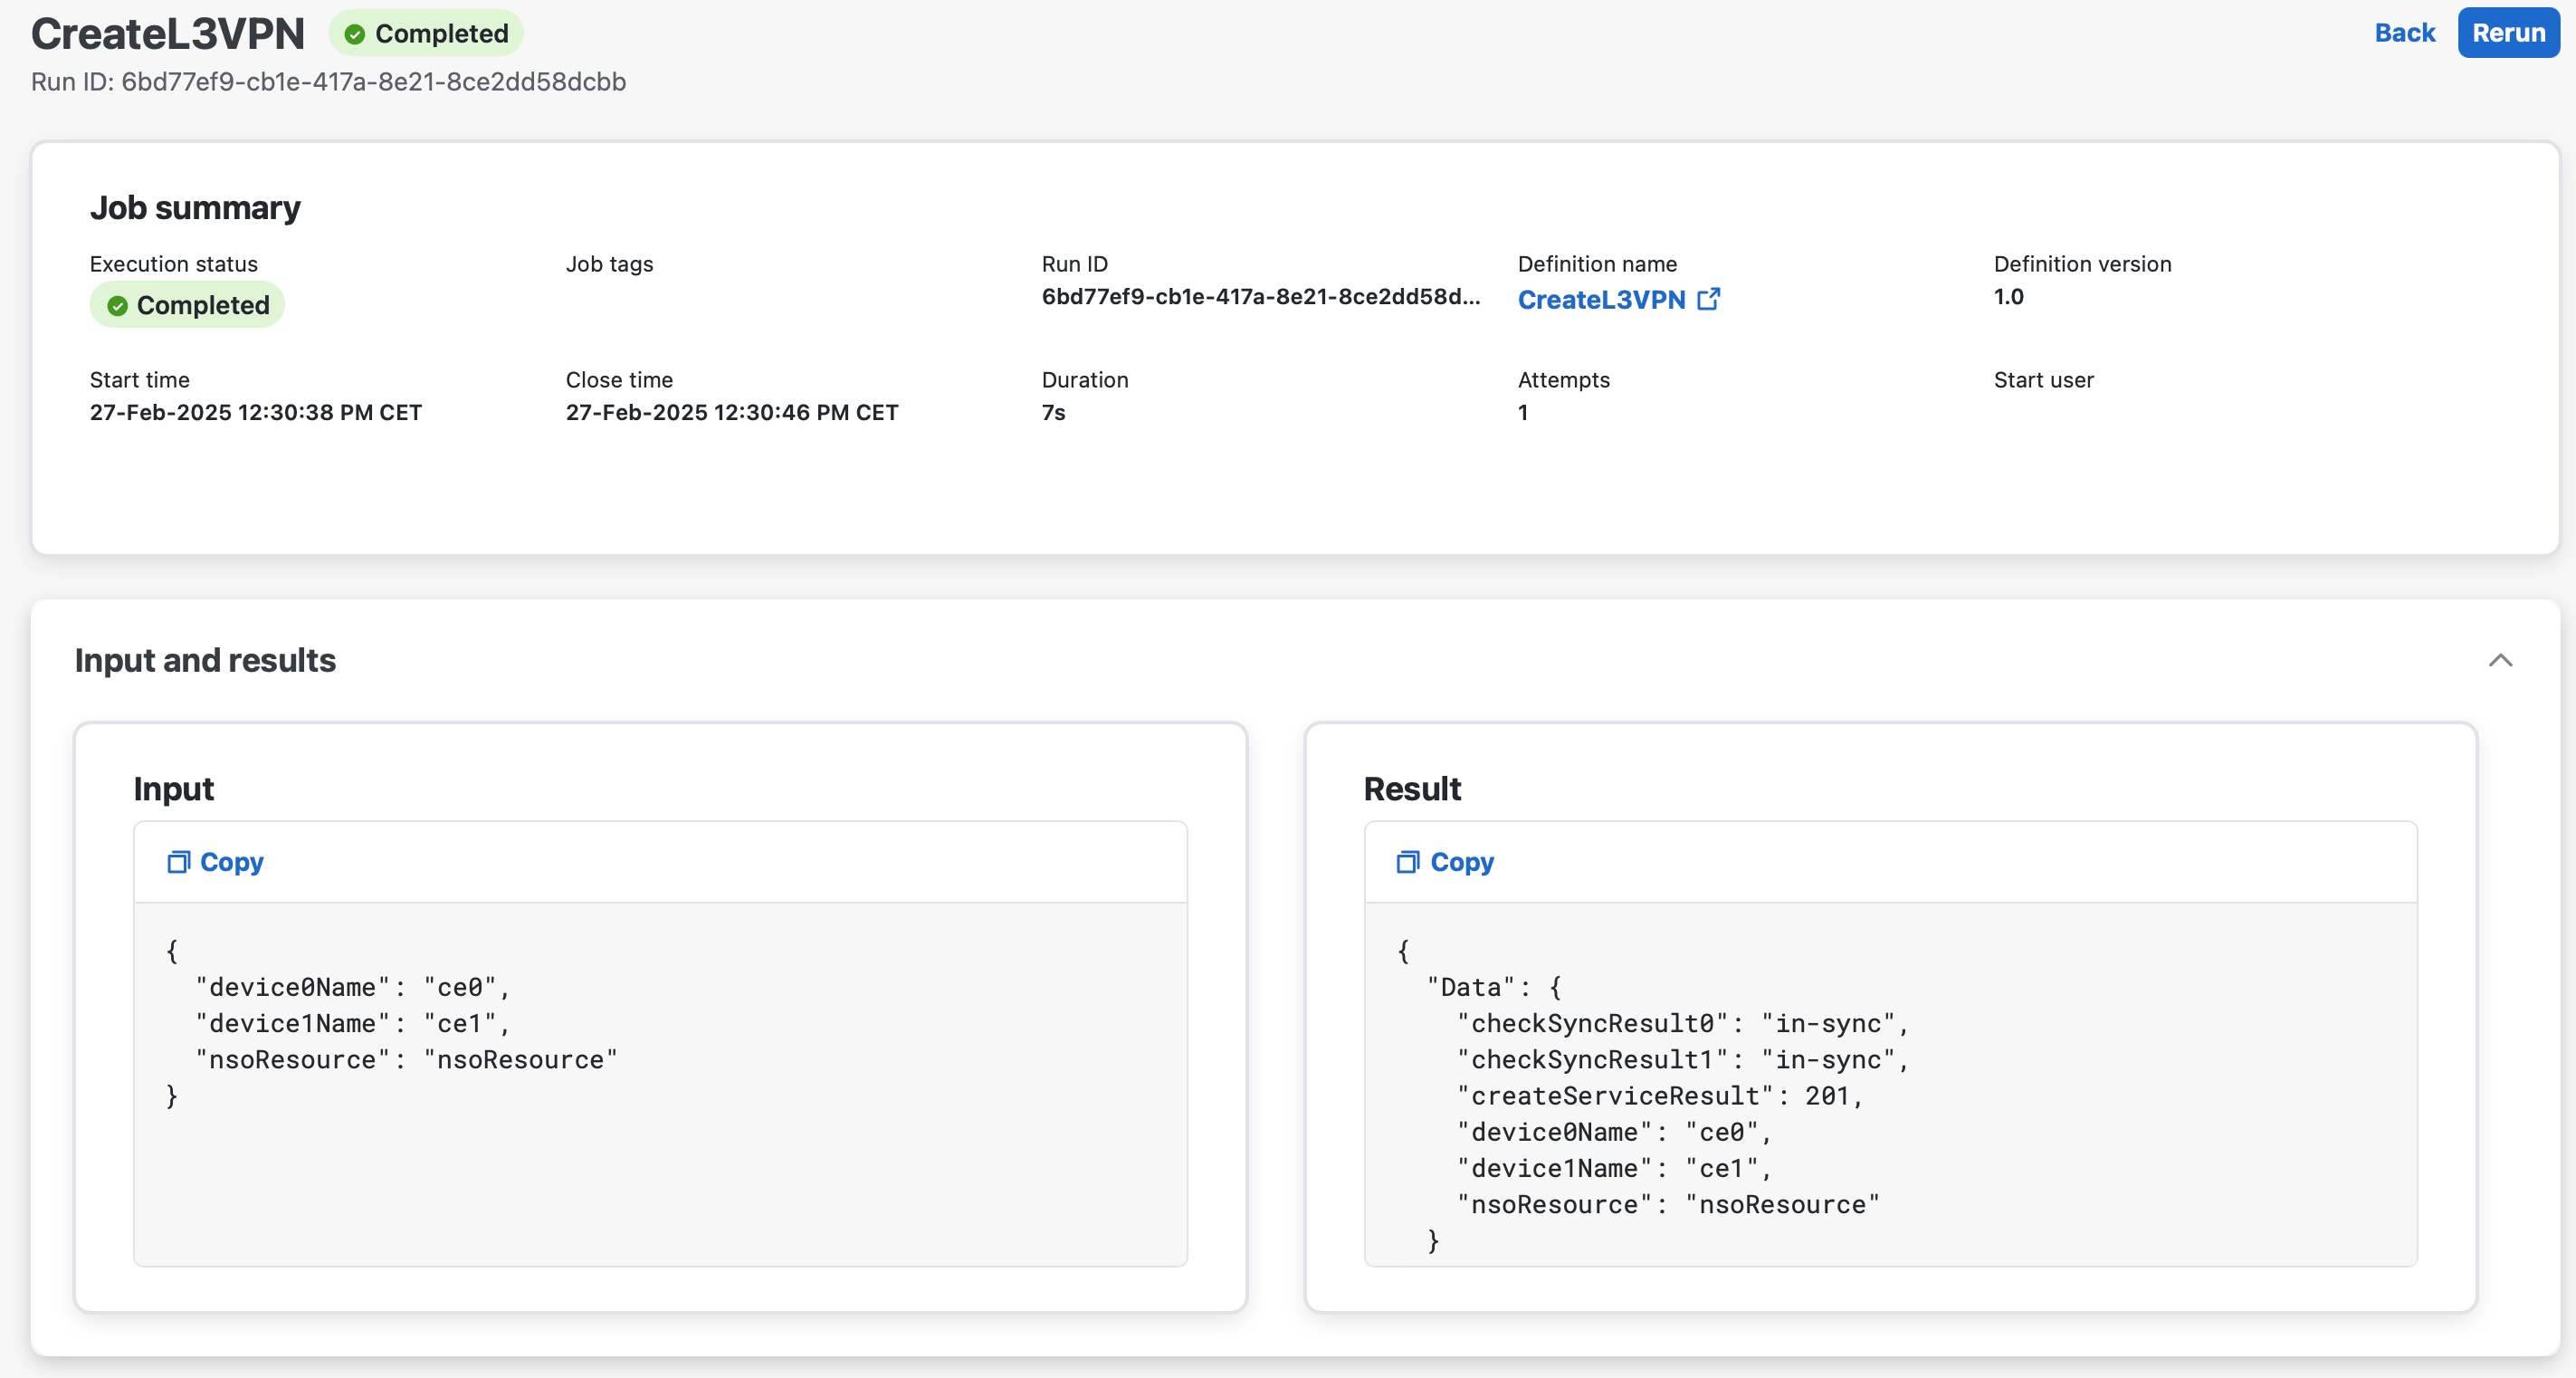
In the Jobs view, find your job and check the status of the workflow execution in the Status table column: |
If the workflow is executed correctly, a green checkmark with Completed status will be visible. If the workflow execution is still in progress or the engine is retrying an action, a blue label with the Running status will be displayed. |
|
Step 3 |
Click the job name to view its details. |
|
|
Step 4 |
Expand the Input and result section by clicking its name. |
|
|
Step 5 |
The Result card presents the final data output updated by the successful execution of the workflow actions for which |
 |
In NSO Service Manager
Procedure
| Command or Action | Purpose | |
|---|---|---|
|
Step 1 |
Log in to your NSO account. |
|
|
Step 2 |
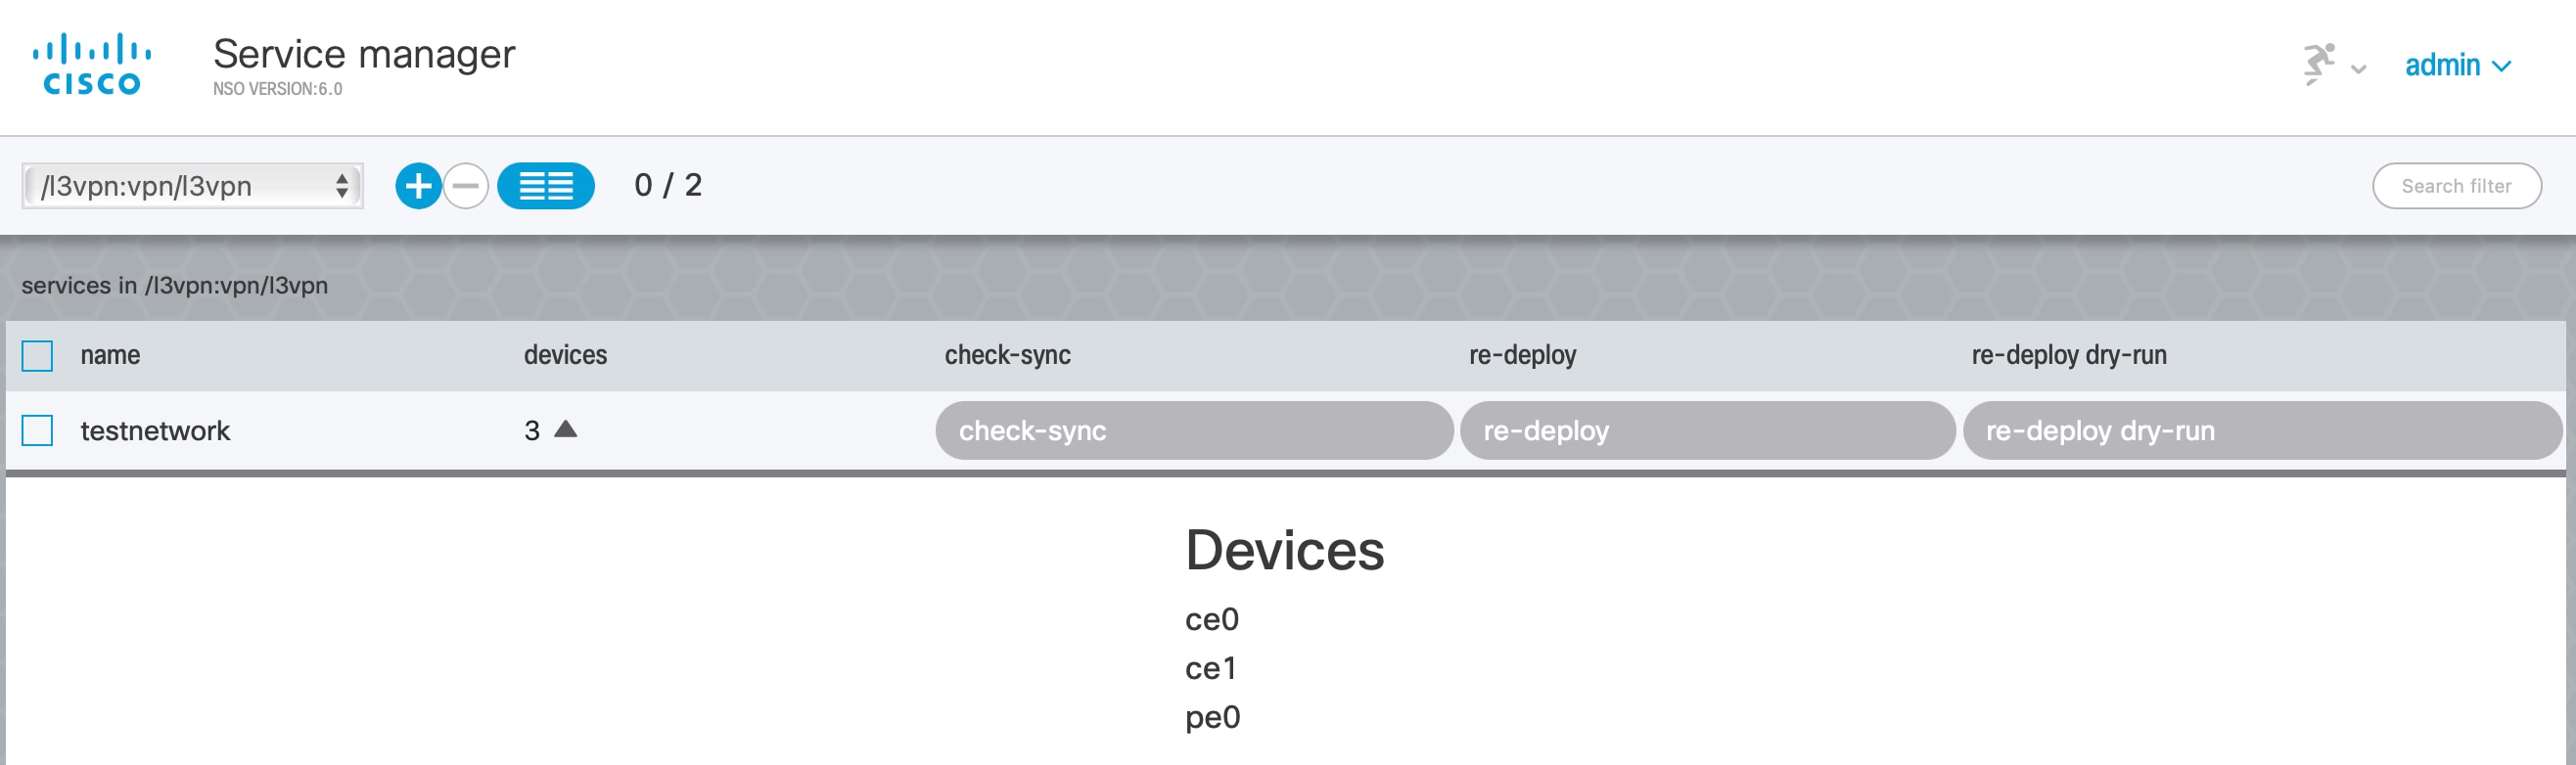
In the Application hub view, click the Service manager tile. |
|
|
Step 3 |
From the Select service points drop-down, select /l3vpn:vpn/l3vpn. |
|
|
Step 4 |
In the table, find |
 |

 Feedback