Visualize the Network

Cisco Crosswork Optimization Engine provides a real-time graphical, topological map view of devices, links, and SR policies between them. This section focuses on device and link visualization features, and customizing the topology map.

For information on SR policy management and visualization, see Visualize and Manage SR Policies and Get Started with Function Packs).

Network Topology Map

The network topology can be displayed on a logical map or a geographical map, where the devices and links are shown in their geographic context. From the map, you can drill down to get detailed information about devices and links.

To get to the topology map, choose Optimization Engine from the left navigation bar, and click SR Policies.

Figure 1. Network Topology Map - Devices and Links
Topology Map
Callout No. Description

1

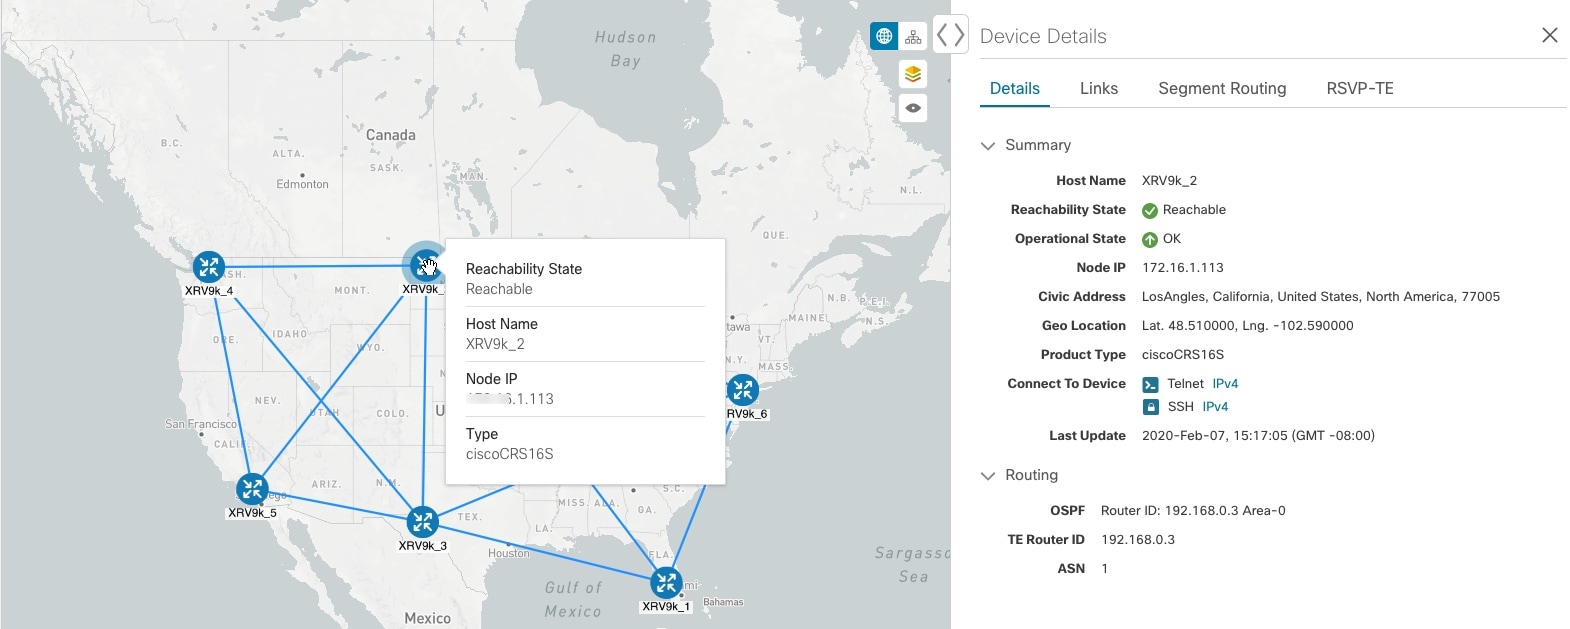
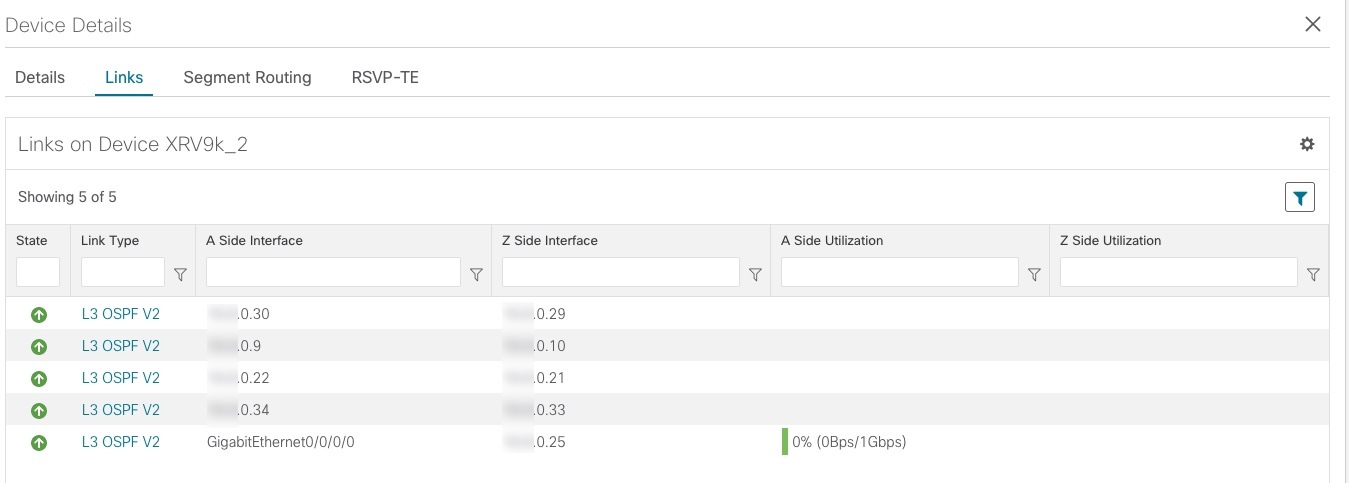
Single Device: A blue device icon means the device is reachable; a gray icon means the device is not reachable.

To view a device configuration summary, hover the mouse cursor over the device icon. A pop up window displaying the host name, state, node ID, and device type appears.

To view device details, click on the device icon. The Device Details window appears to the right. See Get More Information About Devices on the Map.

2

Device Cluster: If devices are in close physical proximity, the geographical map shows them as a cluster. The number in the blue circle indicates the number of devices in the cluster. Displaying devices in this manner helps prevent overlap and clutter on the map. In this example, there are two devices in the cluster. Click on the cluster to zoom in and see the individual devices.

3

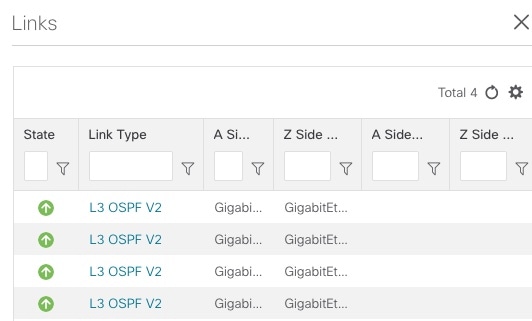
Links: A solid line indicates a single link between two devices. If there is more than one link between two devices, or between a device and a cluster of devices, the line is shown dashed instead. A dashed line indicates an aggregated link that represents more than one link.

4

Geographical Map: Click this icon to view the geographical map.

The geographical map shows single devices, device clusters, links, and SR policies, superimposed on a map of the world. Each device location on the map reflects the device's GPS coordinates (longitude and latitude) as defined in the device inventory.

5

Logical Map: Click this icon to toggle from the geographical map to the logical map. The logical map shows devices and their links, positioned according to an automatic layout algorithm, ignoring their geographical location. You can change the layout algorithm; see Change the Layout of a Logical Map.

The logical map displays up to 5000 devices and never displays devices in clusters.

If you drill down to the logical map from a geographical cluster at the maximum zoom level, the logical map shows devices that are located in the same location. See Identify the Members of a Cluster.

6

Expand/Collapse/Hide Side Panel: Expand or collapse the contents of the side panel. Close the side panel to get a larger view of the topology map.

7

Zoom In: Click this icon to zoom in on the selected area; for example, to view clustered devices on the geographical map.

8

Zoom Out: Click this icon to zoom out from a selection area.

9

Zoom Fit: Lets you automatically scale the map to fit your zoom area.

10

Auto Zoom: Zooms in on selected SR policies. This option is selected by default. If you uncheck this option, navigate away from the map, and later return to the map; it will revert to the default option.

11

Bandwidth Utilization: Lets you enable or disable visualization of the bandwidth utilization for the mapped links. See Show Bandwidth Utilization for Links on the Map. This option is selected by default. If you uncheck this option, navigate away from the map, and later return to the map; it will revert to the default option.

12

Custom Map View: Lets you create a named custom view using the settings and layout for your current map, or display a custom view you have created previously. See Create Custom Map Views.

Troubleshoot Network Topology Map

If you encounter topology issues, such as topology components not rendering as expected or component data not displaying on the map, Cisco recommends the following:

  • If you cannot see geographical map tiles: Make sure your browser has Internet connectivity to your selected geographical map services vendor. The map services vendor and the verndor's URL are set by the system administrator, as explained in Configure Geographical Map Settings.

  • If your devices are missing from the geographical map: Ensure that latitude and longitude data was included when onboarding your devices, or entered later. Cisco Crosswork Optimization Engine cannot position devices properly on the geographical map without location information.

  • Devices that do not have geographical coordinates default to 0° latitude and 0° longitude.

  • If your devices are appearing in the wrong location on the geographical map, confirm that you have entered the latitude and longitude values in the correct order via the UI or in the CSV file you uploaded.

  • If you are having intermittent problems displaying the map or your devices: Clear your browser cache and try again.

Device and Link Icons

The following tables describe the icons used to represent device states, link states, and device types in the Cisco Crosswork Optimization Engine user interface.

Table 1. Device State Icons
Icon Description

Reachable icon

The device is reachable.

Unreachable icon

The device is unreachable.

Reachability Unknown icon

The device has an unknown reachability state (its reachability cannot be determined).

Up icon

The device is operational.

Error icon

The device is not operational. It is either not up, or unreachable, or both.

A number in a circle is shown next to this icon. The number indicates the number of recent errors and can be clicked on to display error details.

Degraded icon

Some connections to the device are down.

Table 2. Link State Icons
Icon Description
Down icon

Link is down.

Up icon

Link is up and traffic is passing through it.

Degraded icon

Link is degraded.

If some (but not all links) in an aggregated link are down, the aggregated link shows a degraded icon. The link will also show as degraded if only one direction of an L2 or L3 link was discovered instead of both directions. Click the degraded icon to see exactly which link or interface is down.

If all links in an aggregated link are down, the connectivity link shows a link down icon.

Table 3. Device Icons
Icon Description

Router

Router (unreachable)

Device is reachable, but is undefined or of an unknown type

Unreachable device

Configure Geographical Map Settings

The geographical map lets you position your network devices on a world map and monitor them within their geographical context. The displayed world map is imported by accessing the map vendor's site over the Internet (online mode). The look of the map will vary depending on the map vendor you choose.

By default, the client machine from where you access Optimization Engine UI is setup to get map tiles from a specific Mapbox URL over internet connection. If required, you can use a different map vendor (such as Google Maps or OpenStreetMap) by providing the appropriate URL. Both of these options require an Internet connection from your client machine.

Cisco Crosswork Optimization Engine administrator privileges are required to change these settings.

Procedure


Step 1

From the main menu, choose Admin > Visualization Settings.

Step 2

Click the Map tab.

Step 3

From the Map Provider drop-down list, choose one of the following:

  • Mapbox—Specifies that you want to display the geographical map using the default map provider.
  • Custom—Identifies the map tiles source (using an Internet connection). To use a map provider other than Mapbox, you must provide the URL for map tiles access. Be sure to request the exact format of this URL from the map tiles provider.
Step 4

If you are using a custom map provider, in the Map Source URL field, enter the URL for map access.

Step 5

Click Save.

Step 6

Return to the SR Policies page and confirm that the map is displayed correctly.


Change the Layout of a Logical Map

When you open the logical map, it is displayed according to the default standard layout. You can change the layout, but any changes you make will not persist if you close the map. To save your layout changes, create a custom view (see Create Custom Map Views).

Procedure


Step 1

From the main menu, choose Optimization Engine > SR Policies.

Step 2

In the top-right corner of the map, toggle from the geographical map view to the logical map view.

Step 3

In the logical map, click the System Layouts icon in the toolbar to access the layout options.

Figure 2. System Layouts
Systems Layout
Step 4

Choose one of the predefined options to rearrange the devices and links in the map according to your preference:

  • Standard (default)—Maintains consistent link length and distributes devices evenly. This ensures that adjacent devices are closer to each other and prevents overlap.

  • Lens—Positions highly connected devices in the center, and moves less-connected devices out to the edges. This layout is especially useful in large networks.

  • Radial—Arranges the devices in a circular style around the original subject. Each generation of devices becomes a new concentric ring that orbits the original parent. This layout is useful in networks where each parent has many child devices.

  • Hierarchy—Displays devices in a family tree, where child devices are shown in horizontal layers underneath their parents.

  • Structural—Groups devices with similar attributes together in a fan shape. This layout gives you an overview of the clusters in the network.

  • Tweak—Adjusts the layout as the network evolves. As devices and links are added and removed, the layout adapts itself, allowing you to visualize network changes.


Create Custom Map Views

When you rearrange the devices and links on a map, your changes are not normally saved. When you open the map later, your map settings are lost.

To easily recreate a useful map layout, you can save it as a named custom view and quickly retrieve it, without having to rearrange the map each time. This is especially useful when managing large networks with many devices.

When you save a custom view, the following settings will be saved:

  • Whether it is a geographical or logical map.

  • Device positions in the logical map layout.

  • Whether bandwidth utilization visualization is enabled or disabled.

  • Tag filters that have been applied to the map.

The map zoom level will not be saved.

Your custom map views are not user-specific. It is shared and can be modified by all users using the same Cisco Crosswork Optimization Engine server.

To create custom views:

Procedure


Step 1

Choose Optimization Engine > SR Policies from the left navigation bar.

Step 2

Customize the current map view until it contains only the information you want and until the layout meets your needs.

Step 3

When you have the view the way you want it, click Custom View icon. The Custom Views pane opens.

Step 4

From the pane's toolbar, click Add icon. The pane displays a new, blank input field under the Name field.

Step 5

Enter a unique name for the new custom view. When you press Enter, the new custom view appears in the list of custom views under the Name field.

Step 6

When you are finished, click Close icon in the Custom Views pane to close it.


What to do next

Retrieve, update and delete your custom views as explained in Manage Custom Map Views.

Manage Custom Map Views

You can display, update or delete any of the custom views created using the instructions in Create Custom Map Views. This includes custom views created by other Cisco Crosswork Network Automation users.

To manage custom views:

Procedure


Step 1

Open the topology map by choosing Optimization Engine > SR Policies from the left navigation bar.

Step 2

Click Custom View icon. The Custom Views pane displays a list of existing custom views under the Name field.

Step 3

To display a custom view, find the view you want in the list and then click the selection button next to the view's name in the list. Cisco Crosswork Optimization Engine displays the custom view.

Step 4

To find a custom view in the list:

  1. Click in the Name field above the list.

  2. Enter text matching the name of the view you want. The Name field includes a type-ahead feature: As you type, it will restrict the list of views to those with names that contain all or part of the text you enter. A filter icon indicates that the list is now filtered.

  3. To use Boolean operators instead of the default "Contains" text match: Click the dropdown menu icon at the right of the Name field label and then select the operator you want (for example: "Not Contains" or "Equals").

  4. To sort the list in ascending or descending alphanumerical order, click the arrow icon next to the Name field label.

  5. To clear the filter, delete your search text.

Step 5

To update a custom view:

  1. Click Custom View icon to display the list of custom views.

  2. Find the view you want in the list and then click the selection button next to the view's name in the list.

  3. Customize the view as needed.

  4. With the list of custom views still displayed, click Save icon. Your changes overwrite the previous state of the custom view.

Step 6

To delete a custom view:

  1. Click Custom View icon to display the list of custom views.

  2. Find the view you want in the list and then click the selection button next to the view's name in the list.

  3. Click Delete icon.

  4. Click the Delete button to confirm that you want to delete the custom view.


Visualize Devices

Cisco Crosswork Optimization Engine displays discovered devices in your network and gives you the ability to access the device via SSH or Telnet. To view link state icons, see Device and Link Icons. This section contains the following topics:

Get More Information About Devices on the Map

In the topology map, hover over a device icon to open a popup window with the most important device details: hostname, reachability state, IP address, and type. Click on the device icon to open the Device Details pop-up window, where you can view more detailed information about the device and its associated links. The following example shows both details windows.

Click on the device icon to open the Device Details pop-up window where you can view more detailed information about the device and its associated links, as in the following example:

Figure 3. Device Details Popups
Device Details Popups

In the Device Details window, click on the Links tab to see a list of all of the device's links to other devices, as in the following example (see Get More Information About Links):

Figure 4. Links Tab of Device Details Window

Access the Device Console

After drilling down to a device's details from the topology map, you can access the device's CLI command console from the Device Details window (see Get More Information About Devices on the Map).

Before you begin

  • Depending on your environment, your local machine may not have direct access to your network devices (for example: you cannot ping the device's management address directly from the command line on your local machine). If this is the case, you may need to configure a tunnel. Contact Cisco Services for assistance with this more advanced configuration.

  • Be sure you have installed on your client an application that can connect to devices via Secure Shell (SSH) or Telnet.

Procedure


Step 1

From the main menu, choose Optimization Engine > SR Policies.

Step 2

In the topology map, click on the icon representing the device to which you want to connect. The Device Details window displays its Details tab, with the device hostname, reachability state, IP address, and other details.

Step 3

In the Connect to Device field, click the relevant link to connect to the device console via Telnet Script icon, or via SSH Connect to Device via SSH icon.

If you have already defined a default connectivity application that you want to launch, Cisco Crosswork Optimization Engine launches your selected application and attempts to connect to the device. Log into the device and enter the commands you want.

If you have not defined a default application to launch, your browser will prompt you to select one. Your choices and how they are presented will be appropriate for your client operating system, the applications you have installed, and the connectivity protocol you choose. Select the application you want and, for convenience, make sure that you select the check box indicating that this is your default choice before continuing.


Identify the Members of a Cluster

When there are multiple devices that are too close to be shown individually at the current Zoom level, they are combined together and shown as a single cluster. The cluster is represented on the geographical map by a circle with a number in its center, indicating the number of devices in the cluster.

Zoom in on a cluster to see the individual devices in the cluster displayed on the map.

If cluster members are very close to each other or in the same location, zooming in will not show the individual devices. In this case, follow these steps to see the individual members of the cluster:

Procedure


Step 1

In the geographical map, click device cluster. The map zooms in on the cluster area.

Step 2

Click device cluster again. If you are at the maximum zoom level, the geographical map toggles to the logical map and displays the individual devices in the cluster. When you close the view, you will be switched back to the geographical map.


Visualize Links

Cisco Crosswork Optimization Engine displays the links between devices and gives you the ability to configure and view bandwidth utilization on these links. To view link state icons, see Device and Link Icons. This section contains the following topics:

Get More Information About Links

You can drill down in the topology map to view detailed information about links, using either of these methods:

  • Click on an aggregated link (symbolized by a dashed line) to show the individual links in the side panel.

  • Click on a single link (solid line) to show the Link Details page.

The Links page provides information about the configuration and status of all of a device's links, including each link's type, interfaces, and utilization (you can get the same information from the Links tab on the Device Details window; see Get More Information About Devices on the Map). The Links window lists all the underlying links in the aggregation, as in the following example:

Figure 5. Links Window
Links window

Use the expand and collapse icons (< and >) to the left of the Links title to expand the window to the entire screen, or collapse the window back to its normal size.

Click Table Settings icon to choose the columns to make visible in the Links window's table:

  • State—Displays each link's state: up, down, degraded, and so on (see Device and Link Icons).

  • Link Type—Displays the type of link. Click on the link type to open the Link Details window for the specific link.

  • A Side Device—Displays the originating device for the link.

  • Z Side Device—Displays the destination device for the link.

  • A Side Interface—Displays the originating interface for the link.

  • Z Side Interface—Displays the destination interface for the link.

  • A Side Utilization—Displays the percentage of bandwidth consumption on the originating side of the link.

  • Z Side Utilization—Displays the percentage of bandwidth consumption on the destination side of the link.

You can also use sorts and filters in the Links window to focus the table on only the links in which you are interested (see Set, Sort and Filter Table Data).

The Link Details window provides information about the configuration and status of a single link, including link type, the link's interfaces, associated adjacent segment IDs, and so on.

Figure 6. Link Details Window

Show Bandwidth Utilization for Links on the Map

In the geographical map and in the logical map, you can enable visualization of the bandwidth utilization for links over which circuits are provisioned. When bandwidth utilization visualization is enabled, links in the map are colored based on the percentage of total bandwidth currently utilized on the link. The utilization value is a percentage calculated by dividing link traffic by link capacity.

In this way, you can easily identify when a link is over-utilized or approaching over-utilization. Bandwidth visualization is enabled by default. The color of the link indicates the percentage of total bandwidth being used by provisioned circuits on the link:

  • Green—0–25% usage

  • Yellow—25–50% usage

  • Orange—50–75% usage

  • Red—75–100% usage

You can adjust the thresholds for each color as needed (see Define Color Thresholds for Link Bandwidth Utilization). When visualization is disabled, the links are shown only in blue.

Please note that link bandwidth utilization data can be collected and displayed only if the linked devices are added to and managed in the device inventory.

To enable or disable visualization of bandwidth utilization:

Procedure


Step 1

From the main menu, choose Optimization Engine > SR Policies.

Step 2

In the top-right corner of the map, click Bandwidth Utilization icon
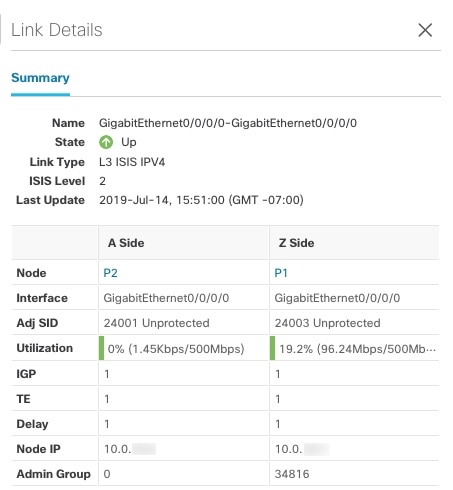
, which toggles the display of bandwidth utilization. When usage visualization is enabled, the links are shown in green, yellow, orange, or red, depending on their utilization. If you see only blue links, usage visualization is disabled. This option is selected by default. If you uncheck this option, navigate away from the map, and later return to the map; it will revert to the default option.


Define Color Thresholds for Link Bandwidth Utilization

Cisco Crosswork Optimization Engine comes with a default set of BW Utilization color indicators and % range assignments. You can customize these to meet your needs with the following notes and limitations:

  • You can enter values in the "To" ranges. Each row begins automatically from the end of the previous row's range.

  • The thresholds must be sequential, meaning that each row's range must follow on from the previous row's range. For example, if the range in the first row is 0-25%, the second row's range must end with a value greater than 25.

  • You cannot use the same color for multiple thresholds. For example, you cannot choose Green for both the first and second rows.

Cisco Crosswork Optimization Engine administrator privileges are required to change these settings.

Procedure


Step 1

From the main menu, choose Admin > Visualization Settings.

Step 2

Click the Bandwidth Utilization tab.

Step 3

In the Polling Frequency field, enter a whole number from 5 to 60. By default, Cisco Crosswork Optimization Engine polls link bandwidth every 5 minutes.

Step 4

In the Link Coloring Thresholds area, define the criteria for coloring the links. Each row defines a color and the bandwidth percentage range that the color will represent. The default thresholds are:

  • Green—0–25% usage

  • Yellow—25–50% usage

  • Orange—50–75% usage

  • Red—75–100% usage

Step 5

Click Save.