Cisco Crosswork Optimization Engine 1.0 User Guide
Bias-Free Language
The documentation set for this product strives to use bias-free language. For the purposes of this documentation set, bias-free is defined as language that does not imply discrimination based on age, disability, gender, racial identity, ethnic identity, sexual orientation, socioeconomic status, and intersectionality. Exceptions may be present in the documentation due to language that is hardcoded in the user interfaces of the product software, language used based on RFP documentation, or language that is used by a referenced third-party product. Learn more about how Cisco is using Inclusive Language.
This section mainly describes what Cisco Crosswork Optimization Engine does and how to navigate the main user interface. To quickly get started, you should understand some basic concepts and look
over the high-level workflows described in Get Started.
The following topics are addressed in this section:
Audience
This guide is for experienced network administrators who want to use Cisco Crosswork Optimization Engine in their network. This guide assumes that you are familiar with the following topics:
Networking technologies and protocols (BGP-LS, IGP (OSPF and IS-IS), PCEP, model-driven telemetry, and so on)
Cisco IOS XR Traffic Controller (XTC) or Segment Routing Path Computation Element (SR-PCE) functionality
Segment routing (SR) and SR policy provisioning
Overview of Cisco Crosswork Optimization Engine
Cisco Crosswork Optimization Engine is part of the Cisco Crosswork Network Automation suite of products. Cisco Crosswork Optimization Engine provides real-time network optimization allowing operators to effectively maximize network utilization as well as increase
service velocity.
Crosswork Optimization Engine provides the following:
A topology map that gives valuable real-time visualization of devices, links, link utilization, and Segment Routing (SR) policies
in the network.
A UI that allows for easy manageability of SR policies. Crosswork Optimization Engine enables the network operator to perform the following tasks:
Provision SR policies and modify or remove them using an intuitive workflow
Continuously track SR policy dynamic path computations to maintain SLA objectives
Preview an SR policy before deploying it to the network
Crosswork Optimization Engine function packs (with correct licensing) that provide closed-loop optimization to define the optimization intent, implement
the intent, and continuously monitor, track, and react to maintain the original intent.
A framework that enables other function packs that can be developed in the field to support additional use cases that are
not available out of the box. By leveraging SDKs and APIs, network operators can build additional function packs to support
more optimization workflows.
Note
To get a quick overview on how to start using Crosswork Optimization Engine, see High-Level Workflows.
Segment Routing Path Computation Element (SR-PCE)
Crosswork Optimization Engine uses the combination of telemetry and Cisco Segment Routing Path Computation Element (SR-PCE) to analyze and compute optimal SR policy paths.
Cisco SR-PCE (formerly Cisco XR Traffic Controller (XTC)) runs on the Cisco IOS XR operating system. SR-PCE provides stateful PCE functionality that helps control and move SR policies to optimize the network. PCE describes a set
of procedures by which a Path Computation Client (PCC) can report and delegate control of head-end tunnels sourced from the
PCC to a PCE peer. The PCC and PCE establish a Path Computation Element Communication Protocol (PCEP) connection that SR-PCE uses to push updates to the network.
Crosswork Optimization Engine discovers all devices that are part of the IGP domain including those that do not establish PCEP peering with SR-PCE. However,
PCEP peering is required to deploy SR policies to the device.
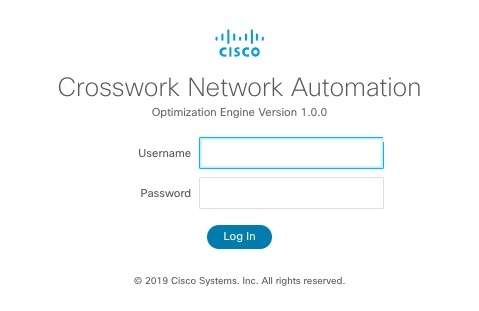
Log In and Log Out
The Cisco Crosswork Optimization Engine user interface is browser based. See the Cisco Crosswork Optimization Engine Installation Guide for supported browser versions.
Procedure
Step 1
Open a web browser and enter:
https://<CrossworkVMManagementIPAddress>:30603/
Step 2
The Cisco Crosswork Optimization Engine browser-based user interface displays the login window. Enter your username and password.
Figure 1. Cisco Crosswork Optimization Engine Log In Window
Note
The default Cisco Crosswork Optimization Engine administrator user name and password is admin. This account is created automatically at installation (see Administrative Users Created During Installation). The initial password for this account must be changed during installation verification. Cisco strongly recommends that
you keep the default administrator credential secure, and never use it for routine logins. Instead, create new user accounts
with appropriate privileges and their own credentials (as explained in Add Users) and use only those accounts for all subsequent user logins.
Step 3
Click Log In.
When you access Cisco Crosswork Optimization Engine from your browser for the first time, some browsers display a warning that the site is untrusted. When this happens, follow
the prompts to add a security exception and download the self-signed certificate from the server. After you do this, the browser
accepts the Cisco Crosswork Optimization Engine server as a trusted site in all subsequent logins.
Step 4
To log out, click in the top right of the Cisco Crosswork Optimization Engine main window and choose Log out.
Crosswork Optimization Engine Home Page
Figure 2. Crosswork Optimization Engine Home Page
Callout No.
Description
1
More: Toggles the main menu to compact mode or expanded mode.
In compact mode, you must hover over the main menu items to view and select available options.
In expanded mode, you must click on the main menu item to display the available options. In this mode, when a main menu item
is expanded, it will remain so until you collapse the menu item.
2
Network Topology Map: Displays a geographical or logical map view of the devices, links, and SR policies in your network. It also shows the general
condition of devices and links. See Visualize the Network.
In conjunction with the SR Policies Table, it quickly highlights selected SR policies and associated SR policy information such as metrics, adjacency segment IDs,
segment hops, source and destination nodes. See Visualize and Manage SR Policies.
3
Expand/Collapse/Hide Side Panel: Expand or collapse the contents of the side panel. Close the side panel to get a larger view of the topology map.
4
The SR Policies Table (Optimization Engine > SR Policies) is shown by default. The content of this panel changes depending on what is selected on the topology map, or whether you
are in the process of viewing and managing SR policies. You can do the following:
The Alerts icon notifies you of any current error conditions related to the system operations which require attention, and provides
a link to detailed information about those conditions.
The Events icon notifies you of new events related to system operation, and also provides access to the history of all system events.
The About icon displays the current version of Crosswork Optimization Engine.
The User Account icon lets you view your username, change your password, and log out.
6
Optimization Engine Menu: You can access the following SR policy related options:
SR Policies—Returns you to the main window as shown above.
Certificate Management—Lets you view and manage certificates. See Manage Certificates.
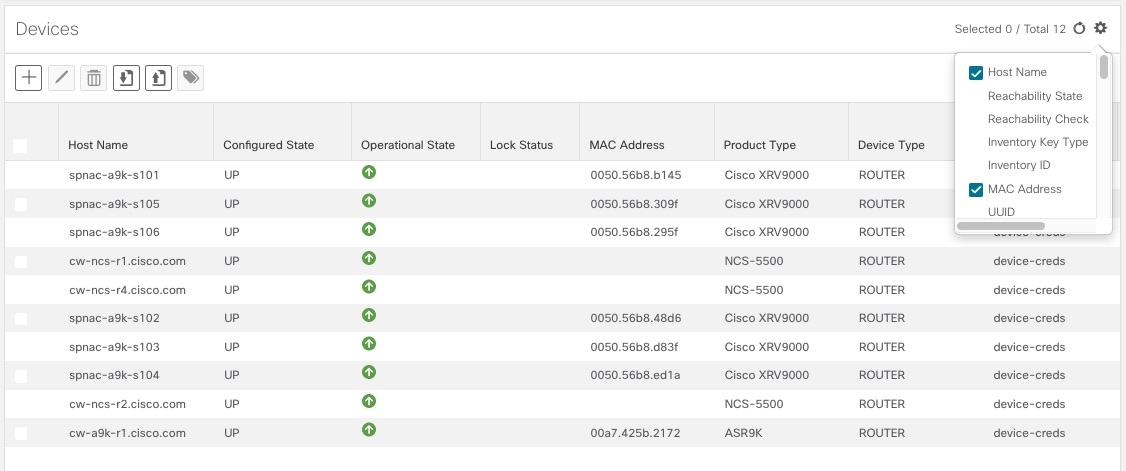
Set, Sort and Filter Table Data
Many Cisco Crosswork Optimization Engine windows show database records in tables.
Any window with a table will also provide column selection, sorting, and filter functions that let you control the database
records shown in the tables and help you locate particular records quickly.
Click to display a list of all the fields in the database for the kind of data record displayed in the table. You can choose which
fields you want to display as table columns by checking or unchecking the box next to any field in the list. Your choices
are enabled immediately and are permanent.
For example: In the Devices window shown below, we have unchecked the Reachability State and Inventory Key Type fields. These are normally shown as part of the default Devices table, but are now removed. We have also checked the MAC Address field, adding it to the table.
Figure 3. Devices Window With MAC Address Column Added
You can also sort all the records displayed in the table according to the data in any one column by clicking that column's
title:
To sort the records in ascending order, click the column title once.
To sort the records in descending order, click the column title again.
Sorting takes place immediately. You can only have one active sort at a time. The example Links window, below, shows an active sort on the Link Type field.
You can also filter the table to show only the records you want, using a quick filter or an advanced filter. Many tables have
all these features enabled by default. If you cannot see the quick and advanced filter features displayed on a window with
a table, click .
The quick filter displays only the records that match the value you enter above the column in the quick filter field (see item 2, below). Filtering takes place immediately, as you type.
The advanced filter narrows the content in the table by applying a filter that includes both a value and a logical operator,
such as Equals, Starts with, Contains, and so on. Click in the column header to access the advanced filter (see items 4 and 5, below).
In addition to these quick and advanced filters, you can also use tags to filter the devices shown in the Devices window (see Filter Devices by Tags).
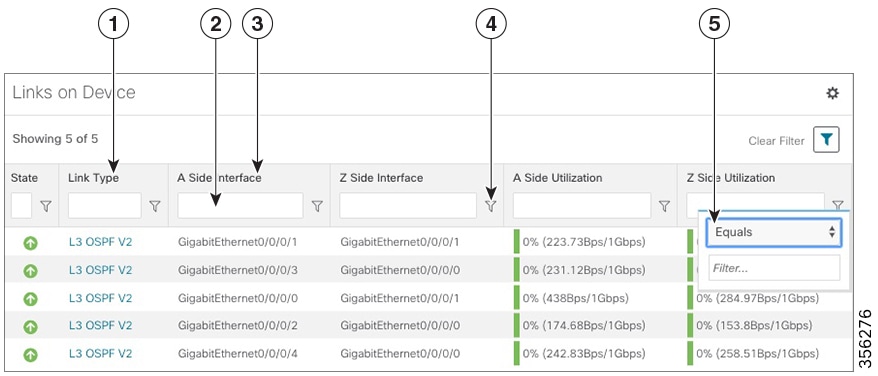
Figure 4. Links Window With Active Sort and Filters
Item
Description
1
Sort active icon: This arrow icon indicates that the user has sorted the links by clicking on the column header. The arrow's direction shows
that the table is sorted by Link Type, in ascending order.
2
Quick filter field: Type a text or numeric value in this field to show only the links that match the value you enter. The field shows the values
you entered for both quick and advanced filters.
3
Filter active icon: This icon shows that a quick or advanced filter is currently applied to the data in this column.
4
Advanced filter icon: Click , shown in each column header, to specify an advanced filter on that column, using logical operators as well as alphanumerical
values.
5
Filter criteria fields: These fields appear in a popup next to the column after you click the icon. Set the filter criteria by selecting the logical operator from the drop down list in the first field, and then entering
the filter value in the second field. Your criteria will be applied immediately. You will then be prompted to enter more operators
and values, and to decide if you want to concatenate them using logical AND or OR. The quick filter field shows the values
you entered (but not the operators). Logical operators include Equals, Not equal, Starts with, Ends with, Contains, and Not
contains.
Note
Some columns will not have all of the logical operators available.

 in the top right of the
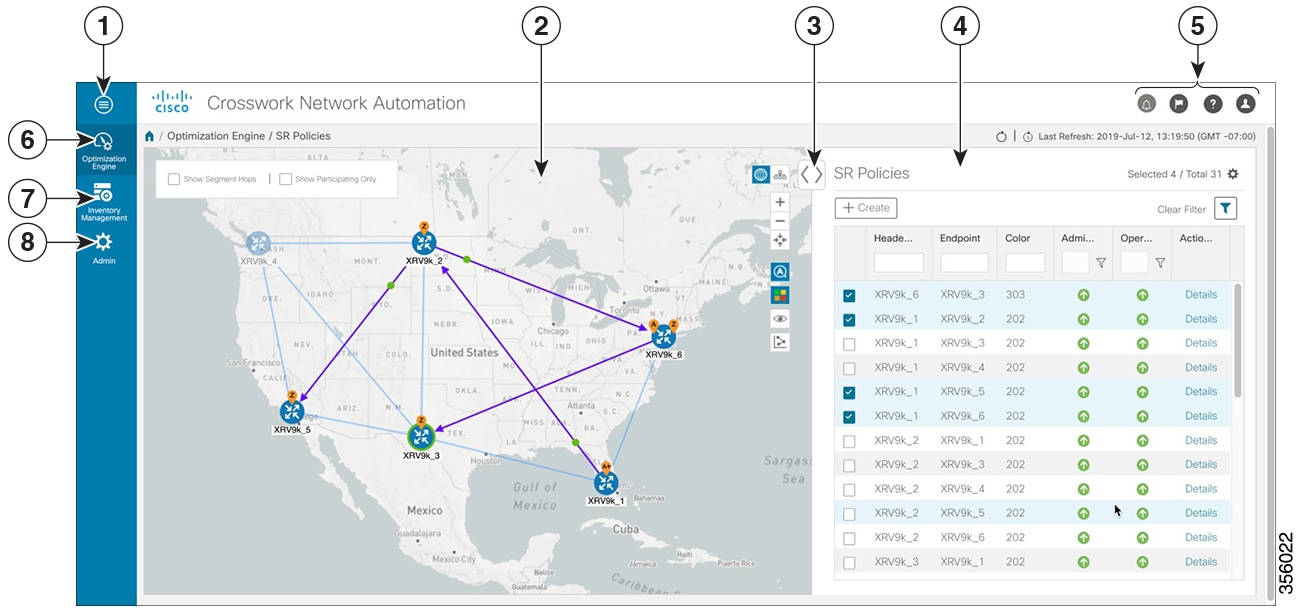
 The Alerts icon notifies you of any current error conditions related to the system operations which require attention, and provides
a link to detailed information about those conditions.
The Alerts icon notifies you of any current error conditions related to the system operations which require attention, and provides
a link to detailed information about those conditions.
 The Events icon notifies you of new events related to system operation, and also provides access to the history of all system events.
 The About icon displays the current version of
  to display a list of all the fields in the database for the kind of data record displayed in the table. You can choose which
fields you want to display as table columns by checking or unchecking the box next to any field in the list. Your choices
are enabled immediately and are permanent.
to display a list of all the fields in the database for the kind of data record displayed in the table. You can choose which
fields you want to display as table columns by checking or unchecking the box next to any field in the list. Your choices
are enabled immediately and are permanent.
 .
.
 in the column header to access the advanced filter (see items 4 and 5, below).
 Feedback