Crosswork Data Gateway supports SNMP-based data collection based on the OIDs supported on the devices.
The SNMP collector makes a poll request to Crosswork to get its configuration profile (a list of MIB objects to collect and
a list of devices to fetch from). It determines the corresponding OIDs by looking up the pre-packaged list of MIB modules
or the custom list of MIB modules.

Note |
MIBs are required only if the collection request references MIB TABLE names or SCALAR names. However, if the requests are
OID-based, then MIBs are not required.
|
Once the OIDs are resolved, they are provided as input to the SNMP collectors.
The device packages can be imported into the Crosswork Data Gateway VM as described in Section Add a Custom Software Package.
The following SNMP versions are supported:
The table below lists supported privacy protocols and the value that needs to be given in the collection payload for SNMP
and SNMP Trap collection jobs:
|
Protocol
|
SNMP Collection Payload
|
SNMP Trap Collection Payload
|
|
aes
|
AES
|
N/A
|
|
des56
|
DES
|
DES
|
|
3des
|
3DES
|
3DES
|
|
aes 128
|
AES128
|
AES128
|
|
aes 192
|
AES192 or CiscoAES192(Cisco specific)
|
AES192 or CiscoAES192(Cisco specific)
|
|
aes 256
|
AES256 or CiscoAES256(Cisco specific)
|
AES256 or CiscoAES256(Cisco specific)
|
Note |
-
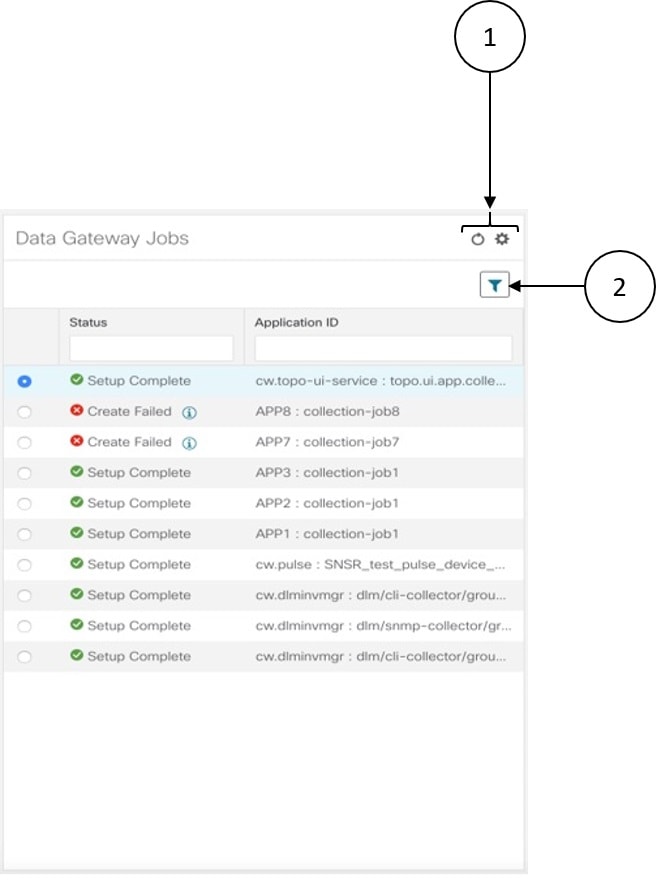
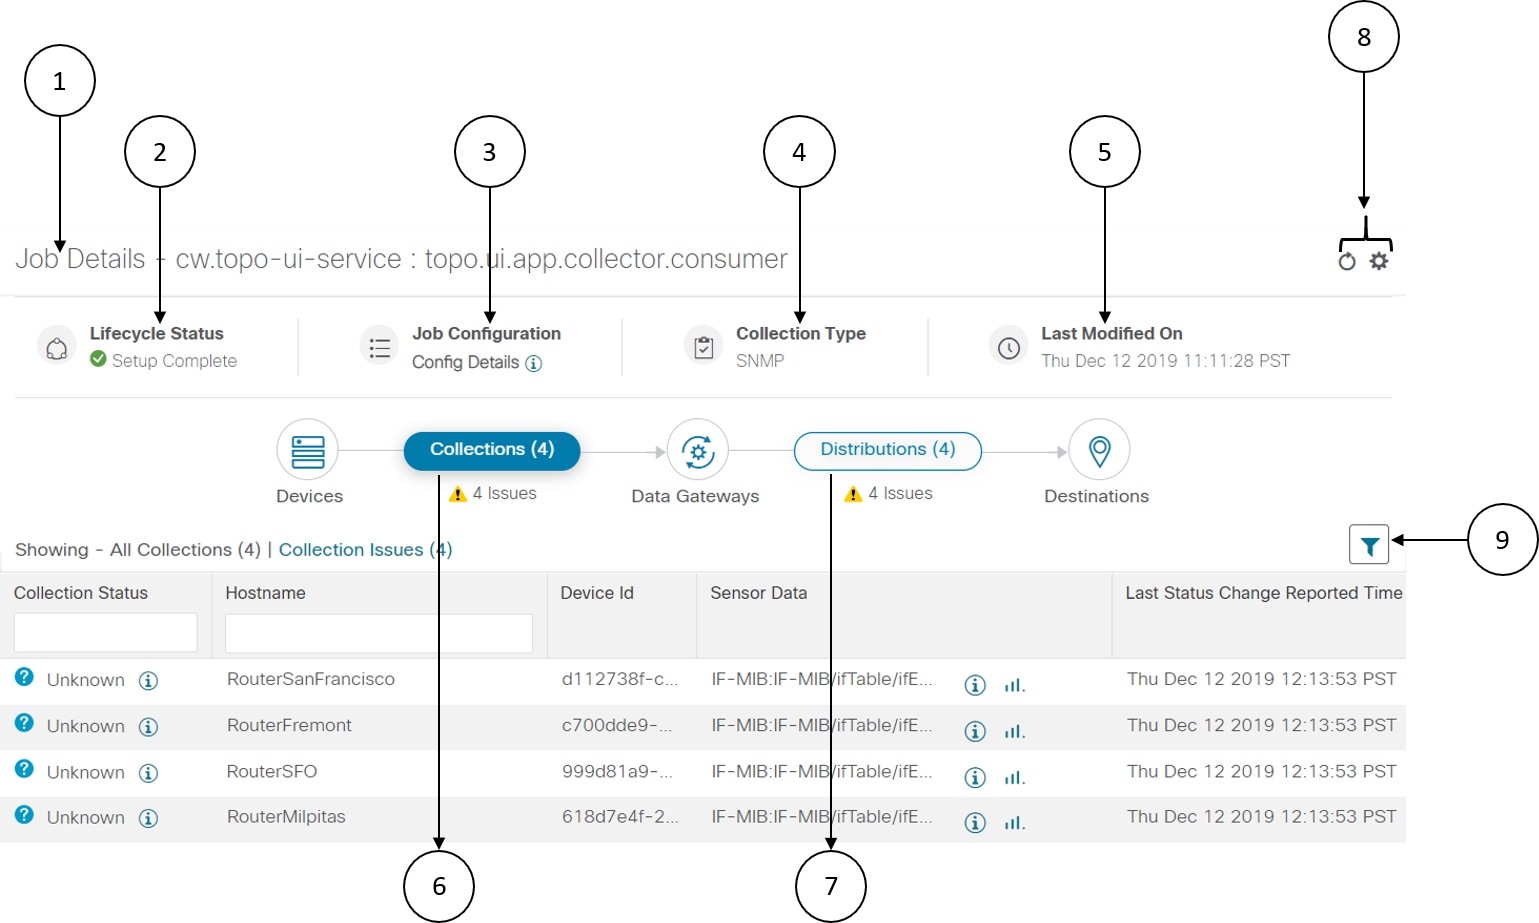
The initial status for all the collection jobs in the UI is Unknown. Upon receiving a
SNMP collection job, Cisco Crosswork Data Gateway performs basic validations on it. If
the collection job is valid, its status changes to Successful, else it changes to
Failed.
-
The value of Cadence is in seconds. It should be set either to 0 to indicate the sensor configured to be collected only once.
OR
It should be >= 60 (i.e. at least 1 minute) up to 2764800 seconds ( i.e. at most 32 days) max, indicating how frequently configured
sensor data should be collected.
-
When collection from a device is skipped due to previous execution still in progress, Crosswork Data Gateway raises a warning
log. No alert is generated for this scenario.
-
For SNMP v1/v2c, if the device details (such as host or community string) are incorrect in the payload, Crosswork Data Gateway
ignores the traps received from the device and logs the a WARN message.
In case of SNMP v3, if the device details (such as auth, priv, and security name details) are incorrect in the payload, Crosswork
Data Gateway filters it out and hence, does not receive the trap. Thus, no WARN message is logged.
|
Sample Configurations on Device:
|
Version
|
Configuration
|
|
V1
|
snmp-server group group1 v1
snmp-server user user1 group1 v1
snmp-server host <host_ip> traps <community_string> udp-port 1062
For example,
snmp-server host 172.29.194.78 traps test udp-port 1062
| Note
|
Version 1 is the default version used by the device.
|
|
|
V2c
|
snmp-server group group1 v2c
snmp-server user user1 group1 v2c
snmp-server host 172.29.194.142 traps version 2c v2test udp-port 1062
|
|
V3
|
snmp-server group group1 v3 auth notify user1 read user1 write user1
snmp-server view user1 1.3 included
snmp-server user user1 group1 v3 auth md5 <password> priv aes 128 <password>
snmp-server host 172.23.92.193 traps version 3 priv user1 udp-port 1062
|
The SNMP Collector supports the following operations:
-
SCALAR
-
TABLE
-
MIB_WALK
-
TRAP
-
DEVICE_PACKAGE
These operations are defined in the sensor config (see payload sample below).
Note |
There is an optional deviceParams attribute
snmpRequestTimeoutMillis (not shown in the sample payloads) that should be used if the device response time is very high. It’s not recommended to
use snmpRequestTimeoutMillis unless you are absolutely certain that your device response time is very high.
The value for snmpRequestTimeoutMillis should be specified in milliseconds:
Default value is 1500 milliseconds
Minimum value is 1500 milliseconds
However, there is no limitation on the maximum value of this attribute.
|
Following is an SNMP collection job sample:
{
  "collection_job": {
    "application_context": {
      "context_id": "collection-job1",
      "application_id": "APP1"
    },
    "collection_mode": {
      "lifetime_type": "APPLICATION_MANAGED",
      "collector_type": "SNMP_COLLECTOR"
    },
    "job_device_set": {
      "device_set": {
        "devices": {
          "device_ids": [
            "c70fc034-0cbd-443f-ad3d-a30d4319f937",
            "8627c130-9127-4ed7-ace5-93d3b4321d5e",
            "c0067069-c8f6-4183-9e67-1f2e9bf56f58"
          ]
        }
      }
    },
    "sensor_input_configs": [
      {
        "sensor_data": {
          "snmp_sensor": {
            "snmp_mib": {
              "oid": "1.3.6.1.2.1.1.3.0",
              "snmp_operation": "SCALAR"
            }
          }
        },
        "cadence_in_millisec": "60000"
      },
      {
        "sensor_data": {
          "snmp_sensor": {
            "snmp_mib": {
              "oid": "1.3.6.1.2.1.31.1.1",
              "snmp_operation": "TABLE"
            }
          }
        },
        "cadence_in_millisec": "60000"
      }
    ],
    "sensor_output_configs": [
      {
        "sensor_data": {
          "snmp_sensor": {
            "snmp_mib": {
              "oid": "1.3.6.1.2.1.1.3.0",
              "snmp_operation": "SCALAR"
            }
          }
        },
        "destination": {
          "destination_id": "4c2ab662-2670-4b3c-b7d3-b94acba98c56",
          "context_id": "topic1_461cb8aa-a16a-44b8-b79f-c3daf3ea925f"
        }
      },
      {
        "sensor_data": {
          "snmp_sensor": {
            "snmp_mib": {
              "oid": "1.3.6.1.2.1.31.1.1",
              "snmp_operation": "TABLE"
            }
          }
        },
        "destination": {
          "destination_id": "4c2ab662-2670-4b3c-b7d3-b94acba98c56",
          "context_id": "topic2_e7ed6300-fc8c-47ee-8445-70e543057f8a"
        }
      }
    ]
  }
}
SNMP Traps Collection Job
SNMP traps are handled in a similar manner. Trap listeners listen on a port and then dispatch data to recipients (based on
their topic of interest).
Note |
-
Device should have been pre-configured by the traps.
-
Crosswork Data Gateway listens on UDP port 1062 for Traps.
-
If the collection job is invalid, there is missing configuration on the device, or no
trap is received, the status of the job remains "Unknown".
|
On receiving a trap, Crosswork Data Gateway does the following validations:
-
Check if any collection job is created for the device.
-
Checks the trap version and community string.
-
For SNMP v3, validates for user auth and priv protocol and credentials.
Following is an SNMP-Trap collection job sample:
{
  "collection_job": {
    "application_context": {
      "context_id": "collection-job1",
      "application_id": "APP1"
    },
    "collection_mode": {
      "lifetime_type": "APPLICATION_MANAGED",
      "collector_type": "TRAP_COLLECTOR"
    },
    "job_device_set": {
      "device_set": {
        "devices": {
          "device_ids": [
            "a9b8f43d-130b-4866-a26a-4d0f9e07562a",
            "8c4431a0-f21d-452d-95a8-84323a19e0d6",
            "eaab2647-2351-40ae-bf94-6e4a3d79af3a"
          ]
        }
      }
    },
    "sensor_input_configs": [
      {
        "sensor_data": {
          "trap_sensor": {
            "path": "1.3.6.1.6.3.1.1.4"
          }
        },
        "cadence_in_millisec": "60000"
      }
    ],
    "sensor_output_configs": [
      {
        "sensor_data": {
          "trap_sensor": {
            "path": "1.3.6.1.6.3.1.1.4"
          }
        },
        "destination": {
          "destination_id": "4c2ab662-2670-4b3c-b7d3-b94acba98c56",
          "context_id": "topic1_696600ae-80ee-4a02-96cb-3a01a2415324"
        }
      }
    ]
  }
}
Enabling Traps forwarding to external applications
As per the current implementation, in case of an SNMP Trap collection job, all traps are
sent to the specified data destination even if the SNMP Trap OID is provided in the sensor
path.
Therefore, it is recommended to have a single SNMP Trap collection job per device (with any
OID as sensor path) as it would be enough to get all traps from that device.
To identify the type of trap from the data received on the destination, look for
oid (OBJECT_IDENTIFIER, for example,
1.3.6.1.6.3.1.1.4.1.0 ) and strValue associated to the
oid in the OidRecords (application can match the OID of interest to
determine the kind of trap).
Below are some sample values and a sample payload:
-
Link up
1.3.6.1.6.3.1.1.4.1.0 = 1.3.6.1.6.3.1.1.5.4
-
Link Down
1.3.6.1.6.3.1.1.4.1.0 = 1.3.6.1.6.3.1.1.5.3
-
Syslog
1.3.6.1.6.3.1.1.4.1.0 = 1.3.6.1.4.1.9.9.41.2.0.1
-
Cold Start
1.3.6.1.6.3.1.1.4.1.0 = 1.3.6.1.6.3.1.1.5.1
{
  "nodeIdStr": "BF5-XRV9K1.tr3.es",
  "nodeIdUuid": "C9tZ5lJoSJKf5OZ67+U5JQ==",
  "collectionId": "133",
  "collectionStartTime": "1580931985267",
  "msgTimestamp": "1580931985267",
  "dataGpbkv": [
    {
      "timestamp": "1580931985267",
      "name": "trapsensor.path",
      "snmpTrap": {
        "version": "V2c",
        "pduType": "TRAP",
        "v2v3Data": {
          "agentAddress": "172.70.39.227",
          "oidRecords": [
            {
              "oid": "1.3.6.1.2.1.1.3.0",
              "strValue": "7 days, 2:15:17.02"
            },
            {
              "oid": "1.3.6.1.6.3.1.1.4.1.0",  // This oid is the Object Identifier.
              "strValue": "1.3.6.1.6.3.1.1.5.3" // This is the value that determines the kind of trap.
            },
            {
              "oid": "1.3.6.1.2.1.2.2.1.1.8",
              "strValue": "8"
            },
            {
              "oid": "1.3.6.1.2.1.2.2.1.2.8",
              "strValue": "GigabitEthernet0/0/0/2"
            },
            {
              "oid": "1.3.6.1.2.1.2.2.1.3.8",
              "strValue": "6"
            },
            {
              "oid": "1.3.6.1.4.1.9.9.276.1.1.2.1.3.8",
              "strValue": "down"
            }
          ]
        }
      }
    }
  ],
  "collectionEndTime": "1580931985267",
  "collectorUuid": "YmNjZjEzMTktZjFlOS00NTE5LWI4OTgtY2Y1ZmQxZDFjNWExOlRSQVBfQ09MTEVDVE9S",
  "status": {
    "status": "SUCCESS"
  },
  "modelData": {},
  "sensorData": {
    "trapSensor": {
      "path": "1.3.6.1.6.3.1.1.5.4"
    }
  },
  "applicationContexts": [
    {
      "applicationId": "APP1",
      "contextId": "collection-job-snmp-traps"
    }
  ]
}
 Feedback