Use Templates to Configure Similar Devices

You can deploy templates for quick and consistent application of settings across your network devices. Templates help you to update configurations by applying changes to multiple devices simultaneously. You can also onboard devices without all the desired configurations initially and later push a standardized configuration to the devices using templates.


Note


  • For template operations such as creating, editing, or deleting, you must have Global API Permissions enabled for Device Configurations.

  • For support with configuring templates for any non-Cisco devices, contact the Cisco Customer Experience team.


The types of templates available with Crosswork are:

  • System templates: These are predefined configuration templates bundled with Crosswork, ready for deployment on your network devices.

  • User-defined templates: Create and customize these templates, making them available for others to use.

You can use a combination of these templates on your devices to:

  • Streamline and manage existing device settings.

    OR

  • Design templates to provision new settings on devices for ease of deployment.

    This section contains the following topics:

Key benefits of configuration templates

Using configuration template as a network management tool offers the following benefits:

  • Ensures uniformity across devices.

  • Reduces manual errors and ensures consistent network configurations.

  • Saves time by applying pre-defined settings to multiple devices simultaneously.

  • Allows granular control from the topology view for device-level management.

  • Integrates with inventory using APIs to display pre-configured values in the UI for device-level configurations.

  • Efficiently manages up to 1,000 devices per template in a SVM environment and 3000 devices per template in a cluster setup.

Configuring devices using templates

Follow these steps to configure a template for devices with similar configurations.

Prepare for template deployment

  1. Choose a device group or list of devices for template deployment. Consider your network and device similarities carefully to ensure correct template application. Refer to the section, Identify and group devices for deploying templates for more details.

  2. If you select the device group option, ensure that all devices within the chosen group are compatible with the selected template, as Crosswork Network Controller does not perform any validation or compatibility checks.

  3. Ensure your devices are configured for Crosswork Network Controller for template deployment. Check network settings and compatibility requirements. Refer to the section, Configuration prerequisites for new devices to verify and complete device configurations for Crosswork Network Controller.

  4. The templates are executed by Crosswork Network Controller VMs. Ensure that the VM has direct reachability to the managed devices before deploying templates. If NSO is integrated with Crosswork Network Controller, a sync-from operation is automatically performed to keep NSO aligned with the device configuration.

Backup and restore device configuration

Use the backup and restore capabilities to protect your device configurations and maintain the templates applied to your onboarded devices. For more information, see Configuration Backup and Restore.

Create and deploy templates

Navigate to Device Management > Configuration Templates > Create Template in the Crosswork Network Controller UI and proceed with the following steps for your selected devices.

  1. Define configuration preferences for the templates that you create. Refer to the section, Set configuration preferences.

  2. Enter the template information. Refer to the section, Specify template details.

  3. Define the variables and input methods. Refer to the section, Define variables.

  4. Convert variable inputs into CLI commands using different code syntax. Refer to the section, Configuration template commands.

  5. Configure the script for a template. Refer to the section, Create template script.

  6. Apply the configuration template to selected devices. Refer to the section, Deploy templates.

  7. Check the status and results of the deployed configuration template. Refer to the section, Monitor template jobs.

  8. Use the topology map to modify or replace templates on devices that already have templates applied. Refer to the section, Deploy templates from detailed inventory.

Identify and group devices for deploying templates

Group devices by network role and refine groups based on attributes.

  1. Identify and standardize shared protocols and features across similar devices.

    Grouping examples:

    • Routers running the same version of IOS-XE with similar routing configurations.

    • Interface settings such as security parameters and routing protocols, variables like MTU size, NAT, or DNS configurations.

    • Protocols like OSPF or BGP, shared QoS policies, and security measures like ACLs.

    • Common elements such as VLAN configurations, SNMP settings, and logging policies across similar devices.

  2. Identify the configurations on your devices that you want to standardize with templates, such as:

    • Common settings: These are basic configurations that are standardized across many devices, with role-specific variations.

      Example: A SNMP configuration, where the core settings are the same, but the target server may differ. Other examples include configuring user accounts, banners, and PCE.

    • Free-form variable input: These configurations require you to enter specific values, such as descriptions, names, port descriptions, and IP addresses.

      Example: Setting an interface description or defining a service name such as:

      interface GigabitEthernet0/0/0/1 description "Uplink to Core Router"

    • Interactive configurations: These configurations allow you to make choices that influence the configuration. You can use UI elements like radio buttons, checkboxes or dropdown lists.

      Example: Enabling or disabling a specific feature on an interface such as:

      shutdown or no shutdown

Define configuration preferences for templates and backup and restore

Customize your configuration preferences to tailor your template setup. Define settings like session timeouts backup configurations and retention policies to manage resources and ensure data compliance effectively. You can set your preferences before deploying a template or before scheduling configuration backup.

Procedure


Step 1

From the main menu, navigate to Device Management > Configuration Preferences.

Step 2

Set your preferences for templates, as well as backup and restore operations. Refer to the Configuration preferences table to view the options available for customization.

Table 1. Configuration preferences

Field

Enter or select

Timeout (seconds)

Specify the duration in seconds before a session times out due to inactivity.

The valid range is from 60 to 900 seconds.

Maximum backup versions

Choose the maximum number of configuration backup versions to retain per device, ensuring you have sufficient historical data for rollback or audit purposes without excessive storage usage. Note that this limit applies to each device individually, not the total number of backups in Crosswork Network Controller.

The valid range is from 0 to 52.

Maximum retention days

Set the number of days to retain configuration backups.

The valid range is from 0 to 365 days.

If both Maximum backup version and Maximum retention days are configured, Crosswork Network Controller will only purge backups when both conditions are met. This occurs when the number of backup versions exceeds the specified maximum and they are older than the specified retention period. As a result, you may see more backup versions than the configured maximum if they are still within the retention period.

Alarm threshold

Define the number of backup failures to trigger an alarm.

The valid range is from 1 to 10.

Job retention days

Specify the number of days to retain data and logs for template jobs, backup jobs, and restore jobs.

The valid range is from 7 to 14 days.

Archive configuration while adding a device

Enable or disable automatic archiving of the device configuration upon its addition. This option safeguards against failed configurations during the initial setup.

Collect configuration backup when the configuration changes

This option enables automatic backups upon configuration changes to maintain a secure, up-to-date archive.

Hold Off Timer (seconds) This option becomes visible if you select Collect configuration backup when the configuration changes.

When a configuration change occurs on a device, a notification is sent from the device to Crosswork Network Controller. After receiving the notification, the system activates a hold off timer to wait for a specific duration before proceeding with further actions. If there is a configuration change on the device, the system will wait for the time you specify to check if another backup request is triggered for the same device. If additional backup requests are received within this time, they will be grouped into a single backup process for the device.

The valid range is from 60 to 600 seconds.

Initiate the copy function using the EMS server

Select to specify whether the EMS server should transfer the configuration to the device during the restore operation.

Enable syslog and traps on devices

Select this option to enable monitoring and receive status updates from devices. When this option is activated, Crosswork Network Controller automatically configures the device to send syslog and traps to the Crosswork Data Gateway virtual IPs after the device is onboarded. This allows the system to receive and process important network events and device status updates.

Synchronize with NSO

Select to trigger device synchronization with NSO whenever a configuration is pushed to the device, including template deployments, restore operations, or syslog or trap configurations.


Specify template details

Provide template details to define and set it up on the Specify template details page.

Procedure


Step 1

In the Specify template details section, enter a template name and description. Template name can only contain letters, numbers, hyphens and underscores. Spaces and special characters are not allowed.

The default transport protocol for connecting to a device is set to CLI in the current release and this option cannot be modified. Future implementations may support additional protocols for configuration templates.

Step 2

In the Labels field, enter a label name. You can enter more than one label.

Assigning a label to a configuration template helps you to:

  • Search a template using the label name in the search field.

  • Use the labeled template as a reference to configure more devices.

Step 3

If you want to configure a troubleshooting template, enable the Read template for troubleshooting slider.

This option creates a read template with a set of commands, such as show commands, to gather information from devices without altering their configurations. These show commands are visible under the Configuration Templates > Jobs tab.

Use a troublshooting template to:

  • Execute multi-show commands for a single device or a group of devices for easy and quick diagnostics.

  • Deploy schedule based execution for better network management.

  • To gather data over time for offline comparison.

Choosing the Read template for troubleshooting option automatically tags the template as a Read template for easy identification. We recommend that you maintain the default tag of these templates to distinguish them from other templates.

Step 4

Choose the users that you wish to authorize to deploy the template from the Users dropdown menu. Note that administrator users are not displayed in the list.


Select device types

Choose the device types for template deployment on the Select device types page.

Procedure


Step 1

Select a category from the dropdown to specify the type of device, interface, or module the template applies to, and to differentiate it from system templates. This step is optional.

The template utilizes these device types to configure settings or retrieve data. However, Crosswork Network Controller does not validate if the template is compatible with a specific device type.

Step 2

Select the device types for template deployment from the available list.


Define variables

Add rows to specify variables to be used in CLI commands on the Define variables page. For a new template this task is optional.

Procedure


Step 1

Click Add row to add one or more variables and enter their details.

Step 2

Select the variable to be a mandatory or non-mandatory field.

Refer to the table Data types and usage in configuration templates for examples of data types you can use to define variables.

Table 2. Data Types and usage in configuration templates

Data type

Usage

Code snippet

String Creates a text box for entering text values. hostname ${deviceName}
Integer Creates a text box that accepts only numeric values. interface ${interfaceName}mtu ${mtu} !
IPv4 address Creates a text box that accepts only IPv4 addresses. interface ${interfaceName} ip address ${ipAddress} !
Dropdown Creates a list of options. interface ${interfaceName} #if\(${speed}=="10_MBPS"\) speed 10 #elseif\(${speed}=="100_MBPS"\) speed 100 #elseif\(${speed}=="1000_MBPS"\) speed 1000 #end !
Checkbox Creates a checkbox for selection. interface ${interfaceName} #if\(${shutdown}=="true"\) shutdown #else no shutdown #end !
Radio button Creates a radio button for choices. interface ${interfaceName} #if\(${adminStatus}=="Down"\) shutdown #elseif\(${adminStatus}=="Up"\) no shutdown #end !
Text area Creates a text area that allows multiple-line values. banner motd ^C${bannerText}^C

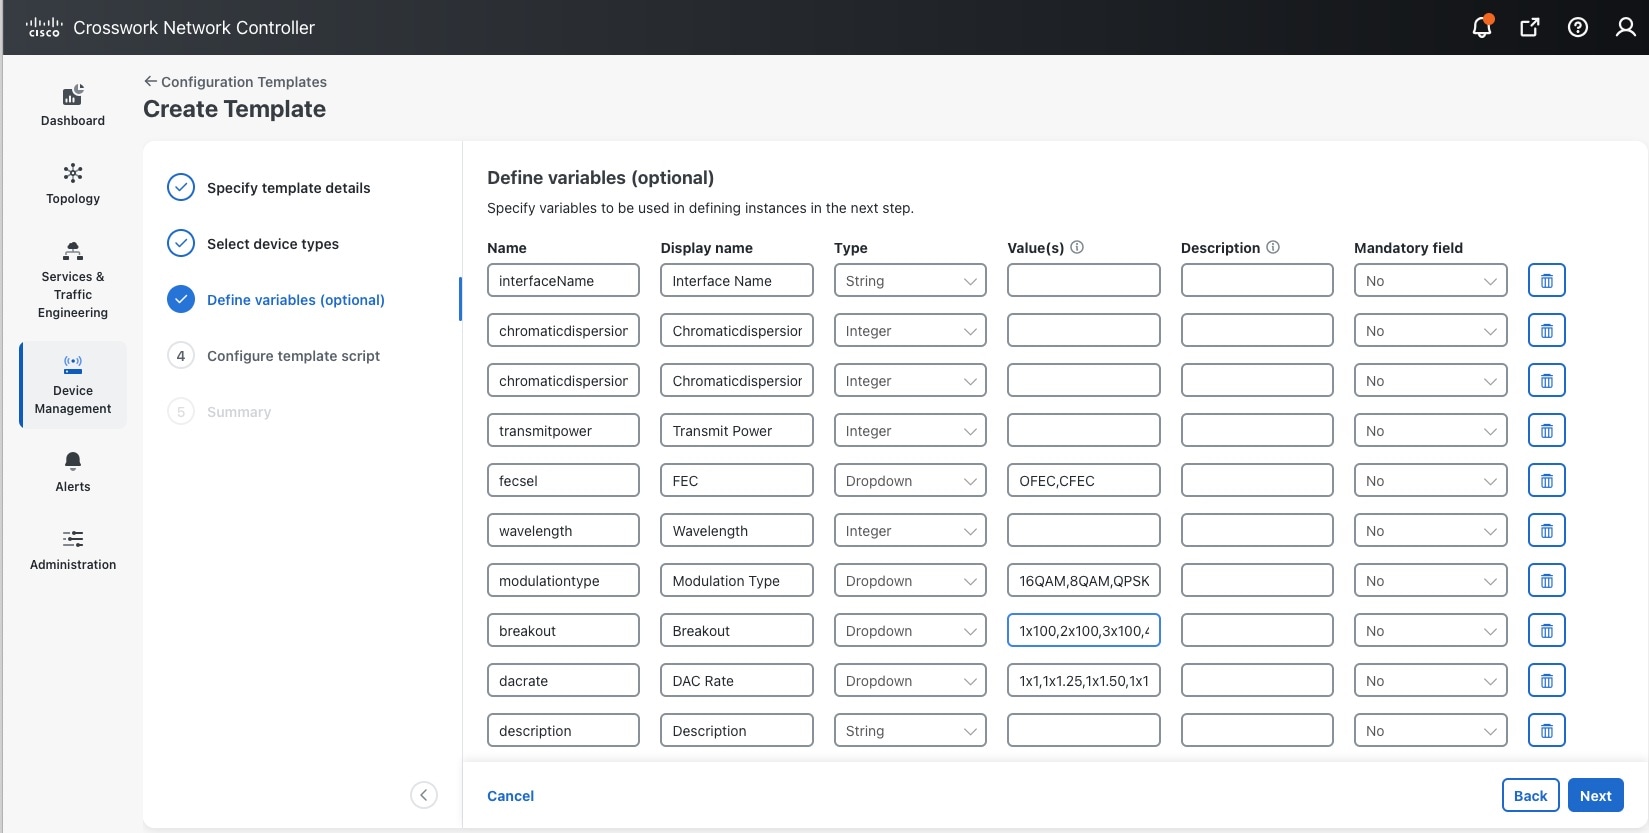
The figure Define variables shows some more examples of functions such as strings, integers, and dropdown lists that you can use within configuration templates.

Figure 1. Define variables

Configuration template commands

This section explains the different CLI commands you can use with variables while creating the configuration script.

To make your templates more flexible you can also use Apache VTL. It enables you to create more dynamic templates by adding conditional logic, loops, and calculations. Refer to the section, Apache VTL: syntax and examples for more information on incorporating VTL syntax to your CLI commands.

Enable mode commands

Certain functions like connecting to remote devices and changing terminal settings require you to use EXEC mode.

Use the following syntax to enter EXEC mode commands:

#MODE_ENABLE<<commands >>#MODE_END_ENABLE

Multi-line commands

Multi-line commands allow you to define text areas within CLI templates that accommodate multiple lines of values.

Table 3. Multi-line commands
Command type Description Syntax and example
Multi-line Commands Allows creation of multiline text areas Use <MLTCMD> and </MLTCMD> tags
Example 1 Banner creation
<MLTCMD>banner_motd Welcome to Cisco. You are using Multi-line
            commands.</MLTCMD>
Example 2 Banner message
<MLTCMD>banner motd ~ ${message}</MLTCMD>

where {message} is a multi line input variable.

Where:

  • <MLTCMD> and </MLTCMD> tags are case-sensitive and must be entered as uppercase.

  • The multi-line commands must be inserted between the <MLTCMD> and </MLTCMD> tags.

  • The tag cannot start with a space.

  • The <MLTCMD> and </MLTCMD> tags cannot be used in a single line.


Restriction


For using multi-line banner commands

Multi-line banner commands are not supported directly. Instead, use the banner file format as shown in the example:

#conf t
Enter configuration commands, one per line. End with Ctrl-Z.
(config)#parameter-map type webauth global
(config-params-parameter-map)# type webauth
(config-params-parameter-map)#banner file tftp://209.165.202.10/banner.txt
(config-params-parameter-map)#^Z
#more tftp://192.168.0.0/banner.txt
Disclaimer:
Usage of this wireless network is restricted to authorized users only.
Unauthorized access is strictly forbidden.
All accesses are logged and can be monitored.
#

Interactive commands

Interactive commands allow real-time engagement with network devices, requiring user inputs to proceed with configuration tasks. These commands facilitate interactions to ensure configurations are applied correctly based on user responses.

To enter an interactive command in the CLI content, use the following syntax:

#INTERACTIVE
commands<IQ>interactive question<R>response
#ENDS_INTERACTIVE

The <IQ> tag utilizes regular expressions for interactive questions. Use valid regular expressions for matching patterns.

Refer to the table Interactive commands for syntax and examples.

Table 4. Interactive commands
Description Syntax and examples
General syntax Enter interactive commands
CLI Command<IQ>interactive question 1<R>command response 1 <IQ>interactive question
2<R>command response 2

Where, <IQ> and <R> tag are case-sensitive and must be entered as uppercase.

Invalid content Example with invalid interactive question usage
#INTERACTIVE save config<IQ>Are you sure you want to save? \(y/n\)<R>y
              #ENDS_INTERACTIVE

A question mark in between a command is invalid and does not match the pattern.

Valid content Example with valid interactive question usage
#INTERACTIVE save config<IQ>\(y/n\)<R>y #ENDS_INTERACTIVE
Example 1 No new line required

Replace the <IQ> tag with the <IQNONEWLINE> tag for interactive questions in which the default <return> or new line character is not required in the command.

#INTERACTIVE
transfer download start <IQNONEWLINE>y/N<R>y<IQNONEWLINE>y/N<R>y
#ENDS_INTERACTIVE
Example 2 RSA key generation
#INTERACTIVE crypto key generate rsa general-keys <IQ>yes/no<R> no
              #ENDS_INTERACTIVE

Mixed commands

Mixed commands combine elements of different command types, such as using interactive prompts within a multi-line command configuration, or integrating VTL templates to generate CLI commands for a given setup. This approach allows flexibility and control when managing complex network requirements.

Combining enable mode and multi-line commands

Combine interactive and enable mode commands for tasks involving both configuration changes and interactive input.

Table 5. Enable mode and interactive commands
Syntax
#MODE_ENABLE
#INTERACTIVE
commands<IQ>interactive question<R>response
#ENDS_INTERACTIVE
#MODE_END_ENABLE
Example
#MODE_ENABLE #INTERACTIVE mkdir <IQ>Create directory<R>XXX #ENDS_INTERACTIVE
#MODE_END_ENABLE
Combining interactive and multi-line commands

Interactive multi-line commands allow complex interactions with multiline configurations. Combine interactive commands and multi-line commands in scenarios where the execution of a command requires both user interaction and spans multiple lines.

#INTERACTIVE
macro name EgressQoS<IQ>Enter macro<R><MLTCMD>mls qos trust dscp
wrr-queue queue-limit 10 25 10 10 10 10 10
wrr-queue bandwidth 1 25 4 10 10 10 10
priority-queue queue-limit 15
wrr-queue random-detect 1
wrr-queue random-detect 2
wrr-queue random-detect 3
wrr-queue random-detect max-threshold 1 100 100 100 100
wrr-queue random-detect min-threshold 1 80 100 100 100
wrr-queue random-detect max-threshold 2 100 100 100 100
wrr-queue random-detect min-threshold 2 80 100 100 100
wrr-queue random-detect max-threshold 3 80 90 100 100
wrr-queue random-detect min-threshold 3 70 80 90 100
@</MLTCMD>
#ENDS_INTERACTIVE

Apache VTL: syntax and examples

Apache VTL enables you to create configuration scripts that dynamically incorporate input variables. Use VTL to add conditional logic, loops, or calculations to your template. This will enable you to structure and automate the generation of commands within CLI templates.

The table Apache VTL examples for CLI templates shows different variable types that you can use to dynamically insert values into command templates.

Additonally, see https://velocity.apache.org/engine/devel/vtl-reference.html for more details on VTL syntax.

Table 6. Apache VTL examples for CLI templates
Variable Type Example Code Snippet
Normal variable
#set\($hostname = "Router1"\) configure terminal \n hostname $hostname
Array of integers
#set\($ports = \[1, 2, 3\]\) interface GigabitEthernet0/$ports\[0\]
Array of strings
#set\($users = \["admin", "guest", "operator"\]\) username $users\[1\]
Map
#set\($interface = {"name" : "GigabitEthernet0/0", "ip" : "192.168.1.1"}\) \n interface ${interface.name} \n ip address ${interface.ip}

Create template script

This step transforms the variable inputs and the CLI commands that you create into valid executable configurations. If no variables have been defined, you can directly enter the script into the configlet.

Procedure


Step 1

Navigate to the Configure template script page.

Step 2

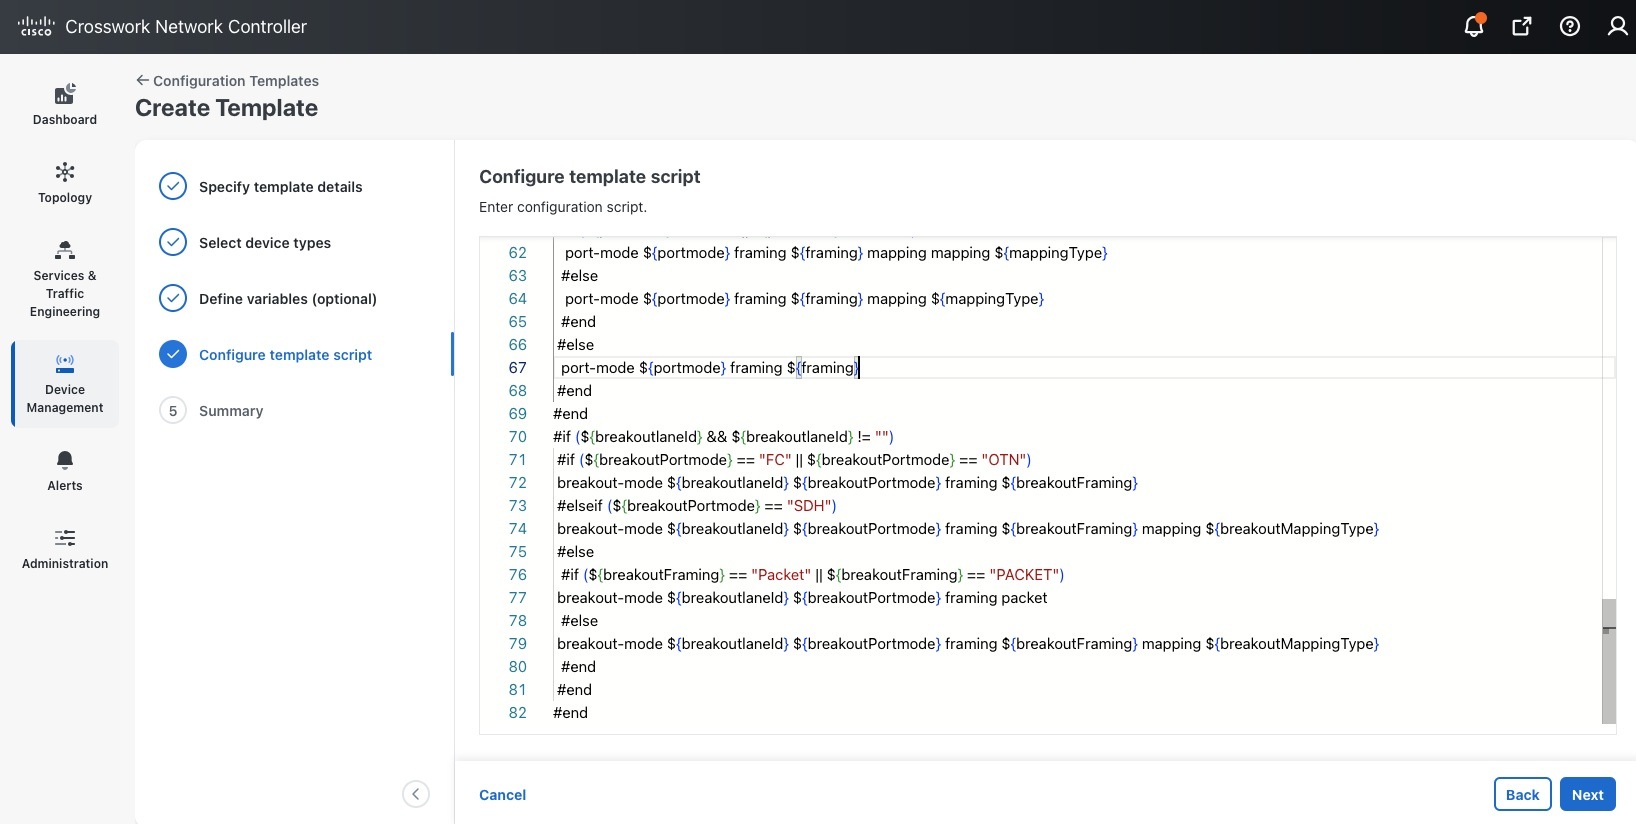
Enter the configuration script in the configlet.

Figure 2. Example of a template script

Refer to the section Sample configuration scripts for templates for a collection of template scripts.


Deploy templates

Deploy templates across multiple devices with similar configurations.

Procedure


Step 1

From the main menu, navigate to Device Management > Configuration Templates.

Step 2

Select a template and click Deploy. The Specify device details page is displayed where you can view the general details about the template.

Step 3

Select a device group or a list of devices from the Device selection section. This is a crucial step as you must take into account the compatibility of the devices.

Step 4

If you have defined variables when creating a user-defined template, assign values to the variable settings on the Assign variables page.

Example:

  1. Interface name-GigabitEthernet0/1/1

  2. Description-This is an uplink interface

  3. MTU-1,500

  4. Admin state- Up

Step 5

You can assign these values either individually to devices or to a group of devices. To assign values individually, toggle the slider to Yes for the option labeled Assign values to devices individually and click Assign variables.

If variables are set as mandatory on the Define variables page, the Next button is not enabled when selecting Assign values to devices individually.You must provide inputs at the global level first, after which the Next button will become active.

Setting default values for variables in templates can significantly simplify the deployment process. Defining these values in advance removes the need for manual input during each deployment.

Step 6

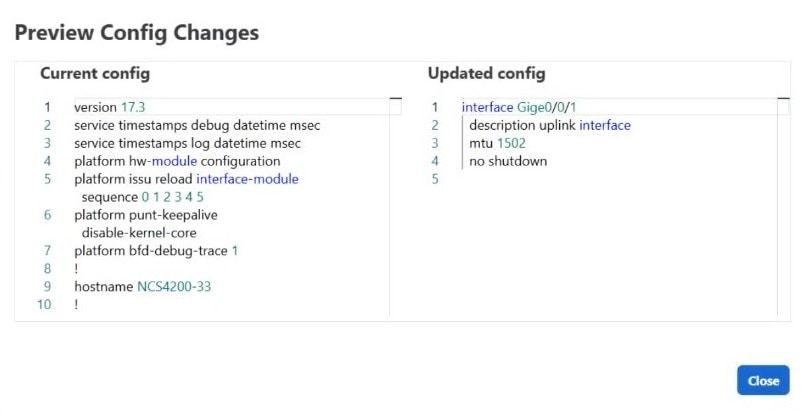
On the Preview configuration page, select the device from the Select device dropdown and verify the template details you have provided. Whether you have made changes to an existing template or want to review the current configurations, click Preview Config Changes to view the details. If there are configuration changes, they are displayed under the Updated Config section.

Figure 3. Preview configuration changes

Note


Sensitive data such as passwords and SNMP community strings are masked under the Current Config section.

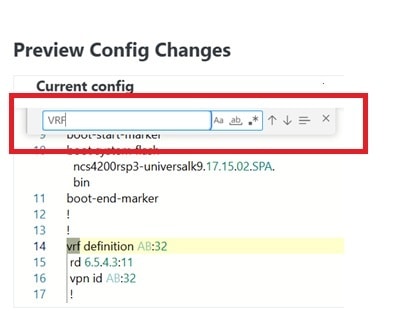
To search for a variable or value, place your cursor in the config section and type your search term.

Step 7

On the Manage settings page:

  1. Select the recovery and backup settings.

    If..

    Then..

    You are deploying the template on IOS-XR or Nexus devices

    Select Backup configuration before deployment. This ensures that if a template fails to deploy, the configuration can be restored to the last backup taken.

    You are deploying the template on IOS-XE devices

    Select Rollback configuration upon failure.

    For IOS- XE devices, configuration sessions are automatically locked, preventing simultaneous edits. If a template fails to deploy,the backup version created prior to the deployment attempt is restored.

  2. Schedule the deployment for immediate execution or at a later time.

Step 8

On the Summary page, review the details of your template, and if needed, make changes before clicking Deploy template.


Manage template jobs

Template jobs provide details on configuration tasks associated with templates. Use the Jobs page to track and manage template executions, filter by status, examine error details, and schedule jobs.

Navigate to the main menu and select Device Management > Configuration Templates > Jobs. The Deployed jobs section is displayed.

  • At the top of the Jobs tab, you can see the types of states that deployed jobs can be in: Success, In progress, Partial, and Failed.

  • The page lists all the current jobs with their details such as job ID, status of the job, deployed time and name of the template creator.

Use the Jobs page to track and manage template jobs.

Procedure


Step 1

Use filters such as status or deployed time to narrow down specific jobs based on a criteria.

Step 2

Click the Job ID in the Deployed Jobs section to see detailed information about the job, such as device names and time deployed. Under the Action column, click the three dots menu, then choose either Re-run to execute the job again or Delete to remove the job. The re-run option applies only to the same devices with the same configuration. If the template has been modified, you must deploy it again.

Step 3

Click on the job ID to view a summary of the job, including details such as device name, job ID, and scheduled time. In the Configlet column, click view to see the configuration script associated with the template.You can the see the commands pushed to device for a successful job or the reason for a failed job

Step 4

Handling failed and partial jobs:

  1. To monitor the status of a job, apply a filter to display Failed jobs.

  2. Click on the job ID to examine the error details of the failed job.

  3. Edit the template from the Configuration Template page to address any configuration errors identified in the error details.

  4. After correcting the template, go to the Jobs page and locate the failed job ID. Under the Action column, click the three dots menu, then choose either Re-run to execute the job again or Delete to remove the job.

Step 5

Scheduling jobs:

  1. To view and manage jobs scheduled for a later time, click on Scheduled jobs. This will display a list of all scheduled jobs.

  2. To reschedule a job, locate the job ID under Scheduled jobs. Under the Action column, click the three dots menu, then choose Reschedule. Select the date and time of the job and click Reschedule.


Monitor and manage templates

Ensure templates run smoothly and maintain efficiency.

Procedure


Step 1

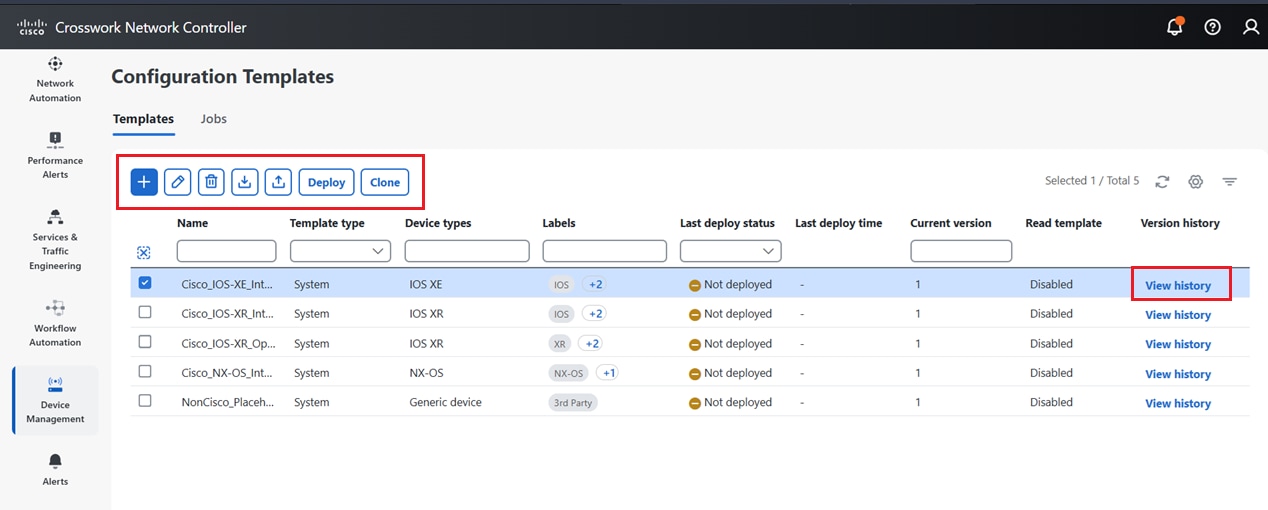
From the main menu, navigate to Device Management > Configuration Templates page. You can see a list of all the available templates.

Figure 4. Configuration templates

Step 2

On this page, you can do the these tasks:

Task

Steps

Create a new template

Click + to create a new template.

Edit a template

Select a template and click the Edit icon. Make sure to review the edited template details before clicking Update template.

Delete a template

Select a template and click the Delete icon. Only user defined templates can be deleted.

Check the different versions of a template

Select the device and click View history.

Compare versions of a template to review changes in the configuration script Click View history for a selected template. On the Version history page, choose a specific version of the template and click Compare version. Use the dropdown menu to select a version to compare. Note that only one version can be selected for comparison at a time.

Note


The version history associated with a configuration template will display a new version only when the template's version field is explicitly updated during the editing process. If you modify the template data without incrementing the version, the changes will be saved in the current version. To maintain an accurate version history, ensure that whenever you modify the template, you update the version field according to the nature of the change. For example, changing the version to 1.2 or 2.0.

Import a template

Click the Import icon, browse for a template and click Import.
Export a template Select a template and click Export. The templates are generated in JSON format and compressed into a .zip file before being exported.

If you export without selecting one or more templates, all the available templates are exported.

Create a new template from an exisiting one

Select a template and click Clone to duplicate the selected template. Modify any of the template attributes to create a new version tailored to your needs.You can also clone a system template, customize its attributes as needed and transform it into a user-defined template.

Ensure that you adhere to guidelines provided for creating and editing templates. Check any constraints or dependencies related to template properties before you deploy a cloned template.

Use filters to view templates

Explore various templates by filtering based on template name, type, associated device types, labels, deployment status, and version history.


Deploy templates from detailed inventory

Use the Detailed inventory view of a device to update or modify templates on any Gigabit interface such as IOS XR, IOS XE, NX-OS or Optics Controller with pluggables like RON devices. Follow these steps:

Before you begin

Back up your current configurations and ensure compatibility of new updates or templates with your device interface.

Procedure


Step 1

From the main menu, navigate to the Topology page.

Step 2

Click the Host name of a device and then click the Detailed inventory button in the Device details pane to access the detailed inventory for the chosen device.

Step 3

Focus on the interface or optics controller that you want to manage using the Device groups or Show layers filters.

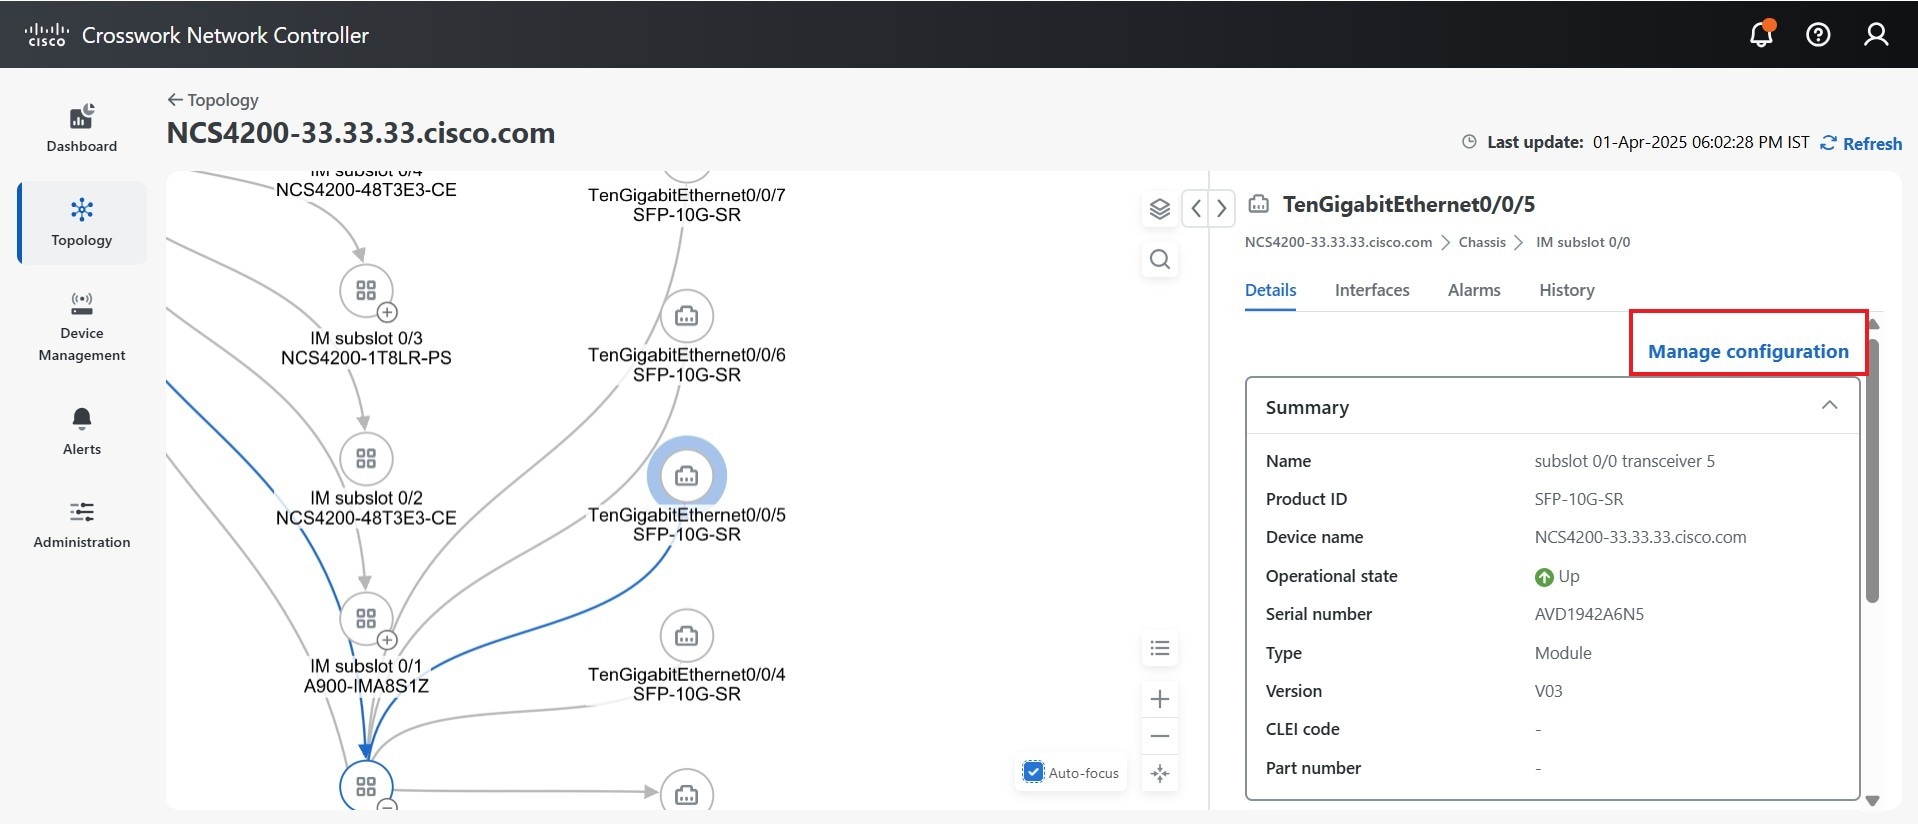
For all supported modules, the Manage configuration option will be visible in the device details pane.

Figure 5. Manage configuration

Step 4

Update or change template from the same category: On the Manage configuration page, you have the option to either update the current template details or select another template for deployment.

  1. Update current template: Modify the existing template configuration by updating the current details. Use Preview config changes to review and compare current and updated settings, then click Save to finalize the changes.

    OR

  2. Choose another template: Click Select another template.View the available options and select a new template.

  3. Use the show run command to check current configurations.

    For example:

    show running-config interface GigabitEthernet0/1
    
    This command displays the current configuration settings applied to the specified interface, such as:
    interface GigabitEthernet0/1
     description Link to Router
     ip address 192.168.1.1 255.255.255.0
     duplex auto
     speed auto
     mtu 1500
    Use the output of the show run command to understand existing settings that might need to be preserved or updated when deploying the new template. Note that if the input command in Select another template is show run, sensitive data, such as passwords and SNMP community strings, are masked in the Current config section.
  4. Apply your changes with Save or cancel them with Discard changes.


Sample configuration scripts for templates

This section provides a collection of sample configuration scripts you can use for your reference.

Configure an interface via VTL templates

#if (${interfaceName})
 interface ${interfaceName}

 #if(${shutdown}=="true")
   shutdown
 #else
   no shutdown
 #end
 
 #if (${description} != "")
  description ${description}
 #end
 
 #if (${mtu} != "")
  mtu ${mtu}
 #end

 #if (${ipAddress} != "")
  ip address ${ipAddress}
 #end
      
 #if(${speed}=="10_MBPS")
   speed 10
 #elseif(${speed}=="100_MBPS")
    speed 100
 #elseif(${speed}=="1000_MBPS")
    speed 1000
 #end
#end

Configure a banner

<MLTCMD>banner exec %
--------------------------------------------------------------------------
This system is private property of Cisco.
Any unauthorized access is strictly prohibited and will be
prosecuted to the full extent of applicable local and international law.
--------------------------------------------------------------------------
% </MLTCMD>

Configure password encryption

#MODE_ENABLE
#INTERACTIVE
<MLTCMD>key config-key password-encryption<IQ>Enter new key :<R>${key}<IQ>Enter confirm key :<R>${key}
</MLTCMD>
#ENDS_INTERACTIVE
#MODE_END_ENABLE