Manage Inventory

This section contains the following topics:

Device Management Overview

The Device Management application lets you create, edit, and delete:

  • The credential profiles that control Cisco Crosswork Change Automation and Health Insights's access to devices and providers. See Manage Credential Profiles.

  • The devices you manage using Cisco Crosswork Change Automation and Health Insights. See Manage Network Devices.

You can also use Device Management to review the jobs executed on your devices. See View Device Job History.

Reachability and Operational State

Cisco Crosswork Change Automation and Health Insights computes the Reachability State of the providers it uses and devices it manages, as well as the Operational State of reachable managed devices. It indicates these states using the icons in the following table.

Table 1. Reachability and Operational State Icons
This Icon... Indicates...

Reachability State icons show whether a device or a provider is reachable or not

Reachable icon

Reachable: The device or provider can be reached by all configured protocols configured for it.

Degraded icon

Reachability Degraded: The device or provider can be reached by at least one protocol, but is not reachable by one or more of the other protocols configured for it.

Unreachable icon

Unreachable: The device or provider cannot be reached by reachable by any protocol configured for it.

Reachability Unknown icon

Reachability Unknown: Cisco Crosswork Change Automation and Health Insights cannot determine if the device is reachable, degraded, or unreachable . This state can also occur if the device is not connected to Cisco Crosswork Data Gateway.

Operational State icons show whether a device is operational or not.

Up icon

The device is operational and under management, and all individual protocols are "OK" ( also known as "up").

Down icon

The device is not operational ("down"). The same icon is used when the device has been set "administratively down" by an operator.

Reachability Unknown icon

The device's operational or configuration state is unknown.

Degraded icon

The device's operational or configuration state is degraded.

Error icon

The device's operational or configuration state is in an error condition. It is either not up, or unreachable, or both, due to errors encountered while attempting to reach it and compute its operational state. The number in the circle shown next to the icon indicates the number of recent errors. Click on the number to see a list of these errors. (Note that the icon badging for errors is not available in the Network Visualization application.)

Checking icon

The device's operational state is currently being checked

Deleting icon

The device is being deleted.

Unmanaged icon

The device is unmanaged.

The Reachability State of a device is computed as follows:

  1. Reachability is always computed for each device as long as the device's configured state (as configured by users) is UP. It is not computed if the device is administratively DOWN or UNMANAGED.

  2. Reachability state is always either REACHABLE, UNREACHABLE, or UNKNOWN.

    • The Reachability state is REACHABLE if there is at least one route to the device via at least one protocol AND the device is discoverable.

    • The Reachability state is UNREACHABLE if there are no routes to the device via one protocol OR the device does not respond.

    • The Reachability state is UNKNOWN if the device is UNMANAGED.

The Operational State of a device is computed as follows:

  1. Operational state is always computed for each device as long as the device's configured state (as configured by users) is UP. It is not computed if the device is administratively DOWN or UNMANAGED.

  2. Operational state is always OK or ERROR.

  3. For a device to be Operational=OK, the device must be REACHABLE and discoverable. Any other Reachability state is ERROR.

  4. For XR or XE devices only, Operational=OK also requires that Clock Drift difference between the Crosswork host and device clocks is <=the default Drift Value, currently 2 minutes.


    Note

    Some timezone settings are known to result in Clock Drift errors when no clock drift actually exists. To work around this issue set your devices to use UTC time.

Manage Credential Profiles

Credential profiles are collections of credentials for SNMP, Telnet, SSH, HTTP, and other network protocols. You can have multiple protocols and credentials in a single credential profile.

Using credential profiles lets you automate device configuration changes and monitoring, and communicate with providers. When you add or import devices, or create providers, you specify the credential profile.

From the Credential Profiles window, you can create a new credential profile, update the settings configured for an existing profile, or delete a profile. To open this window, choose Device Management > Credential Profiles from the main menu.

Figure 1. Credentials Profile window
Credentials Profile window
Item Description

1

Click Add icon to add a credential profile. See Create Credential Profiles.

Click Edit icon to edit the settings for the selected credential profile. See Edit Credential Profiles.

Click Delete icon to delete the selected credential profile. See Delete Credential Profiles.

Click Import icon to import new credential profiles from a CSV file. You can also download a CSV file template by clicking this icon. The template includes sample data that you can use as a guide for building your own CSV file. See Import Credential Profiles.

Click Export icon to export credential profiles to a CSV file. See Export Credential Profiles.

2

Click Refresh icon to refresh the Credential Profiles window.

Click Settings icon to choose the columns to make visible in the Credential Profiles window (see Set, Sort and Filter Table Data).

3

Click Set Filter icon to set filter criteria on one or more columns in the Credential Profiles window.

Click the Clear Filter link to clear any filter criteria you may have set.

Create Credential Profiles

Follow the steps below to create a new credential profile. You can then use the profile to apply credentials consistently when you add new devices or providers. You can add as many protocols and corresponding credentials to the profile as you want.

If you have many credential profiles to add, you may find it more efficient to put the information in a CSV file and import the file. See Import Credential Profiles.

When creating device credential profiles that contain SNMP credentials, Cisco recommends that the profile contain credentials for the version of SNMP actually enabled on the device, and that version only. For example: If SNMPv3 is not enabled in the device configuration, do not include SNMPv3 credentials in the device credential profile.

If you plan to use the import and export features and CSV files to create credential profiles in bulk, please note that:

  • All the characters in each password or community string entry in every credential profile exported to a CSV file are replaced with asterisks (Export Credential Profiles).

  • You cannot import credential profiles if the passwords and community strings in the CSV file are blank (see Import Credential Profiles).

To maintain network security, Cisco recommends that you use asterisks in place of real passwords and community strings in any CSV file you plan to import. After the import, follow the steps in Edit Credential Profiles to replace the asterisks with actual passwords and community strings.

Procedure


Step 1

From the main menu, choose Device Management > Credential Profiles.

Step 2

Click Add icon.

Step 3

In the Profile Name field, enter a descriptive profile name. The name can contain a maximum of 128 alphanumeric characters, plus dots (.), underscores ("_") or hyphens ("-"). No other special characters are allowed.

If you will have many credential profiles, make the name as informative as possible because that information will be displayed on the Credential Profiles panel.

Step 4

Select a protocol from the Connectivity Type dropdown.

Step 5

Complete the credentials fields described in the following table. The required and optional fields displayed will vary with the connectivity type you chose. The values you enter must match the values configured on the device.

Connectivity Type Fields

SSH

Enter the required User Name, Password, and Confirm Password. The Enable Password is optional.

SNMPv2

Enter the required SNMPv2 Read Community string. The Write Community string is optional.

NETCONF

Enter the required User Name, Password, and Confirm Password.

TELNET

Note 

There may be some security limitations when using this protocol.

Enter the required User Name, Password, and Confirm Password. The Enable Password is optional.

HTTP

Enter the required User Name, Password, and Confirm Password.

HTTPS

Enter the required User Name, Password, and Confirm Password.

GRPC

Enter the required User Name, Password, and Confirm Password.

SNMPv3

Choose the required Security Level and enter the User Name.

If you chose the NO_AUTH_NO_PRIV Security Level of AUTH_NO_PRIV or AUTH_PRIV, the remaining fields are optional.

If you chose the AUTH_NO_PRIV Security Level, you must choose an Auth Type and enter an Auth Password.

If you chose the AUTH_PRIV Security Level, you must choose an Auth Type and Priv Type, and enter an Auth Password and Priv Password.

Only the following SNMPv3 Privacy Types are supported

  • CFB_AES_128

  • CBC_DES_56

The following Privacy Types are not supported:

  • AES192

  • AES256

  • 3DES

Step 6

(Optional) Click + Add Another and repeat the above steps, as needed, for all other protocols and corresponding credentials you want to add to this credential profile.

Step 7

Click Save.


Import Credential Profiles

Complete the steps below to create a CSV file that specifies multiple credential profiles and then import it into Cisco Crosswork Change Automation and Health Insights.

Importing credential profiles from a CSV file adds any profiles not already in the database. You cannot import a credential profile that already exists.

If you are re-importing a credential profile CSV file that you previously exported and modified, remember that all the passwords and community strings in the exported credential profile CSV file are replaced with asterisks. You cannot re-import an exported credential profile CSV file with blank passwords. To maintain security, Cisco recommends that you use asterisks in place of real passwords and community strings in the CSV file. After the import, follow the steps in Edit Credential Profiles to replace the asterisks with actual passwords and community strings.

Procedure


Step 1

From the main menu, choose Device Management > Credential Profiles.

Step 2

Click Import icon to open the Import CSV File dialog box.

Step 3

If you have not already created a credential profile CSV file to import:

  1. Click the Download sample 'Credential template (*.csv)' file link and save the CSV file template to your local disk.

  2. Open the template using your preferred tool. Begin adding rows to the file, one row for each credential profile.

    Use a semicolon to separate multiple entries in the same field. Use two semicolons with no space between them to indicate that you are leaving the field blank. When you separate multiple entries with semicolons, remember that the order in which you enter values in each field is important. For example, if you enter SSH;NETCONF;TELNET in the Connectivity Type field and you enter UserTom;UserDick;UserHarry; in the User Name field, the order of entry determines the mapping between the two fields:

    • SSH: UserTom

    • NETCONF: UserDick

    • TELNET: UserHarry

    Also note:

    • Be sure to enter SNMP community string information exactly as currently entered on your devices. Failure to do so will result in loss of device connectivity, and inability to collect certain KPI data or execute configured Playbooks on devices associated with the credential profile.

    • Password and community string information associated with a user ID are stored in plain text in the CSV file you prepare. Be aware of the security implications of this, and apply appropriate safeguards.

    Field Entries Required or Optional

    Credential Profile

    The name of the credential profile. For example: nso.

    Required

    Connectivity Type

    Valid values are: SSH, SNMPv2, NETCONF, TELNET, HTTP, HTTPS, GRPC or SNMPv3

    Required

    User Name

    For example: NSOUser

    Required if Connectivity Type is SSH, NETCONF, TELNET, HTTP, HTTPS, SNMPv3 or GRPC.

    Password

    The password for the preceding User Name.

    Required if Connectivity Type is SSH, NETCONF, TELNET, HTTP, HTTPS or GRPC

    Enable Password

    Use an Enable password. Valid values are: ENABLE, DISABLE

    Required if Connectivity Type is SSH or TELNET. Otherwise leave blank.

    Enable Password Value

    Specify the Enable password to use.

    Required if Connectivity Type is SSH or TELNET and Enable Password is set to ENABLE. Otherwise leave blank.

    SNMPV2 Read Community

    For example: readprivate

    Required if Connectivity Type is SNMPv2

    SNMPV2 Write Community

    For example: writeprivate

    Required if Connectivity Type is SNMPv2

    SNMPV3 User Name

    For example: DemoUser

    Required if Connectivity Type is SNMPv3

    SNMPV3 Security Level

    Valid values are noAuthNoPriv, AuthNoPriv or AuthPriv

    Required if Connectivity Type is SNMPv3

    SNMPV3 Auth Type

    Valid values are HMAC_MD5 or HMAC_SHA

    Required if Connectivity Type is SNMPv3 and SnmpV3 Security Level is AuthNoPriv or AuthPriv

    SNMPV3 Auth Password

    The password for this authorization type.

    Required if Connectivity Type is SNMPv3 and SnmpV3 Security Level is AuthNoPriv or AuthPriv

    SNMPV3 Priv Type

    Valid values are CFB_AES_128 or CBC_DES_56

    The following SNMPv3 privacy types are not supported: AES192, AES256, 3DES

    Required if Connectivity Type is SNMPv3 and SnmpV3 Security Level is AuthPriv

    SNMPV3 Priv Password

    The password for this privilege type.

    Required if Connectivity Type is SNMPv3 and SnmpV3 Security Level is AuthPriv

    Be sure to delete the sample data rows before saving the file or they will be imported along with the data you want. The column header row can stay, as it is ignored during import.

  3. When you are finished, save the new CSV file.

Step 4

Click Browse to navigate to the CSV file you just created and then click Open to select it.

Step 5

With the CSV file selected, click Import.

The credential profiles you imported should now be displayed in the Credential Profiles window.


Edit Credential Profiles

A credential profile can be shared by multiple devices, even hundreds of devices in a large network. Complete the following procedure to edit credential profile settings.


Warning

Changing the settings in a credential profile without first changing the settings on the device associated with the profile may result in a loss of connectivity, inability to collect certain KPI data, or an inability to execute configured playbooks on devices associated with the modified profile. For example: If the SNMP community string on the device no longer matches what is in the credential profile, SNMP-based KPIs will not function.


Before editing any credential profile, it is always good practice to export a CSV backup of the profiles you want to change (see Export Credential Profiles).

Procedure


Step 1

From the main menu, choose Device Management > Credentials.

Step 2

From the left-hand side of the Credential Profiles window, select the profile you want to update, and click Edit icon.

The Edit Profile window of the selected credential is displayed.
Step 3

Make the necessary changes and then click Save.

Note 

If the device is not updated within 30 seconds when you modify connectivity or credential profile information, move the device state to DOWN and then UP. The CLI reachability is triggered and the updated values are displayed.


Delete Credential Profiles

Follow the steps below to delete a credential profile.


Note

You cannot delete a credential profile that is associated with one or more devices or providers.


Procedure


Step 1

Export a backup CSV file containing the credential profile you plan to delete (see Export Credential Profiles).

Step 2

Check whether any devices or providers are using the credential profile you plan to delete. You can do this by filtering on the Credential Profile column, which is available on both the Devices window (choose Device Management > Credential Profiles) and the Providers window (choose Admin > Providers).

Step 3

Reassign the devices or providers to a different credential profile (for help with this task, see Change the Credential Profile for a Device or Provider or Change the Credential Profile for Multiple Network Devices, and Edit Providers).

Step 4

After all devices and providers have had their credential profiles reassigned: From the main menu, choose Device Management > Credential Profiles.

Step 5

In the Credential Profiles window, choose the profile that you want to delete and then click Delete icon.


Export Credential Profiles

Exporting credential profiles stores all the profiles you selected in a CSV file. This is a quick way to make backup copies of your credential profiles. You can also edit the CSV file as needed, and re-import it to add new or modify credential profile data.

The exported credential profiles CSV file does not contain real passwords or community strings. All the characters in the passwords and community strings entries in the credential profiles are replaced with asterisks in the exported CSV file. If you plan on modifying your exported CSV file and then re-importing it, Cisco recommends that you use asterisks in place of real passwords and community strings. After the import, follow the steps in Edit Credential Profiles to replace the asterisks with actual passwords and community strings.

Procedure


Step 1

From the main menu, choose Device Management > Credential Profiles.

Step 2

(Optional) In the Credential Profiles window, filter the credential profile list as needed.

Step 3

Check the check boxes for the profiles you want to export. Check the check box at the top of the column to select all the profiles for export.

Step 4

Click Export icon. Depending on your browser, you will be prompted to select a path and file name to use when saving the CSV file, or to open it immediately


Change the Credential Profile for a Device or Provider

You can edit device information, including changing the credential profile in the device record. This operation changes an existing association between a device and a credential profile.

Before you begin

You need a credential profile to complete this task. To create a credential profile, see Create Credential Profiles.

Note

Make sure the profile’s credential settings are correct before following this procedure.

Procedure


Step 1

From the main menu, choose Device Management > Devices. The Network Devices tab is displayed by default.

Step 2

(Optional) Filter the device list by entering text in the Search field or filtering specific columns.

Step 3

Check the check box of the device you want to change, and click Edit icon.

Step 4

Choose a different credential profile from the Credential Profile drop-down list.

Step 5

Click Save.


After the device record is updated, the system attempts to communicate with the device using the new profile. Confirm that the device is reachable without any errors.

Change the Credential Profile for Multiple Network Devices

If you want to change the credential profile for a large number of network devices, you may find it more efficient to make the change by editing a devices CSV file. The basic method is:

  1. Export a CSV file containing the devices whose credential profiles you want to change (see Export Network Devices).

  2. Edit the CSV file, changing the credential profile for each device (this credential profile must already exist). Save the edited file.

You will need to make sure that the credential profile to which you are changing already exists. If you have not yet created that credential profile, the CSV import will fail. The credential profile you associate with these devices must also have the authorization credentials for every protocol that was configured for these devices during onboarding. If any credential for a specific protocol configured on the devices is missing from or incorrect in the credential profile, then the CSV import will succeed, but reachability checks will fail for these devices.

Procedure


Step 1

From the main menu, choose Device Management > Devices. The Network Devices tab is displayed by default.

Step 2

Choose the devices whose credential profiles you want to change. Your options are:

  • Click Export icon to include all devices.
  • Filter the device list by entering text in the Search field or by filtering specific columns. Then click Export icon to include only the filtered list of devices.
  • Check the boxes next to the device records you want to change. Then click Export icon to include only the devices that have been checked.
Step 3

Edit and save the new CSV file using the tool of your choice. Be sure to enter the correct credential profile name in the Credential Profile field for each device.

Step 4

Click Import icon.

Step 5

In the Import dialog box, click Browse, choose the new CSV file, and click Import.


Manage Network Devices

The Device Management application's Network Devices window (shown below) gives you a consolidated list of all your devices and their status. To view the Network Devices window, select Device Management > Devices. The Network Devices tab is displayed by default.

Figure 2. Devices Window
Item Description

1

The Filter by tags field lets you filter the devices by the tags applied to them. Type the name of the tag that has been applied to the device that you are trying to find. See Filter Network Devices by Tags.

2

Click Add icon to add a new device to the device inventory. See About Adding Devices to Inventory.

Click Edit icon to edit the information for the currently selected devices. See Edit Network Devices.

Click Delete icon to delete the currently selected devices. See Delete Network Devices.

Click Import icon to import new devices and update existing devices, using a CSV file. You can also download a CSV file template by clicking this icon. The template includes sample data that you can use as a guide for building your own CSV file. See Import Network Devices.

Click Export icon to export information for selected devices to a CSV file. See Export Network Devices.

Click Edit Tags icon to modify tags applied to the selected devices. See Apply or Remove Device Tags.

3

Click Details icon to open the Device Details pop-up window, where you can view important information for the selected device. See Get Network Device Details.

4

Icons in the Operational State column show whether a device is operational or not. See Reachability and Operational State

5

Click Refresh icon to refresh the Devices list.

6

Click Settings icon to select which columns to display in the Devices list (see Set, Sort and Filter Table Data).

7

Click Set Filter icon to set filter criteria on one or more columns in the Devices list.

Click the Clear Filter link to clear any filter criteria you may have set.

8

Icons in the Reachability State column show whether a device is reachable or not. See Reachability and Operational State.

About Adding Devices to Inventory

There are six ways to add devices to Cisco Crosswork Change Automation and Health Insights. Each has its own set of prerequisites, which you must fulfill if the device addition is to succeed.

In order of preference for most users, the methods and their prerequisites are:

  1. Importing devices using the Cisco Crosswork Change Automation and Health Insights APIs: : This is the fastest and most efficient of the three methods, but requires programming skills and API knowledge. For more, see the inventory management APIs on Cisco Devnet.

  2. Importing devices from a Devices CSV file: This method is explained in Import Network Devices. This method is time-consuming and error-prone, as you must create and format all of the data yourself beforehand (including not only devices, but also the providers, credential profiles and tags), and then ensure all of these items are properly associated with the devices after the CSV import. To succeed with this method, you must first:

    • Create the provider(s) that will be associated with the devices (see Manage Providers)

    • Create corresponding credential profiles for all of the devices and providers listed in the CSV file (see Create Credential Profiles)

    • Create tags for use in grouping the new devices (see Manage Tags)

    • Download the CSV template file from Cisco Crosswork Change Automation and Health Insights and populate it with all the devices you will need.

  3. Adding them via the UI: This method is explained in Add Network Devices Through the UI. It is the least error-prone of the three methods, as all data is validated during entry, but also the most time-consuming, being suitable only for adding a few devices at a time. Note that the providers, credential profiles and tags you want to apply to them must exist beforehand.

  4. Auto-onboarding from a Cisco SR-PCE provider: This method is explained in Add Cisco SR-PCE Providers. Note that the device and provider credential profiles and tags you want to apply to these devices must exist beforehand. After onboarding devices from this source, you will need to edit each device to add device information that is not automatically discovered.

  5. Auto-onboarding using Zero Touch Provisioning: This method is explained in Manage Devices Using Zero Touch Provisioning. Note that the device and provider credential profiles and tags you want to apply to these devices must exist beforehand. After provisioning and onboarding devices using this method, you will need to edit each device to add information that is not automatically supplied.

  6. Onboard the devices on Cisco Crosswork Data Gateway: This method is explained in Attach a Device to a Cisco Crosswork Data Gateway Instance.


Note

Cisco Crosswork Change Automation and Health Insights version 3.2 supports only single stack deployment modes. Devices can be onboarded either with only IPv4 address or only IPv6 address.


Prerequisites for Onboarding Devices

Before adding devices, you must ensure that the devices themselves are configured to collect and transmit telemetry data properly and communicate successfully with Cisco Crosswork Change Automation and Health Insights. The following sections provide sample configurations for a variety of communications options. Use them as a guide to configuring the devices you plan to manage using Cisco Crosswork Change Automation and Health Insights.

Pre-Onboarding SNMP v2 Device Configuration

Note

Only SNMPv2 and SNMPv3 (NoAuth/NoPriv) traps are supported.


The following commands provide a sample pre-onboarding device configuration that sets the correct SNMPv2 and NETCONF configuration, and SSH and Telnet rate limits. The NETCONF setting is only needed if the device is MDT-capable.

logging console debugging
logging monitor debugging
telnet vrf default ipv4 server max-servers 100
telnet vrf default ipv6 server max-servers 100
crypto key generate rsa
line default
 exec-timeout 0 0
 width 107
 length 37
 absolute-timeout 0
!
snmp-server community public RO
snmp-server community robot-demo2 RO
snmp-server ifindex persist
ntp
 server <NTPServerIPAddress>
!
service cli history size 5000
service cli interactive disable
ssh server v2
ssh server vrf default
ssh server netconf vrf default
ssh server logging
ssh server rate-limit 100
ssh server session-limit 100
!         
netconf agent tty
!         
netconf-yang agent
 ssh      
!
Pre-Onboarding SNMPv3 Device Configuration

If you want to enable SNMPv3 data collection, repeat the SNMPv2 configuration commands in the previous section, and add the following commands:

snmp-server group grpauthpriv v3 priv notify v1default
snmp-server user <user-ID> grpauthpriv v3 auth md5 <password> priv aes 128 <password>
Pre-Onboarding SNMPv2 and SNMPv3 Trap Configuration

If you want the device to send SNMP traps to Cisco Crosswork Change Automation and Health Insights, use the following commands to perform a pre-onboarding device configuration and test for the trap version you want.

For SNMP v2 traps:

snmp-server trap link ietf

snmp-server host <CrossworkDataGatewaysouthboundIPAddress> traps version 2c cisco123 udp-port 1062

snmp-server community cisco123

snmp-server traps snmp linkup

snmp-server traps snmp linkdown

For SNMP v3 traps:

snmp-server trap link ietf

snmp-server host < CrossworkDataGatewaysouthboundIPAddress> traps version 3 cisco123 udp-port 1062

snmp-server community cisco123

snmp-server traps snmp linkup

snmp-server traps snmp linkdown

Please note that, for traps to be received, the node_ip field for the device as listed in the Cisco Crosswork Change Automation and Health Insights inventory must match the IP address of the device interface from which the traps are sent. If they do not, Cisco Crosswork Change Automation and Health Insights will reject the traps. Also, the device needs to be in ADMIN_UP state for traps to be received.

Sample Configuration for Devices in Cisco NSO

If you plan to use Cisco NSO as a provider to configure devices managed by Cisco Crosswork Change Automation and Health Insights, be sure that the Cisco NSO device configurations observe the following guidelines.

The following example shows a Cisco NSO setup that uses the hostname as the device ID. If you are using a CSV file to import devices, use ROBOT_PROVDEVKEY_HOST_NAME as the enum value for the provider_node_key field. The example hostname RouterFremont used here must match the hostname for the device in the CSV file.


configure
set devices device RouterFremont address 198.18.1.11 port 22
set devices device RouterSFO address 198.18.1.12 port 830

In the following example, we are creating an authgroup called cisco with remote name and password of cisco. Next, we are setting all the devices with a name that starts with Router to a device type of netconf using ned-id cisco-iosxr-nc-6.6. Finally, we are setting all of the devices with a name starting with Router to be assigned to authgroup cisco. Edit the setting to match your environment. For example:


set devices authgroups group cisco default-map remote-name cisco remote-password cisco
set devices device Router* device-type netconf ned-id cisco-iosxr-nc-6.6
set devices device Router* authgroup cisco

The following steps unlock the devices and retrieve the ssh keys from all of the devices. NSO then synchronizes itself with the device by uploading the devices current configuration and stores the present configuration. It is important to perform these steps to ensure that the device, NSO, and Crosswork Network Automation applications are starting from a common configuration. For example:


set devices device Router* state admin-state unlocked
request devices device Router* ssh fetch-host-keys
request devices device Router* sync-from
commit

Import Network Devices

Complete the steps below to create a CSV file that specifies multiple devices and then import it into Cisco Crosswork Change Automation and Health Insights.

Importing devices from a CSV file adds any devices not already in the database, and overwrites the data in any device record with an Inventory Key Type and device key field value that matches those of an imported device (this excludes the UUID, which is set by the system and not affected by import). For this reason, it is a good idea to export a backup copy of all your current devices before an import (see Export Network Devices).


Note

If you plan on using a CSV file to import devices managed by Cisco Network Services Orchestrator (Cisco NSO), you must prepare the CSV following the guidelines given in Sample Configuration for Devices in Cisco NSO.


Procedure

Step 1

From the main menu, choose Device Management > Devices. The Network Devices tab is displayed by default.

Step 2

Click Import icon to open the Import CSV File dialog box.

Step 3

If you have not already created a device CSV file to import:

  1. Click the Download sample 'Device Management template (*.csv)' file link and save the CSV file template to a local storage resource.

  2. Open the template using your preferred tool. Begin adding rows to the file, one row for each device.

    Note 

    Confirm that the TE router ID value for each device is populated. This value is used to uniquely identify the device in the topology which is learned from SR-PCE. Without a valid TE router ID for each device, the topology will not be displayed.

    Use a semicolon to separate multiple entries in the same field. Use two semicolons with no space between them to indicate that you are leaving the field blank. When you separate multiple entries with semicolons, remember that the order in which you enter values in each field is important. For example, if you enter SSH;SNMP;NETCONF in the Connectivity Type field and you enter 22;161;830 in the Connectivity Port field, the order of entry determines the mapping between the two fields:

    • SSH: port 22

    • SNMP: port 161

    • NETCONF: port 830

    For a list of the fields and the mandatory values you must enter, see the "Add New Device" field table in Add Network Devices Through the UI.

    Be sure to delete the sample data rows before saving the file, or they will be imported along with the data you want. The column header row can stay, as it is ignored during import.

  3. When you are finished, save the new CSV file.

Step 4

Click Browse to navigate to the CSV file you just created and then click Open to select it.

Step 5

With the CSV file selected, click Import.

Step 6

Resolve any errors and confirm device reachability.

The device information you imported should be displayed in the Devices window within a few minutes (see Manage Network Devices).

It is normal for devices to show as unreachable or not operational when they are first imported. However, if after 30 minutes they are still displayed as unreachable or not operational, there is an issue that needs to be investigated. To investigate, select Device Management > Job History and click on any Error icon you see in the Status column. Common issues include failure to ensure the associated credential profile contains the correct credentials. You can test this by opening a terminal window on the Cisco Crosswork Change Automation and Health Insights server and then trying to access the device using the protocol and credentials specified in the associated credential profile.


Add Network Devices Through the UI

Follow the steps below to add devices one by one, using the UI. Under normal circumstances, you will want to use this method when adding one or a few devices only. For the bulk of your devices, add them either by synchronization with a provider (see Add Cisco SR-PCE Providers), or by importation from a CSV file (see Import Network Devices).

Before you begin

Be sure you have completed the planning steps and setup requirements discussed in Get Started, and that the devices themselves have been pre-configured as explained in Prerequisites for Onboarding Devices.

Procedure

Step 1

From the main menu, choose Device Management > Devices. The Network Devices tab is displayed by default.

Step 2

Click Add icon.

Step 3

Enter values for the new device, as listed in the table below.

Step 4

Click Save. (The Save button is disabled until all mandatory fields are complete.)

Step 5

(Optional) Repeat to add more devices.


Table 2. Add New Device Window (*=Required)
Field Description

* Configured State

The management state of the device. Options are

  • UNMANAGEDCisco Crosswork Change Automation and Health Insights is not monitoring the device.

  • DOWN—The device is being managed and is down.

  • UP—The device is being managed and is up.

* Reachability Check

Determines whether Cisco Crosswork Change Automation and Health Insights performs reachability checks on the device. Options are:

  • ENABLE (In CSV: REACH_CHECK_ENABLE)—Checks for reachability and then updates the Reachability State in the UI automatically.

  • DISABLE (In CSV: REACH_CHECK_DISABLE)—The device reachability check is disabled.

Cisco recommends that you always set this to ENABLE. This field is optional if Configured State is marked as UNMANAGED.

* Credential Profile

The name of the credential profile to be used to access the device for data collection and configuration changes. For example: nso23 or srpce123.

This field is optional if Configured State is marked as UNMANAGED.

Host Name

The hostname of the device. Cisco Crosswork Change Automation and Health Insights discovers it and updates it.

Inventory ID

Inventory ID value for the device. The value can contain a maximum of 128 alphanumeric characters, and can include dots (.), underscores ("_"), colons (":"), or hyphens ("-"). No other special characters are allowed.

Software Type

Software type of the device. For more information, see Supported Devices and Software Types.

Software Version

Software version of the device. For more information, see Supported Devices and Software Types.

UUID

Universally unique identifier (UUID) for the device.

Serial Number

Serial number for the device.

MAC Address

MAC address of the device.

* Capability

The capabilities that allow collection of device data and that are configured on the device. You must select at least SNMP as this is a required capability. The device will not be onboarded if SNMP is not configured. Other options are YANG_MDT, TL1, YANG_CLI, and YANG-EPNM. The capabilities you select will depend on the device software type and version.

Tags

The available tags to assign to the device for identification and grouping purposes.

Use device tags to group devices for monitoring, and to provide additional information that might be of interest to other users, such as the device’s physical location or its administrator’s email ID. For more information, see Manage Device Tags.

Product Type

Product type of the device.

Connectivity Details

Protocol

The connectivity protocols used by the device. Choices are: SSH, SNMPv2, NETCONF, TELNET, HTTP, HTTPS, GRPC, and SNMPv3.

To add more connectivity protocols for this device, click Add icon at the end of the first row in the Connectivity Details panel. To delete a protocol you have entered, click Delete icon shown next to that row in the panel.

You can enter as many sets of connectivity details as you want, including multiple sets for the same protocol. You must enter details for at least SSH and SNMP. If you do not configure SNMP, the device will not be added. If you want to manage the device (or you are managing XR devices), you must enter details for NETCONF. TELNET connectivity is optional.

* IP Address / Subnet Mask

Enter the device's IP address (IPv4 or IPv6) and subnet mask.

Note 

Please ensure that the subnets chosen for the IP networks (including devices and destinations) do not have overlapping address space (subnets/supernets) as it may result in unpredictable connectivity issues.

* Port

The port used for this connectivity protocol. Each protocol is mapped to a port, so be sure to enter the port number that corresponds to the Protocol you chose. The standard port assignments for each protocol are:

  • SSH: 22

  • SNMP: 161

  • NETCONF: 830

  • TELNET: 23

  • HTTP: 80

  • HTTPS: 443

Timeout

The elapsed time (in seconds) before communication attempts using this protocol will time out. The default value is 30 seconds. For XE devices using NETCONF, the recommended minimum timeout value is 90 seconds. For all other devices and protocols, the recommended minimum timeout value is 60 seconds.

Routing Info

ISIS System ID

The device's IS-IS system ID. This ID identifies the router in an IS-IS topology, and is required for SR-PCE integration.

OSPF Router ID

The device's OSPF router ID. This ID identifies the router in an OSPF topology, and is required for SR-PCE integration.

*TE Router ID

The device’s OSPF Router ID or ISIS Router ID depending on the IGP used in the network topology.

Streaming Telemetry Config

Telemetry Interface Source VRF

Name of the VRF within which Model Driven Telemetry (MDT) traffic is routed.

Location

All location fields are optional, with the exception of Longitude and Latitude, which are required for the geographical view of your network topology.

Longitude, Latitude

Longitude and latitude values are required so that the geographical map can present the correct geographical location of the device and its links to other devices. Enter the longitude and latitude in Decimal Degrees (DD) format.

Altitude

The altitude, in feet or meters, at which the device is located. For example, 123.

Providers and Access

Local Config:Provider and Device Key

Provider type used to configure devices. Choose a provider from the list.

If a Cisco NSO provider is chosen, the Device Key will automatically populate and the Credential Profile appears.

For CSV entry, use ROBOT_PROVIDER_LOCAL_CONFIG and enter the Provider name.

Compute Config: Provider

Provider type used for topology computation. Choose a provider from the list.

For CSV entry, use ROBOT_PROVIDER_COMPUTE and enter the Provider name.

Example
Figure 3. Add New Device Window

Get Network Device Details

Whenever you select Device Management > Devices and display the list of devices under the Network Devices tab, you can click Details icon next to any listed device to get more information about that device. Clicking this icon opens the Details for DeviceName pop-up window, as shown in the following example:

Figure 4. Details for DeviceName Window
Details for DeviceName Window

Expand the Connectivity Details area at the top of the pop-up window (if it is not already expanded). This area shows the reachability status for all transport types (for help with the icons shown in this area, see Device and Link Icons).

Expand and collapse the other areas of the pop-up window, as needed. Click Close icon to close the window.

Filter Network Devices by Tags

By creating a tag and assigning it to a particular device, you can easily provide additional information that might be of interest to other users, such as the device’s physical location and its administrator’s email ID. You can also use tags to find and group devices with the same or similar tags in any window that lists devices.

For help with tagging your devices, see Apply or Remove Device Tags. For help with creating and deleting tags, see Manage Tags.

To filter devices by tags:

Procedure


Step 1

Display the Network Devices tab or the Network Topology map:

  1. Display the Network Devices tab by choosing Device Management > Devices.

  2. Display the topology map by choosing Network Visualization > View Topology.

Step 2

In the Type to filter by tags bar at the top of the user interface, type all or part of the name of a tag.

The Type to filter by Tags bar has a type-ahead feature: As you start typing, the field shows a drop-down list of tags that match all the characters you have typed so far. To force the drop-down list to display all available tags, type *.

Step 3

Choose the name of the tag you want to add to the filter. The filter appears in the Type to filter by tags filter bar. The table or map shows only the devices with that tag.

Step 4

If you want to filter on more than one tag:

  1. Repeat Steps 2 and 3 for each additional tag you want to set as part of the filter.

  2. When you have selected all the tags you want, click Apply Filters. The table or map shows only the devices with tags that match all the tags in your filter.

Step 5

To clear all tag filters, click the Clear Filters link. To remove a tag from a filter containing multiple tags, click the X icon next to that tag's name in the filter.


Edit Network Devices

Complete the following procedure to update a device's information.

Before editing any device, it is always good practice to export a CSV backup of the devices you want to change (see Export Network Devices).

Procedure


Step 1

From the main menu, choose Device Management > Devices. The Network Devices tab is displayed by default.

Step 2

(Optional) Filter the list of devices by filtering specific columns.

Step 3

Check the check box of the device you want to change, then click Edit icon.

Step 4

Edit the values configured for the device, as needed. For a description of the fields you can update, see Add Devices Through the UI.

Note 

In addition to the exising fields, you can also view the Data Gateway configured for the selected device. This field is read-only.

Step 5

Click Save. (The Save button remains dimmed until all required fields are filled in.)

Step 6

Resolve any errors and confirm device reachability.


Delete Network Devices

Complete the following procedure to delete devices.

Before you begin

  • If the auto-onboard managed or unmanaged options are set for an SR-PCE provider, you should set auto-onboard for the SR-PCE(s) to off.

  • Confirm that the device is not connected to the network or that it is powered off before deleting the device.


Note

  • If devices are mapped to Cisco NSO with MDT capability, and telemetry configuration is pushed, then those configurations will be removed from the device.

  • If auto-onboard is not set to off, and it is still functional and connected to the network, the device will be rediscovered as unmanaged as soon as it is deleted.


Procedure


Step 1

Export a backup CSV file containing the devices you plan to delete (see Export Network Devices).

Step 2

From the main menu, choose Device Management > Devices. The Network Devices tab is displayed by default.

Step 3

(Optional) In the Devices window, filter the list of devices by entering text in the Search field or filtering specific columns.

Step 4

Check the check boxes for the devices you want to delete.

Step 5

Click Edit icon to edit the devices, as follows:

  1. Change each device's state to DOWN or UNMANAGED.

    If you want to delete devices in bulk, Cisco recommends that you change the device state in this manner in batches of 50 devices, then complete deletion of these devices before deleting another batch.

  2. Delete any KPIs currently running on the devices.

  3. Abort any Playbooks running on or scheduled to run on the devices.

Step 6

Click Delete icon.

Step 7

In the confirmation dialog box, click Delete.

Step 8

After deleting a device from the user interface, delete any telemetry configuration objects on the router that match the regex pattern .*CW_*.*. For example: You would find and delete router config objects like the three shown below:

 !
 destination-group CW_df5068767b68f9f0d9649cb32aca0cde917e5694
   address-family ipv4 172.16.2.31 port 31500
    encoding self-describing-gpb
    protocol tcp
   !
!
  sensor-group CW_df5068767b68f9f0d9649cb32aca0cde917e5694
   sensor-path Cisco-IOS-XR-nto-misc-oper:memory-summary/nodes/node/summary
  !
 subscription CW_df5068767b68f9f0d9649cb32aca0cde917e5694
   sensor-group-id CW_df5068767b68f9f0d9649cb32aca0cde917e5694 sample-interval 120000
   destination-id CW_df5068767b68f9f0d9649cb32aca0cde917e5694
  !
 !

Export Network Devices

When you export the device list, all device information is exported to a CSV file. Exporting the device list is a handy way to keep a record of all devices in the system at one time. You can also edit the CSV file as needed, and re-import it to overwrite existing device data.


Note

The exported device CSV file will contain only the name of the credential profile for each device, not the credentials themselves.


Procedure


Step 1

From the main menu, choose Device Management > Devices. The Network Devices tab is displayed by default.

Step 2

(Optional) Filter the device list as needed.

Step 3

Check the check boxes for the devices you want to export. Check the check box at the top of the column to select all the devices for export.

Step 4

Click Export icon. Your browser will prompt you to select a path and the file name to use when saving the CSV file, or to open it immediately


View Device Job History

Device Management collects and stores information about device-related jobs. Follow the steps below to track all create, update and delete activities.

Procedure


Step 1

From the main menu, choose Device Management > Job History. The Inventory Jobs window displays a log of all device-related jobs, like the one shown below.

Figure 5. Job History Window With Error Details Popup
Job History Window With Error Details Popup

The jobs display in descending order of creation time. The most recent job is shown first. To sort the data in the table, click a column heading. You can toggle between ascending and descending sort order (for more help, see Set, Sort and Filter Table Data).

Step 2

The Status column shows three types of states: completed, failed, and partial. For any failed or partial job, click Job Error Details icon shown next to the error for information.

Error information may include clean-up failure events as audit messages. These messages indicate that Cisco Crosswork Network Automation configuration objects on the device could not be removed, and will explain why they could not be removed. Users will need to take manual action to remove them. This typically involves deleting any XR telemetry configuration objects with names starting with CW_.


Manage Devices Using Zero Touch Provisioning

Introduction

The Crosswork Zero Touch Provisioning (ZTP) application allows users to quickly and easily bring up devices using a Cisco-certified software image and a day-zero software configuration of the customer's choice. Once provisioned in this way, the new device is onboarded to the Crosswork device inventory (and, if it is configured as a Crosswork Provider, to Cisco NSO), where it can be monitored and managed like other devices.

Crosswork ZTP can connect devices to the network either out-of-band, via the management network (if your organization has established one), or in-band, over the data network. The file integrity of software images is validated before upload to Crosswork using the Cisco-supplied MD5 checksum for each image file. Both image and configuration files are stored in the Crosswork inventory, as part of the ZTP controller service, which is accessible via API. ZTP uses the secure iPXE remote boot capability, and your organization's DHCP server, to download files to each device and install or execute them.

Crosswork ZTP is especially useful when factory-reset devices have been shipped to a branch office or other remote site and then cabled to the network, with no image or configuration. Using the ZTP application, a network administrator can establish an entry for the device with a corresponding image and configuration, and both provision and onboard the device. The only intervention needed at the device is to press the reset button on the device chassis.

Crosswork ZTP is also useful for devices that are already in production. Users can trigger a CLI reboot of the already-imaged device, and then reload or replace the current software image, apply a Software Maintenance Update (SMU), run a day-one or later configuration script, or execute arbitrary CLI, shell or Python scripts on the device as needed.

Crosswork ZTP is fully integrated with Cisco Smart Licensing. Once provisioned and onboarded, each ZTP device's "Provisioned" status registers and activates a single Smart License for that device, based on its serial number. The license and the device are thereafter counted and tracked. Re-provisioning or configuring for the same device does not consume an additional license (see Evaluation Licenses and ZTP).

ZTP Process Logic

The illustration below shows the process logic that ZTP uses to provision and onboard devices.

ZTP Process Logic

ZTP Device State Transitions

Once initiated by a factory reset or CLI reload, the ZTP process proceeds automatically, and updates the Zero Touch Devices window with status messages indicating which stage of the process the device has reached. The figure below shows the state changes as the process proceeds. ZTP device entries start out in the Unprovisioned state and, after ZTP is initiated, transition to the Provisioned state, where they are connected to the network. If the provisioning is successful, the device will transition to the Onboarded state, where it becomes part of the Crosswork inventory and can be monitored and managed like any other Crosswork network device.

The ZTP process is considered successful when the ZTP device loads all of its code successfully ("code" meaning both the image plus configuration files, or the configuration file alone), establishes connectivity with Crosswork, and updates its Status to Provisioned. Achieving this state causes one license to be counted for that specific device's serial number. Because the license is based on the device serial number, later transition to the Onboarded state, or any further ZTP re-provisioning, re-imaging, or re-configuration, does not affect the license count.

ZTP Device State Transitions

Evaluation Licenses and ZTP

All licenses start with an evaluation period, typically 90 days. When the evaluation period expires, Crosswork will display a banner, warning users that evaluation licenses have expired. While this banner is displayed, some ZTP operations (such as configuration downloads) will be blocked. Users will need to purchase a valid license with an entitlement for the number of ZTP devices to be provisioned and onboarded to resume using blocked functions. The ZTP server treats licenses in a non-restrictive manner, in the sense that, even if all of the valid licenses are consumed, most ZTP functions will continue to work, but the warning banner will be displayed.

ZTP Supported Platforms

Crosswork Zero Touch Provisioning supports the following platforms:

  • Software: Cisco IOS-XR versions 6.6.3, 7.0.1, 7.0.2, and 7.0.12.

  • Hardware: Cisco Network Convergence Systems (NCS) 5500 Series Routers, NCS 540 Series Routers, NCS 560 Series Routers, NCS 1000-1004 Series Routers, Cisco Aggregation Services (ASR) 9000 Series Routers, and Cisco 8000 and 8800 Series Routers.


Note

Customers using the following Cisco IOS-XR versions, please contact Cisco Customer Experience (CX) to source SMUs/ISOs for the following caveats:


ZTP Prerequisites

In addition to the other requirements mentioned in this section, using Crosswork ZTP to provision and onboard devices means your Crosswork installation must meet the following requirements:

  • Ensure that Crosswork and your IOS XR devices are deployed in a secure network domain.

  • Configure your organization's DHCP server to enable ZTP image and configuration file downloads. See DHCP Setup for Crosswork ZTP.

  • The Crosswork server must be reachable from the devices, via an out-of-band management or in-band data network. See the network diagram in the "Network Requirements" topic in the Cisco Crosswork Change Automation and Health Insights Installation Guide.

  • The Credential Profiles you plan to use to manage the ZTP devices once they have been onboarded must already exist in Crosswork. See Manage Credential Profiles.

  • If you want Crosswork ZTP to onboard your devices to Cisco NSO, NSO must already be configured as a Crosswork Provider. See Manage Providers and Sample Configuration for Devices in Cisco NSO.

Use the Zero Touch Devices Window to Work with Devices

The Zero Touch Devices window (shown below) gives you a list of all of the ZTP device entries you have created and enables you to add, import, edit, and delete them. Once ZTP processing is initiated, you can use the window's Status column to monitor each device's progress from the initial Unprovisioned state to the Provisioned and final Onboarded states (see ZTP Device State Transitions). You can also get a summary view of current ZTP device status by viewing the Zero Touch Provisioning dashboard on the Crosswork Home page (see Use the Zero Touch Provisioning Tile to Monitor Progress).

The same Status column notifies you when a Provisioning Error or Onboarding Error occurs for a device during ZTP processing. If errors are detected, you can use this window to view possible causes of an onboarding error, edit the device's Status back to Unprovisioned, and then either Retry Onboarding (in the case of an onboarding error) or trigger ZTP processing again (in the case of a provisioning error).

Once ZTP devices are successfully onboarded, you can manage and monitor them using the Network Devices tab.

To view the Zero Touch Devices window, select Device Management > Devices > Zero Touch Devices.

Zero Touch Devices window
Item Description

1

Text and icons in the Status column show the current provisioning status of each ZTP device.

2

Click Add icon to add a new ZTP device to the ZTP repository. See Create ZTP Device Entries Using the UI.

Click Edit icon to edit the information for the currently selected ZTP device entry, including the device Status. See Edit ZTP Devices.

For devices with an error Status, such as Onboarding Error or Provisioning Error, you must always use the Edit icon to reset the device's Status to Unprovisioned before attempting to retry onboarding.

Click Delete icon to delete the currently selected ZTP device entry. See Delete ZTP Devices. Note that deleting a device that has successfully completed ZTP processing has no impact on the number of ZTP licenses that have been used.

Click Import icon to import new ZTP device entries using a CSV file. You can also download a CSV file template by clicking this icon. The template includes sample data that you can use as a guide for building your own CSV file. See Create ZTP Device Entries Using Import and Prepare ZTP Device Import Files.

Click Export icon to export information for selected ZTP devices to a CSV file. See Export Devices.

Click Retry Onboarding to attempt to onboard a selected ZTP device entry when a previous onboarding attempt failed. You must first select the device entry you want to retry. You cannot retry more than one device entry at a time.

Before before attempting to retry onboarding for a device, you must use the Edit icon to reset the device's Status to Unprovisioned.

You will want to review the error popup and log files, determine why the ZTP onboarding process failed (for example: bad IP address) and, where needed, update the device entry's image or configuration, or update the corresponding DHCP device entry (see DHCP Setup for Crosswork ZTP).

3

Click Details icon in the Status column for information on the cause of any detected provisioning or onboarding errors. See Troubleshoot ZTP Issues.

4

Click Details icon in the Host column for details about the host.

5

Click these links to bypass the Crosswork main menu and navigate directly to the Software Image, Configurations or ZTP Profiles window.

6

Click Refresh icon to refresh the Zero Touch Devices window.

7

Click Info icon to display the Zero Touch Provisioning Steps page. It will remind you of the ZTP process workflow steps, and help you navigate to the parts of the ZTP user interface that will enable you to complete each step. See Workflow: Zero Touch Provisioning.

8

Click Settings icon to select which columns to display in the Zero Touch Devices window. See Set, Sort and Filter Table Data.

9

Click Set Filter icon to set filter criteria on one or more columns in the Zero Touch Devices window. See Set, Sort and Filter Table Data.

Click the Clear Filter link to clear any filter criteria you may have set.

Use the Zero Touch Provisioning Tile to Monitor Progress

The Zero Touch Provisioning tile (shown below) lets you see a summary view of your current ZTP processing status. It provides a count for all the devices, images, configuration files and profiles currently in use, as well as the number of devices in each of the possible ZTP states (see ZTP Device State Transitions).

Until you begin using ZTP device management, the tile will have counts of zero for all of these indicators. The counts will change as you work with the application. Clicking on the View ZTP devices link at the bottom of the tile will navigate directly to the Zero Touch Devices window, where you can begin creating ZTP device entries and ZTP profiles by uploading the associated software image and configuration files (see Use the Zero Touch Devices Window to Work with Devices).

To view the Zero Touch Provisioning tile, click the Home icon on the main menu.

Zero Touch Provisioning Dashboard

Zero Touch Provisioning Concepts

Crosswork Zero Touch Provisioning (ZTP) makes use of the following basic terminology and concepts:

  • Image file: A binary Cisco IOS-XR software image or Software Maintenance Update (SMU) file, used to install or maintain an installation of the Cisco Internet Operating System on a network device. The Crosswork ZTP process on the device downloads the image from Crosswork and installs the images using the open-source boot firmware iPXE. If any SMU maintenance patches need to be deployed, they can be done via user script after image download via ZTP processing.

  • Configuration file: A file used to set the operating parameters of the newly imaged or re-imaged device. This can be a Python script, Linux shell script, or a sequence of Cisco IOS CLI commands stored as an ASCII text file. The Crosswork ZTP process downloads the configuration file to the newly imaged device, which then executes it.

  • ZTP profile: A Crosswork storage construct that combines (normally) one image and one configuration into a single unit. Crosswork uses ZTP profiles to automate imaging and configuration processes. While optional, creating ZTP profiles is recommended as the best way to combine a single image file and configuration file based on a product or device family, such as the Cisco ASR 9000 or Cisco NCS5500. It will also help you to configure your organization's DHCP server based on device family class, and use a single set of image/configuration files for devices in that class.

  • ZTP repository: The location where Crosswork stores ZTP image and configuration files.

  • File path: The explicit path to a stored image, SMU, or configuration file in the ZTP repository. Better known as the bootfile name, the file path is used in DHCP (option 67 for v4) configuration and represented as an HTTP/HTTPS URL image or configuration file path in the repository. File paths must be specified when you update DHCP for your ZTP devices. You can easily copy this URL from the ZTP repository and update it in the DHCP server configuration file (see Copy Configuration File Paths and UUIDs and Copy Image File Paths and UUIDs).

  • UUID: The Universal Unique Identifier (UUID) uniquely identifies an image or configuration file uploaded to Crosswork. In the DHCP bootfile URL, for any change in the configuration or image file used for ZTP, it is sufficient to copy and then update the corresponding UUID in the URL.

Workflow: Zero Touch Provisioning

For a reminder of the main steps in using Zero Touch Provisioning (ZTP) to provision and onboard your network devices, click Info icon on any window in the ZTP application. The popup Zero Touch Provisioning Steps page shown below displays icons representing each major step in the process. Click on one of the icons to navigate directly to the part of the Crosswork ZTP user interface that allows you to perform that step.

Zero Touch Provisioning Steps window

The following table provides links to more detailed information on how to perform each step in the process

Step

For details, see...

1. Download from Cisco and then upload to the ZTP repository the IOS-XR device image files you want to use to image your ZTP devices.

Upload Software Image Files

2. Create and then upload to the ZTP repository the day-zero (or later) configuration files you want to use to configure your devices.

Upload Configuration Files

Prepare Your Custom Day-Zero Configuration Files

Use Custom Day-Zero Configuration Files

3. (Optional) Create one or more ZTP profiles to image and/or configure your devices. Note that specifying an image file in a ZTP profile is optional. You can also image or configure a device without a ZTP profile, by specifying the image and/or configuration file when you create the ZTP device entry.

Create Zero Touch Profiles

4. Create ZTP device entries to be provisioned and onboarded by ZTP processing. You can specify the device image and/or configuration file to be used in ZTP processing either in the ZTP device entry itself, or by specifying a ZTP profile (if you have created one).

Create ZTP Device Entries

5. Modify your organization's DHCP configuration, so that DHCP can properly respond to each device's request for an image and/or configuration download.

DHCP Setup for Crosswork ZTP

6. Initiate the ZTP process, which will then provision and onboard ZTP devices. You can trigger Crosswork ZTP processing by rebooting the device.

You can do this either by:

  • If you have physical access to the device: Press the reset button on the device chassis.

  • If the device has been imaged: Connect to the device via the console, enter exec mode, and issue a ztp initiate command. The command will try to initiate on the management port first, then try other available ports.

For details and options for the ztp initiate command, see the examples at this link.

7. Troubleshoot provisioning and onboarding issues as needed

Troubleshoot ZTP Issues

Upload Software Image Files

The ZTP repository is intended for initial onboarding of devices. You can upload as many images as you want, up to the maximum image-file storage limit of 20GB. As image files tend to be large, Cisco recommends that you restrict uploads to only those images needed for day-zero imaging.

Before you begin

Be sure to:

  • Download the image files you plan to add to the ZTP repository. Licensed software images and SMU files are always available for download from the Cisco Software Download site. Only image files with the filename extensions iso, tar or rpm can be uploaded to the ZTP repository. See ZTP Supported Platforms.

  • Copy to your clipboard or record the MD5 checksum used to verify the integrity of each image file. The MD5 checksum for each image file is available on the Details popup window for the Cisco Software Download page from which you downloaded that file. You can quickly copy the checksum to your clipboard by clicking the clipboard icon shown on the same line as the MD5 checksum itself (highlighted in the example popup shown below).

    MD5 Checksum on Download Details Popup

    This image 444598.jpg is not available in preview/cisco.com

Procedure


Step 1

From the main menu, choose Device Management > Software Images. Crosswork displays the Image Repository list.

Step 2

Click Add icon. Crosswork displays the Add Image page.

Step 3

Enter the values for the new file upload as shown in the table below.

Table 3. Add Image Fields (*=required)

Field

Description

Image Name *

The unique name you want to assign to the uploaded image file.

Image Type *

Select Image or SMU.

MD5 Checksum *

Enter the image's MD5 checksum.

OS Platform *

Select the IOS device software platform. Currently, the IOS-XR platform is supported.

OS Version *

Select the IOS software platform version for the image or SMU. Currently, versions 6.6.3, 7.0.1, 7.0.2 and 7.0.12 are supported.

Device Family *

Select the device family on which this software image or SMU will be applied (for example, CISCO ASR9000).

Software Image *

Click Browse to navigate to and select the image or SMU file to be uploaded.

Step 4

When you have complete entries in all of the required fields, click Add to begin uploading the new file.

Crosswork displays a progress bar during the upload. Once the upload is complete, Crosswork verifies the integrity of the image file using the MD5 checksum you entered. If these do not match, then either the checksum is incorrect or the file is corrupt. Crosswork will prompt you to either correct the checksum, or upload another version of the file.

Edit Image Files

Except for the software image file name itself, you can change any of the properties for an image you have added to the ZTP repository.

Procedure

Step 1

From the main menu, choose Device Management > Software Images. Crosswork displays the Image Repository list.

Step 2

In the Image Repository list, click the selection box next to the image file whose properties you want to edit.

Step 3

Click Edit icon. Crosswork displays the Edit Image page.

Step 4

Change the values in the fields as needed.

Step 5

When you have completed your changes, click Update to save them.


Delete Image Files

Deleting an image associated with a ZTP profile will render that profile non-functional. A mistaken deletion cannot be undone, but the image can be uploaded again and re-associated with the ZTP profile.

As software image files tend to be very large, Cisco recommends that you restrict your ZTP repository to only those images needed for Day Zero and Day One configurations.

Before you begin

There are no checks to prevent deletion of an active image file. Be sure that any image you plan to delete from the ZTP repository is not already associated with ZTP device entries or ZTP profiles. You can check if an image file is associated with an individual ZTP device entry by checking your device entries listed on the Zero Touch Devices window (see Use the Zero Touch Devices Window to Work with Devices). You can check if an image file is associated with a ZTP profile by selecting the View Details option for the ZTP profile with which you think it may be associated (see View Zero Touch Profile Details).

Procedure

Step 1

From the main menu, choose Device Management > Software Images. Crosswork displays the Image Repository list.

Step 2

In the Image Repository list, click the selection box next to the image you want to delete.

Step 3

Click Delete icon.

Crosswork prompts you to verify that the image file is not already associated with a ZTP profile.

Step 4

Click Delete to delete the image file.


Copy Image File Paths and UUIDs

When added to Crosswork, every image or SMU file is assigned a unique UUID and stored in the Crosswork repository. You will need to specify the unique repository file path and UUID for each device when modifying your DHCP server configuration file to permit provisioning (see DHCP Setup for Crosswork ZTP). You can quickly copy to your clipboard the complete file path and UUID for any image or SMU file, directly from the Software Images list. You can also copy just the image file's UUID.

Procedure

Step 1

From the main menu, choose Device Management > Software Images. Crosswork displays the Image Repository list.

Step 2

If you want to copy:

  • The image's full path and UUID: Click Copy Icon in the Image/SMU Name column.
  • The image's UUID only: Click Copy Icon in the Image UUID column.

Crosswork copies the file path and/or UUID to your clipboard. You can now paste it into your DHCP host entry.

When using the copied file path to create DHCP host entries, be sure to replace the IP variable with the IP address and port of your Crosswork server.


Upload Configuration Files

You can add a maximum of 5GB of configuration files to the ZTP repository. No single configuration file can exceed 2MB in size.

Before you begin

Be sure you have prepared one or more configuration or script files to add to the ZTP repository. Only IOS-XR CLI text configuration (.txt), Linux shell (.sh) or Python script (.py) files, with the appropriate filename extensions, can be added.

For guidance on creating and running custom configuration files using Crosswork ZTP, see Prepare Your Custom Day-Zero Configuration Files and Use Custom Day-Zero Configuration Files.

Procedure


Step 1

From the main menu, choose Device Management > Configuration Files. Crosswork displays the Configurations window.

Step 2

Click Add icon. Crosswork displays the Add Configuration page.

Step 3

Enter the values for the new configuration file upload as shown in the table below.

Table 4. Add Configuration Fields (*=required)

Field

Description

Configuration Name *

The unique name you want to assign to the uploaded configuration file. This is the name that distinguishes it from all other configuration files in the repository, and is the name that will appear on the Configuration Files list.

OS Platform *

Select the IOS device software platform appropriate for this configuration. Currently, the IOS-XR platform is supported.

OS Version *

Select the IOS software platform version appropriate for this configuration. Currently, versions 6.6.3, 7.0.1, 7.0.2 and 7.0.12 are supported.

Device Family *

Select the family of devices to which this configuration will be applied (for example, CISCO ASR9000).

Config/Script File *

Click Browse to navigate to and select the configuration or script file to be uploaded.

Step 4

When you have complete entries in all of the required fields, click Add to begin uploading the new configuration file.

Crosswork displays the contents of the configuration file in a popup window. Verify that it is the file you want. You can scroll the popup window to verify the contents of the file.
Step 5

When you are ready, click OK to continue. Then click Add to upload the file.


Prepare Your Custom Day-Zero Configuration Files

Configuration files vary greatly in contents, depending on the needs of the organization using the device and the device capabilities. The following topics provide guidelines to follow when preparing day-zero configuration scripts for use with Crosswork ZTP

A Sample Basic Day-Zero Configuration Script

The generic shell script does most of the work of configuring your IOS-XR devices (see Use Custom Day-Zero Configuration Files). Your custom day-zero configuration file can be as simple as the example shown below:

#!! IOS XR Configuration 7.0.1
!! Last configuration change at Wed Mar 1 10:38:34 2019 by admin
!
hostname {$HOSTNAME}
username {$SSH_USERNAME}
 group root-lr
 group cisco-support
 secret {$SSH_PASSWORD}
!
tpa
 vrf default
 !
!
call-home
 service active
 contact smart-licensing
 profile CiscoTAC-1
  active
  destination transport-method http
 !
!
interface MgmtEth0/RP0/CPU0/0
 ipv4 address dhcp

This example makes use of several placeholders, such as {$HOSTNAME}, for which the system will insert corresponding values at runtime. See the next section for guidelines on using these placeholders in your configuration file

ZTP Placeholders in Day-Zero Configuration Files

The following table lists the placeholders you can use in your custom day-zero configuration files. At runtime, for each of these placeholders, Crosswork will substitute the appropriate values for each device. For an example of the use of these placeholders, see the sample configuration script in the preceding topic.

Table 5. ZTP Placeholders in Configuration Files

This placeholder...

...is filled using the value from the...

{$HOSTNAME}

Device's host name value as specified in the ZTP device entry.

{$IP_ADDRESS}

Device's IP address value, as assigned by DHCP.

{$SSH_USERNAME}

Credential Profile's User Name field (where the Connectivity Type is SSH).

{$SSH_PASSWORD}

Credential Profile's Password field (where the Connectivity Type is SSH).

{$SSH_ENPASSWORD}

Credential Profile's Enable Password field (where the Connectivity Type is SSH)

{$SNMP_READ_COM}

Credential Profile's Read Community field (where the Connectivity Type is SNMPv2).

{$SNMP_WRITE_COM}

Credential Profile's Write Community field (where the Connectivity Type is SNMPv2).

{$SNMP_SEC_LEVEL}

Credential Profile's Security Level field (where the Connectivity Type is SNMPv3).

{$SNMP_USERNAME}

Credential Profile's User Name field (where the Connectivity Type is either SNMPv2 or SNMPv3).

{$SNMP_AUTH_TYPE}

Credential Profile's User Name field (where the Connectivity Type is SNMPv3 and Security Level is AUTH_NO_PRIV) or AUTH_PRIV).

{$SNMP_AUTH_PASS}

Credential Profile's User Name field (where the Connectivity Type is SNMPv3 and Security Level is AUTH_NO_PRIV or AUTH_PRIV).

{$SNMP_PRIV_TYPE}

Credential Profile's User Name field (where the Connectivity Type is SNMPv3 and Security Level is AUTH_PRIV)).

{$SNMP_PRIV_PASS}

Credential Profile's Priv Password field (where the Connectivity Type is SNMPv3 and Security Level is AUTH_PRIV)).

Use Custom Day-Zero Configuration Files

You will be applying your day-zero configuration using a generic shell script that works with all of the supported routers and does most of the work of configuring them. The modified shell script will call your own custom configuration file.

Before you begin

Be sure you have prepared your own custom day-zero configuration file as explained in Prepare Your Custom Day-Zero Configuration Files. You will also need to add it to the Crosswork ZTP repository, as explained in Upload Configuration Files.

Once you have uploaded your own custom day-zero configuration file to Crosswork, copy or record its UUID, as explained in Copy Configuration File Paths and UUIDs. You will need it when you modify the generic shell script.

Procedure

Step 1

From the main menu, choose Device Management > Devices. Crosswork displays the Configuration Files list.

Step 2

Click Download Sample Script. Your browser will prompt you to save the generic script file on your local file system.

Give the file a unique name and change the filename extension to sh, to indicate that it is a Linux shell script.

Step 3

Open the saved shell script with the editor of your choice.

Step 4

In the saved shell script, locate and modify the values assigned to the following variables, as follows:

  • XRZTP_INTERFACE_NAME: The interface on the device where the ZTP process will be initiated. For example: MgmtEth0/RP0/CPU0/0.

  • CW_HOST_IP: The IP address of the Crosswork server. For example: 192.168.1.1.

  • CW_PORT: The Crosswork server port number on which to initiate download of your own custom configuration file. Use 30604 if this will be an HTTP download, or 30603 for an HTTPS download.

  • CW_CONFIG_UUID: The UUID of your own custom day-zero configuration file, previously uploaded to the Crosswork repository. For example: 30d2d77c-462a-4b4d-8960-fd94436cc0f9.

Step 5

(Optional) If you will be using the script to configure Cisco ASR 9000 devices: The generic script, as written, will work with all the supported device families except ASR 9000. The script contains commands that will make it work with ASR 9000, but these have been commented out. To make it work with ASR 9000, un-comment the ASR 9000 command sections and comment out the sections for other devices. These sections are clearly documented in the script.

Step 6

Save the modified shell script.

Step 7

Upload the modified shell script to the ZTP repository, as explained in Upload Configuration Files.

Step 8

Create or modify ZTP device entries, or create ZTP profiles, with Configuration settings that point to the UUID of the modified shell script. For help with these tasks, see the topics under Create ZTP Device Entries and Create Zero Touch Profiles.


Edit Configuration Files

You can change any of the stored field values for a configuration file you have uploaded to the ZTP repository. For a list of the field values you can change, see the "Add Configuration Fields" table in Upload Configuration Files.

If you change the value in the Config/Script File field during an edit session, you will trigger a configuration file upload to the repository, just as you do when uploading configuration files (see Upload Configuration Files). Note that you will need to browse to and select the new configuration or script file to change the value in Config/Script File.

Except for uploads triggered by changes in Config/Script File, changing the value in these fields does not change the configuration file itself. In order to update a configuration file's contents:

  1. Download the existing file, as explained in Download Configuration Files.

  2. Make your changes to the file, using your choice of editor.

  3. Upload the changed configuration file to the ZTP repository, as explained in Upload Configuration Files.

Procedure

Step 1

From the main menu, choose Device Management > Configuration Files. Crosswork displays the Configurations window.

Step 2

In the Configurations list, click the selection box next to the configuration file you want to edit.

Step 3

Click Edit icon. Crosswork displays the Edit Configuration page.

Step 4

Change the values in the fields as needed.

Step 5

When you have completed your changes, click Update to save them.


Download Configuration Files

You can download any configuration file previously added to the ZTP repository. This is handy when you want to make changes in an existing file, or create a new configuration using an existing one as a template.

Procedure

Step 1

From the main menu, choose Device Management > Configuration Files. Crosswork displays the Configurations window.

Step 2

In the Configuration Files list, in the Configuration Name column next to the configuration file you want to download, click Download icon.

Crosswork displays the file download window for your client OS. Change the file name as needed, navigate to the folder where you want to store it, and confirm that you want to save the file.

Delete Configuration Files

Follow the steps below to delete a configuration file.

Before you begin

Be sure that any configuration file you plan to delete from the ZTP repository is not already associated with ZTP device entries or ZTP profiles. You can check if a configuration file is associated with an individual ZTP device entry by checking your device entries listed on the Zero Touch Devices window (see Use the Zero Touch Devices Window to Work with Devices). You can check if a configuration file is associated with a ZTP profile by selecting the View Details option for the ZTP profile with which you think it may be associated (see View Zero Touch Profile Details).

Deleting a configuration file associated with a ZTP profile will render that profile non-functional. A mistaken deletion cannot be undone, but the configuration file can be uploaded again and re-associated with the ZTP profile.

Procedure

Step 1

From the main menu, choose Device Management > Configuration Files. Crosswork displays the Configurations window.

Step 2

In the Configurations list, click the selection box next to the configuration file you want to delete.

Step 3

Click Delete icon.

Crosswork prompts you to check that the file is not already associated with a device entry or ZTP profile.

Step 4

Click Delete to delete the file.


Copy Configuration File Paths and UUIDs

When added to Crosswork, every configuration file is assigned a unique UUID and stored in the Crosswork ZTP repository. You will need to specify the unique repository file path and UUID for each device when modifying your DHCP server configuration file to permit provisioning (see DHCP Setup for Crosswork ZTP). You can quickly copy to your clipboard the complete file path and UUID for any configuration file, directly from the Configurations list. You can also copy just the configuration file's UUID.

Procedure

Step 1

From the main menu, choose Device Management > Configuration Files. Crosswork displays the Configurations window.

Step 2

If you want to copy:

  • The configuration file's full path and UUID: Click Copy Icon in the Configuration Name column.
  • The configuration file's UUID only: Click Copy Icon in the Config UUID column.

Crosswork copies the file path and/or UUID to your clipboard. You can now paste it into your DHCP host entry.

When using the copied file path to create DHCP host entries, be sure to replace the CCW_HOST_IP variable with the IP address and port of your Crosswork server.


Create Zero Touch Profiles

You can create as many ZTP profiles as you like. However, Cisco recommends that you create one and only one day-zero ZTP profile per specific device group or device family. Each ZTP profile can have just one image file and one configuration file associated with it.

An image file is not required in every ZTP profile. You can create ZTP profiles that specify a configuration only. You can also associate image or configuration files directly with a device entry, without using a ZTP profile, by selecting a previously added image or configuration file from the dropdown menu in the ZTP device entry's Software Image and Configuration File fields (see Create ZTP Device Entries Using the UI) or entering the file names in those columns in the CSV file you use to import device entries (see Create ZTP Device Entries Using Import).

Before you begin

Be sure you have added to the ZTP repository:

  • All of the image files you plan to use in the ZTP profiles you create. For help with this task, see Upload Software Image Files.

  • All of the configuration files you plan to use in the ZTP profiles you create. For help with this task, see Upload Configuration Files.

Procedure


Step 1

From the main menu, choose Device Management > Zero Touch Profiles. Crosswork displays the ZTP profile Management page.

Step 2

Click + New Profile. Crosswork displays the Add Profile page, with tiles representing your ZTP profiles.

Step 3

Enter the values for the new ZTP profile as shown in the table below.

Step 4

When you have completed entries in all of the required fields, click Save to create the new ZTP profile. Crosswork displays the ZTP Profile Management page, with a new tile for the new profile.

Table 6. Add Profile Fields (*=required)

Field

Description

Profile Name *

The unique name you want to assign to this ZTP profile. This is the name as it will appear in the tile representing this ZTP profile on the ZTP Profile Management page, and when adding new ZTP devices.

Description

Enter a description of the ZTP profile. This description will appear in the tile representing this ZTP profile on the ZTP Profile Management page.

OS Platform *

Select the IOS software platform for the devices to which this ZTP profile will be applied. This should be the same platform as the image and configuration files the profile uses. Currently, the IOS-XR platform is supported.

OS Version *

Select the IOS software platform version for the devices to which this ZTP profile will be applied. This should be the same version as the image and configuration files the profile uses. Currently, IOS-XR versions 6.6.3, 7.0.1, 7.0.2 and 7.0.12 are supported.

Device Family *

Select the device family for the devices to which this ZTP profile will be applied. This should be the same device family as the image and configuration files the profile uses. The device family will appear in the tile representing this ZTP profile on the ZTP Profile Management page.

Software Image

Select from the dropdown menu the image file that this profile will apply to the devices. The file must already exist in the ZTP repository. See Upload Software Image Files. Note that an image file is optional for ZTP profiles; you may have profiles that only apply a configuration.

Configuration File *

Select from the dropdown menu the configuration file that this profile will apply to the devices. The file must already exist in the ZTP repository. See Upload Configuration Files.


Edit Zero Touch Profiles

Follow the steps below to edit the stored field values for a ZTP profile.

Procedure

Step 1

From the main menu, choose Device Management > Zero Touch Profiles. Crosswork displays the ZTP Profile Management page.

A tile icon represents each of the existing ZTP profiles.

Step 2

(Optional) To find a specific profile: Click in the Search Profiles box and begin typing. The ZTP Profile Management page displays only the profile tiles that match the text you entered.

Step 3

In the top right corner of the tile for the ZTP profile you want to edit, click More icon.

Step 4

From the drop down menu, select Edit. Crosswork displays the Edit Profile page.

Step 5

Change the values in the fields as needed.

Crosswork will verify that any changes you make to the OS Platform, OS Version or Device Family field values match the same values for the software image or configuration file you associated with the ZTP profile. You cannot change the Profile Name.

Step 6

When you have completed your changes, click Update to save them.


Delete Zero Touch Profiles

You can delete any ZTP profile as long as it is not already associated with an unprovisioned ZTP device. Deleting a ZTP profile does not affect the configuration or image files associated with it.

You can check if a ZTP profile is associated with an individual ZTP device entry by checking your device entries listed on the Zero Touch Devices window (see Use the Zero Touch Devices Window to Work with Devices).

Procedure

Step 1

From the main menu, choose Device Management > Zero Touch Profiles. Crosswork displays the ZTP profile Management page.

A tile icon represents each of the existing ZTP profiles.

Step 2

(Optional) To find a specific profile: Click in the Search Profiles box and begin typing. The ZTP Profile Management page displays only the profile tiles that match the text you entered.

Step 3

In the top right corner of the tile for the ZTP profile you want to delete, click More icon.

Step 4

From the drop down menu, select Delete.

Step 5

To confirm, click Delete again.


View Zero Touch Profile Details

You can view the stored field values for any ZTP profile without editing it. Profile details include the Profile Name, Description, Device Type, OS and OS Version, and the names of the associated image and configuration files.

Procedure

Step 1

From the main menu, choose Device Management > Zero Touch Profiles. Crosswork displays the ZTP Profile Management page.

A tile icon represents each of the existing ZTP profiles.

Step 2

(Optional) To find a specific profile: Click in the Search Profiles box and begin typing. The ZTP Profile Management page displays only the profile tiles that match the text you entered.

Step 3

In the top right corner of the tile representing the ZTP profile you want to view, click More icon.

Step 4

From the drop down menu, select View Details.

Crosswork displays a popup window listing all the ZTP profile details.


Create ZTP Device Entries

Before you can provision and onboard ZTP devices, you must first create ZTP device entries. Crosswork uses these entries to provision and onboard the actual devices once ZTP processing is initiated

You can create ZTP device entries one at a time, using the Crosswork user interface, or in bulk by importing a CSV file.

The following topics discuss both methods, as well as how to properly prepare CSV files, and ways to edit, delete, and export backups of your ZTP entries.

Create ZTP Device Entries Using the UI

Follow the steps below to create ZTP device entries one by one, using the GUI. Under normal circumstances, you will want to use this method when adding a few devices only. For adding device entries in bulk, import them from a CSV file (see Create ZTP Device Entries Using Import).

Newly added ZTP device entries always appear in the Zero Touch Devices tab with their Status set to unprovisioned. They will remain unprovisioned until you initiate ZTP processing.

Before you begin

Be sure you have:

  • Completed the planning steps and setup requirements discussed in Get Started.

  • Added the software image files you want loaded onto your ZTP devices when ZTP processing is initiated, as explained in Add Image Files.

  • Added the configuration files you want to use to provision or configure your ZTP devices when ZTP processing is initiated, as explained in Upload Configuration Files.

As a convenience for users who may be testing a ZTP profile for a new family of devices, Crosswork provides fields for associating image and configuration files directly with a ZTP device entry, instead of via a ZTP profile. Once you have tested these files and provision/onboarding is successful, Cisco recommends that you create the ZTP profiles you want to use to provision/onboard other instances of this device family, before adding the device entries for them. This can be especially helpful if you are planning to add ZTP devices via import.

Procedure

Step 1

From the main menu, choose Device Management > Devices. Crosswork displays the Devices list.

Step 2

Click the Zero Touch Devices tab.

Step 3

Click Add icon.

Step 4

Enter values for the new ZTP device entry, as listed in the table below.

Once devices are onboarded, additional attributes may be displayed.

Step 5

Click Save. The Save button is disabled until all required fields are complete.

Table 7. Add ZTP Device Fields (*=required)

Field

Description

Host Name *

The hostname of the device. Crosswork discovers it and updates it.

Serial Number *

Serial number for the device. ZTP uses the serial number as part of the device ID.

Profile

Choose whether you want to use a Zero Touch (ZT) profile to configure this device.

Select No Profile if you have not yet created a ZTP profile for the new ZTP device. No Profile is the default.

If you select Use Profile, you must select the ZTP profile in the next field.

Profile Name *

Select the ZTP profile you want to use to provision this device. Required only if you selected Use Profile in the Profile field

IP Address

The IP address of the device, obtained via script from your organizations DHCP server.

Status

Defaults to Unprovisioned during ZTP device entry creation. You cannot select a different status while adding an entry. The Status updates automatically after ZTP processing is initiated.

MAC Address

The MAC address for the device.

Inventory ID

The inventory ID for the device.

UUID

The Universally Unique Identifier (UUID) for the device. This is assigned by the system unless you elect to enter one yourself.

OS Platform *

Select the software platform for the device. This should be the same platform as the image and configuration files you will use to provision it. Currently, the IOS-XR platform is supported.

Required only if you selected No Profile in the Profile field.

OS Version *

Select the IOS software platform version for the device. This should be the same version as the image and configuration files you will use to provision it. Currently, IOS-XR versions 6.6.3, 7.0.1, 7.0.2 and 7.0.12 are supported.

Required only if you selected No Profile in the Profile field.

Device Family *

Select the device family for the device. This should be the same device family as the image and configuration files you will use to provision it.

Required only if you selected No Profile in the Profile field.

Software Image

Select from the dropdown menu the image file you will use to image the device.

A software image is not required, even if you selected No Profile in the Profile field.

Configuration File *

Select from the dropdown menu the configuration file you will use to configure the device.

Required only if you selected No Profile in the Profile field.

Credential Profile *

Select from the dropdown menu the Credential Profile to be assigned to the device, which will be used to access it for data collection and configuration changes. For example: nso23.

Connectivity Details

Protocol

The connectivity protocols used by the device. Choices are: SSH, SNMPv2, NETCONF, TELNET, HTTP, HTTPS, GRPC, and SNMPv3.

You can add one protocol for this device by completing the fields in the first row of the Connectivity Details panel. To add more connectivity protocols, click Add icon at the end of the first row. To delete a protocol you have entered, click Delete icon shown next to that row in the panel. You can enter as many sets of connectivity details as you want. You must enter connectivity details for at least SSH, SNMPv2 or SNMPv3, and NETCONF. SNMP is required to onboard the device. NETCONF is required to manage IOS-XR devices. TELNET and other connectivity protocols are optional.

Please note that the assigned IP address needs to be reachable from the Crosswork server. In some cases, this may require route creation. Consult the Cisco Crosswork Change Automation and Health Insights Installation Guide for additional details on network configuration.

* IP Address / Subnet Mask

Enter the device's IP address (IPv4 or IPv6) and subnet mask.

Required only if you chose to set up a connectivity protocol.

* Port

The port used for this connectivity protocol. Each protocol is mapped to a port, so be sure to enter the port number that corresponds to the Protocol you chose. The standard port assignments for each protocol are:

  • SSH: 22

  • SNMP: 161

  • NETCONF: 830

  • HTTP: 80

  • HTTPS: 443

Required only if you chose to set up a connectivity protocol.

Timeout

The elapsed time (in seconds) before communication attempts using this protocol will time out. The default value is 30 seconds; the recommended timeout value is 60 seconds.

Providers and Access

Provider Names

Select the provider type used to manage devices. For ZTP, select an NSO provider only.

Device Key

If you choose Cisco NSO as a provider, the Device Key will automatically populate.


Create ZTP Device Entries Using Import

Follow the steps below to create multiple ZTP device entries all at once by importing a CSV file.

Imported ZTP device entries always appear in the Zero Touch Devices tab with their Status set to Unprovisioned. They will remain Unprovisioned until you initiate ZTP processing.

Before you begin

Be sure you have:

  • Completed the planning steps and setup requirements discussed in Get Started.

  • Uploaded to Crosswork the software files you will use to image the devices when ZTP processing is initiated, as explained in Add Image Files.

  • Uploaded to Crosswork the configuration files you will use to configure the devices when ZTP processing is initiated, as explained in Upload Configuration Files.

  • Used the template to prepare a CSV file describing the device entries you want to import. You can download the CSV template using the Import Devices dialog box, as explained in Prepare ZTP Device Import Files.

Procedure

Step 1

From the main menu, choose Device Management > Devices. Crosswork displays the Devices list.

Step 2

Click the Zero Touch Devices tab.

Step 3

Click Import icon to open the Import Devices dialog box.

Step 4

Click Browse to navigate to the CSV file you created and then select it.

Step 5

With the CSV file selected, click Import.


Prepare ZTP Device Import Files

Complete the steps below to create a CSV file specifying one or more ZTP devices that you can then import into Crosswork, as explained in Create ZTP Device Entries Using Import.

Note that, if you are preparing the import file to correct device entries you have already made, the device entries must be in the Unprovisioned status. For instructions on how to reset the device entry's status, see XREF

Procedure

Step 1

From the main menu, choose Device Management > Devices. Crosswork displays the Devices list.

Step 2

Click the Zero Touch Devices tab.

Step 3

Click Import icon to open the Import Devices dialog box.

Step 4

Click the Download 'Devices import' template (.csv)' file link and save the CSV file template to a local storage resource. Then click Cancel to exit the Import Devices dialog.

Step 5

Open the template using your preferred tool. Begin adding rows to the file, one row for each device. As you do so, observe the following guidelines:

Use two semicolons with no space between them to indicate that you are leaving a field blank.

Use a semicolon to separate multiple entries in the same field.

When you separate multiple entries with semicolons, remember that the order in which you enter values in each field is important. For example, if you enter SSH;SNMP;NETCONF in the Connectivity Type field and you enter 22;161;830 in the Connectivity Port field, the mapping between the two fields will be as follows:

  • SSH: 22

  • SNMP: 161

  • NETCONF: 830

For a list of the fields and the values you can enter, see the "Add ZTP Device Fields" table in Create ZTP Device Entries Using the UI.

Be sure to delete the sample data rows before saving the file, or they will be imported along with the data you want. The column header row can stay, as it is ignored during import.

If you notice errors next to your device entries after the import, download the ZTP device entries as explained in Export ZTP Devices. Correct the errors in the exported CSV file. Before re-importing it, make sure the device entries with errors have their Status set to Unprovisioned.


Export ZTP Devices

When you export the ZTP device list, all of the ZTP device information is exported to a CSV file. Export is a handy way to keep a record of all the ZTP devices in the system at one time. You can also edit the CSV file as needed, and re-import it to overwrite existing device data (this works only for ZTP device entries with a Status of Unprovisioned).


Note

The exported ZTP device CSV file will contain only the name of the credential profile for each device, not the credentials themselves.


Procedure

Step 1

From the main menu, choose Device Management > Devices. Crosswork displays the Devices list.

Step 2

Click the Zero Touch Devices tab.

Step 3

Click Export icon. Your browser will prompt you to select a path and file name to use when saving the CSV file, or to open it immediately.


Edit ZTP Devices

Follow the steps below to update a ZTP device entry. You can select and edit only one ZTP device entry at a time.

Before editing any device, it is always good practice to export a CSV backup of the devices you want to change (see Export ZTP Devices).

Procedure

Step 1

From the main menu, choose Device Management > Devices. Crosswork displays the Devices list.

Step 2

Click the Zero Touch Devices tab.

Step 3

(Optional) Filter the list of ZTP devices by filtering specific columns (see Set, Sort and Filter Table Data).

Step 4

Check the check box of the device entry you want to change, then click Edit icon. The Edit Device page appears.

Step 5

Edit the values configured for the device entry, as needed.

For a description of the fields you can edit, see Create ZTP Device Entries Using the UI. Some fields will be disabled, depending on the Status of the device entry.

If the device entry Status displays an Onboarding Error or Provisioning Error, you must reset the Status to Unprovisioned before attempting to retry onboarding or importing a device entry CSV file.

Step 6

Click Save. The Save button is disabled until all required fields are completed.


Delete ZTP Devices

Follow the steps below to delete an unprovisioned ZTP device. Deleting ZTP devices from the Zero Touch Devices tab deletes them from the ZTP repository only. Onboarded ZTP devices must be deleted from the Network Devices tab.

Before deleting any device, it is always good practice to export a CSV backup (see Export ZTP Devices). Note that deleting a device that has successfully completed ZTP processing has no impact on the number of ZTP licenses that have been used.

Procedure

Step 1

From the main menu, choose Device Management > Devices. Crosswork displays the Devices list.

Step 2

Click the Zero Touch Devices tab.

Step 3

(Optional) Filter the list of ZTP devices by filtering specific columns (see Set, Sort and Filter Table Data).

Step 4

Check the check box for the ZTP devices you want to delete.

Step 5

Click Delete icon.

Step 6

In the confirmation dialog box, click Delete.


DHCP Setup for Crosswork ZTP

Once you have uploaded your ZTP image and configuration files, (optionally) created ZTP profiles, and created your device entries, you must update your organization's DHCP server configuration file with the IDs for these device entries and the paths to the image and configuration files stored in the Crosswork ZTP repository. These entries identify each ZTP host and the corresponding file paths and UUIDs of the associated image and configuration files. This step is necessary to allow Crosswork and DHCP to identify these ZTP devices and to respond correctly to each device's requests for connection to the network, and image and configuration file downloads.

The following topics discuss how to update common DHCP server configurations to meet this requirement. Please refer to the following note on support for HTTP and HTTPS downloads.

Crosswork ZTP Device Management Support for HTTP and HTTPS

Cisco strongly recommends that you deploy ZTP over secure network domains.

As of today, Cisco devices supported by Crosswork 3.2.0 (that is, those running IOS-XR versions 6.6.3, 7.0.1, 7.0.2, and 7.0.12) allow iPXE software image downloads via HTTP only. These same devices support download of configuration files via either HTTP or HTTPS. These options require entry of DHCP bootfile URLs in your organization's DHCP server configuration.

If you want to use HTTP for both image and configuration file downloads, these URLs must specify the HTTP protocol and port 30604, as shown in Example 1, below.

If you want to use HTTPS for configuration file downloads only, the URL must specify the HTTPS protocol and port 30603. You must also specify the -k option before the HTTPS protocol specification of the URL. See Example 2, below.

Figure 6. Example 1: HTTP Image and Configuration File Download URLs
if exists user-class and option user-class = "iPXE" {
filename = “http://<CW_HOST_IP>:30604/crosswork/imagesvc/v1/device/files/cw-image-uuid-...853a3210c581”;
} else if exists user-class and option user-class = "exr-config" {
filename = “http://<CW_HOST_IP>:30604/crosswork/configsvc/v1/configs/device/files/...3b2c07b94cee”;
}
Figure 7. Example 2: HTTP Image and HTTPS Configuration File Download URLs
if exists user-class and option user-class = "iPXE" {
filename = “http://<CW_HOST_IP>:30604/crosswork/imagesvc/v1/device/files/cw-image-uuid-...853a3210c581”;
} else if exists user-class and option user-class = "exr-config" {
filename = “-k https://<CW_HOST_IP>:30603/crosswork/configsvc/v1/configs/device/files/...3b2c07b94cee”;
}

Cisco Prime Network Registrar DHCP Setup

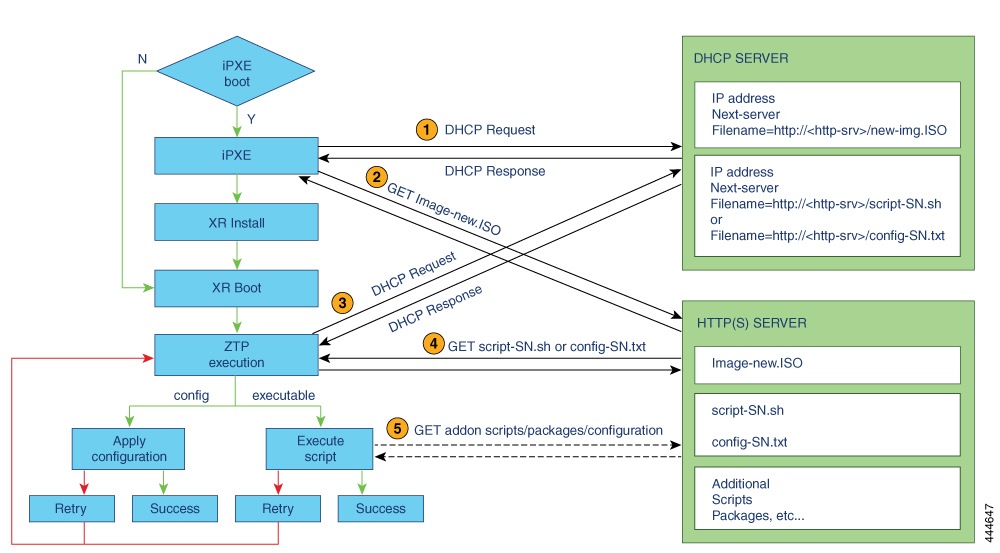
Below are two sets of scripts that allow you to add ZTP device, image and configuration file entries to the Cisco Prime Network Registrar (CPNR) DHCP server configuration file. There is one set of three scripts for IPv4, and a separate set of five scripts for IPv6. To use these scripts:

  1. Copy and paste the contents of the scripts into local text files with the names given here.

  2. Modify the device, image and configuration entries in the ztp-v4-setup-vi-nrcmd.txt or ztp-v6-setup-vi-nrcmd.txt script to fit your needs, as explained in the script's comments.

  3. Copy all of the script files you want to use to the root folder of your local CPNR server.

  4. Execute the scripts on the CPNR server using the following command:

    [root@cpnr-local ~]#/opt/nwreg2/local/usrbin/nrcmd -N username -P password <ztp-IPVersion-setup-via-nrcmd.txt

    Where:

    • username is the name of a user ID with administrator privileges on the CPNR server.

    • password is the password for the corresponding CPNR admin user ID.

    • IPVersion is either v4 for the IPv4 version of the scripts, or v6 for the IPv6 version of the scripts.

Cisco recommends that you deploy Crosswork ZTP over secure networks only. Please see the additional requirements in #Cisco_Reference.dita_bcea55f7-a7aa-42a2-a707-2d254de554c7__.

IPv4 Script 1 of 3: ztp-v4-setup-vi-nrcmd.txt
#
# Create the scope
#
scope ztp-ncs-5501-mgmt create 192.0.20.0/24
 
# Add the dynamic range
scope ztp-ncs-5501-mgmt addrange 200 225
 
# Default the routers option. Note: No need to do subnet-mask. It is automatically provided.
scope-policy ztp-ncs-5501-mgmt setoption routers 10.10.10.1
 
# Set the lease time for clients on this scope
scope-policy ztp-ncs-5501-mgmt setoption dhcp-lease-time 216000
#
# Load the option 43 definitions
import option-set ztp-v4-option-set.txt
#
# Set the client classing expression and enable use of client-class
dhcp set client-class-lookup-id=@ztp-v4-client-class-expr.txt
dhcp enable client-class
#
# Load the client classes - these are used to lookup the correct client details 
# depending on whether an iso or script is requested by the client.
client-class ztp-iso create
client-class ztp-iso set client-lookup-id="(or (try (concat (as-string 
    (request get option 61)) \"-iso\")) (request macaddress-string))"
#
client-class ztp-script create
client-class ztp-script set client-lookup-id="(or (try (concat (as-string 
    (request get option 61)) \"-script\")) (request macaddress-string))"
#
# Clients that are not ztp will fall into the ztp-none class
# and should not be offered service so they are excluded.
#
client-class ztp-none create
client-class ztp-none set action=exclude
#
# Create a default client that will prevent service to unknown clients.
client default create
client default set action=exclude
#
# Create some ZTP clients
#
# For each ZTP client we create two clients based on their serial number.
# (See above for the client-lookup-id expressions.)
# One has "-iso" added to the end that will be used when the client's
# request includes "iPXE" in option 77.
# The other has "-script" added to the end that will be used when the
# client's request includes "exr-config" in option 77.
#
 
### Device-1 Settings ####
client <device-1-serial-num>-iso create
client-policy <device-1-serial-num>-iso set packet-file-name=
   "http://<cw-ipv4-address>:30604/crosswork/imagesvc/v1/device/files/cw-image-uuid-d3930e13-b081-4905-b2e5-051249d9b0cb"
 
client <device-1-serial-num>-script create
client-policy <device-1-serial-num>-script set packet-file-name=
   "http://<cw-ipv4-address>:30604/crosswork/configsvc/v1/configs/device/files/d1d7b441-3a27-47d1-aef0-39c3087d34c1"
client-policy <device-1-serial-num>-script setvendoroption 43 Cisco-ZTP "(1 exr-config)(2 0)"
 
### Device-2 Settings ####
client <device-2-serial-num>--iso create
client-policy <device-2-serial-num>-iso set packet-file-name=
   "http://<cw-ipv4-address>:30604/crosswork/imagesvc/v1/device/files/cw-image-uuid-d3930e13-b081-4905-b2e5-051249d9b0cb"
 
client <device-2-serial-num>-script create
client-policy <device-2-serial-num>-script set packet-file-name=
   "http://<cw-ipv4-address>:30604/crosswork/configsvc/v1/configs/device/files/d1640deb-8252-47b6-aab1-a843c0c7757b"
client-policy <device-2-serial-num>-script setvendoroption 43 Cisco-ZTP "(1 exr-config)(2 0)"
 
#
# Create more as needed using the above as models.
# Note: For those that need option 67 (boot file), you can use:
#   client-policy <name> setoption boot-file "<file-url>"
#
# The next line is optional. Uncomment it if you want to log what the script is doing.
# dhcp set log-settings=+incoming-packet-detail,outgoing-packet-detail,client-detail

# Assure that the server is up-to-date with this configuration
dhcp reload
IPv4 Script 2 of 3: ztp-v4-option-set.txt
#
#
# Option Definition Set Export/Import Utility
# Version: 1
#
{
  ( name = Cisco-ZTP )
  ( id-range = 1 )
  ( vendor-option-regex = PXEClient:Arch:.* )
  ( tenant-id = 0 )
  ( desc = Cisco ZTP Suboption Definitions )
  ( option-list = [
    {
      ( id = 43 )
      ( name = Cisco-ZTP )
      ( base-type = AT_BLOB )
      ( desc = Cisco Zero Touch Provision )
      ( flags =  )
      ( option-list = [
        {
          ( id = 1 )
          ( name = clientId )
          ( base-type = AT_NSTRING )
          ( desc =  )
          ( flags =  )
        }
        {
          ( id = 2 )
          ( name = authCode )
          ( base-type = AT_INT8 )
          ( desc =  )
          ( flags =  )
        }
        {
          ( id = 3 )
          ( name = md5sum )
          ( base-type = AT_NSTRING )
          ( desc =  )
          ( flags =  )
        }
      ] )
    }
  ] )
}
IPv4 Script 3 of 3: ztp-v4-client-class-expr.txt

(or
   (if (equal (as-string (request get-blob option 77)) "iPXE") "ztp-iso")
   (if (equal (as-string (request get-blob option 77)) "exr-config") "ztp-script")
   "ztp-none"
)
IPv6 Script 1 of 5: ztp-v6-setup-vi-nrcmd.txt

#
# create prefix for mgmt
prefix prefix-for-mgmt create 2001:DB8:10e:201a::/64
#
# Set the client classing expression and enable use
# of client-class
#
dhcp set v6-client-class-lookup-id=@ztp-v6-client-class-expr.txt
dhcp enable client-class
#
# Load the client classes - these are used to lookup the correct
# client details depending on whether an iso or script is requested
# by the client.
#
client-class ztp-iso create
client-class ztp-iso set v6-client-lookup-id=@ztp-v6-iso-lookup-expr.txt
#
client-class ztp-script create
client-class ztp-script set v6-client-lookup-id=@ztp-v6-script-lookup-expr.txt
client-class-policy ztp-script set v6-reply-options=17
#
# Delete option set (may not exist and ok if fails)
#
option-set dhcp6-cisco-custom delete
#
import option-set ztp-v6-options.txt
#
# Clients that are not ztp will fall into the ztp-none class
# and should not be offered service so they are excluded.
#
client-class ztp-none create action=exclude
#
# Create a default client that will prevent service to
# unknown clients.
#
client default create
client default set action=exclude
#
# Create some ZTP clients
#
# For each ZTP client we create two clients based on their mac-address.
# One has "-iso" added to the end that will be used when the client's
# request does not include the "exr-config" in option 77.
# The other has "-script" added to the end that will be used when the
# client's request does include "exr-config" in option 77.
#
client <device-serial-no>-iso create
# Set the vendor options using blob format as option definitions are for different data
client-policy <device-serial-no>-iso setV6VendorOption 17 dhcp6-cisco-custom "(1 exr-config)(2 0)"
# Escape the [ and ] as nrcmd (which uses tcl interpreter) will otherwise fail command
client-policy <device-serial-no>-iso setv6option bootfile-url 
   "http://\[cw-ipv6-address\]:30604/crosswork/imagesvc/v1/device/files/cw-image-uuid-aec596
      a1-7847-4254-966a-2456aa5"
#
client <device-serial-no>-script create
# Set the vendor options using blob format as option definitions are for different data
client-policy <device-serial-no>-script setV6VendorOption 17 dhcp6-cisco-custom "(1 exr-config)(2 0)"
# Escape the [ and ] as nrcmd (which uses tcl interpreter) will otherwise fail command
client-policy <device-serial-no>-script setv6option bootfile-url 
   "http://\[cw-ipv6-address\]:30604/crosswork/configsvc/v1/configs/device/files/8eb6b7e1
      -bd54-40bb-84e0-89f11a60128b"
#
 
# Assure the server is up-to-date with this configuration
dhcp reload
 
IPv6 Script 2 of 5: ztp-v6-client-class-expr.txt

(or (try (if (equal (as-string (request get option 15)) "exr-config") "ztp-script"))
    (try (if (equal (as-string (request get option 15)) "iPXE") "ztp-iso"))
   "ztp-none"
)
IPv6 Script 3 of 5: ztp-v6-iso-lookup-expr.txt

(let (id)
  (setq id (request get option 1))
  (or
# First try extracting the serial number from DUID
      (try (if (equali (substring id 0 6) 00:02:00:00:00:09)
               (concat (as-string (substring id 6 128)) "-script")
           )
      )
# If that fails, use normal client-id (DUID) lookup
     (concat (to-string id) "-iso")

  )
)
IPv6 Script 4 of 5: ztp-v6-script-lookup-expr.txt

(let (id)
  (setq id (request get option 1))
  (or
# First try extracting the serial number from DUID
      (try (if (equali (substring id 0 6) 00:02:00:00:00:09)
               (concat (as-string (substring id 6 128)) "-script")
           )
      )
# If that fails, use normal client-id (DUID) lookup
     (concat (to-string id) "-script")
  )
)
IPv6 Script 5 of 5: ztp-v6-options.txt

# Option Definition Set Export/Import Utility
# Version: 1
#
{
  ( name = dhcp6-cisco-custom )
  ( desc = Cisco Systems, Inc. )
  ( vendor-option-enterprise-id = 9 )
  ( id-range = 2 )
  ( option-list = [
    {
      ( name = cisco-17 )
      ( id = 17 )
      ( base-type = AT_VENDOR_OPTS )
      ( flags = AF_IMMUTABLE )
      ( sepstr = , )
      ( option-list = [
        {
          ( name = clientID )
          ( id = 1 )
          ( base-type = AT_NSTRING )
          ( sepstr = , )
          ( desc = ZTP - clientID )
        }
        {
          ( name = authCode )
          ( id = 2 )
          ( base-type = AT_INT8 )
          ( sepstr = , )
          ( desc = ZTP - authCode )
        }
        {
          ( id = 3 )
          ( name = md5sum )
          ( base-type = AT_NSTRING )
          ( desc = ZTP - md5sum )
        }
        {
          ( name = cnr-leasequery )
          ( id = 13 )
          ( base-type = AT_BLOB )
          ( flags = AF_IMMUTABLE )
          ( sepstr = , )
          ( option-list = [
            {
              ( name = oro )
              ( id = 1 )
              ( base-type = AT_SHORT )
              ( flags = AF_IMMUTABLE )
              ( repeat = ZERO_OR_MORE )
              ( sepstr = , )
            }
            {
              ( name = dhcp-state )
              ( id = 2 )
              ( base-type = AT_INT8 )
              ( flags = AF_IMMUTABLE )
              ( sepstr = , )
            }
            {
              ( name = data-source )
              ( id = 3 )
              ( base-type = AT_INT8 )
              ( flags = AF_IMMUTABLE )
              ( sepstr = , )
            }
            {
              ( name = start-time-of-state )
              ( id = 4 )
              ( base-type = AT_TIME )
              ( flags = AF_IMMUTABLE )
              ( sepstr = , )
            }
            {
              ( name = base-time )
              ( id = 5 )
              ( base-type = AT_DATE )
              ( flags = AF_IMMUTABLE )
              ( sepstr = , )
            }
            {
              ( name = query-start-time )
              ( id = 6 )
              ( base-type = AT_DATE )
              ( flags = AF_IMMUTABLE )
              ( sepstr = , )
            }
            {
              ( name = query-end-time )
              ( id = 7 )
              ( base-type = AT_DATE )
              ( flags = AF_IMMUTABLE )
              ( sepstr = , )
            }
            {
              ( name = client-class-name )
              ( id = 8 )
              ( base-type = AT_NSTRING )
              ( flags = AF_IMMUTABLE )
              ( sepstr = , )
            }
            {
              ( name = partner-last-transaction-time )
              ( id = 9 )
              ( base-type = AT_TIME )
              ( flags = AF_IMMUTABLE )
              ( sepstr = , )
            }
            {
              ( name = client-creation-time )
              ( id = 10 )
              ( base-type = AT_TIME )
              ( flags = AF_IMMUTABLE )
              ( sepstr = , )
            }
            {
              ( name = limitation-id )
              ( id = 11 )
              ( base-type = AT_BLOB )
              ( flags = AF_IMMUTABLE )
              ( sepstr = , )
            }
            {
              ( name = binding-start-time )
              ( id = 12 )
              ( base-type = AT_TIME )
              ( flags = AF_IMMUTABLE )
              ( sepstr = , )
            }
            {
              ( name = binding-end-time )
              ( id = 13 )
              ( base-type = AT_STIME )
              ( flags = AF_IMMUTABLE )
              ( sepstr = , )
            }
            {
              ( name = fwd-dns-config-name )
              ( id = 14 )
              ( base-type = AT_NSTRING )
              ( flags = AF_IMMUTABLE )
              ( sepstr = , )
            }
            {
              ( name = rev-dns-config-name )
              ( id = 15 )
              ( base-type = AT_NSTRING )
              ( flags = AF_IMMUTABLE )
              ( sepstr = , )
            }
            {
              ( name = lookup-key )
              ( id = 16 )
              ( base-type = AT_BLOB )
              ( flags = AF_IMMUTABLE )
              ( sepstr = , )
            }
            {
              ( name = user-defined-data )
              ( id = 17 )
              ( base-type = AT_NSTRING )
              ( flags = AF_IMMUTABLE )
              ( sepstr = , )
            }
            {
              ( name = prefix-name )
              ( id = 18 )
              ( base-type = AT_NSTRING )
              ( flags = AF_IMMUTABLE )
              ( sepstr = , )
            }
            {
              ( name = failover-state-serial-number )
              ( id = 19 )
              ( base-type = AT_INT )
              ( flags = AF_IMMUTABLE )
              ( sepstr = , )
            }
            {
              ( name = reservation-key )
              ( id = 20 )
              ( base-type = AT_BLOB )
              ( flags = AF_IMMUTABLE )
              ( sepstr = , )
            }
            {
              ( name = failover-partner-lifetime )
              ( id = 21 )
              ( base-type = AT_STIME )
              ( flags = AF_IMMUTABLE )
              ( sepstr = , )
            }
            {
              ( name = failover-next-partner-lifetime )
              ( id = 22 )
              ( base-type = AT_STIME )
              ( flags = AF_IMMUTABLE )
              ( sepstr = , )
            }
            {
              ( name = failover-expiration-time )
              ( id = 23 )
              ( base-type = AT_STIME )
              ( flags = AF_IMMUTABLE )
              ( sepstr = , )
            }
            {
              ( name = client-oro )
              ( id = 24 )
              ( base-type = AT_SHORT )
              ( flags = AF_IMMUTABLE )
              ( repeat = ZERO_OR_MORE )
              ( sepstr = , )
            }
          ] )
        }
        {
          ( name = failover )
          ( id = 21 )
          ( base-type = AT_BLOB )
          ( flags = AF_NO_CONFIG_OPTION,AF_SUPPORTS_ENCAP_OPTION,AF_IMMUTABLE )
          ( sepstr = , )
          ( option-list = [
            {
              ( name = server-state )
              ( id = 1 )
              ( base-type = AT_INT8 )
              ( flags = AF_IMMUTABLE )
              ( sepstr = , )
            }
            {
              ( name = server-flags )
              ( id = 2 )
              ( base-type = AT_INT8 )
              ( flags = AF_IMMUTABLE )
              ( sepstr = , )
            }
            {
              ( name = binding-status )
              ( id = 3 )
              ( base-type = AT_INT8 )
              ( flags = AF_IMMUTABLE )
              ( sepstr = , )
            }
            {
              ( name = binding-flags )
              ( id = 4 )
              ( base-type = AT_INT8 )
              ( flags = AF_IMMUTABLE )
              ( sepstr = , )
            }
            {
              ( name = start-time-of-state )
              ( id = 5 )
              ( base-type = AT_DATE )
              ( flags = AF_IMMUTABLE )
              ( sepstr = , )
            }
            {
              ( name = state-expiration-time )
              ( id = 6 )
              ( base-type = AT_DATE )
              ( flags = AF_IMMUTABLE )
              ( sepstr = , )
            }
            {
              ( name = failover-expiration-time )
              ( id = 7 )
              ( base-type = AT_DATE )
              ( flags = AF_IMMUTABLE )
              ( sepstr = , )
            }
            {
              ( name = bndupd-serial )
              ( id = 8 )
              ( base-type = AT_INT )
              ( flags = AF_IMMUTABLE )
              ( sepstr = , )
            }
            {
              ( name = bndack-serial )
              ( id = 9 )
              ( base-type = AT_INT )
              ( flags = AF_IMMUTABLE )
              ( sepstr = , )
            }
            {
              ( name = client-flags )
              ( id = 10 )
              ( base-type = AT_INT )
              ( flags = AF_IMMUTABLE )
              ( sepstr = , )
            }
            {
              ( name = vpn-id )
              ( id = 11 )
              ( base-type = AT_INT )
              ( flags = AF_IMMUTABLE )
              ( sepstr = , )
            }
            {
              ( name = lookup-key )
              ( id = 12 )
              ( base-type = AT_BLOB )
              ( flags = AF_IMMUTABLE )
              ( sepstr = , )
              ( option-list = [
                {
                  ( name = type )
                  ( id = 0 )
                  ( base-type = AT_INT8 )
                  ( flags = AF_IMMUTABLE )
                  ( sepstr = , )
                }
                {
                  ( name = data )
                  ( id = 0 )
                  ( base-type = AT_BLOB )
                  ( flags = AF_IMMUTABLE )
                  ( sepstr = , )
                }
              ] )
            }
            {
              ( name = user-defined-data )
              ( id = 13 )
              ( base-type = AT_BLOB )
              ( flags = AF_IMMUTABLE )
              ( sepstr = , )
            }
            {
              ( name = reconfigure-data )
              ( id = 14 )
              ( base-type = AT_BLOB )
              ( flags = AF_IMMUTABLE )
              ( sepstr = , )
              ( option-list = [
                {
                  ( name = time )
                  ( id = 0 )
                  ( base-type = AT_DATE )
                  ( flags = AF_IMMUTABLE )
                  ( sepstr = , )
                }
                {
                  ( name = key )
                  ( id = 0 )
                  ( base-type = AT_BLOB )
                  ( flags = AF_IMMUTABLE )
                  ( sepstr = , )
                }
              ] )
            }
            {
              ( name = requested-fqdn )
              ( id = 15 )
              ( base-type = AT_BLOB )
              ( flags = AF_IMMUTABLE )
              ( sepstr = , )
              ( option-list = [
                {
                  ( name = flags )
                  ( id = 0 )
                  ( base-type = AT_INT8 )
                  ( flags = AF_IMMUTABLE )
                  ( sepstr = , )
                }
                {
                  ( name = domain-name )
                  ( id = 0 )
                  ( base-type = AT_DNSNAME )
                  ( flags = AF_IMMUTABLE )
                  ( sepstr = , )
                }
              ] )
            }
            {
              ( name = forward-dnsupdate )
              ( id = 16 )
              ( base-type = AT_NSTRING )
              ( flags = AF_IMMUTABLE )
              ( sepstr = , )
            }
            {
              ( name = reverse-dnsupdate )
              ( id = 17 )
              ( base-type = AT_NSTRING )
              ( flags = AF_IMMUTABLE )
              ( sepstr = , )
            }
            {
              ( name = partner-raw-cltt )
              ( id = 18 )
              ( base-type = AT_DATE )
              ( flags = AF_IMMUTABLE )
              ( sepstr = , )
            }
            {
              ( name = client-class )
              ( id = 19 )
              ( base-type = AT_NSTRING )
              ( flags = AF_IMMUTABLE )
              ( sepstr = , )
            }
            {
              ( name = status-code )
              ( id = 20 )
              ( base-type = AT_BLOB )
              ( flags = AF_IMMUTABLE )
              ( sepstr = , )
              ( option-list = [
                {
                  ( name = status-code )
                  ( id = 0 )
                  ( base-type = AT_SHORT )
                  ( flags = AF_IMMUTABLE )
                  ( sepstr = , )
                }
                {
                  ( name = status-message )
                  ( id = 0 )
                  ( base-type = AT_NSTRING )
                  ( flags = AF_IMMUTABLE )
                  ( sepstr = , )
                }
              ] )
            }
            {
              ( name = dns-info )
              ( id = 21 )
              ( base-type = AT_BLOB )
              ( flags = AF_IMMUTABLE )
              ( sepstr = , )
              ( option-list = [
                {
                  ( name = flags )
                  ( id = 0 )
                  ( base-type = AT_SHORT )
                  ( flags = AF_IMMUTABLE )
                  ( sepstr = , )
                }
                {
                  ( name = host-label-count )
                  ( id = 0 )
                  ( base-type = AT_INT8 )
                  ( flags = AF_IMMUTABLE )
                  ( sepstr = , )
                }
                {
                  ( name = name-number )
                  ( id = 0 )
                  ( base-type = AT_INT8 )
                  ( flags = AF_IMMUTABLE )
                  ( sepstr = , )
                }
              ] )
            }
            {
              ( name = base-time )
              ( id = 22 )
              ( base-type = AT_DATE )
              ( flags = AF_IMMUTABLE )
              ( sepstr = , )
            }
            {
              ( name = relationship-name )
              ( id = 23 )
              ( base-type = AT_NSTRING )
              ( flags = AF_IMMUTABLE )
              ( sepstr = , )
            }
            {
              ( name = protocol-version )
              ( id = 24 )
              ( base-type = AT_INT )
              ( flags = AF_IMMUTABLE )
              ( sepstr = , )
            }
            {
              ( name = mclt )
              ( id = 25 )
              ( base-type = AT_INT )
              ( flags = AF_IMMUTABLE )
              ( sepstr = , )
            }
            {
              ( name = dns-removal-info )
              ( id = 26 )
              ( base-type = AT_BLOB )
              ( flags = AF_IMMUTABLE )
              ( sepstr = , )
              ( option-list = [
                {
                  ( name = host-name )
                  ( id = 1 )
                  ( base-type = AT_RDNSNAME )
                  ( flags = AF_IMMUTABLE )
                  ( sepstr = , )
                }
                {
                  ( name = zone-name )
                  ( id = 2 )
                  ( base-type = AT_DNSNAME )
                  ( flags = AF_IMMUTABLE )
                  ( sepstr = , )
                }
                {
                  ( name = flags )
                  ( id = 3 )
                  ( base-type = AT_SHORT )
                  ( flags = AF_IMMUTABLE )
                  ( sepstr = , )
                }
                {
                  ( name = forward-dnsupdate )
                  ( id = 4 )
                  ( base-type = AT_NSTRING )
                  ( flags = AF_IMMUTABLE )
                  ( sepstr = , )
                }
                {
                  ( name = reverse-dnsupdate )
                  ( id = 5 )
                  ( base-type = AT_NSTRING )
                  ( flags = AF_IMMUTABLE )
                  ( sepstr = , )
                }
              ] )
            }
            {
              ( name = max-unacked-bndupd )
              ( id = 27 )
              ( base-type = AT_INT )
              ( flags = AF_IMMUTABLE )
              ( sepstr = , )
            }
            {
              ( name = receive-timer )
              ( id = 28 )
              ( base-type = AT_INT )
              ( flags = AF_IMMUTABLE )
              ( sepstr = , )
            }
            {
              ( name = hash-bucket-assignment )
              ( id = 29 )
              ( base-type = AT_BLOB )
              ( flags = AF_IMMUTABLE )
              ( sepstr = , )
            }
            {
              ( name = partner-down-time )
              ( id = 30 )
              ( base-type = AT_DATE )
              ( flags = AF_IMMUTABLE )
              ( sepstr = , )
            }
            {
              ( name = next-partner-lifetime )
              ( id = 31 )
              ( base-type = AT_DATE )
              ( flags = AF_IMMUTABLE )
              ( sepstr = , )
            }
            {
              ( name = next-partner-lifetime-sent )
              ( id = 32 )
              ( base-type = AT_DATE )
              ( flags = AF_IMMUTABLE )
              ( sepstr = , )
            }
            {
              ( name = client-oro )
              ( id = 33 )
              ( base-type = AT_SHORT )
              ( flags = AF_IMMUTABLE )
              ( repeat = ZERO_OR_MORE )
              ( sepstr = , )
            }
            {
              ( name = requested-prefix-length )
              ( id = 34 )
              ( base-type = AT_INT8 )
              ( flags = AF_IMMUTABLE )
              ( sepstr = , )
            }
          ] )
        }
      ] )
    }
  ] )
}


Generic ISC DHCP Setup

Below is a sample of the type of host entry you would make for a ZTP device in the /etc/dhcp/dhcp.conf configuration file of an Internet Systems Consortium (ISC) DHCP server.

While DHCP servers differ in overall implementation, most open-source DHCP servers use options and formats similar to the following ISC examples for IPv4 and IPv6.

Cisco recommends that you deploy Crosswork ZTP over secure networks only. Please see the additional requirements in #Cisco_Reference.dita_bcea55f7-a7aa-42a2-a707-2d254de554c7__.

Be sure to reload or restart the ISC DHCP server once you have finished creating these new entries.

ISC IPv4 DHCP Configuration Example

host NCS5k-l
{
    option dhcp-client-identifier "FOC2302R09H";
    hardware ethernet 00:cc:fc:bb:be:6a;
    fixed-address 105.1.1.16;
    if exists user-class and option user-class = "iPXE" {
        filename = "http://105.11.1.2.1:30604/crosswork/imagesvc/vl/device/files/
           cw-image-uuid-2b66f2ce-21ff-44cl-9801-d649db2a5581
    } else if exists user-class and option user-class = "exr-config" {
        filename = "http://105.1.2.1:30604/crosswork/configsvc/vl/configs/device/files/
           9cclea36-f53f-4306-959f-0fd804b32f01";
    }
}
ISC IPv6 DHCP Configuration Example

host 5501
{
    host-identifier option dhcp6.client-id 00:02:00:00:00:09:46:4f:43:32:33:30:38:52:30:53:33:00;
    fixed-address6 fc00:15:2::36;
    if exists dhcp6.user-class and substring(option dhcp6.user-class, 2, 4) = "iPXE" {
      option dhcp6.bootfile-url "http://[fc00:15:2::2]:30604/crosswork/imagesvc/v1/device/files/
        cw-image-uuid-94dc3788-e0d4-4bb0-9c17-721b23c30007";
    } else {if exists dhcp6.user-class and substring(option dhcp6.user-class, 0, 10) = "exr-config" {
      option dhcp6.bootfile-url "http://[fc00:15:2::2]:30604/crosswork/configsvc/v1/configs/device/files/
        2dde1691-bb9c-4e1e-919c-08fffa89611a";
    } 
}
IPv4 DHCP Configuration Entries and Values

The following table describes each line in the IPv4 example DHCP device entries and the source of the values used. The IPv6 entries are similar.

Table 8. IPv4 DHCP Configuration Host Entries and Values

IPv4 Entry

Description

host NCS5k-l

The device entry host name. This can be the same as the actual assigned host name, but need not be.

option dhcp-client-identifier

The unique ID of the device entry. The value "FOC2302R09H" is the serial number of the device, which can be found on the device chassis. If you do not have physical access to the device, the IOS-XR show inventory command will provide the serial number.

hardware ethernet 00:cc:fc:bb:be:6a

The MAC address of the device's Ethernet NIC on which you trigger the zero-touch provisioning process. This can be a management or data port, as long as it is reachable from Crosswork.

fixed-address 105.1.1.16

The IP address to be assigned to the device during configuration. This example is for a static IP, but you can also use standard DHCP IP pool assignment commands.

option user-class = "iPXE" and filename =

This line checks that the incoming ZTP request contains the "iPXE" option, which is used to image (or re-image) the device. If the request includes this option, then the device will download from the ZTP repository the image file corresponding to the UUID and on the path specified in the filename = parameter. To copy the complete image file path and/or UUID into your DHCP device entry, follow the steps in Copy Image File Paths and UUIDs.

option user-class = "exr-config" and ffl filename =

This line checks that the incoming ZTP request contains the "exr-config" option, which is used to configure the device. If the request includes this option, then the device will download from the Crosswork repository the configuration file corresponding to the UUID and on the path specified in the filename = parameter. To copy the complete configuration file path and/or UUID into your DHCP device entry, follow the steps in Copy Configuration File Paths and UUIDs.

Troubleshoot ZTP Issues

Crosswork ZTP provisioning and onboarding happen quickly and automatically, but errors and problems do occur. The following topics discuss how to remedy common problems.

Inspect Status Errors

As explained in Use the Zero Touch Devices Window to Work with Devices, the Status column displays the Details icon next to every device entry whose ZTP processing finished with a Provisioning Error or Onboarding Error. Click on the icon to display a popup window with information about the error, as in the example shown below. When you are finished viewing the popup window, click Close icon to close it.

Provisioning Error Popup Window

Errors while uploading image files

Make sure that the image file's MD5 checksum was entered correctly. If all the information was entered correctly, image uploads to the Crosswork repository can still fail due to slow network connections. If you are running into this problem, retry the upload.

Uploaded images and configuration files are not in the drop down menu when creating ZTP device entries or ZTP profiles

The drop down menu selects images and configuration files based on the device family and release number you specify in your device entry or profile. Make sure that the release and the device family for the image or configuration files matches the release and device family specified for the device entry or profile you are creating.

Errors during import of devices

If there are any devices already present in Crosswork that have the same serial numbers as the devices you are importing, make sure these existing devices are in the Unprovisioned state before the import (all the devices imported using CSV files have their status set to Unprovisioned on import). Before importing the devices, make sure the configuration files, software images, and ZTP profiles mentioned in the CSV file are already present in Crosswork. If you are importing a previously exported CSV file in which you have made changes, and want to ensure they are associated with new image or configuration files you have uploaded, make sure to edit the UUIDs of the associated image and configuration files in the CSV file before importing.

Image file download fails

Check that there is network connectivity between Crosswork and the device. Make sure that the device is getting its IP address from the DHCP server. Ensure that the UUID of the software image given in the DHCP server's configuration file is correct. If you must correct the image UUID specified in the DHCP server's configuration file, make sure you restart the DHCP server before initiating ZTP processing again.

Configuration file download fails

Check that there is network connectivity between Crosswork and the device. Make sure that the device is getting its IP address from the DHCP server. Ensure that the UUID of the software image given in the DHCP server's configuration file is correct. If you must correct the image UUID specified in the DHCP server's configuration file, make sure you restart the DHCP server before initiating ZTP processing again. Make sure that the device serial number entered in Crosswork is correct and matches the serial number on the device's chassis. Ensure that the device's status in Crosswork is either Unprovisioned or In Progress before initiating ZTP processing. If the device is in any other state, the configuration download will fail again.

Device state is showing Onboarded and not Provisioned

This is expected behavior, as Provisioned is an intermediate state. As soon as the device state is changed to Provisioned, Crosswork will attempt to onboard the device immediately, and the status will change to Onboarded or Onboarding Error, depending on whether the onboard to DLM was successful or not.

Onboarding Error

The default Crosswork device life-cycle management (DLM) policy for identifying devices uniquely is the IP address. If your Crosswork installation is using the default DLM policy and if there is already a device in inventory with the same IP address as the ZTP device entry being processed, the device status will change first to Provisioned, then to Onboarding Error. You will get the same result if the IP address field is not populated in the device entry. These same issues apply if your Crosswork installation uses an OSPF ID, ISIS ID, or other DLM policy. All the DLM policy fields must be populated and their values must be unique for onboarding to succeed. If onboarding fails, inspect the popup error message, update the corresponding fields and retry onboarding.