-
null
- About Cisco WAAS with Akamai Connect
- Components of Cisco WAAS with Akamai Connect
- Deployment Options for Cisco WAAS with Akamai Connect
- Supported Platforms for Cisco WAAS with Akamai Connect
Configuring Cisco WAAS with Akamai Connect
This chapter describes how to configure Cisco WAAS with Akamai Connect, to create an integrated solution that combines WAN optimization and intelligent object caching to accelerate HTTP/S applications, video, and content.

Note![]() Throughout this chapter, the term Cisco WAAS device is used to refer collectively to the Cisco Wide Area Application Services (Cisco WAAS) Central Managers and Cisco Wide Area Application Engines (WAEs) in your network. The term WAE refers to WAE and Cisco Wide Area Virtualization Engine (WAVE) appliances, and Cisco Virtual WAAS (vWAAS) instances.
Throughout this chapter, the term Cisco WAAS device is used to refer collectively to the Cisco Wide Area Application Services (Cisco WAAS) Central Managers and Cisco Wide Area Application Engines (WAEs) in your network. The term WAE refers to WAE and Cisco Wide Area Virtualization Engine (WAVE) appliances, and Cisco Virtual WAAS (vWAAS) instances.
This chapter contains the following sections:
- About Cisco WAAS with Akamai Connect
- Components of Cisco WAAS with Akamai Connect
- Deployment Options for Cisco WAAS with Akamai Connect
- Supported Platforms for Cisco WAAS with Akamai Connect
- Workflow for Enabling Akamai Connect
- Activating the Akamai Connect License
- Enabling Akamai Connect
- Enabling Akamai Connected Cache
- Enabling Over the Top (OTT) caching
- Setting Transparent Caching Policies
- Enabling Cisco Cloud Web Security (Cisco CWS)
- Configuring Cisco WAAS Connections to the Akamai Network
- Configuring Server Address Validation
- Configuring Akamai Connect Cache Prepositioning
- Configuring HTTP/S Preposition Proxy for Akamai Connect
- Cisco Support for Microsoft Windows Update
- Cisco WAAS CLI Commands Used with Akamai Connect
About Cisco WAAS with Akamai Connect
Akamai Connect is the HTTP/S object cache component added to Cisco WAAS, integrated into the existing WAAS software stack and leveraged via the HTTP Application Optimizer.
- Cisco WAAS with Akamai Connect helps to reduce latency for HTTP/S traffic for business and web applications, and can improve performance for many applications, including Point of Sale (POS), HD video, digital signage, and in-store order processing.
- Cisco WAAS with Akamai Connect provides significant and measurable WAN data offload, and is compatible with existing WAAS functions such as DRE (deduplication), LZ (compression), TFO (Transport Flow Optimization), and SSL acceleration (secure/encrypted) for first and second pass acceleration.
Akamai Connected Cache is a component of Akamai Connect, which allows the cache engine to cache content that is delivered by an edge server on the Akamai Intelligent Platform.
The following list highlights some of the benefits offered by Cisco WAAS with Akamai Connect:
- Intelligent transparent object caching.
- Seamless integration of Akamai Connect into Cisco WAAS software and configuration, using either the Cisco WAAS Central Manager or Cisco WAAS CLI.
- Integration with Akamai’s Edge Grid Network, which provides low-latency Content Delivery Network transfers via Akamai Connected Cache.
- Significant and measurable WAN data offload.
- Cache prepositioning (warming) for websites that you specify.
- Hostname rules for cache control of specific websites or domains.
- First-pass and second-pass acceleration, with Akamai Connect working with Cisco WAAS middle-mile capabilities, including DRE, LZ, TFO, and SSL acceleration.
- Dual-sided or single-sided deployment.
Components of Cisco WAAS with Akamai Connect
Table provides overviews of Cisco WAAS with Akamai Connect components, links to further information, and links to Akamai Connect configuration procedures.
|
|
|
|---|---|
The Akamai Connect license for Cisco WAAS is an advanced license available for all supported Cisco with Akamai Connect devices. The Akamai Connect license for Cisco WAAS is aligned with the number of optimized connections in each supported Cisco WAAS device. For more information, see Activating the Akamai Connect License. |
|
For Cisco WAAS Version 5.4.1 and later, Cisco with Akamai Connect supports WAAS and vWAAS devices up to 6,000 connections. For Cisco WAAS Versions later than Cisco WAAS Version 5.4.1, Cisco with Akamai Connect supports WAAS and vWAAS devices beyond 6,000 connections. For more information, see Supported Platforms for Cisco WAAS with Akamai Connect. |
|
The Transparent cache, Akamai’s high-performance HTTP object cache, provides the ability to locally cache HTTP-based content for LAN-like performance, regardless of whether the web application was served from the private corporate cloud or the public Internet. This content includes on-demand and live HTTP video streams to deliver fast, high-quality, high-definition video experiences in the branch, all while offloading the enterprise network. There are four caching policies (modes):
For more information, see Setting Transparent Caching Policies. For configuration information, see the Enabling Akamai Connect procedure, Setting a Transparent Caching Policy for All Sites and Setting a Transparent Caching Policy for a Specific Site. |
|
Akamai’s proprietary caching rules in connection with the edge servers of the Akamai Intelligent Platform lets you cache and deliver content inside the branch office that might otherwise be deemed noncacheable. This content could be an enterprise’s own web content or any content that is delivered by the Akamai Intelligent Platform, which is up to thirty percent of all web traffic. For more information, see the Enabling Akamai Connect procedure, Enabling Akamai Connected Cache. |
|
Over-The-Top (OTT) caching is used for streamed content, particularly video content. OTT caching caches HTTP content served from dynamic URLs and content marked as noncacheable, such as YouTube videos. Akamai achieves this by using metadata logic to determine a unique cache key per video, which allows dynamic URLs to be cached. For more information, see Enabling Over the Top (OTT) caching. |
|
Cisco Cloud Web Security (CWS) provides content scanning of HTTP and HTTP/S traffic, and provides malware protection service to web traffic. CWS enforces content filtering by enabling force IMS for every cached object, for both single-sided and dual-sided deployment. For more information, see Enabling Cisco Cloud Web Security (Cisco CWS). |
|
There are three ways for Cisco WAAS devices to connect to the Akamai network: For more information, see Configuring Cisco WAAS Connections to the Akamai Network. |
|
Cache prepositioning, also known as cache warming, allows you to specify a policy to prefetch and cache content at a specified time. Cache prepositioning allows you to take advantage of idle time on the WAN to transfer large or frequently accessed files to selected Cisco WAAS devices, so that users can benefit from cache-level performance even during first-time access of these files. For more information, see Configuring Akamai Connect Cache Prepositioning. |
|
Cisco support for Microsoft Windows Update enables the Akamai cache engine to support Windows Update in two ways: to download and cache full objects even when ranges within objects that not in cache are requested, and future range requests on the objects can be served out of cache. For more information, see Cisco Support for Microsoft Windows Update. |
Deployment Options for Cisco WAAS with Akamai Connect
This section contains the following topics:
- About Deployment Options for Cisco WAAS with Akamai Connect
- Operating Guidelines for Cisco WAAS with Akamai Connect
About Deployment Options for Cisco WAAS with Akamai Connect
You can deploy Cisco WAAS with Akamai Connect as a dual-sided or single-sided deployment:
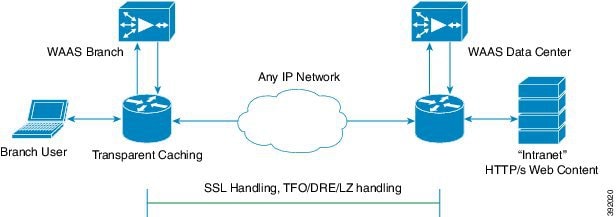
- Dual-sided deployment of Cisco WAAS with Akamai Connect, shown in Figure 13-1, provides the following benefits for HTTP and HTTPS traffic:
–![]() Transparent caching of customer-owned, Intranet web resources.
Transparent caching of customer-owned, Intranet web resources.
–![]() Includes prepositioning (for non-SSL content).
Includes prepositioning (for non-SSL content).
Figure 13-1 Cisco WAAS with Akamai Connect Dual-Sided Deployment
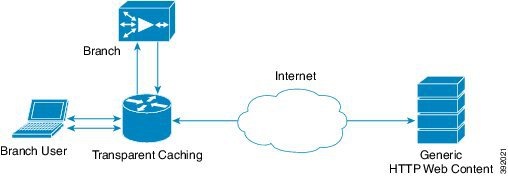
- Single-sided deployment of Cisco WAAS with Akamai Connect, shown in Figure 13-2, provides the following benefits for HTTP and HTTPS traffic:
–![]() Generic web resources that utilize proxy-specific HTTP cache-control headers.
Generic web resources that utilize proxy-specific HTTP cache-control headers.
–![]() Includes prepositioning (for non-SSL content).
Includes prepositioning (for non-SSL content).
Note![]() For Transparent caching in Standard mode, single-sided deployment of Cisco WAAS with Akamai Connect is enabled by default.
For Transparent caching in Standard mode, single-sided deployment of Cisco WAAS with Akamai Connect is enabled by default.
Figure 13-2 Cisco WAAS with Akamai Connect Single-Sided Deployment
Operating Guidelines for Cisco WAAS with Akamai Connect
Consider the following operating guidelines for Cisco WAAS with Akamai Connect:
- There is no separate cache for HTTPS content. However, data is stored differently for the same site if both HTTP and HTTPS are accessing. (The way the sites are stored in the cache is based on the URL, and this will change between HTTP and HTTPS.)
- You cannot view the contents of the cache, and cannot pin content to make it remain in the cache, for example, for prepositioned content.
- The Akamai cache engine has no explicit integration with Cisco AppNav. The Cisco AppNav status is based on the Cisco HTTP application accelerator.
Supported Platforms for Cisco WAAS with Akamai Connect
This section contains the following topics:
- Supported Cisco Platforms Up to 6,000 Connections
- Supported Cisco Platforms Beyond 6,000 Connections
- Configuring HTTP Object Cache
Supported Cisco Platforms Up to 6,000 Connections
The flow of allocated resources to the Akamai cache engine is controlled by the Cisco WAAS Central Manager, but the overall resource pool and the amount of resources that can be allocated to the Akamai cache engine is controlled by the following:
- the hardware platform
- the number of supported connections and users that the router is designed to service
Table 13-1 shows Cisco WAAS with Akamai Connect supported platforms up to 6,000 connections, for Cisco WAAS Version 5.4.1 and later.
For information on Cisco WAAS with Akamai Connect supported platforms beyond 6,000 connections, see Supported Cisco Platforms Beyond 6,000 Connections.
Table 13-1 Cisco WAAS with Akamai Connect Supported Platforms up to 6,000 Connections
|
|
|
|
|
|---|---|---|---|
ISR-WAAS-750 |
|||
Note![]() If you are upgrading from a version earlier than Cisco vWAAS in Cisco WAAS Version 5.4.x, you will need a third disk and possibly more memory added. For more information, see the “Cisco vWAAS with Akamai Connect” chapter in the Cisco Virtual Wide Area Application Services Configuration Guide.
If you are upgrading from a version earlier than Cisco vWAAS in Cisco WAAS Version 5.4.x, you will need a third disk and possibly more memory added. For more information, see the “Cisco vWAAS with Akamai Connect” chapter in the Cisco Virtual Wide Area Application Services Configuration Guide.
Supported Cisco Platforms Beyond 6,000 Connections
About Supported Cisco Platforms Beyond 6,000 Connections
The flow of allocated resources to the Akamai cache engine is controlled by the Cisco WAAS Central Manager, but the overall resource pool and the amount of resources that can be allocated to the Akamai cache engine is controlled by the hardware platform and the number of supported connections and users that the router is designed to service.
For Cisco WAAS Version 6.2.1 and later, the following list shows the Cisco WAAS with Akamai Connect supported platforms for scaling beyond 6,000 connections:
For Cisco WAAS with Akamai Connect for Cisco WAAS Version 5.4.1 and earlier, see Supported Cisco Platforms Up to 6,000 Connections.
Operating Guidelines for Supported Cisco Platforms Beyond 6,000 Connections
Supported Cisco WAVE Models Beyond 6,000 Connections
- Table 13-2 shows the supported Cisco WAVE models with Akamai Connect beyond 6,000 connections, as well as the total HTTP object cache connections, memory required for the cache engine, and cache engine cache disk.
Table 13-2 Cisco WAAS with Akamai Connect Requirements for HTTP Object Cache
|
|
|
|
|---|---|---|
- The Akamai cache engine connection-handling capacity is determined by the upper limit of memory that is given to the Akamai cache engine at startup. The Akamai cache engine will allocate memory as needed up to the upper limit. In case of overload, the connection will be optimized by HTTP-AO, without a caching benefit.

Supported Cisco vWAAS Models Beyond 6,000 Connections
- Table 13-3 shows supported Cisco vWAAS models with Akamai Connect beyond 6,000 connections, as well as the total HTTP object cache connections, cache engine cache disk, and additional resources that may be needed.
Table 13-3 Cisco vWAAS with Akamai Connect Requirements for Beyond 6,000 Connections
|
|
|
|
to be Added |
|---|---|---|---|
–![]() HTTP object cache will scale up to the platform TFO limit. To achieve this, you must augment the platform resources (CPU, RAM, and disk) during provisioning.
HTTP object cache will scale up to the platform TFO limit. To achieve this, you must augment the platform resources (CPU, RAM, and disk) during provisioning.
–![]() For Cisco vWAAS-12000 and Cisco vWAAS-50000, you must allocate Akamai cache engine cache disk resources. Cache disk requirements are shown in Table 13-3 .
For Cisco vWAAS-12000 and Cisco vWAAS-50000, you must allocate Akamai cache engine cache disk resources. Cache disk requirements are shown in Table 13-3 .
–![]() For Cisco vWAAS-12000, you must allocate at least 6 GB of additional RAM.
For Cisco vWAAS-12000, you must allocate at least 6 GB of additional RAM.
- Consider the following overview of operating guidelines for Cisco vWAAS with Akamai Connect caching. For detailed information on configuring and using Cisco vWAAS with Akamai Connect caching, see the “Cisco vWAAS with Akamai Connect” chapter in the Cisco Virtual Wide Area Application Services Configuration Guide.
–![]() For Cisco vWAAS in Cisco WAAS Version 6.1.1 and later, Cisco vWAAS-150 on Cisco ISR-WAAS is supported for Akamai Connect.
For Cisco vWAAS in Cisco WAAS Version 6.1.1 and later, Cisco vWAAS-150 on Cisco ISR-WAAS is supported for Akamai Connect.
–![]() For Cisco vWAAS in Cisco WAAS Version 6.2.1 and later, Cisco vWAAS-150 is also supported for RHEL KVM and Microsoft Hyper-V.
For Cisco vWAAS in Cisco WAAS Version 6.2.1 and later, Cisco vWAAS-150 is also supported for RHEL KVM and Microsoft Hyper-V.
–![]() For vWAAS in Cisco WAAS versions earlier than 6.x, Akamai Connect beyond 6,000 connections is not supported for Cisco vWAAS on RHEL KVM or KVM on CentOS.
For vWAAS in Cisco WAAS versions earlier than 6.x, Akamai Connect beyond 6,000 connections is not supported for Cisco vWAAS on RHEL KVM or KVM on CentOS.
Configuring HTTP Object Cache
Configuring HTTP Object Cache in Cisco Devices with Akamai Connect
- HTTP object cache is used to enable the Akamai cache engine for a Cisco device, for Cisco WAAS Version 6.2.1 and later.
- Enabling HTTP object cache for Cisco WAVE-7541, Cisco WAVE-7571 or Cisco WAVE-8541 includes configuring the device profile feature, repartitioning the Cisco WAVE data disk, and if needed, upgrading your Cisco WAAS system to Cisco WAAS Version 6.2.1 or later.
To configure HTTP object cache in Cisco WAVE or Cisco vWAAS device follow these steps.
Step 1![]() If needed, upgrade the Cisco WAAS Central Manager and Cisco WAE devices to Cisco WAAS Version 6.2.1 or later.
If needed, upgrade the Cisco WAAS Central Manager and Cisco WAE devices to Cisco WAAS Version 6.2.1 or later.
- For complete upgrade instructions, including critical prerequisites before upgrading to Cisco WAAS Version 6.2.1 or later, see the Release Note for Cisco Wide Area Application Services for your Cisco WAAS version.
- To configure HTTP object cache on Cisco vWAAS-12000 or Cisco vWAAS-50000, and to avoid object and DRE caching being lost due to execution of the disk delete-data-partitions command, you must downgrade from WAAS Version 6.2.x to WAAS Version 5.x, and then upgrade to WAAS Version 6.2.x. For more information, see.
Step 2![]() To enable HTTP object cache on the Cisco WAVE device, run the accelerator http object-cache enable global configuration command.
To enable HTTP object cache on the Cisco WAVE device, run the accelerator http object-cache enable global configuration command.
A message is displayed to restart the system, with two prerequisite procedures:
You must provide approval for each of these procedures.
Step 3![]() Run the disk delete-data-partitions command.
Run the disk delete-data-partitions command.
- To accommodate the larger-scale connections available for Cisco WAAS Version 6.2.1 and later with Akamai Connect, the single partition for the RAID5-based disk subsystem is split into multiple partitions.
Note![]() The disk delete-data-partitions command deletes all data partitions on all logical drives, including CONTENT, PRINTSPOOL, and SYSFS partitions. These partitions include all DRE and SMB object cache files, SYSFS and print spool files. New partitions are created at system restart.
The disk delete-data-partitions command deletes all data partitions on all logical drives, including CONTENT, PRINTSPOOL, and SYSFS partitions. These partitions include all DRE and SMB object cache files, SYSFS and print spool files. New partitions are created at system restart.
Step 4![]() Enable Device Profile: After the upgrade is complete, Device Profile is initially disabled.
Enable Device Profile: After the upgrade is complete, Device Profile is initially disabled.
Considering the following operating guidelines for Device Profile:
- For Cisco WAAS Version 6.2.1 and later, Device Profile enables the device mode as branch, which tunes the resource allocation for various Cisco WAAS services as a branch traffic scenario and branch services.
- For Cisco WAVE-7541 and Cisco WAVE-8541, the Device Profile is automatically set or unset when you enable or disable HTTP object cache.
- For Cisco WAVE-7571, the Device Profile feature requires you to reboot the system to change the Device Profile feature status.
To enable Device Profile from the Cisco WAAS Central Manager:
a.![]() Choose Device > device-name > Configure > Caching > Device Profile.
Choose Device > device-name > Configure > Caching > Device Profile.
The Device Profile window is displayed.
b.![]() To enable Device Profile, check the Branch check box.
To enable Device Profile, check the Branch check box.
Note![]() The Device Profile feature is enabled at the individual device level; it is not enabled for an entire device group.
The Device Profile feature is enabled at the individual device level; it is not enabled for an entire device group.
To enable Device Profile from the Cisco WAAS CLI:
When you restart the system using the Cisco WAAS Central Manager, the HTTP object cache is enabled on the device.
Downgrading and Upgrading a Cisco vWAAS Device with Additional Akamai Cache Disk Removed and Reinstalled
To configure HTTP object cache in Cisco vWAAS-12000 or Cisco vWAAS-50000 with the additional Akamai Connect cache disk removed and then reinstalled, follow these steps:
Step 1![]() For the Cisco vWAAS device in Cisco WAAS Version 6.2.x with Akamai Connect enabled:
For the Cisco vWAAS device in Cisco WAAS Version 6.2.x with Akamai Connect enabled:
a.![]() From the Cisco WAAS Central Manager menu, from either the Device Groups or Devices tab, and then choose Configure > Caching > Akamai Connect.
From the Cisco WAAS Central Manager menu, from either the Device Groups or Devices tab, and then choose Configure > Caching > Akamai Connect.
The Akamai Connect window appears, with the Cache Settings tab displayed ().
b.![]() To disable Akamai Connect, uncheck the Enable Akamai Connect check box.
To disable Akamai Connect, uncheck the Enable Akamai Connect check box.
c.![]() Power down the Cisco vWAAS device.
Power down the Cisco vWAAS device.
Step 2![]() Remove the additional Akamai Cache disk.
Remove the additional Akamai Cache disk.
Step 3![]() Power on the Cisco vWAAS device.
Power on the Cisco vWAAS device.
Step 4![]() Downgrade from Cisco WAAS Version 6.2.x to Cisco WAAS Version 5.x.
Downgrade from Cisco WAAS Version 6.2.x to Cisco WAAS Version 5.x.
Step 5![]() Upgrade the Cisco WAAS Central Manager and Cisco WAE devices to Cisco WAAS Version 6.2.x.
Upgrade the Cisco WAAS Central Manager and Cisco WAE devices to Cisco WAAS Version 6.2.x.
Step 6![]() After the upgrade is complete, power off the device.
After the upgrade is complete, power off the device.
Step 7![]() Reinstall the additional Akamai Cache disk.
Reinstall the additional Akamai Cache disk.
Step 8![]() Power on the Cisco vWAAS device.
Power on the Cisco vWAAS device.
a.![]() From the Cisco WAAS Central Manager menu, from either the Device Groups or Devices tab, choose Configure > Caching > Akamai Connect.
From the Cisco WAAS Central Manager menu, from either the Device Groups or Devices tab, choose Configure > Caching > Akamai Connect.
The Akamai Connect window appears, with the Cache Settings tab displayed.
b.![]() To enable Akamai Connect, check the Enable Akamai Connect check box.
To enable Akamai Connect, check the Enable Akamai Connect check box.
Step 10![]() Enable HTTP object cache from the Cisco WAAS Central Manager or from the Cisco WAAS CLI.
Enable HTTP object cache from the Cisco WAAS Central Manager or from the Cisco WAAS CLI.
Consider the following guidelines for enabling HTTP object cache:
- A message is displayed regarding the required additional memory and disk resources. See Table 13-2 for resource guidelines.
- For information on enabling HTTP object cache for Cisco WAVE devices, see Configuring HTTP Object Cache.
- For information on enabling HTTP object cache for Cisco vWAAS devices, see Configuring HTTP Object Cache in Cisco Devices with Akamai Connect.
Step 11![]() Power down the Cisco vWAAS device and add the necessary resources to the Cisco vWAAS device.
Power down the Cisco vWAAS device and add the necessary resources to the Cisco vWAAS device.
Step 12![]() Power up the Cisco vWAAS VM.
Power up the Cisco vWAAS VM.
HTTP object cache is enabled on the Cisco vWAAS device.
Downgrading and Upgrading a Cisco vWAAS Device with Additional Akamai Cache Disk Remaining In Place
To configure HTTP object cache in Cisco vWAAS-12000 or Cisco vWAAS-50000 with the additional Akamai Connect cache disk remaining in place, follow these steps:
Step 1![]() Upgrade the Cisco WAAS Central Manager and Cisco WAE devices to Cisco WAAS Version 6.2.1 or later.
Upgrade the Cisco WAAS Central Manager and Cisco WAE devices to Cisco WAAS Version 6.2.1 or later.
Step 2![]() Disable Akamai Connect.
Disable Akamai Connect.
a.![]() From the Cisco WAAS Central Manager menu, from either the Device Groups or Devices tab, and then choose Configure > Caching > Akamai Connect.
From the Cisco WAAS Central Manager menu, from either the Device Groups or Devices tab, and then choose Configure > Caching > Akamai Connect.
The Akamai Connect window appears, with the Cache Settings tab displayed.
b.![]() To disable Akamai Connect, uncheck the Enable Akamai Connect check box.
To disable Akamai Connect, uncheck the Enable Akamai Connect check box.
c.![]() Power down the Cisco vWAAS device.
Power down the Cisco vWAAS device.
Step 3![]() Downgrade from Cisco WAAS Version 6.2.x to Cisco WAAS Version 5.x.
Downgrade from Cisco WAAS Version 6.2.x to Cisco WAAS Version 5.x.
Step 4![]() Upgrade the Cisco WAAS Central Manager and Cisco WAE devices to Cisco WAAS Version 6.2.x.
Upgrade the Cisco WAAS Central Manager and Cisco WAE devices to Cisco WAAS Version 6.2.x.
Step 5![]() Run the disk delete-data-partitions EXEC command and restart the system.
Run the disk delete-data-partitions EXEC command and restart the system.
After the upgrade, you must run the disk delete-data-partitions command to enable Akamai Connect.
Note![]() The disk delete-data-partitions command deletes all data partitions on all logical drives, including CONTENT, PRINTSPOOL, and SYSFS partitions. These partitions include all DRE and SMB object cache files, SYSFS and print spool files. New partitions are created at system restart.
The disk delete-data-partitions command deletes all data partitions on all logical drives, including CONTENT, PRINTSPOOL, and SYSFS partitions. These partitions include all DRE and SMB object cache files, SYSFS and print spool files. New partitions are created at system restart.
a.![]() From the Cisco WAAS Central Manager menu, from either the Device Groups or Devices tab, choose Configure > Caching > Akamai Connect.
From the Cisco WAAS Central Manager menu, from either the Device Groups or Devices tab, choose Configure > Caching > Akamai Connect.
The Akamai Connect window appears, with the Cache Settings tab displayed ().
b.![]() To enable Akamai Connect, check the Enable Akamai Connect check box.
To enable Akamai Connect, check the Enable Akamai Connect check box.
Workflow for Enabling Akamai Connect
Table shows the workflow for enabling Akamai Connect
Activating the Akamai Connect License
This section contains the following topics:
- About the Akamai Connect License
- Prerequisites for Activating the Akamai License
- Activating the Akamai Connect License File
- Deregistering and Reregistering a Cisco WAAS Device
- Replacing an Inactive or Expired Akamai Connect License
About the Akamai Connect License
The Akamai Connect license for Cisco WAAS is an advanced license available for all supported Cisco with Akamai Connect devices. The Akamai Connect license for Cisco WAAS is aligned with the number of optimized connections in each supported Cisco WAAS device.
Prerequisites for Activating the Akamai License
Confirming the Akamai License Customer ID Information
Before you upload a new license, collect the following information:
- The new license activation file that is going to be uploaded
- A customer ID snapshot from the Cisco WAAS Central Manager Akamai Diagnostics: Choose Home > Monitor > Troubleshoot > Akamai Diagnostics > Akamai Connect License > Details.
- To capture the hostname and Akamai ID, copy the list of some devices, as either a snapshot or an Excel spreadsheet: Choose Home > Monitor > Troubleshoot > Akamai Diagnostics > Akamai Connect License > Details > Test.
- Open a service request with this information so that Cisco TAC can assist you further. For further information on contacting TAC, see the Cisco Support and Downloads page, Contacts/Support Cases section.
Confirming Cisco WAAS Configuration Parameters for Akamai Connect
Complete the following prerequisites before you enable Akamai Connect on Cisco WAAS and activate the Akamai Connect License file:
- Confirm the readiness of your Cisco WAAS configuration, as described in Prerequisites for Activating the Akamai License.
- For information on the status of an active Akamai Connect license, see Akamai Connect Diagnostics Using the Central Manager in the chapter “Troubleshooting Your Cisco WAAS Network” .
Activating the Akamai Connect License File
To receive and activate the Akamai Connect activation file, follow these steps:
Step 1![]() Enable Akamai Connect, as described in Workflow for Enabling Akamai Connect.
Enable Akamai Connect, as described in Workflow for Enabling Akamai Connect.
If this is the first time you are enabling Akamai Connect, you are prompted to provide the activation file for licensing.
Step 2![]() If you have not done so, purchase an Akamai Connect license from your Cisco account representative or reseller. The following actions are generated by this purchase:
If you have not done so, purchase an Akamai Connect license from your Cisco account representative or reseller. The following actions are generated by this purchase:
- The account representative or reseller enters the order into the Cisco Commerce Workspace (CCW) system. The order must specify an email address for eDelivery of the Activation file.
- CCW contacts the Akamai Luna Portal to request a license or licenses for the number and type of Akamai licenses entered.
- Akamai generates and sends the license(s) to the CCW system in the form of a single activation file.
- The CCW system sends an email, with the activation file attached, to the email address specified in the order. The order of priority for selecting the email address in a CCW order is::
–![]() Priority1: eDelivery email address
Priority1: eDelivery email address
–![]() Priority2: end customer email address
Priority2: end customer email address
–![]() Priority3: shipping contact email address
Priority3: shipping contact email address
Note![]() If you do not provide an email address in your order, you will not receive an activation file.
If you do not provide an email address in your order, you will not receive an activation file.
Step 3![]() To upload the Akamai Connect License file, choose Home > Admin > Licenses > Akamai Connect.
To upload the Akamai Connect License file, choose Home > Admin > Licenses > Akamai Connect.
The Upload Akamai Connect License file window is displayed.
Step 4![]() Use to the Browse button to highlight and select the activation file, and click Upload.
Use to the Browse button to highlight and select the activation file, and click Upload.
- The authentication data in the activation file is transmitted to the Akamai Luna portal.
- After the device message is sent to the Akamai Luna portal, the Akamai Luna portal sends the Entitlement Code to the Cisco WAAS Central Manager and the Akamai Management Gateway (AMG). The Cisco WAAS Central Manager sends the Entitlement Code to Cisco WAAS, and the AMG rolls out the Entitlement Code to the edge servers on the Akamai Grid Network.
Each of these steps happens automatically, but each takes some time to complete.
Step 5![]() The activation process begins.
The activation process begins.
The Status of Devices with Akamai Connect Feature Configured table listing displays the following types of status for one, some, or all devices. Table 13-5 shows the states that the Akamai Device Status, Operational Status, and Connectivity to Akamai indicators proceed through.
Table 13-5 Status Indicator States for Device, Operational and Connectivity Status
|
|
|
|
|
|
|---|---|---|---|---|
Note![]() The activation process for WAAS devices may take between 15-60 minutes to complete, and for this time period, the Connectivity to Akamai status displays as Activating. During this time, device(s) may not be able to communicate with the Akamai Network, because they are not recognized by the AMG until the activation process is complete, and the Connectivity to Akamai status displays as Connected.
The activation process for WAAS devices may take between 15-60 minutes to complete, and for this time period, the Connectivity to Akamai status displays as Activating. During this time, device(s) may not be able to communicate with the Akamai Network, because they are not recognized by the AMG until the activation process is complete, and the Connectivity to Akamai status displays as Connected.
Step 6![]() For the final steps in the registration process:
For the final steps in the registration process:
- Akamai Luna sends the Akamai Connected Cache credentials to the AMG and to the Akamai edge servers on the Akamai Grid network. The AMG forwards the Akamai Connected Cache credentials on to Cisco WAAS.
- With the Akamai Connected Cache credentials on both Cisco WAAS and the Akamai edge servers, the Akamai Connected Cache is enabled, and caching requests can be served by the Akamai edge servers. This authenticated connection can then service requests for Akamai Connected Cache and OTT caching from the Akamai Grid network Akamai edge servers.
- The registration of each Cisco WAE begins. The Cisco WAAS Central Manager provides information to the Akamai Luna Portal for each Cisco WAAS device that will be running Akamai Connect.
Note![]() The Connected Operational Status can take several minutes to complete. Rollout of the activation to the Akamai edge servers can take up to 45 minutes to complete. A device may take from a few minutes to up to two hours to show an Active Activation Status, depending on when the request was made, traffic conditions, and other variables.
The Connected Operational Status can take several minutes to complete. Rollout of the activation to the Akamai edge servers can take up to 45 minutes to complete. A device may take from a few minutes to up to two hours to show an Active Activation Status, depending on when the request was made, traffic conditions, and other variables.
Step 7![]() Each Cisco WAE that has been sent the entitlement code will try to make an SSL connection to the AMG using amg.terra.akamai.com. The Akamai Luna Portal will push out the Akamai Connected Cache credentials to the AMG and to the Akamai Grid Network (to the Akamai edge servers).
Each Cisco WAE that has been sent the entitlement code will try to make an SSL connection to the AMG using amg.terra.akamai.com. The Akamai Luna Portal will push out the Akamai Connected Cache credentials to the AMG and to the Akamai Grid Network (to the Akamai edge servers).
- The AMG will push the Akamai Connected Cache credentials out to each of the Cisco WAEs that are configured for Akamai Connected Cache. If OTT is enabled, the OTT metadata needed to help cache YouTube objects is also processed at this time.
- The Akamai Connected Cache credentials are sent by the Cisco WAE cache engine when going to the origin server. If the Cisco WAE cache engine has valid credentials according to the Akamai edge server, the Akamai edge server then provides objects to the Cisco WAE cache engine that are not normally cacheable to other devices.
Step 8![]() The Cisco WAE cache engine will request new credentials daily and will be good for two days. The connections are always established from the Cisco WAE or Cisco WAAS Central Manager over TCP 443 to the AMG.
The Cisco WAE cache engine will request new credentials daily and will be good for two days. The connections are always established from the Cisco WAE or Cisco WAAS Central Manager over TCP 443 to the AMG.
Because connection should not initiate from AMG to any Cisco WAAS Central Manager or Cisco WAE at any time, there should not be an issue. If there is, then a hole will need to be made to allow the Cisco WAAS Central Manager or Cisco WAE to communicate with any device on port 443.
Step 9![]() As needed, configure HTTP proxy or external HTTP proxy, described in Configuring Cisco WAAS Connections to the Akamai Network.
As needed, configure HTTP proxy or external HTTP proxy, described in Configuring Cisco WAAS Connections to the Akamai Network.
Deregistering and Reregistering a Cisco WAAS Device
This section provides an overview of how to deregister and reregister a Cisco WAAS device. For more information, see Changing Device Mode in the chapter “Planning Your Cisco WAAS Network” .
- To change the device mode of a Cisco WAAS device that is already registered with a Cisco WAAS Central Manager, you must perform the following tasks:
1.![]() Deregister the Cisco WAAS device from the Cisco WAAS Central Manager.
Deregister the Cisco WAAS device from the Cisco WAAS Central Manager.
2.![]() Change the device mode of the Cisco WAAS device.
Change the device mode of the Cisco WAAS device.
3.![]() Reload the Cisco WAAS device.
Reload the Cisco WAAS device.
4.![]() Re-enable CMS services for the Cisco WAAS device.
Re-enable CMS services for the Cisco WAAS device.
–![]() The Cisco WAAS Central Manager triggers the removal of the device record on the Akamai side, thereby invalidating the entitlement key used by the Cisco WAE cache engine to talk to AMG devices.
The Cisco WAAS Central Manager triggers the removal of the device record on the Akamai side, thereby invalidating the entitlement key used by the Cisco WAE cache engine to talk to AMG devices.
–![]() On the Cisco WAAS side, the Cisco WAE cache engine will continue to operate in Transparent caching mode.
On the Cisco WAAS side, the Cisco WAE cache engine will continue to operate in Transparent caching mode.
- When you reregister a Cisco WAAS device with the Cisco WAAS Central Manager, one of two things happen:
–![]() The Cisco WAAS Central Manager auto-assigns the Cisco WAAS device to device groups (that are so marked). If any of these device groups have Akamai Connect and HTTP cache settings, the Cisco WAAS Central Manager will trigger registration with Akamai.
The Cisco WAAS Central Manager auto-assigns the Cisco WAAS device to device groups (that are so marked). If any of these device groups have Akamai Connect and HTTP cache settings, the Cisco WAAS Central Manager will trigger registration with Akamai.
–![]() If no device group is configured with Akamai Connect and HTTP cache settings, the registration is done individually.
If no device group is configured with Akamai Connect and HTTP cache settings, the registration is done individually.
–![]() After the Cisco WAAS device is registered, it will get a new entitlement key.
After the Cisco WAAS device is registered, it will get a new entitlement key.
Replacing an Inactive or Expired Akamai Connect License
If your Akamai Connect license has become inactive or has expired, follow these steps to replace your license:
Step 1![]() When a license is inactive or expired, a notification is displayed in one of these Cisco WAAS Central Manager windows:
When a license is inactive or expired, a notification is displayed in one of these Cisco WAAS Central Manager windows:
- At the Home > Admin > Akamai Connect window:
Akamai Connect License is Inactive. Please remove current license and import valid license. - At the Home > Monitor > Troubleshoot > Akamai Diagnostics window:
Akamai Connect License is Inactive. Please remove existing license and import new one using Akamai License page.
Step 2![]() Remove the inactive or expired license.
Remove the inactive or expired license.
Step 3![]() To upload a new license file, choose Home > Admin > Licenses > Akamai Connect.
To upload a new license file, choose Home > Admin > Licenses > Akamai Connect.
Step 4![]() The Akamai Connect window is displayed.
The Akamai Connect window is displayed.
Step 5![]() Click Choose File and browse to the new license file, and then click Upload.
Click Choose File and browse to the new license file, and then click Upload.
If you try to import an expired license, you will see the message:
Unable to communicate to Akamai server (Error: License is inactive or expired). See Central Manager log file for detailed error information.
Step 6![]() To obtain a new license, contact your Cisco account representative or reseller.
To obtain a new license, contact your Cisco account representative or reseller.
Enabling Akamai Connect
This section contains the following topics:
- Confirming Akamai Connect Configuration Prerequisites
- Turning on the Akamai Cache Engine and Enabling Akamai Connect
Confirming Akamai Connect Configuration Prerequisites
Before you enable Akamai Connect, confirm that your Cisco WAAS configuration has the following Akamai Connect prerequisites:
- Cisco WAAS Version: The Cisco WAAS Central Manager and Cisco WAAS appliances are running at Cisco WAAS Version 5.4.1 or later.
- NTP Service: A verified Network Time Protocol (NTP) service that is within 30 seconds of the NTP standard server (NTP.org). For how to configure the NTP server, see Configuring an NTP Server in the chapter “Configuring Other System Settings” .
- DNS Server: A working public Domain Name System (DNS) server configured on the WAAS devices and the WAAS Central Manager. For how to configure the DNS server, see Configuring the DNS Server in the chapter “Configuring Network Settings” .
- Akamai Luna system and Akamai Management Gateway: The ability for the Cisco WAAS Central Manager to reach Akamai’s Luna system via HTTPS on port 443. (The custom hostname is in your activation file.)
The ability for Cisco WAAS devices to make a connection to the Akamai Management Gateway (AMG) to get the authentication key. The Cisco WAAS device configured for Akamai Connect needs the correct network connectivity to access the AMG every day to get correct credentials and updated metadata. Cisco WAAS will make an HTTPS connection on port 443 to the AMG to get this information.
Note![]() The Akamai Connected Cache feature will stop functioning if Cisco WAAS loses communication with the AMG for more than 48 hours.
The Akamai Connected Cache feature will stop functioning if Cisco WAAS loses communication with the AMG for more than 48 hours.
If the Cisco WAAS devices cannot go directly to the Internet, you can configure them to use the Cisco WAAS Central Manager as a proxy (see).
Turning on the Akamai Cache Engine and Enabling Akamai Connect
Step 1![]() From the Cisco WAAS Central Manager menu, from either the Device Groups or Devices tab, choose Configure > Caching > Akamai Connect.
From the Cisco WAAS Central Manager menu, from either the Device Groups or Devices tab, choose Configure > Caching > Akamai Connect.
The Akamai Connect window appears, with the Cache Settings tab displayed.
Note![]() If you are configuring the Akamai Connect feature for a device group, the device group should have only devices that support Akamai Connect. For more information, see Supported Platforms for Cisco WAAS with Akamai Connect.
If you are configuring the Akamai Connect feature for a device group, the device group should have only devices that support Akamai Connect. For more information, see Supported Platforms for Cisco WAAS with Akamai Connect.
Step 2![]() To turn on the Akamai cache engine, check the Enable Akamai Connect check box.
To turn on the Akamai cache engine, check the Enable Akamai Connect check box.
The End-User License Agreement - Akamai Connect dialog box appears.
- When you create settings for the first time, either at the device or the group level, the Akamai Connect upload file drop-down list is displayed. Choose the Akamai Connect license file and click Submit. For a description of the full registration procedure, see.
- If you have not yet purchased an Akamai Connect license, see.
Step 4![]() From the Choose File drop-down box, choose your Akamai Connect license file.
From the Choose File drop-down box, choose your Akamai Connect license file.
Step 5![]() Click Submit or proceed to Enabling Akamai Connected Cache.
Click Submit or proceed to Enabling Akamai Connected Cache.
Enabling Akamai Connected Cache
This section contains the following topics:
- About Akamai Connected Cache
- Operating Guidelines for Akamai Connected Cache
- Procedure for Enabling Akamai Connected Cache
About Akamai Connected Cache
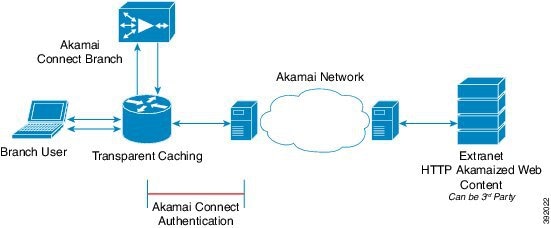
Akamai’s proprietary caching rules in connection with the edge servers of the Akamai Intelligent Platform lets you cache and deliver content inside the branch office that might otherwise be deemed noncacheable. This content could be an enterprise’s own web content, content that is served by the worldwide Akamai Content Delivery Network (Akamai CDN), or any content that is delivered by the Akamai Intelligent Platform, which is up to 30 percent of all web traffic.
Figure 13-3 shows a deployment of Akamai Connected Cache.
Figure 13-3 Akamai Connected Cache
Akamai Connected Cache includes the following features:
- Akamai Connected Cache is automatically enabled in Cisco WAAS when you enable Akamai Connect. You then specify the sites to be accelerated.
- Object caching is done on the client-side Cisco WAAS device only.
- Prepositioning can be leveraged to cache HTTP websites delivered via the Akamai Intelligent Platform.
- The Cisco WAAS/Akamai cache engine determines which sites can be “Akamaized” by Akamai Connected Cache from the HTTP headers in the first reply. The cache engine and the Akamai edge server then exchange credentials and agree that Akamai Connected Cache can occur. This is done again via HTTP headers in HTTP request and responses.
- During the enabling and registration of HTTP object cache, each Cisco WAE cache engine contacts the Akamai network to obtain credentials.
After registration is complete, and Akamai Connected Cache is turned on, DNS requests are routed through the Akamai DNS system, and content is served up from an edge server to the Cisco WAAS router whenever it is possible.
- The Akamai edge server provides additional headers to allow the WAAS/Akamai cache engine to cache the objects for the objects it handles. The cache engine forwards this back to the corresponding client. The headers passed between the cache engine and the client are similar to what the client or enterprise proxy server would see if the Cisco WAE was not in the path.
Operating Guidelines for Akamai Connected Cache
For Akamai Connected Cache to function properly, you must have the following parameters configured:
–![]() Access to public DNS server: for more information, see Configuring the DNS Server in the chapter Configuring Network Settings .
Access to public DNS server: for more information, see Configuring the DNS Server in the chapter Configuring Network Settings .
–![]() NTP services: for more information, see Configuring Date and Time Settings in the chapter “Configuring Other System Settings” .
NTP services: for more information, see Configuring Date and Time Settings in the chapter “Configuring Other System Settings” .
Procedure for Enabling Akamai Connected Cache
To enable Akamai Connected Cache, follow these steps:
Step 1![]() From the Cisco WAAS Central Manager menu, from either the Device Groups or Devices tab, choose Configure > Caching > Akamai Connect.
From the Cisco WAAS Central Manager menu, from either the Device Groups or Devices tab, choose Configure > Caching > Akamai Connect.
The Akamai Connect window appears, with the Cache Settings tab displayed.
Step 2![]() At the Edit Settings pane, check the Akamai Connected Cache check box. The default is enabled.
At the Edit Settings pane, check the Akamai Connected Cache check box. The default is enabled.
Consider the following configuration guidelines for Akamai Connected Cache:
–![]() To apply Akamai Connected Cache to all registered Cisco WAAS devices, configure Akamai Connected Cache at the device group level.
To apply Akamai Connected Cache to all registered Cisco WAAS devices, configure Akamai Connected Cache at the device group level.
–![]() To apply Akamai Connected Cache to a specific registered Cisco WAAS device, configure Akamai Connected Cache at the device level.
To apply Akamai Connected Cache to a specific registered Cisco WAAS device, configure Akamai Connected Cache at the device level.
–![]() Set a caching policy for all sites.
Set a caching policy for all sites.
–![]() Set an individual caching policy for specific sites.
Set an individual caching policy for specific sites.
–![]() Enable Over the Top (OTT) caching ().
Enable Over the Top (OTT) caching ().
–![]() Configure cache prepositioning.
Configure cache prepositioning.
Step 3![]() Click Submit or proceed to Enabling Over the Top (OTT) caching.
Click Submit or proceed to Enabling Over the Top (OTT) caching.
Enabling Over the Top (OTT) caching
This section contains the following topics:
About OTT Caching
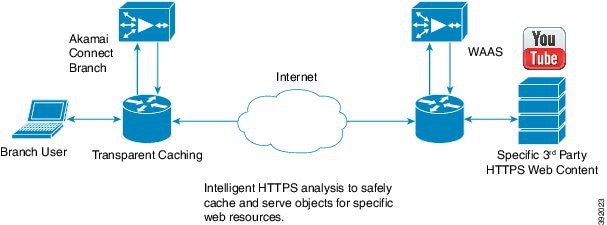
Over-The-Top (OTT) caching is used for streamed content, particularly video content. OTT caching caches HTTP content served from dynamic URLs and content marked as noncacheable, such as YouTube videos. Akamai achieves this by using metadata logic to determine a unique cache key per video, which allows dynamic URLs to be cached. Figure 13-4 shows an example of OTT caching.
Figure 13-4 Example of OTT Caching
Note![]() OTT caching is disabled by default. You can enable OTT caching after you enable Akamai Connected Cache. For more information, see.
OTT caching is disabled by default. You can enable OTT caching after you enable Akamai Connected Cache. For more information, see.
Sites that support OTT caching include the following:
Because YouTube is delivered via HTTPS, you must follow the same process as you do for Softwae as a Service (SaaS) optimization. The domains that must be matched are *.youtube.com, *.ytimg.com, *.googlevideo.com, and *.ggpht.com. For more information, see Configuring SSL Acceleration for SaaS Applications in the chapter “Configuring Application Acceleration” .
Procedure for Enabling OTT Caching
Confirm that Akamai Connected Cache is enabled. For more information, see Enabling Akamai Connected Cache.
To enable OTT caching, follow these steps:
Step 1![]() From the Cisco WAAS Central Manager menu, from either the Device Groups or Devices tab, choose Configure > Caching > Akamai Connect.
From the Cisco WAAS Central Manager menu, from either the Device Groups or Devices tab, choose Configure > Caching > Akamai Connect.
The Akamai Connect window appears, with the Cache Settings tab displayed.
Step 2![]() At the Edit Settings pane, check the Over the Top Cache check box.
At the Edit Settings pane, check the Over the Top Cache check box.
Note![]() You must enable Akamai Connected Cache before you enable OTT caching. For more information, see Enabling Akamai Connected Cache.
You must enable Akamai Connected Cache before you enable OTT caching. For more information, see Enabling Akamai Connected Cache.
Step 3![]() Click Submit or proceed to tasks for setting caching policies: Setting a Transparent Caching Policy for All Sites or Setting a Transparent Caching Policy for a Specific Site.
Click Submit or proceed to tasks for setting caching policies: Setting a Transparent Caching Policy for All Sites or Setting a Transparent Caching Policy for a Specific Site.
Setting Transparent Caching Policies
This section contains the following topics:
- Transparent Caching and Caching Modes
- Setting a Transparent Caching Policy for All Sites
- Setting a Transparent Caching Policy for a Specific Site
Transparent Caching and Caching Modes
About Transparent Caching and HTTP Object Cache
Transparent cache is Akamai’s high-performance HTTP object cache, which provides the ability to locally cache HTTP-based content for LAN-like performance, whether the web application was served from the private corporate cloud or from the public Internet. This content includes on-demand and live HTTP video streams, to deliver fast, high-quality, high-definition video in the branch, while offloading the enterprise network. Akamai Connect supports the latest generation of streaming protocols including Apple HTTP Live Streaming (HLS), Adobe HTTP Dynamic Streaming (HDS), and Microsoft HTTP Smooth Streaming (HSS). Akamai’s HTTP object cache also supports the caching of Apple software updates such as iOS and OS X, and Microsoft Windows Update, further offloading the enterprise network.
Transparent caching delivers content from an origin server to the client without any modification. Transparent caching sends a request from a client to a server along with the associated authentication. No changes are made by proxy servers to either the headers or the returned packets along the way, although there are some headers that mark proxy actions that can be altered without the meaning of the cache control headers being altered.
Note![]() When accessing transparent caching via HTTPS, the default caching mode is Basic mode. This ensures that no sensitive content is accidentally cached (in Basic mode, only content that you explicitly mark is cached). If you want content cached in a different mode with HTTPS, create a host rule that matches the HTTPS server location. For more information on creating a host rule, see Setting a Transparent Caching Policy for All Sites and Setting a Transparent Caching Policy for a Specific Site.
When accessing transparent caching via HTTPS, the default caching mode is Basic mode. This ensures that no sensitive content is accidentally cached (in Basic mode, only content that you explicitly mark is cached). If you want content cached in a different mode with HTTPS, create a host rule that matches the HTTPS server location. For more information on creating a host rule, see Setting a Transparent Caching Policy for All Sites and Setting a Transparent Caching Policy for a Specific Site.
Transparent caching modes are used to set caching policies. For more information, see.
Transparent Caching Modes
Basic Transparent Caching Mode
Basic mode is the lowest level of caching, where it strictly complies with the client caching directives in the HTTP header, caching only objects marked explicitly as cacheable. Caching is only in the branch or local router, and content can be cached from the Internet regardless of the location of the original source.
Standard Transparent Caching Mode (Default)
Standard (default) caching mode expands the breadth of caching objects by including objects marked as cacheable, objects that do not have caching directives, and with a last-modified date. For example, with Standard caching, the object will be cached for 10 percent of the current age of the response and then updated.
Advanced Transparent Caching Mode
Advanced caching mode further extends the duration for which the objects without specific age limits are cached, thus allowing an aggressive amount of caching in appropriate situations, and to cache all object types for longer times, when there is no explicit expiration time. Advanced mode is best suited for media-rich Intranet sites.
If cache-control or expire headers are not present and Last Modified Time appears, the cache engine performs a heuristic based on the Last Modified Time and stores objects for 20 percent of their apparent age, up to a maximum of one day.
For certain media file types, listed in Table 13-6 , Advanced Mode will cache these for a full day if the media type is not specified as uncacheable or the media type has no obvious age in the request. For all other media types, the system caches the object for a minimum of one hour to a maximum of seven days - regardless of whether the Last Modified Time is present.
Table 13-6 Advanced Mode: Media Types That May be Cached for a Full Day
| Advanced Mode: Media types that may be cached for a full day |
||||||||||
Bypass Transparent Caching Mode
Bypass mode turns off caching for a configured site or sites. When Bypass mode is set for a particular hostname, the caching for the site’s hostname specified in a rule is suppressed.
Bypass mode is useful when you want to turn off Akamai Connected Cache or OTT caching for a site or for a part of a site. For example, if you have servers of the type images#.bar.com, you can configure a bypass rule so that only images2.bar.com is excluded from caching. All other images#.bar.com servers will continue to be cached under the existing rules.
Order of Preference for Caching Modes
When there are multiple caching mode policies in use, the cache engine applies an order of precedence to implement these. A rule that is higher in the order of precedence is run first, and any other rules that are applied to that domain or digital property is ignored. The order of precedence is:
For example, if test.com is an Akamai Connected Cache property, but an Advanced mode cache rule is set for this site, then Advanced mode will take precedence and Akamai Connected Cache will be skipped.
Note![]() When cache prepositioning is turned on, it has the same priority as any other caching type.
When cache prepositioning is turned on, it has the same priority as any other caching type.
Note![]() Akamai Connect determines cache type based on most exact hostname match followed by cache priorities. www.host.com is more exact than *.host.com. In this scenario, if a lower-priority cache, such as Akamai Connected Cache (Order of Precedence #2), has a more exact match than a higher priority cache, such as transparent (Order of Precedence #1), the caching will occur with the more exact match and lower-priority cache.
Akamai Connect determines cache type based on most exact hostname match followed by cache priorities. www.host.com is more exact than *.host.com. In this scenario, if a lower-priority cache, such as Akamai Connected Cache (Order of Precedence #2), has a more exact match than a higher priority cache, such as transparent (Order of Precedence #1), the caching will occur with the more exact match and lower-priority cache.
Setting a Transparent Caching Policy for All Sites
To set a transparent caching policy for all sites, follow these steps:
Step 1![]() From the Cisco WAAS Central Manager menu, from either the Device Groups or Devices tab, choose Configure > Caching > Akamai Connect.
From the Cisco WAAS Central Manager menu, from either the Device Groups or Devices tab, choose Configure > Caching > Akamai Connect.
The Akamai Connect window appears, with the Cache Settings tab displayed.
Step 2![]() At the Advanced Cache Settings pane, from the Default Transparent Caching Policy drop-down list, choose one of the following caching policies as a default transparent caching policy for all sites:
At the Advanced Cache Settings pane, from the Default Transparent Caching Policy drop-down list, choose one of the following caching policies as a default transparent caching policy for all sites:
- Basic: Caches only objects marked explicitly as cacheable.
- Standard (default): Caches objects marked as cacheable, as well as objects that do not have caching directives or a last-modified date.
- Advanced: Further extends the duration for which the objects without specific age limits are cached, thus allowing an aggressive amount of caching in appropriate situations, and to cache all object types for longer times, when there is no explicit expiration time.
- Bypass: Turns off caching for a specific configured site or sites.
Considering the following about caching polices:
- Checking the Akamai Connected Cache check box () starts active caching with the default Standard caching policy. To use the Akamai cache engine with a Basic, Advanced, or Bypass caching policy, you must specify that caching policy with the Default Transparent Caching Policy drop-down list.
- To set a caching policy for a specific site, see Setting a Transparent Caching Policy for a Specific Site.
- For more information about caching policies, see.
Step 3![]() Click Submit or proceed to Setting a Transparent Caching Policy for a Specific Site.
Click Submit or proceed to Setting a Transparent Caching Policy for a Specific Site.
Setting a Transparent Caching Policy for a Specific Site
To set a transparent caching policy for a specific site, follow these steps:
Step 1![]() From the Cisco WAAS Central Manager menu, from either the Device Groups or Devices tab, choose Configure > Caching > Akamai Connect.
From the Cisco WAAS Central Manager menu, from either the Device Groups or Devices tab, choose Configure > Caching > Akamai Connect.
The Akamai Connect window appears, with the Cache Settings tab displayed.
Step 2![]() At the Advanced Cache Settings pane, from the Default Transparent Caching Policy drop-down list, choose Bypass.
At the Advanced Cache Settings pane, from the Default Transparent Caching Policy drop-down list, choose Bypass.
Choosing Bypass turns off caching, so that you can set a specific caching policy for the site.
Step 3![]() To add a site to contain a specific caching policy, at the Site Specific Transparent Caching Policy table listing, click Add Hostname/IP.
To add a site to contain a specific caching policy, at the Site Specific Transparent Caching Policy table listing, click Add Hostname/IP.
The Site Caching Policy Task dialog box appears.
Step 4![]() In the Site Caching Policy Task dialog box, in the Hostname/IP field, specify the hostname of the site to be configured.
In the Site Caching Policy Task dialog box, in the Hostname/IP field, specify the hostname of the site to be configured.
Consider the following guidelines for creating a hostname:
- The hostname can be a specific server, or a domain name that contains a wildcard, such as *.cisco.com.
- You can configure up to 512 hostnames for each site-specific caching policy.
- At the Transparent Caching Policy drop-down list, select the cache policy for this site: Basic, Standard, Advanced, or Bypass.
- Consider the following guidelines for setting a site-specific cache policy:
–![]() +The policy you set for a specific site takes precedence over the default caching policy set for all sites.
+The policy you set for a specific site takes precedence over the default caching policy set for all sites.
–![]() If you configure Bypass mode as the site-specific transparent caching policy, you must specify a complete server name or a complete domain name (a Fully Qualified Domain Name [FQDN]). If you use a wildcard to specify sites for Bypass mode, the sites will still be optimized via Akamai Cache.
If you configure Bypass mode as the site-specific transparent caching policy, you must specify a complete server name or a complete domain name (a Fully Qualified Domain Name [FQDN]). If you use a wildcard to specify sites for Bypass mode, the sites will still be optimized via Akamai Cache.
The new hostname/IP is added as a line item to the Site Specific Transparent Caching Policy table.
- To edit an existing site, highlight the site listing and click Edit.
- To delete an existing site, highlight the site listing and click Delete.
Step 6![]() Click Submit or proceed to Enabling Cisco Cloud Web Security (Cisco CWS).
Click Submit or proceed to Enabling Cisco Cloud Web Security (Cisco CWS).
Enabling Cisco Cloud Web Security (Cisco CWS)
This section contains the following topics:
About Cisco CWS
Cisco Cloud Web Security (CWS) provides content scanning of HTTP and HTTP/S traffic, and provides malware protection service to web traffic. CWS enforces content filtering by enabling force IMS for every cached object, for both single-sided and dual-sided deployment.
CWS servers scan web traffic content and either allow or block the traffic based on configured policies. Servers use credentials to identify and authenticate users and redirect the traffic for content scanning. Traffic is transparently proxyed by Cisco routers to cloud-based CWS servers, where the web traffic is scanned and, if deemed acceptable, is provided to the origin server. All traffic coming back is through the CWS server.
Cisco CWS Operating Guidelines
Note the following guidelines for Cisco CWS:
–![]() For Cisco WAAS Version 6.2.1 and later, the CWS feature enforces content filtering by enabling force IMS for every cached object, for both single-sided and dual-sided deployment.
For Cisco WAAS Version 6.2.1 and later, the CWS feature enforces content filtering by enabling force IMS for every cached object, for both single-sided and dual-sided deployment.
–![]() For Cisco WAAS Versions earlier than 6.2.1, content filtering is enforced on single-sided deployments.
For Cisco WAAS Versions earlier than 6.2.1, content filtering is enforced on single-sided deployments.
- CWS can be used only when one Cisco WAAS device is present in the path.
- If preposition is enabled, the traffic flow may be redirected to a CWS server, follow these recommendations:
–![]() (Preferred choice): Configure a white list on the Cisco ISR or the Cisco CWS server to bypass the Cisco WAE IP address.
(Preferred choice): Configure a white list on the Cisco ISR or the Cisco CWS server to bypass the Cisco WAE IP address.
–![]() On the Cisco CWS server, configure a user or group that the Cisco WAE will fall into for authentication and allow it access to all sites on which the preposition is occurring.
On the Cisco CWS server, configure a user or group that the Cisco WAE will fall into for authentication and allow it access to all sites on which the preposition is occurring.
Procedure for Enabling Cisco CWS
To enable Cisco CWS, follow these steps:
Step 1![]() From the Cisco WAAS Central Manager menu, from either the Device Groups or Devices tab, choose Configure > Caching > Akamai Connect.
From the Cisco WAAS Central Manager menu, from either the Device Groups or Devices tab, choose Configure > Caching > Akamai Connect.
The Akamai Connect window appears, with the Cache Settings tab displayed.
Step 2![]() At the Advanced Cache Settings pane, to enable Cisco CWS:
At the Advanced Cache Settings pane, to enable Cisco CWS:
- To enable CWS user policy enforcement for content access with Direct Internet Access (DIA), check the Force IMS DIA check box.
- To apply CWS user policy enforcement for content access with all flows, check the Force IMS Always check box.
Step 3![]() Click Submit or proceed to Configuring Cisco WAAS Connections to the Akamai Network.
Click Submit or proceed to Configuring Cisco WAAS Connections to the Akamai Network.
Configuring Cisco WAAS Connections to the Akamai Network
This section contains the following topics:
- About Cisco WAAS Connections to the Akamai Network
- Configuring No HTTP Proxy
- Configuring Cisco WAAS Central Manager as HTTP Proxy
- Configuring External HTTP Proxy
About Cisco WAAS Connections to the Akamai Network
This section provides an overview of the three ways for Cisco WAAS devices to connect to the Akamai network.
When using Akamai Connect, the WAAS Central Manager and WAAS device(s) must be able to communicate with the Akamai Network: with the Akamai Luna API servers to provision entries for WAAS devices, and with the Akamai AMG devices for Akamai Connected Cache and OTT features.
However, when using Akamai Connect, some Cisco WAAS deployments may disallow outgoing connections to the Internet for the Cisco WAAS Central Manager or Cisco WAAS device(s). For these deployments, the Cisco WAAS device(s) may use an HTTP proxy to contact the Akamai Network.
Note![]() HTTP proxy must support HTTP CONNECT for tunneling HTTPS connections.
HTTP proxy must support HTTP CONNECT for tunneling HTTPS connections.
Table 13-7 shows the available connection configurations.
Table 13-7 Connection Configurations for Cisco WAAS to Akamai Network
|
|
|
|
|
|---|---|---|---|
The following considerations apply to all HTTP proxy deployments:
- You configure HTTP proxy from the Cisco WAAS Central Manager; there are no CLI commands for HTTP proxy. Configuring HTTP proxy settings does not require restart of the WAAS Central Manager.
- HTTP Proxy must support HTTP Connect method for tunneling HTTPS connections.
- Configuring the HTTP proxy setting does not require restart of the Cisco WAAS Central Manager.
Note![]() Cisco WAAS v5.5.1 does not support HTTP proxy user authentication. It is recommended that you restrict access to proxy using IP address ACLs.
Cisco WAAS v5.5.1 does not support HTTP proxy user authentication. It is recommended that you restrict access to proxy using IP address ACLs.
Configuring No HTTP Proxy
To configure a direct connection from the Cisco WAAS Central Manager and Cisco WAAS devices to the Akamai network, follow these steps:
Step 1![]() From the Cisco WAAS Central Manager menu, from either the Device Groups or Devices tab, choose Configure > Caching > Akamai Connect.
From the Cisco WAAS Central Manager menu, from either the Device Groups or Devices tab, choose Configure > Caching > Akamai Connect.
The Akamai Connect window appears, with the Cache Settings tab displayed.
4.![]() At the Advanced Cache Settings pane, confirm that the Use HTTP proxy for connections to Akamai network check box is unchecked.
At the Advanced Cache Settings pane, confirm that the Use HTTP proxy for connections to Akamai network check box is unchecked.
Configuring Cisco WAAS Central Manager as HTTP Proxy
Operating Guidelines for Cisco WAAS Central Manager as HTTP Proxy
Note the following considerations when using the Cisco WAAS Central Manager as a proxy to the Akamai network:
- When using Akamai Connected Cache, each Cisco WAAS cache engine device is communicating with the Akamai network. Some Cisco WAAS deployments may disallow WAE devices to establish outgoing connections to the Internet (i.e., private networks). In this case, the WAE device may use the Cisco WAAS Central Manager device(s) as proxy for all connections to the Akamai network.
- You may still have to allow a hole for the Cisco WAAS Central Manager to make communications on TCP port 443 outbound.
- There is no option for the Cisco WAAS Central Manager to use a proxy device to get to the Internet.
- All connections are made from the Cisco WAAS cache engine device or Cisco WAAS Central Manager out to the Akamai network; never from the Akamai network to the Cisco WAAS cache engine device or Cisco WAAS Central Manager.
- You configure this feature from the Cisco WAAS Central Manager only, not the CLI.
Procedure for Configuring Cisco WAAS Central Manager as HTTP Proxy
To configure the Cisco WAAS Central Manager as HTTP Proxy, follow these steps:
Step 1![]() From the Cisco WAAS Central Manager menu, from either the Device Groups or Devices tab, choose Configure > Caching > Akamai Connect.
From the Cisco WAAS Central Manager menu, from either the Device Groups or Devices tab, choose Configure > Caching > Akamai Connect.
The Akamai Connect window appears, with the Cache Settings tab displayed.
Step 2![]() At the Advanced Cache Settings pane, check the Use HTTP proxy for connections to Akamai network check box.
At the Advanced Cache Settings pane, check the Use HTTP proxy for connections to Akamai network check box.
Step 3![]() At the HTTP Proxy: drop-down list, choose Central Manager as HTTP Proxy.
At the HTTP Proxy: drop-down list, choose Central Manager as HTTP Proxy.
Configuring External HTTP Proxy
About External HTTP Proxy
When using Akamai Connect, some Cisco WAAS deployments may disallow outgoing connections to the Internet for the Cisco WAAS Central Manager or Cisco WAAS device(s). For these deployments, the Cisco WAAS device(s) may use an HTTP proxy to contact the Akamai Network.
Configuring External HTTP Proxy for a Device or Device Group
To configure External HTTP Proxy for a device or device group, follow these steps:
Step 1![]() From the Cisco WAAS Central Manager menu, from either the Device Groups or Devices tab, choose Configure > Caching > Akamai Connect.
From the Cisco WAAS Central Manager menu, from either the Device Groups or Devices tab, choose Configure > Caching > Akamai Connect.
The Akamai Connect window appears, with the Cache Settings tab displayed.
Step 2![]() Check the Use HTTP proxy for connections to Akamai network check box.
Check the Use HTTP proxy for connections to Akamai network check box.
Step 3![]() At the Advanced Cache Settings pane, from the HTTP Proxy: drop-down list, select External HTTP Proxy.
At the Advanced Cache Settings pane, from the HTTP Proxy: drop-down list, select External HTTP Proxy.
Step 4![]() Specify a Proxy Host and a Proxy Port:
Specify a Proxy Host and a Proxy Port:
Note![]() If the Cisco WAAS Central Manager is already using an external HTTP proxy, there is no option displayed to use the Cisco WAAS Central Manager as proxy; these fields will display the currently configured HTTP proxy.
If the Cisco WAAS Central Manager is already using an external HTTP proxy, there is no option displayed to use the Cisco WAAS Central Manager as proxy; these fields will display the currently configured HTTP proxy.
Configuring External HTTP Proxy for All Devices
To configure External HTTP Proxy for all devices, follow these steps:
Step 1![]() From the Cisco WAAS Central Manager menu, from either the Device Groups or Devices tab, choose Configure > Global > External HTTP Proxy.
From the Cisco WAAS Central Manager menu, from either the Device Groups or Devices tab, choose Configure > Global > External HTTP Proxy.
The following message is displayed:
Some deployments may disallow direct connections from Central Manager to Internet hosts. This would
affect WAAS features such as Akamai Connect, where Central Manager needs to communicate with
Akamai servers. For such deployments WAAS Central Manager may use an external HTTP proxy to contact
Internet. HTTP proxy must support HTTP CONNECT method for tunneling HTTPS connections.
Step 2![]() Specify a Proxy Host and a Proxy Port:
Specify a Proxy Host and a Proxy Port:
Note![]() If the Cisco WAAS Central Manager is already using an external HTTP proxy, there is no option displayed to use the Cisco WAAS Central Manager as proxy; these fields will display the currently configured HTTP proxy.
If the Cisco WAAS Central Manager is already using an external HTTP proxy, there is no option displayed to use the Cisco WAAS Central Manager as proxy; these fields will display the currently configured HTTP proxy.
Configuring Server Address Validation
This section contains the following topics:
- About Server Address Validation
- Alarms Used with Server Address Validation
- Procedure for Configuring Server Address Validation
About Server Address Validation
Server Address Validation prevents malicious content from infecting the Akamai Connect cache, by performing Domain Name Service (DNS) lookups on the name in the HTTP host header, comparing the lookup result with that connection’s forward IP address, and, if there is a mismatch, the transaction is allowed to pass through the cache, but no content is allowed to be cached.
Server Address Validation is available for Cisco WAAS Version 6.4.1 and later.
- The server IP address to which a DNS name resolves might be an IP address of a server that contains malicious content, rather than that of an expected and trusted server.
- The resulting response would get cached, and the Akamai cache would then contain malicious content.
- After the cache is “poisoned” with this malicious content, other clients accessing the same content would also get served with this malicious data.
To prevent such situations, the server address validation feature:
A valid Domain Name System (DNS) configuration is required for Server Address Validation to work properly. For more information, see Configuring the DNS Server in the chapter “Configuring Network Settings” .
- Compares the lookup result with that connection’s forward IP address.
- If there is a mismatch, the transaction is allowed to pass through the cache, however—no content is allowed to be cached.
Note![]() The Cisco Cloud Web Security (CWS) feature also performs traffic scanning and malware protection for the Akamai Connect cache. For more information on CWS, see Enabling Cisco Cloud Web Security (Cisco CWS).
The Cisco Cloud Web Security (CWS) feature also performs traffic scanning and malware protection for the Akamai Connect cache. For more information on CWS, see Enabling Cisco Cloud Web Security (Cisco CWS).
Alarms Used with Server Address Validation
Table 13-8 shows the alarms used with Server Address Validation.
Table 13-8 Alarms Used with Akamai Connect Cache Server IP Address Validation
|
|
|
|
|---|---|---|
|
– – |
||
Procedure for Configuring Server Address Validation
This section describes how to use the WAAS Central Manager to enable or disable Server Address Validation, and to add, edit, or delete bypass server addresses into or from a whitelist.
Before you configure Server Address Validation, consider these guidelines:
- A valid Domain Name System (DNS) configuration is required for Server Address Validation to work properly. For more information, see Configuring the DNS Server in the chapter “Configuring Network Settings” .
- If Interposer-SSL is disabled, the following warning message is displayed:
Interposer-SSL is in disabled state. Enable Interposer-SSL for HTTP Object Cache Server Validation feature to
use SNI extension. Peformance for HTTPS connections, when this feature is enabled, might get affected in the absence of SNI.
For more information, see Enabling and Disabling Global Optimization Features in the chapter “Configuring Application Acceleration” .
- To configure Server Address Validation with the CLI, use the accelerator http object-cache validate-address enable and accelerator http object-cache validate-address bypass global configuration commands. For more information, see the Cisco Wide Area Application Services Command Reference.
Step 1![]() From the Cisco WAAS Central Manager menu, from either the Device Groups or Devices tab, choose Configure > Caching > Akamai Connect.
From the Cisco WAAS Central Manager menu, from either the Device Groups or Devices tab, choose Configure > Caching > Akamai Connect.
The Akamai Connect window appears, with the Cache Settings tab displayed.
Step 2![]() At the Server Address Validation pane (Figure 13-5), check the Enable server address validation check box. The default is disabled.
At the Server Address Validation pane (Figure 13-5), check the Enable server address validation check box. The default is disabled.
Figure 13-5 Server Address Validation Panel
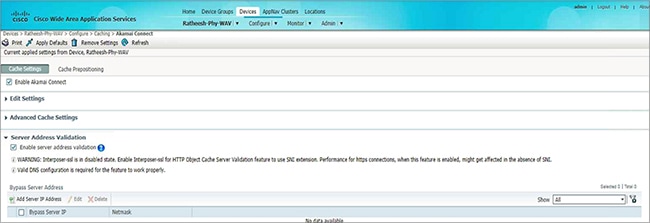
Note the following operating guidelines about enabling or disabling Server Address Validation:
Step 3![]() To create a server address whitelist:
To create a server address whitelist:
a.![]() At the Bypass Server Address table listing taskbar, click Add Server IP Address.
At the Bypass Server Address table listing taskbar, click Add Server IP Address.
The Bypass Server dialog box appears.
b.![]() In the Bypass Server IP field, specify the server IP address.
In the Bypass Server IP field, specify the server IP address.
c.![]() In the Netmask field, specify the netmask.
In the Netmask field, specify the netmask.
The new server IP address and netmask are added to the Bypass Server Address table listing.
- You can configure up to 50 server IP addresses per whitelist.
- To edit an existing bypass server address, highlight the bypass server address and click Edit.
- To delete an existing bypass server address, highlight the bypass server address and click Delete.
Note![]() A server address whitelist that you have created is stored on the data server until you delete it. The server IP address whitelist is not automatically deleted if you disable Server Address Validation.
A server address whitelist that you have created is stored on the data server until you delete it. The server IP address whitelist is not automatically deleted if you disable Server Address Validation.
Configuring Akamai Connect Cache Prepositioning
This section contains the following topics:
- About Akamai Connect Cache Prepositioning
- Operating Guidelines for Akamai Connect Cache Prepositioning
- Configuring a Cache Preposition Task
- Viewing Cache Prepositioning Task Status
- Copying Cache Prepositioning Tasks
About Akamai Connect Cache Prepositioning
Cache prepositioning, also known as cache warming, allows you to specify a policy to prefetch and cache content at a specified time. Cache prepositioning allows you to take advantage of idle time on the WAN to transfer large or frequently accessed files to selected Cisco WAAS devices, so that users can benefit from cache-level performance even during first-time access of these files.
Cache prepositioning fetches content based on:
Cache prepositioning runs at the same priority as other caching types, for example, Akamai Connected Cache or OTT.
For Cisco WAAS Version 6.2.1 and later with Akamai Connect, cache prepositioning for Akamai Connect also provides the following cache prepositioning features:
Operating Guidelines for Akamai Connect Cache Prepositioning
Consider the following operating guidelines for cache prepositioning for Akamai Connect:
- When a scheduled fetch operation begins or is complete, it is added to the Cache Preposition Status table.
- In order for HTTP/S content to be prepositioned, you must define an SSL accelerated service; otherwise, any HTTP requests encountered in the job will fail, although the preposition task will continue and any objects available via HTTP will be retrieved.
For more information on how to define an SSL accelerated service, see Configuring SSL Acceleration in the chapter “Configuring Application Acceleration” .
Configuring a Cache Preposition Task
Table shows the dialog boxes, available from the Cache Prepositioning tab, used to configure a preposition task.
Table 13-9 Overview of Dialog Boxes Used to Configure Cache Preposition Tasks
To configure a cache preposition task, follow these steps:
Step 1![]() From Devices or Device Groups, choose Configure > Caching > Akamai Connect.
From Devices or Device Groups, choose Configure > Caching > Akamai Connect.
The Akamai Connect window appears, with two tabs: Cache Settings and Cache Prepositioning.
Step 2![]() Choose the Cache Prepositioning tab.
Choose the Cache Prepositioning tab.
At this tab, you can add, edit, or delete cache prepositioning tasks, as well as monitor cache preposition task status.
Step 3![]() (Optional) To enable DRE for preposition connections, check the Preposition with DRE check box. The default is disabled, to prevent negative impact to the DRE byte cache for data that will be stored at the object level.
(Optional) To enable DRE for preposition connections, check the Preposition with DRE check box. The default is disabled, to prevent negative impact to the DRE byte cache for data that will be stored at the object level.
Step 4![]() At the Cache Prepositioning table listing, click Add Cache Preposition Task.
At the Cache Prepositioning table listing, click Add Cache Preposition Task.
The Cache Prepositioning Task dialog box opens.
Step 5![]() In the Name field, enter the name of the preposition task.
In the Name field, enter the name of the preposition task.
Step 6![]() In the URLs field, enter the base URLs for prepositioning.
In the URLs field, enter the base URLs for prepositioning.
Step 7![]() In the Exclude Types field, enter the object types to exclude from caching, such as.jsp or.asp, each separated by a comma.
In the Exclude Types field, enter the object types to exclude from caching, such as.jsp or.asp, each separated by a comma.
The list of object name patterns to be excluded has a total pattern field limit of 47 characters.
Step 8![]() In the Download Rate field, enter the maximum download rate, in KBps. Select any value between 0 to 10,000,000 KBps.
In the Download Rate field, enter the maximum download rate, in KBps. Select any value between 0 to 10,000,000 KBps.
Step 9![]() To enable recursion for this cache preposition task, check the Recursive Task check box. To have recursion disabled for this cache preposition task, leave the Recursive Task check box unchecked. The default is unchecked.
To enable recursion for this cache preposition task, check the Recursive Task check box. To have recursion disabled for this cache preposition task, leave the Recursive Task check box unchecked. The default is unchecked.
Step 10![]() If you have checked the Recursive Task check box, from the Recursion Depth drop-down list, choose the depth of the link level at which content is retrieved: 1, 2, 3, 5, 8, 13, or 21. You can also enter a custom value from 1 to 1000. The default recursion depth value is 1.
If you have checked the Recursive Task check box, from the Recursion Depth drop-down list, choose the depth of the link level at which content is retrieved: 1, 2, 3, 5, 8, 13, or 21. You can also enter a custom value from 1 to 1000. The default recursion depth value is 1.
The Recursion Depth drop-down list is active only if you check the Recursive Task check box.
Note![]() A greater number of specified levels of links means a greater amount of data stored in the cache, sometimes exponentially more. If the amount of requested prefetched data becomes larger than the cache, the newly requested data will flush all previously stored data, and may slow down other operations that attempt to use the cache.
A greater number of specified levels of links means a greater amount of data stored in the cache, sometimes exponentially more. If the amount of requested prefetched data becomes larger than the cache, the newly requested data will flush all previously stored data, and may slow down other operations that attempt to use the cache.
Step 11![]() To enable this cache preposition task, check the Enable Task check box. The task must specify at least one URL (specified in the URLs field) and one schedule, specified in the next step.
To enable this cache preposition task, check the Enable Task check box. The task must specify at least one URL (specified in the URLs field) and one schedule, specified in the next step.
Step 12![]() At the Cache Prepositioning Schedule table listing, click Add Schedule.
At the Cache Prepositioning Schedule table listing, click Add Schedule.
The Cache Prepositioning Schedule dialog box appears.
a.![]() In the Schedule Name field, enter the name of the schedule of this cache preposition task, up to 256 alphanumeric characters. The schedule name allows you to provide your own representation of a schedule. For example, you can name a schedule that occurs every Monday, Wednesday, and Friday at 10:30 a.m. as Weekly MWF 10:30AM or as Every Week - Mon-Wed-Fri at 10:30AM.
In the Schedule Name field, enter the name of the schedule of this cache preposition task, up to 256 alphanumeric characters. The schedule name allows you to provide your own representation of a schedule. For example, you can name a schedule that occurs every Monday, Wednesday, and Friday at 10:30 a.m. as Weekly MWF 10:30AM or as Every Week - Mon-Wed-Fri at 10:30AM.
b.![]() From the Frequency drop-down list, choose the specified time for prepositioning: yearly, daily, weekly, or monthly days.
From the Frequency drop-down list, choose the specified time for prepositioning: yearly, daily, weekly, or monthly days.
For example, if you choose you choose monthly days, a calendar with check boxes opens for you to check one, some, or all the days in a month for this schedule.
c.![]() From the Start Time (HH:MM) drop-down lists, choose the hour and minute at which this cache prepositioning task should start.
From the Start Time (HH:MM) drop-down lists, choose the hour and minute at which this cache prepositioning task should start.
Step 13![]() At the Advanced Settings section of the Cache Prepositioning Task dialog box, you can specify recursion delay time and recursion hostnames.
At the Advanced Settings section of the Cache Prepositioning Task dialog box, you can specify recursion delay time and recursion hostnames.
a.![]() In the Recursion Delay Time field, enter the delay time, in seconds, between requests during recursive download. This simulates user wait time. Recursive delay time is necessary because some servers use the lack of time between requests to detect and restrict web crawlers.
In the Recursion Delay Time field, enter the delay time, in seconds, between requests during recursive download. This simulates user wait time. Recursive delay time is necessary because some servers use the lack of time between requests to detect and restrict web crawlers.
- Enter a value between 0 to 600 seconds. The default is 2 seconds.
- A value of zero provides the best performance when there are no web crawler restrictions.
Step 14![]() In the Recursion Domains field, enter the list of server domain suffixes for which recursive web crawling is permitted. If this list is empty, then web crawling is only permitted within the same domain as the specified URL.
In the Recursion Domains field, enter the list of server domain suffixes for which recursive web crawling is permitted. If this list is empty, then web crawling is only permitted within the same domain as the specified URL.
You can configure up to ten servers:
Step 16![]() In the Cache Prepositioning Schedule dialog box, click OK.
In the Cache Prepositioning Schedule dialog box, click OK.
Step 17![]() In the Cache Prepositioning Task dialog box, click OK.
In the Cache Prepositioning Task dialog box, click OK.
The new cache prepositioning task is added as a line item in the Cache Prepositioning table listing.
Viewing Cache Prepositioning Task Status
The Cache Prepositioning pane provides two tables to show the status of a cache prepositioning task.
- To view the status of a cache preposition task you have configured, highlight and select the task from the first table, the Cache Preposition table listing.
- The second table, the Cache Prepositioning Status table listing, displays information on the selected task.
–![]() For an individual device, the cache prepositioning status table shows the selected task status for the current device.
For an individual device, the cache prepositioning status table shows the selected task status for the current device.
–![]() For a device group, the cache prepositioning status table shows the status of the selected cache preposition task, for all devices under that device group.
For a device group, the cache prepositioning status table shows the status of the selected cache preposition task, for all devices under that device group.
Table shows the information displayed for the selected cache preposition task.
Copying Cache Prepositioning Tasks
You can copy cache prepositioning tasks that have a device or device group enabled with Akamai Connect. Use the following methods to copy cache prepositioning tasks:
To copy a cache preposition task, follow these steps:
Step 1![]() From the Cisco WAAS Central Manager menu, from either the Device Groups or Devices tab, choose Configure > Caching > Akamai Connect.
From the Cisco WAAS Central Manager menu, from either the Device Groups or Devices tab, choose Configure > Caching > Akamai Connect.
The Akamai Connect window appears, with two tabs: Cache Settings and Cache Prepositioning.
Step 2![]() Choose the Cache Prepositioning tab.
Choose the Cache Prepositioning tab.
Step 3![]() At the Cache Prepositioning pane, click Copy Tasks.
At the Cache Prepositioning pane, click Copy Tasks.
The Cache Prepositioning Task dialog box opens.
Step 4![]() From the From drop-down list, choose a device or device group as the source.
From the From drop-down list, choose a device or device group as the source.
Step 5![]() From the To drop-down list, choose a device or device group as the destination.
From the To drop-down list, choose a device or device group as the destination.
Note![]() If you try to copy a task with the same name between device and device groups, the following error message is displayed: One or more preposition tasks with the same name already exists in the destination device/DG.
If you try to copy a task with the same name between device and device groups, the following error message is displayed: One or more preposition tasks with the same name already exists in the destination device/DG.
Step 6![]() At the Existing Cache Prepositioning Tasks table listing, select one, some or all of the cache preposition tasks to be copied.
At the Existing Cache Prepositioning Tasks table listing, select one, some or all of the cache preposition tasks to be copied.
The selected cache prepositioning tasks are copied from the specified source to the specified destination.
Configuring HTTP/S Preposition Proxy for Akamai Connect
This section contains the following topics:
- About HTTP/S Preposition Proxy for Akamai Connect
- Configuring Global Proxy Host and Port for Preposition Tasks
- Modifying Proxy Settings for an Individual Preposition Task
- Removing Proxy Settings for an Individual Preposition Task
About HTTP/S Preposition Proxy for Akamai Connect
For Cisco WAAS Version 6.2.1 and later, you can preposition external content in the case of a deployment with proxy. Consider the following when configuring HTTP/S preposition proxy for Akamai Connect:
- IPv4 proxy is supported for HTTP/S prepositioning.
- The HTTP preposition proxy feature is a feature independent of the Cisco WAAS Central Manager and external HTTP proxy features described in the sections Configuring Cisco WAAS Central Manager as HTTP Proxy and Configuring External HTTP Proxy.
- Specific IP address-based proxy configuration is supported for HTTP/S preposition proxy. File-based and auto-detected configurations are not supported for HTTP/S preposition proxy.
Configuring Global Proxy Host and Port for Preposition Tasks
To configure global proxy host and port for preposition tasks, follow these steps.
Step 1![]() From the Cisco WAAS Central Manager menu, from either the Device Groups or Devices tab, choose Configure > Caching > Akamai Connect.
From the Cisco WAAS Central Manager menu, from either the Device Groups or Devices tab, choose Configure > Caching > Akamai Connect.
The Akamai Connect window appears, with two tabs: Cache Settings and Cache Prepositioning.
Step 2![]() Choose the Cache Prepositioning tab.
Choose the Cache Prepositioning tab.
Step 3![]() In the Proxy Host field, enter the hostname or IP address for the proxy host.
In the Proxy Host field, enter the hostname or IP address for the proxy host.
Step 4![]() In the Proxy Port field, enter the port number. Valid port numbers are 0 to 65535.
In the Proxy Port field, enter the port number. Valid port numbers are 0 to 65535.
Step 6![]() Create a preposition task, as described in Configuring a Cache Preposition Task.
Create a preposition task, as described in Configuring a Cache Preposition Task.
Step 7![]() In the Cache Prepositioning Task dialog box, check the Enable Proxy check box.
In the Cache Prepositioning Task dialog box, check the Enable Proxy check box.
Step 8![]() Schedule the task, as described in Step 12 of Configuring a Cache Preposition Task.
Schedule the task, as described in Step 12 of Configuring a Cache Preposition Task.
Modifying Proxy Settings for an Individual Preposition Task
To modify proxy settings for an individual preposition task, follow these steps.
Step 1![]() From the Cisco WAAS Central Manager menu, from either the Device Groups or Devices tab, choose Configure > Caching > Akamai Connect.
From the Cisco WAAS Central Manager menu, from either the Device Groups or Devices tab, choose Configure > Caching > Akamai Connect.
The Akamai Connect window appears, with two tabs: Cache Settings and Cache Prepositioning.
Step 2![]() Choose the Cache Prepositioning tab.
Choose the Cache Prepositioning tab.
Step 3![]() Select a cache prepositioning task that you have configured as proxy.
Select a cache prepositioning task that you have configured as proxy.
Step 4![]() Modify the particular setting or settings.
Modify the particular setting or settings.
Step 5![]() Check the Enable Task check box.
Check the Enable Task check box.
Step 6![]() Check the Enable Proxy check box.
Check the Enable Proxy check box.
Step 7![]() In the Cache Prepositioning Schedule dialog box, select parameters to reschedule the task.
In the Cache Prepositioning Schedule dialog box, select parameters to reschedule the task.
Step 9![]() In the Cache Prepositioning Task dialog box, click OK.
In the Cache Prepositioning Task dialog box, click OK.
Removing Proxy Settings for an Individual Preposition Task
To remove proxy settings for an individual preposition task, follow these steps.
Step 1![]() From the Cisco WAAS Central Manager menu, from either the Device Groups or Devices tab, choose Configure > Caching > Akamai Connect.
From the Cisco WAAS Central Manager menu, from either the Device Groups or Devices tab, choose Configure > Caching > Akamai Connect.
The Akamai Connect window appears, with two tabs: Cache Settings and Cache Prepositioning.
Step 2![]() Choose the Cache Prepositioning tab.
Choose the Cache Prepositioning tab.
Step 3![]() Select a cache prepositioning task that you have configured as proxy.
Select a cache prepositioning task that you have configured as proxy.
Step 4![]() Check the Enable Task check box.
Check the Enable Task check box.
Step 5![]() Uncheck the Enable Proxy check box.
Uncheck the Enable Proxy check box.
Step 6![]() In the Cache Prepositioning Schedule dialog box, select parameters to reschedule the task.
In the Cache Prepositioning Schedule dialog box, select parameters to reschedule the task.
Step 8![]() In the Cache Prepositioning Task dialog box, click OK.
In the Cache Prepositioning Task dialog box, click OK.
Cisco Support for Microsoft Windows Update
Cisco support for Microsoft Windows Update enables caching of objects used in Windows OS and application updates. Cisco support for Microsoft Windows Update is enabled by default, and enabled only for specific sites.
This section contains the following topics:
- About Cisco WAAS Support for Microsoft Windows Update
- Viewing Statistics for Cisco Support for Microsoft Windows Update
- Cisco Support for Microsoft Windows Update and Akamai Cache Engine
About Cisco WAAS Support for Microsoft Windows Update
The Microsoft operating system and application updates are managed by update clients such as Microsoft Update. Microsoft Update downloads the updates via HTTP, often in combination with BITS (Background Intelligent Transfer Service) to help facilitate the downloads. Clients use HTTP range request to fetch updates.
The objects that comprise the updates, such as.cab files, are typically cacheable, so that HTTP object cache is a significant benefit for this process.
For example, for Microsoft Windows 7 and Microsoft 8 OS updates, via direct Internet or WSUS (Windows Server Update Services), versions 2012 and 2012R2, more than 98% of the update files, such as.cab,.exe, and.psf files, are served from cache on subsequent updates. Cisco support for Microsoft Windows Update reduces the volume of WAN offload bytes and reduces response time for subsequent Microsoft Windows updates.
Viewing Statistics for Cisco Support for Microsoft Windows Update
There are two ways to view data generated by Cisco support for Microsoft Windows Update:
- Akamai Connected Cache Charts in the chapter “Monitoring Your Cisco WAAS Network” provides information including WAN response time and WAN offload bytes.
- For Cisco WAAS Version 6.1.1 and later, the cache engine access log file has two new fields for Microsoft Windows Update statistics:
–![]() rm-w (range miss, wait): The main transaction, a cache miss, which waited for the sub-transaction to fetch the needed bytes.
rm-w (range miss, wait): The main transaction, a cache miss, which waited for the sub-transaction to fetch the needed bytes.
–![]() rm-f (range miss, full): The sub-transaction, a cache write of the entire document.
rm-f (range miss, full): The sub-transaction, a cache write of the entire document.
Example 1 contains two log lines, the main transaction and sub-transaction, when a range is requested on an object that is not in cache:
Example 2 shows a cache hit when a range is requested on an object that is either completely in cache, or in the process of being downloaded. If it is in the process of being downloaded, then the main transaction has latched onto a sub-transaction like the one shown in Example 1.
Cisco Support for Microsoft Windows Update and Akamai Cache Engine
Cisco support for Microsoft Windows Update enables Akamai cache engine to support Windows Update caching in two ways:
- Download and cache full objects even when ranges within objects that not in cache are requested.
- Future range requests on the objects can be served out of cache.
There is a limit, set by OTT metadata during the Akamai Connect registration process, from the start of the object—the number of bytes or the percent of file length—where the download functionality is triggered. A request of a size above the set limit does not initiate a full object download, and the request is forwarded to the origin as is.
If you want to disable Cisco Support for Microsoft Windows Update, you must disable OTT caching. To do this, uncheck the Over the Top Cache check box. However, note that unchecking the Over the Top Cache check box disables all OTT functionality, both global and custom OTT configurations.
For more information on the Akamai Connect registration process, see Activating the Akamai Connect License.
Cisco WAAS CLI Commands Used with Akamai Connect
This section contains the following topics:
- Cisco WAAS Global Configuration Commands Used with Akamai Connect
- Cisco WAAS Preposition Configuration Commands Used with Akamai Connect
- Cisco WAAS EXEC Commands Used with Akamai Connect
For detailed Cisco WAAS CLI command information, see the Cisco Wide Area Application Services Command Reference.
Cisco WAAS Global Configuration Commands Used with Akamai Connect
Table 13-10 highlights Cisco WAAS global configuration commands used with Akamai Connect.
Table 13-10 Cisco WAAS Global Configuration Commands Used with Akamai Connect
Cisco WAAS Preposition Configuration Commands Used with Akamai Connect
Table 13-11 highlights the Cisco WAAS preposition configuration commands used with Akamai Connect.
Table 13-11 Cisco WAAS Preposition Configuration Commands Used with Akamai Connect
Cisco WAAS EXEC Commands Used with Akamai Connect
Table 13-12 highlights the Cisco WAAS EXEC commands used with Akamai Connect.
Table 13-12 Cisco WAAS EXEC Used with Akamai Connect
 Feedback