- Contents
- Prerequisites for Configuring Failover Between Redundant Cisco Vision Director Servers
- Restrictions for Configuring Failover Between Redundant Cisco Vision Director Servers
- Information About Failover Between Redundant Cisco Vision Director Servers
- How to Promote a Standby Secondary Server to the Active Server
- Starting and Configuring the Services on the Secondary Server
- Restoring the Secondary Server with System Data From a Backup File
- Stopping Services and Auto-Restart and Shutting Down the Primary Server
- Shutting Down Services on the Secondary Server
- Changing the IP Address on the Secondary Server
- Restarting the Network Service on the Secondary Server
- Verifying Network Connectivity to the Secondary Server
- Clearing the ARP Cache on the Switch
- Restarting Cisco Vision Director on the Secondary Server
- Verifying the Cisco Vision Director Configuration on the Secondary Server
- How to Restore the Primary Server to Active
- Prerequisites to Restoring the Primary Server to Active
- Stopping Services and Auto-Restart on the Secondary Server
- Changing the IP Address on the Secondary Server
- Verifying Network Connectivity on the Secondary Server
- Starting and Configuring the Services on the Original Primary Server
- Verifying Network Connectivity to the Primary Server
- Restoring the Original Primary Server with System Data From a Backup File
- Restarting the Cisco Vision Director Software
- Verifying the Cisco Vision Director Configuration on the Original Primary Server
- Upgrading the Primary Server Software
- Reconfiguring the Backup Environment After Upgrades
Configuring Failover Between Redundant Cisco Vision Director Servers
Cisco Vision Director supports an environment best described as warm standby between two servers that run the Cisco Vision Director software—one of the servers operates as the primary active server and the other server operates as a secondary backup server. If a failure occurs, you can configure the backup server to become the active server, but the failover process is not automatic.
Contents
■![]() Prerequisites for Configuring Failover Between Redundant Cisco Vision Director Servers
Prerequisites for Configuring Failover Between Redundant Cisco Vision Director Servers
■![]() Restrictions for Configuring Failover Between Redundant Cisco Vision Director Servers
Restrictions for Configuring Failover Between Redundant Cisco Vision Director Servers
■![]() Information About Failover Between Redundant Cisco Vision Director Servers
Information About Failover Between Redundant Cisco Vision Director Servers
■![]() How to Promote a Standby Secondary Server to the Active Server
How to Promote a Standby Secondary Server to the Active Server
■![]() How to Restore the Primary Server to Active
How to Restore the Primary Server to Active
Note: Restoring the primary server after failover to secondary requires a service interruption and should only be conducted during scheduled downtime. Be aware that until you change the IP address of the primary server to remove the addressing conflict with the newly active secondary server, you will be unable to schedule backups between the two servers. Reconfigure the backup/restore environment using the Text Utility Interface (TUI) after the restore. For more information, see Backing Up and Restoring Cisco Vision Director Servers.
Prerequisites for Configuring Failover Between Redundant Cisco Vision Director Servers
Before you promote a secondary server to become the primary active server, be sure that the following requirements are met:
■![]() You have either physical console access or an SSH client such as PuTTY to log into both Cisco Vision Director servers.
You have either physical console access or an SSH client such as PuTTY to log into both Cisco Vision Director servers.
■![]() You understand how to use the Text Utility Interface (TUI). For more information, see Cisco Vision Dynamic Signage Director Server Text-Based User Interface. To select a menu item, type the character that corresponds to the menu option and press Enter.
You understand how to use the Text Utility Interface (TUI). For more information, see Cisco Vision Dynamic Signage Director Server Text-Based User Interface. To select a menu item, type the character that corresponds to the menu option and press Enter.
■![]() Verify that you have a successful backup of the primary server on the secondary server. For more information, see Backing Up and Restoring Cisco Vision Director Servers.
Verify that you have a successful backup of the primary server on the secondary server. For more information, see Backing Up and Restoring Cisco Vision Director Servers.
■![]() The Cisco Vision Director backup server is on the same subnet as the primary server.
The Cisco Vision Director backup server is on the same subnet as the primary server.
■![]() The servers are using the Eth0 interface for connection to the network.
The servers are using the Eth0 interface for connection to the network.
■![]() You have the IP addresses of the primary and secondary servers.
You have the IP addresses of the primary and secondary servers.
Tip : The IP address for the server is displayed on the screen when you log into the TUI. You also can view the /etc/hosts information on each server using the TUI System Settings > System Information menu option.
Restrictions for Configuring Failover Between Redundant Cisco Vision Director Servers
The Cisco Vision Director server redundancy architecture has the following restrictions:
■![]() The Cisco Vision Director server architecture does not support automatic failover when a failure occurs on the active server.
The Cisco Vision Director server architecture does not support automatic failover when a failure occurs on the active server.
■![]() Depending on your environment, it takes 30 minutes or more to complete the manual failover process.
Depending on your environment, it takes 30 minutes or more to complete the manual failover process.
■![]() In addition, after the manual failover process completes, perform a script push if you are in an active event, which depending on your deployment and content size, can take anywhere from minutes to an hour. When pushing the script again, there will be a service interruption.
In addition, after the manual failover process completes, perform a script push if you are in an active event, which depending on your deployment and content size, can take anywhere from minutes to an hour. When pushing the script again, there will be a service interruption.
Information About Failover Between Redundant Cisco Vision Director Servers
Figure 1 shows the architecture of Cisco Vision Director server redundancy under normal network conditions and operation. The primary and secondary servers are addressed as independent hosts with two different IP addresses on the same subnet in the Cisco Connected Venue (Connected Stadium) network.
While the secondary server is still connected to the network, notice that communication and control only occurs between the primary Cisco Vision Director server and the rest of the network, including the DMPs.
The secondary server is only connected to the network as a backup to the primary, should a failure occur. Configure the secondary server to be backed up with data from the primary server on a scheduled basis.
Figure 1 Cisco Vision Director Redundancy Under Normal Operation
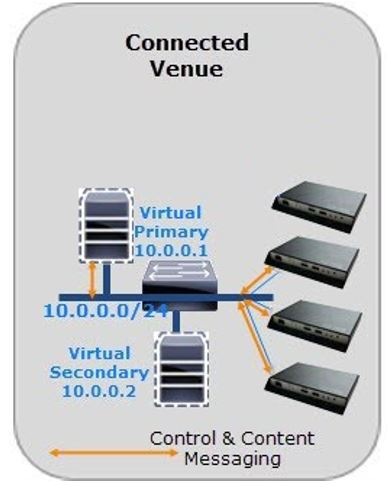
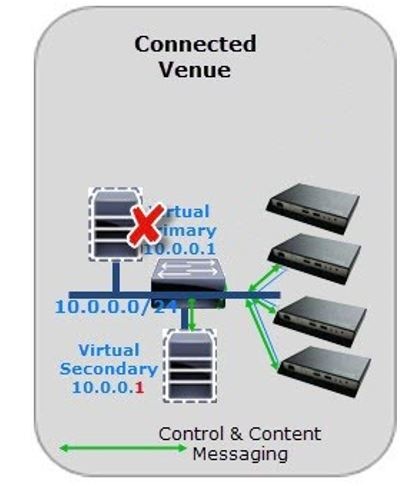
Figure 2 shows the redundancy environment when connectivity from the primary Cisco Vision Director server fails. When the primary server fails, a manual process must take place to restore the secondary server from a backup, shut down the primary server, and activate the secondary server as the primary.
Notice that the secondary server must be reconfigured to use the same IP address as the original primary server. In this example, the secondary server IP address is changed to 10.0.0.1 (from 10.0.0.2) to match the primary server address. When the process completes, communication and control only occurs between the newly activated secondary server and the rest of the network.
Note: The word “failover” does not mean automatic activation of a secondary server. The failover process is manual.
Figure 2 Cisco Vision Director Redundancy Under Failover Operation
How to Promote a Standby Secondary Server to the Active Server
This section describes the related tasks to perform when a primary Cisco Vision Director server fails in a redundant server environment, or if you need to perform an upgrade of your Cisco Vision Director software. It includes tasks to activate the secondary server to replace the functionality of the primary server for Cisco Vision Director operation.
Note : To s elect a TUI menu item, type the character that corresponds to the menu option and press Enter.
This section includes the following tasks:
■![]() Starting and Configuring the Services on the Secondary Server (required)
Starting and Configuring the Services on the Secondary Server (required)
■![]() Restoring the Secondary Server with System Data From a Backup File (required)
Restoring the Secondary Server with System Data From a Backup File (required)
■![]() Stopping Services and Auto-Restart and Shutting Down the Primary Server (required)
Stopping Services and Auto-Restart and Shutting Down the Primary Server (required)
■![]() Shutting Down Services on the Secondary Server (required)
Shutting Down Services on the Secondary Server (required)
■![]() Changing the IP Address on the Secondary Server (required)
Changing the IP Address on the Secondary Server (required)
■![]() Restarting the Network Service on the Secondary Server (required)
Restarting the Network Service on the Secondary Server (required)
■![]() Verifying Network Connectivity to the Secondary Server (required)
Verifying Network Connectivity to the Secondary Server (required)
■![]() Clearing the ARP Cache on the Switch (optional)
Clearing the ARP Cache on the Switch (optional)
■![]() Restarting Cisco Vision Director on the Secondary Server (required)
Restarting Cisco Vision Director on the Secondary Server (required)
■![]() Verifying the Cisco Vision Director Configuration on the Secondary Server (required)
Verifying the Cisco Vision Director Configuration on the Secondary Server (required)
Starting and Configuring the Services on the Secondary Server
To start and configure the services on the secondary server:
1.![]() Log into the TUI as installer on the secondary server using a directly-connected console or SSH client.
Log into the TUI as installer on the secondary server using a directly-connected console or SSH client.
2.![]() Choose Cisco Vision Server Administration.
Choose Cisco Vision Server Administration.
4.![]() Choose Promote as Primary/Active.
Choose Promote as Primary/Active.
The Cisco Vision Director services are started and configured to start automatically when a reboot occurs.
Restoring the Secondary Server with System Data From a Backup File
To restore the secondary server with system data from a backup file:
1.![]() Log into the TUI as installer on the secondary server using a directly-connected console or SSH client.
Log into the TUI as installer on the secondary server using a directly-connected console or SSH client.
2.![]() Choose Cisco Vision Server Administration.
Choose Cisco Vision Server Administration.
3.![]() Choose Restore all system data from system backup.
Choose Restore all system data from system backup.
4.![]() Select the components that you want to restore, and select the date of the backup file to use for the restore.
Select the components that you want to restore, and select the date of the backup file to use for the restore.
The restore begins. A dialog box appears notifying you when the restore process successfully completes.
6.![]() When the restore is complete, look around the system to verify that everything looks as expected.
When the restore is complete, look around the system to verify that everything looks as expected.
Stopping Services and Auto-Restart and Shutting Down the Primary Server
Note: If the primary server becomes unavailable for this task, power down the server so that it will not conflict with the newly active secondary server.
To stop services and auto-restart and to shut down the primary server:
1.![]() Log into the TUI as installer on the primary server using a directly-connected console or SSH client.
Log into the TUI as installer on the primary server using a directly-connected console or SSH client.
2.![]() Choose Cisco Vision Server Administration.
Choose Cisco Vision Server Administration.
4.![]() Choose Configure as Secondary/Inactive.
Choose Configure as Secondary/Inactive.
5.![]() Press any key to return to the Failover sub-menu.
Press any key to return to the Failover sub-menu.
6.![]() Return to the Cisco Vision Server Administration menu by typing R and pressing Enter.
Return to the Cisco Vision Server Administration menu by typing R and pressing Enter.
Shutting Down Services on the Secondary Server
To shut down services on the secondary server:
1.![]() Log into the TUI as installer on the secondary server using a directly-connected console or SSH client.
Log into the TUI as installer on the secondary server using a directly-connected console or SSH client.
The TUI Main Menu is displayed.
2.![]() Choose Cisco Vision Server Administration.
Choose Cisco Vision Server Administration.
3.![]() Choose Shutdown Dynamic Signage Director software.
Choose Shutdown Dynamic Signage Director software.
Changing the IP Address on the Secondary Server
Prerequisites
Before you change the IP address on the secondary server, be sure that the following requirements are met:
■![]() You have the IP address of the primary server.
You have the IP address of the primary server.
■![]() You understand how to use the vi editor. For information about using the vi editor, see Cisco Vision Dynamic Signage Director Server Text-Based User Interface.
You understand how to use the vi editor. For information about using the vi editor, see Cisco Vision Dynamic Signage Director Server Text-Based User Interface.
Note: The system will run if the localhost entry exists but the hostname entry is missing in the /etc/hosts file. However, when the secondary hostname exists, the IP address of the secondary server must be changed to match the IP address of the primary server.
Procedure
Tip: If you need to back out of the TUI menus for any reason, type :q
To change the IP address on the secondary server:
1.![]() Log into the TUI as installer using a directly-connected console or SSH client. The TUI Main Menu displays.
Log into the TUI as installer using a directly-connected console or SSH client. The TUI Main Menu displays.
2.![]() From the Main Menu, choose System Settings.
From the Main Menu, choose System Settings.
4.![]() Choose Setup Network Information.
Choose Setup Network Information.
Tip: To navigate through the TUI menus, type the character that corresponds to the menu area (a, b, c, and so on) and press Enter. To return to other menus, use one of the indicated keys to return to prior menus.
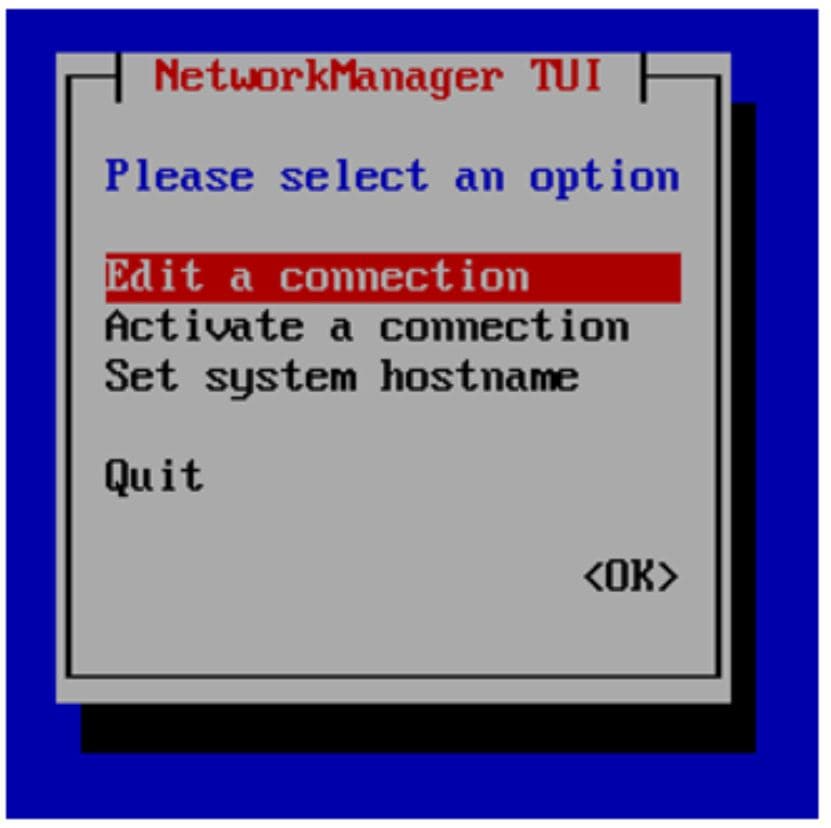
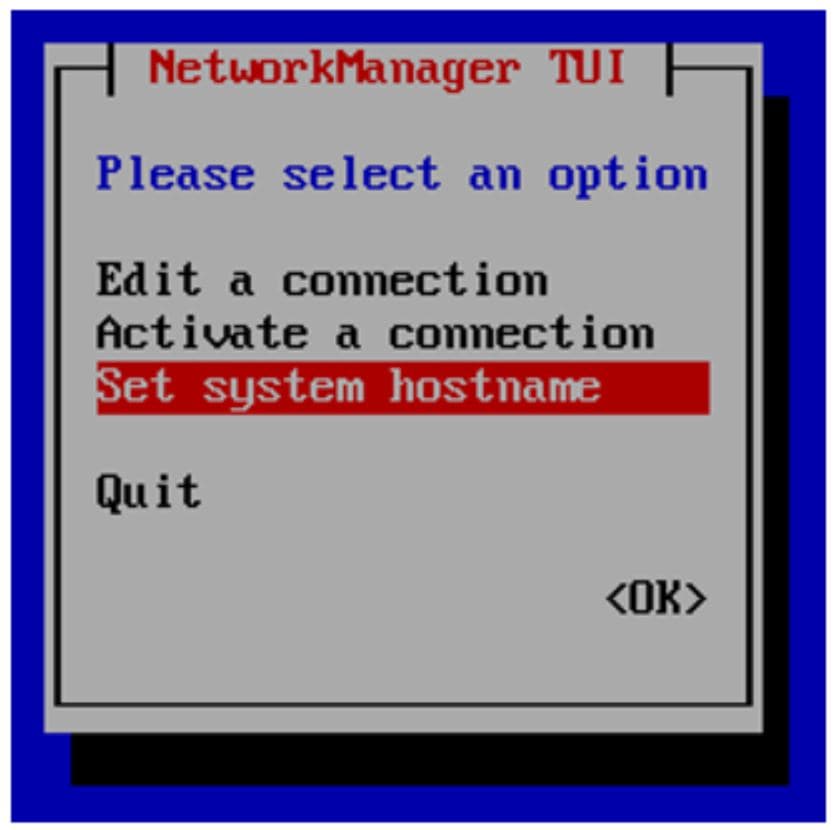
5.![]() At the Network Manager TUI screen, select Edit a Connection (Figure 3).
At the Network Manager TUI screen, select Edit a Connection (Figure 3).
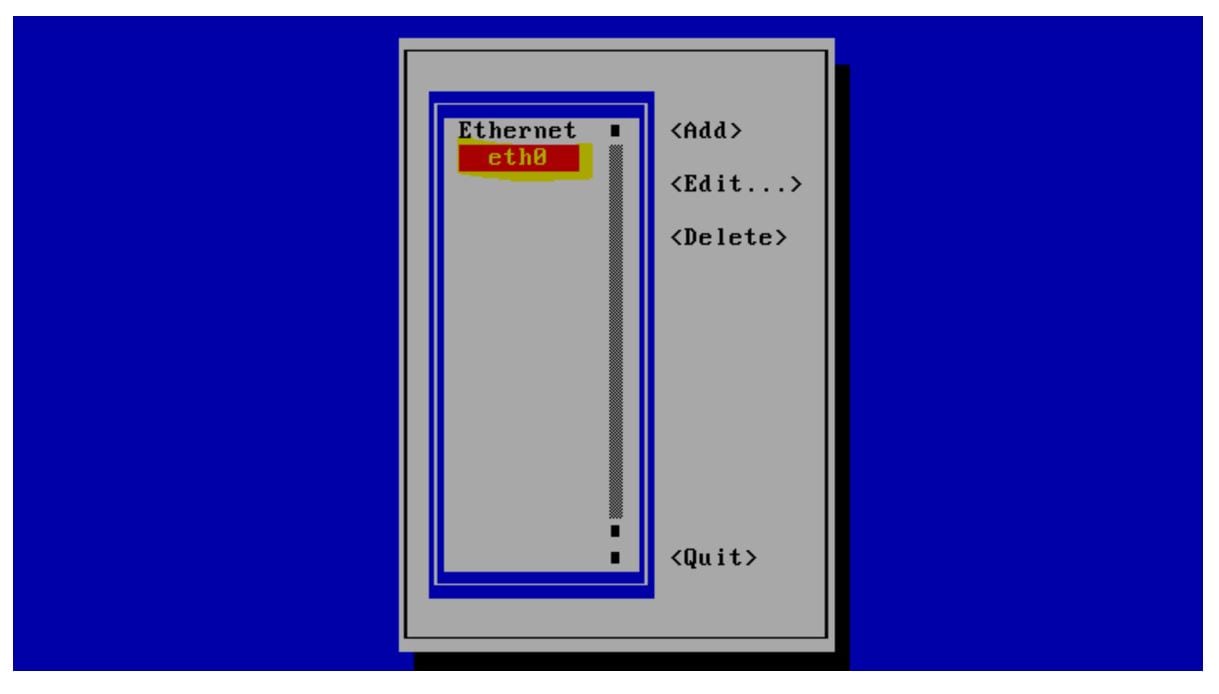
7.![]() Select “Edit...”(Figure 4).
Select “Edit...”(Figure 4).
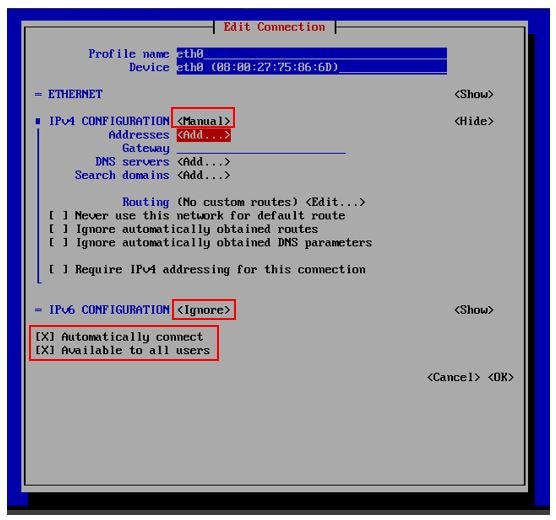
8.![]() Set IPv4 CONFIGURATION to “Manual” (Figure 5).
Set IPv4 CONFIGURATION to “Manual” (Figure 5).
9.![]() Select “Show” to provide details.
Select “Show” to provide details.
10.![]() Press the tab key until the cursor is positioned on the Static IP address line.
Press the tab key until the cursor is positioned on the Static IP address line.
11.![]() Press the backspace key to go to the beginning of the line and type in the IP address of the primary server.
Press the backspace key to go to the beginning of the line and type in the IP address of the primary server.
In our example from Figure 2, this would be 10.0.0.1. Use the actual IP address of your primary server.
Notes:
Do not change the name of “eth0”.
Keep the IPv6 CONFIGURATION to “Ignore”.
Leave the boxes for “Automatically connect” and “Available to all users” checked.
12.![]() Navigate to OK and hit Enter.
Navigate to OK and hit Enter.
13.![]() Press any key to return to the Network Settings sub-menu.
Press any key to return to the Network Settings sub-menu.
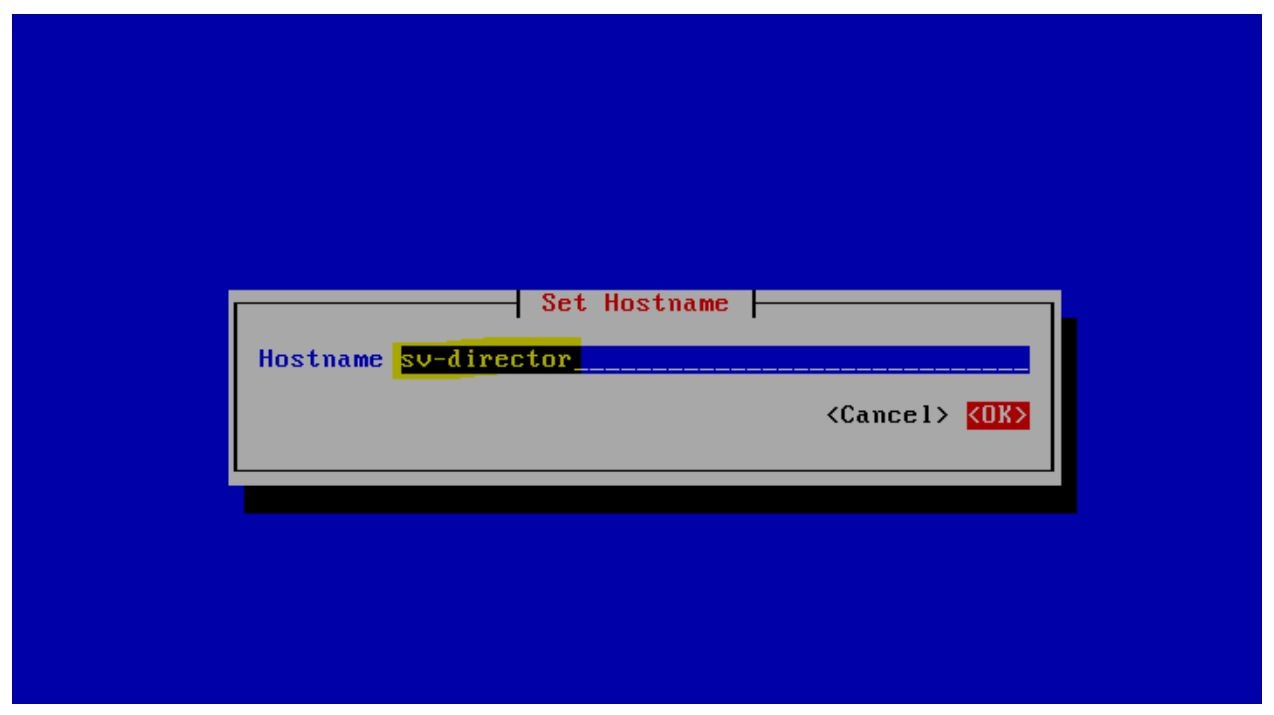
14.![]() Select Set system hostname (Figure 6).
Select Set system hostname (Figure 6).
15.![]() Provide the Cisco Vision Director server name and hit OK.
Provide the Cisco Vision Director server name and hit OK.
Note: Use a fully-qualified domain name (FQDN) for the hostname.
16.![]() See Editing the Hosts File.
See Editing the Hosts File.
17.![]() Replace this server’s IP address with the IP address of the primary server.
Replace this server’s IP address with the IP address of the primary server.
18.![]() Save the configuration and exit vi using the following command:
Save the configuration and exit vi using the following command:
Restarting the Network Service on the Secondary Server
To restart the network service on the secondary server:
1.![]() From the TUI Main Menu on the secondary server, go to the Services Control sub-menu.
From the TUI Main Menu on the secondary server, go to the Services Control sub-menu.
2.![]() Select the Networking option.
Select the Networking option.
The Networking sub-menu is displayed.
3.![]() Select the Restart networking option.
Select the Restart networking option.
The network daemon is restarted and the IP address change is put into effect on the secondary server.
Note: If you are connected to the server through the network using SSH, your session disconnects. Reconnect using the IP address of the primary server.
Verifying Network Connectivity to the Secondary Server
To verify network connectivity to the secondary server:
1.![]() From the TUI Main Menu on the secondary server, go to the Troubleshooting sub-menu.
From the TUI Main Menu on the secondary server, go to the Troubleshooting sub-menu.
2.![]() Select the Ping a host option.
Select the Ping a host option.
3.![]() At the “Enter hostname” prompt, type the hostname or IP address of the secondary server and press Enter.
At the “Enter hostname” prompt, type the hostname or IP address of the secondary server and press Enter.
4.![]() Look for successful transmission and receipt of PING packets.
Look for successful transmission and receipt of PING packets.
Note: If you cannot reach the secondary server, go to Clearing the ARP Cache on the Switch.
Clearing the ARP Cache on the Switch
This task is optional; the ARP cache on the switch will refresh in 5-10 minutes. However, if you cannot access the secondary server after changing its IP address, clear the ARP cache for that IP address on the switch using the clear ip arp privileged EXEC command.
To clear the ARP cache on the switch:
1.![]() Use a directly-connected console, or if you know the IP address of the switch, use Telnet to access the switch as shown in the following example, where ip-address is the address of your switch:
Use a directly-connected console, or if you know the IP address of the switch, use Telnet to access the switch as shown in the following example, where ip-address is the address of your switch:
2.![]() At the corresponding prompts, enter your login information as shown in the following example, where yourname and yourpass are your username and password:
At the corresponding prompts, enter your login information as shown in the following example, where yourname and yourpass are your username and password:
3.![]() Enter privileged EXEC mode using the enable command and corresponding password:
Enter privileged EXEC mode using the enable command and corresponding password:
4.![]() To clear the ARP cache of the newly-assigned IP address now used by the secondary server, use the clear ip arp command as shown in the following example:
To clear the ARP cache of the newly-assigned IP address now used by the secondary server, use the clear ip arp command as shown in the following example:
Restarting Cisco Vision Director on the Secondary Server
To restart Cisco Vision Director on the secondary server:
1.![]() Do one of the following on the secondary server:
Do one of the following on the secondary server:
–![]() If still logged into the TUI, go to the Main Menu.
If still logged into the TUI, go to the Main Menu.
–![]() If not still logged into the TUI as installer on the secondary server, use the new IP address and log in again using a directly-connected console or SSH client.
If not still logged into the TUI as installer on the secondary server, use the new IP address and log in again using a directly-connected console or SSH client.
2.![]() Choose Cisco Vision Server Administration.
Choose Cisco Vision Server Administration.
3.![]() Choose Restart Dynamic Signage Director software.
Choose Restart Dynamic Signage Director software.
All Cisco Vision Director services are started.
4.![]() Press any key to return to the Cisco Vision Server Administration sub-menu.
Press any key to return to the Cisco Vision Server Administration sub-menu.
Verifying the Cisco Vision Director Configuration on the Secondary Server
To verify the Cisco Vision Director configuration on the secondary server:
1.![]() Log into Cisco Vision Director on the secondary server using an administrator account.
Log into Cisco Vision Director on the secondary server using an administrator account.
2.![]() From the Cisco Vision Director main menu, click Device Management > Get Status.
From the Cisco Vision Director main menu, click Device Management > Get Status.
Confirm that you have successful communication between the DMPs and Cisco Vision Director.
4.![]() Verify that all of the content is on this server.
Verify that all of the content is on this server.
5.![]() To establish control of the DMPs, start a script without any content and with No Staging selected. This should require less than 10 minutes.
To establish control of the DMPs, start a script without any content and with No Staging selected. This should require less than 10 minutes.
Note: You can push a script with content, but that means longer downtime.
How to Restore the Primary Server to Active
Note: This task requires a service interruption.
At a scheduled downtime, restore the primary server as the active server to re-establish your normal operating environment to clean up the original primary server from a failure or prepare to do a software upgrade, make IP addressing changes, and have regularly scheduled backups again between the two servers.
Note: To select a TUI menu item, type the character that corresponds to the menu option and press Enter.
This section includes the following tasks:
■![]() Prerequisites to Restoring the Primary Server to Active
Prerequisites to Restoring the Primary Server to Active
■![]() Stopping Services and Auto-Restart on the Secondary Server (required)
Stopping Services and Auto-Restart on the Secondary Server (required)
■![]() Changing the IP Address on the Secondary Server (required)
Changing the IP Address on the Secondary Server (required)
■![]() Verifying Network Connectivity on the Secondary Server (required)
Verifying Network Connectivity on the Secondary Server (required)
■![]() Starting and Configuring the Services on the Original Primary Server (required)
Starting and Configuring the Services on the Original Primary Server (required)
■![]() Verifying Network Connectivity to the Primary Server (required)
Verifying Network Connectivity to the Primary Server (required)
■![]() Restoring the Original Primary Server with System Data From a Backup File (as required)
Restoring the Original Primary Server with System Data From a Backup File (as required)
■![]() Restarting the Cisco Vision Director Software (required after restore run)
Restarting the Cisco Vision Director Software (required after restore run)
■![]() Verifying the Cisco Vision Director Configuration on the Original Primary Server (required)
Verifying the Cisco Vision Director Configuration on the Original Primary Server (required)
■![]() Upgrading the Primary Server Software (as required)
Upgrading the Primary Server Software (as required)
■![]() Reconfiguring the Backup Environment After Upgrades (as required)
Reconfiguring the Backup Environment After Upgrades (as required)
Prerequisites to Restoring the Primary Server to Active
If you make any administrative changes on the active secondary server, run a successful backup.
While the secondary server is still active, re-configure the backup environment and run a manual backup from the Cisco Vision Director Manage Software > System Backups. The latest backup will then be copied to the primary (inactive) server. For more information, see Backing Up and Restoring Cisco Vision Director Servers.
Note: Smart Software Licensing requires that you register both servers. See the Cisco Vision Software Installation and Upgrade Guide.
Stopping Services and Auto-Restart on the Secondary Server
To stop services and auto-restart of them on the secondary server:
1.![]() Log into the TUI as installer on the secondary server using a directly-connected console or SSH client.
Log into the TUI as installer on the secondary server using a directly-connected console or SSH client.
2.![]() Choose Cisco Vision Server Administration > Failover.
Choose Cisco Vision Server Administration > Failover.
3.![]() Choose Configure as Secondary/Inactive.
Choose Configure as Secondary/Inactive.
4.![]() Press any key to return to the Failover sub-menu.
Press any key to return to the Failover sub-menu.
5.![]() Return to the Cisco Vision Server Administration menu by typing R and pressing Enter.
Return to the Cisco Vision Server Administration menu by typing R and pressing Enter.
Changing the IP Address on the Secondary Server
Prerequisites
Before you change the IP address on the secondary server, be sure that the following requirements are met:
■![]() You have the IP address of the secondary server.
You have the IP address of the secondary server.
■![]() You understand how to use the vi editor. For information about using the vi editor, see Cisco Vision Dynamic Signage Director Server Text-Based User Interface.
You understand how to use the vi editor. For information about using the vi editor, see Cisco Vision Dynamic Signage Director Server Text-Based User Interface.
■![]() See procedure Changing the IP Address on the Secondary Server.
See procedure Changing the IP Address on the Secondary Server.
Verifying Network Connectivity on the Secondary Server
To verify network connectivity to the secondary server:
1.![]() From the TUI Main Menu on the secondary server, go to the Troubleshooting sub-menu.
From the TUI Main Menu on the secondary server, go to the Troubleshooting sub-menu.
3.![]() At the “Enter hostname” prompt, type the hostname or IP address of the secondary server and press Enter.
At the “Enter hostname” prompt, type the hostname or IP address of the secondary server and press Enter.
4.![]() Look for successful transmission and receipt of PING packets.
Look for successful transmission and receipt of PING packets.
Note : If you cannot reach the secondary server, go to Clearing the ARP Cache on the Switch.
Starting and Configuring the Services on the Original Primary Server
To start and configure the services on the original primary server:
1.![]() Power on the original primary server.
Power on the original primary server.
Note: It might take a few minutes for SSH to be available as the server boots.
2.![]() Log into the TUI as installer on the original primary server using a directly-connected console or SSH client.
Log into the TUI as installer on the original primary server using a directly-connected console or SSH client.
3.![]() Choose Cisco Vision Server Administration > Failover.
Choose Cisco Vision Server Administration > Failover.
4.![]() Choose Promote as Primary/Active.
Choose Promote as Primary/Active.
The Cisco Vision Director services are started and also configured to start automatically when a reboot occurs.
5.![]() Press any key to return to the Failover sub-menu.
Press any key to return to the Failover sub-menu.
6.![]() If a script is running on the original primary Cisco Vision Director server, end the script.
If a script is running on the original primary Cisco Vision Director server, end the script.
Verifying Network Connectivity to the Primary Server
To verify network connectivity to the primary server:
1.![]() From the TUI Main Menu on the original primary server, go to the Troubleshooting sub-menu.
From the TUI Main Menu on the original primary server, go to the Troubleshooting sub-menu.
3.![]() At the “Enter hostname” prompt, type the hostname or IP address of the primary server and press Enter.
At the “Enter hostname” prompt, type the hostname or IP address of the primary server and press Enter.
4.![]() Look for successful transmission and receipt of PING packets.
Look for successful transmission and receipt of PING packets.
Note: If you cannot reach the secondary server, go to Clearing the ARP Cache on the Switch.
5.![]() Press Ctrl-C to stop sending PING packets.
Press Ctrl-C to stop sending PING packets.
6.![]() Press any key to return to the Troubleshooting menu.
Press any key to return to the Troubleshooting menu.
Restoring the Original Primary Server with System Data From a Backup File
If any administrative changes were made to the system while in failover to the other server, restore the backup from the secondary.
Note: This step requires that a backup was run from the secondary server to the primary, before reactivating the primary server.
To restore the original primary server with system data from a backup file:
1.![]() Log into Cisco Vision Director on the original primary server using an administrator account.
Log into Cisco Vision Director on the original primary server using an administrator account.
2.![]() From the Cisco Vision Director Main Menu, click Configuration > System Configuration.
From the Cisco Vision Director Main Menu, click Configuration > System Configuration.
3.![]() From the Dashboard drawers, select Tools > Advanced > Restore system data from backup.
From the Dashboard drawers, select Tools > Advanced > Restore system data from backup.
4.![]() Select the components that you want to restore.
Select the components that you want to restore.
5.![]() Select the date of the backup file to use for the restore.
Select the date of the backup file to use for the restore.
Restarting the Cisco Vision Director Software
After you perform any restore on a Cisco Vision Director server, restart the Cisco Vision Director software to resume normal operation of the services.
To restart the Cisco Vision Director software:
1.![]() Log into the TUI as installer on the original primary server using a directly-connected console or SSH client.
Log into the TUI as installer on the original primary server using a directly-connected console or SSH client.
2.![]() Go to Cisco Vision Server Administration > Restart Cisco Vision Director Software.
Go to Cisco Vision Server Administration > Restart Cisco Vision Director Software.
Verifying the Cisco Vision Director Configuration on the Original Primary Server
To verify the Cisco Vision Director configuration on the original primary server:
1.![]() Log into Cisco Vision Director on the original primary server using an administrator account.
Log into Cisco Vision Director on the original primary server using an administrator account.
2.![]() From the Cisco Vision Director Main Menu go to More > Management Dashboard.
From the Cisco Vision Director Main Menu go to More > Management Dashboard.
3.![]() From the Dashboard drawers, select DMP and TV Controls > Monitoring > Get Status.
From the Dashboard drawers, select DMP and TV Controls > Monitoring > Get Status.
Confirm that you have successful communication between the DMPs and Cisco Vision Director.
4.![]() Verify that all of the content is on this server.
Verify that all of the content is on this server.
5.![]() Test the system by looking at the status in the Management Dashboard.
Test the system by looking at the status in the Management Dashboard.
Upgrading the Primary Server Software
Note: This task is only necessary when performing a software upgrade on redundant servers according to the instructions in Cisco Vision Software Installation and Upgrade Guide: Dynamic Signage Director Release 6.2.
After you restore the original primary server to active status after an upgrade of the software on the secondary server, upgrade the primary server software.
Reconfiguring the Backup Environment After Upgrades
After you complete software upgrades for both the secondary and primary servers, reconfigure the backup environment to re-enable the backup account on the secondary server and to configure the primary server for automatic backup and restore. For more information, see Backing Up and Restoring Cisco Vision Director Servers.
 Feedback