- Contents
- Prerequisites for Backing Up and Restoring Cisco Vision Director Servers
- Restrictions for Backing Up and Restoring Cisco Vision Director Servers
- Information About Backing Up and Restoring Cisco Vision Director Servers
- How to Backup a Cisco Vision Director Server
- How to Restore a Cisco Vision Director Server
Backing Up and Restoring Cisco Vision Director Servers
This module describes how to setup and schedule backups between a primary and secondary server and restore data between them.
Contents
■![]() Prerequisites for Backing Up and Restoring Cisco Vision Director Servers
Prerequisites for Backing Up and Restoring Cisco Vision Director Servers
■![]() Restrictions for Backing Up and Restoring Cisco Vision Director Servers
Restrictions for Backing Up and Restoring Cisco Vision Director Servers
■![]() Information About Backing Up and Restoring Cisco Vision Director Servers
Information About Backing Up and Restoring Cisco Vision Director Servers
Prerequisites for Backing Up and Restoring Cisco Vision Director Servers
Before you backup or restore Cisco Vision Director servers, be sure that the following requirements are met:
■![]() You are familiar with using the Text-based User Interface (TUI) in Cisco Vision Director.
You are familiar with using the Text-based User Interface (TUI) in Cisco Vision Director.
For more information, see Cisco Vision Dynamic Signage Director Server Text-Based User Interface.
■![]() You have a directly-connected console or an SSH client to access the primary active and secondary servers.
You have a directly-connected console or an SSH client to access the primary active and secondary servers.
■![]() You have the IP addresses of the active and secondary servers.
You have the IP addresses of the active and secondary servers.
■![]() You know the installer account credentials on the Cisco Vision Director active and secondary servers.
You know the installer account credentials on the Cisco Vision Director active and secondary servers.
■![]() The IP address of the secondary server must be reachable on the network from the active server or the TUI backup configuration will fail.
The IP address of the secondary server must be reachable on the network from the active server or the TUI backup configuration will fail.
■![]() You have determined an appropriate time on the network to schedule automatic backups and restores.
You have determined an appropriate time on the network to schedule automatic backups and restores.
Restrictions for Backing Up and Restoring Cisco Vision Director Servers
Consider the following restrictions when backing up and restoring Cisco Vision Director servers:
Caution: The tasks described in this document apply only to a redundant server environment where both servers are running Cisco Vision Director software.
■![]() If you have to fail over to your secondary Cisco Vision Director server due to a problem on the primary, then your original backup configuration will be invalid.
If you have to fail over to your secondary Cisco Vision Director server due to a problem on the primary, then your original backup configuration will be invalid.
Be aware that your scheduled backup process cannot fully operate by automatically transferring a copy of the backup to the secondary server until you use the TUI automatic backup configuration again to reset the backup configuration between the primary and secondary servers. However, a backup will continue to be saved on the primary server.
■![]() When you fail back to the original primary server and are now using the original IP addressing configuration, use the TUI automatic backup configuration again, so that the backup directory can be re-established on the secondary server.
When you fail back to the original primary server and are now using the original IP addressing configuration, use the TUI automatic backup configuration again, so that the backup directory can be re-established on the secondary server.
Information About Backing Up and Restoring Cisco Vision Director Servers
This section includes the following topics:
■![]() What Cisco Vision Director Data is Backed Up
What Cisco Vision Director Data is Backed Up
Backup Environment
While you can run a backup for a network environment where there is only a single Cisco Vision Director server, we recommended a redundant, virtualized environment. In a redundant environment, you run Cisco Vision Director on a primary server, with a secondary server connected to the same subnet where the backup data from the primary server is saved.
The backup process can be scheduled or run manually. When a backup completes, the Content Management System (CMS) is automatically restarted.
The backup task can run even while an event script is running. As part of this change, the database is no longer optimized or repaired during the backup process—a new TUI option is added to run database maintenance manually if needed.
Although it is not expected that database maintenance should be needed regularly, slow performance may indicate a need to run database maintenance.
Tip: You can look at the backup log (/var/log/svd-config/backup-YYYMMddHHMMSSz.log) to see if the table updates are “OK” and up-to-date. If not, then use the TUI option to run database maintenance. For more information, see the “Running Database Maintenance” topic in the Cisco Vision Dynamic Signage Director Operations Guide, Release 6.3.
What Cisco Vision Director Data is Backed Up
There are several areas of Cisco Vision Director that need to be backed up. The backup process backs up the following areas of the Cisco Vision Director server:
■![]() Cisco Vision Director Content Management System (CMS)
Cisco Vision Director Content Management System (CMS)
■![]() Cisco Vision Director database
Cisco Vision Director database
■![]() Cisco Vision Director system configuration files
Cisco Vision Director system configuration files
■![]() Proof of Play report data in the /var/sv/pofp/data directory
Proof of Play report data in the /var/sv/pofp/data directory
Caution: The proof of play raw data in the /var/sv/pofp/raw directory is not backed up.
Disk Storage and Maintenance
Note: To be sure that your system has enough disk space, Release 4.0 and later releases only retain one backup file by default.
For more information, see the “Managing Server Resources in Cisco Vision Director” module of the Cisco Vision Dynamic Signage Director Operations Guide, Release 6.3.
Restore Environment
As with backups, schedule the restore process or run it manually. When the manual restore screen is displayed, it lists backups from both the backup and restore directories, concatenated together. This allows you to run a manual restore on either the primary or the secondary server. An automated restore always uses the most recent backup file in the restore directory.
Also, the schedule of tasks to run in the primary database and the secondary database will be different, due to the existence of the backup and restore tasks. Therefore, the schedule itself is not automatically restored.
How to Backup a Cisco Vision Director Server
This section includes the following tasks:
■![]() Enabling the Backup Account on the Secondary Server (required)
Enabling the Backup Account on the Secondary Server (required)
■![]() Setting Up the Primary Server for Automatic Backup and Restore (required)
Setting Up the Primary Server for Automatic Backup and Restore (required)
■![]() Scheduling a Regular Backup (required)
Scheduling a Regular Backup (required)
■![]() Starting a Backup Manually for Immediate Execution (optional)
Starting a Backup Manually for Immediate Execution (optional)
■![]() Verifying Backup Completion (optional)
Verifying Backup Completion (optional)
■![]() Modifying the Number of Backup Files to Retain (optional)
Modifying the Number of Backup Files to Retain (optional)
Enabling the Backup Account on the Secondary Server
Before you set up the primary Cisco Vision Director server for automatic backup and restore with a redundant secondary server, enable the backup account on the secondary server using the TUI.
For more information about using the TUI, see Cisco Vision Dynamic Signage Director Server Text-Based User Interface.
To enable the backup account on the secondary server:
1.![]() On the secondary server, log into the TUI by doing the following:
On the secondary server, log into the TUI by doing the following:
a.![]() Use a directly connected console, or use an SSH client from a laptop computer that is connected to the Cisco Vision Director server network to run a secure login to the secondary Cisco Vision Director server using the IP address for your server.
Use a directly connected console, or use an SSH client from a laptop computer that is connected to the Cisco Vision Director server network to run a secure login to the secondary Cisco Vision Director server using the IP address for your server.
b.![]() When the login prompt appears, enter the installer userid followed by the installer password at the password prompt.
When the login prompt appears, enter the installer userid followed by the installer password at the password prompt.
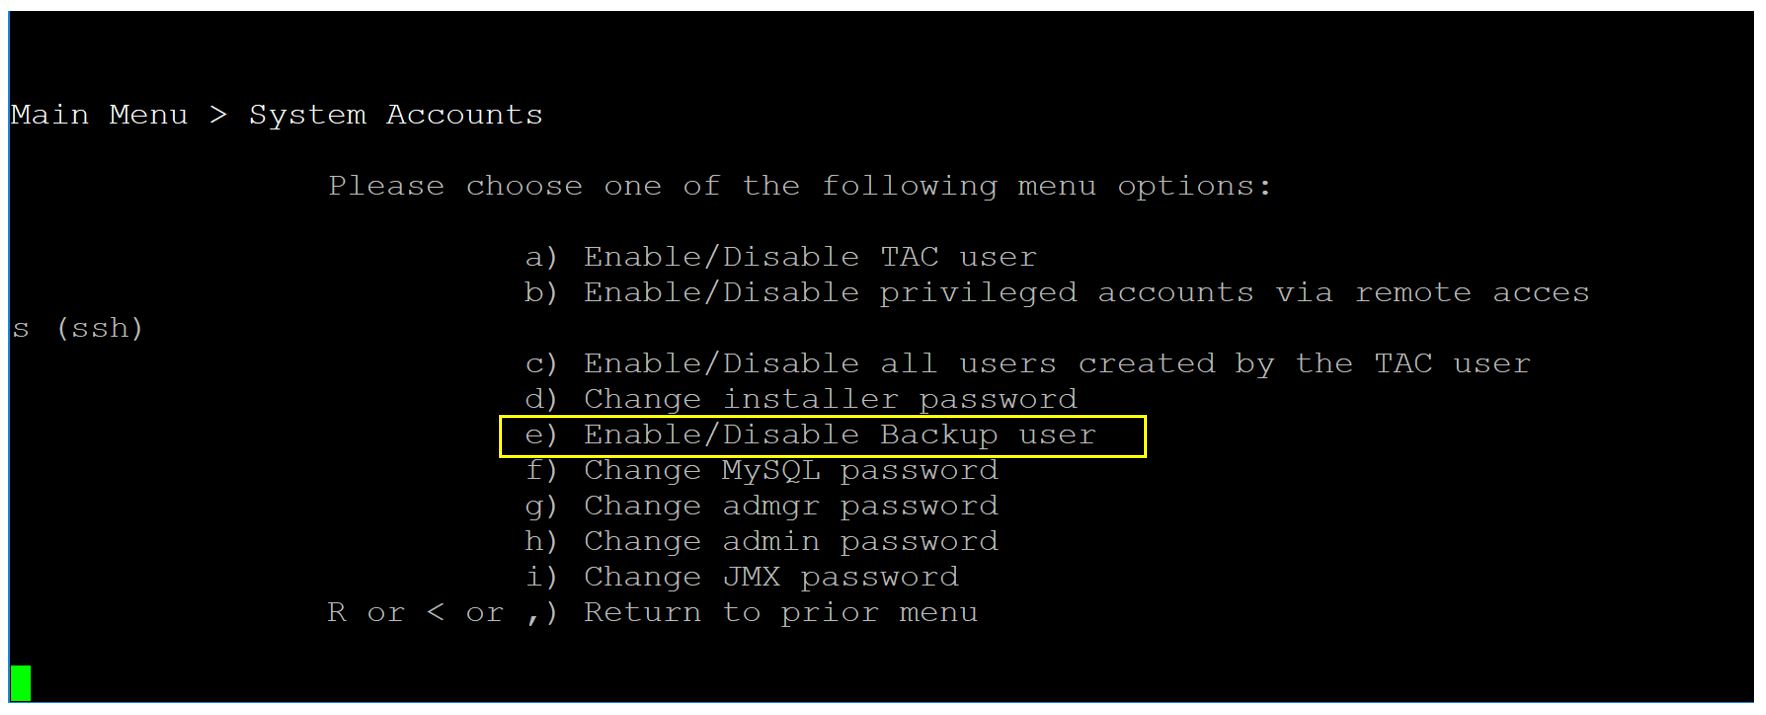
2.![]() From the Main Menu, go to the System Accounts > Enable/Disable Backup User menu (Figure 1).
From the Main Menu, go to the System Accounts > Enable/Disable Backup User menu (Figure 1).
Tip: To navigate through the TUI menus, type the character that corresponds to the menu area where you want to go (a, b, c, and so on) and press Enter. To return to other menus, back out of the hierarchy of menus using one of the indicated keys to return you to prior menus.
Figure 1 Enable/Disable Backup User Menu
1.![]() Select Enable backup user account.
Select Enable backup user account.
When successfully created, the following messages display:
2.![]() Press any key to return to the Enable/Disable Backup user menu.
Press any key to return to the Enable/Disable Backup user menu.
Setting Up the Primary Server for Automatic Backup and Restore
Use a TUI menu option to automate the configuration of the backup accounts and directories between the primary and backup server. Use the TUI to setup the Cisco Vision Director Server environment to run the backup and restore processes.
Note: The TUI is only used to configure the backup environment. Use System Configuration to schedule or run any manual backups. For more information, see Scheduling a Regular Backup and Starting a Backup Manually for Immediate Execution.
Prerequisites
Complete these few steps before performing a backup and restore:
■![]() Determine the IP address of the DSD server which is the destination of the backup files
Determine the IP address of the DSD server which is the destination of the backup files
■![]() On that server (the backup one), enable remote ssh access. Use the TUI on the backup DSD.
On that server (the backup one), enable remote ssh access. Use the TUI on the backup DSD.
a.![]() Use a directly connected console, or use an SSH client from a laptop computer that is connected to the Cisco Vision Director Server network to run a secure login to the primary Cisco Vision Director server using the IP address for your server.
Use a directly connected console, or use an SSH client from a laptop computer that is connected to the Cisco Vision Director Server network to run a secure login to the primary Cisco Vision Director server using the IP address for your server.
b.![]() When the login prompt appears, enter the installer userid followed by the installer password at the password prompt.
When the login prompt appears, enter the installer userid followed by the installer password at the password prompt.
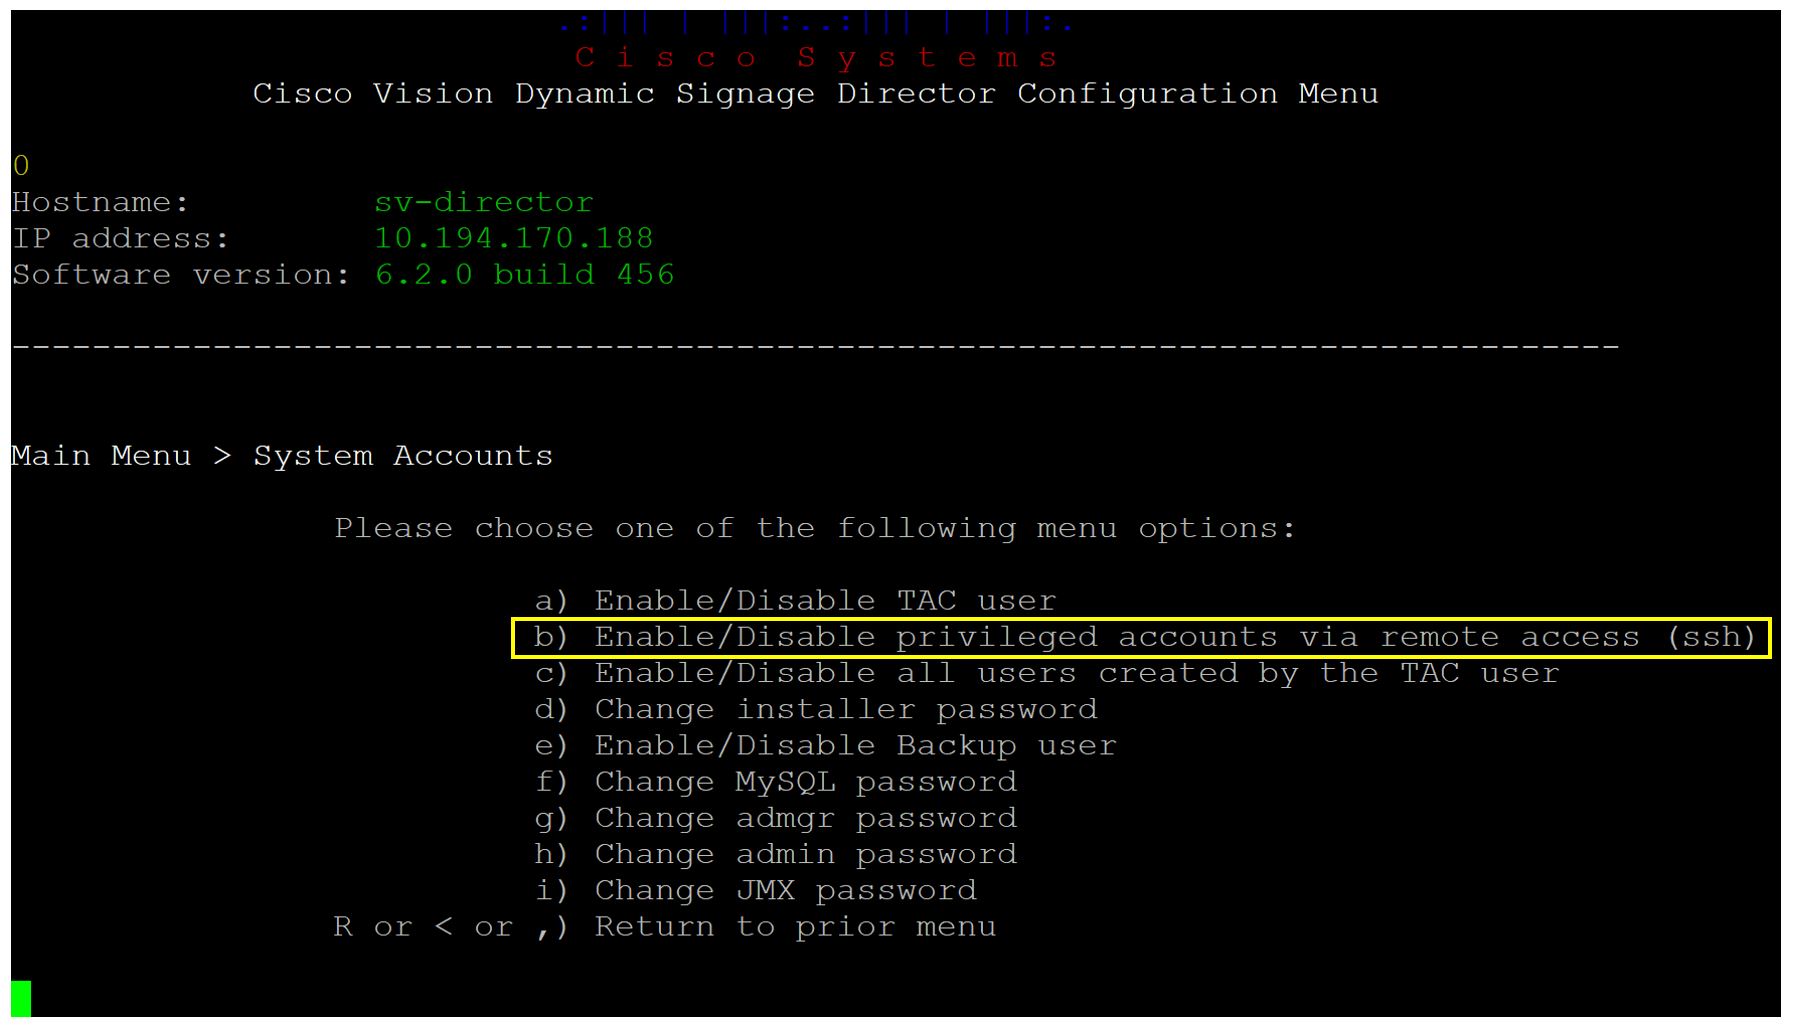
c.![]() From the Main Menu, choose System Accounts (Figure 2) then choose Enable/Disable privileged accounts via remote access (ssh) (Figure 3).
From the Main Menu, choose System Accounts (Figure 2) then choose Enable/Disable privileged accounts via remote access (ssh) (Figure 3).
Figure 2 System Accounts in TUI
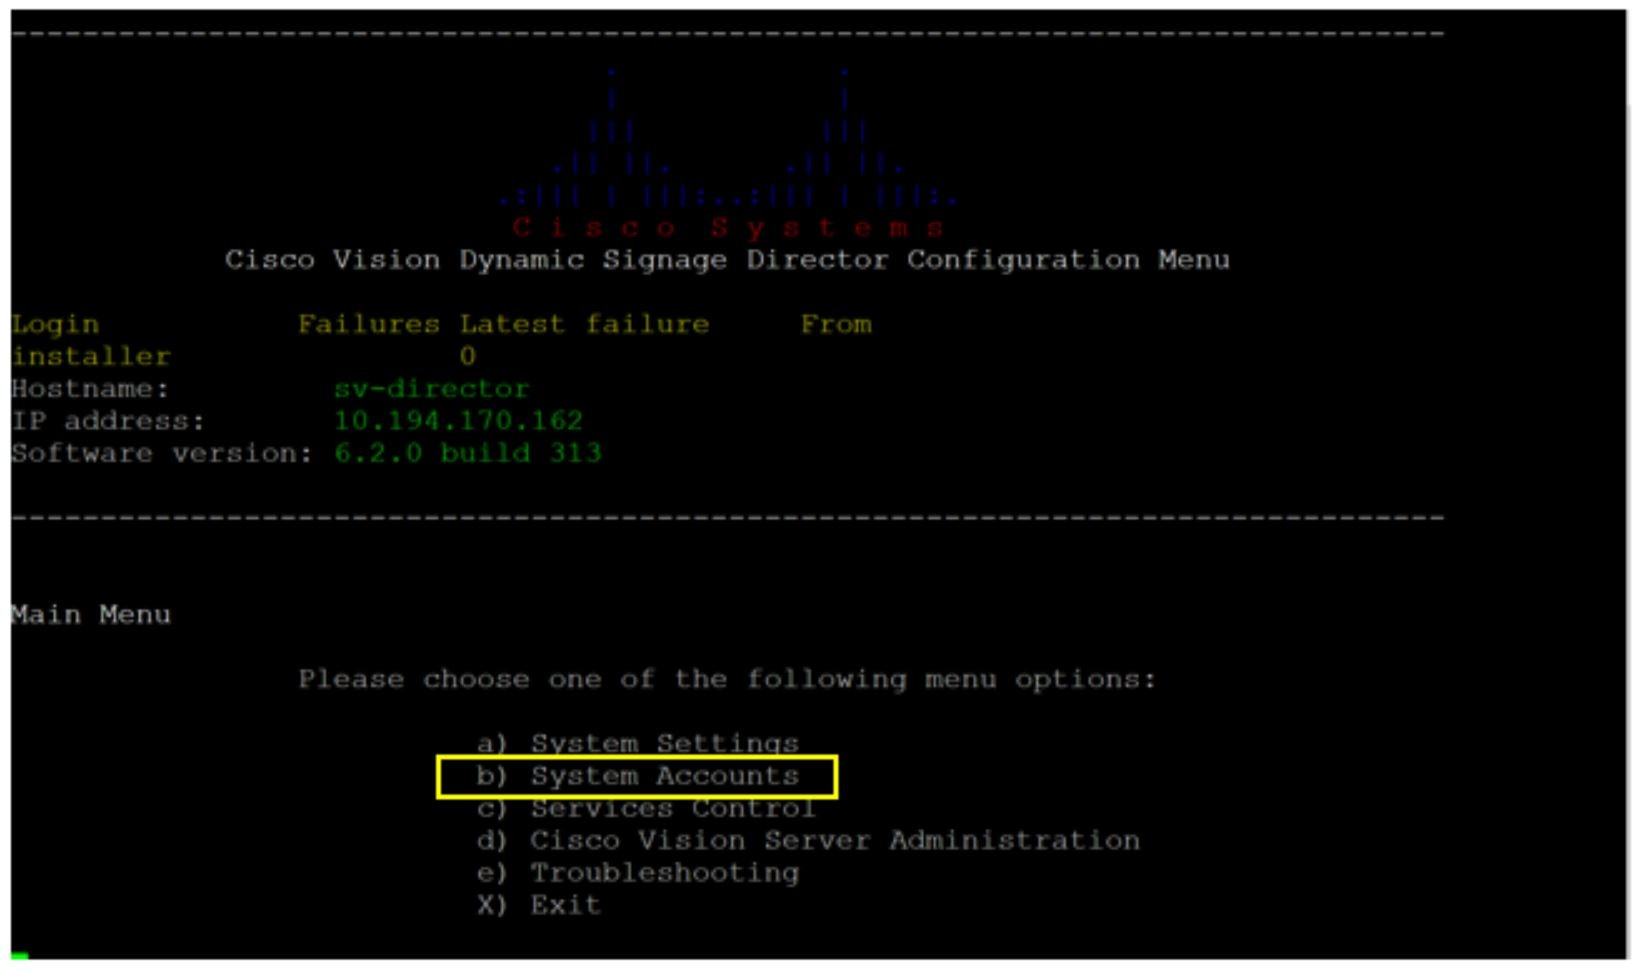
Figure 3 Enable Remote Access via SSH
After enabling access on the remote (backup) server, go back to the primary DSD server and proceed.
To set up the primary server for automatic backup and restore:
1.![]() On the primary server, log into the TUI by doing the following:
On the primary server, log into the TUI by doing the following:
a.![]() Use a directly connected console, or use an SSH client from a laptop computer that is connected to the Cisco Vision Director Server network to run a secure login to the primary Cisco Vision Director server using the IP address for your server.
Use a directly connected console, or use an SSH client from a laptop computer that is connected to the Cisco Vision Director Server network to run a secure login to the primary Cisco Vision Director server using the IP address for your server.
b.![]() When the login prompt appears, enter the installer userid followed by the installer password at the password prompt.
When the login prompt appears, enter the installer userid followed by the installer password at the password prompt.
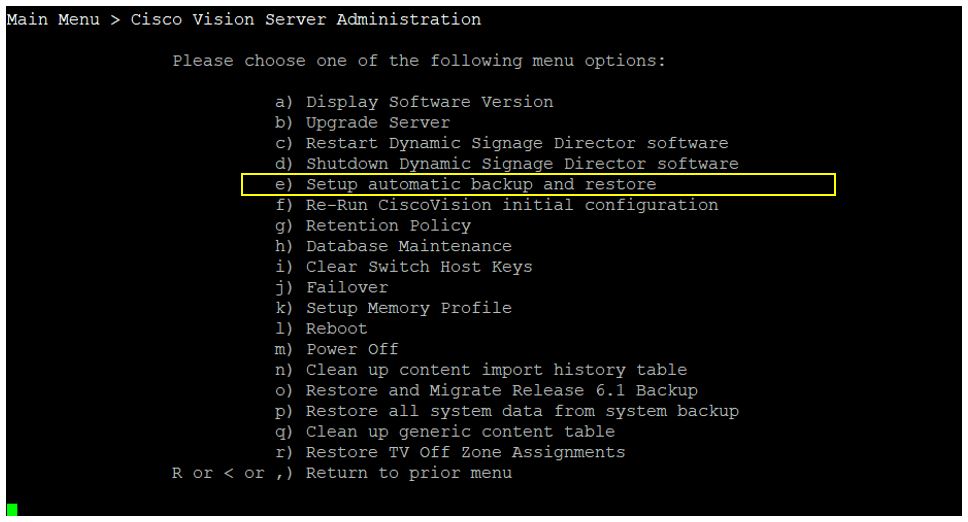
2.![]() From the Main Menu, go to Cisco Vision Server Administration > Setup automatic backup and restore.
From the Main Menu, go to Cisco Vision Server Administration > Setup automatic backup and restore.
Figure 4 Setup Automatic Backup and Restore Menu Option
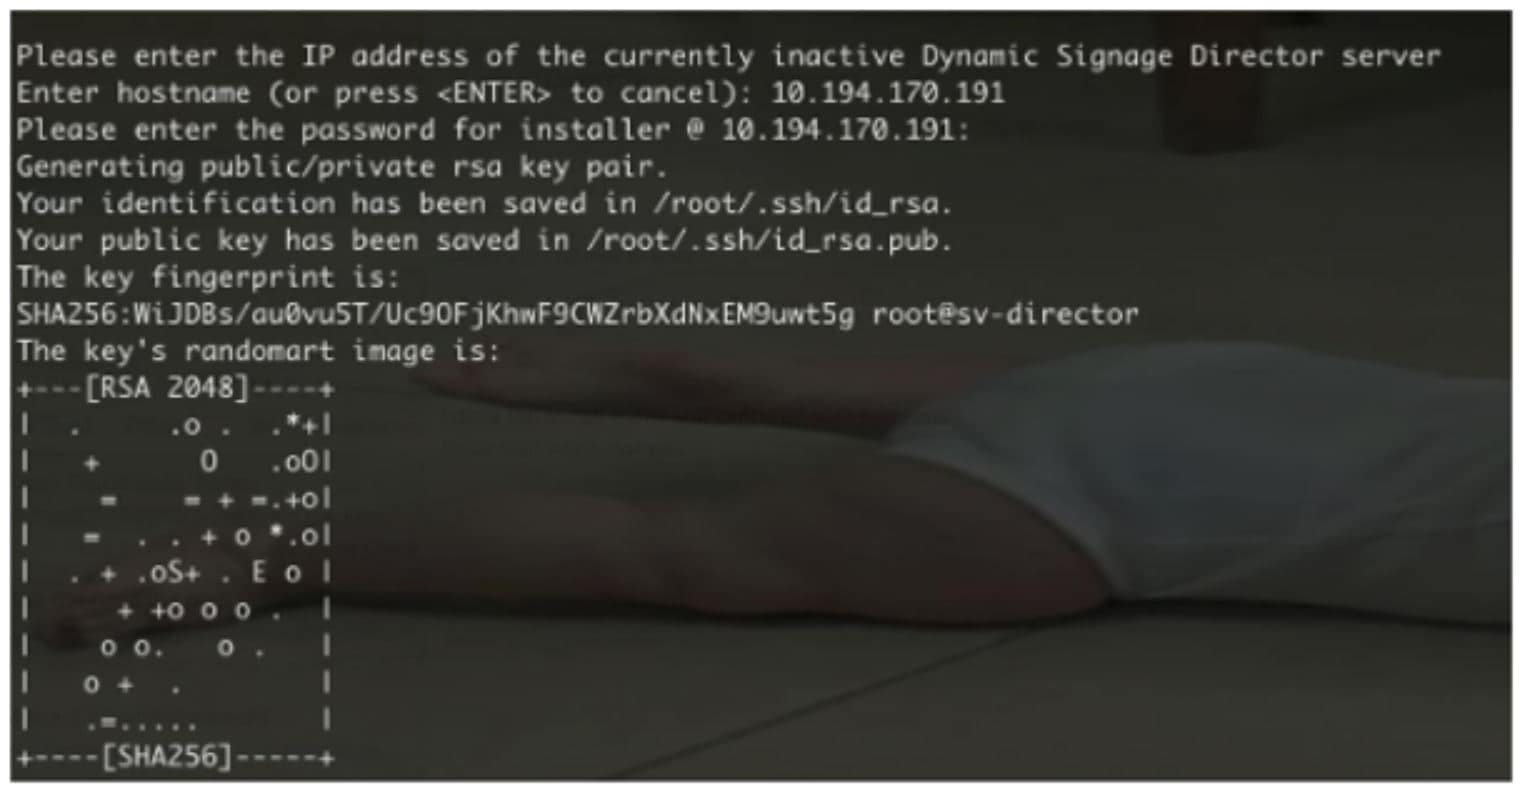
3.![]() At the prompt type the IP address or hostname of your secondary (remote backup) server as shown in the example in Figure 5.
At the prompt type the IP address or hostname of your secondary (remote backup) server as shown in the example in Figure 5.
Note: Text shown in yellow in the screen (omitted in figure below) is instructions on what is done in Prerequisites above.
Figure 5 Secondary Server IP Address Configuration

4.![]() At the prompt, type the password for the installer account on the secondary backup server.
At the prompt, type the password for the installer account on the secondary backup server.
5.![]() When accepted, the system generates the RSA keys and the public key is copied to the secondary server. Confirm that the keys are created without errors as shown in (Figure 6).
When accepted, the system generates the RSA keys and the public key is copied to the secondary server. Confirm that the keys are created without errors as shown in (Figure 6).
6.![]() Wait until the “Press any key” message appears (there may be a short delay before it displays).
Wait until the “Press any key” message appears (there may be a short delay before it displays).
7.![]() Press any key to return to the Cisco Vision Server Administration menu.
Press any key to return to the Cisco Vision Server Administration menu.
Scheduling a Regular Backup
After you have configured the servers to support the backup process, schedule backups using System Configuration in the Cisco Vision Director software.
To configure a backup to run on a regular schedule:
1.![]() Log into the primary Cisco Vision Director server as an administrator.
Log into the primary Cisco Vision Director server as an administrator.
2.![]() From the Cisco Vision Director click Configuration > System Configuration > Scheduled Tasks (Figure 7).
From the Cisco Vision Director click Configuration > System Configuration > Scheduled Tasks (Figure 7).
3.![]() Click the Add icon. The Schedule Task – Add dialog box appears (Figure 8).
Click the Add icon. The Schedule Task – Add dialog box appears (Figure 8).
4.![]() Click in the Task Type field and type BackupTask (Figure 8).
Click in the Task Type field and type BackupTask (Figure 8).
Note: Be sure to type the name of the task exactly as shown with upper and lowercase characters.
Figure 7 Adding a Backup Task to Run on a Regular Schedule

5.![]() Click in the Task Time field and specify the time (in 24:00 format) when you want the backup to run.
Click in the Task Time field and specify the time (in 24:00 format) when you want the backup to run.
Figure 8 Schedule Task – Add Dialog Box

Starting a Backup Manually for Immediate Execution
If you want to start a backup right away, run a backup manually.
To start a backup manually for immediate execution:
1.![]() Log into Cisco Vision Director as an administrator.
Log into Cisco Vision Director as an administrator.
2.![]() Click More > Manage Software.
Click More > Manage Software.
3.![]() Click the System Backup tab (Figure 9).
Click the System Backup tab (Figure 9).
4.![]() Click the + icon to start creating a backup. The backup begins immediately.
Click the + icon to start creating a backup. The backup begins immediately.
Figure 9 Generating a System Backup
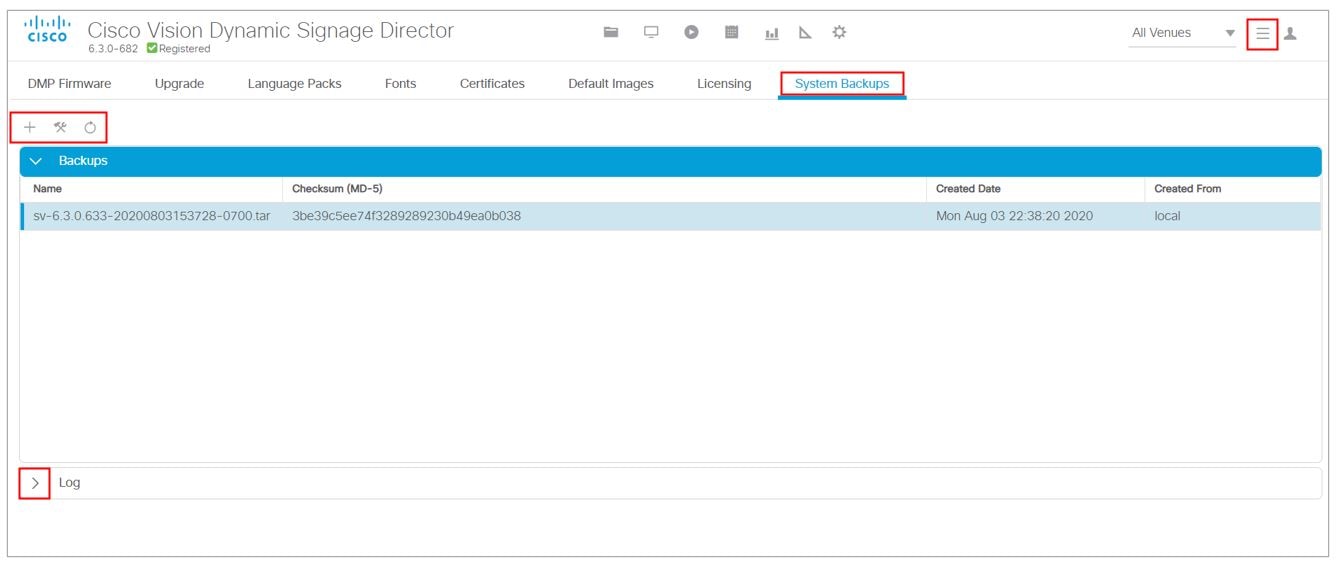
Use the Log arrow to see the log file information.
Note: The “success” message that appears means that the backup task started. It does not mean that the backup is completed.
Verifying Backup Completion
To verify backup completion, confirm that a backup file exists and also that no errors appear in the log file.
Verifying That a Backup File Exists
Note: Verifying the existence of a backup file only tells you that a backup was attempted. Check the file for errors.
To verify that a backup file exists:
1.![]() Log into the TUI. When the login prompt appears, enter the installer userid followed by the installer password at the password prompt.
Log into the TUI. When the login prompt appears, enter the installer userid followed by the installer password at the password prompt.
2.![]() Choose Cisco Vision Server Administration.
Choose Cisco Vision Server Administration.
Finding Backup Errors in the Log File
Note: The messages “Starting backup” and “Backup completed” always appear in the log, even if unsuccessful.
To find backup errors in the log file:
1.![]() Open the /opt/sv/servers/config/logs/sv_dev_debug.log file.
Open the /opt/sv/servers/config/logs/sv_dev_debug.log file.
Tip: You can access log files from the TUI, or by running a System State Report from the Cisco Vision Director Library (Main Menu). Click More > System State Report.
2.![]() In the sv_dev_debug.log file, find messages that include the string “com.cisco.sv.backup.”
In the sv_dev_debug.log file, find messages that include the string “com.cisco.sv.backup.”
These are the backup process messages.
3.![]() Find the “Starting backup” message.
Find the “Starting backup” message.
4.![]() After the “Starting backup” message (but before the “Backup completed” message), look for a “com.cisco.sv.backup” message that also includes “ERROR” in the string.
After the “Starting backup” message (but before the “Backup completed” message), look for a “com.cisco.sv.backup” message that also includes “ERROR” in the string.
If you find this error, the backup did not complete successfully.
Modifying the Number of Backup Files to Retain
To reduce the amount of disk storage required in your system, the default backup retention policy is to keep one backup file. This retention policy can be modified to retain 2, 5, 7, or 10 days backup files.
Caution: Check your overall disk utilization and the size of your backup content so that your system resources support the number of backup files you keep.
Note: Run this task on both the primary server and secondary backup server.
To modify the number of backup files to retain:
1.![]() Log into the TUI by doing the following:
Log into the TUI by doing the following:
a.![]() Use a directly connected console, or use an SSH client from a laptop computer that is connected to the Cisco Vision Director server network to run a secure login to the primary Cisco Vision Director server using the IP address for your server.
Use a directly connected console, or use an SSH client from a laptop computer that is connected to the Cisco Vision Director server network to run a secure login to the primary Cisco Vision Director server using the IP address for your server.
b.![]() When the login prompt appears, enter the installer userid followed by the installer password at the password prompt.
When the login prompt appears, enter the installer userid followed by the installer password at the password prompt.
2.![]() From the Main Menu, choose Cisco Vision Server Administration.
From the Main Menu, choose Cisco Vision Server Administration.
4.![]() Choose Backup/restore Files.
Choose Backup/restore Files.
A menu of policy options is displayed (Figure 10), where you can choose to retain 1 (the default), 2, 5, 7, or 10 backup files.
Figure 10 Backup Retention Policy Menu
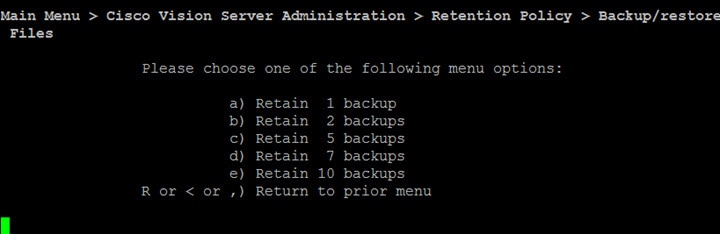
5.![]() Type the letter that corresponds to the number of days that you want to retain files and press Enter.
Type the letter that corresponds to the number of days that you want to retain files and press Enter.
6.![]() When the change of policy confirmation message displays, press any key to return to the Cisco Vision Server Administration menu.
When the change of policy confirmation message displays, press any key to return to the Cisco Vision Server Administration menu.
Figure 11 Confirmation of Policy Change

How to Restore a Cisco Vision Director Server
The Cisco Vision Director software automatically copies backup files between the primary and secondary servers and when the restore process starts, verifies the MD5 checksum.
If you need to failover to the secondary server and do a restore, follow the procedures in Configuring Failover Between Redundant Cisco Vision Director Servers.
Note: If you need to manually copy files between the servers, copy both the.tar and.chksum files. The restore process automatically uses both files to verify the MD5 signature.
This section includes the following tasks:
■![]() Starting a Restore Manually for Immediate Execution (optional)
Starting a Restore Manually for Immediate Execution (optional)
■![]() Restarting the Cisco Vision Director Software (required after restore run)
Restarting the Cisco Vision Director Software (required after restore run)
Starting a Restore Manually for Immediate Execution
To start a restore other than at the regularly scheduled time, the Cisco Vision Director software also allows you to run a restore from backup to begin immediately.
Caution: You cannot successfully run the restore process while an event script is running. In addition, if your venue was running any script when the backup took place, then those scripts will begin running after the restore.
To start a restore manually for immediate execution:
1.![]() Log in to Cisco Vision Director as an Administrator.
Log in to Cisco Vision Director as an Administrator.
2.![]() Click More > Manage Software.
Click More > Manage Software.
3.![]() Click the System Backups tab (Figure 12).
Click the System Backups tab (Figure 12).
4.![]() Click Restore. The Confirm Restore dialog box appears.
Click Restore. The Confirm Restore dialog box appears.
Figure 12 Restore the System from Backup
The system restore from backup process begins.
Or, if you prefer, you can still do the same process using TUI.
To start a restore manually for immediate execution:
1.![]() Login to the TUI by doing the following:
Login to the TUI by doing the following:
a.![]() Use a directly connected console, or use an SSH client from a laptop computer that is connected to the Cisco Vision Director server network to run a secure login to the primary Cisco Vision Director server using the IP address for your server.
Use a directly connected console, or use an SSH client from a laptop computer that is connected to the Cisco Vision Director server network to run a secure login to the primary Cisco Vision Director server using the IP address for your server.
b.![]() When the login prompt appears, enter the installer userid followed by the installer password at the password prompt.
When the login prompt appears, enter the installer userid followed by the installer password at the password prompt.
2.![]() From the Main Menu, choose Cisco Vision Server Administration.
From the Main Menu, choose Cisco Vision Server Administration.
Restarting the Cisco Vision Director Software
After you perform any restore on a Cisco Vision Director server, you must restart the Cisco Vision Director software to resume normal operation of the services.
To restart the Cisco Vision Director software:
1.![]() On the primary server, log into the TUI by doing the following:
On the primary server, log into the TUI by doing the following:
a.![]() Use a directly connected console, or use an SSH client from a laptop computer that is connected to the Cisco Vision Director server network to run a secure login to the primary Cisco Vision Director server using the IP address for your server.
Use a directly connected console, or use an SSH client from a laptop computer that is connected to the Cisco Vision Director server network to run a secure login to the primary Cisco Vision Director server using the IP address for your server.
b.![]() When the login prompt appears, enter the installer userid followed by the installer password at the password prompt.
When the login prompt appears, enter the installer userid followed by the installer password at the password prompt.
2.![]() From the Main Menu, choose Cisco Vision Server Administration.
From the Main Menu, choose Cisco Vision Server Administration.
3.![]() Choose Restart Dynamic Signage Director Software.
Choose Restart Dynamic Signage Director Software.
 Feedback