- Contents
- Prerequisites for Backing Up and Restoring CiscoStadiumVision Director Servers
- Restrictions for Backing Up and Restoring Cisco StadiumVision Director Servers
- Information About Backing Up and Restoring Cisco StadiumVision Director Servers
- How to Backup a Cisco StadiumVision Director Server
- How to Restore a Cisco StadiumVision Director Server
Backing Up and Restoring Cisco StadiumVision Director Servers
First Published: April 21, 2014
This module describes how to setup and schedule backups between a primary and secondary server, and restore data between them.
Contents
- Prerequisites for Backing Up and Restoring Cisco StadiumVision Director Servers
- Restrictions for Backing Up and Restoring Cisco StadiumVision Director Servers
- Information About Backing Up and Restoring Cisco StadiumVision Director Servers
- How to Backup a Cisco StadiumVision Director Server
- How to Restore a Cisco StadiumVision Director Server
Prerequisites for Backing Up and Restoring Cisco StadiumVision Director Servers
Before you backup or restore Cisco StadiumVision Director servers, be sure that the following requirements are met:
For more information, see the “Cisco StadiumVision Director Server Text Utility Interface” module of the Cisco StadiumVision Director Server Administration Guide .
- You have a directly-connected console or an SSH client to access the primary active and secondary servers.
- You have the IP addresses of the active and secondary servers.
- You know the installer account credentials on the Cisco StadiumVision Director active and secondary servers.
- The IP address of the secondary server must be reachable on the network from the active server or the TUI backup configuration will fail.
- You have determined an appropriate time on the network to schedule automatic backups and restores.
Restrictions for Backing Up and Restoring Cisco StadiumVision Director Servers
Consider the following restrictions when backing up and restoring Cisco StadiumVision Director servers:

- If you have to fail over to your secondary Cisco StadiumVision Director server due to a problem on the primary, then your original backup configuration will be invalid.
Be aware that your scheduled backup process cannot fully operate by automatically transferring a copy of the backup to the secondary server until you use the TUI automatic backup configuration again to reset the backup configuration between the primary and secondary servers. However, a backup will continue to be saved on the primary server.
- When you fail back to the original primary server and are now using the original IP addressing configuration, you still will need to use the TUI automatic backup configuration again so that the backup directory can be re-established on the secondary server.
- A restore cannot run while an event script is running.
Information About Backing Up and Restoring Cisco StadiumVision Director Servers
This section includes the following topics:
- Backup Environment
- What Cisco StadiumVision Director Data is Backed Up
- Disk Storage and Maintenance
- Restore Environment
Backup Environment
While you can run a backup for a network environment where there is only a single Cisco StadiumVision Director server, the recommended environment that is described in this document is a redundant environment for either Platform 2 or Platform 3 servers or a virtualized environment. In a redundant environment, you are running Cisco StadiumVision Director on a primary server, with a secondary server connected to the same subnet where the backup data from the primary server is saved.
What Cisco StadiumVision Director Data is Backed Up
There are several areas of Cisco StadiumVision Director that need to be backed up. The backup process backs up the following areas of the Cisco StadiumVision Director server:
- Uploaded fonts
- Cisco StadiumVision Director Content Management System (CMS)
- Cisco StadiumVision Director database
- Cisco StadiumVision Director system configuration files
- Content Integration data
- Dynamic Menu Board data (including GAR files)
- Proof of play report data in the /var/sv/pofp/data directory
Disk Storage and Maintenance
Cisco StadiumVision Director automatically deletes backup files that are older than 10 days. However, you should continue to monitor disk space because this removal is based on a time period and is not run based on any automatic monitoring of disk space.
For systems with high volumes of video content, you might change the backup retention period to a smaller period of time to conserve disk space. For more information, see the “Modifying the Number of Days for Backup File Retention” section.
The Management Dashboard has a gauge for % Disk Utilization, or you can use the Disk Monitoring option from the TUI Troubleshooting menu to get file system usage (Figure 1).
Figure 1 TUI File System Disk Usage


Note If you have the Director Server enabled for monitoring (recommended), you can look for any alerts on the Director Server in the Service Alerts window in the Management Dashboard. To view the alert details, you can go to Event Viewer > All Events > System.
For a disk space alert based on the disk critical threshold set for the server, look for “DEGRADED” in the Sub Type column for the “Service Monitor” in the Source column.
Restore Environment
As with backups, you can schedule the restore process or run it manually. When the manual restore screen is displayed, it lists backups from both the backup and restore directories, concatenated together. This allows you to run a manual restore on either the primary or the secondary server. An automated restore always uses the most recent backup file in the restore directory.
Also, the schedule of tasks to run in the primary database and the secondary database will be different, due to the existence of the backup and restore tasks. Therefore, the schedule itself is not automatically restored.
How to Backup a Cisco StadiumVision Director Server
This section includes the following tasks:
- Enabling the Backup Account on the Secondary Server (required)
- Setting Up the Primary Server for Automatic Backup and Restore (required)
- Scheduling a Regular Backup (required)
- Starting a Backup Manually for Immediate Execution (optional)
- Verifying Backup Completion (optional)
- Modifying the Number of Days for Backup File Retention (optional)
Enabling the Backup Account on the Secondary Server
Before you set up the primary Cisco StadiumVision Director server for automatic backup and restore with a redundant secondary server, you need to enable the backup account on the secondary server using the TUI.
For more information about using the TUI, see the “Cisco StadiumVision Director Server Text Utility Interface” module of the Cisco StadiumVision Director Server Administration Guide .
To enable the backup account on the secondary server, complete the following steps:
Step 1![]() On the secondary server, log into the TUI by doing the following:
On the secondary server, log into the TUI by doing the following:
a.![]() Use a directly connected console, or use an SSH client from a laptop computer that is connected to the Cisco StadiumVision Server network to run a secure login to the secondary Cisco StadiumVision Director server using the IP address for your server.
Use a directly connected console, or use an SSH client from a laptop computer that is connected to the Cisco StadiumVision Server network to run a secure login to the secondary Cisco StadiumVision Director server using the IP address for your server.
b.![]() When the login prompt appears, enter the
installer
userid followed by the installer password at the password prompt.
When the login prompt appears, enter the
installer
userid followed by the installer password at the password prompt.
Step 2![]() From the Main Menu, go to the
System
From the Main Menu, go to the
System![]() Accounts
>
Enable/Disable Backup User
menu (Figure 2).
Accounts
>
Enable/Disable Backup User
menu (Figure 2).
Figure 2 Enable/Disable Backup User Menu
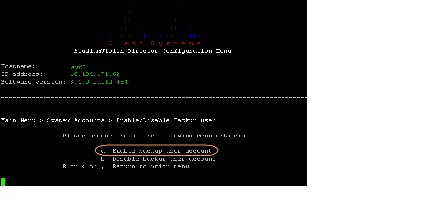
Step 3![]() Select
Enable backup user account
.
Select
Enable backup user account
.

Tip To navigate through the TUI menus you must type the character that corresponds to the menu area where you want to go (a, b, c, and so on) and press Enter.
To return to other menus, you must back out of the hierarchy of menus using one of the indicated keys to return you to prior menus.
When successfully created, the following messages are displayed:
Step 4![]() Press any key to return to the Enable/Disable Backup user menu.
Press any key to return to the Enable/Disable Backup user menu.
Step 5![]() Continue to return to the Main Menu and exit the TUI.
Continue to return to the Main Menu and exit the TUI.
Setting Up the Primary Server for Automatic Backup and Restore
The configuration of the backup accounts and directories between the primary and backup server is automated using a TUI menu option. You need to use the TUI to setup the Cisco StadiumVision Server environment to be able to run the backup and restore processes.
Note The TUI is only used to configure the backup environment. You need to use the Management Dashboard to schedule or run any manual backups. For more information, see the “Scheduling a Regular Backup” section and “Starting a Backup Manually for Immediate Execution” section.
To set up the primary server for automatic backup and restore, complete the following steps:
Step 1![]() On the primary server, log into the TUI by doing the following:
On the primary server, log into the TUI by doing the following:
a.![]() Use a directly connected console, or use an SSH client from a laptop computer that is connected to the Cisco StadiumVision Server network to run a secure login to the primary Cisco StadiumVision Director server using the IP address for your server.
Use a directly connected console, or use an SSH client from a laptop computer that is connected to the Cisco StadiumVision Server network to run a secure login to the primary Cisco StadiumVision Director server using the IP address for your server.
b.![]() When the login prompt appears, enter the
installer
userid followed by the installer password at the password prompt.
When the login prompt appears, enter the
installer
userid followed by the installer password at the password prompt.
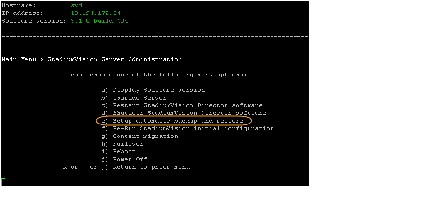
Step 2![]() From the Main Menu, go to
StadiumVision Server Administration
>
Setup automatic backup and restore
.
From the Main Menu, go to
StadiumVision Server Administration
>
Setup automatic backup and restore
.
Figure 3 Setup Automatic Backup and Restore Menu Option
Step 3![]() At the prompt type the IP address or hostname of your secondary server as shown in the example in Figure 4:
At the prompt type the IP address or hostname of your secondary server as shown in the example in Figure 4:
Figure 4 Secondary Server IP Address Configuration
Step 4![]() At the prompt, type the password for the installer account on the secondary backup server.
At the prompt, type the password for the installer account on the secondary backup server.
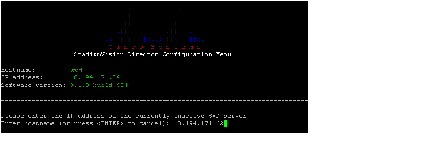
Step 5![]() When accepted, the system generates the RSA keys and the public key is copied to the secondary server. Confirm that the keys are created without errors as shown in (Figure 5):
When accepted, the system generates the RSA keys and the public key is copied to the secondary server. Confirm that the keys are created without errors as shown in (Figure 5):
Figure 5 Generation of RSA Keys

Step 6![]() Wait until the “Press any key” message appears (there can be a short delay before it is displayed).
Wait until the “Press any key” message appears (there can be a short delay before it is displayed).
Step 7![]() Then, press any key to return to the StadiumVision Server Administration menu.
Then, press any key to return to the StadiumVision Server Administration menu.
Step 8![]() Continue to return to the Main Menu and exit the TUI.
Continue to return to the Main Menu and exit the TUI.
Scheduling a Regular Backup
After you have configured the servers to support the backup process, you need to schedule backups using the Management Dashboard in the Cisco StadiumVision Director software.
Note It is recommended that you schedule backups to occur while the Cisco StadiumVision Director servers are not actively running scripts or performing other event processing.
To configure a backup to run on a regular schedule, complete the following steps:
Step 1![]() Log into the primary Cisco StadiumVision Director server as an administrator.
Log into the primary Cisco StadiumVision Director server as an administrator.
Step 2![]() From the Cisco StadiumVision Director main menu, click
Management Dashboard
.
From the Cisco StadiumVision Director main menu, click
Management Dashboard
.
The Cisco StadiumVision Management Dashboard opens in a new window.
Step 3![]() Select
Tools
>
Advanced
>
Scheduled Tasks
.
Select
Tools
>
Advanced
>
Scheduled Tasks
.
Step 4![]() Click
Add Row
and scroll to the new blank line.
Click
Add Row
and scroll to the new blank line.
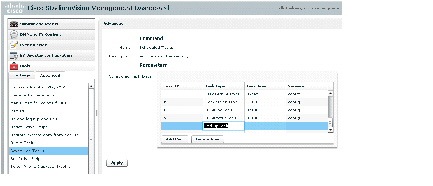
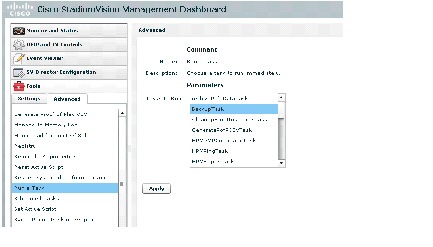
Step 5![]() Click in the Task Type column and type
BackupTask
(Figure 6).
Click in the Task Type column and type
BackupTask
(Figure 6).
Note Be sure to type the name of the task exactly as shown with upper and lowercase characters.
Figure 6 Adding a Backup Task to Run on a Regular Schedule
Step 6![]() Click in the Task Time column and specify the time (in 24:00 format) when you want the backup to run.
Click in the Task Time column and specify the time (in 24:00 format) when you want the backup to run.
Step 7![]() Click in the Servers column and type
config
.
Click in the Servers column and type
config
.
Starting a Backup Manually for Immediate Execution
If you want to start a backup other than at the regularly scheduled time, the Cisco StadiumVision Director software also allows you to run a backup process immediately.
To start a backup manually for immediate execution, complete the following steps:
Step 1![]() Log into Cisco StadiumVision Director as an administrator.
Log into Cisco StadiumVision Director as an administrator.
Step 2![]() From the Cisco StadiumVision Director main menu, click
Management Dashboard
.
From the Cisco StadiumVision Director main menu, click
Management Dashboard
.
The Cisco StadiumVision Management Dashboard is opened in a new window.
Step 3![]() Select
Tools
>
Advanced
>
Run a Task
.
Select
Tools
>
Advanced
>
Run a Task
.
Step 4![]() In the Tasks to Run box, select the
BackupTask
(Figure 7).
In the Tasks to Run box, select the
BackupTask
(Figure 7).
Figure 7 Running a Scheduled Backup Task Manually
The backup begins immediately.
Note The “success” message that appears means that the backup task has started. It does not mean that the backup has completed.
Verifying Backup Completion
You can go to the Management Dashboard > Tools > Advanced > Restore system data from backup and verify that backup files with dates and times appear.
Note Messages from the backup process include the string “com.cisco.sv.backup” and are stored in the /opt/sv/servers/config/logs/sv_dev_debug.log file. However, be aware that the messages “Starting backup” and “Backup completed” will always appear in the log regardless of success.
The “Backup completed” message does not necessarily mean that the backup was successful. If a log message appears before the “Backup completed” message (and after the “Starting backup” message) that includes the “com.cisco.sv.backup” string and also “ERROR,” then there is a problem.
Modifying the Number of Days for Backup File Retention
If your site maintains a large volume of video content, you might want to modify the number of days that backup files are retained to reduce the amount of disk storage required in your system. The default retention period is 10 days.
Note This task must be run on both the primary server and secondary backup server.
To modify the number of days for backup file retention, complete the following steps:
Step 1![]() Log into the TUI by doing the following:
Log into the TUI by doing the following:
a.![]() Use a directly connected console, or use an SSH client from a laptop computer that is connected to the Cisco StadiumVision Server network to run a secure login to the primary Cisco StadiumVision Director server using the IP address for your server.
Use a directly connected console, or use an SSH client from a laptop computer that is connected to the Cisco StadiumVision Server network to run a secure login to the primary Cisco StadiumVision Director server using the IP address for your server.
b.![]() When the login prompt appears, enter the
installer
userid followed by the installer password at the password prompt.
When the login prompt appears, enter the
installer
userid followed by the installer password at the password prompt.
Step 2![]() From the Main Menu, go to
StadiumVision Server Administration
>
Backup/restore Retention Policy
.
From the Main Menu, go to
StadiumVision Server Administration
>
Backup/restore Retention Policy
.
A menu of policy options is displayed (Figure 8), where you can choose to retain files for 1, 2, 5, 7, or 10 (the default) days.
Figure 8 Backup/restore Retention Policy Menu

Step 3![]() Type the letter that corresponds to the number of days that you want to retain files and press
Enter
.
Type the letter that corresponds to the number of days that you want to retain files and press
Enter
.
Step 4![]() When the change of policy confirmation message displays, press any key to return to the StadiumVision Server Administration menu.
When the change of policy confirmation message displays, press any key to return to the StadiumVision Server Administration menu.
Figure 9 Confirmation of Policy Change

Step 5![]() Continue to return to the Main Menu and exit the TUI.
Continue to return to the Main Menu and exit the TUI.
How to Restore a Cisco StadiumVision Director Server
The Cisco StadiumVision Director software automatically copies backup files between the primary and secondary servers and when the restore process starts, verifies the MD5 checksum.
If you need to failover to the secondary server and do a restore, follow the procedures in the Configuring Failover Between Redundant Cisco StadiumVision Director Servers.
Note If for some reason you need to manually copy files between the servers, be sure that you copy both the .tar and .chksum files because the restore process automatically uses both files to verify the MD5 signature.
This section includes the following tasks:
- Starting a Restore Manually for Immediate Execution (optional)
- Restarting the Cisco StadiumVision Director Software (required after restore run)
Starting a Restore Manually for Immediate Execution
If you want to start a restore other than at the regularly scheduled time, the Cisco StadiumVision Director software also allows you to run a restore from backup to begin immediately.
To start a restore manually for immediate execution, complete the following steps:
Step 1![]() Log into Cisco StadiumVision Director as an administrator.
Log into Cisco StadiumVision Director as an administrator.
Step 2![]() From the Cisco StadiumVision Director main menu, click
Management Dashboard
.
From the Cisco StadiumVision Director main menu, click
Management Dashboard
.
The Cisco StadiumVision Management Dashboard is opened in a new window.
Step 3![]() Select
Tools
>
Advanced
>
Restore system
Select
Tools
>
Advanced
>
Restore system![]() data from backup
.
data from backup
.
Step 4![]() For Components, select the
All components except Scheduled tasks
(Figure 10).
For Components, select the
All components except Scheduled tasks
(Figure 10).
Figure 10 Running a Restore Task Manually
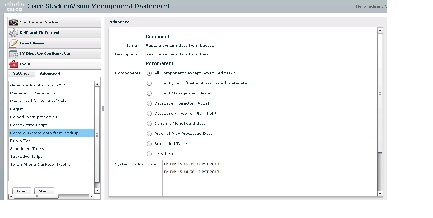
Step 5![]() (Optional) If you do not want to restore the latest backup (the default), then in the Sytem backup time box, select the date and time of the backup file that you want to restore (Figure 10).
(Optional) If you do not want to restore the latest backup (the default), then in the Sytem backup time box, select the date and time of the backup file that you want to restore (Figure 10).
The restore begins immediately.
Note If you need to also restore the scheduled tasks, you can rerun the Restore system data from backup and for Components, select Scheduled Tasks.
Restarting the Cisco StadiumVision Director Software
After you perform any restore on a Cisco StadiumVision Director server, you must restart the Cisco StadiumVision Director software to resume normal operation of the services.
To restart the Cisco StadiumVision Director software, complete the following steps:
Step 1![]() On the primary server, log into the TUI by doing the following:
On the primary server, log into the TUI by doing the following:
a.![]() Use a directly connected console, or use an SSH client from a laptop computer that is connected to the Cisco StadiumVision Server network to run a secure login to the primary Cisco StadiumVision Director server using the IP address for your server.
Use a directly connected console, or use an SSH client from a laptop computer that is connected to the Cisco StadiumVision Server network to run a secure login to the primary Cisco StadiumVision Director server using the IP address for your server.
b.![]() When the login prompt appears, enter the
installer
userid followed by the installer password at the password prompt.
When the login prompt appears, enter the
installer
userid followed by the installer password at the password prompt.
Step 2![]() From the Main Menu, go to
StadiumVision Server Administration
>
Restart StadiumVision Director Software
.
From the Main Menu, go to
StadiumVision Server Administration
>
Restart StadiumVision Director Software
.
Step 3![]() Return to the Main Menu and exit the TUI.
Return to the Main Menu and exit the TUI.
 Feedback