Configure SAML Group Policy for Secure Firewall and Entra ID
Available Languages
Introduction
This document describes how to assign group policies using MS Entra ID for SAML authentication for Cisco Secure Client on Cisco Secure Firewall.
Prerequisites
Requirements
Cisco recommends you have knowledge of these topics:
- Cisco Secure Client AnyConnect VPN
- Microsoft Entra ID Identity Provider (IdP) Configuration
- Cisco Firepower Threat Defense (FTD) or Cisco Secure Firewall ASA Remote Access VPN and Single Sign-On (SSO) Server Object Configuration
Components Used
The information in this guide is based on these hardware and software versions:
- FTD Version 7.6
- FMC Version 7.6
- MS Entra ID SAML IdP
The information in this document was created from the devices in a specific lab environment. All of the devices used in this document started with a cleared (default) configuration. If your network is live, ensure that you understand the potential impact of any command.
Background Information
SAML (Security Assertion Markup Language) is an XML-based framework for exchanging authentication and authorization data between security domains. It creates a circle of trust between the user, a Service Provider (SP), and an Identity Provider (IdP), which allows users to sign in once (SSO) for multiple services. SAML can be used for Remote Access VPN authentication for Cisco Secure Client connections to ASA and FTD VPN headends, where the ASA or FTD is the SP of the trust circle.
In this document, Microsoft Entra ID/Azure is used as the IdP. However, you can assign group policies using other IdPs as it is based on standard attributes that can be sent in the SAML assertion.

Note: Be aware that each user must only belong to one User Group on MS Entra ID, as multiple SAML attributes being sent to the ASA or FTD can cause issues with the group policy assignment as detailed in Cisco bug ID CSCwm33613.
Configure
FMC SAML Configuration
1. On the FMC, navigate to Objects > Object Management > AAA Server > Single Sign-on Server. The Entity ID, SSO URL, Logout URL, and Identity Provider certificate are obtained from the IdP, see Step 6 in the Microsoft Entra ID section. The Base URL and Service Provider certificate are specific to the FTD the configuration is added to.
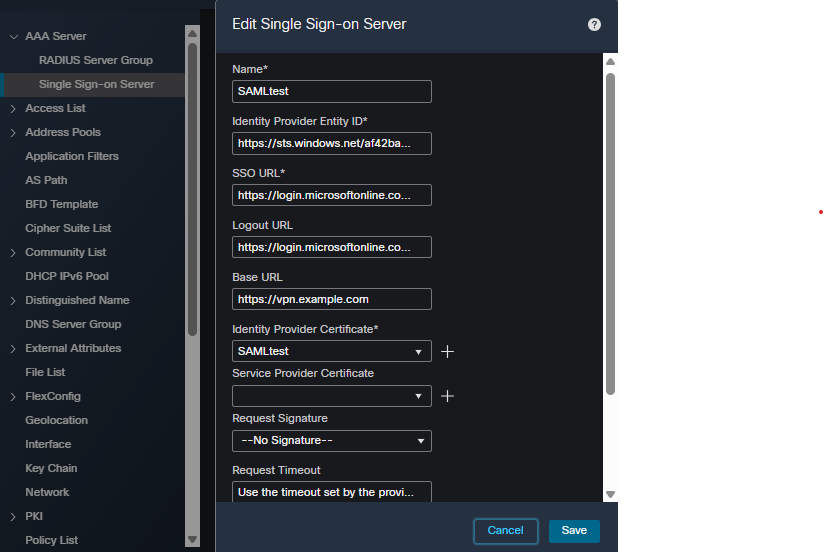 FMC SSO Object Configuration
FMC RAVPN Tunnel Group Configuration
1. On the FMC navigate to Devices > VPN > Remote Access > Connection Profile and select, or create, the VPN policy for the FTD you are configuring. Once selected, create a connection profile similar to this:
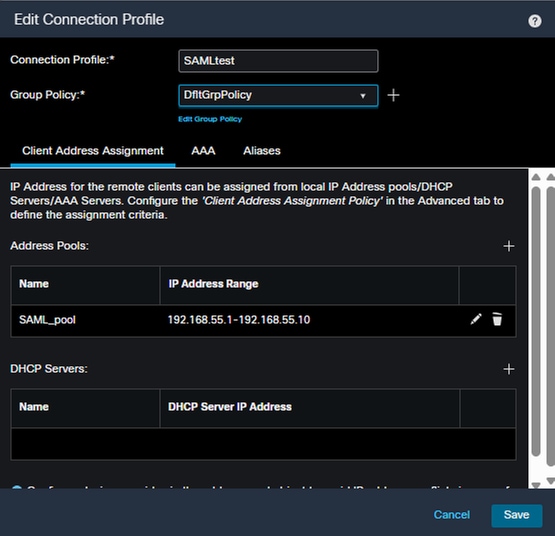 FMC Connection Profile Address Assignment
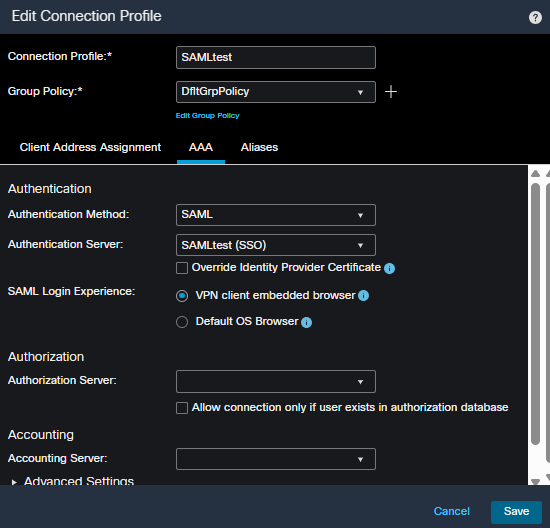 FMC Connection Profile AAA configuration
FMC RAVPN Group Policy Configuration
1. You must create a group policy with the required options for each user group on Microsoft Entra ID and add to the RAVPN policy for the FTD you are configuring.
2. Navigate to Devices > VPN > Remote Access > Advanced and select Group Policies from the left-hand side. Then click the + in the upper right to add a group policy.
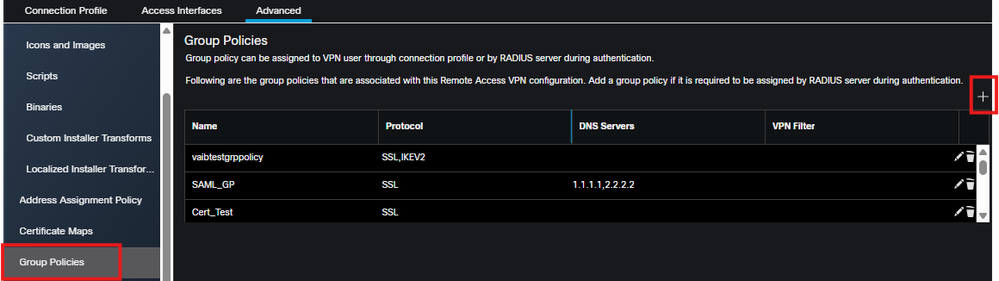 FMC add group policy
3. Click the + in the pop-up to view the dialog and create a new Group Policy. Fill in the required options and Save.
Note: If you have already created the required group policy, you can skip this step and continue with Step 4.
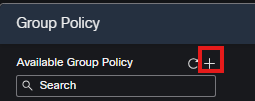 Create new group policy
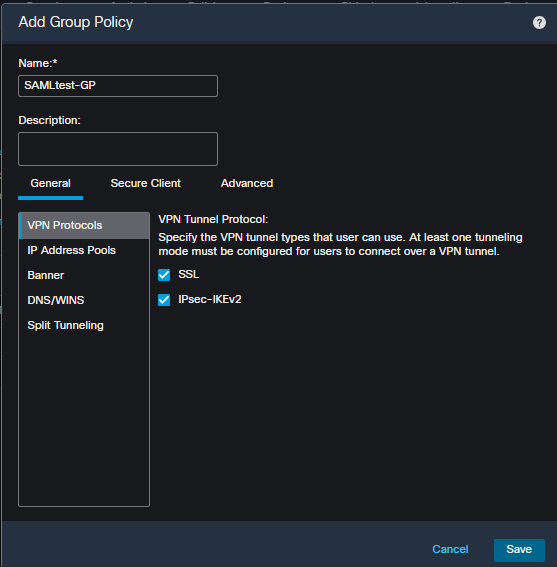 Group Policy options
4. Select the newly created group policy in the list on the left, and click the Add button, then click OK to save the list.
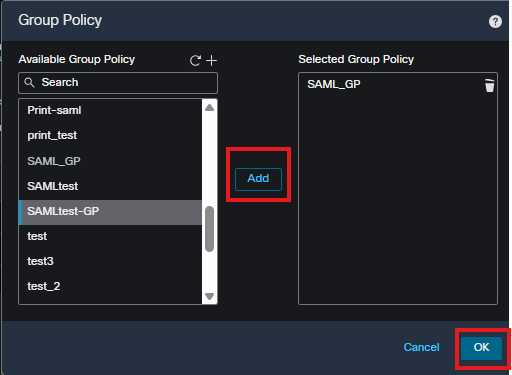 add group policy
FTD Metadata
1. Once the configuration has been deployed to the FTD, navigate to the FTD CLI and run the show saml metadata <tunnel group name> command and collect the FTD Entity ID and ACS URL.
Note: The certificate in the metadata was truncated for brevity.
FTD# show saml metadata SAMLtest
SP Metadata
-----------
<?xml version="1.0" encoding="UTF-8" standalone="yes"?>
<EntityDescriptor entityID="https://vpn.example.net/saml/sp/metadata/SAMLtest" xmlns="urn:oasis:names:tc:SAML:2.0:metadata">
<SPSSODescriptor AuthnRequestsSigned="false" WantAssertionsSigned="true" protocolSupportEnumeration="urn:oasis:names:tc:SAML:2.0:protocol">
<KeyDescriptor use="signing">
<ds:KeyInfo xmlns:ds="http://www.w3.org/2000/09/xmldsig#">
<ds:X509Data>
<ds:X509Certificate>
MIIFWzCCBEOgAwIBAgITRwAAAAgZ9Nmfv5mpJQAAAAAACDANBgkqhkiG9w0BAQsF
ADBJMRMwEQYKCZImiZPyLGQBGRYDY29tMRYwFAYKCZImiZPyLGQBGRYGcnRwdnBu
MRowGAYDVQQDExFydHB2cG4tV0lOQVVUSC1DQTAeFw0yNTAzMjUxNzU5NDZaFw0y
NzAzMjUxNzU5NDZaMDAxDzANBgNVBAoTBlJUUFZQTjEdMBsGA1UEAxMUcnRwdnBu
LWZ0ZC5jaXNjby5jb20wggEiMA0GCSqGSIb3DQEBAQUAA4IBDwAwggEKAoIBAQC5
5B0tH9RIjvG0MxhpDT3/BpDEFfTcVE2w2fxu5m8gZFTeeezyF5B93rWx+N26V8JE
sB5I1KLTGRj8b9TK6L357cdbgr692Wl952TLFB3XC43gpe0fnN3+Uas/HJ3IudsF
N+QPC9FO4LE88attuGuVMquV+10DRPA06a6QNwkehB0Un7XzTNepJ02JQtxdNR2t

</ds:X509Certificate>
</ds:X509Data>
</ds:KeyInfo>
</KeyDescriptor>
<AssertionConsumerService index="0" isDefault="true" Binding="urn:oasis:names:tc:SAML:2.0:bindings:HTTP-POST" Location="https://vpn.example.net/+CSCOE+/saml/sp/acs?tgname=SAMLtest" />
<SingleLogoutService Binding="urn:oasis:names:tc:SAML:2.0:bindings:HTTP-Redirect" Location="https://vpn.example.net/+CSCOE+/saml/sp/logout"/><SingleLogoutService Binding="urn:oasis:names:tc:SAML:2.0:bindings:HTTP-POST" Location="https://vpn.example.net/+CSCOE+/saml/sp/logout"/></SPSSODescriptor>
</EntityDescriptor>
Microsoft Entra ID
1. On the Microsoft Azure Portal, select Microsoft Entra ID from the menu on the left.
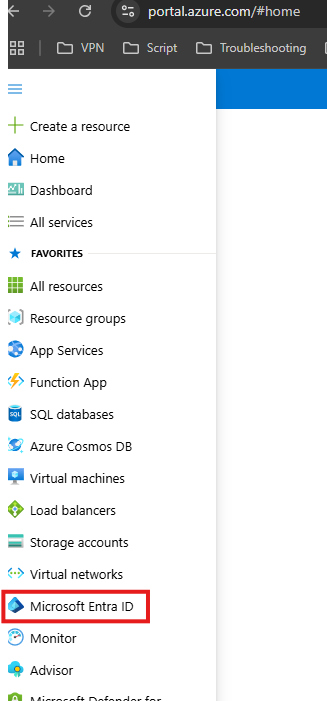 Microsoft Entra ID
2. Select Enterprise Applications.
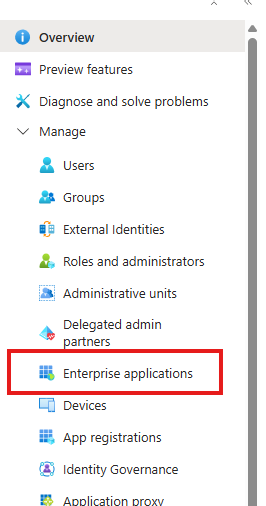 Enterprise Applications
3. Select New Application.
Note: If there is an Enterprise Application already configured for the FTD RAVPN, skip the next steps and continue on Step 7.
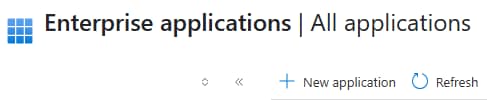 MS Entra ID Enterprise Application
4. Select Cisco Secure Firewall - Secure Client (formerly AnyConnect) Authentication under Featured Applications. Give the application a name and select Create.
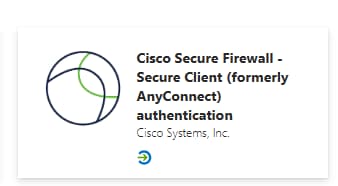 MS Entra ID Cisco Secure Firewall Secure Client (formerly AnyConnect) authentication application
5. Once in the application, select Users and Groups and assign the required user or group names to the application.
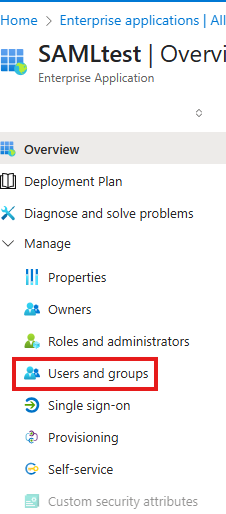 Users and Groups
6. Select Single Sign-On > SAML and retrieve the Login URL, Microsoft Entra Identifier, and Logout URL for the FMC SAML Configuration section of this guide.
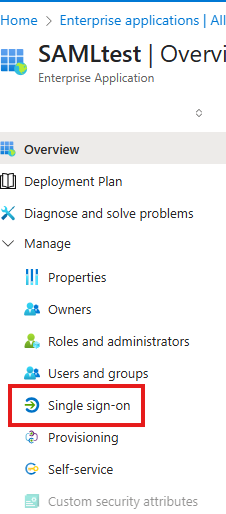 Single Sign-on
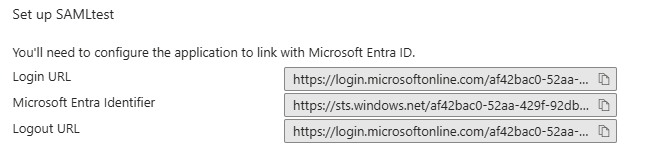 IdP URLs
7. Configure the Basic SAML Configuration with the Identifier (Entity ID) and Reply (ACS) URL retrieved from the FTD metadata and Save.
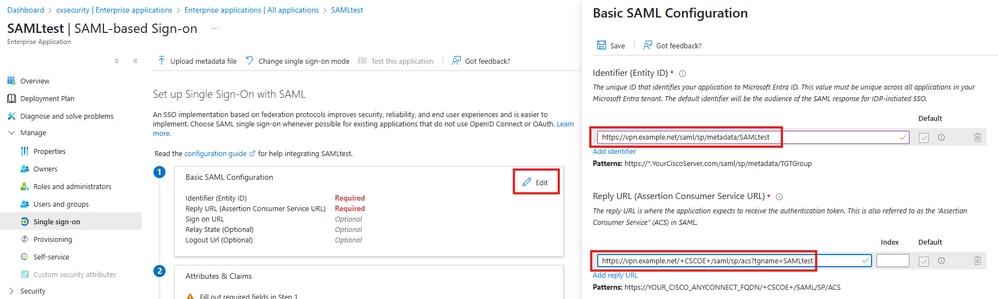 Basic SAML Configuration
8. Select Edit for Attribute & Claims and click Add New Claim.
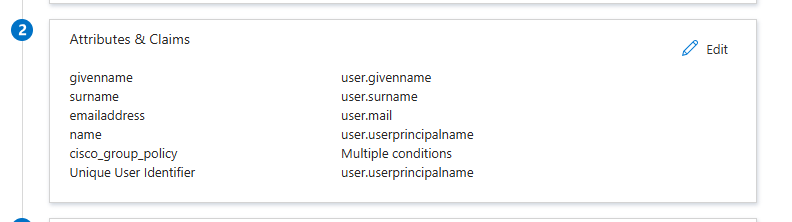 Attributes & Claims
9. The new claim must have a name of cisco_group_policy.
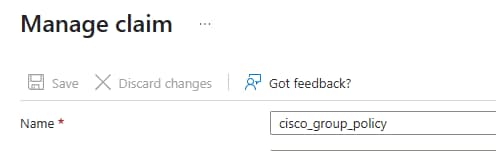 Manage Claim
10. Expand the section for Claim conditions. Select the User type and Scoped Groups, then under Source, choose Attribute and add the correct group policy name from the FTD configuration in the Value drown-down menu and click Save.
Note: The custom group policy name from the FTD used in this example is SAMLtest-GP, which was created in the FMC RAVPN Group Policy Configuration section of this guide. This value must be replaced with the group policy name from the FTD that corresponds to each user group on the IdP.
 MS Entra ID claim condition
Verify
FTD
To verify the desired group-policy, validate the output by running the show vpn-sessiondb anyconnect command:
FTD# show vpn-sessiondb anyconnect

Session Type: AnyConnect

Username : RTPVPNtest
Index : 7110
Assigned IP : 192.168.55.3 Public IP : 10.26.162.189
Protocol : AnyConnect-Parent SSL-Tunnel DTLS-Tunnel
License : AnyConnect Premium
Encryption : AnyConnect-Parent: (1)none SSL-Tunnel: (1)AES-GCM-256 DTLS-Tunnel: (1)AES256
Hashing : AnyConnect-Parent: (1)none SSL-Tunnel: (1)SHA384 DTLS-Tunnel: (1)SHA256
Bytes Tx : 105817 Bytes Rx : 63694
Group Policy : SAMLtest-GP Tunnel Group : SAMLtest
Login Time : 16:54:17 UTC Fri May 9 2025
Duration : 0h:11m:19s
Inactivity : 0h:00m:00s
VLAN Mapping : N/A VLAN : none
Audt Sess ID : ac127ca101bc6000681e3339
Security Grp : none Tunnel Zone : 0
To verify IdP is sending the correct claim, retrieve the output by running the debug webvpn saml 255 command while connecting to the VPN. Analyze the assertion output in the debugs and compare the attribute section to what is configured on the IdP.
<Attribute Name="cisco_group_policy">
<AttributeValue>SAMLtest-GP</AttributeValue>
</Attribute>
Troubleshoot
firepower# show run webvpn
firepower# show run tunnel-group
firepower# show crypto ca certificate
firepower# debug webvpn saml 255
firepower# debug webvpn 255
firepower# debug aaa authorization
Related Information
Revision History
| Revision | Publish Date | Comments |
|---|---|---|
2.0 |
01-Sep-2026
|
Updated title, introduction, spelling/grammar, inserted horizontal lines to separate sections for readability, fixed CCW alerts, and alt text. |
1.0 |
04-Aug-2025
|
Initial Release |

 Feedback
Contact Cisco
- Open a Support Case

- (Requires a Cisco Service Contract)