Non-Disruptive SAN Migration: From a Heterogeneous Environment to a SAN Based on Cisco MDS 9000 Family Switch Architecture
Available Languages
Bias-Free Language
The documentation set for this product strives to use bias-free language. For the purposes of this documentation set, bias-free is defined as language that does not imply discrimination based on age, disability, gender, racial identity, ethnic identity, sexual orientation, socioeconomic status, and intersectionality. Exceptions may be present in the documentation due to language that is hardcoded in the user interfaces of the product software, language used based on RFP documentation, or language that is used by a referenced third-party product. Learn more about how Cisco is using Inclusive Language.
Chassis Power, Cooling, and Airflow
Migration Tool – Cisco Zone Migrator
Operate and Optimize: A Continuous Cycle
Limitations, Precautions, and Verifications
The Cisco MDS 9000 Family Advantage
Cisco MDS 9700 Series Multilayer Directors
Cisco MDS 9396V 64-Gbps 96-Port Fabric Fibre Channel Switch
Cisco MDS 9148V 64-Gbps 48-Port Fabric Fibre Channel Switch
Cisco MDS 9124V 64-Gbps 24-Port Fabric Fibre Channel Switch
Cisco MDS 9396T 32-Gbps 96-Port Fabric Fibre Channel Switch
Cisco MDS 9148T 32-Gbps 48-Port Fibre Channel Switch
Cisco MDS 9132T 32-Gbps 32-Port Fibre Channel Switch
Cisco MDS 9396S 16G Multilayer Fabric Switch
Cisco MDS 9148S 16G Multilayer Fabric Switch
Cisco MDS 9250i Multiservice Fabric Switch
Cisco MDS 9220i Multiservice Fabric Switch
Virtual Fabric, LSAN, and VSAN
Inter-VSAN Routing and Virtual Fabric Routing
Fabric Shortest Path First and Brocade Dynamic Load Sharing
Inter-Switch Link and Inter-Chassis Link
Zone-Set Database and its Propagation
Today’s SAN administrators are faced with the need for more storage capacity and speed. They require high performance and redundant SAN networks that can both meet their current demands and scale for growth in the future. To accommodate these new requirements, SAN administrators often need to migrate or upgrade from their existing storage networks.
Cisco® MDS 9000 Family SAN switches are recognized across the data center industry for their reliability, flexibility, performance, and investment protection. The Cisco MDS 9000 Family portfolio includes the Cisco MDS 9700 Series Multilayer Directors, the multiprotocol Cisco MDS 9200 Series Multiservice Switches, and the fixed form-factor Cisco MDS 9300 and 9100 Multilayer Fabric Switches. These switches provide flexibility, visibility, redundancy, high availability, and high performance at the core and edge levels, with room for future growth.
The 32G Fibre Channel family switches and modules also provide complete visibility across the SAN, using SAN Analytics technology. SAN Analytics is a vendor-agnostic feature that can provide deep analytics for any flows, at any speed, for any vendor to customer. To take advantage of some of these futuristic technology features, customers often must go through cycles of migrating storage network switching from one vendor to Cisco MDS. The SAN migration can be relatively easy and painless if performed through planning, design, and execution. This document helps you evaluate appropriate options for SAN conversion from third-party solutions to the Cisco MDS 9000 series-based SAN switching family.
This document provides an overview of SAN technology terms, various features, interoperability requirements, and licensing, along with other verification checks to consider when migrating to Cisco MDS 9000 Family switches. This document also discusses some of the key design parameters and best practices to help guide the migration process.
When migrating to a Cisco MDS 9000 Family–based SAN, the main migration method is: rip and replace. The choice of migration method is determined by several criteria, including risk-mitigation needs, migration timeline, connectivity requirements, overall fabric capacity during the migration process, and whether you want a single-vendor or mixed-vendor operation.
As the name suggests, with this approach you simply replace fabric-wide third-party switches with preconfigured Cisco MDS 9000 Family switches. In almost all installations of SAN, there are always dual fabrics. Performing one fabric upgrade at a time means that, due to the availability of the second fabric, this will be nondisruptive.
Migrating or upgrading a SAN from one vendor to the Cisco MDS 9000 Family product line can be relatively easy if proper guidelines are followed. We have included explanations of some of these technical terms at the end of the paper, in the Appendix. For ease of migration, the migration process is divided into steps, narrowing the change window required, focusing the tasks, and helping mitigate risk and ease deployment. These are the main steps:
● Prepare: Analyze the current storage infrastructure, business requirements, and risks. Identify critical servers, storage subsystems, and applications. Prepare a rollback procedure in case rollback is required. Prepare or update the SAN and storage diagram to meet new requirements. Prepare all device configurations (zone conversion, VSAN configuration, etc.) in advance and have them ready during the change window. Depending on migration method used, most of the configuration can be completed ahead of time.
● Plan and design: Identify migration options and create a migration strategy. Identify any new additions and future requirements for the SAN fabric at this stage. This step will require the SAN administrators to consider redundancy, flexibility, and future growth requirements to sustain this environment for the longer duration.
● Execution: Perform the actual migration by moving cables, connecting SFPs, and configuring switches and chassis and put the new Cisco MDS 9000 switches in production.
● Operate and optimize: After migration is complete, you can implement continuous monitoring and optimization to identify and mitigate risk and tune the infrastructure to accommodate new projects and applications as the need arises. White papers have been published detailing some of the best practices to operate and optimize Cisco MDS 9000 series–based SAN; they are listed on Cisco’s website at https://www.cisco.com/c/en/us/products/storage-networking/mds-9700-series-multilayer-directors/white-paper-listing.html.
◦ Monitoring and Alerting in Cisco MDS Fabric White Paper
◦ Cisco MDS 9000 Family Diagnostics, Error Recovery, Troubleshooting, and Serviceability Features
The better the design, in-depth planning, and preparation, the easier the final execution of the migration will be.
The process of SAN migration starts with preparation. This step helps you define, scale, and meet your migration goals.
● Inventory your network: Prepare a list of hosts, targets, and switches and their hardware, software, and firmware versions.
● Verify compatibility: Verify your inventory with the software- and hardware-compatibility matrix. Here is the interoperability matrix that Cisco maintains with some vendors: Cisco Data Center Interoperability Support Matrix. In the interoperability-matrix document, you will also find the vendors we support and have tested in our interoperability lab. The document includes links to other storage, server, and HBA vendors that you can reach out to for more details about their solutions.
● Upgrade components: You may need to upgrade some components to meet the requirements of the support matrices. Upgrading will reduce the likelihood that incompatible hardware or conflicts with existing software will delay the migration process. You then may need to upgrade the hardware and software on the list you prepared in the previous steps.
● Assess the SAN: Before starting the migration, collect current metrics and plan to collect future metrics for proper assessment. This step will help you avoid bottlenecks later in the migration process or in the immediate future. Statistics such as bandwidth requirements (based on existing and new needs) and projected growth for bandwidth, targets, hosts, etc., can help you gauge the right set of requirements.
● Validate applications: To set Service-Level Agreements (SLAs), application validation is essential. You need to consider current and expected future latency associated with growth. In addition, multipath connectivity is required for nondisruptive migration. If the multipath connectivity is broken, it may be disruptive for applications. Cisco Nexus Dashboard Fabric Controller (NDFC) for SAN can be used to perform a dual path host redundancy check.
As a best practice, it is also desirable to do some pretesting to validate hardware or software upgrades to test application-level connectivity between the fabrics along with the intended initiator-target pairs. When required, this testing should also be conducted on important features and functions for any site-to-site replication, data mobility, etc. However, exhaustive feature and function testing is not always practical because it may require dedicated test ports in the production fabric and storage subsystems, but such tasks, when they can be performed, boost confidence in the migration for the operation team.
The following information about the existing SAN network for each fabric will also help you define an appropriate migration plan:
● Total number of host and server ports
● Total number of storage (disk and tape) ports
● Total bandwidth requirements from the host edge
● Total bandwidth requirements from the storage edge
● Current oversubscription ratio from the host to storage
● Expected oversubscription ratio from the host to storage
● List of third-party fabric licenses in use
The planning and design phases involve both physical and architectural elements.
Physical planning includes identification of space, cooling, airflow direction, power, Power Distribution Unit (PDU), cabling, and cable rack requirements. Different chassis from different vendors have their own sets of requirements. More details about specific Cisco MDS 9000 Family chassis can be found in the individual data sheets. Some of the important hardware components that should be considered are discussed here.
Chassis Power, Cooling, and Airflow
For the new SAN switches, verify that you have the correct amount of AC and DC power for proper operation, correct power cord connectors, and PDUs along with Uninterruptible Power Supplies (UPSs) with the appropriate capacity. The Cisco site preparation checklist includes more information about power requirements in the technical specification sections of the respective hardware installation guides.
Cisco MDS 9700 Series Multilayer Directors support AC and DC power supplies in the same chassis. They also provide GRID level redundancy. Power planning for the chassis requires information about the total number of power supplies in the chassis, the type of power source (AC/DC), etc. to achieve GRID redundancy. The chassis’s cooling characteristics and the proper spacing needed for airflow are important for efficient operation of the chassis. For Cisco MDS 9000 Family switches, the hardware installation guide provides details about the height, width, and depth of the chassis.
The Cisco MDS 9700 directors have a front-to-back airflow direction, whereas any of the Cisco MDS 9000 Series 32G Multilayer Fabric Switch family can be in either direction (port-side intake or port-side exhaust airflow). Customer can select the type of airflow required during purchasing process. For more details about airflow direction, please see Table 1, below.
Table 1. Airflow direction for Cisco MDS 9000 Family switches
| Cisco chassis name |
Airflow direction support |
| Cisco MDS 9124V Multilayer Fabric Switch |
Bidirectional |
| Cisco MDS 9132T Multilayer Fabric Switch |
Bidirectional |
| Cisco MDS 9148S Multilayer Fabric Switch |
Port-side exhaust |
| Cisco MDS 9148T Multilayer Fabric Switch |
Bidirectional |
| Cisco MDS 9148V Multilayer Fabric Switch |
Bidirectional |
| Cisco MDS 9220i Multiservice Fabric Switch |
Port-side intake |
| Cisco MDS 9250i Multiservice Fabric Switch |
Port-side intake |
| Cisco MDS 9396S Multilayer Fabric Switch |
Bidirectional |
| Cisco MDS 9396T Multilayer Fabric Switch |
Bidirectional |
| Cisco MDS 9396V Multilayer Fabric Switch |
Bidirectional |
| Cisco MDS 9700 Multilayer Directors |
Port-side intake |
For more information, refer to the hardware installation guides.
Architectural planning includes all design-related details, including network topology, cable diagrams, cabling techniques, cable management, power-plug connections and positions, cabling mechanisms for different chassis, PDU placement, air conditioning, air circulation requirements, and any future requirements. Architectural planning requires more information and analysis than physical planning, including information about:
● Fibre Channel cable connections to the chassis (How are they stacked across the chassis and blade: vertically or horizontally?)
● Power cable connections to the chassis (Some chassis have front-end and some have back-end connections.)
● PDU connectors and types (high-voltage AC/DC, power cable connector types, etc.)
● Space for new hardware (form factors and rack unit size and depth)
● Cable-length specifications
● Air space required around the chassis for proper airflow
● Airflow direction of the new switches
● Placement of PDUs and power-cable connections for the chassis
● Console connections to the chassis
● Front-door placement and space required at the front of the chassis
● Space required for maintenance (for example, for pulling out the line card or replacing the fan tray in the Cisco MDS 9700 director chassis)
Before migrating from third-party SANs to Cisco SANs, it is important to obtain the correct license set for Cisco MDS 9000 Family switches. Most Cisco MDS 9000 Family software features are included in the base switch license, which is preinstalled on the switch. However, some features are logically grouped into add-on packages that must be licensed separately. Examples include the Cisco MDS 9000 Enterprise Package, Cisco MDS 9000 Mainframe Package, and Cisco Nexus Dashboard Fabric Controller (NDFC) for SAN Advanced Edition. For more details, please see following guides:
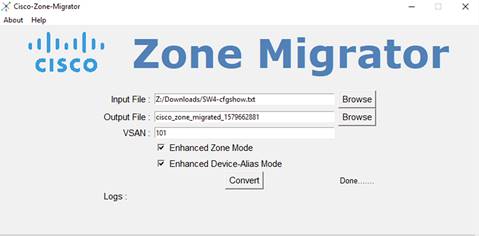
Migration Tool – Cisco Zone Migrator
To migrate a SAN from Brocade to a Cisco MDS 9000 Family SAN, Cisco has provided a small, Windows-based program to easily migrate the zoning configuration. This zone-migration tool is called Cisco Zone Migrator and can be downloaded from GitHub or the Cisco.com software download page.
GitHub link: https://github.com/CiscoMDS/ZoneMigratorTool
Cisco software download link: https://software.cisco.com/download/home/283453013/type/282088132/release/8.2.1
The Cisco MDS zone-migration tool is a tiny Windows program that helps to convert a non-Cisco configuration file to a Cisco NX-OS–compatible zoning configuration. The zip file contains a small Windows utility along with readme.txt file with additional instructions and information.
Here is the step-by-step process to convert a Brocade zoning configuration to a Cisco MDS NX-OS–compatible zoning configuration.
Step 1. Run “cfgshow” CLI command on principal (core) Brocade switch.
Sample “cfgshow” file:
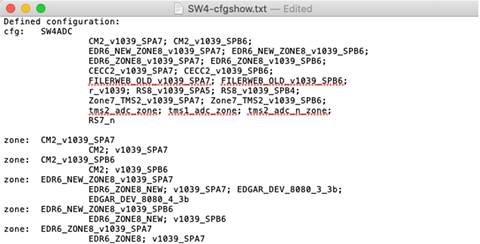
Step 2. Save output of “cfgshow” as a pure text file.
Step 3. Load the Zone Migrator tool that you downloaded from GitHub or Cisco’s download page.
Step 4. Point the Zone Migrator tool to the text file you saved in Step 2 (with Brocade “cfgshow” output).
Step 5. Within a few seconds, it will generate a Cisco NX-OS equivalent zoning configuration file.
A sample NX-OS equivalent converted configuration file with zoning configuration:
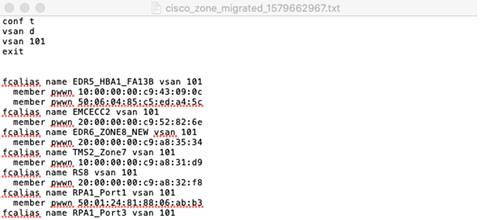 |
Step 6. Verify the zoning configuration. (You can also delete dead or extra or unwanted zones from this file.)
Step 7. Copy this zoning configuration on the Cisco MDS switch over CLI using the console or through an SSH/telnet connection through a management port.
Step 8. Give a final check to the configuration on the Cisco MDS switch.
The Cisco MDS switch is now ready to take over as a core SAN switch in the production network.
Important notes
● Cisco Zone Migrator is a Windows-based utility, supported only over Windows 10 or Windows 7, 64-bit version.
● The Windows workstation where you run the script should not have any pre-installed Python running on it. The program may give a runtime or library error if it finds any Python installation.
● Ensure that the Brocade fabric switch is running Brocade Fabric OS v7.x.x or later.
● Cisco Zone Migrator does not support domain-based or port-based zone conversion. If any zone member types are unknown in the Brocade configuration, please change them manually before taking the “cfgshow” output. If the tool finds any domain-based or port-based zoning configuration in the “cfgshow” output, it will create a log file with error messages for domain-based and port-based zone members.
● During the conversion process, you can select enhanced zone mode or enhanced device-alias mode or both. This will help reduce payload sizes as the zones are referenced.
SAN best-practices typically call for two fabrics for redundancy, referred to as Fabric A and Fabric B in this document. Several migration options are available, but the most preferred method is discussed here.
The rip-and-replace approach to migration is also called fabric-by-fabric replacement. The advantage of this option is that the migration process takes very little time to complete, and you avoid interoperability challenges while replacing third-party switches with Cisco MDS 9000 Family switches on a per-fabric basis.
With this option, Fabric A hardware will be replaced while Fabric B remains running, providing redundancy and reduced downtime. As a best practice, you should disable the host and target Host Bus Adapters (HBAs) connected to Fabric A prior to the migration, to avoid any impact on applications. After the Fabric A hardware is replaced and verified to be up and running, all host and target connections to Fabric A are reenabled. After verification that server-to-target operation is restored over Fabric A, you repeat the same process on Fabric B. The conversion of Fabric B can occur in the same change window or in a subsequent change window at a later date, depending on user requirements. The following figure shows the migration process.
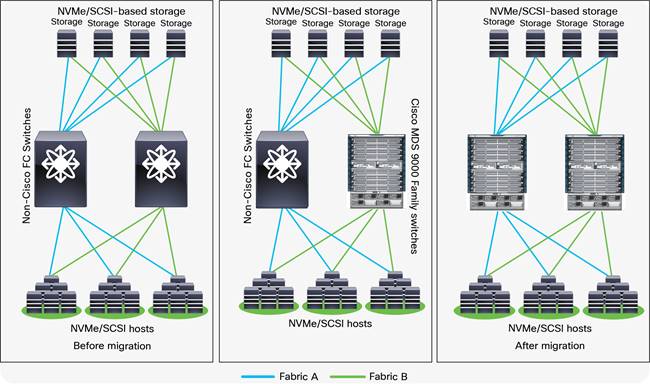
Rip-and-replace migration method overview
Migration Steps Using Migration Tool
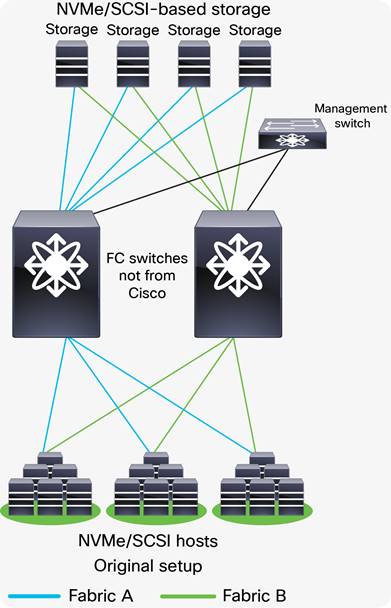
Original setup using FC switches not from Cisco
Step 1. Download and run Cisco Zone Migrator from links provided earlier in this document.
Step 2. Convert the non-Cisco zoning configuration to Cisco NX-OS equivalent zoning configuration.
Step 3. Clean up and verify the newly converted zoning configuration (remove dead or old or unnecessary) zones.
Step 4. Stage the new Cisco MDS switch in the staging area.
Step 5. Connect the management and console cables for initial switch configuration.
Step 6. Upgrade (or downgrade) the NX-OS software as needed.
Step 7. Copy the zoning configuration from the step above to the new switch(es).
Step 8. Prepare the switch(es) with the new configuration by configuring parameters that are unique to the switch, such as management IPs, software upgrades, SNMP alerts, call-home alerts, any nonzoning–related configurations, etc.
Step 9. If there are multiple Cisco MDS switches (directors and/or fabric switches) in the fabric, perform step 8, above, on all of them.
Step 10. Copy the converted zoning configuration from step 3, above, to the Principal (core) MDS switch in the fabric.
Step 11. Cisco MDS switch(es) are now ready to be included in a production network. Install them in the production racks and connect the hosts and targets to the MDS switches.
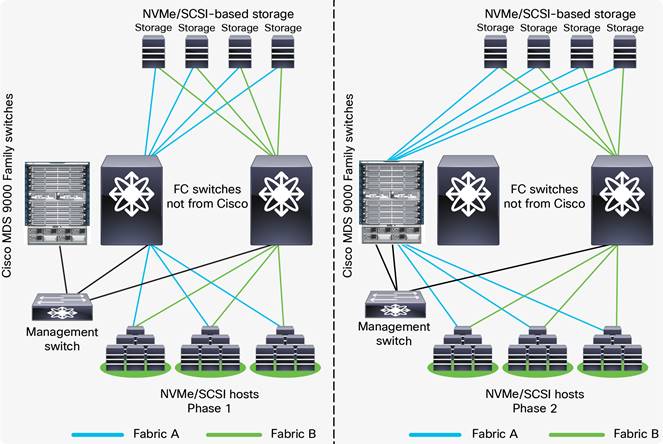
Migrating Fabric A to Cisco MDS 9000 Family switches
Step 12. The principal switch will autopopulate the zoning configuration across all of the other member fabric switches.
Step 13. Verify that the host and the storage ports can log into the new Cisco MDS switch(es) and that the ports are in the correct VSAN and part of the correct zone and zone set. Also verify application connectivity through both paths.
Step 14. Repeat the above steps to migrate the path(s) from the second fabric’s third-party switch(es) to the new Cisco MDS switch(es) once everything comes up in the new fabric.
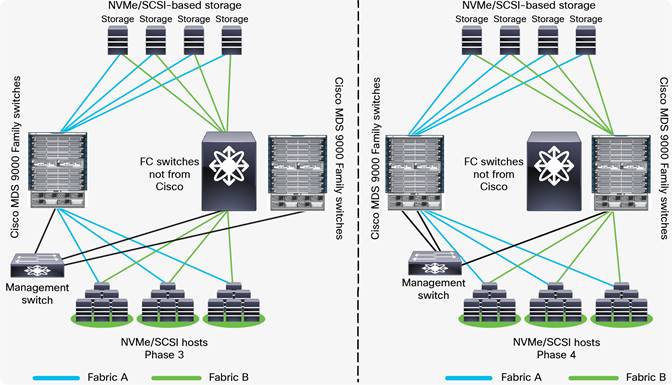
Migrating Fabric B to Cisco MDS 9000 Family switches
The final SAN configuration will look like the figure below:
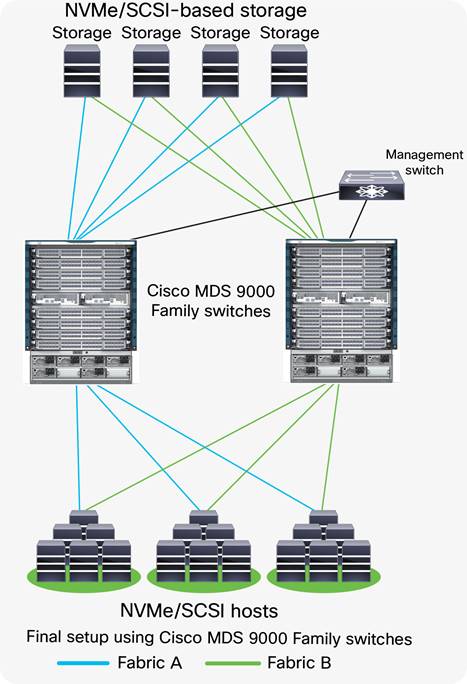
Final setup using Cisco MDS 9000 Family switches
Operate and Optimize: A Continuous Cycle
After the migration process is complete, perform the following actions to verify that the migration was successful:
● Run a Cisco NDFC SAN dual-host path redundancy check report to verify that all hosts and storage devices have redundant paths.
● Check application performance levels and servers for path redundancy to verify that defined and expected SLAs are being met.
● Back up new SAN configurations so that they are available in the event of a failure.
● Back up switch configurations regularly to protect against unexpected outages. You can run a script at a scheduled time to back up configurations to a Secure FTP (SFTP) server, or you can use Cisco NDFC to back up configurations in the Cisco NDFC database.
After the migration is complete, we need to keep the network optimized and run it with optimal efficiency. Cisco NDFC for SAN has features that can help optimize the network.
Cisco NDFC topology discovery is an inherent capability of Cisco NDFC for SAN to accurately depict the current topology and the device state of the connected fabric. This topology discovery also maps end storage and host devices and older switches discovered in the fabric - a very handy capability during migration.
The below table lists some of the Cisco NDFC for SAN software features available to help you optimize and operate a new fabric.
Table 2. Cisco NDFC for SAN features
| Feature |
Description |
| SAN Analytics |
The SAN Analytics solution provides insights into your fabric by allowing you to monitor, analyze, identify, and troubleshoot performance issues. |
| Slowdrain monitoring |
The Slowdrain monitoring template can help detect, troubleshoot, and automatically recover from the slowdrain situation. |
| Port Monitoring |
Using Port Monitoring, we can configure various counters on ports to monitor them for any unexpected behavioral issues. |
| Template configuration |
Using the Cisco NDFC web client, you can monitor Cisco MDS 9000 Family and Cisco Nexus® Family switch events, performance, and inventory, and perform minor administrative tasks. |
| Common LAN and SAN discovery |
Discover Cisco® LAN and SAN devices from a single interface. |
| Summary dashboard |
Get information about data center switches, selected SAN and LAN switches, or a group of LAN and SAN switches to see their current status, licensing details, host topology and events, and storage device topology and events. |
| SAN discovery and topology mapping |
Cisco NDFC for SAN provides extensive SAN discovery, topology mapping, and information viewing capabilities. It collects information about the fabric topology through Simple Network Management Protocol (SNMP) queries to the switches connected to it. Cisco NDFC for SAN re-creates a fabric topology, presents it in a customizable map, and provides inventory and configuration information with multiple viewing options. |
| Inventory management |
The Information pane in Cisco NDFC for SAN shows inventory, configuration, and status information for all switches, links, and hosts in the fabric. Inventory management information includes vendor names and models and software and firmware versions. Select a fabric or VSAN from the Logical Domains pane and then select the Summary tab in the Information pane to get a count of the number of VSANS, switches, hosts, and storage elements in the fabric. |
| SAN Health Advisor |
The SAN Health Advisor tool is a utility for monitoring performance and collecting statistics. You can perform the following tasks with this tool:
● Run Performance Monitor to collect I/O statistics
● Collect fabric inventory (switches and other devices)
● Create a graphical layout of the fabric topology
● Create reports of error conditions and statistical data
|
Limitations, Precautions, and Verifications
While performing the migration, be sure to note the following:
● In most cases, Brocade switches require the entire switch to be taken offline after the domain ID is changed. For example, after changing domain-related configurations, you need to use #switchdisable, which takes the switch offline.
● The Brocade Virtual Fabrics feature requires an external router in most cases, but in some cases the base switch can be used to route between virtual fabrics as well as trunk multiple virtual fabrics over ISLs. With Cisco MDS 9000 SAN switches, there is no such need and IVR can be run on the MDS switch itself.
● You should select a principal switch to assign a domain ID to all the switches in the fabric to avoid any duplicates. During the fabric merge process, if a duplicate domain ID exists, the principal switch assigns a new domain ID to one of the duplicate switches in the fabric. The recommended approach is to use a core switch as the principal switch.
● If you are migrating from an AIX or HP-UX network, preserve the existing domain ID on the Cisco MDS 9000 Family VSAN; otherwise, the process is disruptive because these hosts write the Fibre Channel ID (FCID) on the disk. Therefore, in some scenarios, a rip-and-replace migration may be the best solution.
● Modification of the domain ID may be disruptive for all the devices on that switch, but not to the remaining switches in the fabric. To avoid such disruption, the domain ID must be statically configured with the same value as the run-time domain ID.
● All Fibre Channel timers should be set to the default values before you start the actual migration to avoid any outages and conflicts later.
● If possible, always use enhanced device aliases to limit any changes to the device alias to Port World Wide Name (pWWN) mapping.
● During zone-set propagation using the zone-migration tool (Cisco Zone Migrator), you must address all conflicts manually.
● It is always advisable to use a seed switch – the same switch every time – preferably a core switch, during zoning configuration.
The Cisco MDS 9000 Family Advantage
In the world of storage networking, Cisco MDS 9000 Series Multilayer Directors and Fabric Switches bring simplicity, flexibility, agility, and performance, providing the high availability and redundancy needed to access the right data at the right time from the right place, independent of the protocols being used. Cisco MDS 9000 Family switches have Fibre Channel, and Gigabit Ethernet interfaces to support multiple protocols in the same switch. The Fibre Channel port supports Fibre Channel and FICON protocols; and Gigabit Ethernet for FCIP and Small Computer System Interface over IP (iSCSI) traffic. All of the 16-Gbps, 32-Gbps, and 64-Gbs MDS 9000 series switches support NVMe/FC across the fabric using any NX-OS 8.x release. Some of the unique features supported by 32-Gbps/64-Gbps MDS 9700 Module and 32-Gbps/64-Gbps MDS Fabric switches are:
● Future ready: the Cisco MDS 9700 Series chassis is ready to support next-generation 64G FC speeds.
● SAN Analytics: built-in to provide always-on, industry-unique, deep packet visibility for SCSI and NVMe flows
● Security: anti-counterfeit and secure boot support to make sure you are using genuine Cisco hardware with genuine Cisco software.
● Interoperability: easy integration and interoperability with legacy Cisco MDS 9000 Series Multilayer Switches (for example, Cisco MDS 9500 Series Multilayer Directors).
● Flexibility: it can support 2/4/8/10/16/32/64G FC speeds on a single chassis using 16-Gbps, 32-Gbps, and 64-Gbps modules.
The following provides a quick overview of the Cisco MDS 9000 Family product portfolio.
Cisco MDS 9700 Series Multilayer Directors
Cisco MDS 9700 Series Multilayer Directors deliver superior performance, a fault-tolerant design, and multiprotocol flexibility support with nonstop operation. The Cisco MDS director switches are NVMe-ready with SAN Analytics support. This platform has three different models: MDS 9706, MDS 9710, and MDS 9718. MDS 9706 can support up to 12Tbps of bandwidth using 192 ports @2/4/8/10/16/32G/64G FC line-rate speeds. MDS 9710 can support 384 ports at line-rate 64G performance and supports up to 24Tbps throughput, and MDS 9718 can support up to 768 ports to provide 48Tbps of throughput, at a 64G line-rate speed. The Cisco MDS 9700 switches also support fully integrated SAN Analytics for SCSI and NVMe Over Fabrics (NVMeoF) flows on a 32G/64G module or 32G/64G fabric switches. Using Fabric-3 and Supervisor-4 modules, the MDS 9700 chassis is now ready to support next-generation 64G FC performance at line rates. Intelligent Network Services such as QoS, Smart Zoning, Security, and Management are some of the other standard key features supported across Cisco MDS 9700 director switches. The Cisco MDS 9700 chassis has five different modules (line cards) to choose from:
● 48-Port 64-Gbps Fibre Channel Switching Module
● 48-Port 32-Gbps Fibre Channel Switching Module
● 48-Port 16-Gbps Fibre Channel Switching Module
● 24/10-Port SAN Extension Module
Cisco MDS 9396V 64-Gbps 96-Port Fabric Fibre Channel Switch
The Cisco MDS 9396V 64-Gbps 96-Port Fibre Channel Switch provides high-speed Fibre Channel connectivity for all-flash arrays and high-performance hosts. This switch offers state-of-the-art analytics and telemetry capabilities built into its next-generation Application-Specific Integrated Circuits (ASIC). This switch allows seamless transition to Fibre Channel Non-Volatile Memory Express (NVMe/FC) workloads. It empowers enterprises that are rapidly deploying cloud-scale applications using extremely dense virtualized servers, providing the benefits of greater bandwidth, scale, and consolidation.
Cisco MDS 9148V 64-Gbps 48-Port Fabric Fibre Channel Switch
The next-generation Cisco MDS 9148V 64-Gbps 48-Port Fibre Channel Switch provides high-speed Fibre Channel connectivity for all-flash arrays and high-performance hosts. This switch offers state-of-the-art analytics and telemetry capabilities built into its next-generation Application-Specific Integrated Circuit (ASIC) chipset. This switch allows seamless transition to Fibre Channel Non-Volatile Memory Express (NVMe/FC) workloads whenever available without any hardware upgrade in the SAN. It empowers small, midsize, and large enterprises that are rapidly deploying cloud-scale applications using extremely dense virtualized servers, providing the benefits of greater bandwidth, scale, and consolidation.
Cisco MDS 9124V 64-Gbps 24-Port Fabric Fibre Channel Switch
The next-generation Cisco MDS 9124V 64-Gbps 24-Port Fibre Channel Switch provides high-speed Fibre Channel connectivity for all-flash arrays and high-performance hosts. This switch offers state-of-the-art analytics and telemetry capabilities built into its next-generation Application-Specific Integrated Circuit (ASIC) chipset. This switch allows seamless transition to Fibre Channel Non-Volatile Memory Express (NVMe/FC) workloads whenever available without any hardware upgrade in the SAN. It empowers small, midsize, and large enterprises that are rapidly deploying cloud-scale applications using extremely dense virtualized servers, providing the benefits of greater bandwidth, scale, and consolidation.
Cisco MDS 9396T 32-Gbps 96-Port Fabric Fibre Channel Switch
The Cisco MDS 9396T 32-Gbps 96-Port 2-rack unit Fibre Channel switch provides state-of-art SAN Analytics and telemetry capability built into its next-generation Application-Specific Integrated Circuit (ASIC) platform. The Non-Volatile Memory express (NVMe)-ready switch allows seamless transition to Fibre Channel Non-Volatile Memory Express (NVMe/FC) workloads whenever available without any hardware upgrade in the SAN. This 96-port high-density, highly reliable and scalable, enterprise-class switch is ideal for medium to large departmental SANs.
Cisco MDS 9148T 32-Gbps 48-Port Fibre Channel Switch
The Cisco MDS 9148T is a 32-Gbps 48-Port 1-rack unit Fibre Channel switch provides state-of-art SAN Analytics and telemetry capability built into its next-generation Application-Specific Integrated Circuit (ASIC) platform. The Non-Volatile Memory express (NVMe)-ready switch allows seamless transition to Fibre Channel Non-Volatile Memory Express (NVMe/FC) workloads whenever available without any hardware upgrade in the SAN. This switch empowers small, midsize, and large enterprises that are rapidly deploying cloud-scale applications using extremely dense virtualized servers, providing the benefits of greater bandwidth, scale, and consolidation.
Cisco MDS 9132T 32-Gbps 32-Port Fibre Channel Switch
The Cisco MDS 9132T 32-Gbps 32-Port Fibre Channel switch provides high-speed Fibre Channel connectivity from the server rack to the SAN core. It empowers small, midsize, and large enterprises that are rapidly deploying cloud-scale applications using extremely dense virtualized servers, providing the dual benefits of greater bandwidth and consolidation. Small-scale SAN architectures can be built from the foundation using this low-cost, low-power, nonblocking, line-rate, and low-latency, bidirectional-airflow-capable, fixed standalone SAN switch connecting both storage and host ports. Medium-size to large-scale SAN architectures built with SAN core directors can expand 32-Gbps connectivity to the server rack using these switches either in switch mode or Network Port Virtualization (NPV) mode.
Cisco MDS 9396S 16G Multilayer Fabric Switch
The Cisco MDS 9396S is a 16G 96-port Fibre Channel fabric switch. It combines performance with exceptional flexibility and cost effectiveness. This compact, 2-Rack-Unit (2RU) switch scales from 48 to 96 line-rate 16-Gbps Fibre Channel ports. The Cisco MDS 9396S is ideal for a standalone SAN in large departmental storage environments or as a middle-of-row/top-of-rack switch in medium-sized redundant fabrics or as an edge switch in an enterprise data center core-edge SAN.
Cisco MDS 9148S 16G Multilayer Fabric Switch
The Cisco MDS 9148S is a 16G 48-port Fibre Channel fabric switch in a 1RU form. It combines performance with flexibility and cost effectiveness. This One Rack-Unit (1RU) switch scales from 12 to 48 line-rate 16 Gbps Fibre Channel ports. This switch can act as a standalone switch in small departmental storage environments or a top-of-the-rack switch in medium-sized redundant fabrics or an edge switch in enterprise data center core-edge topologies.
Cisco MDS 9250i Multiservice Fabric Switch
The Cisco MDS 9250i Multiservice Fabric Switch provides superior flexibility for SAN connectivity by delivering multiprotocol convergence and distributed fabric services along with 50 fixed ports in a compact form factor. It has 40 line-rate 16-Gbps Fibre Channel ports, eight 10-Gbps FCoE-capable Ethernet ports, and two 10-Gbps IP storage (FCIP) ports. It supports remote SAN extension with high-performance FCIP for remote replication and other disaster-recovery services along with intelligent fabric services, such as Cisco I/O Accelerator and Cisco Digital Media Manager.
Cisco MDS 9220i Multiservice Fabric Switch
The Cisco MDS 9220i Multiservice Fabric Switch is part of the next generation of the Cisco MDS 9200 Series Multiservice Switches designed to provide high-performance SAN-extension solutions, distributed intelligent fabric services, and cost-effective multiprotocol connectivity for both open systems and mainframe environments. This switch is ideal for departmental and remote branch-office SANs as well as large-scale SANs when used with Cisco MDS 9700 Series Multilayer Directors.
Migration from a Brocade SAN to a Cisco SAN requires planning and risk analysis. The process can be relatively easy, however, with proper planning and if proper procedures are defined. Cisco MDS 9000 Family SAN switches offer many features and design functions that facilitate SAN migration between various vendors. The Cisco NDFC for SAN GUI management tool can easily migrate Brocade SAN switch configurations. Cisco NDFC for SAN has built-in tools to help with this kind of migration and to help merge the fabrics according to defined rules. Cisco can provide additional resources such as Cisco Advanced Services through your Cisco account team for more detailed analysis, evaluation, and implementation.
Cisco MDS 9700 Series:
● Cisco MDS 9000 series Switches Quick Reference Guide
● Compare MDS 9700 series Multilayer Director Switches
Cisco MDS 9000 Family Hardware Installation Guides:
● Hardware installation guides
● Cisco MDS 9700 Installation Guides
Important Cisco MDS 9000 Family Guides:
● Interoperability matrix for Cisco Nexus and Cisco MDS 9000 Family products
● Cisco MDS 9000 Family Pluggable Transceivers Data Sheet
● Cisco Data Center Interoperability Support Matrix
● Cisco MDS 9000 NX-OS Software Release Notes
Virtual Fabric, LSAN, and VSAN
Brocade Virtual Fabrics: The Brocade Virtual Fabrics feature augments the proven security and fault isolation features of Brocade Fabric OS, enabling organizations to create logical groups of separately managed devices, ports, and switches within a physical SAN. Virtual fabrics and fabric zoning have a complementary relationship. Physical ports or World Wide Names (WWNs) are assigned to virtual fabrics, and then zones are configured within the virtual fabric. Virtual fabrics may change, for example, when ports are needed or management boundaries change. When the Brocade Virtual Fabrics feature is activated, the capabilities of some features, such as administrative domains and port mirroring, are reduced. Brocade Virtual Fabrics are restrictive in their capabilities compared to Cisco VSANs, which offer greater flexibility and scalability. Virtual fabrics partition the physical infrastructure. The Brocade Virtual Fabrics feature is available on 8-Gbps products that support it, such as the Brocade DCX Backbone, Brocade DCX-4S Backbone, and Brocade 5300 and Brocade 5100 switches.
Brocade administrative domains: An administrative domain is a logical grouping of fabric elements that define the switches, ports, and devices that you can view and modify. Administrative domains partition the administration of a fabric into logical groups and allocate these groups to different user accounts so that these accounts are restricted to manage only the administrative domains assigned to them. You can configure up to 256 administrative domains in a fabric (254 user-defined, 2 system-defined), numbered from 0 through 255. Each administrative domain is designated by a name and a number.
Brocade logical SAN (LSAN): A Brocade LSAN consists of zones in two or more edge or backbone fabrics that contain the same devices. LSANs essentially provide selective device connectivity between fabrics without forcing you to merge those fabrics. Fibre Channel routers provide multiple mechanisms to manage inter-fabric device connectivity through extensions to existing switch management interfaces.
Cisco Virtual SAN (VSAN): Cisco pioneered logical fabric separation with the introduction of VSANs in the first Cisco MDS 9000 Family products, introduced in 2002. A Cisco VSAN is a logical fabric in single or multiple switches built on a physical infrastructure to form a single fabric. Every VSAN has its own services, security, and other parameters, providing isolation of any problems within that VSAN boundary only, though the VSANs share the same physical switch and hardware. VSANs can also share frame tagging for shared ISLs. VSANs also support FICON. Multiple VSANs can be defined on a single switch. To separate the VSANs, you must assign each a unique domain ID. A single VSAN can span 239 physical switches, and you can create up to 256 VSANs in a single switch.
Multiprotocol SANs can use Fibre Channel with FCoE across Cisco Nexus switching platforms (Cisco Nexus 9000, 7000, and 5000 series switches) along with Cisco UCS Fabric Interconnects to span the platforms easily. Up to 256 VSANs can be configured in a switch. Of these, one is the default VSAN (VSAN 1), and another is an isolated VSAN (VSAN 4094). User-specified VSAN IDs range from 2 to 4093.
Brocade Virtual Fabrics and LSAN configurations can be migrated to Cisco VSAN configurations to provide greater scalability, performance, and interoperability. Cisco VSANs are supported across the entire Cisco MDS 9000 Family and Cisco Nexus 7000 and 5000 series switches.
The below table provides additional information about Brocade Virtual Fabrics and Cisco VSANs.
Table 3. Feature interoperability of Cisco VSANs and Brocade Virtual Fabrics
| Feature |
Cisco VSANs |
Brocade Virtual Fabrics |
| Virtual fabric support |
Cisco MDS 9000 Family |
Brocade DCX, 5300, 5100, DCX 8510, and 6500 platforms only |
| Maximum number of Brocade Virtual Fabrics and Cisco VSANs per switch |
All platforms: 256 |
Brocade DCX and DCX 8510-8 |
| Frame tagging for shared ISLs |
Yes |
Yes, with qualifications* |
| FICON support |
Yes |
Yes, with qualifications* |
| Isolation of virtual fabrics |
Yes |
No |
| Default virtual fabrics |
Yes |
No |
| Feature limitations (after enabling virtual fabrics and VSAN support) |
No |
Yes** |
| Routing between virtual fabrics |
Yes |
Yes, with qualifications*** |
Note: For a single virtual fabric migration from Brocade, it is easy to migrate to the default Cisco VSAN (VSAN 1). The default VSAN requires only a simple port-to-port mapping between the two fabrics, though the use of VSAN 1 for production traffic is not a best practice. If the existing fabric has multiple Brocade Virtual Fabrics, you will have to create multiple Cisco VSANs to match the different virtual fabric groups.
Inter-VSAN Routing and Virtual Fabric Routing
Cisco defines IVR to control and allow VSAN traffic within its boundaries and to set its own security and traffic policies. This approach enables easy management of the VSAN without disruption of other VSAN traffic. Devices in different VSANs communicate through a super-set zone called an IVR zone set. Only devices in the IVR zone set can see across VSAN boundaries. IVR offers an extension of the VSAN technology to provide cross-VSAN connectivity without the need to merge the routed virtual fabrics. This approach avoids propagation of irrelevant or potentially disruptive fabric events beyond the boundaries of a given VSAN. Using IVR, you can extend connectivity across VSAN boundaries and share a common storage resource among multiple VSANs, without the risk of destabilizing the fabric. IVR supports routing between all VSAN interoperate modes. IVR switches will modify the Fibre Channel headers for all communication between the end devices, including the VSAN number and source and destination FCIDs. Cisco IVR can be easily managed with less overhead. IVR is used mainly in situations in which problems arise with interoperability.
Device aliases are the user-friendly names given to pWWNs. These aliases use one-to-one mappings to pWWNs and were developed to easily identify devices within the switch. They are used for purposes such as zoning and QoS. There are two types of device aliases: standard and enhanced. With standard aliases, the information is passed to the switch, which substitutes the WWN for the device alias and then passes it to the application or service being used. With enhanced mode, applications accept the device alias name in its native format, rather than expanding the alias to a pWWN. Because applications such as zone servers IVR and Dynamic Port VSAN Membership (DPVM) automatically track and enforce device alias membership changes, you have a single point of change.
Fibre Channel aliases are used to associate one or more pWWNs with a user-friendly name. They are also VSAN-specific; hence, if a device is moved from one VSAN to another, a new Fibre Channel alias is needed in the new VSAN. Fibre Channel aliases are propagated through zone-set activation (assuming that the zone-set distribution is set to the full zone set). Fibre Channel aliases are propagated as part of the full database only, if propagation of the full database is allowed in that specific mode.
The below table summarizes the differences between Fibre Channel aliases and device aliases.
Table 4. Fibre Channel alias and device alias comparison
| Fibre Channel alias |
Device alias |
| Used for zoning purposes only |
Multifunction (port security, IVR, zoning, etc.) |
| Can contain multiple pWWNs |
Can have only one pWWN |
| Configured per VSAN |
Not VSAN-specific |
| Used mainly in multivendor environments |
Used mainly if the fabric is Cisco MDS 9000 Family only |
| Propagated through full zone-set distribution |
Propagated through Cisco Fabric Services |
The primary uses of device aliases and Fibre Channel aliases are summarized below:
● IVR zoning is easier to perform in Cisco NDFC when using device aliases.
● Fibre Channel aliases can use only zones and zone sets. Device alias can be used with any services that use Cisco Fabric Services.
● Fibre Channel aliases interoperate with some third-party Fibre Channel switches.
● In Fibre Channel aliases, the full zone set is distributed, so they are available on all switches in the fabric.
● Device aliases are not VSAN-specific. After a device alias is created, it applies to that pWWN regardless of the VSAN, whereas with a Fibre Channel alias, a different alias needs to be defined for each VSAN.
● Device aliases are automatically distributed to other Cisco switches attached to the fabric.
● Troubleshooting is easier when using device aliases. After a device alias is assigned to a pWWN, any time that the pWWN is displayed, the device alias is also displayed. For example, CLI commands such as show flogi database and show fcns database will display the pWWN along with the associated device alias.
Cisco MDS 9000 Family switches cache assigned FCIDs for each pWWN in volatile memory by default. In the event of any software or hardware failure, these assignments can be wiped out. The use of persistent FCIDs changes this behavior so that the assigned FCIDs and FCID-pWWN mappings are stored in nonvolatile memory. Some traditional operating systems such as HP-UX and AIX use the FCID of the SAN device mapped to the SCSI target number of the storage device to determine the logical unit number and OS storage mapping. Changing the FCID requires the server administrator to remap each LUN on each server. Persistent FCIDs can map the FCID of the storage device as the SCSI target number, so that these devices get the same FCID every time they perform a fabric login (FLOGI) to the switch. You may want to enable this feature less as a security precaution than as a way to achieve flexibility and availability in the event of migration. The FCID persistence feature is enabled by default on all Cisco MDS 9000 Family switches.
The domain ID is part of the FCID. Every VSAN has its own unique domain ID on every interconnected switch. When the domain ID is changed, the switch itself will need to re-register with the principal switch in the fabric to verify the uniqueness of the domain ID. As a result, all devices attached to the switch will need to log into the switch again, which could be disruptive. Hence, use of a nonoverlapping static domain ID is preferred, to avoid any disruption from fabric events during migration.
Timers are extremely important for many purposes. For a Fibre Channel environment, timers can determine the time that packets are allowed to be considered in transit, and they can define various error-detection conditions, etc. The default values for these timers usually don’t need to be changed, but when merging fabrics from different vendors, you must be sure that they are set identically in both fabrics. All timers should be the same across all switches because these values are exchanged by E-ports when an ISL is established. They should be left at the default settings on all Brocade switches to make sure that the transition is smooth. All Cisco switches have the same timer settings unless they have been modified manually. Some valuable timer parameters are the Resource Allocation Time-Out Value (R_A_TOV), Error Detect Time-Out Value (E_D_TOV), Distributed Services Time-Out Value (D_S_TOV), Fabric Stability Time-Out Value (F_S_TOV), and Receiver Transmitter Time-Out Value (R_T_TOV).
Fabric Shortest Path First and Brocade Dynamic Load Sharing
Brocade Dynamic Load Sharing (DLS) is an exchange-based routing. Cisco uses Fabric Shortest Path First (FSPF) to dynamically compute routes through a fabric by establishing the shortest and quickest path between any two switches. It supports multipath routing based on the link-state protocol and domain ID. Cisco MDS 9000 Family switches use the default src-id, dst-id, and ox-id values (or src-id and dst-id values, if these are configured) to load balance across multiple ISLs, whereas Brocade switches use their default src-id and dst-id values.
Inter-Switch Link and Inter-Chassis Link
Cisco ISLs can be configured between any Cisco MDS 9000 Family switches and line cards. Brocade ICLs use the same algorithm as Cisco Extended ISLs (EISLs), but the links can be used only between like-generation Brocade DCX switches and not with any other models or brands. The Brocade ICLs also need to go through the same Application-Specific Integrated Circuit (ASIC) in the backend of Brocade CR-module, which means that the ports used by ICLs must come from the same ASIC in the back end.
A PortChannel is an aggregation of FC/FCoE/FCIP links into a single logical link to provide a fault-tolerant, high-bandwidth single link. A PortChannel can include all Fibre Channel, Fibre Channel over Ethernet (FCoE), or Fibre Channel over IP (FCIP) ports between two chassis. Brocade uses the term “trunking,” and Cisco uses the term “PortChannel” to describe the aggregation of multiple ISLs into a single logical ISL.
Cisco PortChannel technology is supported between different line cards, different ASICs, and different port groups. Cisco MDS 9000 Family switches support a maximum of 16 ISLs per PortChannel and 16 parallel PortChannels between chassis, depending upon the switch model. Brocade supports a maximum of 8 ISLs from the same ASIC on the module, which can be combined into a single logical ISL.
Trunking and PortChannels are not supported between switches from two different vendors. However, some vendors can continue to use trunking and PortChannels between their own switches while in interoperability mode. This feature can be disabled on a per-port or per-switch basis and can continue to work as expected only if it is allowed by the interoperability mode of the vendor.
VSAN trunking is the trunking of multiple VSANs using a single ISL or group of ISLs and becomes an EISL using VSAN header information. This feature enables a common group of ISLs to be used as a pool for connectivity between switches for multiple fabrics. It uses industry-standard Virtual Fabric Tagging (VFT) extended headers to provide traffic segregation across common trunked ISLs. The primary benefit of VSAN trunking is that it consolidates and reduces the number of distinct ISLs required between switches. For organizations that have multiple fabrics between data centers, VSAN trunking enables a common pool of ISLs to be used, reducing the number of individual ISLs. This approach typically results in substantial cost savings through reduction in the number of Dense Wavelength-Division Multiplexing (DWDM) transponders or dark fiber pairs, allowing separate logical VSAN fabrics between sites through VSAN pruning. All VSANs do not need to go through a trunked ISL. Furthermore, individual fabrics often have very different load profiles, and grouping them together can result in higher overall throughput. VSAN trunking also allows a more controlled environment in which priority can be given to specific traffic or devices, and QoS policy can be applied to provide guaranteed bandwidth allocation for specific devices or VSANs.
Zones help you define security and provide control over communications between multiple storage devices and user groups. Zones can be created by the administrator to increase security to help prevent data loss through corruption or spoofing. Zoning is enforced by looking at the source and destination ID fields. A zone consists of multiple zone members that can access each other. A device can belong to multiple zones, and zone size can vary. By default, all members are in the default zone unless they are part of some other active zone. Zones can be part of multiple zone sets. The default zone policy for the Cisco MDS 9000 Family switch zone set denies communication between devices. The default zone behavior of permit or deny (all nodes are isolated when not explicitly placed in a zone) may change. The default zone parameter is restricted to the switch on which it is configured, and it is not propagated to other switches. Deny is the recommended setting to help secure the environment. While configuring zones, a zone with a single initiator and a single target provides the most efficient use of switch resources.
A zone set comprises one or more individual zones. A single zone can be part of multiple zone sets. There are two types of zones: active and local. Active zone sets define the zone rules to enforce zoning security. This type of zone set cannot be modified and is distributed to all switches in the VSAN. There can be only one active zone set. A local zone set contains the complete the zone-set database for that switch. This zone set can then be activated to become the active zone set. A VSAN can have multiple local zone sets.
Zoning can be enforced in two ways: through hard zoning and soft zoning. Hard zoning is enforced with the hardware of each switch for each frame. As soon as a frame reaches the switch, the source and destination IDs are compared with ACL combinations to allow or deny the frame. Hard zoning can be applied to all forms of zoning. Hard zoning is also more secure than soft zoning because it is applied to every frame to help prevent unauthorized access.
Soft zoning is applied only for the duration of interaction between the name server and the end device. If an end device knows the FCID of a device outside its zone, it can access it easily.
A switch can be preconfigured with a set of zones, with zone membership based on the port to which a device is connected (hard zoning). If other proprietary zoning methods (physical port numbers) are eliminated, zones may be limited to the pWWN. Not all vendors can support the same number of zones. Determine the lowest common denominator with Brocade and limit the fabric to the values in the below table.
Table 5. Zone types in interoperability mode
| Zone type |
Cisco MDS 9000 Family–compatible interoperability modes |
| pWWN |
All |
| FCID |
Non-interoperability mode only |
| Fabric pWWN |
Non-interoperability mode only |
| Fibre Channel alias |
All |
| Domain and port |
Traditional switch interoperability modes 2, 3, and 4 |
| Symbolic node name |
Non-interoperability mode only |
| Interface and switch WWN |
Non-interoperability mode only |
Zone-Set Database and its Propagation
A zone-set database and an active zone set are two separate entities. A zone-set database is a local database on each switch that contains all the zone sets, zones, and zone member information, whereas each VSAN in the fabric has a single active zone-set entity derived from the zone-set database of the local switch. This active zone set is distributed to all the switches in the fabric upon activation and remains consistent across all the switches in the fabric, whereas the zone-set database is a local entity and does not need to be homogeneous in the fabric. The zone-set database is not identical on all the switches, which could lead to problems. Multiple switches can be used to configure zoning information at different times, but upon activation only the local switch zone-set database is enforced by the fabric.
This behavior could be disruptive if proper attention is not paid to the zoning methodology, and for that reason some switch vendors recommend use of a seed switch for all zoning configuration. Use of a seed switch can definitely alleviate this problem; however, Cisco MDS 9000 Family switches also provide two commands:
● The EXEC level zoneset distribute command distributes the zone-set database of that switch to the entire fabric upon activation.
● The config level zoneset distribute command distributes the zone-set database of that switch upon zone-set activation.
Use of the config level zoneset distribute command on all switches in the fabric is highly recommended. After this command is activated, all the switches in the fabric will have a consistent zone-set database in the active zone-set entity. Using the Enhanced Zoning feature, the administrator performs all configurations within a single configuration session on switch in the fabric. When you begin a session and start zoning configuration, the switch locks the entire fabric to implement the change.
Note: The Cisco NDFC for SAN GUI tool always uses the principal switch as the seed switch for all zoning configurations.