Information About Cisco Unified IP Phone Options
Clear Directory Entries
Cisco Unified CME 8.6 allows you to clear the display of call-history details such as missed, placed, and received call entries on your Cisco Unified SCCP IP phone’s display screen. You can press the directory services button on most of the Cisco Unified IP phones or program a line button on 7931 phone to delete the display of phone number entries in the missed, placed, and received calls. The clear call directory feature is supported on Cisco Unified IP phones, 7960, 7961, 7970. 7971 and 8961.
To enable the clear directory entries feature, a call-history option is added to the exclude command. For more information on configuring phones to clear call-history details, see Clear Call-History Details from a SCCP Phone.
Enable Customized Background Images for Cisco Unified IP Phone 7970
The Cisco Unified IP Phone 7970 and 7971 support customized background images on the phone screen. To enable your Cisco Unified IP Phone 7970 or 7971 to display a customized background image, follow the procedure in the technical note at http://www.cisco.com/en/US/products/sw/voicesw/ps4625/products_tech_note09186a008062495a.shtml.
Sample background images are available in the 7970-backgrounds.tar file at http://www.cisco.com/cgi-bin/tablebuild.pl/ip-iostsp.
Customized Button Layout
Cisco Unified CME 8.5 and later versions allow you to customize the display order of various button types on a phone using the button layout feature. The button layout feature allows you to customize the display of the following button types:
-
Line buttons
-
Speed Dial buttons
-
BLF Speed Dial buttons
-
Feature Buttons
-
ServiceURL buttons
Cisco Unified CME 8.5 uses the button layout command is to populate buttons in any desired order. All buttons displayed on the phone follow the button-layout configuration. In the button layout command, the physical button number on the phone is specified under the button-string parameter of the button layout command. Buttons that are not defined under the button layout configuration are displayed as blank lines. Before configuring button layout on phones, line buttons, feature buttons (including privacy button), and url buttons must be configured through line button , feature button and url button commands, respectively.
Line Buttons
The button layout control feature allows you to populate buttons with corresponding physical line numbers or line number ranges. Line buttons that are not associated with a physical line are not displayed on the phone.You can customize any Cisco Unified SCCP IP phone button to function as a line button using the button command and specifying the position, button type, and directory number of the phone. For more information, see Configure Button Layout on SCCP Phones.
For Cisco Unified SIP phones, the first physical button must be a line button with a valid directory number. You can customize the other buttons using the button command and specifying the relative position (position index), button type, and directory number of the button. For more information, see Configure Button Layout on SIP Phones.
Speed Dial Buttons
You can customize the display of Speed Dial buttons to appear before, after, or between line buttons using the speed-dial command and specifying the position of the button. The button layout feature allows you to populate the buttons with corresponding physical line numbers or line number ranges. Buttons that do not have a physical line associated with them are not displayed on the phone.
BLF Speed Dial Buttons
The button layout feature allows you to display the BLF Speed-Dial buttons before, after or between the line buttons using the blf-speed-dial command with a specific position. Once the BLF speed-dial button is configured, the system populates the button with corresponding physical line number or range of line numbers. Buttons without a physical line association are not displayed on the phone.
Feature Buttons
Currently, privacy button is the only button available and is presented at the end of all the above mentioned buttons. With PLK feature you can enable most phone features on phone’s physical buttons (line keys). This button layout feature requests all presented buttons to be configured via button , speed-dial , blf-speed-dial , feature-button , or url-button commands. The privacy-button is overridden by feature-button if there is one. For more information on configuring feature buttons on a line key, see Configure Feature Button on a Cisco Unified SCCP Line Key and Configure Feature Button on a Cisco Unified SIP Phone Line Key.
 Note |
If the button-layout feature is configured in both ephone-template and logout profile (extension mobility) mode, configuration in the latter takes precedence. Button-layout configuration under ephone mode takes precedence in phones that do not have extension mobility (EM). |
Note |
Privacy button is counted as a feature button on phones that support privacy button and do not have any feature button configured through the feature-button command. |
URL Buttons
The button layout feature allows you to display the url button before, after, or even between the line buttons, speed dial buttons, BLF speed dial buttons, or feature buttons. For more information on configuring the URL button on a line key, see Configure Service URL Button on a SCCP Phone Line Key and Configure Service URL Button on a SIP IP Phone Line Key.
Customized Phone User Interface Services
In Cisco Unified CME 8.5 and later, you can customize the availability of individual service items such as Extension Mobility, My Phone Apps, and Single Number Reach (SNR) on a phone’s user interface by assigning individual service item to a button using the Programmable Line Key (PLK) url-button configuration. For more information, see Configure Service URL Button on a SCCP Phone Line Key.
You can limit the availability of an individual service item on a phone’s user interface by disabling the configuration for services such as EM, My Phone Apps, and Local Directory and exclude the display of these services from the phone’s user interface. You can use the exclude command under ephone-template mode to exclude the display of Extension Mobility (EM), My Phone Apps, and Local Directory. For more information, see Block Local Services on Phone User Interface.
If a directory service is enabled through PLK configuration, the PLK configuration takes precedence over the exclusion of directory services under ephone or ephone template configuration modes. The service is available through the button directly regardless of the exclusion of services configured under ephone and ephone-template modes.
In Cisco Unified CME 8.5 and later versions, you use the exclude command in ephone or ephone-template configuration mode to exclude the availability of local services such as EM, My Phone Apps, and Local Directory from a Cisco Unified SCCP IP phone's user interface.
In Cisco Unified CME 9.0 and later versions, you use the exclude command in voice register pool or voice register template configuration mode to exclude any of these local services from a Cisco Unified SIP IP phone's user interface.
Note |
Before Cisco Unified CME 9.0, you must configure the Local Directory service with the internal URL address. In Cisco Unified CME 9.0 and later versions, the internal URL address is the default when no external URL address is configured. |
Fixed Line-Feature Buttons for Cisco Unified IP Phone 7931G
In Cisco Unified CME 4.0(2) and later versions, you can select from two fixed button-layout formats to assign functionality to certain line buttons on a Cisco Unified IP Phone 7931G to support key system phone behavior. If you do not select a button set, no fixed set of feature/line buttons are defined.
The line button layout for the Cisco Unified IP Phone 7931G is a bottom-up array. Button 1 is at the bottom right of the array and button 24 is at the top left of the array.
Button set 1 includes two predefined feature buttons: button 24 is Menu and button 23 is Headset.
Button set 2 includes four predefined feature buttons: button 24 is Menu; button 23 is Headset; button 22 is Directories; and button 21 is Messages.
For configuration, see Select Button Layout for a Cisco Unified SCCP IP Phone 7931G.
Header Bar Display
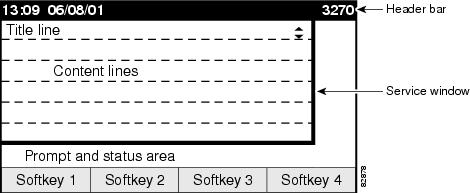
You can customize the content of an IP phone header bar, which is the top line of the IP phone display.
The IP phone header bar, or top line, of a Cisco Unified IP Phone normally replicates the text that appears next to the first line button. The header bar is shown in Cisco Unified IP Phone Display. The header bar can, however, contain a user-definable message instead of the extension number. For example, the header bar can be used to display a name or the full E.164 number of the phone. If no description is specified, the header bar replicates the extension number that appears next to the first button on the phone.
Phone Labels
Phone labels are configurable text strings that can be displayed instead of extension numbers next to line buttons on a Cisco Unified IP phone. By default, the number that is associated to a directory number, and assigned to a phone, is displayed next to the applicable button. The label feature allows you to enter a meaningful text string for each directory number so that a phone user with multiple lines can select a line by label instead of by phone number, thus eliminating the need to consult in-house phone directories. For configuration information, see Create Labels for Directory Numbers on SCCP Phones or Create Labels for Directory Numbers on a SIP Phone.
Programmable Vendor Parameters for Phones
The vendorConfig section of the configuration file contains phone and display parameters that are read and implemented by a phone's firmware when that phone is booted. Only the parameters supported by the currently loaded firmware are available. The number and type of parameters may vary from one firmware version to the next.
The IP phone that downloads the configuration file will implement only those parameters that it can support and ignore configured parameters that it cannot implement. For example, a Cisco Unified IP Phone 7970G does not have a backlit display and cannot implement Backlight parameters regardless of whether they are configured. The following text shows the format of an entry in the configuration file:
<vendorConfig>
<parameter-name>parameter-value</parameter-name>
</vendorConfig>
For configuration information at the system level, see Modify Vendor Parameters for All SCCP Phones.
For configuration information for individual phones, see Modify Vendor Parameters for a Specific SCCP Phone.
Push-to-Talk
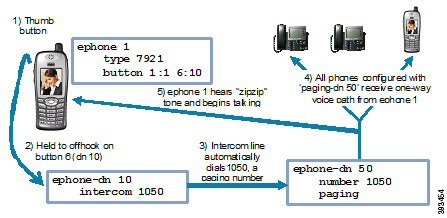
This feature allows one-way Push-to-Talk (PTT) in Cisco Unified CME 7.0 and later versions without requiring an external server to support the functionality. PTT is supported in firmware version 1.0.4 and later versions on Cisco Unified Wireless IP Phone 7921 and 7925 with a thumb button.
In the following figure, button1/DN 1 is configured as the primary line for this phone. Button 6/ DN 10 is configured for PTT and is the line that is triggered by pushing the thumb button on this phone.
-
Holding down on the thumb button causes the configured DN on the phone to go off-hook.
-
The thumb button utilizes an intercom DN that targets a paging number (1050).
-
The targeted paging group (DN 50) can be unicast or multicast or both.
-
Users will hear a “zipzip” tone when call path is set up.
-
All other keys on the phone are locked during this operation.
-
Releasing the thumb button ends the call.
For configuration information, see Configure One-Way Push-to-Talk on Cisco Unified SCCP Wireless IP Phones.
Support for Cisco Jabber
For Unified CME 12.5, Cisco Jabber was supported. In this version, the SIP softphone client supports VoIP over WLAN. Unified CME supports supplementary services such as Hold, Resume, Transfer, Call Park, and Call Pickup for the softphone SIP client.
Note |
Cisco Jabber versions supported on Unified CME are now End-of-Life. Hence, there is no active support for Cisco Jabber on Unified CME 14.1 or earlier releases. |
Feature Support for Cisco Jabber
The following features are supported for Cisco Jabber with Unified CME:
-
Hold or Resume
-
Transfer
-
Shared Line
-
Mixed Shared Line
-
Call forward—All, Busy, No Answer, Unregistered
-
Directed Call Park Pickup
-
Single Number Reach (SNR)
-
Voice Hunt Group (Sequential, Parallel)
-
Hardware Conference
-
Music On Hold
-
Video
Restrictions
The following features are not supported for Cisco Jabber with Unified CME:
-
Barge
-
cBarge
-
Built-in Bridge (BIB) Conference
-
Do Not Disturb
-
KPML Dialing
Cisco Jabber Client Support on CME
Cisco Jabber Client is a SIP-based soft client with integrated Instant Messaging and presence functionality, and uses the new Client Services Framework 2nd Generation (CSF2G) architecture.
CSF is a unified communications engine that is reused by multiple Cisco PC-based clients and mobile clients. The client is identified by a device ID name that can be configured under the voice register pool in Cisco Unified CME. You should configure the username and password under voice register pool to identify the user logging into Cisco Unified CME through Cisco Jabber client. The device discovery process uses HTTPS connection. Therefore, you should configure the secure HTTP on Cisco Unified CME.
A new phone type, Jabber-CSF-Client has been added to configure the Cisco Jabber client under voice register pool. This can be used to configure any CSF based Cisco Jabber client. In Unified CME 10.0, we used the type 'Jabber-Win' to configure Cisco Jabber client. In Unified CME 10.5, this type is deprecated and the new 'Jabber-CSF-Client' should be used to configure Cisco Jabber client as well.
Cisco Jabber CSF client can be provisioned in two modes: Full UC mode (with integrated IM and Presence services) and Phone only mode. The phone-only mode of Cisco Jabber CSF devices is also supported. This can be configured with the option 'phone-mode phone-only' under 'voice register global' or 'voice register pool' or 'voice register template' config.
If the Jabber client is installed in phone only mode then no extra configuration is required on CME. The normal Jabber configuration should be sufficient.
For more information on installing Jabber client in phone mode for Windows, see https://www.cisco.com/c/en/us/support/unified-communications/jabber-windows/products-installation-guides-list.html.
For more information on installing Jabber client in phone mode for Mac, see https://www.cisco.com/c/en/us/support/unified-communications/jabber-mac/products-installation-guides-list.html.
If the Jabber client is installed in Full UC mode and you want to enable the phone only mode from CME, then the 'phone-mode' configuration is required as mentioned in the configuration section.
Table 1 lists the Cisco Jabber Client Support versions along with the corresponding CME and Jabber client versions:
For Unified CME Release 12.5 (On Cisco 4000 Series Integrated Services Router), Cisco Jabber CSF client (softphone mode) Version 12.1.0 for MAC (phone-only) and Windows (phone-only) was supported.
Note |
Cisco Jabber client versions supported on Unified CME are now End-of-Life (EOL). Hence, there is no active support on Unified CME for Cisco Jabber clients. |
|
Cisco CSF Device Type |
Unified CME Supported Version |
Jabber Client Version |
|---|---|---|
|
Cisco Jabber for MAC (phone-only) and Windows (phone-only) |
10.0 |
9.1.0 |
|
10.5 |
9.2.1 |
|
|
12.5 |
12.1.0 |
Restrictions
-
The Cisco Jabber CSF client supports only the softphone mode with Cisco Unified CME.
-
Desk phone mode is not supported.
-
The following Cisco Jabber CSF type of devices are not supported:
-
Cisco Jabber for iPhone (both full UC mode and phone-only mode)
-
Cisco Jabber for Android (both full UC mode and phone-only mode)
-
Cisco Jabber for iPad (both full UC mode and phone-only mode)
-
For configuration information, see Configure Cisco Jabber for CSF Client in Unified CME.
For configuration examples, see Example for Configuring Cisco Jabber CSF Client.
System Message Display
The System Message Display feature allows you to specify a custom text or display message to appear in the lower part of the display window on display-capable IP phones. If you do not set a custom text or display message, the default message “Cisco Unified CME” is displayed.
When you specify a text message, the number of characters that can be displayed is not fixed because IP phones typically use a proportional (as opposed to fixed-width) font. There is room for approximately 30 alphanumeric characters.
The display message is refreshed with a new message after one of the following events occurs:
-
Busy phone goes back on-hook.
-
idle phone receives a keepalive message.
-
Phone is restarted.
The file-display feature allows you to specify a file to display on display-capable IP phones when they are not in use. You can use this feature to provide the phone display with a system message that is refreshed at configurable intervals, similar to the way that the text message feature provides a message. The difference between the two is that the system text message feature displays a single line of text at the bottom of the phone display, whereas the system display message feature can use the entire display area and contain graphic images.
Note |
|
URL Provisioning for Feature Buttons
URL provisioning for programmable feature buttons allows you to specify alternative XML files to access using the feature buttons on IP phones.
Certain phones, such as the Cisco Unified IP Phone 7940, 7940G, 7960, and 7960G, have programmable feature buttons that invoke noncall-related services. The four buttons—Services, Directories, Messages, and Information (the i button)—are linked to appropriate feature operations through URLs. The fifth button—Settings—is managed entirely by the phone.
The feature buttons are provisioned with specific URLs. The URLs link to XML web pages formatted with XML tags that the Cisco Unified IP phone understands and uses. When you press a feature button, the Cisco Unified IP phone uses the configured URL to access the appropriate XML web page for instructions. The web page sends instructions to the Cisco Unified IP phone to display information on the screen for users to navigate. Phone users can select options and enter information by using soft keys and the scroll button.
Operation of these feature buttons is determined by the capabilities of the Cisco Unified IP phone and the content of the specified URL.
In Cisco Unified CME 4.2 and later versions, up to eight URLs can be configured for the Services feature button by using an ephone template to apply the configuration to one or more supported SCCP phones. If you use an ephone template to configure services URLs for one or SCCP phones and you also configure a system-level services URL in telephony-service configuration mode, the value set in telephony-service configuration mode appears first in the list of services displayed when the phone user presses the Services feature button. Cisco Unified CME self-hosted services, such as Extension Mobility, always appears last in the list of options displayed for the Services feature button.
For configuration information, see Provision URLs for Feature Buttons for SCCP Phones.
My Phone Apps for Cisco Unified SIP IP Phones
Before Cisco Unified CME 9.0, the My Phone Apps features were only supported on Cisco Unified SCCP IP phones.
In Cisco Unified CME 9.0 and later versions, support is added for My Phone Apps feature on Cisco Unified SIP IP phones.
-
add, modify, or delete Speed Dial
-
add, modify, or delete Fast Dial
-
add, modify, or delete BLF Speed Dial
-
change SNR DN
-
perform after-hour login
-
reset the phone
The My Phone Apps features are available on both Extension Mobility (EM) and non-EM phones. For EM phones, the user login service allows the user to temporarily access a physical phone other than their own and utilize their personal settings as if the phone is their own desk phone. Any change in settings follows the user to the next phone they access. For non-EM phones, any change in settings remains with the physical phone.
 Feedback