Table Of Contents
Configuring Intercom Lines
Contents
Information About Intercom Lines
Intercom Auto-Answer Lines
Whisper Intercom
How to Configure Intercom Lines
SCCP: Configuring an Intercom Auto-Answer Line
Restrictions
SCCP: Configuring Whisper Intercom
Prerequisites
Restrictions
Examples
SIP: Configuring an Intercom Auto-Answer Line
Prerequisites
Restrictions
Configuration Examples for Intercom Lines
Intercom Lines: Example
Where to Go Next
Additional References
Related Documents
Technical Assistance
Feature Information for Intercom Lines
Configuring Intercom Lines
Last Updated: January 15, 2009
This chapter describes the intercom features in Cisco Unified Communications Manager Express (Cisco Unified CME).
Finding Feature Information in This Module
Your Cisco Unified CME version may not support all of the features documented in this module. For a list of the versions in which each feature is supported, see the "Feature Information for Intercom Lines" section.
Contents
•
Information About Intercom Lines
•
How to Configure Intercom Lines
•
Configuration Examples for Intercom Lines
•
Where to Go Next
•
Additional References
•
Feature Information for Intercom Lines
Information About Intercom Lines
To enable intercom lines, you should understand the following concept:
•
Intercom Auto-Answer Lines
•
Whisper Intercom
Intercom Auto-Answer Lines
An intercom line is a dedicated two-way audio path between two phones. Cisco Unified CME supports intercom functionality for one-way and press-to-answer voice connections using a dedicated pair of intercom directory numbers on two phones that speed-dial each other.
When an intercom speed-dial button is pressed, a call is speed-dialed to the directory that is the other half of the dedicated pair. The called phone automatically answers the call in speakerphone mode with mute activated, which provides a one-way voice path from the initiator to the recipient. A beep is sounded when the call is auto-answered to alert the recipient to the incoming call. To respond to the intercom call and open a two-way voice path, the recipient deactivates the mute function by pressing the Mute button or, on phones such as the Cisco Unified IP Phone 7910, lifting the handset.
In Cisco CME 3.2.1 and later versions, you can deactivate the speaker-mute function on intercom calls. For example, if phone user 1 makes an intercom call to phone user 2, both users hear each other on connection when no-mute is configured. The benefit is that people who receive intercom calls can be heard without them having to disable the mute function. The disadvantage is that nearby background sounds and conversations can be heard the moment a person receives an intercom call, regardless of whether they are ready to take a call or not.
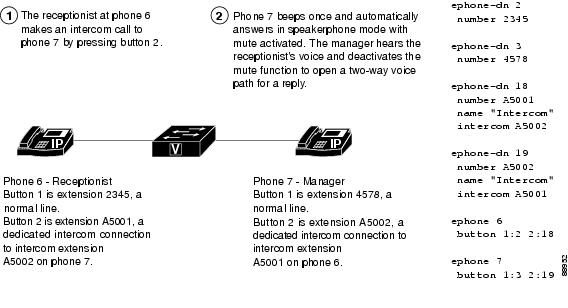
Intercom lines cannot be used in shared-line configurations. If a directory number is configured for intercom operation, it must be associated with one IP phone only. The intercom attribute causes an IP phone line to operate as an autodial line for outbound calls and as an autoanswer-with-mute line for inbound calls. Figure 32 shows an intercom between a receptionist and a manager.
To prevent an unauthorized phone from dialing an intercom line (and creating a situation in which a phone automatically answers a nonintercom call), you can assign the intercom a directory number that includes an alphabetic character. No one can dial the alphabetic character from a normal phone, but the phone at the other end of the intercom can be configured to dial the number that contains the alphabetic character through the Cisco Unified CME router. For example, the intercom ephone-dns in Figure 32 are assigned numbers with alphabetic characters so that only the receptionist can call the manager on his or her intercom line, and no one except the manager can call the receptionist on his or her intercom line.
Note
An intercom requires the configuration of two ephone-dns, one each on a separate phone.
Figure 32 Intercom Lines
Whisper Intercom
When a phone user dials a whisper intercom line, the called phone automatically answers using speakerphone mode, providing a one-way voice path from the caller to the called party, regardless of whether the called party is busy or idle.
Unlike the standard intercom feature, this feature allows an intercom call to a busy extension. The calling party can only be heard by the recipient. The original caller on the receiving phone does not hear the whisper page. The phone receiving a whisper page displays the extension and name of the party initiating the whisper page and Cisco Unified CME plays a zipzip tone before the called party hears the caller's voice. If the called party wants to speak to the caller, the called party selects the intercom line button on their phone. The lamp for intercom buttons are colored amber to indicate one-way audio for whisper intercom and green to indicate two-way audio for standard intercom.
You must configure a whisper intercom directory number for each phone that requires the Whisper Intercom feature. A whisper intercom directory number can place calls only to another whisper intercom directory number. Calls between a whisper intercom directory number and a standard directory number or intercom directory number are rejected with a busy tone.
This feature is supported in Cisco Unified CME 7.1 and later versions. For configuration information, see the "SCCP: Configuring Whisper Intercom" section.
How to Configure Intercom Lines
This section contains the following tasks:
•
SCCP: Configuring an Intercom Auto-Answer Line (required)
•
SCCP: Configuring Whisper Intercom (optional)
•
SIP: Configuring an Intercom Auto-Answer Line (required)
SCCP: Configuring an Intercom Auto-Answer Line
To enable a two-way audio path between two phones, perform the following steps for each SCCP phone at both ends of the two-way voice path.
Restrictions
•
Intercom lines cannot be dual-line.
•
If a directory number is configured for intercom operation, it can be associated with only one Cisco Unified IP phone.
•
A separate configuration is required for each phone at both ends of the two-way voice path.
SUMMARY STEPS
1.
enable
2.
configure terminal
3.
ephone-dn dn-tag
4.
number number
5.
name name
6.
intercom extension-number [[barge-in [no-mute] | no-auto-answer | no-mute] [label label]] | label label]
7.
exit
8.
ephone phone-tag
9.
button button-number:dn-tag [[button-number:dn-tag] ...]
10.
end
DETAILED STEPS
| |
Command or Action
|
Purpose
|
Step 1
|
enable
Example:
Router> enable
|
Enables privileged EXEC mode.
• Enter your password if prompted.
|
Step 2
|
configure terminal
Example:
Router# configure terminal
|
Enters global configuration mode.
|
Step 3
|
ephone-dn dn-tag
Example:
Router(config)# ephone-dn 11
|
Enters ephone-dn configuration mode.
• Do not use the dual-line keyword with this command. Intercom ephone-dns cannot be dual-line.
|
Step 4
|
number number
Example:
Router(config-ephone-dn)# number A2345
|
Assigns a valid intercom number.
• Using one or more alphabetic characters in an intercom number ensures that the number can only be dialed from the one other intercom number that is programmed to dial this number. The number cannot be dialed from a normal phone if it contains an alphabetic character.
|
Step 5
|
name name
Example:
Router(config-ephone-dn)# name intercom
|
Sets a name to be associated with the ephone-dn.
• This name is used for caller-ID displays and also shows up in the local directory associated with the ephone-dn.
|
Step 6
|
intercom extension-number [[barge-in [no-mute] |
no-auto-answer | no-mute] [label label]] | label
label]
Example:
Router(config-ephone-dn)# intercom A2346 label
Security
|
Defines the directory number that is speed-dialed for the intercom feature when this line is used.
|
Step 7
|
exit
Example:
Router(config-ephone-dn)# exit
|
Exits ephone-dn configuration mode.
|
Step 8
|
ephone phone-tag
Example:
Router(config)# ephone 24
|
Enters ephone configuration mode.
|
Step 9
|
button button-number:dn-tag [[button-number:dn-tag]
...]
Example:
Router(config-ephone)# button 1:1 2:4 3:14
|
Assigns a button number to the intercom ephone-dn being configured.
• Use the colon separator (:) between the button number and the intercom ephone-dn tag to indicate a normal ring for the intercom line.
|
Step 10
|
end
Example:
Router(config)# exit
|
Exits configuration mode and enters privileged EXEC mode.
|
SCCP: Configuring Whisper Intercom
To enable the Whisper Intercom feature on a directory number, perform the following steps.
Prerequisites
•
Cisco Unified CME 7.1 or a later version.
•
IP phones require SCCP 12.0 or a later version.
Restrictions
•
Not supported on single-line phone models such as the Cisco Unified IP Phone 7906 or 7911.
•
Whisper intercom directory numbers can place calls only to other whisper intercom numbers.
•
A directory number can be configured as either a regular intercom or a whisper intercom, not both.
•
Dual-line and octo-line directory numbers are not supported as intercom lines.
•
Only one intercom call, either incoming or outgoing, is allowed on the phone at one time.
•
Call features are not supported on intercom calls.
SUMMARY STEPS
1.
enable
2.
configure terminal
3.
ephone-dn dn-tag
4.
whisper-intercom [label string | speed-dial number [label string]]
5.
end
6.
show ephone-dn whisper
DETAILED STEPS
| |
Command or Action
|
Purpose
|
Step 1
|
enable
Example:
Router> enable
|
Enables privileged EXEC mode.
• Enter your password if prompted.
|
Step 2
|
configure terminal
Example:
Router# configure terminal
|
Enters global configuration mode.
|
Step 3
|
ephone-dn dn-tag
Example:
Router(config)# ephone-dn 1
|
Enters ephone configuration mode to create a directory number for a SCCP phone.
|
Step 4
|
whisper-intercom [label string | speed-dial
number [label string]]
Example:
Router(config-ephone-dn)# whisper intercom
|
Enables whisper intercom on a directory number.
• label string—(Optional) Alphanumeric label that identifies the whisper intercom button. String can contain a maximum of 30 characters.
• speed-dial number—(Optional) Telephone number to speed dial.
|
Step 5
|
end
Example:
Router(config-ephone-dn)# end
|
Exits to privileged EXEC mode.
|
Step 6
|
show ephone-dn whisper
Example:
Router# show ephone-dn whisper
|
Display information about whisper intercom ephone-dns that have been created.
|
Examples
The following example shows Whisper Intercom configured on extension 2004:
ephone-dn 24
number 2004
whisper-intercom label "sales"!
!
!
ephone 24
mac-address 02EA.EAEA.0001
button 1:24
SIP: Configuring an Intercom Auto-Answer Line
To enable the Intercom Auto-Answer feature for SIP phones, perform the following steps for each SIP phone at both ends of the two-way voice path.
Prerequisites
Cisco CME 3.4 or a later version.
Restrictions
•
If a directory number is configured for intercom operation, it can be associated with only one Cisco Unified IP phone.
•
A separate configuration is required for each phone at each end of the two-way voice path.
SUMMARY STEPS
1.
enable
2.
configure terminal
3.
voice register dn dn-tag
4.
number number
5.
auto-answer
6.
exit
7.
voice register pool pool-tag
8.
id mac address
9.
type phone-type
10.
number tag dn dn-tag
11.
end
DETAILED STEPS
| |
Command or Action
|
Purpose
|
Step 1
|
enable
Example:
Router> enable
|
Enables privileged EXEC mode.
• Enter your password if prompted.
|
Step 2
|
configure terminal
Example:
Router# configure terminal
|
Enters global configuration mode.
|
Step 3
|
voice register dn dn-tag
Example:
Router(config-register-global)# voice register
dn 1
|
Enters voice register dn configuration mode to define a directory number for a SIP phone, intercom line, voice port, or an MWI.
|
Step 4
|
number number
Example:
Router(config-register-dn)# number A5001
|
Defines a valid number for the directory number being configured.
• To prevent non intercom originators from manually dialing an intercom destination, the number string can contain alphabetic characters enabling the number to be dialed only by the Cisco Unified CME router and not from telephone keypads.
|
Step 5
|
auto-answer
Example:
Router(config-register-dn)# auto-answer
|
Enables the Intercom Auto Answer feature on the directory number being configured.
|
Step 6
|
exit
Example:
Router(config-register-dn)# exit
|
Exits configuration mode to the next highest mode in the configuration mode hierarchy.
|
Step 7
|
voice register pool pool-tag
Example:
Router(config)# voice register pool 3
|
Enters voice register pool configuration mode to set phone-specific parameters for a SIP phone in Cisco Unified CME.
|
Step 8
|
id {network address mask mask | ip address mask
mask | mac address}
Example:
Router(config-register-pool)# id mac
0009.A3D4.1234
|
Explicitly identifies a locally available individual SIP phone to support a degree of authentication.
|
Step 9
|
type phone-type
Example:
Router(config-register-pool)# type 7960-7940
|
Defines a phone type for the SIP phone being configured.
|
Step 10
|
number tag dn dn-tag
Example:
Router(config-register-pool)# number 1 dn 17
|
Associates a directory number with the SIP phone being configured.
|
Step 11
|
end
Example:
Router(config-register-pool)# end
|
Exits configuration mode and enters privileged EXEC mode.
|
Configuration Examples for Intercom Lines
This section contains the following example:
•
Intercom Lines: Example
The following example shows an intercom between two Cisco Unified IP phones. In this example, ephone-dn 2 and ephone-dn 4 are normal extensions, while ephone-dn 18 and ephone-dn 19 are set as an intercom pair. Ephone-dn 18 is associated with line button 2 on Cisco Unified IP phone 4. Ephone-dn 19 is associated with line button 2 on Cisco Unified IP phone 5. The two ephone-dns provide a two-way intercom between the two Cisco Unified IP phones.
ephone-dn 2
number 5333
ephone-dn 4
number 5222
ephone-dn 18
number 5001
name "intercom"
intercom 5002 barge-in
ephone-dn 19
name "intercom"
number 5002
intercom 5001 barge-in
ephone 4
button 1:2 2:18
ephone 5
button 1:4 2:19
Where to Go Next
If you are done modifying parameters for phones in Cisco Unified CME, generate a new configuration file and restart the phones. See "Generating Configuration Files for Phones" on page 261.
Paging
The paging feature sets up a one-way audio path to deliver information to a group of phones at one time. For more information, see "Configuring Paging" on page 989.
Additional References
The following sections provide references related to Cisco Unified CME features.
Related Documents
Technical Assistance
Description
|
Link
|
The Cisco Support website provides extensive online resources, including documentation and tools for troubleshooting and resolving technical issues with Cisco products and technologies.
To receive security and technical information about your products, you can subscribe to various services, such as the Product Alert Tool (accessed from Field Notices), the Cisco Technical Services Newsletter, and Really Simple Syndication (RSS) Feeds.
Access to most tools on the Cisco Support website requires a Cisco.com user ID and password.
|
http://www.cisco.com/techsupport
|
Feature Information for Intercom Lines
Table 30 lists the features in this module and enhancements to the features by version.
To determine the correct Cisco IOS release to support a specific Cisco Unified CME version, see the Cisco Unified CME and Cisco IOS Software Version Compatibility Matrix at http://www.cisco.com/en/US/docs/voice_ip_comm/cucme/requirements/guide/33matrix.htm.
Use Cisco Feature Navigator to find information about platform support and software image support. Cisco Feature Navigator enables you to determine which Cisco IOS software images support a specific software release, feature set, or platform. To access Cisco Feature Navigator, go to http://www.cisco.com/go/cfn. An account on Cisco.com is not required.
Note
Table 30 lists the Cisco Unified CME version that introduced support for a given feature. Unless noted otherwise, subsequent versions of Cisco Unified CME software also support that feature.
Table 30 Feature Information for Intercom Lines
Feature Name
|
Cisco Unified CME Version
|
Feature Information
|
Intercom Lines
|
3.4
|
Adds intercom feature, with no-mute function, for supported Cisco Unified IP phones that are connected to a Cisco Unified CME router and running SIP.
|
3.2.1
|
The no-mute function was introduced.
|
2.0
|
Intercom feature was introduced.
|
Whisper Intercom
|
7.1
|
Whisper intercom feature was introduced.
|