-
Cisco Aironet Access Point Software Configuration Guide for VxWorks
-
Preface
-
Overview
-
Using the Management Interfaces
-
Configuring the Radio and Basic Settings
-
Configuring VLANs
-
Configuring Filters and Quality of Service
-
Configuring Proxy Mobile IP
-
Configuring Other Settings
-
Security Setup
-
Network Management
-
Managing Firmware and Configurations
-
Management System Setup
-
Special Configurations
-
Diagnostics and Troubleshooting
-
Appendix A - Protocol Filter Lists
-
Appendix B - Channels, Power Levels, and Antenna Gains
-
Appendix C - Event Log Messages
-
Index
-
 Feedback
Table Of Contents
Settings on the SNMP Setup Page
Settings on the Database Query Page
Changing Settings with the Database Query Page
Settings on the Console/Telnet Page
Management System Setup
This chapter explains how to set up your access point to use SNMP, Telnet, or the console port to manage the access point. This chapter contains the following sections:
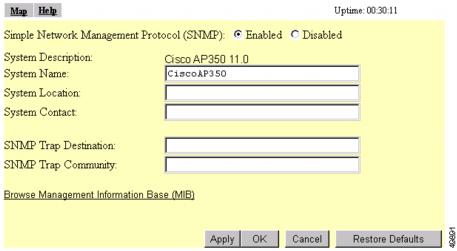
SNMP Setup
Use the SNMP Setup page to configure the access point to work with your network's SNMP station. Figure 11-1 shows the SNMP Setup page.
Figure 11-1 SNMP Setup Page
Follow this link path to reach the SNMP Setup page:
1.
On the Summary Status page, click Setup.
2.
Settings on the SNMP Setup Page
The SNMP Setup page contains the following settings:
•
•
•
•
•
•
•
The Browse Management Information Base (MIB) link at the bottom of the SNMP Setup page leads to the Database Query page.
Using the Database Query Page
Use the Database Query page to find and change the value of many access point managed objects. Figure 11-2 shows the Database Query page.
Figure 11-2 Database Query Page
Follow this link path to reach the Database Query page:
1.
2.
3.
Settings on the Database Query Page
The Database Query page contains the following entry fields and buttons:
•
•
•
•
•
Changing Settings with the Database Query Page
Follow these steps to change an access point setting from the Database Query page:
Step 1
Step 2
Step 3
Step 4
Note
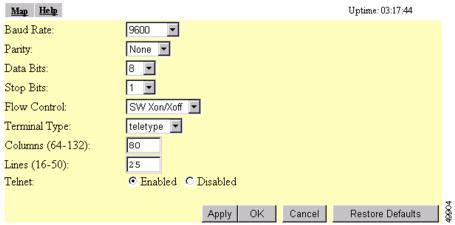
Console and Telnet Setup
Use the Console/Telnet Setup page to configure the access point to work with a terminal emulator or through Telnet. Figure 11-3 shows the Console/Telnet Setup page.
Figure 11-3 Console/Telnet Setup Page
Follow this link path to reach the Console/Telnet Setup page:
1.
2.
Settings on the Console/Telnet Page
The Console/Telnet Setup page contains the following settings:
•
•
•
•
•
•
•
•
•
Using Secure Shell
Secure Shell (SSH) is a program that provides a cryptographically secure replacement for Telnet that is considered the de facto protocol for remote logins. SSH runs in the Application Layer of the TCP/IP stack. SSH provides a secure connection over the Internet providing strong user authentication. SSH protects the privacy of transmitted data (such as passwords, binary data, and administrative commands) by encrypting it.
SSH clients make SSH relatively easy to use and are available on most computers including those that run Windows or a type of UNIX. SSH clients are also available on some handheld devices.
SSH on the access point is enabled by default. When user manager is enabled, SSH uses the same usernames and passwords established by the user manager.
Newer computers have the SSH client installed. If your computer does not have the SSH client installed, you must procure and install it before you can proceed. You can download the latest SSH client from the following site:
After you download and install the client on your computer, make sure you can browse to the access point. Then launch your SSH client and make the connection to the access point through it.