-
Cisco MDS 9000 Family CLI Configuration Guide, Release 3.3(3)
-
Index
-
New and Changed Information
-
Preface
- Getting Started
- Installation and Switch Management
- Switch Configuration
-
Fabric Configuration
-
Configuring and Managing VSANs
-
SAN Device Virtualization
-
Creating Dynamic VSANs
-
Configuring Inter-VSAN Routing
-
Distributing Device Alias Services
-
Configuring Fibre Channel Routing Services and Protocols
-
Managing FLOGI, Name Server, FDMI, and RSCN Databases
-
Discovering SCSI Targets
-
Configuring FICON
-
Advanced Features and Concepts
-
Configuring and Managing Zones
-
-
Security
-
Configuring FIPS
-
Configuring Users and Common Roles
-
Configuring SNMP
-
Configuring RADIUS and TACACS+
-
Configuring IPv4 and IPv6 Access Control Lists
-
Configuring Certificate Authorities and Digital Certificates
-
Configuring IPsec Network Security
-
Configuring FC-SP and DHCHAP
-
Configuring Port Security
-
Configuring Fabric Binding
-
- IP Services
- Intelligent Storage Services
- Network and Switch Monitoring
- Traffic Management
- Troubleshooting
-
Configuration Limits for Cisco MDS SAN-OS Release 3.x
-
 Feedback
Table Of Contents
Dependent Factors for Software Installation
Selecting the Correct Software Images for Cisco MDS 9100 Series Switches
Selecting the Correct Software Images for Cisco MDS 9200 Series Switches
Selecting the Correct Software Images for Cisco MDS 9500 Family Switches
Essential Upgrade Prerequisites
Determining Software Compatibility
Benefits of Using the install all Command
Non-Disruptive Upgrades on Fabric and Modular Switches
Preparing for a Non-Disruptive Upgrade on Fabric and Modular Switches
Performing a Non-Disruptive Upgrade on a Fabric Switch
Viewing the Status of a Non-Disruptive Upgrade on a Fabric Switch
Troubleshooting a Non-Disruptive Upgrade on a Fabric Switch
Manual Upgrade on a Dual Supervisor Module Switch
Preparing for a Manual Installation
Downgrading from a Higher Release
Maintaining Supervisor Modules
Migrating from Supervisor-1 Modules to Supervisor-2 Modules
Standby Supervisor Module Boot Variable Version
Standby Supervisor Module Bootflash Memory
Standby Supervisor Module Boot Alert
Installing Generation 2 Modules in Generation 1 Chassis
Software Images
This chapter describes how to install and upgrade Cisco MDS SAN-OS software images. It includes the following sections:
•
About Software Images, page 8-1
•
•
•
•
•
•
•
•
About Software Images
Each switch is shipped with a Cisco MDS SAN-OS operating system for Cisco MDS 9000 Family switches. The Cisco MDS SAN-OS consists of two images—the kickstart image and the system image. To upgrade the switch to a new image, you must specify the variables that direct the switch to the images.
•
•
The images and variables are important factors in any install procedure. You must specify the variable and the image to upgrade your switch. Both images are not always required for each install.
Note
Dependent Factors for Software Installation
The software image install procedure is dependent on the following factors:
•
•
•
•
Selecting the Correct Software Images for Cisco MDS 9100 Series Switches
The Supervisor-1 and Supervisor-2 modules supported by Cisco MDS 9100 Series switches require different system and kicstart images. You can determine which images to use on your switch by the naming conventions shown in Table 8-1.
Selecting the Correct Software Images for Cisco MDS 9200 Series Switches
The Supervisor-1 and Supervisor-2 modules supported by Cisco MDS 9200 Series switches require different system and kicstart images. You can determine which images to use on your switch by the naming conventions shown in Table 8-2.
Selecting the Correct Software Images for Cisco MDS 9500 Family Switches
The Supervisor-1 and Supervisor-2 modules supported by Cisco MDS 9500 Family switches require different system and kickstart images. You can determine which images to use on your switch by the naming conventions shown in Table 8-3.
Use the show module command to display the type of supervisor module in the switch.
Example 8-1 shows the output for a switch with Supervisor-1 modules.
Example 8-1 show module Command Output for Supervisor-1 Modules
switch# show moduleMod Ports Module-Type Model Status--- ----- -------------------------------- ------------------ ------------......5 0 Supervisor/Fabric-1 DS-X9530-SF1-K9 active*6 0 Supervisor/Fabric-1 DS-X9530-SF1-K9 ha-standbyExample 8-3 shows the output for a switch with Supervisor-2 modules.
Example 8-2 show module Command Output for Supervisor-2 Modules
switch# show moduleMod Ports Module-Type Model Status--- ----- -------------------------------- ------------------ ------------......7 0 Supervisor/Fabric-2 DS-X9530-SF2-K9 active *8 0 Supervisor/Fabric-2 DS-X9530-SF2-K9 ha-standbyEssential Upgrade Prerequisites
Before attempting to migrate to any software image version, follow these guidelines:
•
Before performing any software upgrade, contact your respective customer service representative to review your software upgrade requirements and to provide recommendations based on your current operating environment.
Note
•
Schedule the upgrade when the fabric is stable and steady. Ensure that everyone who has access to the switch or the network is not configuring the switch or the network during this time. All configurations are disallowed at this time.
•
Verify that sufficient space is available in the location where you are copying the images. This location includes the active and standby supervisor module bootflash: (internal to the switch).
–
–
•
Avoid power interruption during any install procedure. These kinds of problems can corrupt the software image.
•
–
Note
–
•
–
–
–
–
Local file—images are locally available on the switch.
Network file—images are in a remote location and the user specifies the destination using the remote server parameters and the file name to be used locally.
•
Table 8-4 summarizes terms used in this chapter with specific reference to the install and upgrade process.
•
–
–
–
–
–
–
Note
Note
Note
Software Upgrade Methods
You can upgrade software without any disruptions using the Cisco MDS SAN-OS software designed for mission-critical high availability environments. To realize the benefits of nondisruptive upgrades on the Cisco MDS 9500 Directors, we highly recommend that you install dual supervisor modules.
You can upgrade any switch in the Cisco MDS 9000 Family using one of the following methods:
•
•
Tip
In some cases, regardless of which process you use, the software upgrades may be disruptive. These exception scenarios can occur under the following conditions:
•
•
Note
Determining Software Compatibility
If the running image and the image you want to install are incompatible, the software reports the incompatibility. In some cases, you may decide to proceed with this installation. If the active and the standby supervisor modules run different versions of the image, both images may be HA compatible in some cases and incompatible in others.
Compatibility is established based on the image and configuration:
•
•
–
–
Note
To view the results of a dynamic compatibility check, issue the show incompatibility system bootflash:filename command (see Example 8-3). Use this command to obtain further information when the install all command returns the following message:
Warning: The startup config contains commands not supported by the standby supervisor; as
a result, some resources might become unavailable after a switchover.
Do you wish to continue? (y/ n) [y]: nExample 8-3 Displays HA Compatibility Status
switch# show incompatibility system bootflash:new-system-imageThe following configurations on active are incompatible with the system imageThe following configurations on active are incompatible with the system image1) Service : cfs , Capability : CAP_FEATURE_CFS_ENABLED_DEVICE_ALIASDescription : CFS - Distribution is enabled for DEVICE-ALIASCapability requirement : STRICTDisable command : no device-alias distributeAutomated Upgrades
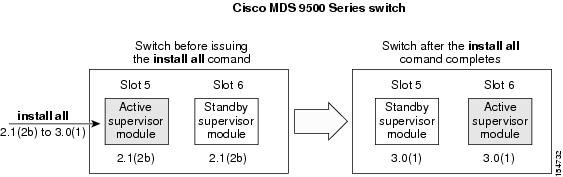
The install all command upgrades all modules in any Cisco MDS 9000 Family switch. Figure 8-1 provides an overview of the switch status before and after issuing the install all command.
Figure 8-1 The Effect of the install all Command
The install all command automatically verifies if the standby supervisor module is functioning (if present). If it is not functioning, it reloads that module and uses the reload module slot force-dnld command to force it to function.
Benefits of Using the install all Command
The install all command provides the following benefits:
•
•
•
Do you want to continue (y/n) [n] :y•
•
–
–
•
•
•
•
For example, if a switching module fails to be updated for any reason (for example, due to an unstable fabric state), then the command sequence disruptively updates that module and ends. In such cases, you can verify the problem on the affected switching module and upgrade the other switching modules.
Recognizing Failure Cases
The following situations cause the installation to end:
•
•
•
•
•
•
•
•
•
Caution
Tip
Using the install all Command
Note
To perform an automated software upgrade on any switch, follow these steps:
Step 1
Step 2
Step 3
switch# dir bootflash:12288 Jan 01 00:01:06 1980 lost+found/14765056 Mar 21 15:35:06 2005 m9500-sf1ek9-kickstart-mz.2.1.1.bin15944704 Apr 06 16:46:04 2005 m9500-sf1ek9-kickstart-mz.2.1.1a.bin48063243 Mar 21 15:34:46 2005 m9500-sf1ek9-mz.2.1.1.bin48036239 Apr 06 16:45:41 2005 m9500-sf1ek9-mz.2.1.1a.binUsage for bootflash://sup-local141066240 bytes used43493376 bytes free184559616 bytes totalswitch# show moduleMod Ports Module-Type Model Status--- ----- -------------------------------- ------------------ ------------2 32 Storage Services Module DS-X9032-SSM ok5 0 Supervisor/Fabric-1 DS-X9530-SF1-K9 active *6 0 Supervisor/Fabric-1 DS-X9530-SF1-K9 ha-standby...The show module command output shows that the standby supervisor is in slot 6. Use the attach command to access the supervisor module.
switch# attach module 6...switch(standby)# dir bootflash:12288 Jan 01 00:01:06 1980 lost+found/14765056 Mar 21 15:35:06 2005 m9500-sf1ek9-kickstart-mz.2.1.1.bin15944704 Apr 06 16:46:04 2005 m9500-sf1ek9-kickstart-mz.2.1.1a.bin48063243 Mar 21 15:34:46 2005 m9500-sf1ek9-mz.2.1.1.bin48036239 Apr 06 16:45:41 2005 m9500-sf1ek9-mz.2.1.1a.binUsage for bootflash://sup-local141066240 bytes used43493376 bytes free184559616 bytes totalswitch(standby)# exitswitch#Step 4
switch# copy tftp://10.16.10.100/system-img bootflash:system-imgTrying to connect to tftp server......
Note
Step 5
switch# copy tftp://10.16.10.100/kickstart-img bootflash:kickstart-imgTrying to connect to tftp server......Step 6
Note
install all system bootflash:filename kickstart bootflash:filename.switch# install all system bootflash:system-img kickstart bootflash:kickstart-imgVerifying image bootflash:/kickstart-img[####################] 100% -- SUCCESSVerifying image bootflash:/system-img[####################] 100% -- SUCCESSExtracting "slc" version from image bootflash:/system-img.[####################] 100% -- SUCCESSExtracting "ips" version from image bootflash:/system-img.[####################] 100% -- SUCCESSExtracting "system" version from image bootflash:/system-img.[####################] 100% -- SUCCESSExtracting "kickstart" version from image bootflash:/kickstart-img.[####################] 100% -- SUCCESSExtracting "loader" version from image bootflash:/kickstart-img.[####################] 100% -- SUCCESSCompatibility check is done:Module bootable Impact Install-type Reason------ -------- -------------- ------------ ------1 yes non-disruptive rolling2 yes disruptive rolling Hitless upgrade is not supported3 yes disruptive rolling Hitless upgrade is not supported4 yes non-disruptive rolling5 yes non-disruptive reset6 yes non-disruptive resetImages will be upgraded according to following table:Module Image Running-Version New-Version Upg-Required------ ---------- -------------------- -------------------- ------------1 slc 1.3(2a) 1.3(1) yes1 bios v1.1.0(10/24/03) v1.1.0(10/24/03) no2 ips 1.3(2a) 1.3(1) yes2 bios v1.1.0(10/24/03) v1.1.0(10/24/03) no3 ips 1.3(2a) 1.3(1) yes3 bios v1.1.0(10/24/03) v1.1.0(10/24/03) no4 slc 1.3(2a) 1.3(1) yes4 bios v1.1.0(10/24/03) v1.1.0(10/24/03) no5 system 1.3(2a) 1.3(1) yes5 kickstart 1.3(2a) 1.3(1) yes5 bios v1.1.0(10/24/03) v1.1.0(10/24/03) no5 loader 1.2(2) 1.2(2) no6 system 1.3(2a) 1.3(1) yes6 kickstart 1.3(2a) 1.3(1) yes6 bios v1.1.0(10/24/03) v1.1.0(10/24/03) no6 loader 1.2(2) 1.2(2) noDo you want to continue with the installation (y/n)? [n] yInstall is in progress, please wait.Syncing image bootflash:/kickstart-img to standby.[####################] 100% -- SUCCESSSyncing image bootflash:/system-img to standby.[####################] 100% -- SUCCESSJan 18 23:40:03 Hacienda %VSHD-5-VSHD_SYSLOG_CONFIG_I: Configuring console fromPerforming configuration copy.[####################] 100% -- SUCCESSModule 6: Waiting for module online.|Auto booting bootflash:/kickstart-img bootflash:/system-img...Booting kickstart image: bootflash:/kickstart-img.........................................Image verification OKStarting kernel...INIT: version 2.78 bootingChecking all filesystems..r.r.. done.Loading system softwareUncompressing system image: bootflash:/system-imgCCCCCCCCCCCCCCCCCCCCCCCCCCCCCCCCCCCCCCCCCCCCCCCCCCCCCCCCCCCCCCCCCCCCCCCCCCCCCCCCCCCCCCCCCC CCCCCCCCCCCCCCCCCCCCCCCCINIT: Entering runlevel: 3Step 7
If the configuration meets all guidelines when the install all command is issued, all modules (supervisor and switching) are upgraded. This is true for any switch in the Cisco MDS 9000 Family.
Caution
If you purchased Cisco support through a Cisco reseller, contact the reseller directly. If you purchased support directly from Cisco Systems, contact Cisco Technical Support at this URL: http://www.cisco.com/warp/public/687/Directory/DirTAC.shtml
Upgrading Services Modules
Any Fibre Channel switching module supports nondisruptive upgrades. The14/2-port Multiprotocol Services (MPS-14/2)) module supports nondisruptive upgrades for the Fibre Channel ports. Any software upgrade for the two Gigabit Ethernet ports in this module is disruptive. See Chapter 45, "Configuring IP Storage" for more information on MPS-14/2 modules.
Caution
CSMs and IPS modules use a rolling upgrade install mechanism to guarantee a stable state for each module in the switch:
•
•
When you upgrade, or downgrade, the SSI boot image on a Storage Services Module (SSM), you might disrupt traffic through the module. Table 8-5 describes how updating the SSI boot image affects SSM traffic.
As shown in Table 8-5, Layer 3 Intelligent Storage Services traffic is disrupted when you update the SSI boot image. If you have configured Layer 3 Intelligent Storage Services on your SSM, we recommend that you shut down these services before upgrading the SSI boot image. You can use dual fabric configuration to minimize the impact of shutting down Layer 3 services. See Chapter 12, "Managing Modules," for more information on updating the boot images on the SSM.
Sample install all Commands
Example 8-4 displays the result of the install all command issued from a console terminal that is connected to the active supervisor module. Once a switchover happens, you can see the rest of the output from the console terminal of the standby supervisor module. Example 8-5 displays the file output continuation of the install all command on the console of the standby supervisor module. Example 8-6 displays the result of the install all command issued from a console terminal for a system that contains an SSI image.
Similarly, you can view the results of the install all command issued from the SSH or Telnet terminal that is connected to the active supervisor module. Once a switchover happens, you need to log back into the switch and issue the show install all status command (see the "Upgrade Status Verification" section on page 8-20).
Example 8-4 Successful install all Command Issued from the Active Console
Hacienda# install all system bootflash:system-img kickstart bootflash:kickstart-imgVerifying image bootflash:/kickstart-img[####################] 100% -- SUCCESSVerifying image bootflash:/system-img[####################] 100% -- SUCCESSExtracting "slc" version from image bootflash:/system-img.[####################] 100% -- SUCCESSExtracting "ips" version from image bootflash:/system-img.[####################] 100% -- SUCCESSExtracting "system" version from image bootflash:/system-img.[####################] 100% -- SUCCESSExtracting "kickstart" version from image bootflash:/kickstart-img.[####################] 100% -- SUCCESSExtracting "loader" version from image bootflash:/kickstart-img.[####################] 100% -- SUCCESSCompatibility check is done:Module bootable Impact Install-type Reason------ -------- -------------- ------------ ------1 yes non-disruptive rolling2 yes disruptive rolling Hitless upgrade is not supported3 yes disruptive rolling Hitless upgrade is not supported4 yes non-disruptive rolling5 yes non-disruptive reset6 yes non-disruptive resetImages will be upgraded according to following table:Module Image Running-Version New-Version Upg-Required------ ---------- -------------------- -------------------- ------------1 slc 1.3(2a) 1.3(1) yes1 bios v1.1.0(10/24/03) v1.1.0(10/24/03) no2 ips 1.3(2a) 1.3(1) yes2 bios v1.1.0(10/24/03) v1.1.0(10/24/03) no3 ips 1.3(2a) 1.3(1) yes3 bios v1.1.0(10/24/03) v1.1.0(10/24/03) no4 slc 1.3(2a) 1.3(1) yes4 bios v1.1.0(10/24/03) v1.1.0(10/24/03) no5 system 1.3(2a) 1.3(1) yes5 kickstart 1.3(2a) 1.3(1) yes5 bios v1.1.0(10/24/03) v1.1.0(10/24/03) no5 loader 1.2(2) 1.2(2) no6 system 1.3(2a) 1.3(1) yes6 kickstart 1.3(2a) 1.3(1) yes6 bios v1.1.0(10/24/03) v1.1.0(10/24/03) no6 loader 1.2(2) 1.2(2) noDo you want to continue with the installation (y/n)? [n] yInstall is in progress, please wait.Syncing image bootflash:/kickstart-img to standby.[####################] 100% -- SUCCESSSyncing image bootflash:/system-img to standby.[####################] 100% -- SUCCESSJan 18 23:40:03 Hacienda %VSHD-5-VSHD_SYSLOG_CONFIG_I: Configuring console fromPerforming configuration copy.[####################] 100% -- SUCCESSModule 6: Waiting for module online.|Auto booting bootflash:/kickstart-img bootflash:/system-img...Booting kickstart image: bootflash:/kickstart-img.........................................Image verification OKStarting kernel...INIT: version 2.78 bootingChecking all filesystems..r.r.. done.Loading system softwareUncompressing system image: bootflash:/system-imgCCCCCCCCCCCCCCCCCCCCCCCCCCCCCCCCCCCCCCCCCCCCCCCCCCCCCCCCCCCCCCCCCCCCCCCCCCCCCCCCCCCCCCCCCC CCCCCCCCCCCCCCCCCCCCCCCCINIT: Entering runlevel: 3Example 8-5 displays the file output continuation of the install all command on the console of the standby supervisor module.Example 8-5 Successful install all Command Output Continued from the Standby Console
Hacienda(standby)#Auto booting bootflash:/kickstart-img bootflash:/system-img...Booting kickstart image: bootflash:/kickstart-img.........................................Image verification OKStarting kernel...INIT: version 2.78 bootingChecking all filesystems..r.r.. done.Loading system softwareUncompressing system image: bootflash:/system-imgCCCCCCCCCCCCCCCCCCCCCCCCCCCCCCCCCCCCCCCCCCCCCCCCCCCCCCCCCCCCCCCCCCCCCCCCCCCCCCCCCCCCCCCCCC CCCCCCCCCCCCCCCCCCCCCCCCINIT: Entering runlevel: 3Continue on installation process, please wait.The login will be disabled until the installation is completed.Module 6: Waiting for module online.Jan 18 23:43:02 Hacienda %PORT-5-IF_UP: Interface mgmt0 is upJan 18 23:43:19 Hacienda %LICMGR-3-LOG_LIC_NO_LIC: No license(s) present for feature FM_SERVER_PKG. Application(s) shutdown in 53 days.Jan 18 23:43:19 Hacienda %LICMGR-3-LOG_LIC_NO_LIC: No license(s) present for feature ENTERPRISE_PKG. Application(s) shutdown in 50 days.Jan 18 23:43:19 Hacienda %LICMGR-3-LOG_LIC_NO_LIC: No license(s) present for feature SAN_EXTN_OVER_IP. Application(s) shutdown in 50 days.Jan 18 23:43:19 Hacienda %LICMGR-3-LOG_LICAPP_NO_LIC: Application port-security running without ENTERPRISE_PKG license, shutdown in 50 daysJan 18 23:43:19 Hacienda %LICMGR-4-LOG_LICAPP_EXPIRY_WARNING: Application Roles evaluation license ENTERPRISE_PKG expiry in 50 daysJan 18 23:44:54 Hacienda %BOOTVAR-5-NEIGHBOR_UPDATE_AUTOCOPY: auto-copy supported by neighbor, starting...Module 1: Non-disruptive upgrading.[# ] 0%Jan 18 23:44:56 Hacienda %MODULE-5-STANDBY_SUP_OK: Supervisor 5 is standbyJan 18 23:44:55 Hacienda %IMAGE_DNLD-SLOT1-2-IMG_DNLD_STARTED: Module image download process. Please wait until completion...Jan 18 23:45:12 Hacienda %IMAGE_DNLD-SLOT1-2-IMG_DNLD_COMPLETE: Module image download process. Download successful.Jan 18 23:45:48 Hacienda %MODULE-5-MOD_OK: Module 1 is online[####################] 100% -- SUCCESSModule 4: Non-disruptive upgrading.[# ] 0%Jan 18 23:46:12 Hacienda %IMAGE_DNLD-SLOT4-2-IMG_DNLD_STARTED: Module image download process. Please wait until completion...Jan 18 23:46:26 Hacienda %IMAGE_DNLD-SLOT4-2-IMG_DNLD_COMPLETE: Module image download process. Download successful.Jan 18 23:47:02 Hacienda %MODULE-5-MOD_OK: Module 4 is online[####################] 100% -- SUCCESSModule 2: Disruptive upgrading....-- SUCCESSModule 3: Disruptive upgrading....-- SUCCESSInstall has been successful.MDS SwitchHacienda login:Example 8-6 displays the result of the install all command issued from a console terminal for a system that contains an SSI image.The install all command syncs the SSI image to the standby supervisor module.
Note
Example 8-6 Successful install all Command Including an SSI Image
Cisco-MDS# install all system bootflash:isan-2-1-1a kickstartbootflash:boot-2-1-1a ssi bootflash:ssi-2.1.1aVerifying image bootflash:/ssi-2.1.1a[####################] 100% -- SUCCESSVerifying image bootflash:/boot-2-1-1a[####################] 100% -- SUCCESSVerifying image bootflash:/isan-2-1-1a[####################] 100% -- SUCCESSExtracting "slc" version from image bootflash:/isan-2-1-1a.[####################] 100% -- SUCCESSExtracting "ips4" version from image bootflash:/isan-2-1-1a.[####################] 100% -- SUCCESSExtracting "system" version from image bootflash:/isan-2-1-1a.[####################] 100% -- SUCCESSExtracting "kickstart" version from image bootflash:/boot-2-1-1a.[####################] 100% -- SUCCESSExtracting "loader" version from image bootflash:/boot-2-1-1a.[####################] 100% -- SUCCESSCompatibility check is done:Module bootable Impact Install-type Reason------ -------- -------------- ------------ ------2 yes non-disruptive rolling3 yes disruptive rolling Hitless upgrade is not supported4 yes disruptive rolling Hitless upgrade is not supported5 yes non-disruptive resetImages will be upgraded according to following table:Module Image Running-Version New-Version Upg-Required------ ---------- -------------------- -------------------- ------------2 slc 2.0(3) 2.1(1a) yes2 bios v1.1.0(10/24/03) v1.1.0(10/24/03) no3 slc 2.0(3) 2.1(1a) yes3 ssi 2.0(3) 2.1(1a) yes3 bios v1.0.8(08/07/03) v1.1.0(10/24/03) yes4 ips4 2.0(3) 2.1(1a) yes4 bios v1.1.0(10/24/03) v1.1.0(10/24/03) no5 system 2.0(3) 2.1(1a) yes5 kickstart 2.0(3) 2.1(1a) yes5 bios v1.1.0(10/24/03) v1.1.0(10/24/03) no5 loader 1.2(2) 1.2(2) noDo you want to continue with the installation (y/n)? [n] yInstall is in progress, please wait.Module 6:Force downloading.-- SUCCESSSyncing image bootflash:/ssi-2.1.1a to standby.[####################] 100% -- SUCCESSSyncing image bootflash:/boot-2-1-1a to standby.[####################] 100% -- SUCCESSSyncing image bootflash:/isan-2-1-1a to standby.[####################] 100% -- SUCCESSSetting boot variables.[####################] 100% -- SUCCESSPerforming configuration copy.[####################] 100% -- SUCCESSModule 3:Upgrading Bios/loader/bootrom.[####################] 100% -- SUCCESSModule 6:Waiting for module online.-- SUCCESS"Switching over onto standby".-----------------------------
Note
Example 8-7 displays the result of the install all command if the system and kickstart files are automatically downloaded using a remote (TFTP, FTP, SCP, or SFTP) download option. It shows an accurate and complete example.
Caution
switch# install all system bootflash:system-image kickstart tftp:
Please provide a complete URI
switch# install all system scp:
Please provide a complete URI
Example 8-7 A Sample of the install all Command Issued Using a Remote Download
switch# install all system
scp://user@10.10.1.1/tftpboot/HKrel/qa/final/m9500-sf1ek9-mz.1.3.2a.bin kickstart
scp://user@10.10.1.1/tftpboot/HKrel/qa/final/m9500-sf1ek9-kickstart-mz.1.3.2a.bin
For scp://user@10.10.1.1, please enter password:For scp://user@10.10.1.1, please enter password:Copying image from scp://user@10.10.1.1/tftpboot/HKrel/qa/final/m9500-sf1ek9-kickstart-mz.1.3.2a.bin to bootflash:///m9500-sf1ek9-kickstart-mz.1.3.2a.bin.[####################] 100% -- SUCCESSCopying image from scp://user@10.10.1.1/tftpboot/HKrel/qa/final/m9500-sf1ek9-mz.1.3.2a.bin to bootflash:///m9500-sf1ek9-mz.1.3.2a.bin.[####################] 100% -- SUCCESSVerifying image bootflash:///m9500-sf1ek9-kickstart-mz.1.3.2a.bin[####################] 100% -- SUCCESSVerifying image bootflash:///m9500-sf1ek9-mz.1.3.2a.bin[####################] 100% -- SUCCESSExtracting "slc" version from image bootflash:///m9500-sf1ek9-mz.1.3.2a.bin.[####################] 100% -- SUCCESSExtracting "ips" version from image bootflash:///m9500-sf1ek9-mz.1.3.2a.bin.[####################] 100% -- SUCCESSExtracting "system" version from image bootflash:///m9500-sf1ek9-mz.1.3.2a.bin.[####################] 100% -- SUCCESSExtracting "kickstart" version from image bootflash:///m9500-sf1ek9-kickstart-mz.1.3.2a.bin.[####################] 100% -- SUCCESSExtracting "loader" version from image bootflash:///m9500-sf1ek9-kickstart-mz.1.3.2a.bin.[####################] 100% -- SUCCESSCompatibility check is done:Module bootable Impact Install-type Reason------ -------- -------------- ------------ ------1 yes non-disruptive rolling2 yes disruptive rolling Hitless upgrade is not supported3 yes non-disruptive rolling4 yes non-disruptive rolling5 yes non-disruptive reset6 yes non-disruptive reset7 yes non-disruptive rolling8 yes non-disruptive rolling9 yes disruptive rolling Hitless upgrade is not supportedImages will be upgraded according to following table:Module Image Running-Version New-Version Upg-Required------ ---------- -------------------- -------------------- ------------1 slc 1.3(1) 1.3(2a) yes1 bios v1.1.0(10/24/03) v1.0.8(08/07/03) no2 ips 1.3(1) 1.3(2a) yes2 bios v1.1.0(10/24/03) v1.0.8(08/07/03) no3 slc 1.3(1) 1.3(2a) yes3 bios v1.1.0(10/24/03) v1.0.8(08/07/03) no4 slc 1.3(1) 1.3(2a) yes4 bios v1.1.0(10/24/03) v1.0.8(08/07/03) no5 system 1.3(1) 1.3(2a) yes5 kickstart 1.3(1) 1.3(2a) yes5 bios v1.1.0(10/24/03) v1.0.8(08/07/03) no5 loader 1.2(2) 1.2(2) no6 system 1.3(1) 1.3(2a) yes6 kickstart 1.3(1) 1.3(2a) yes6 bios v1.1.0(10/24/03) v1.0.8(08/07/03) no6 loader 1.2(2) 1.2(2) no7 slc 1.3(1) 1.3(2a) yes7 bios v1.1.0(10/24/03) v1.0.8(08/07/03) no8 slc 1.3(1) 1.3(2a) yes8 bios v1.1.0(10/24/03) v1.0.8(08/07/03) no9 ips 1.3(1) 1.3(2a) yes9 bios v1.1.0(10/24/03) v1.0.8(08/07/03) noDo you want to continue with the installation (y/n)? [n]Example 8-8 displays the install all command output of a failed operation due to a lack of disk space.
Example 8-8 Failed Operation Due to a Full bootflash: File System
switch# install all system bootflash:isan-1.3.2a kickstart bootflash:boot-1.3.2aVerifying image bootflash:/boot-1.3.2a[####################] 100% -- SUCCESSVerifying image bootflash:/isan-1.3.2a[####################] 100% -- SUCCESSExtracting "slc" version from image bootflash:/isan-1.3.2a.[####################] 100% -- SUCCESSExtracting "ips" version from image bootflash:/isan-1.3.2a.[####################] 100% -- SUCCESSExtracting "system" version from image bootflash:/isan-1.3.2a.[####################] 100% -- SUCCESSExtracting "kickstart" version from image bootflash:/boot-1.3.2a.[####################] 100% -- SUCCESSExtracting "loader" version from image bootflash:/boot-1.3.2a.[####################] 100% -- SUCCESSCompatibility check is done:Module bootable Impact Install-type Reason------ -------- -------------- ------------ ------1 yes non-disruptive rolling2 yes disruptive rolling Hitless upgrade is not supported3 yes non-disruptive rolling4 yes non-disruptive rolling5 yes non-disruptive reset6 yes non-disruptive reset7 yes non-disruptive rolling8 yes non-disruptive rolling9 yes disruptive rolling Hitless upgrade is not supportedImages will be upgraded according to following table:Module Image Running-Version New-Version Upg-Required------ ---------- -------------------- -------------------- ------------1 slc 1.3(1) 1.3(2a) yes1 bios v1.1.0(10/24/03) v1.0.8(08/07/03) no2 ips 1.3(1) 1.3(2a) yes2 bios v1.1.0(10/24/03) v1.0.8(08/07/03) no3 slc 1.3(1) 1.3(2a) yes3 bios v1.1.0(10/24/03) v1.0.8(08/07/03) no4 slc 1.3(1) 1.3(2a) yes4 bios v1.1.0(10/24/03) v1.0.8(08/07/03) no5 system 1.3(1) 1.3(2a) yes5 kickstart 1.3(1) 1.3(2a) yes5 bios v1.1.0(10/24/03) v1.0.8(08/07/03) no5 loader 1.2(2) 1.2(2) no6 system 1.3(1) 1.3(2a) yes6 kickstart 1.3(1) 1.3(2a) yes6 bios v1.1.0(10/24/03) v1.0.8(08/07/03) no6 loader 1.2(2) 1.2(2) no7 slc 1.3(1) 1.3(2a) yes7 bios v1.1.0(10/24/03) v1.0.8(08/07/03) no8 slc 1.3(1) 1.3(2a) yes8 bios v1.1.0(10/24/03) v1.0.8(08/07/03) no9 ips 1.3(1) 1.3(2a) yes9 bios v1.1.0(10/24/03) v1.0.8(08/07/03) noDo you want to continue with the installation (y/n)? [n] yInstall is in progress, please wait.Syncing image bootflash:/boot-1.3.2a to standby.[####################] 100% -- SUCCESSSyncing image bootflash:/isan-1.3.2a to standby.[# ] 0% -- FAIL. Return code 0x401E0008 (request was aborted, standby disk may be full).Install has failed. Return code 0x40930013 (Syncing images to standby failed).Please identify the cause of the failure, and try 'install all' again.Dec 15 19:36:42 switch %SYSMGR-3-SERVICE_TERMINATED: Service "installer" (PID 5470) has finished with error code SYSMGR_EXITCODE_FAILURE_NOCALLHOME (20).Example 8-9 displays the install all command output of a failed operation due to an invalid image.
Example 8-9 Failed Operation Due to an Invalid Image
install all system bootflash:junk kickstart bootflash:junkVerifying image bootflash:/junk[# ] 0% -- FAIL. Return code 0x4045001E (mismatch between actual image type and boot variable).Compatibility check failed. Return code 0x40930011 (Image verification failed).Hacienda# Jan 19 00:20:35 Hacienda %SYSMGR-3-SERVICE_TERMINATED: Service "installer" (PID 5664) has finished with error code SYSMGR_EXITCODE_FAILURE_NOCALLHOME (20).Upgrade Status Verification
Use the show install all status command to view the ongoing install all command or the log of the last installed install all command from a console, SSH, or Telnet session.
This command presents the install all output on both the active and standby supervisor module even if you are not connected to the console terminal. It only displays the status of an install all command that is issued from the CLI (not the GUI). See Example 8-10.
Example 8-10 Displays the install all Command Output
switch# show install all statusThere is an on-going installation... <---------------------- in progress installationEnter Ctrl-C to go back to the prompt.Verifying image bootflash:/b-1.3.0.104-- SUCCESSVerifying image bootflash:/i-1.3.0.104-- SUCCESSExtracting "system" version from image bootflash:/i-1.3.0.104.-- SUCCESSExtracting "kickstart" version from image bootflash:/b-1.3.0.104.-- SUCCESSExtracting "loader" version from image bootflash:/b-1.3.0.104.-- SUCCESSswitch# show install all statusThis is the log of last installation. <<<<<< log of last installVerifying image bootflash:/b-1.3.0.104-- SUCCESSVerifying image bootflash:/i-1.3.0.104-- SUCCESSExtracting "system" version from image bootflash:/i-1.3.0.104.-- SUCCESSExtracting "kickstart" version from image bootflash:/b-1.3.0.104.-- SUCCESSExtracting "loader" version from image bootflash:/b-1.3.0.104.-- SUCCESSNon-Disruptive Upgrades on Fabric and Modular Switches
This section describes how to perform non-disruptive upgrades on the following Cisco Fabric Switches:
•
•
•
•
•
This section includes the following topics:
•
•
•
•
Preparing for a Non-Disruptive Upgrade on Fabric and Modular Switches
You can upgrade software on the following without any disruptions using the install all command for the system software images.
•
•
•
•
•
When completed, the supervisor kickstart image, supervisor system image, the linecard image and the system bios are all updated.
Non-disruptive upgrades on these fabric switches take down the control plane for not more than 80 seconds. In some cases, when the upgrade has progressed past the point at which it cannot be stopped gracefully, or if a failure occurs, the software upgrade may be disruptive.
Note
Before attempting to upgrade any software images on these fabric switches, follow these guidelines:
•
–
–
–
–
–
•
•
•
•
•
•
•
•
To ensure that you can view the entire upgrade process, it is recommended that you perform the upgrade via the console port; performing the upgrade in this way also enables you to log your session to a file (in case you need it later for troubleshooting). Also, telnet sessions are lost when the switch is rebooted, so if you wish to view the process in its entirety, use the console port instead.
Example 8-11 Failed Nondisruptive Upgrade Due to Insufficient Resources
switch# install all kickstart bootflash:boot-fs9124 system bootflash:isan-164Verifying image bootflash:/boot-fs9124 for boot variable "kickstart".[####################] 100% -- SUCCESSVerifying image bootflash:/isan-164 for boot variable "system".[####################] 100% -- SUCCESSExtracting "system" version from image bootflash:/isan-164.[####################] 100% -- SUCCESSExtracting "kickstart" version from image bootflash:/boot-fs9124.[####################] 100% -- SUCCESSExtracting "bios" version from image bootflash:/isan-164.[####################] 100% -- SUCCESSCompatibility check is done:Module bootable Impact Install-type Reason------ -------- -------------- ------------ ------1 yes disruptive reset insufficient resources<----Reason for failureImages will be upgraded according to following table:Module Image Running-Version(pri:alt) New-Version Upg-Required------ ---------- ----------------------- ----------- --------------------1 system 3.1(1u) 3.1(1) yes1 kickstart 3.1(1u) 3.1(1) yes1 bios v1.0.0(10/04/06):v1.0.0(10/04/06) v1.0.0(10/04/06) noDo you want to continue with the installation (y/n)? [n]Before performing an upgrade, you may wish to use the show install all impact command to view the effect of updating the system from the running image to another specified image.
switch# show install all impact kickstart bootflash:boot-fs9124 system bootflash:isan-164Verifying image bootflash:/boot-fs9124 for boot variable "kickstart".[####################] 100% -- SUCCESSVerifying image bootflash:/isan-164 for boot variable "system".[####################] 100% -- SUCCESSExtracting "system" version from image bootflash:/isan-164.[####################] 100% -- SUCCESSExtracting "kickstart" version from image bootflash:/boot-fs9124.[####################] 100% -- SUCCESSExtracting "bios" version from image bootflash:/isan-164.[####################] 100% -- SUCCESSCompatibility check is done:Module bootable Impact Install-type Reason------ -------- -------------- ------------ ------1 yes non-disruptive resetImages will be upgraded according to following table:Module Image Running-Version(pri:alt) New-Version Upg-Required------ ---------- ------------------------ ----------- -------------1 system 3.1(1u) 3.1(1) yes1 kickstart 3.1(1u) 3.1(1) yes1 bios v1.0.0(10/04/06): v1.0.0(10/04/06) v1.0.0(10/04/06) noswitch#Performing a Non-Disruptive Upgrade on a Fabric Switch
To perform a non-disruptive software upgrade on any of the following switches, enter the install all kickstart command using the console port:
•
•
•
•
•
switch# install all kickstart bootflash:boot-fs9124 system bootflash:isan-164uVerifying image bootflash:/boot-fs9124 for boot variable "kickstart".[####################] 100% -- SUCCESSVerifying image bootflash:/isan-164u for boot variable "system".[####################] 100% -- SUCCESSExtracting "system" version from image bootflash:/isan-164u.[####################] 100% -- SUCCESSExtracting "kickstart" version from image bootflash:/boot-fs9124.[####################] 100% -- SUCCESSExtracting "bios" version from image bootflash:/isan-164u.[####################] 100% -- SUCCESSCompatibility check is done:Module bootable Impact Install-type Reason------ -------- -------------- ------------ ------1 yes non-disruptive resetImages will be upgraded according to following table:Module Image Running-Version(pri:alt) New-Version Upg-Required------ ---------- -------------------------- -------------------- ------------1 system 3.1(1) 3.1(1u) yes1 kickstart 3.1(1) 3.1(1u) yes1 bios v1.0.0(10/04/06): v1.0.0(10/04/06) v1.0.0(10/04/06) noDo you want to continue with the installation (y/n)? [n]Install is in progress, please wait.Notifying services about the upgrade.[####################] 100% -- SUCCESSSetting boot variables.[####################] 100% -- SUCCESSPerforming configuration copy.[####################] 100% -- SUCCESSConverting startup config.[####################] 100% -- SUCCESSUpgrade can no longer be aborted, any failure will result in a disruptive upgrade. <---Note that after this point you cannot abort the upgrade.Freeing memory in the file system.[####################] 100% -- SUCCESSLoading images into memory.[####################] 100% -- SUCCESSSaving linecard runtime state.[####################] 100% -- SUCCESSSaving supervisor runtime state.[####################] 100% -- SUCCESSSaving mts state.[####################] 100% -- SUCCESSRebooting the switch to proceed with the upgrade.Continuing with installation process, please wait.The login will be disabled until the installation is completed.Status for linecard upgrade.[####################] 100% -- SUCCESSPerforming supervisor state verification.[####################] 100% -- SUCCESSInstall has been successful.
Caution
Note
Viewing the Status of a Non-Disruptive Upgrade on a Fabric Switch
You can view the status of a non-disruptive upgrade using the show install all status command. Note that the output shows the status only after the switch has rebooted to come up with the new image. All actions preceding the reboot are not captured in this output because when you enter the install all command using a telnet session, the session is disconnected when the switch reboots. After you can reconnect to the switch via a telnet session, the upgrade may already be complete; in this case, the output will show the status of the upgrade.
switch# show install all statusThis is the log of last installation.Continuing with installation process, please wait.The login will be disabled until the installation is completed.Status for linecard upgrade.-- SUCCESSPerforming supervisor state verification.-- SUCCESSInstall has been successful.Troubleshooting a Non-Disruptive Upgrade on a Fabric Switch
When a non-disruptive upgrade begins, the system notifies all services that an upgrade is about to start, and finds out whether or not the upgrade can proceed. If a service cannot allow the upgrade to proceed at this time (for example, FSPF timers are not configured to the default value, or a CFS operation is in progress), then the service will abort the upgrade. In such a context, you will be prompted to enter the show install all failure-reason command to determine the reason why the upgrade cannot proceed.
...Do you want to continue with the installation (y/n)? [n] yInstall is in progress, please wait.Notifying services about the upgrade.[# ] 0% -- FAIL. Return code 0x401E0066 (request timed out).Please issue "show install all failure-reason" to find the cause of the failure.<---system prompt to enter the show all failure-reason command.Install has failed. Return code 0x401E0066 (request timed out).Please identify the cause of the failure, and try 'install all' again.switch# show install all failure-reasonService: "cfs" failed to respond within the given time period.switch#If there are any failures for whatever reason (a save runtime state failure or linecard upgrade failure) once the upgrade is already in progress, then the switch will be rebooted disruptively because the changes cannot be rolled back. In such cases the upgrade has failed; you are not prompted to enter the show install all failure-reason command, and entering it will not yield any useful information.
If further assistance is required to determine why an upgrade is unsuccessful, you should collect the details from the show tech-support command output, and the console output from the installation, if available.
Manual Upgrade on a Dual Supervisor Module Switch
Caution
You can manually upgrade the BIOS and the loader in any Cisco MDS switch using the procedures provided in this section. This upgrade process requires you to implement some or all procedures depending on your switch or network configuration.
This section includes the following topics:
•
•
•
Preparing for a Manual Installation
To prepare any Cisco MDS 9000 Family switch for a manual software installation, follow these steps:
Step 1
Step 2
Step 3
The switch remains operational while the image file is copied.
•
switch# copy scp://server_IP_address/destination_file_nameFor example:
switch# copy scp://user@10.1.7.2/system-image bootflash:system-image
Note
•
switch# copy scp://server_IP_address/file_name_in_SCP slot0:system-imageYou can also copy the image onto a new Flash disk from a PC and insert it in slot0: in the Cisco MDS 9500 Series switch. After you copy the image and insert it into the slot0: file system, the process is the same as the CompactFlash device after the copy command is issued.
Step 4
switch# dir bootflash:40295206 Aug 05 15:23:51 1980 ilc1.bin12456448 Jul 30 23:05:28 1980 kickstart-image112288 Jun 23 14:58:44 1980 lost+found/27602159 Jul 30 23:05:16 1980 system-image112447232 Aug 05 15:08:30 1980 kickstart-image228364853 Aug 05 15:11:57 1980 system-image2Usage for bootflash://sup-local135404544 bytes used49155072 bytes free184559616 bytes totalStep 5
When copying a new image to your switch, confirm that the image was not corrupted during the copy process.
Use the show version image command to verify that the required image was copied successfully.
switch# show version image bootflash:kickstart-imageimage name: m9500-sf1ek9-kickstart-mzg.1.0.3.binkickstart: version 1.0(3)loader: version 1.0(3)compiled: 2/12/2003 11:00:00
Note
Step 6
Upgrading a Loader
The install module slot# of the supervisor module loader command upgrades the (boot) loader.
Note
Caution
To upgrade the loader on either the active or standby supervisor module, follow these steps.
Step 1
switch# show versionCisco Storage Area Networking Operating System (SAN-OS) SoftwareTAC support: http://www.cisco.com/tacCopyright (c) 2002-2003, Cisco Systems, Inc. All rights reserved.The copyrights to certain works contained herein are owned byCisco Systems, Inc. and/or other third parties and are used anddistributed under license. Some parts of this software are coveredunder the GNU Public License. A copy of the license is availableat http://www.gnu.org/licenses/gpl.html.SoftwareBIOS: version 1.0.8loader: version 1.1(2) <-------------------------current running versionkickstart: version 2.0(1)system: version 2.0(1)BIOS compile time: 08/07/03kickstart image file is: bootflash:///m9500-sf1ek9-kickstart-mzg.2.0.0.6.binkickstart compile time: 10/25/2010 12:00:00system image file is: bootflash:///m9500-sf1ek9-mzg.2.0.0.6.binsystem compile time: 10/25/2020 12:00:00HardwareRAM 1024584 kBbootflash: 1000944 blocks (block size 512b)slot0: 0 blocks (block size 512b)172.22.92.181 uptime is 0 days 2 hours 18 minute(s) 1 second(s)Last reset at 970069 usecs after Tue Sep 16 22:31:25 1980Reason: Reset Requested by CLI command reloadSystem version: 2.0(0.6)Service:Step 2
switch# install module 6 loader bootflash:kickstart-image
Note
Step 3
switch# show versionCisco Storage Area Networking Operating System (SAN-OS) SoftwareTAC support: http://www.cisco.com/tacCopyright (c) 2002-2003, Cisco Systems, Inc. All rights reserved.The copyrights to certain works contained herein are owned byCisco Systems, Inc. and/or other third parties and are used anddistributed under license. Some parts of this software are coveredunder the GNU Public License. A copy of the license is availableat http://www.gnu.org/licenses/gpl.html.SoftwareBIOS: version 1.3.1loader: version 1.2(2) <---------------New running versionkickstart: version 1.3(1) ]system: version 1.3(1)BIOS compile time: 08/07/03kickstart image file is: bootflash:///m9500-sf1ek9-kickstart-mzg.2.0.0.6.binkickstart compile time: 10/25/2010 12:00:00system image file is: bootflash:///m9500-sf1ek9-mzg.2.0.0.6.binsystem compile time: 10/25/2020 12:00:00HardwareRAM 1024584 kBbootflash: 1000944 blocks (block size 512b)slot0: 0 blocks (block size 512b)172.22.92.181 uptime is 0 days 2 hours 18 minute(s) 1 second(s)Last reset at 970069 usecs after Tue Sep 16 22:31:25 1980Reason: Reset Requested by CLI command reloadSystem version: 2.0(0.6)Service:
Upgrading the BIOS
Tip
Program the supervisor module or switching module BIOS only if a new BIOS image is provided by Cisco Systems. Only use the provided image to upgrade the BIOS. This command does not affect traffic and can be issued at any time on any switch in the Cisco MDS 9200 Series or Cisco MDS 9500 Series.
Note
Caution
To upgrade the BIOS for a module, follow these steps:
Step 1
switch# show versionCisco Storage Area Networking Operating System (SAN-OS) SoftwareTAC support: http://www.cisco.com/tacCopyright (c) 2002-2003 by Cisco Systems, Inc. All rights reserved.The copyright for certain works contained herein are owned byCisco Systems, Inc. and/or other third parties and are used anddistributed under license.SoftwareBIOS: version 1.0(6) <--------------- current running versionloader: version 1.0(3)kickstart: version 1.0(3)system: version 1.0(3)BIOS compile time: 01/27/03kickstart image file is: bootflash:/kickstart-imagekickstart compile time: 01/25/2003 12:00:00system image file is: bootflash:/system-imagesystem compile time: 01/25/2003 12:00:00HardwareRAM 1027564 kBStep 2
switch# show version image bootflash:system-imageimage name: m9500-sf1ek9-mz.1.0.3.binbios: version v1.0.6(01/27/03) <--------------- BIOS is same version 1.0.6system: version 1.0(3)compiled: 2/28/2003 5:00:00system service's listpackage name package versionacl 1.0(3)ascii-cfg 1.0(3)bios_daemon 1.0(3)...
Note
Step 3
switch# install module 6 bios system bootflash:system-imageStarted bios programming .... please wait[########################################] 100%BIOS upgrade succeeded for module 1
Caution
Step 4
switch# show version module 6ModNo Image Type SW Version SW Interim Version BIOS Version6 Stby Sup 1.3(2) 1.3(1.1) 1.1.0 [last 1.0.6]
Quick Upgrade
To perform a quick upgrade on a Cisco MDS 9000 Family switch, follow these steps:
Step 1
Step 2
switch# config tswitch(config)# boot system system-imgswitch(config)# boot kickstart kickstart-imgswitch(config)# exitswitch#Step 3
Tip
Downgrading from a Higher Release
Use the install all command to gracefully reload the switch and handle configuration conversions. When downgrading any switch in the Cisco MDS 9000 Family, avoid using the reload command.
Note
For example, to revert to Cisco MDS SAN-OS Release 1.3(4b) or 1.3(5) from Release 3.0(1), follow these steps:
Step 1
switch# show incompatibility system bootflash:m9200-ek9-mz.1.3.4b.binThe following configurations on active are incompatible with the system image1) Service : cfs , Capability : CAP_FEATURE_CFS_ENABLED_DEVICE_ALIASDescription : CFS - Distribution is enabled for DEVICE-ALIASCapability requirement : STRICTDisable command : no device-alias distributeStep 2
switch# config tswitch(config)# no device-alias distributeswitch(config)# exitswitch#Step 3
switch# copy running-config start-configStep 4
Maintaining Supervisor Modules
This section includes general information about replacing and using supervisor modules effectively.
This section includes the following topics:
•
•
•
•
Replacing Supervisor Modules
To avoid packet loss when removing a supervisor module from a Cisco MDS 9500 Series Director, take the supervisor modules out of service before removing the supervisor module.
Use the out-of-service command in EXEC mode before removing the supervisor module.
out-of-service module slot
Where slot indicates the chassis slot number in which the supervisor module resides.
Note
Migrating from Supervisor-1 Modules to Supervisor-2 Modules
Supervisor-1 modules and Supervisor-2 modules cannot be used in the same switch, except for migration purposes. Both the active and standby supervisor modules must be of the same type, either Supervisor-1 or Supervisor-2 modules. For Cisco MDS 9513 Directors, both supervisor modules must be Supervisor-2 modules.
The procedure described in this section ensures that your configuration is correctly synchronized after completing the migration.
Caution
For step-by-step instructions about migrating from Supervisor 1 modules to Supervisor 2 modules, refer to the Cisco MDS 9000 Family NX-OS and SAN-OS Software Upgrade and Downgrade Guide.
Note
Standby Supervisor Module Boot Variable Version
If the standby supervisor module boot variable images are not the same version as those running on the active supervisor module, the software forces the standby supervisor module to run the same version as the active supervisor module.
If you specifically set the boot variables of the standby supervisor module to a different version and reboot the standby supervisor module, the standby supervisor module will only load the specified boot variable if the same version is also running on the active supervisor module. At this point, the standby supervisor module is not running the images set in the boot variables.
Standby Supervisor Module Bootflash Memory
When updating software images on the standby supervisor module, verify that there is enough space available for the image using the dir bootflash://sup-standby/ command. It is a good practice to remove older versions of Cisco MDS SAN-OS images and kickstart images.
Standby Supervisor Module Boot Alert
If a standby supervisor module fails to boot, the active supervisor module detects that condition and generates a Call Home event and a system message and reboots the standby supervisor module approximately 3 to 6 minutes after the standby supervisor module moves to the loader> prompt.
The following system message is issued:
%DAEMON-2-SYSTEM_MSG:Standby supervisor failed to boot up.This error message is also generated if one of the following situations apply:
•
•
Installing Generation 2 Modules in Generation 1 Chassis
The Generation 2 modules have the following installation restrictions:
•
Note
•
•
•
Replacing Modules
When you replace any module (supervisor, switching, or services module), you must ensure that the new module is running the same software version as the rest of the switch.
Refer to Cisco MDS 9000 Family SAN Volume Controller Configuration Guide for configuration details on replacing the caching services module (CSM).
Note
Tip
Issuing the install all command after replacing any module, ensures the following actions:
•
•
•
To replace a module in any switch in the Cisco MDS 9200 Series or 9500 Series, follow these steps:
Step 1
Step 2
Step 3
Step 4
Step 5
Default Settings
Table 8-6 lists the default image settings for all Cisco MDS 9000 Family switches.
Table 8-6 Default Image Settings
Kickstart image
No image is specified.
System image
No image is specified.