-
Cisco MDS 9000 Family CLI Configuration Guide, Release 3.3(3)
-
Index
-
New and Changed Information
-
Preface
- Getting Started
- Installation and Switch Management
- Switch Configuration
-
Fabric Configuration
-
Configuring and Managing VSANs
-
SAN Device Virtualization
-
Creating Dynamic VSANs
-
Configuring Inter-VSAN Routing
-
Distributing Device Alias Services
-
Configuring Fibre Channel Routing Services and Protocols
-
Managing FLOGI, Name Server, FDMI, and RSCN Databases
-
Discovering SCSI Targets
-
Configuring FICON
-
Advanced Features and Concepts
-
Configuring and Managing Zones
-
-
Security
-
Configuring FIPS
-
Configuring Users and Common Roles
-
Configuring SNMP
-
Configuring RADIUS and TACACS+
-
Configuring IPv4 and IPv6 Access Control Lists
-
Configuring Certificate Authorities and Digital Certificates
-
Configuring IPsec Network Security
-
Configuring FC-SP and DHCHAP
-
Configuring Port Security
-
Configuring Fabric Binding
-
- IP Services
- Intelligent Storage Services
- Network and Switch Monitoring
- Traffic Management
- Troubleshooting
-
Configuration Limits for Cisco MDS SAN-OS Release 3.x
-
 Feedback
Table Of Contents
Removing Appliance-Generated Entities
Removing Initiator-Target-LUNs
Configuring SANTap
The Storage Services Module (SSM) supports SANTap in Cisco MDS SAN-OS Release 2.0(2b) and later.
This chapter includes the following sections:
•
Displaying SANTap Information
•
•
About SANTap
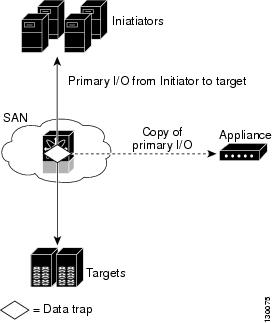
The SANTap feature allows third-party data storage applications, such as long distance replication and continuous backup, to be integrated into the SAN. The protocol-based interface that is offered by SANTap allows easy and rapid integration of the data storage service application because it delivers a loose connection between the application and an SSM, which reduces the effort needed to integrate applications with the core services being offered by the SSM. See Figure 50-1.
Figure 50-1 Integrating Third-Party Storage Applications in a SAN
SANTap has a control path and a data path. The control path handles requests that create and manipulate replication sessions sent by an appliance. The control path is implemented using an SCSI-based protocol. An appliance sends requests to a Control Virtual Target (CVT), which the SANTap process creates and monitors. Responses are sent to the control LUN on the appliance. SANTap also allows LUN mapping to Appliance Virtual Targets (AVTs). You can have a maximum of 512 target LUNs.
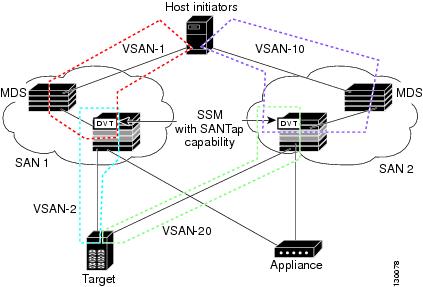
SANTap does not require reconfiguration of either the host or target when introducing SANTap-based applications. Also, neither the host initiator nor the target is required to be directly connected to an SSM. This is accomplished by assigning Cisco-specific WWNs to the virtual initiators (VIs) and Data Virtual Targets (DVTs). A host initiator or a target can be connected directly to an SSM. However, you must partition the SAN using VSANs.
You must configure the host initiator and the DVT in one VSAN and configure the VI and the target in another VSAN. See Figure 50-2.
Figure 50-2 SANTap Proxy Mode-2 Example
You can use SANTap to remove your appliance-based storage applications from the primary data path in SAN. Removing these applications from the primary data path prevents them from compromising the security, availability, and performance of the SAN. SANTap copies the data at line speed and makes it available to other storage applications; these storage applications are prevented from affecting the SAN while maintaining the integrity of the data that storage applications need.
Dynamic LUN is a feature introduced in the Cisco SAN OS release 3.2(1). When one or more LUNs are removed or added on the backend target during the periodic scan, SANTap automatically uninstalls the deleted DVT LUNs and installs any additional LUNs. Uninstallation of the deleted DVT LUNs is done even if the total number of LUNs remains the same.
In previous releases, when the set of LUNs changed on the target, the original LUN list was displayed on the DVT. The new and changed LUNs were not reflected on the DVT. However, if the total number of LUNs increases, then the additional LUNs are installed and displayed on the host.
Before Cisco SAN OS release 3.2(1), a user had the following options for displaying the LUN list on DVT:
•
•
64-Bit LUN Support- In Cisco SAN OS release 3.2(1) or later releases, SANTap supports 64-bit LUNs on the target.
The following CLI commands are used to obtain the mapping between the host-side LUN and the target-side LUN:
Switch# show santap module <num> dvtlun
Switch# show santap module <num> dvtlun brief
Module# show santap vttbl dvt <dvt_wwn> host <host_wwn>Configuring SANTap
This section includes the following topics:
Enabling SANTap
SANTap can be enabled on an entire SSM or it can be enabled on a group of four ports on an SSM. Enabling SANTap on interfaces has the following restrictions:
•
•
•
To enable the SANTap feature, follow these steps:
Note
Configuring DVTs
To configure a DVT, follow these steps:
In Cisco SAN OS release 3.2(1) or later releases, SANTap supports 32 host initiators per DVT.
Displaying SANTap Information
Use the show santap module command to display information about SANTap (see Example 50-1 to Example 50-8).
Example 50-1 Displays SANTap CVT Information
switch# show santap module 2 cvtCVT Information :cvt pwwn = 23:4f:00:0d:ec:09:3c:02cvt nwwn = 23:9d:00:0d:ec:09:3c:02cvt id = 135895180cvt xmap_id = 135895212cvt vsan = 8cvt name =Example 50-2 Displays SANTap DVT Information
switch# show santap module 2 dvtDVT Information :dvt pwwn = 50:06:0e:80:03:81:32:36dvt nwwn = 50:06:0e:80:03:81:32:36dvt id = 136773180dvt mode = 3dvt vsan = 12dvt if_index = 0x1080000dvt fp_port = 1dvt name = MYDVTdvt tgt-vsan = 9dvt io timeout = 10 secsdvt lun size handling = 0dvt app iofail behaviour = 1dvt quiesce behavior = 1dvt tgt iofail behavior = 0dvt appio failover time = 50 secsdvt inq data behavior = 0Example 50-3 Displays SANTap DVT LUN Information
switch# show santap module 2 dvtlunDVT LUN Information :dvt pwwn = 22:00:00:20:37:88:20:efdvt lun = 0x0xmap id = 8dvt id = 3dvt mode = 0dvt vsan = 3tgt pwwn = 22:00:00:20:37:88:20:eftgt lun = 0x0tgt vsan = 1Example 50-4 Displays SANTap Session Information
switch# show santap module 2 sessionSession Information :session id = 1host pwwn = 21:00:00:e0:8b:12:8b:7advt pwwn = 50:06:0e:80:03:81:32:36dvt lun = 0x0tgt pwwn = 50:06:0e:80:03:81:32:36tgt lun = 0x0adt pwwn = 33:33:33:33:33:33:33:00adt lun = 0x0aci pwwn = 22:22:22:22:22:22:22:22cvt pwwn = 23:4f:00:0d:ec:09:3c:02num ranges = 0session state = 5redirect mode = 0mrl requested 1MRL : vsan 8 RegionSize 4806720, DiskPWWN 0x234f000dec093c02, DiskLun 0x 1, startLBA 1pwl requested 1PWL : type 2, UpdatePol 2, RetirePolicy 4, pwl_start 1iol requested 0Example 50-5 Displays SANTap AVT Information
switch# show santap module 2 avtAVT Information :avt pwwn = 2a:4b:00:05:30:00:22:25avt nwwn = 2a:60:00:05:30:00:22:25avt id = 12avt vsan = 4avt if_index = 0x1080000hi pwwn = 21:00:00:e0:8b:07:61:aatgt pwwn = 22:00:00:20:37:88:20:eftgt vsan = 1Example 50-6 Displays SANTap AVT LUN Information
switch# show santap module 2 avtlunAVT LUN Information :avt pwwn = 2a:4b:00:05:30:00:22:25avt lun = 0x0xmap id = 16avt id = 12tgt lun = 0x0Example 50-7 Displays SANTap Remote Virtual Terminal Information
switch# show santap module 2 rvtRVT Information :rvt pwwn = 2a:61:00:05:30:00:22:25rvt nwwn = 2a:62:00:05:30:00:22:25rvt id = 17rvt vsan = 4rvt if_index = 0x1080000Example 50-8 Displays SANTap Remote Virtual Terminal LUN Information
switch# show santap module 2 rvtlunRVT LUN Information :rvt pwwn = 2a:61:00:05:30:00:22:25rvt lun = 0x0xmap id = 22rvt id = 17app pwwn = 22:00:00:20:37:39:b1:00app lun = 0x0app vsan = 1Removing Appliance-Generated Entities
An appliance might terminate its SANTap application without removing generated entities on the MDS switch. This section describes how to remove these entities using the CLI on the MDS switch.
This section includes the following topics:
•
Removing AVTs and AVT LUNs
Occasionally the AVT and AVT LUN configuration remains after a SANTap application terminates. To remove AVTs and AVT LUNs, follow these steps:
Removing SANTap Sessions
Occasionally a SANTap session continues after a SANTap application terminates. To remove a SANTap session, follow these steps:
Removing Initiator-Target-LUNs
The initiator-target-LUN (ITL) triplet identifies a LUN loaded on a DVT. Occasionally the ITL configuration remains after a SANTap application terminates. To remove all LUNs for an ITL triplet, follow these steps:
Default Settings
Table 50-1 lists the default settings for SANTap parameters.
Table 50-1 Default SANTap Parameters
SANTap feature
Disabled.
DVT IO timeout
10 seconds.
DVT LUN size handling flag
1 (enabled).
Note
Enabling SANTap on SSM
SANTap can be enabled on SSM.
The following command enables SANTap on SSM:
switch(config)#
switch# ssm enable feature santap module 1