高级网络配置

本章包含以下部分:

以太网接口上的媒体设置

以太网接口的媒体设置可使用 etherconfig 命令访问。每个以太网接口连同其当前设置一起列出。选择接口后,将会显示可能的介质设置。有关示例,请参阅编辑介质设置示例

使用 etherconfig 编辑以太网接口上的介质设置

etherconfig 命令可用于设置以太网接口的双工设置(全/半)以及速度(10/100/1000 Mbps)。默认情况下,接口会自动选择介质设置;但某些情况下,您可能希望覆盖此设置。


Note


如果您已按照“设置和安装”一章中的说明完成了 GUI 的系统设置向导(或命令行界面 systemsetup 命令)并确认了更改,则默认的以太网接口设置应已在邮件网关上配置。


部分邮件网关提供光纤网络接口选项。如果可用,您会在这些邮件网关上的可用接口列表中看到另外两个以太网接口(Data 3 和 Data 4)。这些千兆光纤接口可以与异类配置中的铜缆(Data 1、Data 2 和管理)接口配对。请参阅网络接口卡配对/组合

编辑介质设置示例

mail3.example.com> etherconfig

Choose the operation you want to perform:
- MEDIA - View and edit ethernet media settings.
- PAIRING - View and configure NIC Pairing.
- VLAN - View and configure VLANs.
- LOOPBACK - View and configure Loopback.
- MTU - View and configure MTU.
- MULTICAST - Accept or reject ARP replies with a multicast address.

[]> media
Ethernet interfaces:
1. Data 1 (Autoselect: <100baseTX full-duplex>) 00:06:5b:f3:ba:6d
2. Data 2 (Autoselect: <100baseTX full-duplex>) 00:06:5b:f3:ba:6e
3. Management (Autoselect: <100baseTX full-duplex>) 00:02:b3:c7:a2:da

Choose the operation you want to perform:
- EDIT - Edit an ethernet interface.
[]> edit
Enter the name or number of the ethernet interface you wish to edit.
[]> 2
Please choose the Ethernet media options for the Data 2 interface.
1. Autoselect
2. 10baseT/UTP half-duplex
3. 10baseT/UTP full-duplex
4. 100baseTX half-duplex

5. 100baseTX full-duplex


6. 1000baseTX half-duplex
7. 1000baseTX full-duplex
[1]> 5
Ethernet interfaces:
1. Data 1 (Autoselect: <100baseTX full-duplex>) 00:06:5b:f3:ba:6d
2. Data 2 (100baseTX full-duplex: <100baseTX full-duplex>) 00:06:5b:f3:ba:6e
3. Management (Autoselect: <100baseTX full-duplex>) 00:02:b3:c7:a2:da
Choose the operation you want to perform:
- EDIT - Edit an ethernet interface.
[]>
Choose the operation you want to perform:
- MEDIA - View and edit ethernet media settings.
- PAIRING - View and configure NIC Pairing.
- VLAN - View and configure VLANs.
- LOOPBACK - View and configure Loopback.
- MTU - View and configure MTU.
- MULTICAST - Accept or reject ARP replies with a multicast address.
[]>
网络接口卡配对/组合

NIC 配对可用于组合任何两个物理数据端口,以在从 NIC 到上游以太网端口的数据路径出现故障时提供备用以太网接口。配对主要是配置以太网接口,以便有一个主接口和一个备用接口。如果主接口发生故障(例如,如果 NIC 和上游节点之间的载体中断),则备用接口变为活动状态,并发送警报。当主接口重新启用后,此接口将自动变为活动状态。在本产品的文档中,NIC 配对与 NIC 组合是同义词。


Note


NIC 配对在 C170、C190 和 C195 邮件网关上不可用。


您可以创建多个 NIC 配对,以为您提供足够的数据端口。创建配对时,可以组合任意两个数据端口。例如:

Data 1 和 Data 2

Data 3 和 Data 4

Data 2 和 Data 3

等等

部分邮件网关提供光纤网络接口选项。如果可用,您会在这些邮件网关上的可用接口列表中看到另外两个以太网接口(Data 3 和 Data 4)。这些千兆光纤接口可以与异类配置中的铜缆(Data 1、Data 2 和管理)接口配对。

NIC 对命名

在创建 NIC 对时,必须指定用于引用该对的名称。在 4.5 之前的 AsyncOS 版本中创建的 NIC 对将在升级后自动接收默认名称“Pair 1”。

因 NIC 配对生成的任何警报都将按名称引用特定的 NIC 对。

NIC 配对和现有侦听程序

如果在为其指定了侦听程序的接口上启用 NIC 配对,系统会提示您删除、重新分配或禁用指定给备用接口的所有侦听程序。

通过 etherconfig 命令启用 NIC 配对


Note


NIC 配对在 C170、C190 和 C195 邮件网关上不可用。


mail3.example.com> etherconfig


Choose the operation you want to perform:

- MEDIA - View and edit ethernet media settings.

- PAIRING - View and configure NIC Pairing.

- VLAN - View and configure VLANs.

- LOOPBACK - View and configure Loopback.

- MTU - View and configure MTU.

- MULTICAST - Accept or reject ARP replies with a multicast address.

[]> pairing
Paired interfaces:

Choose the operation you want to perform:

- NEW - Create a new pairing.

[]> new

Please enter a name for this pair (Ex: "Pair 1"):

[]> Pair 1

Warning: The backup (Data 2) for the NIC Pair is currently configured with one or more
IP addresses. If you continue, the Data 2 interface will be deleted.

Do you want to continue? [N]> y

The interface you are deleting is currently used by listener "OutgoingMail".

What would you like to do?

1. Delete: Remove the listener and all its settings.

2. Change: Choose a new interface.

3. Ignore: Leave the listener configured for interface "Data 2" (the listener will be
disabled until you add a new interface named "Data 2" or edit the listener's settings).


[1]>

Listener OutgoingMail deleted for mail3.example.com.

Interface Data 2 deleted.

Paired interfaces:

1. Pair 1:


Primary (Data 1) Active, Link is up

Backup (Data 2) Standby, Link is up

Choose the operation you want to perform:

- DELETE - Delete a pairing.

- STATUS - Refresh status.

[]>

虚拟局域网 (VLAN)

您可以在邮件网关的任意物理网络端口上配置多个虚拟局域网 (VLAN)。

可以使用 VLAN 来:

  • 邮件网关可连接的网络数增加到超过邮件网关设备上的物理接口数。
  • 允许在现有侦听程序的独立“端口”上定义更多网络。
  • 出于安全考虑对网络进行分段,以简化管理或增加带宽。

使用案例示例:

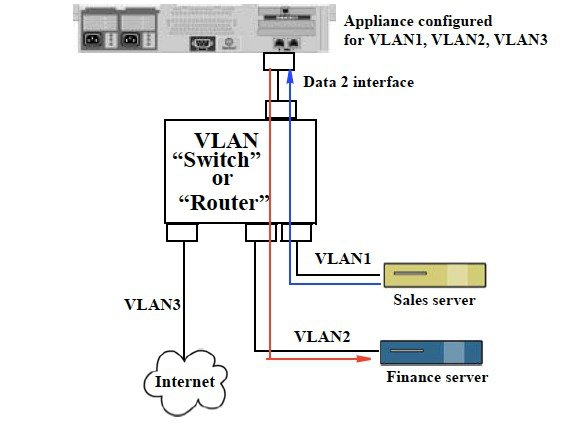
直接因 VLAN 限制而无法通信的两个邮件服务器可以通过邮件网关发送邮件。邮件网关上的 Data 2 接口通过 VLAN1 和 VLAN2 配置。蓝线显示从销售网络 (VLAN1) 发送至设备的邮件。邮件网关按照正常方式处理该,然后在传送时,以目的 VLAN2 信息(红线)标记数据包。

使用 VLAN 加速邮件网关之间的通信

Figure 1. 使用 VLAN 加速邮件网关之间的通信

关于配置 VLAN

可以在邮件网关上的任意物理网络端口上配置多个 VLAN,包括“数据”和“管理”端口以及某些邮件网关型号上提供的光纤数据端口。AsyncOS 最多支持 30 个 VLAN。

物理端口不需要为了进入 VLAN 而配置 IP 地址。在其上创建 VLAN 的物理端口可以有一个用来接收非 VLAN 流量的 IP,以便可以在同一接口上同时拥有 VLAN 和非 VLAN 流量。

VLAN 可与 NIC 配对(在配对的 NIC 上提供)和直接服务器返回 (DSR) 配合使用。

VLAN 显示为以:“VLAN DDDD”格式标记的动态“数据端口”,其中“DDDD”是 ID,是长度最多为 4 位数的整数(例如 VLAN 2 或 VLAN 4094)。VLAN ID 在邮件网关上必须是唯一的。

相关主题

FTP、SSH 和 SCP 访问

管理 VLAN

可以通过 etherconfig 命令创建、编辑和删除 VLAN。创建 VLAN 后,可以通过“网络”(Network) >“接口”(Interfaces) 页面或 CLI 中的 interfaceconfig 命令配置该 VLAN。请记得要确认所有更改。

通过 etherconfig 命令创建新的 VLAN

在本例中,在 Data 1 端口上创建两个 VLAN(名为 VLAN 31 和 VLAN 34):

mail3.example.com> etherconfig


Choose the operation you want to perform:

- MEDIA - View and edit ethernet media settings.

- PAIRING - View and configure NIC Pairing.

- VLAN - View and configure VLANs.

- LOOPBACK - View and configure Loopback.

- MTU - View and configure MTU.

- MULTICAST - Accept or reject ARP replies with a multicast address.

[]> vlan

VLAN interfaces:

Choose the operation you want to perform:

- NEW - Create a new VLAN.

[]> new

VLAN ID for the interface (Ex: "34"):

[]> 34

Enter the name or number of the ethernet interface you wish bind to:

1. Data 1

2. Data 2

3. Management

[1]> 1


VLAN interfaces:

1. VLAN 34 (Data 1)

Choose the operation you want to perform:


- NEW - Create a new VLAN.

- EDIT - Edit a VLAN.

- DELETE - Delete a VLAN.

[]> new

VLAN ID for the interface (Ex: "34"):

[]> 31

Enter the name or number of the ethernet interface you wish bind to:

1. Data 1

2. Data 2

3. Management

[1]> 1

VLAN interfaces:

1. VLAN 31 (Data 1)

2. VLAN 34 (Data 1)

Choose the operation you want to perform:

- NEW - Create a new VLAN.

- EDIT - Edit a VLAN.

- DELETE - Delete a VLAN.

[]>

Choose the operation you want to perform:

- MEDIA - View and edit ethernet media settings.

- PAIRING - View and configure NIC Pairing.

- VLAN - View and configure VLANs.

- LOOPBACK - View and configure Loopback.

- MTU - View and configure MTU.

- MULTICAST - Accept or reject ARP replies with a multicast address.

[]>

通过 interfaceconfig 命令在 VLAN 上创建 IP 接口

在本例中,在 VLAN 31 以太网接口上创建新的 IP 接口。

对接口进行更改可能会断开您与邮件网关的连接。

mail3.example.com> interfaceconfig

Currently configured interfaces:

1. Data 1 (10.10.1.10/24: example.com)

2. Management (10.10.0.10/24: example.com)

Choose the operation you want to perform:

- NEW - Create a new interface.

- EDIT - Modify an interface.

- GROUPS - Define interface groups.

- DELETE - Remove an interface.

[]> new


Please enter a name for this IP interface (Ex: "InternalNet"):


[]> InternalVLAN31

Would you like to configure an IPv4 address for this interface (y/n)? [Y]>

IPv4 Address (Ex: 10.10.10.10):

[]> 10.10.31.10

Netmask (Ex: "255.255.255.0" or "0xffffff00"):

[255.255.255.0]>

Would you like to configure an IPv6 address for this interface (y/n)? [N]>

Ethernet interface:

1. Data 1

2. Data 2

3. Management

4. VLAN 31

5. VLAN 34

[1]> 4

Hostname:

[]> mail31.example.com

Do you want to enable SSH on this interface? [N]>

Do you want to enable FTP on this interface? [N]>

Do you want to enable HTTP on this interface? [N]>

Do you want to enable HTTPS on this interface? [N]>

Currently configured interfaces:

1. Data 1 (10.10.1.10/24: example.com)

2. InternalVLAN31 (10.10.31.10/24: mail31.example.com)

3. Management (10.10.0.10/24: example.com)

Choose the operation you want to perform:

- NEW - Create a new interface.

- EDIT - Modify an interface.

- GROUPS - Define interface groups.

- DELETE - Remove an interface.

[]>

使用 Web 界面配置 VLAN

使用 etherconfig 命令创建 VLAN 后,可以使用“网络”>“侦听程序”页对其进行配置。

直接服务器返回

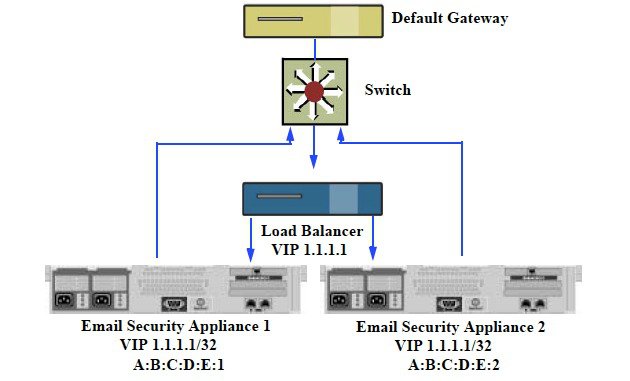
直接服务器返回 (DSR) 是一种为轻量级负载均衡机制提供支持的方式,以实现共享同一虚拟 IP (VIP) 的多个邮件网关之间的负载均衡。

DSR 通过在邮件网关的“环回”以太网接口上创建的 IP 接口实现。


Note


邮件网关配置负载均衡不在本文档的范围之内


启用直接服务器返回

通过在每个参与邮件网关上启用“环回”以太网接口来启用 DSR。接下来,使用 CLI 中的 interfaceconfig 命令或 GUI 中的“网络”(Network) >“接口”(Interfaces) 页面通过虚拟 IP (VIP) 在环回接口上创建 IP 接口。最后,使用 CLI 中的 listenerconfig 命令或 GUI 中的“网络”(Network) >“侦听程序”(Listeners) 页面在新 IP 接口上创建侦听程序。请记得要确认所有更改。


Note


使用环回接口可以防止邮件网关针对该特定接口发出 ARP 应答


当启用 DSR 时,以下规则适用:

所有系统都使用同一虚拟 IP (VIP) 地址

所有系统必须与负载均衡器位于同一交换机和子网上
Figure 2. 使用 DSR 实现交换机上多个邮件网关之间的负载均衡

使用 DSR 实现交换机上多个邮件网关之间的负载均衡

通过 etherconfig 命令启用环回接口

启用后,环回接口将像其他任何接口(例如 Data 1)一样被跟踪:

mail3.example.com> etherconfig

Choose the operation you want to perform:

- MEDIA - View and edit ethernet media settings.

- PAIRING - View and configure NIC Pairing.

- VLAN - View and configure VLANs.

- LOOPBACK - View and configure Loopback.

- MTU - View and configure MTU.

- MULTICAST - Accept or reject ARP replies with a multicast address.


[]> loopback

Currently configured loopback interface:

Choose the operation you want to perform:


- ENABLE - Enable Loopback Interface.

[]> enable

Currently configured loopback interface:


1. Loopback

Choose the operation you want to perform:

- DISABLE - Disable Loopback Interface.

[]>

Choose the operation you want to perform:

- MEDIA - View and edit ethernet media settings.

- PAIRING - View and configure NIC Pairing.

- VLAN - View and configure VLANs.

- LOOPBACK - View and configure Loopback.

- MTU - View and configure MTU.

- MULTICAST - Accept or reject ARP replies with a multicast address.

[]>

通过 interfaceconfig 命令在环回接口上创建 IP

在环回接口上创建 IP 接口:

mail3.example.com> interfaceconfig

Currently configured interfaces:

1. Data 1 (10.10.1.10/24: example.com)

2. InternalV1 (10.10.31.10/24: mail31.example.com)

3. Management (10.10.0.10/24: example.com)

Choose the operation you want to perform:

- NEW - Create a new interface.

- EDIT - Modify an interface.

- GROUPS - Define interface groups.

- DELETE - Remove an interface.

[]> new

Please enter a name for this IP interface (Ex: "InternalNet"):

[]> LoopVIP

Would you like to configure an IPv4 address for this interface (y/n)? [Y]>

IPv4 Address (Ex: 10.10.10.10):

[]> 10.10.1.11

Netmask (Ex: "255.255.255.0" or "0xffffff00"):

[255.255.255.0]> 255.255.255.255

Would you like to configure an IPv6 address for this interface (y/n)? [N]>

Ethernet interface:

1. Data 1

2. Data 2

3. Loopback

4. Management

5. VLAN 31

6. VLAN 34

[1]> 3

Hostname:

[]> example.com

Do you want to enable SSH on this interface? [N]>


Do you want to enable FTP on this interface? [N]>


Do you want to enable HTTP on this interface? [N]>

Do you want to enable HTTPS on this interface? [N]>


Currently configured interfaces:

1. Data 1 (10.10.1.10/24: example.com)

2. InternalV1 (10.10.31.10/24: mail31.example.com)

3. LoopVIP (10.10.1.11/24: example.com)

4. Management (10.10.0.10/24: example.com)

Choose the operation you want to perform:

- NEW - Create a new interface.

- EDIT - Modify an interface.

- GROUPS - Define interface groups.

- DELETE - Remove an interface.

[]>

在新 IP 接口上创建侦听程序

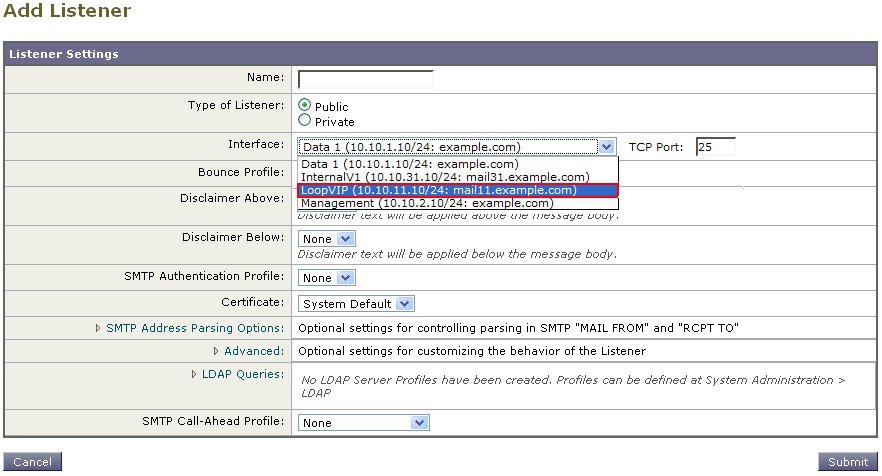
通过 GUI 或 CLI 在新 IP 接口上创建侦听程序。例如,下图显示了 GUI 的“添加侦听程序”(Add Listener) 页面上可用的新创建的 IP 接口。

Figure 3. 在新环回 IP 接口上创建侦听程序


以太网接口的最大传输单位

最大传输单位 (MTU) 是以太网接口将接受的最大数据单位。可以通过 etherconfig 命令降低以太网接口的 MTU。默认的 MTU 大小是 1500 字节,这是以太网可以接受的最大 MTU。

要编辑接口的 MTU,请执行以下操作:

mail3.example.com> etherconfig

Choose the operation you want to perform:

- MEDIA - View and edit ethernet media settings.

- PAIRING - View and configure NIC Pairing.

- VLAN - View and configure VLANs.

- LOOPBACK - View and configure Loopback.

- MTU - View and configure MTU.

- MULTICAST - Accept or reject ARP replies with a multicast address.

[]> mtu

Ethernet interfaces:

1. Data 1 mtu 1400

2. Data 2 default mtu 1500

3. Management default mtu 1500

Choose the operation you want to perform:

- EDIT - Edit an ethernet interface.

[]> edit

Enter the name or number of the ethernet interface you wish to edit.

[]> 2

Please enter a non-default (1500) MTU value for the Data 2 interface.

[]> 1200

Ethernet interfaces:

1. Data 1 mtu 1400

2. Data 2 mtu 1200

3. Management default mtu 1500

Choose the operation you want to perform:

- EDIT - Edit an ethernet interface.

[]>

接受或拒绝包含组播地址的 ARP 应答

您现在可指定是接受还是拒绝包含组播地址的 ARP 应答。使用 MULTICAST 子命令配置此功能。

以下示例显示如何将邮件网关配置为接受包含组播地址的 ARP 应答:


mail.example.com> etherconfig
Choose the operation you want to perform:
- MEDIA - View and edit ethernet media settings.
- VLAN - View and configure VLANs.
- LOOPBACK - View and configure Loopback.
- MTU - View and configure MTU.
- MULTICAST - Accept or reject ARP replies with a multicast address.
[]> multicast
ARP replies with a multicast address will be rejected.
Choose the operation you want to perform:
- ACCEPT - Accept ARP replies with a multicast address.
[]> accept
ARP replies with a multicast address will be accepted.