CSM-S構成例(ブリッジ モード、NATなし)
ここでは、CSM-Sの設定について説明します。この設定により、クライアントはHTTPを3つのWebサーバ(IPアドレスは192.168.6.10、192.168.6.20、192.168.6.30)にロードバランシングし、
HTTPSをオフロードしてから、同一の3つのWebサーバにロードバランシングできます。
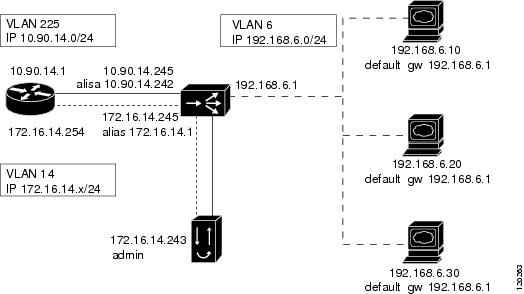
この例では、CSM-SクライアントVLAN(仮想LAN)およびSSLドータカード用のサーバVLANは、同一のIPサブネット(ブリッジ モード)で設定されますが、WebサーバはプライベートIPネットワークにあり、別のVLANに属します(図B-1を参照)。
CSM-Sは、SSLドータカードに暗号化トラフィックを送るときに、Network Address Translation(NAT;ネットワーク アドレス変換)処理を実行しないように設定されます。SSLドータカードも、復号化トラフィックをロードバランシングするためにCSM-Sに戻すときに、NAT処理を実行しないように設定されます。次に、CSM-Sは、選択された宛先サーバへの復号化トラフィックに対してNATを実行するように設定されます。
管理ネットワークは、クライアント トラフィック ネットワークから分離され、独自の管理VLANに属する必要があります。管理VLANは、CSM-SおよびSSLドータカードの両方に設定される必要があります。
図B-1 構成例(ブリッジ モード、NATなし)
次のアドレスがCSM-S上に設定されます。
• クライアント クリア テキスト トラフィック ― 10.90.14.181:80
• クライアントSSLトラフィック ― 10.90.14.181:443
• SSLドータカードからの復号化トラフィック ― 10.90.14.181:80
• クライアント通信用のクライアントVLAN 225 ― IPアドレスは10.90.14.245
• SSLドータカード通信用のサーバVLAN 443 ― IPアドレスは10.90.14.245、エイリアスは10.90.14.242
• SSLドータカードへの管理通信を可能にするサーバVLAN 999 ― IPアドレスは172.16.1.2
• 実サーバ通信用のサーバVLAN 6 ― IPアドレスは192.168.6.2、エイリアスは192.168.6.1
次のアドレスがSSLドータカード上に設定されます。
• 10.90.14.181:443(このIPアドレスは、CSM-Sおよびブリッジ モード要件である secondary キーワードで設定されます)
• VLAN 443 ― IPアドレスは10.90.14.243、ゲートウェイは10.90.14.1
• VLAN 999 ― IPアドレスは172.16.1.3、ゲートウェイは172.16.1.1(管理がイネーブルになります)
図B-1に、同一サブネット内のVLAN 225とVLAN 443、別のサブネット内のVLAN 6を示します。
すべてのVLAN(上記に記載)をVLANデータベースに追加して、Multilayer Switch Feature Card(MSFC;マルチレイヤ スイッチ フィーチャ カード)上でVLAN 999、VLAN 225およびVLAN 6のVLANインターフェイスのIPアドレスを設定します。
(注) VLAN 999(172.16.1.1)およびVLAN 225(10.90.14.1)は、MSFC上のレイヤ3インターフェイスとして存在します。VLAN 443およびVLAN 6(192.168.6.1)は、VLANデータベース内のVLANとして存在しますが、MSFC上に対応するレイヤ3インターフェイスはありません。
次に、スイッチMSFCにレイヤ2およびレイヤ3 VLANを作成する例を示します。
Cat6k# configure terminal
Enter configuration commands, one per line. End with CNTL/Z.
Cat6k(config-vlan)# name Server_communications
Cat6k(config-if)# vlan 225
Cat6k(config-vlan)# name Client_communications
Cat6k(config-vlan)# interface Vlan225
Cat6k(config-if)# ip address 10.90.14.1 255.255.255.0
Cat6k(config-if)# no shutdown
Cat6k(config-if)# vlan 443
Cat6k(config-vlan)# name SSL-DC_communications
Cat6k(config-if)# vlan 999
Cat6k(config-vlan)# name SSL-DC_administrative
Cat6k(config-vlan)# interface Vlan999
Cat6k(config-if)# ip address 172.16.1.1 255.255.255.0
Cat6k(config-if)# no shutdown
次に、スロット番号5に搭載されたCSM-SにクライアントVLANおよびサーバVLANを作成する例を示します。
Cat6k# configure terminal
Enter configuration commands, one per line. End with CNTL/Z.
Cat6k(config-module-csm)# module ContentSwitchingModule 5
Cat6k(config-module-csm)# vlan 999 server
Cat6k(config-slb-vlan-server)# ip address 172.16.1.2 255.255.255.0
Cat6k(config-slb-vlan-server)# vlan 225 client
Cat6k(config-slb-vlan-client)# description Client Traffic
Cat6k(config-slb-vlan-client)# ip address 10.90.14.245 255.255.255.0
Cat6k(config-slb-vlan-client)# gateway 10.90.14.1
Cat6k(config-slb-vlan-client)# !
Cat6k(config-slb-vlan-client)# vlan 6 server
Cat6k(config-slb-vlan-server)# description Server Traffic
Cat6k(config-slb-vlan-server)# ip address 192.168.6.2 255.255.255.0
Cat6k(config-slb-vlan-server)# alias 192.168.6.1 255.255.255.0
Cat6k(config-slb-vlan-server)# !
Cat6k(config-slb-vlan-server)# vlan 443 server
Cat6k(config-slb-vlan-server)# ip address 10.90.14.245 255.255.255.0
次に、名前を使用して実サーバを作成する例を示します。
Cat6k(config-slb-vlan-server)# real LINUX
Cat6k(config-slb-module-real)# address 192.168.6.10
Cat6k(config-slb-module-real)# inservice
Cat6k(config-slb-module-real)# real WIN2K
Cat6k(config-slb-module-real)# address 192.168.6.20
Cat6k(config-slb-module-real)# inservice
Cat6k(config-slb-module-real)# real SUN
Cat6k(config-slb-module-real)# address 192.168.6.30
Cat6k(config-slb-module-real)# inservice
次に、Webサーバのサーバ ファーム(サーバNATを設定)、およびSSLドータカードのサーバ ファーム(サーバNATを設定せずローカルに設定)を作成する例を示します。
Cat6k(config-slb-module-real)# serverfarm SSLOFFLOADERS
Cat6k(config-slb-sfarm)# no nat server
Cat6k(config-slb-sfarm)# real 10.90.14.243 local
(注) CSM-SがSSLドータカードへのローカルVLANを介してトラフィックをこの実サーバに送信するように設定するには、localキーワードが必要になります。
Cat6k(config-slb-real)# inservice
Cat6k(config-slb-real)# serverfarm WEB
Cat6k(config-slb-sfarm)# real name LINUX
Cat6k(config-slb-real)# inservice
Cat6k(config-slb-real)# real name WIN2K
Cat6k(config-slb-real)# inservice
Cat6k(config-slb-real)# real name SUN
Cat6k(config-slb-real)# inservice
次に、2つの仮想サーバを設定して、HTTPSトラフィックをオフロードするためにSSLドータカードに送り、HTTPをWebサーバにロードバランシングする例を示します。この例では、Webサーバはポート80宛てのトラフィックだけを受信します。これらのトラフィックは、クライアントから直接送信されたトラフィック、またはSSLドータカードから送信された復号化トラフィックです(ポート変換が設定されないため)。
Cat6k(config-slb-module-real)# serverfarm SSLOFFLOADERS
Cat6k(config-slb-sfarm)# no nat server
Cat6k(config-slb-sfarm)# real 10.90.14.243 local
Cat6k(config-slb-real)# inservice
Cat6k(config-slb-real)# serverfarm WEB
Cat6k(config-slb-sfarm)# real name LINUX
Cat6k(config-slb-real)# inservice
Cat6k(config-slb-real)# real name WIN2K
Cat6k(config-slb-real)# inservice
Cat6k(config-slb-real)# real name SUN
Cat6k(config-slb-real)# inservice
次に、2つの仮想サーバを設定して、HTTPトラフィックをオフロードするためにSSLドータカードに送り、HTTPをWebサーバにロードバランシングする例を示します。この例では、Webサーバはポート80宛てのトラフィックだけを受信します。これらのトラフィックは、クライアントから直接送信されたトラフィック、またはSSLドータカードから送信された復号化トラフィックです(ポート変換が設定されないため)。
Cat6k(config-slb-real)# vserver SSLTERMINATION
Cat6k(config-slb-vserver)# virtual 10.90.14.181 tcp https
Cat6k(config-slb-vserver)# vlan 225
Cat6k(config-slb-vserver)# serverfarm SSLOFFLOADERS
Cat6k(config-slb-vserver)# persistent rebalance
Cat6k(config-slb-vserver)# inservice
Cat6k(config-slb-vserver)# vserver WEBSERVERS
Cat6k(config-slb-vserver)# virtual 10.90.14.181 tcp www
Cat6k(config-slb-vserver)# serverfarm WEB
Cat6k(config-slb-vserver)# persistent rebalance
Cat6k(config-slb-vserver)# inservice
Cat6k(config-slb-vserver)# exit
Cat6k(config-module-csm)# exit
次に、SSLドータカードに管理VLANを設定し、VLAN 999を介して通信が行われるようにする例を示します。
SSL-DC# configure terminal
Enter configuration commands, one per line. End with CNTL/Z.
SSL-DC(config)# ssl-proxy vlan 999
SSL-DC(config-vlan)# ipaddr 172.16.1.3 255.255.255.0
SSL-DC(config-vlan)# gateway 172.16.1.1
SSL-DC(config-vlan)# admin
次に、VLAN 443が設定されます。この設定により、クライアントSSL接続をオフロードするためのクライアントとの通信が可能になります。
SSL-DC(config-vlan)# ssl-proxy vlan 443
SSL-DC(config-vlan)# ipaddr 10.90.14.243 255.255.255.0
SSL-DC(config-vlan)# gateway 10.90.14.1
設定を完了するには、 ssl-proxy service コマンドを入力してSSLドータカード( sslterm )に新しいサービスを作成します。次に、CSM-S上で作成される仮想サーバに一致するVirtual IP(VIP;仮想IP)アドレスを設定する例を示します(このVIPアドレスは、 secondary キーワードで設定されるため、SSLドータカードはこのIPアドレスに対するAddress Resolution Protocol[ARP;アドレス解決プロトコル]要求には応答しません。この設定は、ブリッジング ネットワーク設計の要件でもあります)。このサービスは、NATを実行せずに、復号化トラフィックをCSM-Sに戻すように設定されています。
SSL-DC(config-vlan)# ssl-proxy service sslterm
SSL-DC(config-ssl-proxy)# virtual ipaddr 10.90.14.181 protocol tcp port 443 secondary
SSL-DC(config-ssl-proxy)# server ipaddr 10.90.14.245 protocol tcp port 80
SSL-DC(config-ssl-proxy)# no nat server
SSL-DC(config-ssl-proxy)# certificate rsa general-purposetrustpoint certs-key
*Aug 19 20:52:11.487: %STE-6-PKI_SERVICE_CERT_INSTALL: Proxy: sslterm, Trustpoin
t: certs-key, Key: RSAKEY, Serial#: 1A65, Index: 2
*Aug 19 20:52:11.487: %STE-6-PKI_CA_CERT_INSTALL: Root, Subject Name: CN = Thawt
e Test CA Root, OU = TEST TEST TEST, O = Thawte Certification, ST = FOR TESTING
PURPOSES ONLY, C = ZA, Serial#: 00, Index: 3
SSL-DC(config-ssl-proxy)# inservice
*Aug 19 20:52:11.515: %STE-5-UPDOWN: ssl-proxy service sslterm changed state to
次に、MSFCおよびCSM上の各種の show コマンドの出力例を示します。
Cat6k# show module csm 5 vlan detail
vlan IP address IP mask type
---------------------------------------------------
6 192.168.6.2 255.255.255.0 SERVER
Description: Server Traffic
--------------------------------
192.168.6.1 255.255.255.0
225 10.90.14.245 255.255.255.0 CLIENT
Description: Client Traffic
443 10.90.14.245 255.255.255.0 SERVER
999 172.16.1.2 255.255.255.0 SERVER
Cat6k# show module csm 5 real
real server farm weight state conns/hits
-------------------------------------------------------------------------
10.90.14.243 SSLOFFLOADERS 8 OPERATIONAL 0
LINUX WEB 8 OPERATIONAL 0
WIN2K WEB 8 OPERATIONAL 0
Cat6k# show module csm 5 vserver detail
SSLTERMINATION, type = SLB, state = OPERATIONAL, v_index = 12
virtual = 10.90.14.181/32:443 bidir, TCP, service = NONE, advertise = FALSE
idle = 3600, replicate csrp = none, vlan = 225, pending = 30, layer 4
max parse len = 2000, persist rebalance = TRUE
ssl sticky offset = 0, length = 32
conns = 1, total conns = 4
server farm = SSLOFFLOADERS, backup = <not assigned>
sticky: timer = 0, subnet = 0.0.0.0, group id = 0
Policy Tot matches Client pkts Server pkts
-----------------------------------------------------
WEBSERVERS, type = SLB, state = OPERATIONAL, v_index = 13
virtual = 10.90.14.181/32:80 bidir, TCP, service = NONE, advertise = FALSE
idle = 3600, replicate csrp = none, vlan = ALL, pending = 30, layer 4
max parse len = 2000, persist rebalance = TRUE
ssl sticky offset = 0, length = 32
conns = 1, total conns = 7
server farm = WEB, backup = <not assigned>
sticky: timer = 0, subnet = 0.0.0.0, group id = 0
Policy Tot matches Client pkts Server pkts
-----------------------------------------------------
次に、SSLドータカード上の各種の show コマンドの出力例を示します。
SSL-DC# show ssl-proxy service sslterm
Service id: 1, bound_service_id: 257
Virtual IP: 10.90.14.181, port: 443 (secondary configured)
Server IP: 10.90.14.245, port: 80
rsa-general-purpose certificate trustpoint: certs-key
Certificate chain for new connections:
Key Label: RSAKEY, 1024-bit, not exportable
Key Timestamp: 02:03:11 UTC Aug 19 2004
Certificate chain complete
SSL-DC# show ssl-proxy stats
Conns initiated : 4 Conns accepted : 4
Conns established : 8 Conns dropped : 4
Conns Allocated : 4 Conns Deallocated : 4
Conns closed : 8 SYN timeouts : 0
Idle timeouts : 0 Total pkts sent : 43
Data packets sent : 19 Data bytes sent : 5875
Total Pkts rcvd : 48 Pkts rcvd in seq : 21
conns attempted : 4 conns completed : 4
full handshakes : 2 resumed handshakes : 2
active conns : 0 active sessions : 0
renegs attempted : 0 conns in reneg : 0
handshake failures : 0 data failures : 0
fatal alerts rcvd : 0 fatal alerts sent : 0
no-cipher alerts : 0 ver mismatch alerts : 0
no-compress alerts : 0 bad macs received : 0
pad errors : 0 session fails : 0
IP Frag Drops : 0 IP Version Drops : 0
IP Addr Discards : 0 Serv_Id Drops : 0
Conn Id Drops : 0 Bound Conn Drops : 0
Vlan Id Drops : 0 TCP Checksum Drops : 0
Hash Full Drops : 0 Hash Alloc Fails : 0
Flow Creates : 8 Flow Deletes : 8
Conn Id allocs : 4 Conn Id deallocs : 4
Tagged Pkts Drops : 0 Non-Tagg Pkts Drops : 0
Add ipcs : 3 Delete ipcs : 0
Disable ipcs : 2 Enable ipcs : 0
Unsolicited ipcs : 127 Duplicate Add ipcs : 0
IOS Broadcast Pkts : 613 IOS Unicast Pkts : 1110
IOS Multicast Pkts : 0 IOS Total Pkts : 1723
IOS Congest Drops : 0 SYN Discards : 0
CSM-S構成例(ルータ モード、サーバNAT)
ここでは、CSM-Sの設定について説明します。この設定により、クライアントはHTTPを3つのWebサーバ(IPアドレスは192.168.6.10、192.168.6.20、192.168.6.30)にロードバランシングし、HTTPSをオフロードしてから、同一の3つのWebサーバにロードバランシングできます。
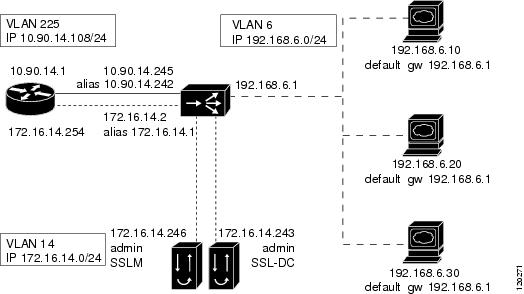
この例では、CSM-SクライアントVLANがパブリック ネットワークにあり、SSLドータカード用のサーバVLANがプライベートIPサブネットにあります。また、Webサーバが異なるプライベートIPネットワークにあり、別のVLANに属します(図B-2を参照)。
CSM-Sは、SSLドータカードに暗号化クライアント トラフィックを送るときに、デフォルトのサーバNAT処理を実行するように設定されます。SSLドータカードも、復号化トラフィックをCSM-Sに戻すときに、サーバNAT処理を実行するように設定されます。次に、CSM-Sは、選択された宛先サーバへの復号化トラフィックに対して別のNATを実行するように設定されます。
図B-2 構成例 ― ルータ モード、サーバNAT
次のアドレスがCSM-S仮想サーバ上に設定されます。
• クライアント クリア テキスト トラフィック ― 10.90.14.182:80
• クライアントSSLトラフィック ― 10.90.14.182:443
• SSLドータカードからの復号化トラフィック ― 10.90.14.182:80
• クライアント通信用のクライアントVLAN 225 ― IPアドレスは10.90.14.245
• SSLドータカード通信用のサーバVLAN 14 ― IPアドレスは172.16.14.245、エイリアスは172.16.14.1
• 実サーバ通信用のサーバVLAN 6 ― IPアドレスは192.168.6.2、エイリアスは192.168.6.1
次のアドレスがSSLドータカード上に設定されます。
• 172.16.14.182:443(このIPアドレスは、CSM-S要件である secondary キーワードで設定されます)
• VLAN 14 ― IPアドレスは172.16.14.243(CSM-S VLANインターフェイスへのクライアント トラフィックのルート)、ゲートウェイは172.16.14.254(管理トラフィックのルーティング用)
図B-2では、VLAN 225、VLAN 14およびVLAN 6はそれぞれ異なるサブネット内にあります。
すべてのVLAN(上記に記載)をVLANデータベースに追加して、MSFC上でVLAN 14およびVLAN 225のVLANインターフェイスのIPアドレスを設定します。
(注) VLAN 225(10.90.14.1)は、クライアント トラフィックをCSM-SにルーティングするためにMSFCのレイヤ3インターフェイスとして存在します。VLAN 14(172.16.1.254)も管理トラフィックがSSLドータカードにルーティングされるようにMSFC上に設定されます。VLAN 14(172.16.14.1)は、SSLドータカード間のSSLトラフィックを送受信するために、CSM-S上に設定されます。VLAN 6(192.168.6.1)はVLANデータベース内のVLAN、およびCSM-SおよびSSLドータカードVLANとしてのみ存在しますが、MSFC上に対応するレイヤ3インターフェイスはありません。
次に、スイッチMSFCにレイヤ2およびレイヤ3 VLANを作成する例を示します。
Cat6k# configure terminal
Enter configuration commands, one per line. End with CNTL/Z.
Cat6k(config-vlan)# name Server_communications
Cat6k(config-vlan)# name SSL-DC_communications
Cat6k(config-vlan)# interface Vlan14
Cat6k(config-if)# ip address 172.16.14.254 255.255.255.0
Cat6k(config-if)# no shutdown
Cat6k(config-if)# vlan 225
Cat6k(config-vlan)# name Client_communications
Cat6k(config-vlan)# interface Vlan225
Cat6k(config-if)# ip address 10.90.14.1 255.255.255.0
Cat6k(config-if)# no shutdown
次に、スロット番号5に搭載されたCSMにクライアントVLANおよびサーバVLANを作成する例を示します。
Cat6k# configure terminal
Enter configuration commands, one per line. End with CNTL/Z.
Cat6k(config)# module ContentSwitchingModule 5
Cat6k(config-module-csm)# vlan 225 client
Cat6k(config-slb-vlan-client)# description Client Traffic
Cat6k(config-slb-vlan-client)# ip address 10.90.14.245 255.255.255.0
Cat6k(config-slb-vlan-client)# gateway 10.90.14.1
Cat6k(config-slb-vlan-client)# vlan 6 server
Cat6k(config-slb-vlan-server)# description Server Traffic
Cat6k(config-slb-vlan-server)# ip address 192.168.6.2 255.255.255.0
Cat6k(config-slb-vlan-server)# alias 192.168.6.1 255.255.255.0
Cat6k(config-slb-vlan-server)# vlan 14 server
Cat6k(config-slb-vlan-server)# ip address 172.16.14.245 255.255.255.0
Cat6k(config-slb-vlan-server)# alias 172.16.14.1 255.255.255.0
次に、名前を使用して実サーバを作成する例を示します。
Cat6k(config-slb-vlan-server)# real LINUX
Cat6k(config-slb-module-real)# address 192.168.6.10
Cat6k(config-slb-module-real)# inservice
Cat6k(config-slb-module-real)# real WIN2K
Cat6k(config-slb-module-real)# address 192.168.6.20
Cat6k(config-slb-module-real)# inservice
Cat6k(config-slb-module-real)# real SUN
Cat6k(config-slb-module-real)# address 192.168.6.30
Cat6k(config-slb-module-real)# inservice
次に、Webサーバのサーバ ファーム(サーバNATを設定)、およびSSLドータカードのサーバ ファーム(サーバNATを設定し、ローカルに設定)を作成する例を示します。
Cat6k(config-slb-module-real)# serverfarm SSLOFFLOADERS
Cat6k(config-slb-sfarm)# nat server
Cat6k(config-slb-sfarm)# no nat client
Cat6k(config-slb-sfarm)# real 172.16.14.182 local
(注) CSM-SがSSLドータカードへのローカルVLANを介してトラフィックをこの実サーバに送信するように設定するには、localキーワードが必要になります。
Cat6k(config-slb-real)# inservice
Cat6k(config-slb-real)# serverfarm WEB
Cat6k(config-slb-sfarm)# nat server
Cat6k(config-slb-sfarm)# no nat client
Cat6k(config-slb-sfarm)# real name LINUX
Cat6k(config-slb-real)# inservice
Cat6k(config-slb-real)# real name WIN2K
Cat6k(config-slb-real)# inservice
Cat6k(config-slb-real)# real name SUN
Cat6k(config-slb-real)# inservice
次に、2つの仮想サーバの設定例を示します。この例では、Webサーバは、クライアントから直接ポート80に送信された要求を受信します。HTTPSトラフィックは、ポート443で受信され、復号化するためにSSLドータカードに送信されます。復号化により、HTTPトラフィックがロードバランシング用にパブリックHTTP仮想サーバに送信されます。
Cat6k(config-slb-real)# vserver SSLTERMINATION
Cat6k(config-slb-vserver)# virtual 10.90.14.182 tcp https
Cat6k(config-slb-vserver)# serverfarm SSLOFFLOADERS
Cat6k(config-slb-vserver)# persistent rebalance
Cat6k(config-slb-vserver)# inservice
Cat6k(config-slb-vserver)# vserver WEBSERVERS
Cat6k(config-slb-vserver)# virtual 10.90.14.182 tcp www
Cat6k(config-slb-vserver)# serverfarm WEB
Cat6k(config-slb-vserver)# persistent rebalance
Cat6k(config-slb-vserver)# inservice
次に、クライアント トラフィックおよび管理トラフィックに対してVLAN 14を介してCSM-Sと通信するように、SSLドータカードを設定する例を示します。
SSL-DC# configure terminal
Enter configuration commands, one per line. End with CNTL/Z.
SSL-DC(config)# ssl-proxy vlan 14
SSL-DC(config-vlan)# ipaddr 172.16.14.243 255.255.255.0
SSL-DC(config-vlan)# gateway 172.16.14.254
SSL-DC(config-vlan)# route 10.90.14.0 255.255.255.0 gateway 172.16.14.1
SSL-DC(config-vlan)# admin
(注) 管理通信のルーティングには、gatewayコマンドが必要です。定義されるルータは、そのVLAN IPアドレス宛のトラフィックにのみ有効です(TELNET、SSHなど)。
routeステートメントは、SSLドータカードが1つのネットワークで暗号化トラフィックを受信し、別のIPネットワークに複合化トラフィックを送信するときに、CSM-SエイリアスIPにトラフィックをルーティングして戻すために必要です。
(注) 必要な場合は、新規のVLANおよび適切なIPアドレスをCSM-SおよびSSLドータカードの両方に追加して、管理VLANを別に設定できます。
設定を完了するには、 ssl-proxy service コマンドを入力してSSLドータカード( sslterm )に新しいサービスを作成します。次に、CSM-S上で作成される仮想サーバに一致するVIPアドレスを設定する例を示します(このVIPアドレスは、 secondary キーワードで設定されるため、SSLドータカードはこのIPアドレスに対するARP要求には応答しません。また、この設定はネットワーク設計のブリッジングにも必要となります)。このサービスは、CSM-Sに複合化トラフィックを戻して、宛先アドレス上でNATを実行するように設定されます。
SSL-DC(config-vlan)# ssl-proxy service sslterm
SSL-DC(config-ssl-proxy)# virtual 172.16.14.182 protocol tcp port 443 secondary
SSL-DC(config-ssl-proxy)# server ipaddr 10.90.14.182 protocol tcp port 80
SSL-DC(config-ssl-proxy)# certificate rsa general-purpose trustpoint certs-key
*Aug 22 14:44:47.395: %STE-6-PKI_SERVICE_CERT_INSTALL: Proxy: sslterm, Trustpoin
t: certs-key, Key: RSAKEY, Serial#: 1A65, Index: 6
*Aug 22 14:44:47.395: %STE-6-PKI_CA_CERT_INSTALL: Root, Subject Name: CN = Thawt
e Test CA Root, OU = TEST TEST TEST, O = Thawte Certification, ST = FOR TESTING
PURPOSES ONLY, C = ZA, Serial#: 00, Index: 7
SSL-DC(config-ssl-proxy)# inservice
*Aug 22 14:44:47.423: %STE-5-UPDOWN: ssl-proxy service sslterm changed state to UP
Cat6k # configure terminal
Enter configuration commands, one per line. End with CNTL/Z.
Cat6k(config)# interface Vlan14
Cat6k(config-if)# ip address 172.16.14.254 255.255.255.0
Cat6k(config-if)# no shutdown
次に、MSFCおよびCSM上の各種の show コマンドの出力例を示します。
cat6k# show mod csm 5 vlan detail
vlan IP address IP mask type
---------------------------------------------------
6 192.168.6.2 255.255.255.0 SERVER
Description: Server Traffic
--------------------------------
192.168.6.1 255.255.255.0
14 172.16.14.245 255.255.255.0 SERVER
--------------------------------
172.16.14.1 255.255.255.0
225 10.90.14.245 255.255.255.0 CLIENT
Description: Client Traffic
Cat6k# show mod csm 5 real
real server farm weight state conns/hits
-------------------------------------------------------------------------
172.16.14.182 SSLOFFLOADERS 8 OPERATIONAL 0
LINUX WEB 8 OPERATIONAL 0
WIN2K WEB 8 OPERATIONAL 0
Cat6k# show mod csm 5 vserver detail
SSLTERMINATION, type = SLB, state = OPERATIONAL, v_index = 20
virtual = 10.90.14.182/32:443 bidir, TCP, service = NONE, advertise = FALSE
idle = 3600, replicate csrp = none, vlan = ALL, pending = 30, layer 4
max parse len = 2000, persist rebalance = TRUE
ssl sticky offset = 0, length = 32
conns = 0, total conns = 8
server farm = SSLOFFLOADERS, backup = <not assigned>
sticky: timer = 0, subnet = 0.0.0.0, group id = 0
Policy Tot matches Client pkts Server pkts
-----------------------------------------------------
WEBSERVERS, type = SLB, state = OPERATIONAL, v_index = 21
virtual = 10.90.14.182/32:80 bidir, TCP, service = NONE, advertise = FALSE
idle = 3600, replicate csrp = none, vlan = ALL, pending = 30, layer 4
max parse len = 2000, persist rebalance = TRUE
ssl sticky offset = 0, length = 32
conns = 0, total conns = 11
server farm = WEB, backup = <not assigned>
sticky: timer = 0, subnet = 0.0.0.0, group id = 0
Policy Tot matches Client pkts Server pkts
-----------------------------------------------------
次に、SSLドータカード上の各種の show コマンドの出力例を示します。
SSL-DC# show ssl-proxy service sslterm
Service id: 4, bound_service_id: 260
Virtual IP: 172.16.14.182, port: 443 (secondary configured)
Server IP: 10.90.14.182, port: 80
rsa-general-purpose certificate trustpoint: certs-key
Certificate chain in graceful rollover, being renewed:
Key Label: RSAKEY, 1024-bit, not exportable
Key Timestamp: 02:03:11 UTC Aug 19 2004
Service certificate in graceful rollover
SSL-DC# show ssl-proxy stats
Conns initiated : 12 Conns accepted : 12
Conns established : 24 Conns dropped : 12
Conns Allocated : 12 Conns Deallocated : 12
Conns closed : 24 SYN timeouts : 0
Idle timeouts : 0 Total pkts sent : 129
Data packets sent : 59 Data bytes sent : 23001
Total Pkts rcvd : 146 Pkts rcvd in seq : 57
conns attempted : 12 conns completed : 12
full handshakes : 10 resumed handshakes : 2
active conns : 0 active sessions : 0
renegs attempted : 0 conns in reneg : 0
handshake failures : 0 data failures : 0
fatal alerts rcvd : 0 fatal alerts sent : 0
no-cipher alerts : 0 ver mismatch alerts : 0
no-compress alerts : 0 bad macs received : 0
pad errors : 0 session fails : 0
IP Frag Drops : 0 IP Version Drops : 0
IP Addr Discards : 0 Serv_Id Drops : 2
Conn Id Drops : 0 Bound Conn Drops : 0
Vlan Id Drops : 0 TCP Checksum Drops : 0
Hash Full Drops : 0 Hash Alloc Fails : 0
Flow Creates : 24 Flow Deletes : 24
Conn Id allocs : 12 Conn Id deallocs : 12
Tagged Pkts Drops : 0 Non-Tagg Pkts Drops : 0
Add ipcs : 7 Delete ipcs : 0
Disable ipcs : 6 Enable ipcs : 0
Unsolicited ipcs : 3579 Duplicate Add ipcs : 0
IOS Broadcast Pkts : 17881 IOS Unicast Pkts : 31780
IOS Multicast Pkts : 0 IOS Total Pkts : 49661
IOS Congest Drops : 0 SYN Discards : 0
CSM-SおよびSSLSMの構成例(ルータ モード、サーバNAT)
ここでは、前のCSM-S設定( 付録B「CSM-S構成例(ルータ モード、サーバNAT)」 )の設計にSSL Services Module(SSLSM)を追加して、この設定を拡張します。SSLドータカードと同じVLANとIPネットワークを使用して、SSLMを追加します。CMS-Sは、重み付きラウンドロビンを使用して、SSLMおよびSSL-DC間のトラフィックをロードバランシングします。SSLMはSSLドータカードより約3倍早いので、重み付きラウンドロビンが、SSLオフローダのパフォーマンスに応じてSSLオフローダ間でトラフィックを分散するのに必要となります。CSM-Sはクライアント接続にSSLスティッキを適用し、SSLセッションの間、同一のSSLセッションが継続して同一のSSLオフローダを使用するようにします。この例では、セッション時間は30分です。
この例では、前のCSM-S設定にSSL Services Moduleが追加されます。SSL Services Moduleは、SSLドータカードと同じネットワークでクライアント接続を受け入れます(図B-3を参照)。
図B-3 構成例 ― CSM-SおよびSSLSM(ルータ モード、サーバNAT)
次のアドレスがSSLM上に設定されます。
• ssl-proxyサービス ― 仮想IPアドレスは172.16.14.10:443、サーバIPアドレスは10.90.14.182:80
• VLAN 14 ― IPアドレスは172.16.14.246(CSM-S VLANインターフェイスへのクライアント トラフィックのルート)、ゲートウェイは172.16.14.254(管理トラフィックのルーティング用)
VLAN 14トラフィックがSSLMに送られるように、SSLMの設定とともにMSFCを設定する必要があります。
次に、Cat6k MSFCにレイヤ2およびレイヤ3 VLANを作成する例を示します。
Cat6k# configure terminal
Enter configuration commands, one per line. End with CNTL/Z.
Cat6k(config)# ssl-proxy module 6 allowed-vlan 14
次に、SSLMをCSM-Sに追加する例を示します。
Cat6k(config-slb-vlan-server)# real SSLM
Cat6k(config-slb-module-real)# address 172.16.14.10
Cat6k(config-slb-module-real)# inservice
Cat6k(config-slb-module-real)# inservice
次に、SSLSM実サーバをSSLオフローダのサーバ ファームに追加し、各実サーバのウェイトを設定する例を示します。
Cat6k(config-slb-module-real)# serverfarm SSLOFFLOADERS
Cat6k(config-slb-sfarm)# real 172.16.14.182 local
Cat6k(config-slb-sfarm)# weight 1
Cat6k(config-slb-real)# inservice
Cat6k(config-slb-sfarm)# real name SSLM
Cat6k(config-slb-sfarm)# weight 3
Cat6k(config-slb-real)# inservice
次に、SSLスティッキを30分のセッションに適用し、SSLセッションIDオフセットを使用するために、CSM-S仮想サーバを設定する例を示します(SSLスティッキ ― sticky 10 ssl timeout 30)。
Cat6k(config-slb-real)# vserver SSLTERMINATION
Cat6k(config-slb-vserver)# sticky 30 group 10
Cat6k(config-slb-vserver)# ssl-sticky offset 20 length 6
次に、クライアント トラフィックおよび管理トラフィックに対してVLAN 14を介してCSM-Sと通信するように、SSLMを設定する例を示します。
Enter configuration commands, one per line. End with CNTL/Z.
SSLM(config)# ssl-proxy vlan 14
SSLM(config-vlan)# ipaddr 172.16.14.246 255.255.255.0
SSLM(config-vlan)# gateway 172.16.14.254
SSLM(config-vlan)# route 10.90.14.0 255.255.255.0 gateway 172.16.14.1
(注) 管理通信のルーティングには、gatewayコマンドが必要です。定義されるルータは、そのVLAN IPアドレス宛のトラフィックにのみ有効です(TELNET、SSHなど)。
routeステートメントは、SSLドータカードが1つのネットワークで暗号化トラフィックを受信し、別のIPネットワークに複合化トラフィックを送信するときに、CSM-SエイリアスIPにトラフィックをルーティングして戻すために必要です。
設定を完了するには、 ssl-proxy service コマンドを入力してSSLドータカード( sslterm )に新しいサービスを作成します。次に、CSM-S上で作成される仮想サーバに一致するVIPアドレスを設定する例を示します(このVIPアドレスは、 secondary キーワードで設定されるため、SSLドータカードはこのIPアドレスに対するARP要求には応答しません。これは、ブリッジング ネットワーク設計の要件でもあります)。このサービスは、復号化トラフィックをCSM-Sに戻して、宛先アドレスでNATを実行するように設定されています。
SSLM(config)# ssl-proxy service sslterm
SSLM(config-ssl-proxy)# virtual ipaddr 172.16.14.10 protocol tcp port 443
SSLM(config-ssl-proxy)# server ipaddr 10.90.14.182 protocol tcp port 80
SSLM(config-ssl-proxy)# certificate rsa general-purpose trustpoint certs-key
*Aug 24 01:40:17.581: %STE-6-PKI_SERVICE_CERT_INSTALL: Proxy: sslterm, Trustpoint: certs-key, Key: RSAKEY, Serial#: 1C2B, Index: 2
*Aug 24 01:40:27.637: %STE-6-PKI_SERVICE_CERT_DELETE: Proxy: , Trustpoint: certs-key, Key: RSAKEY, Serial#: 1C2B, Index: 0
SSLM(config-ssl-proxy)# inservice
*Aug 24 01:40:34.165: %STE-5-UPDOWN: ssl-proxy service sslterm changed state to UP
SSLM(config-ssl-proxy)# exit
Cat6k# show mod csm 5 real
real server farm weight state conns/hits
-------------------------------------------------------------------------
SSLM SSLOFFLOADERS 3 OPERATIONAL 0
172.16.14.182 SSLOFFLOADERS 1 OPERATIONAL 0
LINUX WEB 8 OPERATIONAL 0
WIN2K WEB 8 OPERATIONAL 0
Cat6k# show mod csm 5 vserver detail
SSLTERMINATION, type = SLB, state = OPERATIONAL, v_index = 22
virtual = 10.90.14.182/32:443 bidir, TCP, service = NONE, advertise = FALSE
idle = 3600, replicate csrp = none, vlan = ALL, pending = 30, layer 7
max parse len = 2000, persist rebalance = TRUE
ssl sticky offset = 20, length = 6
conns = 0, total conns = 12
server farm = SSLOFFLOADERS, backup = <not assigned>
sticky: timer = 30, subnet = 0.0.0.0, group id = 10
Policy Tot matches Client pkts Server pkts
-----------------------------------------------------
WEBSERVERS, type = SLB, state = OPERATIONAL, v_index = 23
virtual = 10.90.14.182/32:80 bidir, TCP, service = NONE, advertise = FALSE
idle = 3600, replicate csrp = none, vlan = ALL, pending = 30, layer 4
max parse len = 2000, persist rebalance = TRUE
ssl sticky offset = 0, length = 32
conns = 0, total conns = 12
server farm = WEB, backup = <not assigned>
sticky: timer = 0, subnet = 0.0.0.0, group id = 0
Policy Tot matches Client pkts Server pkts
-----------------------------------------------------
Cat6k# show mod csm 5 sticky
group sticky-data real timeout
----------------------------------------------------------------
10 ssl ADB70000:000DBCAF 172.16.14.182 1680
10 ssl A03F0000:00602F30 172.16.14.10 1596
次に、SSLM上の各種の show コマンドの出力を示します。
SSLM# show ssl-proxy service sslterm
Service id: 1, bound_service_id: 257
Virtual IP: 172.16.14.10, port: 443
Server IP: 10.90.14.182, port: 80
rsa-general-purpose certificate trustpoint: certs-key
Certificate chain for new connections:
Key Label: RSAKEY, 1024-bit, exportable
Key Timestamp: 13:12:48 UTC Aug 23 2004
Certificate chain complete
SSLM# show ssl-proxy stats
Conns initiated : 14 Conns accepted : 14
Conns established : 28 Conns dropped : 10
Conns Allocated : 14 Conns Deallocated : 14
Conns closed : 28 SYN timeouts : 0
Idle timeouts : 0 Total pkts sent : 181
Data packets sent : 90 Data bytes sent : 47214
Total Pkts rcvd : 196 Pkts rcvd in seq : 85
Bytes rcvd in seq : 32480
conns attempted : 14 conns completed : 14
full handshakes : 11 resumed handshakes : 3
active conns : 0 active sessions : 0
renegs attempted : 0 conns in reneg : 0
handshake failures : 0 data failures : 0
fatal alerts rcvd : 0 fatal alerts sent : 0
no-cipher alerts : 0 ver mismatch alerts : 0
no-compress alerts : 0 bad macs received : 0
pad errors : 0 session fails : 0
IP Frag Drops : 0 IP Version Drops : 0
IP Addr Discards : 0 Serv_Id Drops : 0
Conn Id Drops : 0 Bound Conn Drops : 0
Vlan Id Drops : 0 TCP Checksum Drops : 1
Hash Full Drops : 0 Hash Alloc Fails : 0
Flow Creates : 28 Flow Deletes : 28
Conn Id allocs : 14 Conn Id deallocs : 14
Tagged Pkts Drops : 0 Non-Tagg Pkts Drops : 0
Add ipcs : 2 Delete ipcs : 0
Disable ipcs : 1 Enable ipcs : 0
Unsolicited ipcs : 0 Duplicate Add ipcs : 0
IOS Broadcast Pkts : 68857 IOS Unicast Pkts : 293
IOS Multicast Pkts : 0 IOS Total Pkts : 69150
IOS Congest Drops : 0 SYN Discards : 0
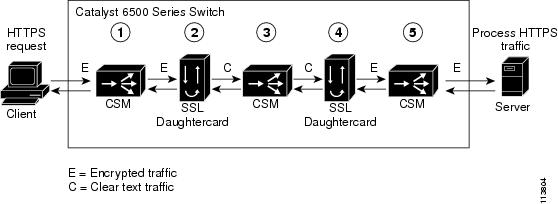
統合型セキュア コンテント スイッチング サービスの例
統合型セキュア コンテント スイッチング サービス(Content Switching Module [CSM;コンテント スイッチング モジュール]をサーバ ロードバランサとして使用)をバックエンド暗号化と組み合わせて設定すると、ロードバランシングとコンテント スイッチングの利点がすべて備わります。その上、脆弱性があるパスを通過する際にSSLの全機能範囲でデータを保護します。
図B-4に示されるように、統合型セキュア コンテント スイッチング サービスの構成には、5つの処理手順が含まれます。
1. CSMは、ロードバランシング ルールに基づくか、またはSSLスティッキ機能を使用してロード バランシングします。SSLドータカードに対する固定接続の設定については、「セッションの持続性(スティッキ性)の設定」を参照してください。
2. SSLドータカードはSSLセッションを終了し、SSLトラフィックをクリア テキスト トラフィックに復号化し、CSMにトラフィックを送り返します。
3. CSMは、SSLトラフィックに暗号化するために、クリア テキスト トラフィックをSSLドータカードに再度コンテント スイッチングします。
4. SSLドータカードは、暗号化されたSSLトラフィックをCSMに転送します。
5. CSMは、SSLトラフィックをHTTPSサーバに転送します。
図B-4 バックエンド暗号化の例(統合型セキュア コンテント スイッチング サービス)
CSMの設定
次に、CSMにVLANを設定する例を示します。VLAN 24は、クライアントのトラフィックが到達するVLANです。VLAN 35は、SSLドータカードとCSM間にあるVLANです。
Enter configuration commands, one per line. End with CNTL/Z.
Router(config)# module ContentSwitchingModule 6
Router(config-module-csm)# vlan 24 client
Route(config-slb-vlan-client)# ip address 24.24.24.24 255.0.0.0
Route(config-slb-vlan-client)# vlan 35 server
Route(config-slb-vlan-server)# ip address 35.35.35.35 255.0.0.0
Route(config-slb-vlan-server)# route 36.0.0.0 255.0.0.0 gateway 35.200.200.3
次に、レイヤ7解析用にURLポリシーを設定する例を示します。
Route(config-slb-vlan-server)# map URL url
Router(config-slb-map-url)# match protocol http method GET url /*
次に、サーバ ファームを作成する例を示します。
Router(config-slb-map-url)# serverfarm SSLCARDS
Router(config-slb-sfarm)# real 35.200.200.101 local
Router(config-slb-real)# inservice
Router(config-slb-real)# serverfarm VLAN36REALS
Router(config-slb-sfarm)# real 36.200.200.14
Router(config-slb-real)# inservice
Router(config-slb-real)# real 36.200.200.5
Router(config-slb-real)# inservice
次に、仮想サーバを作成する例を示します。
Router(config-slb-real)# vserver LB-HTTP-SSLMODS
Router(config-slb-vserver)# virtual 35.35.35.25 tcp 81
Router(config-slb-vserver)# vlan 35
Router(config-slb-vserver)# slb-policy URL
Router(config-slb-vserver)# inservice
Router(config-slb-vserver)# vserver LB-SSL-SSLMODS
Router(config-slb-vserver)# virtual 24.24.24.25 tcp https
Router(config-slb-vserver)# serverfarm SSLCARDS
Router(config-slb-vserver)# inservice
次に、実サーバと仮想サーバのステータスを表示する例を示します。
Router# sh module contentSwitchingModule all reals
---------------------- CSM in slot 6 ----------------------
real server farm weight state conns/hits
-------------------------------------------------------------------------
35.200.200.101 SSLCARDS 8 OPERATIONAL 0
36.200.200.14 VLAN36REALS 8 OPERATIONAL 0
36.200.200.5 VLAN36REALS 8 OPERATIONAL 0
Router# sh module contentSwitchingModule all vservers
---------------------- CSM in slot 6 ----------------------
vserver type prot virtual vlan state conns
---------------------------------------------------------------------------
LB-HTTP-SSLMODS SLB TCP 35.35.35.25/32:81 35 OPERATIONAL 0
LB-SSL-SSLMODS SLB TCP 24.24.24.25/32:443 ALL OPERATIONAL 0
SSLドータカードの設定
次に、SSLドータカードとCSM間にVLANを作成する例を示します。
ssl-proxy(config)# ssl-proxy vlan 35
ssl-proxy(config-vlan)# ipaddr 35.200.200.3 255.0.0.0
ssl-proxy(config-vlan)# gateway 35.200.200.100
ssl-proxy(config-vlan)# admin
次に、SSLドータカード上に信頼される認証局プールを設定する例を示します。
ssl-proxy(config-vlan)# ssl-proxy pool ca net
ssl-proxy(config-ca-pool)# ca trustpoint keon-root
ssl-proxy(config-ca-pool)# ca trustpoint net-root
ssl-proxy(config-ca-pool)# ca trustpoint TP-1024-pcks12-root
次に、SSLドータカードにURLリライト ポリシーを設定する例を示します。
ssl-proxy(config)# ssl-proxy policy url-rewrite frontend
ss(config-url-rewrite-policy)# url www.cisco.com clearport 80 sslport 443
ss(config-url-rewrite-policy)# url wwwin.cisco.com clearport 80 sslport 443
ss(config-url-rewrite-policy)# url wwwin.cisco.com clearport 81 sslport 443
次に、CSMから送信されるクライアント トラフィックを受け入れるSSLサーバ プロキシを設定する例を示します。また次に、クライアント認証、SSL v2.0転送、およびURLリライト ポリシーを設定する例を示します。
(注) SSL V2.0接続では、SSLドータカードは設定されたサーバに直接接続をオープンします。
ssl-proxy(config-ca-pool)# ssl-proxy service frontend
ssl-proxy(config-ssl-proxy)# virtual ipaddr 35.200.200.101 protocol tcp port 443 secondary
ssl-proxy(config-ssl-proxy)# server ipaddr 35.35.35.25 protocol tcp port 81
ssl-proxy(config-ssl-proxy)# server ipaddr 35.200.200.14 protocol tcp port 443 sslv2
ssl-proxy(config-ssl-proxy)# certificate rsa general-purpose trustpoint TP-1024-pkcs12
ssl-proxy(config-ssl-proxy)# policy url-rewrite frontend
ssl-proxy(config-ssl-proxy)# trusted-ca net
ssl-proxy(config-ssl-proxy)# authenticate verify all
ssl-proxy(config-ssl-proxy)# inservice
次に、トラフィックがレイヤ7解析を完了し、実サーバを決定したあとで、CSMからクリア テキスト トラフィックを受け入れるSSLクライアント プロキシを設定する例を示します。また、クライアント証明書およびワイルドカード プロキシを設定する例を示します。
(注) ゲートウェイ アドレス(35.200.200.125)は、実サーバ(36.200.200.14および36.200.200.5)に着信するアドレスです。
ssl-proxy(config-ssl-proxy)# ssl-proxy service wildcard client
ssl-proxy(config-ssl-proxy)# virtual ipaddr 0.0.0.0 0.0.0.0 protocol tcp port 81 secondary
ssl-proxy(config-ssl-proxy)# server ipaddr 35.200.200.125 protocol tcp port 443
ssl-proxy(config-ssl-proxy)# certificate rsa general-purpose trustpoint client-cert
ssl-proxy(config-ssl-proxy)# no nat server
ssl-proxy(config-ssl-proxy)# trusted-ca net
ssl-proxy(config-ssl-proxy)# authenticate verify all
ssl-proxy(config-ssl-proxy)# inservice
ssl-proxy(config-ssl-proxy)# ^Z
次に、SSLサーバ プロキシ サービスのステータスを表示する例を示します。
ssl-proxy# show ssl-proxy service frontend
Service id: 2, bound_service_id: 258
Virtual IP: 35.200.200.101, port: 443
Server IP: 35.35.35.25, port: 81
SSLv2 IP: 35.200.200.14, port: 443
URL Rewrite Policy: frontend
Certificate authority pool: net
rsa-general-purpose certificate trustpoint: TP-1024-pkcs12
Certificate chain for new connections:
Key Label: TP-1024-pkcs12, 1024-bit, not exportable
Key Timestamp: 22:53:16 UTC Mar 14 2003
Serial Number: 3C2CD2330001000000DB
Serial Number: 313AD6510D25ABAE4626E96305511AC4
Certificate chain complete
Certificate authentication type: All attributes (like CRL) are verified
次に、SSLクライアント プロキシ サービスのステータスを表示する例を示します。
ssl-proxy# show ssl-proxy service wildcard
Service id: 267, bound_service_id: 11
Virtual IP: 0.0.0.0, port: 81 (secondary configured)
Server IP: 35.200.200.125, port: 443
Certificate authority pool: net
rsa-general-purpose certificate trustpoint: client-cert
Certificate chain for new connections:
Key Label: client-cert, 1024-bit, not exportable
Key Timestamp: 18:42:01 UTC Jul 14 2003
Certificate chain complete
Certificate authentication type: All attributes (like CRL) are verified
証明書セキュリティの属性ベース アクセス制御の例
証明書セキュリティの属性ベース アクセス制御は、Access Control List(ACL;アクセス制御リスト)を指定できる証明書にフィールドを追加して、証明書ベースのACLを作成します。
証明書セキュリティの属性ベース アクセス制御の設定手順については、次のURLの『 Certificate Security Attribute-Based Access Control 』を参照してください。
http://www.cisco.com/univercd/cc/td/doc/product/software/ios122/122newft/122t/122t15/ftcrtacl.htm
次の例では、SSLプロキシ サービス「ssl-offload」へのSSL接続は、クライアント証明書の件名にドメイン名 .cisco.com が含まれる場合にのみ、正常に行われます。
ssl-proxy(config)# ssl-proxy service ssl-offload
ssl-proxy(config-ssl-proxy)# virtual ipaddr 8.100.100.126 protocol tcp port 443 secondary
ssl-proxy(config-ssl-proxy)# server ipaddr 191.162.2.8 protocol tcp port 80
ssl-proxy(config-ssl-proxy)# certificate rsa general-purpose trustpoint cert
ssl-proxy(config-ssl-proxy)# nat client client-nat
ssl-proxy(config-ssl-proxy)# trusted-ca root-ca
ssl-proxy(config-ssl-proxy)# authenticate verify all
ssl-proxy(config-ssl-proxy)# inservice
ssl-proxy(config-ssl-proxy)# exit
ssl-proxy(config)# ssl-proxy pool ca root-ca
ssl-proxy(config-ca-pool)# ca trustpoint root
ssl-proxy(config-ca-pool)# exit
ssl-proxy(config)# crypto ca trustpoint root
ssl-proxy(ca-trustpoint)# enrollment mode ra
ssl-proxy(ca-trustpoint)# enrollment terminal
ssl-proxy(ca-trustpoint)# crl optional
ssl-proxy(ca-trustpoint)# match certificate acl
ssl-proxy(ca-trustpoint)# exit
ssl-proxy(config)# crypto ca certificate map acl 10
ssl-proxy(ca-certificate-map)# subject-name co .cisco.com
ssl-proxy(ca-certificate-map)# exit
次の例では、証明書ACLが設定されるので、プロキシ サービス「ssl-offload」へのSSL接続は次の状況で正常に行われます。
• クライアント証明書の件名に ste3-server.cisco.com または ste2-server.cisco.com が含まれる
• クライアント証明書の有効開始が、2003年7月30日以降である
• クライアント証明書の有効期限が、2007年1月1日より前である
• クライアント証明書の発行人の名前に、「certificate manager」の文字列が含まれる
ssl-proxy(config)# ssl-proxy service ssl-offload
ssl-proxy(config-ssl-proxy)# virtual ipaddr 8.100.100.126 protocol tcp port 443 secondary
ssl-proxy(config-ssl-proxy)# server ipaddr 191.162.2.8 protocol tcp port 80
ssl-proxy(config-ssl-proxy)# certificate rsa general-purpose trustpoint cert
ssl-proxy(config-ssl-proxy)# nat client client-nat
ssl-proxy(config-ssl-proxy)# trusted-ca root-ca
ssl-proxy(config-ssl-proxy)# authenticate verify all
ssl-proxy(config-ssl-proxy)# inservice
ssl-proxy(config-ssl-proxy)# exit
ssl-proxy(config)# ssl-proxy pool ca root-ca
ssl-proxy(config-ca-pool)# ca trustpoint root
ssl-proxy(config-ca-pool)# exit
ssl-proxy(config)# crypto ca trustpoint root
ssl-proxy(ca-trustpoint)# enrollment mode ra
ssl-proxy(ca-trustpoint)# enrollment terminal
ssl-proxy(ca-trustpoint)# crl optional
ssl-proxy(ca-trustpoint)# match certificate acl
ssl-proxy(ca-trustpoint)# exit
ssl-proxy(config)# crypto ca certificate map acl 10
ssl-proxy(ca-certificate-map)# subject-name co ste3-server.cisco.com
ssl-proxy(ca-certificate-map)# valid-start ge Jul 30 2003 00:00:00 UTC
ssl-proxy(ca-certificate-map)# expires-on lt Jan 01 2007 00:00:00 UTC
ssl-proxy(ca-certificate-map)# issuer-name co certificate manager
ssl-proxy(ca-certificate-map)# exit
ssl-proxy(config)# crypto ca certificate map acl 20
ssl-proxy(ca-certificate-map)# subject-name co ste2-server.cisco.com
ssl-proxy(ca-certificate-map)# expires-on lt Jan 01 2007 00:00:00 UTC
ssl-proxy(ca-certificate-map)# issuer-name co certificate manager
ssl-proxy(ca-certificate-map)# valid-start ge Jul 30 2003 00:00:00 UTC
ssl-proxy(ca-certificate-map)# exit
次の例では、サーバ証明書が証明書フィールドのドメイン名に関してチェックされます。SSL開始は、サーバ証明書の件名に .cisco.com ドメイン名が含まれる場合にのみ、正常に行われます。
ssl-proxy# configure terminal
Enter configuration commands, one per line. End with CNTL/Z.
ssl-proxy(config)# ssl-proxy service ssl-initiation client
ssl-proxy(config-ssl-proxy)# virtual ipaddr 8.100.100.126 protocol tcp port 81
ssl-proxy(config-ssl-proxy)# server ipaddr 191.162.2.8 protocol tcp port 443 secondary
ssl-proxy(config-ssl-proxy)# nat client client-nat
ssl-proxy(config-ssl-proxy)# trusted-ca root
ssl-proxy(config-ssl-proxy)# authenticate verify all
ssl-proxy(config-ssl-proxy)# inservice
ssl-proxy(config-ssl-proxy)# exit
ssl-proxy(config)# ssl-proxy pool ca root-ca
ssl-proxy(config-ca-pool)# ca trustpoint root
ssl-proxy(config-ca-pool)# exit
ssl-proxy(config)# crypto ca trustpoint root
ssl-proxy(ca-trustpoint)# enrollment mode ra
ssl-proxy(ca-trustpoint)# enrollment terminal
ssl-proxy(ca-trustpoint)# crl optional
ssl-proxy(ca-trustpoint)# match certificate acl
ssl-proxy(ca-trustpoint)# exit
ssl-proxy(config)# crypto ca certificate map acl 10
ssl-proxy(ca-certificate-map)# subject-name co .cisco.com
ssl-proxy(ca-certificate-map)# exit
HTTPヘッダー挿入の例
次に、各種のHTTPヘッダーを挿入する例、およびヘッダー挿入の統計情報を表示する例を示します。
例1
次に、サーバに送信されるHTTP要求にカスタム ヘッダー、クライアントIPアドレスおよびTCPポート番号情報、およびプレフィクス文字列を挿入する例を示します。
ssl-proxy# configure terminal
Enter configuration commands, one per line. End with CNTL/Z.
ssl-proxy(config)# ssl-proxy policy http-header ssl-offload
ssl-proxy(config-http-header-policy)# custom "SOFTWARE VERSION :2.1(1)"
ssl-proxy(config-http-header-policy)# custom "module :SSL MODULE - CATALYST 6500"
ssl-proxy(config-http-header-policy)# custom type-of-proxy:server_proxy_with_1024_bit_key_size
ssl-proxy(config-http-header-policy)# client-ip-port
ssl-proxy(config-http-header-policy)# prefix SSL-OFFLOAD
ssl-proxy(config-http-header-policy)# exit
ssl-proxy(config)# ssl-proxy service ssl-offload
ssl-proxy(config-ssl-proxy)# virtual ipaddr 8.100.100.126 protocol tcp port 443 secondary
ssl-proxy(config-ssl-proxy)# server ipaddr 191.162.2.8 protocol tcp port 80
ssl-proxy(config-ssl-proxy)# certificate rsa general-purpose trustpoint cert
ssl-proxy(config-ssl-proxy)# nat client client-nat
ssl-proxy(config-ssl-proxy)# policy http-header ssl-offload
ssl-proxy(config-ssl-proxy)# inservice
ssl-proxy(config-ssl-proxy)# exit
カスタム ヘッダー、クライアントIPアドレスおよびTCPポート番号情報は、HTTP要求ごとに追加され、プレフィクス文字列が前に付けられます(下記を参照)。
SSL-OFFLOAD-Client-IP:7.100.100.1
SSL-OFFLOAD-Client-Port:59008
SSL-OFFLOAD-SOFTWARE VERSION :2.1(1)
SSL-OFFLOAD-module :SSL MODULE - CATALYST 6500
SSL-OFFLOAD-type-of-proxy:server_proxy_with_1024_bit_key_size
次に、ヘッダー挿入情報を表示する例を示します。
ssl-proxy# show ssl-proxy stats hdr
Header Insert Statistics:
Session Headers Inserted :0 Custom Headers Inserted :2
Session Id's Inserted :0 Client Cert. Inserted :0
Client IP/Port Inserted :2
No End of Hdr Detected :0 Payload no HTTP header :0
Desc Alloc Failed :0 Buffer Alloc Failed :0
Client Cert Errors :0 No Service :0
次に、SSL統計情報を表示する例を示します。
ssl-proxy# show ssl-proxy stats ssl
conns attempted :2 conns completed :2
conns in handshake :0 conns in data :0
renegs attempted :0 conns in reneg :0
active sessions :0 max handshake conns :1
rand bufs allocated :0 cached rand buf miss:0
current device q len:0 max device q len :2
sslv2 forwards :0 cert reqs processed :0
fatal alerts rcvd :0 fatal alerts sent :0
stale packet drops :0 service_id discards :0
full handshakes :0 resumed handshakes :0
handshake failures :0 data failures :0
bad macs received :0 pad errors :0
conns established with cipher rsa-with-rc4-128-md5 :0
conns established with cipher rsa-with-rc4-128-sha :0
conns established with cipher rsa-with-des-cbc-sha :0
conns established with cipher rsa-with-3des-ede-cbc-sha :0
full handshakes :1 resumed handshakes :1
handshake failures :0 data failures :0
bad macs received :0 pad errors :0
conns established with cipher rsa-with-rc4-128-md5 :0
conns established with cipher rsa-with-rc4-128-sha :2
conns established with cipher rsa-with-des-cbc-sha :0
conns established with cipher rsa-with-3des-ede-cbc-sha :0
例2
次に、セッション ヘッダーとプレフィクス文字列を挿入する例を示します。すべてのSSLハンドシェイクが発生すると、すべてのセッション ヘッダーがHTTP要求に追加されます。ただし、セッションが再開すると、セッションIDだけが挿入されます。
ssl-proxy# configure terminal
Enter configuration commands, one per line. End with CNTL/Z.
ssl-proxy(config)# ssl-proxy policy http-header ssl-offload
ssl-proxy(config-http-header-policy)# session
ssl-proxy(config-http-header-policy)# prefix SSL-OFFLOAD
ssl-proxy(config-http-header-policy)# exit
ssl-proxy(config)# ssl-proxy service ssl-offload
ssl-proxy(config-ssl-proxy)# virtual ipaddr 8.100.100.126 protocol tcp port 443 secondary
ssl-proxy(config-ssl-proxy)# server ipaddr 191.162.2.8 protocol tcp port 80
ssl-proxy(config-ssl-proxy)# certificate rsa general-purpose trustpoint cert
ssl-proxy(config-ssl-proxy)# nat client client-nat
ssl-proxy(config-ssl-proxy)# policy http-header ssl-offload
ssl-proxy(config-ssl-proxy)# inservice
ssl-proxy(config-ssl-proxy)# exit
すべてのSSLハンドシェイクでは、プレフィクス文字列が前に付けられたセッション ヘッダーがHTTP要求に追加されます(下記を参照)。
SSL-OFFLOAD-Session-Id:33:FF:2C:2D:25:15:3C:50:56:AB:FA:5A:81:0A:EC:E9:00:00:0A:03:00:60:
2F:30:9C:2F:CD:56:2B:91:F2:FF
SSL-OFFLOAD-Session-Cipher-Name:RC4-SHA
SSL-OFFLOAD-Session-Cipher-Key-Size:128
SSL-OFFLOAD-Session-Cipher-Use-Size:128
セッションが再開すると、セッションIDだけが挿入されます。
SSL-OFFLOAD-Session-Id:33:FF:2C:2D:25:15:3C:50:56:AB:FA:5A:81:0A:EC:E9:00:00:0A:03:00:60:
2F:30:9C:2F:CD:56:2B:91:F2:FF
次に、ヘッダー挿入情報を表示する例を示します。
ssl-proxy# show ssl-proxy stats hdr
Header Insert Statistics:
Session Headers Inserted :1 Custom Headers Inserted :0
Session Id's Inserted :2 Client Cert. Inserted :0
Client IP/Port Inserted :0
No End of Hdr Detected :0 Payload no HTTP header :0
Desc Alloc Failed :0 Buffer Alloc Failed :0
Client Cert Errors :0 No Service :0
次に、SSL統計情報を表示する例を示します。
ssl-proxy# show ssl-proxy stats ssl
conns attempted :2 conns completed :2
conns in handshake :0 conns in data :0
renegs attempted :0 conns in reneg :0
active sessions :0 max handshake conns :1
rand bufs allocated :0 cached rand buf miss:0
current device q len:0 max device q len :2
sslv2 forwards :0 cert reqs processed :0
fatal alerts rcvd :0 fatal alerts sent :0
stale packet drops :0 service_id discards :0
full handshakes :0 resumed handshakes :0
handshake failures :0 data failures :0
bad macs received :0 pad errors :0
conns established with cipher rsa-with-rc4-128-md5 :0
conns established with cipher rsa-with-rc4-128-sha :0
conns established with cipher rsa-with-des-cbc-sha :0
conns established with cipher rsa-with-3des-ede-cbc-sha :0
full handshakes :1 resumed handshakes :1
handshake failures :0 data failures :0
bad macs received :0 pad errors :0
conns established with cipher rsa-with-rc4-128-md5 :0
conns established with cipher rsa-with-rc4-128-sha :2
conns established with cipher rsa-with-des-cbc-sha :0
conns established with cipher rsa-with-3des-ede-cbc-sha :0
例3
次に、プレフィクス文字列を前に付けて、カスタム ヘッダー、デコードされたクライアント証明書フィールド、およびクライアント側接続のIPアドレスとTCPポート番号を挿入する例を示します。完全にデコードされたクライアント証明書フィールドは、すべてのSSLハンドシェイク用に挿入されます。ただし、SSLセッションが再開すると、セッションIDのみが挿入されます。
ssl-proxy# configure terminal
Enter configuration commands, one per line. End with CNTL/Z.
ssl-proxy(config)# ssl-proxy policy http-header ssl-offload
ssl-proxy(config-http-header-policy)# custom "SOFTWARE VERSION :2.1(1)"
ssl-proxy(config-http-header-policy)# custom "module :SSL MODULE - CATALYST 6500"
ssl-proxy(config-http-header-policy)# custom type-of-proxy:server_proxy_with_1024_bit_key_size
ssl-proxy(config-http-header-policy)# client-cert
ssl-proxy(config-http-header-policy)# client-ip-port
ssl-proxy(config-http-header-policy)# prefix SSL-OFFLOAD
ssl-proxy(config-http-header-policy)# exit
ssl-proxy(config)# ssl-proxy service ssl-offload
ssl-proxy(config-ssl-proxy)# virtual ipaddr 8.100.100.126 protocol tcp port 443 secondary
ssl-proxy(config-ssl-proxy)# server ipaddr 191.162.2.8 protocol tcp port 80
ssl-proxy(config-ssl-proxy)# certificate rsa general-purpose trustpoint cert
ssl-proxy(config-ssl-proxy)# nat client client-nat
ssl-proxy(config-ssl-proxy)# policy http-header ssl-offload
ssl-proxy(config-ssl-proxy)# trusted-ca root-ca
ssl-proxy(config-ssl-proxy)# authenticate verify all
ssl-proxy(config-ssl-proxy)# inservice
ssl-proxy(config-ssl-proxy)# exit
すべてのSSLハンドシェイクには、プレフィクス文字列を前に付けて、カスタム ヘッダー、デコードされたクライアント証明書フィールド、およびクライアント側接続のIPアドレスとTCPポート番号がHTTP要求に挿入されます(下記を参照)。
SSL-OFFLOAD-Client-IP:7.100.100.1
SSL-OFFLOAD-Client-Port:59011
SSL-OFFLOAD-Session-Id:0F:61:9C:F2:E5:98:70:9D:1B:C1:EA:1D:38:F5:A1:2B:00:00:0E:03:00:60:
2F:30:9C:2F:1D:7D:5A:82:30:F6
SSL-OFFLOAD-SOFTWARE VERSION :2.1(1)
SSL-OFFLOAD-module :SSL MODULE - CATALYST 6500
SSL-OFFLOAD-type-of-proxy:server_proxy_with_1024_bit_key_size
SSL-OFFLOAD-ClientCert-Valid:1
SSL-OFFLOAD-ClientCert-Error:none
SSL-OFFLOAD-ClientCert-Fingerprint:1B:11:0F:E8:20:3F:6C:23:12:9C:76:C0:C1:C2:CC:85
SSL-OFFLOAD-ClientCert-Subject-CN:a
SSL-OFFLOAD-ClientCert-Issuer-CN:Certificate Manager
SSL-OFFLOAD-ClientCert-Certificate-Version:3
SSL-OFFLOAD-ClientCert-Serial-Number:0F:E5
SSL-OFFLOAD-ClientCert-Data-Signature-Algorithm:sha1WithRSAEncryption
SSL-OFFLOAD-ClientCert-Subject:OID.1.2.840.113549.1.9.2 = ste2-server.cisco.com +
OID.2.5.4.5 = B0FFF22E, CN = a, O = Cisco
SSL-OFFLOAD-ClientCert-Issuer:CN = Certificate Manager, OU = HSS, O = Cisco, L = San Jose,
SSL-OFFLOAD-ClientCert-Not-Before:22:29:26 UTC Jul 30 2003
SSL-OFFLOAD-ClientCert-Not-After:07:00:00 UTC Apr 27 2006
SSL-OFFLOAD-ClientCert-Public-Key-Algorithm:rsaEncryption
SSL-OFFLOAD-ClientCert-RSA-Public-Key-Size:1024 bit
SSL-OFFLOAD-ClientCert-RSA-Modulus-Size:1024 bit
SSL-OFFLOAD-ClientCert-RSA-Modulus:B3:32:3C:5E:C9:D1:CC:76:FF:81:F6:F7:97:58:91:4D:B2:0E:
C1:3A:7B:62:63:BD:5D:F6:5F:68:F0:7D:AC:C6:72:F5:72:46:7E:FD:38:D3:A2:E1:03:8B:EC:F7:C9:9A:
80:C7:37:DA:F3:BE:1F:F4:5B:59:BD:52:72:94:EE:46:F5:29:A4:B3:9B:2E:4C:69:D0:11:59:F7:68:3A:
D9:6E:ED:6D:54:4E:B5:A7:89:B9:45:9E:66:0B:90:0B:B1:BD:F4:C8:15:12:CD:85:13:B2:0B:FE:7E:8D:
F0:D7:4A:98:BB:08:88:6E:CC:49:60:37:22:74:4D:73:1E:96:58:91
SSL-OFFLOAD-ClientCert-RSA-Exponent:00:01:00:01
SSL-OFFLOAD-ClientCert-X509v3-Authority-Key-Identifier:keyid=EE:EF:5B:BD:4D:CD:F5:6B:60:
9D:CF:46:C2:EA:25:7B:22:A5:08:00
SSL-OFFLOAD-ClientCert-X509v3-Basic-Constraints:
SSL-OFFLOAD-ClientCert-Signature-Algorithm:sha1WithRSAEncryption
SSL-OFFLOAD-ClientCert-Signature:87:09:C1:F8:86:C1:15:C5:57:18:8E:B3:0D:62:E1:0F:6F:D4:9D:
75:DA:5D:53:E2:C6:0B:73:99:61:BE:B0:F6:19:83:F2:E5:48:1B:D2:6C:92:83:66:B3:63:A6:58:B4:5C:
0E:5D:1B:60:F9:86:AF:B3:93:07:77:16:74:4B:C5
次に、ヘッダー挿入情報を表示する例を示します。
ssl-proxy# show ssl-proxy stats hdr
Header Insert Statistics:
Session Headers Inserted :0 Custom Headers Inserted :1
Session Id's Inserted :1 Client Cert. Inserted :1
Client IP/Port Inserted :1
No End of Hdr Detected :0 Payload no HTTP header :0
Desc Alloc Failed :0 Buffer Alloc Failed :0
Client Cert Errors :0 No Service :0
次に、SSL統計情報を表示する例を示します。
ssl-proxy# show ssl-proxy stats ssl
conns attempted :1 conns completed :1
conns in handshake :0 conns in data :0
renegs attempted :0 conns in reneg :0
active sessions :0 max handshake conns :1
rand bufs allocated :0 cached rand buf miss:0
current device q len:0 max device q len :2
sslv2 forwards :0 cert reqs processed :1
fatal alerts rcvd :0 fatal alerts sent :0
stale packet drops :0 service_id discards :0
full handshakes :0 resumed handshakes :0
handshake failures :0 data failures :0
bad macs received :0 pad errors :0
conns established with cipher rsa-with-rc4-128-md5 :0
conns established with cipher rsa-with-rc4-128-sha :0
conns established with cipher rsa-with-des-cbc-sha :0
conns established with cipher rsa-with-3des-ede-cbc-sha :0
full handshakes :1 resumed handshakes :0
handshake failures :0 data failures :0
bad macs received :0 pad errors :0
conns established with cipher rsa-with-rc4-128-md5 :0
conns established with cipher rsa-with-rc4-128-sha :0
conns established with cipher rsa-with-des-cbc-sha :0
conns established with cipher rsa-with-3des-ede-cbc-sha :1
URLリライトの例
次に、望ましい結果に応じて、URLリライトを設定し、次のプロキシ設定を適用する例を示します。
ssl-proxy service frontend
virtual ipaddr 35.200.200.101 protocol tcp port 443 secondary
server ipaddr 35.200.200.14 protocol tcp port 80
certificate rsa general-purpose trustpoint TP-1024-pkcs12
policy url-rewrite test-url-rewrite
例1
次に、クリア テキスト ポートが標準のHTTPポート80である場合に、プロトコル リライト(HTTPからHTTPSなど)を設定する例を示します。この例では、サーバがhttp://ssl-136.cisco.com/index2.htmlなどの再割り当て文字列を送信すると、SSLドータカードがhttps://ssl-136.cisco.com/index2.htmlなどの文字列をリライトします。
プロトコル リライト(HTTPからHTTPS)を設定するには、次のURLリライト ルールのいずれかを指定します。
• ssl-proxy policy url-rewrite test-url-rewrite
url ssl-136.cisco.com
!
• ssl-proxy policy url-rewrite test-url-rewrite
url ssl*
!
• s sl-proxy policy url-rewrite test-url-rewrite
url *com
!
例2
次に、クリア テキスト ポートが非標準のHTTPポートである場合に、プロトコル リライト(HTTPからHTTPSなど)を設定する例を示します。この例では、サーバが
http://ssl-136.cisco.com:100/index2.htmlなどの再割り当て文字列を送信すると、SSLドータカードがhttps://ssl-136.cisco.com/index2.htmlなどの文字列をリライトします。
非標準のクリア テキスト ポートで、プロトコル リライト(HTTPからHTTPS)を設定するには、次のURLリライト ルールのいずれかを指定します。
• ssl-proxy policy url-rewrite test-url-rewrite
url ssl-136.cisco.com clearport 100
!
• ssl-proxy policy url-rewrite test-url-rewrite
url ssl* clearport 100
!
• ssl-proxy policy url-rewrite test-url-rewrite
url *com clearport 100
!
例3
次に、クリア テキスト ポートが標準のHTTPポート80である場合に、プロトコル リライトおよびSSLポート リライトを設定する例を示します。この例では、サーバが
http://ssl-136.cisco.com/index2.htmlなどの再割り当て文字列を送信すると、SSLドータカードが
https://ssl-136.cisco.com:445/index2.htmlなどの文字列をリライトします。
非標準のSSLテキスト ポートで、プロトコル リライト(HTTPからHTTPS)を設定するには、次のURLリライト ルールのいずれかを指定します。
• ssl-proxy policy url-rewrite test-url-rewrite
url ssl-136.cisco.com sslport 445
!
• ssl-proxy policy url-rewrite test-url-rewrite
url ssl* sslport 445
!
• ssl-proxy policy url-rewrite test-url-rewrite
url *com sslport 445
!
例4
次に、クリア テキスト ポートが非標準である場合に、プロトコル リライトおよびSSLポート リライトを設定する例を示します。この例では、サーバがhttp://ssl-136.cisco.com:100/index2.htmlなどの再割り当て文字列を送信すると、SSLドータカードがhttps://ssl-136.cisco.com:445/index2.htmlなどの文字列をリライトします。
非標準のクリア テキスト ポートで、プロトコル リライトおよびSSLポート リライトを設定するには、次のURLリライト ルールのいずれかを指定します。
• ssl-proxy policy url-rewrite test-url-rewrite
url ssl-136.cisco.com clearport 100 sslport 445
!
• ssl-proxy policy url-rewrite test-url-rewrite
url ssl* clearport 100 sslport 445
!
• ssl-proxy policy url-rewrite test-url-rewrite
url *com clearport 100 sslport 445
!
次に、上記のURLリライト ポリシーを表示する例を示します。
ssl-proxy# show ssl-proxy policy url-rewrite test-url-rewrite
Rule URL Clearport SSLport
SSL proxy services using this policy:
Usage count of this policy:1


 フィードバック