クラシック ZTP を使用したルータの展開

大規模な環境でネットワークデバイスを手動で展開するには、熟練の作業者が必要であり、時間がかかります。

ゼロタッチプロビジョニング(ZTP)を使用すると、何千ものネットワークデバイスを数分以内にシームレスかつ正確にプロビジョニングでき、手動による介入は不要です。ZTP は、シェルまたは Python を使用し、構成ファイルやスクリプトを使用して簡単に定義できます。

ZTP には、次のような複数のオプションがあります。

  • 大規模な環境で特定の設定を自動的に適用する。

  • 特定の IOS XR イメージをダウンロードしてインストールする。

  • 特定のアプリケーションパッケージやサードパーティ アプリケーションを自動的にインストールする。

  • 手動による介入なしでコンテナを展開する。

  • 何千ものネットワークデバイスでソフトウェアバージョンを一度に簡単にアップグレードまたはダウングレードする。

ZTP を使用する利点

ZTP を使用すると、大規模なサービスプロバイダーのインフラストラクチャを簡単に管理できます。ZTP を使用する追加の利点は次のとおりです。

  • ZTP を使用すると、ネットワーク内の任意の場所にルータをリモートでプロビジョニングできるため、ネットワークデバイスを展開するために専門家を派遣する必要がなく、IT コストが削減されます。

  • ZTP を使用した自動プロビジョニングにより、遅延がなくなり、精度が向上するため、コスト効率が高くなり、カスタマーエクスペリエンスが向上します。

    ZTP は、反復作業を自動化することで、ネットワーク管理者がより重要な作業に集中できるようにします。

  • ZTP プロセスは、サービスの迅速な復元に役立ちます。問題を手動でトラブルシューティングする代わりに、システムを既知の動作ステータスにリセットできます。

ユースケース

次に、ZTP の便利なユースケースの一部を示します。

  • ZTP を使用した Chef のインストール

  • ZTP を使用した IOS XR と NSO の統合

  • ZTP を使用した Puppet のインストール

ZTP は次のいずれかの方法で開始できます。

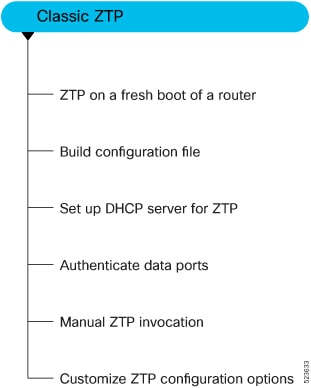
次の図は、クラシック ZTP を設定するために実行するタスクを示しています。

図 1. クラシック ZTP を設定するためのワークフロー
次の図は、クラシック ZTP を設定するために実行するタスクを示しています。

構成ファイルの作成

ビジネスニーズに基づいて、構成ファイルやスクリプトファイルを使用して ZTP プロセスを開始できます。


(注)  


ZTP のソースとして USB フラッシュドライブを使用する場合、スクリプトファイルはプロビジョニングに使用できません。スクリプトファイルは、USB フェッチャではサポートされていません。フェッチャでは、ztp.ini ファイルで定義されているプロビジョニングの詳細を取得するために ZTP プロセスで使用されるポートを定義します。


構成ファイルの内容は !! IOS XR で始まり、スクリプトファイルの内容は #! /bin/bash、#! /bin/sh または #!/usr/bin/python で始まります。

コンフィギュレーション ファイルを作成したら、ztp_helper 関数 xrapply を使用してデバイスに適用します。

次に、構成ファイルの例を示します。

!! IOS XR
username root
group root-lr
password 0 lablab
!
 
hostname ios
alias exec al show alarms brief system active
 
interface HundredGigE 0/0/0/24
ipv4 address 10.10.10.55 255.255.255.0
no shutdown
!

ユーザースクリプトの作成

IOS XR bash シェルで実行されるユーザースクリプトやバイナリは、IOS XR CLI と対話して、設定、設定状態の確認を行い、オペレータが選択したワークフローに基づいて exec コマンドを実行するために使用できます。

シェルか Python を使用して ZTP スクリプトを作成します。ZTP には、ユーザースクリプト内で使用できる一連の CLI コマンドおよびシェルユーティリティが含まれています。


(注)  


すでにプロビジョニングされているルータでは API を実行しないことを推奨します。ZTP ユーティリティ API は、ルータの初回起動時に ZTP スクリプトから実行されるように設計されています。API によって追加の操作が実行され、ブートプロセス中に要求されたアクションが実行され、アクションを実行する前に既存の設定に変更が加えられます。

ZTP ユーティリティ API には、ZTP ユーティリティ API を実行する前に ZTP ワークフローで実行される前提条件があります。それらの前提条件は、ブートプロセス中に特定のアクションを実行し、必要な設定の変更を行うのに役立ちます。

ZTP スクリプトの範囲外で ZTP ユーティリティを使用しないことを推奨します。このスクリプトの API では、すべてのアクションで ztp または ztp-user がユーザー名として使用されます。ZTP スクリプトの範囲外で実行される ZTP ユーティリティは、ZTP ワークフローから実行されないため、失敗する可能性があるため、デバイスの設定が変更され、他の関連する操作に影響を与える可能性があります。ZTP ユーティリティが ZTP スクリプトの範囲外で実行された場合、ユーザー名 ztp または ztp-user を使用してスクリプトが実行されたことがログに表示されるため、スクリプトがワークフローから実行されたと誤解されます。


ZTP シェルユーティリティ

ZTP には、ユーザー スクリプト内から送信可能な一連のシェル ユーティリティが含まれています。ztp_helper.sh は、ユーザー スクリプトによって送信可能なシェル スクリプトです。ztp_helper.sh は、一部の XR 機能にアクセスするための単純なユーティリティを提供します。次の bash 関数を呼び出すことができます。

  • xrcmd:単一の XR exec コマンド xrcmd “show running” を実行するために使用されます。

  • xrapply:ファイルに指定された構成ブロックを適用します。

    
    cat >/tmp/config <<%%
    !! XR config example
    hostname node1-mgmt-via-xrapply
    %%
    xrapply /tmp/config
  • xrapply_with_reason:XR 構成のブロックをロギング目的の理由とともに適用するために使用されます。

    
    cat >/tmp/config <<%%
    !! XR config example
    hostname node1-mgmt-via-xrapply
    %%
    xrapply_with_reason "this is a system upgrade" /tmp/config
  • xrapply_string:XR 構成のブロックを 1 行で適用するために使用されます。

    
    xrapply_string "hostname foo\interface HundredGigE0/0/0/24\nipv4 address 1.2.3.44 
    255.255.255.0\n"
  • xrapply_string_with_reason:ロギング目的の理由とともに XR 構成のブロックを 1 行で適用するために使用されます。

    
    xrapply_string_with_reason ”system renamed again" "hostname venus\n interface HundredGigE0/0/0/24\n 
    ipv4 address 172.30.0.144/24\n”
  • xrreplace:XR 構成の置換をファイルを介して XR 名前空間に適用するために使用されます。

    
    cat rtr.cfg <<%%
    !! XR config example
    hostname node1-mgmt-via-xrreplace
    %%
    xrreplace rtr.cfg
  • xrapply_with_extra_auth:認証を必要とする XR 構成をファイルを介して XR 名前空間に適用するために使用されます。xrapply_with_extra_auth API が、エイリアス、フレックス グループなどの追加の認証を必要とする構成が適用されるときに使用されます。この API は、追加の権限を取得するために、内部で認証と承認を実行します。

    
    cat >/tmp/config <<%%
    !! XR config example
    alias exec alarms show alarms brief system active
    alias exec version run cat /etc/show_version.txt
    %%
    xrapply_with_extra_auth >/tmp/config 
    
    
  • xrreplace_with_extra_auth:XR 構成の置換をファイルを介して XR 名前空間に適用するために使用されます。xrreplace_with_extra_auth API は、エイリアス、Flex グループなど、追加の認証を必要とする構成が適用されるときに使用されます。この API は、追加の権限を取得するために、内部で認証と承認を実行します。

    
    cat >/tmp/config <<%%
    !! XR config example
    alias exec alarms show alarms brief system active
    alias exec version run cat /etc/show_version.txt
    %%
    xrreplace_with_extra_auth >/tmp/config 
API 実装の動作

(注)  


xrcmd xrapply 、および xrreplace API またはユーティリティでは、特定のアクションを実行するための一連の内部操作が実行されます。順番に実行される内部操作には、次の操作が含まれます。

  • ユーザーの作成:この操作では、他の操作を実行する前に ztp-user(一時的なユーザー)が生成されます。

  • コマンドの実行または設定の適用:この操作には、コマンドの実行、パーサーユーティリティを使用した設定の適用、または cfg-mgr による設定の適用が含まれます。

  • ユーザーの削除:この操作では、XR 設定から ztp-user(一時的なユーザー)が削除されます。

これらの内部操作に加えて、xrapply_with_extra_auth および xrreplace_with_extra_auth API では、設定を適用する前に認証プロセスが実行されます。


ZTP ヘルパー Python ライブラリ

ZTP Python ライブラリでは、ZtpHelpers と呼ばれる単一の Python クラスを定義します。ヘルパースクリプトは /pkg/bin/ztp_helper.sh にあります。

ZtpHelpers クラスのメソッド

次に、ZtpHelpers クラスのユーティリティメソッドを示します。

  • init(self, syslog_server=None, syslog_port=None, syslog_file=None):
    __init__ constructor
    :param syslog_server: IP address of reachable Syslog Server 
           :param syslog_port: Port for the reachable syslog server
            :param syslog_file: Alternative or addon file for syslog
            :type syslog_server: str
            :type syslog_port: int
            :type syslog_file:str
    
             All parameters are optional. When nothing is specified during object creation, then all logs are sent to a log rotated file /tmp/ztp_python.log (max size of 1MB).
    
  • setns(cls, fd, nstype):
    Class Method for setting the network namespace
               :param cls: Reference to the class ZtpHelpers 
               :param fd: incoming file descriptor  
               :param nstype: namespace type for the sentns call
               :type nstype: int  
                      0      Allow any type of namespace to be joined.
                      CLONE_NEWNET = 0x40000000 (since Linux 3.0)
                             fd must refer to a network namespace
    
  • get_netns_path(cls, nspath=None, nsname=None, nspid=None):

    Class Method to fetch the network namespace filepath 
               associated with a PID or name 
               :param cls: Reference to the class ZtpHelpers
               :param nspath: optional network namespace associated name
               :param nspid: optional network namespace associate PID
               :type nspath: str
               :type nspid: int 
               :return: Return the complete file path 
               :rtype:  str 
    
  • toggle_debug(self, enable):
    Enable/disable debug logging
               :param enable: Enable/Disable flag 
               :type enable: int
    
  • set_vrf(self, vrfname=None):
    Set the VRF (network namespace)
               :param vrfname: Network namespace name 
                               corresponding to XR VRF  
    
  • download_file(self, file_url, destination_folder):

    Download a file from the specified URL
               :param file_url: Complete URL to download file 
               :param destination_folder: Folder to store the 
                                          downloaded file
               :type file_url: str
               :type destination_folder: str
               :return: Dictionary specifying download success/failure
                        Failure => { 'status' : 'error' }
                        Success => { 'status' : 'success',
                                     'filename' : 'Name of downloaded file',
                                     'folder' : 'Directory location of downloaded file'}
               :rtype: dict 
    
  • setup_syslog(self):

    正しい VRF(ネットワーク名前空間)で sysloghandler を正しく設定し、リモート syslog サーバー、ローカルファイル、またはデフォルトの log-rotated ログファイルを指すメソッド。

  • xrcmd(self, cmd=None):

    Issue an IOS-XR exec command and obtain the output
               :param cmd: Dictionary representing the XR exec cmd
                           and response to potential prompts
                           { 'exec_cmd': '', 'prompt_response': '' }
               :type cmd: dict            
               :return: Return a dictionary with status and output
                        { 'status': 'error/success', 'output': '' }
               :rtype: dict
    
  • xrapply(self, filename=None, reason=None):

    Apply Configuration to XR using a file 
               :param file: Filepath for a config file
                            with the following structure: 
                            !
                            XR config command
                            !
                            end
               
               :param reason: Reason for the config commit.
                              Will show up in the output of:
                              "show configuration commit list detail"
               :type filename: str
               :type reason: str
               :return: Dictionary specifying the effect of the config change
                         { 'status' : 'error/success', 'output': 'exec command based on status'}
                         In case of Error:  'output' = 'show configuration failed' 
                         In case of Success: 'output' = 'show configuration commit changes last 1'
               :rtype: dict
    
  • xrapply_string(self, cmd=None, reason=None):

    Apply Configuration to XR using  a single line string
               :param cmd: Single line string representing an XR config command  
               :param reason: Reason for the config commit.
                              Will show up in the output of:
                              "show configuration commit list detail"
               :type cmd: str
               :type reason: str 
               :return: Dictionary specifying the effect of the config change
                         { 'status' : 'error/success', 'output': 'exec command based on status'}
                         In case of Error:  'output' = 'show configuration failed'
                         In case of Success: 'output' = 'show configuration commit changes last 1'
               :rtype: dict
    
  • xrreplace(self, filename=None):

    Replace XR Configuration using a file
    
               :param file: Filepath for a config file
                            with the following structure:
    
                            !
                            XR config commands
                            !
                            end
               :type filename: str
               :return: Dictionary specifying the effect of the config change
                         { 'status' : 'error/success', 'output': 'exec command based on status'}
                         In case of Error:  'output' = 'show configuration failed'
                         In case of Success: 'output' = 'show configuration commit changes last 1'
               :rtype: dict
    
API 実装の動作

(注)  


xrcmd xrapply 、および xrreplace API またはユーティリティでは、特定のアクションを実行するための一連の内部操作が実行されます。順番に実行される内部操作には、次の操作が含まれます。

  • ユーザーの作成:この操作では、他の操作を実行する前に ztp-user(一時的なユーザー)が生成されます。

  • コマンドの実行または設定の適用:この操作には、コマンドの実行、パーサーユーティリティを使用した設定の適用、または cfg-mgr による設定の適用が含まれます。

  • ユーザーの削除:この操作では、XR 設定から ztp-user(一時的なユーザー)が削除されます。


次に、Python のサンプルスクリプトを示します。

[apple2:~]$ python sample_ztp_script.py 

###### Debugs enabled ######


###### Change context to user specified VRF ######


###### Using Child class method, setting the root user ######

2016-12-17 04:23:24,091 - DebugZTPLogger - DEBUG - Config File content to be applied  !
                     username netops
                     group root-lr
                     group cisco-support
                     secret 5 $1$7kTu$zjrgqbgW08vEXsYzUycXw1
                     !
                     end
2016-12-17 04:23:28,546 - DebugZTPLogger - DEBUG - Received exec command request: "show configuration commit changes last 1"
2016-12-17 04:23:28,546 - DebugZTPLogger - DEBUG - Response to any expected prompt ""
Building configuration...
2016-12-17 04:23:29,329 - DebugZTPLogger - DEBUG - Exec command output is ['!! IOS XR Configuration version = 6.2.1.21I', 'username netops', 'group root-lr', 'group cisco-support', 'secret 5 $1$7kTu$zjrgqbgW08vEXsYzUycXw1', '!', 'end']
2016-12-17 04:23:29,330 - DebugZTPLogger - DEBUG - Config apply through file successful, last change = ['!! IOS XR Configuration version = 6.2.1.21I', 'username netops', 'group root-lr', 'group cisco-support', 'secret 5 $1$7kTu$zjrgqbgW08vEXsYzUycXw1', '!', 'end']


###### Debugs Disabled ######


###### Executing a show command ######

Building configuration...
{'output': ['!! IOS XR Configuration version = 6.2.1.21I',
            '!! Last configuration change at Sat Dec 17 04:23:25 2016 by UNKNOWN',
            '!',
            'hostname customer2',
            'username root',
            'group root-lr',
            'group cisco-support',
            'secret 5 $1$7kTu$zjrgqbgW08vEXsYzUycXw1',
            '!',
            'username noc',
            'group root-lr',
            'group cisco-support',
            'secret 5 $1$7kTu$zjrgqbgW08vEXsYzUycXw1',
            '!',
            'username netops',
            'group root-lr',
            'group cisco-support',
            'secret 5 $1$7kTu$zjrgqbgW08vEXsYzUycXw1',
            '!',
            'username netops2',
            'group root-lr',
            'group cisco-support',
            'secret 5 $1$7kTu$zjrgqbgW08vEXsYzUycXw1',
            '!',
            'username netops3',
            'group root-lr',
            'group cisco-support',
            'secret 5 $1$7kTu$zjrgqbgW08vEXsYzUycXw1',
            '!',
            'cdp',
            'service cli interactive disable',
            'interface MgmtEth0/RP0/CPU0/0',
            'ipv4 address 11.11.11.59 255.255.255.0',
            '!',
            'interface TenGigE0/0/0/0/24',
            'shutdown',
            '!',
            'interface TenGigE0/0/0/0/25',
            'shutdown',
            '!',
             
            'router static',
            'address-family ipv4 unicast',
            '0.0.0.0/0 11.11.11.2',
            '!',
            '!',
            'end'],
 'status': 'success'}

###### Apply valid configuration using a file ######

Building configuration...
{'status': 'success', 'output': ['!! IOS XR Configuration version = 6.2.1.21I', 'hostname customer', 'cdp', 'end']}

###### Apply valid configuration using a string ######

Building configuration...
{'output': ['!! IOS XR Configuration version = 6.2.1.21I',
            'hostname customer2',
            'end'],
 'status': 'success'}

###### Apply invalid configuration using a string ######

{'output': ['!! SYNTAX/AUTHORIZATION ERRORS: This configuration failed due to',
            '!! one or more of the following reasons:',
            '!!  - the entered commands do not exist,',
            '!!  - the entered commands have errors in their syntax,',
            '!!  - the software packages containing the commands are not active,',

ヘルパー API の詳細については、https://github.com/ios-xr/iosxr-ztp-python#iosxr-ztp-python を参照してください。
データ ポートでの認証

新規起動時は ZTP プロセスが管理ポートから開始されますが、データ ポートに切り替えることができます。DHCP サーバーとの接続を検証するために、DHCP オプション 43(IPv4)、およびオプション 17(IPv6)を使用してデータ ポートで認証が実行されます。これらの DHCP オプションはオプションスペースで定義され、dhcpd.conf および dhcpd6.conf コンフィギュレーション ファイルに含まれています。オプション スペースを定義する際は、認証に次のパラメータを指定する必要があります。

  • 認証コード:認証コードは 0 または 1 のいずれかです。0 は認証が不要であることを示し、1 は MD5 チェックサムが必要であることを示します。


    (注)  


    IPv4 のオプション 43 と IPv6 のオプション 17 が無効になっている場合、認証は失敗します。


  • クライアント ID:クライアント ID は 「xr-config」にする必要があります。

  • MD5 チェックサム:これはシャーシのシリアル番号です。MD5 チェックサムは、echo -n $SERIALNUMBER | md5sum | awk '{print $1}' を使用して取得できます。

dhcpd.conf の設定例を次に示します。以下の例では、VendorInfo というオプション スペースが、認証用の 3 つのパラメータを使用して定義されています。
class "vendor-classes" {
   match option vendor-class-identifier;
}

option space VendorInfo;
option VendorInfo.clientId code 1 = string;
option VendorInfo.authCode code 2 = unsigned integer 8;
option VendorInfo.md5sum code 3 = string;
option vendor-specific code 43 = encapsulate VendorInfo;
subnet 10.65.2.0 netmask 255.255.255.0 {
  option subnet-mask 255.255.255.0;
  option routers 10.65.2.1;
  range 10.65.2.1 10.65.2.200;
}
host cisco-mgmt {
   hardware ethernet 00:50:60:45:67:01;
   fixed-address 10.65.2.39;
   vendor-option-space VendorInfo;
   option VendorInfo.clientId  "xr-config";
   option VendorInfo.authCode 1;
   option VendorInfo.md5sum "aedf5c457c36390c664f5942ac1ae3829";
   option bootfile-name "http://10.65.2.1:8800/admin-cmd.sh";
}

dhcpd6.conf コンフィギュレーション ファイルの例を次に示します。以下の例では、コード幅 2 および縦の長さ 2(IPv6 では DHCP 標準に従う)の VendorInfo というオプション スペースが、認証用の 3 つのパラメータを使用して定義されています。


log-facility local7;
option dhcp6.name-servers 2001:1451:c632:1::1;
option dhcp6.domain-search "cisco.com";
dhcpv6-lease-file-name "/var/lib/dhcpd/dhcpd6.leases";
option dhcp6.info-refresh-time 21600;
option dhcp6.bootfile-url code 59 = string;
option dhcp6.user-class code 15 = string;
option space CISCO-XR-CONFIG code width 2 length width 2;
option CISCO-XR-CONFIG.client-identifier code 1 = string;
option CISCO-XR-CONFIG.authCode code 2 = integer 8;
option CISCO-XR-CONFIG.md5sum code 3 = string;
option vsio.CISCO-XR-CONFIG code 9 = encapsulate CISCO-XR-CONFIG;
subnet6 2001:1451:c632:1::/64{
 range6 2001:1451:c632:1::2 2001:1451:c632:1::9;        
 option CISCO-XR-CONFIG.client-identifier "xr-config";
 option CISCO-XR-CONFIG.authCode 1;
 #valid md5
 option CISCO-XR-CONFIG.md5sum "90fd845ac82c77f834d57a034658d0f0";
 if option dhcp6.user-class = 00:04:69:50:58:45 {
  option dhcp6.bootfile-url "http://[2001:1851:c632:1::1]/cisco-2/image.iso";
 }
 else {
   #option dhcp6.bootfile-url "http://[2001:1851:c632:1::1]/cisco-2/cisco-mini-x.iso.sh";
   option dhcp6.bootfile-url "http://[2001:1851:c632:1::1]/cisco-2/ztp.cfg";
  }
}

DHCP サーバーのセットアップ

ZTP を使用して有効な IPv4 または IPv6 アドレスを動作させるには、DHCP サーバーから構成スクリプトにポインタが送信される必要があります。

ルータからの DHCP 要求には、ルータ自身を識別するための次の DHCP オプションがあります。

  • オプション 60:「vendor-class-identifier」:次の 4 つの要素を識別するために使用されます。

    • クライアントのタイプ(例:PXEClient)

    • システム(Arch)のアーキテクチャ:例:00009 x86-64 CPU を使用した EFI システムの特定

    • Universal Network Driver Interface(UNDI):

      例:003010(最初の 3 オクテットはメジャーバージョンを特定し、最後の 3 オクテットはマイナーバージョンを特定)

    • 製品 ID(PID):

  • オプション 61:「dhcp-client-identifier」:デバイスのシリアル番号を識別するために使用されます。

  • オプション 66:TFTP サーバー名を要求するために使用されます。

  • オプション 67:TFTP ファイル名を要求するために使用されます。

  • オプション 97「uuid」:汎用一意識別子を 128 ビット値で識別するために使用されます(現時点では使用できません)。

次の DHCP 要求の例は、固定 IP アドレスと、管理インターフェイスの MAC アドレスを含む構成ファイルを示しています。

host cisco-rp0 {
   hardware ethernet e4:c7:22:be:10:ba;
   fixed-address 172.30.12.54;
   filename "http://172.30.0.22/configs/cisco-1.config";
}

次の DHCP 要求の例は、固定 IP アドレスと、iPXE( "xr-config" オプション)を使用してシステムを再イメージ化する機能とともに、管理インターフェイスの MAC アドレスを含む構成ファイルを示しています。

host cisco-rp0 {
   hardware ethernet e4:c7:22:be:10:ba;
   fixed-address 172.30.12.54;
   if exists user-class and option user-class = "iPXE" {
      filename = "http://172.30.0.22/boot.ipxe";
   } elsif exists user-class and option user-class =  "xr-config" {
      filename = "http://172.30.0.22/scripts/cisco-rp0_ztp.sh";
   }
}

DHCP サーバーはデバイスを識別し、ファイル名オプションとして IOS XR 構成ファイルまたは ZTP スクリプトのいずれかを使用して応答します。

DHCP サーバーは、次の DHCP オプションを使用して応答します。

  • BOOTP ファイル名を使用してスクリプトや構成の場所を指定する DHCPv4。

  • オプション 67(bootfile-name)を使用してスクリプトや構成の場所を指定する DHCPv4。

  • オプション 15 を使用する DHCPv6:サーバーに ZTP 要求を識別させるためにこのオプションを設定した場合は、Linux または ISC サーバーのサーバー設定を更新してください。ZTP のユーザークラスを確認するために必要なサーバー側の設定例を、次の例に示します。

    if exists dhcp6.user-class and (substring(option dhcp6.user-class, 0, 9) = "xr-config" or substring(option dhcp6.user-class, 2, 9) = "xr-config"){
         #
    }
    
  • オプション 59(OPT_BOOTFILE_URL)を使用してスクリプトや構成の場所を指定する DHCPv6

次の例は、bootfile-name(オプション 67)を使用した DHCP 応答を示しています。

option space cisco-vendor-id-vendor-class code width 1 length width 1;
option vendor-class.cisco-vendor-id-vendor-class code 9 = {string};

######### Network 11.11.11.0/24 ################
shared-network 11-11-11-0 {

####### Pools ##############
  subnet 11.11.11.0 netmask 255.255.255.0 {
    option subnet-mask 255.255.255.0;
	option broadcast-address 11.11.11.255;
	option routers 11.11.11.2;
	option domain-name-servers 11.11.11.2;
	option domain-name "cisco.local";
	# DDNS statements
  	ddns-domainname "cisco.local.";
	# use this domain name to update A RR (forward map)
  	ddns-rev-domainname "in-addr.arpa.";
  	# use this domain name to update PTR RR (reverse map)

    }

######## Matching Classes ##########

  class "cisco" {
       match if (substring(option dhcp-client-identifier,0,11) = "FGE194714QS");
  }


  pool {
      allow members of "cisco";
      range 11.11.11.47 11.11.11.50;
      next-server 11.11.11.2;

      if exists user-class and option user-class = "iPXE" {
         filename="http://11.11.11.2:9090/cisco-mini-x-6.2.25.10I.iso";
      }

  
      if exists user-class and option user-class =  "xr-config" 
       {
          if (substring(option vendor-class.cisco-vendor-id-vendor-class,19,99)="cisco")
          {           
            option bootfile-name "http://11.11.11.2:9090/scripts/exhaustive_ztp_script.py";
          }
        }
      

      ddns-hostname "cisco-local";
      option routers 11.11.11.2;
  }
}

重要


システムで Cisco IOS XR リリース 7.3.1 以前を実行している場合、user-class = "exr-config" を送信するデバイスは受け入れられますが、Cisco IOS XR リリース 7.3.2 以降の場合は、user-class = "xr-config" のみを使用する必要があります。

Cisco IOS XR リリース 7.3.2 以降では、以下を使用します。

host cisco-rp0 {
   hardware ethernet e4:c7:22:be:10:ba;
   fixed-address 172.30.12.54;
   if exists user-class and option user-class = "iPXE" {
      filename = "http://172.30.0.22/boot.ipxe";
   } elsif exists user-class and option user-class = "xr-config" {
      filename = "http://172.30.0.22/scripts/cisco-rp0_ztp.sh";
   }
}

また、Cisco IOS XR リリース 7.3.1 以前のリリースから Cisco IOS XR リリース 7.3.2 以降のリリースにアップグレードする場合は、以下を使用します。

host cisco-rp0 {
   hardware ethernet e4:c7:22:be:10:ba;
   fixed-address 172.30.12.54;
   if exists user-class and option user-class = "iPXE" {
      filename = "http://172.30.0.22/boot.ipxe";
   } elsif exists user-class and option user-class = "exr-config" {
      filename = "http://172.30.0.22/scripts/cisco-rp0_ztp.sh";
   }
}

ZTP 初期化ファイルのカスタマイズ

ztp.ini ファイルでは、以下の ZTP の設定可能オプションをカスタマイズできます。

  • [ZTP]:起動時に CLI を使用するか、ztp.ini ファイルを編集することで、ZTP を有効または無効にできます。

  • [Retry]:ZTP DHCP 再試行メカニズムを設定します。設定可能な値は infinite と once です。

  • [Fetcher Priority]:フェッチャでは、プロビジョニングの詳細を取得するために ZTP が使用するポートを定義します。デフォルトでは、各ポートにおけるフェッチャの優先順位は ztp.ini ファイルで定義されています。フェッチャのデフォルトの優先順位は変更できます。許可された範囲は 0 ~ 10 です。


    (注)  


    数字が小さいほど、優先順位が高くなります。値 0 は優先順位が最も高く、10 は優先順位が最も低くなります。


    次の例では、Mgmt4 ポートの優先順位が最も高くなります。

    
    [Fetcher Priority]
    Mgmt4: 0
    Mgmt6: 1
    DPort4: 2
    DPort6: 3
    
  • progress_bar:コンソールのプログレスバーを有効にします。デフォルトでは、ブログレスバーは無効になっています。ブログレスバーを有効にするには、ztp.ini ファイルに次のエントリを追加します。

    [Options]
    progress_bar: True

デフォルトでは、ztp.ini ファイルは /pkg/etc/ にあります。ZTP の設定可能オプションを変更するには、/disk0:/ztp/ ディレクトリにファイルのコピーを作成し、ztp.ini ファイルを編集します。

デフォルトのオプションにリセットするには、/disk0:/ztp/ ディレクトリにある ztp.ini ファイルを削除します。


(注)  


インストール中の問題を回避するために、/pkg/etc/ にある ztp.ini ファイルを編集または削除しないでください。


次に、ztp.ini ファイルの例を示します。

[Startup]
start: True
retry_forever: True

[Fetcher Priority]
Mgmt4:  1 
Mgmt6:  2 
DPort4: 3 
DPort6: 4 

CLI を使用した ZTP の有効化

CLI を使用して ZTP を有効にする場合は、ztp enable コマンドを使用します。

設定例

Router#ztp enable
Fri Jul 12 16:09:02.154 UTC
Enable ZTP? [confirm] [y/n] :y
ZTP Enabled.

CLI を使用した ZTP の無効化

CLI を使用して ZTP を無効にする場合は、ztp disable コマンドを使用します。

設定例

Router#ztp disable
Fri Jul 12 16:07:18.491 UTC
Disable ZTP? [confirm] [y/n] :y
ZTP Disabled.
Run ZTP enable to run ZTP again.

ルータのフレッシュブート時のゼロタッチプロビジョニング

事前に設定されていないデバイスを起動する場合、ZTP プロセスが自動的に開始されます。

DHCP を使用したフレッシュブート

事前に設定されていないデバイスを起動する場合、ZTP プロセスが自動的に開始されます。ZTP プロセス中に、ルータは DHCP サーバーから構成ファイルの詳細を受信します。

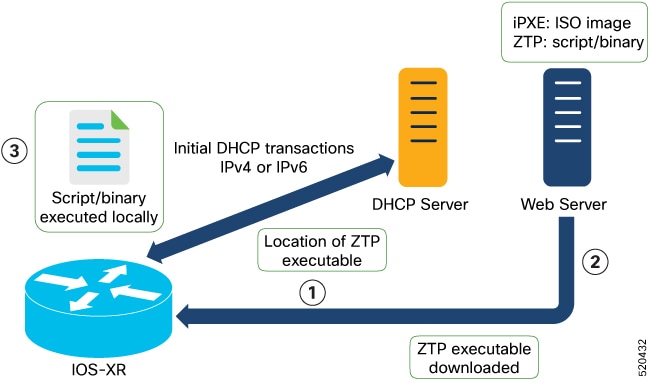
次の図は、ZTP プロセスのワークフローの概要を示しています。

IOS XR イメージを使用してネットワークデバイスを起動すると、ZTP プロセスが開始されます。ZTP プロセスは、事前に設定されていないデバイスでのみ開始されます。

フレッシュブート用の ZTP プロセスのワークフローの概要を次に示します。

  1. ZTP が、ZTP 構成ファイルまたはユーザースクリプトを取得するための DHCP 要求を送信します。ブートストラップサーバーがデバイスを一意に識別できるように、ZTP で以下の DHCP オプションが送信されます。

    • DHCP (v4/v6) client-id:シリアル番号

    • DHCPv4 オプション 124:ベンダー、プラットフォーム、シリアル番号

    • DHCPv6 オプション 16:ベンダー、プラットフォーム、シリアル番号

    次に、ZTP プロセスのデフォルトのシーケンシャルフローを示します。

    • 最初に、ZTP がすべての管理ポートで IPv4 DHCP 要求を送信します。障害が発生した場合、ZTP がすべての管理ポートで IPv6 DHCP 要求を送信します。

    • 最初に、ZTP がすべてのデータポートで IPv4 DHCP 要求を送信します。障害が発生した場合、ZTP がすべてのデータポートで IPv6 DHCP 要求を送信します。

      デフォルトのシーケンシャルフローは構成ファイルで定義されるため、その構成ファイルを使用してシーケンスを変更できます。

  2. DHCP サーバーがデバイスを識別し、次のいずれかのオプションを使用して DHCP 応答で応答します。

    DHCP サーバーは、DHCP オプションで応答するように設定する必要があります。

    • BOOTP ファイル名を使用してスクリプトや構成の場所を指定する DHCPv4。

    • オプション 67(bootfile-name)を使用してスクリプトや構成の場所を指定する DHCPv4。

    • オプション 59(OPT_BOOTFILE_URL)を使用してスクリプトや構成の場所を指定する DHCPv6

  3. ネットワークデバイスが、DHCP 応答で提供される URI の場所を使用して、Web サーバーからファイルをダウンロードします。

  4. デバイスが、HTTP サーバーから構成ファイルまたはスクリプトファイルを受信します。


    (注)  


    • ダウンロードしたファイルの内容が !! IOS XR は構成ファイルと見なされます。

    • ダウンロードしたファイルの内容が #! /bin/bash、#! /bin/sh、または #!/usr/bin/python で始まる場合はスクリプトファイルと見なされます。


  5. デバイスによって、構成ファイルが適用されるか、デフォルトの bash シェルでスクリプトまたはバイナリが実行されます。

  6. これで、ネットワークデバイスが稼働しています。

手動による ZTP の呼び出し

コマンド ライン インターフェイスを使用して、ゼロタッチプロビジョニング(ZTP)を手動で呼び出せます。この方法は、再起動せずに ZTP 設定を確認するのに最適です。この手動によるアプローチは、ルータを段階的にプロビジョニングするのに役立ちます。インターフェイス(データポートまたは管理ポート)上で ZTP を呼び出す場合、最初にインターフェイスを起動して設定する必要はありません。

インターフェイスがダウンしている場合でも、ztp initiate コマンドを実行でき、ZTP スクリプトによってインターフェイスが起動され、dhclient が呼び出されるため、ZTP は、可用性に関係なくすべてのインターフェイスで実行できます。

ZTP コマンドを手動で呼び出し、すべてのインターフェイスで ZTP を強制的に実行するには、次のコマンドを使用します。

  • ztp initiate:新しい ZTP DHCP セッションを呼び出します。ログは /disk0:/ztp/ztp.log にあります。

    設定例

    
    Router#ztp initiate debug verbose interface HundredGigE 0/0/0/24
    Invoke ZTP? (this may change your configuration) [confirm] [y/n] :
    
  • ztp terminate:進行中の ZTP セッションを終了します。

    設定例

    Router #ztp terminate verbose
    Mon Oct 10 16:52:38.507 UTC
    Terminate ZTP? (this may leave your system in a partially configured state) [confirm] [y/n] :y
    ZTP terminated
    
  • ztp enable:起動時に ZTP を有効にします。

    設定例

    Router#ztp enable
    Fri Jul 12 16:09:02.154 UTC
    Enable ZTP? [confirm] [y/n] :y
    ZTP Enabled.
    
  • ztp disable:起動時に ZTP を無効にします。

    設定例

    Router#ztp disable
    Fri Jul 12 16:07:18.491 UTC
    Disable ZTP? [confirm] [y/n] :y
    ZTP Disabled.
    Run ZTP enable to run ZTP again.
    
  • ztp clean:ZTP の状態ファイルのみを削除します。

    設定例

    Router#ztp clean verbose
    Mon Oct 10 17:03:43.581 UTC
    Remove all ZTP temporary files and logs? [confirm] [y/n] :y
    All ZTP files have been removed.
    If you now wish ZTP to run again from boot, do 'conf t/commit replace' followed by reload.
    

    ログファイル ztp.log は /var/log フォルダに保存され、ログファイルのコピーはソフトリンクを使用して /disk0:/ztp/ztp.log で使用できます。ただし、ztp clean を実行すると、現在の ZTP ログが保存されている /var/log フォルダではなく、ディスクに保存されているファイルがクリアされます。現在の ZTP からログを実行するには、/var/log/ フォルダから ZTP ログ ファイルを手動でクリアする必要があります。

設定

このタスクでは、手動 ZTP 呼び出しの最も一般的なユースケース(ZTP の呼び出し)を示します。

  1. 起動している、または起動可能なすべてのデータ ポートで DHCP セッションを呼び出します。ZTP はバックグラウンドで実行されます。進捗状況を確認するには、show logging を使用するか、/disk0:/ztp/ztp.log を確認します。

設定例


Router# ztp initiate dataport