NX-API 開発者サンドボックス

NX-API 開発者サンドボックス: 9.2(2)より前の NX-OS リリース

About the NX-API Developer Sandbox

The NX-API Developer Sandbox is a web form hosted on the switch. It translates NX-OS CLI commands into equivalent XML or JSON payloads, and converts NX-API REST payloads into their CLI equivalents.

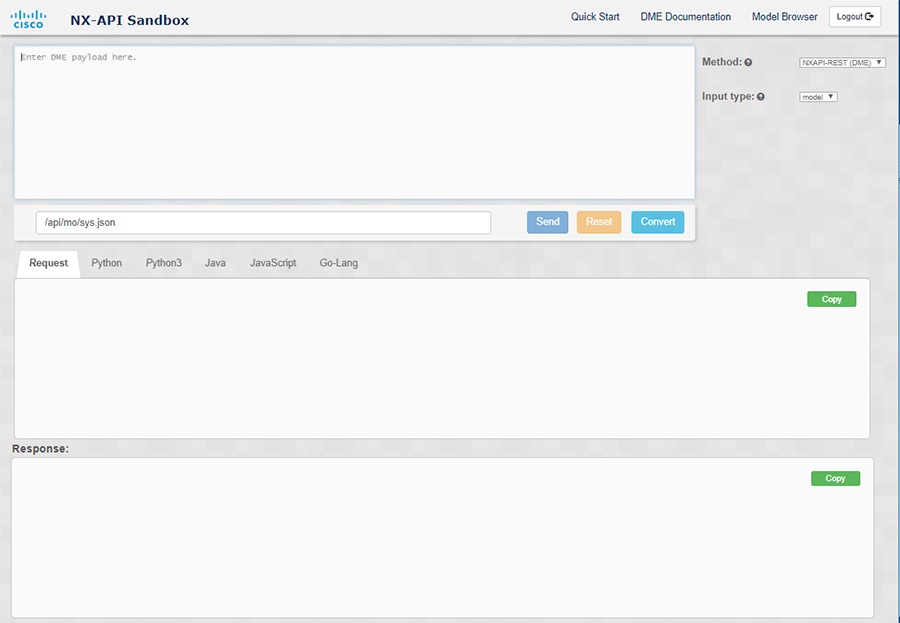
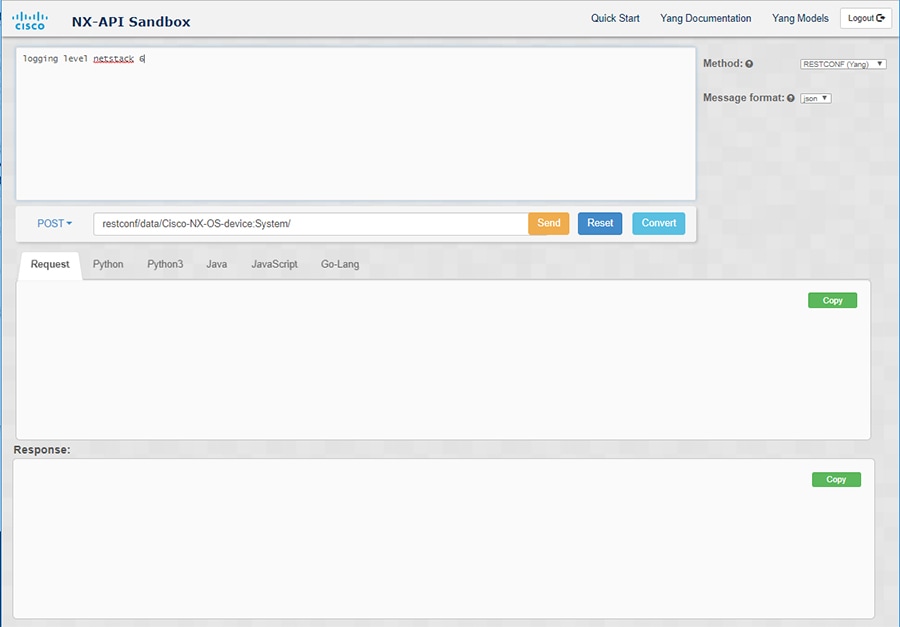
The web form is a single screen with three panes — Command (top pane), Request, and Response — as shown in the figure.

Figure 1. NX-API Developer Sandbox with Example Request and Output Response

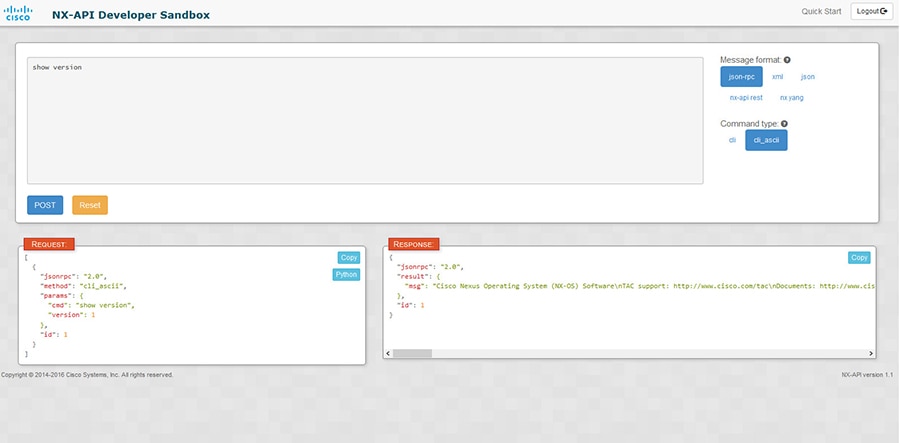
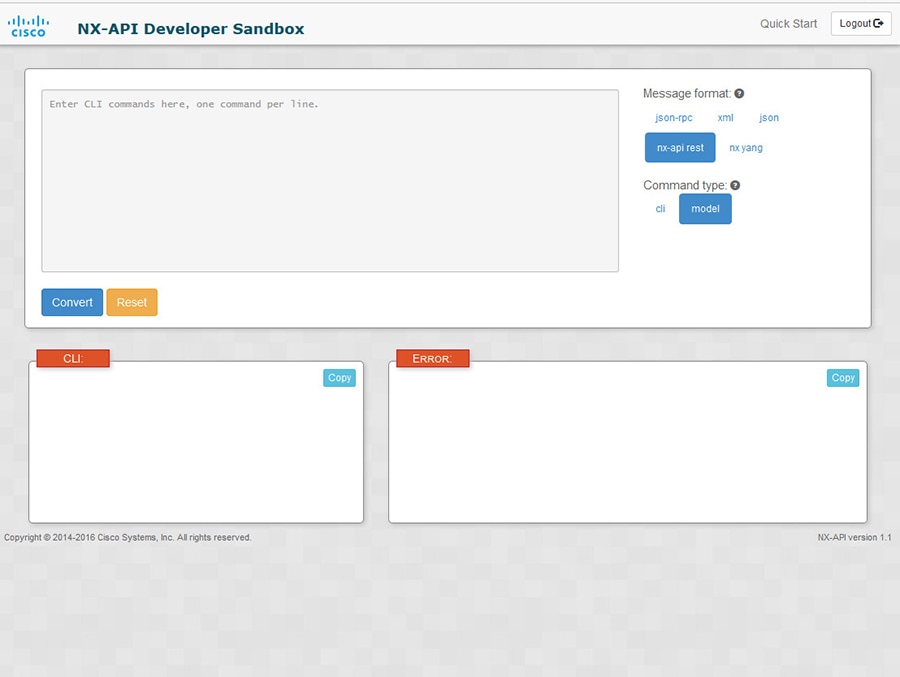
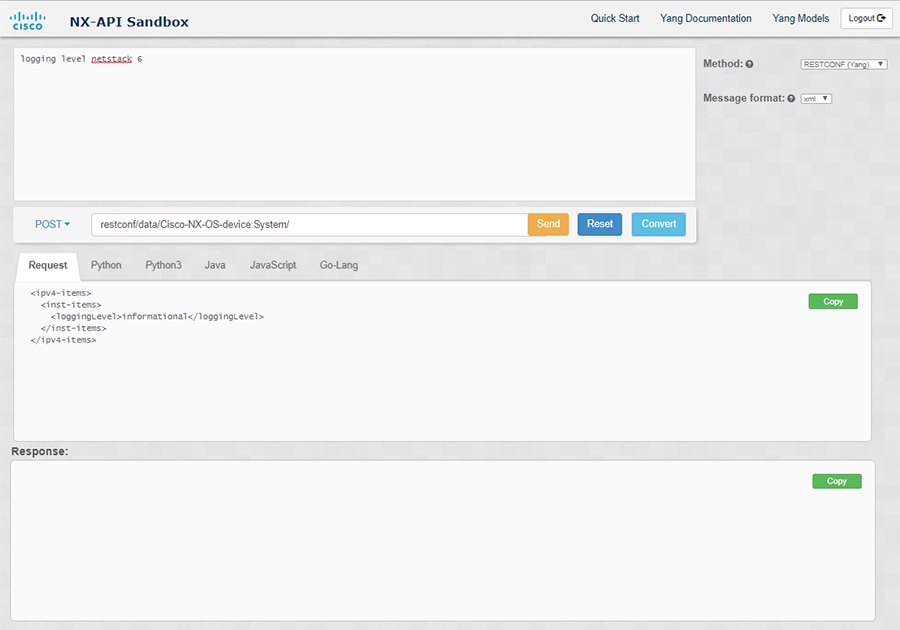
Controls in the Command pane allow you to choose a message format for a supported API, such as NX-API REST, and a command type, such as XML or JSON. The available command type options vary depending on the selected message format.

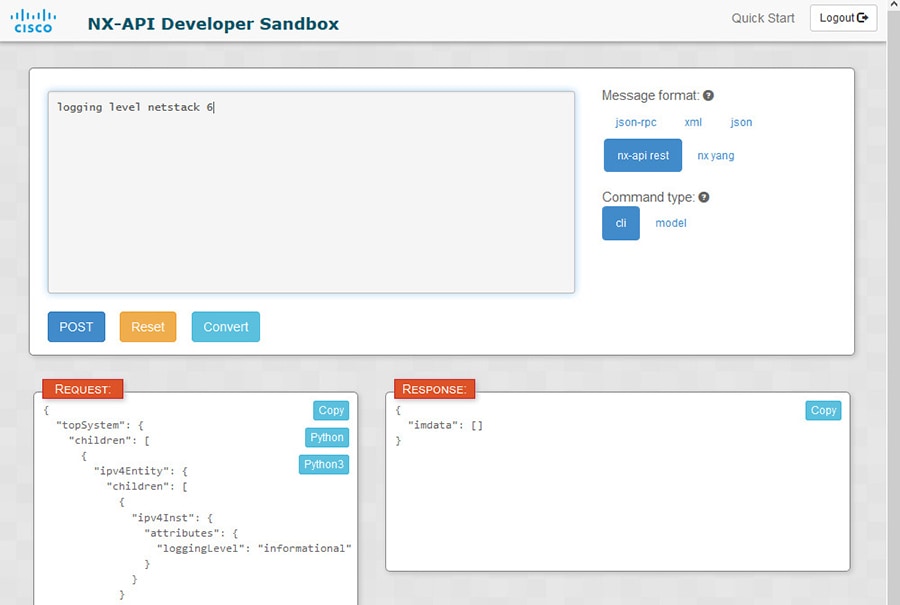
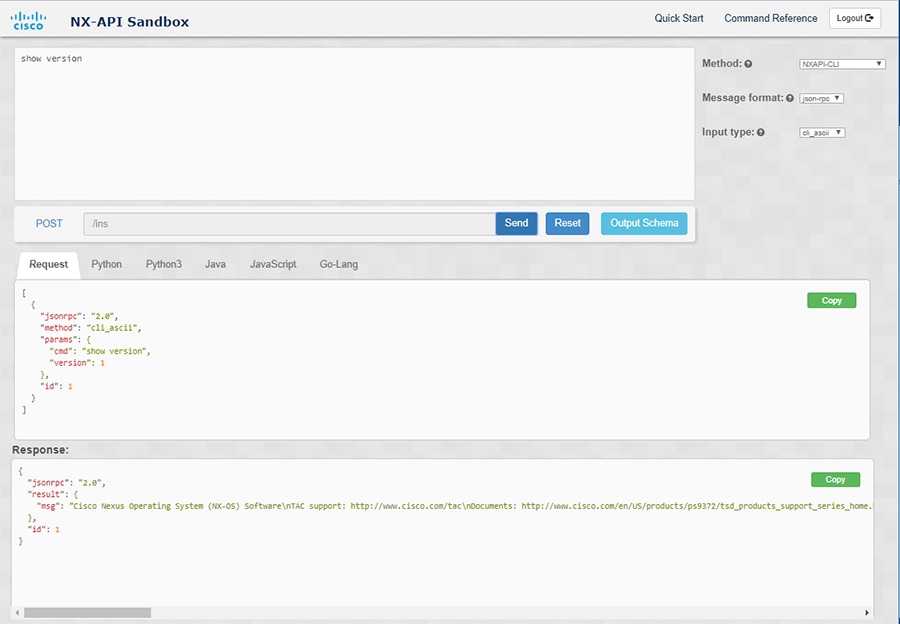
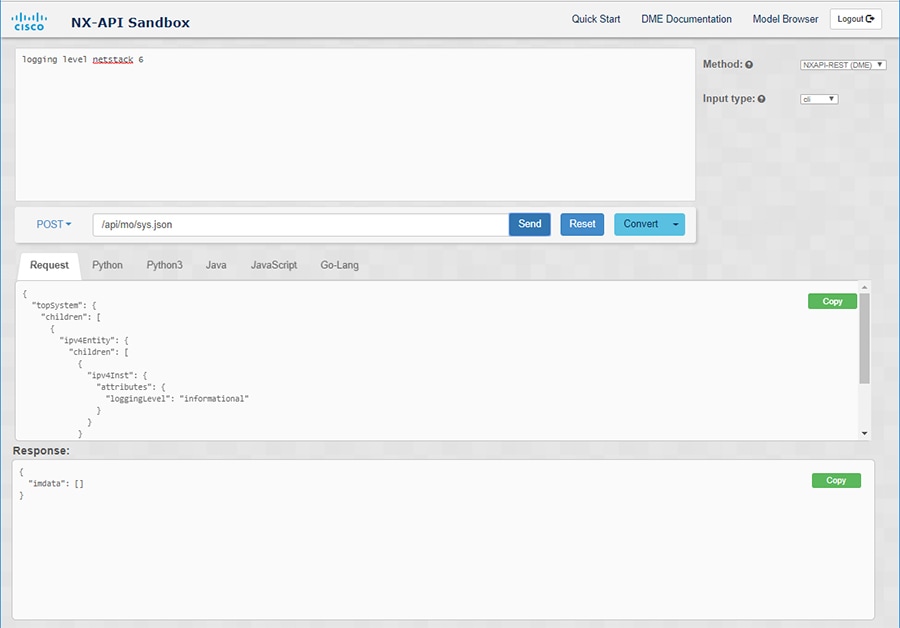
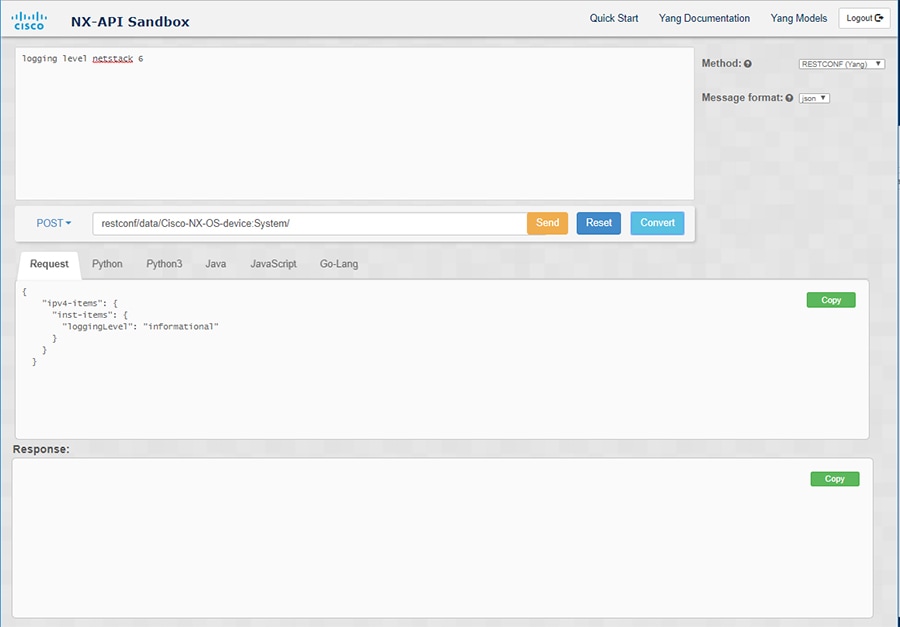
When you type or paste one or more CLI commands into the Command pane, the web form converts the commands into an API payload, checking for configuration errors, and displays the resulting payload in the Request pane. If you then choose to post the payload directly from the Sandbox to the switch, using the POST button in the Command pane, the Response pane displays the API response.

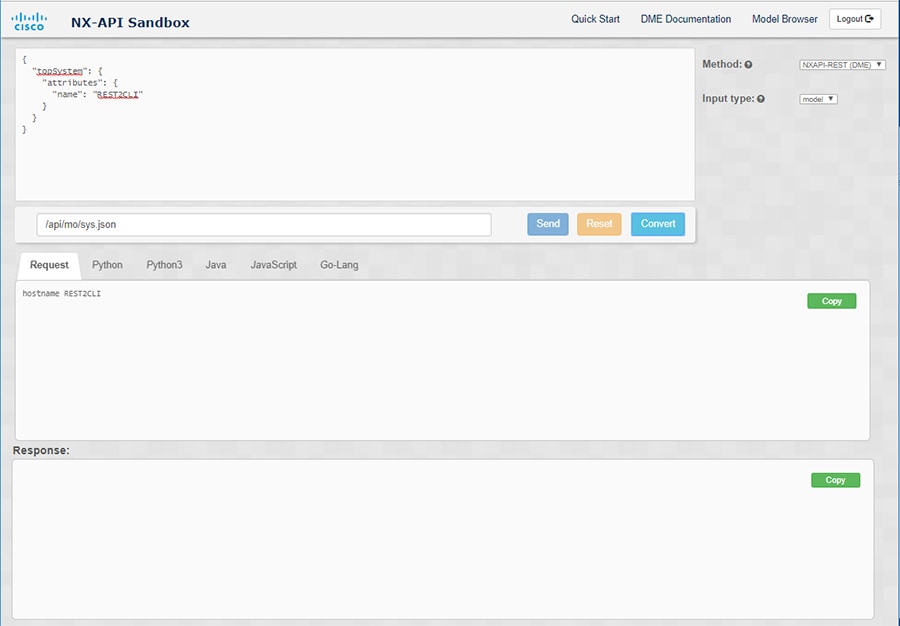
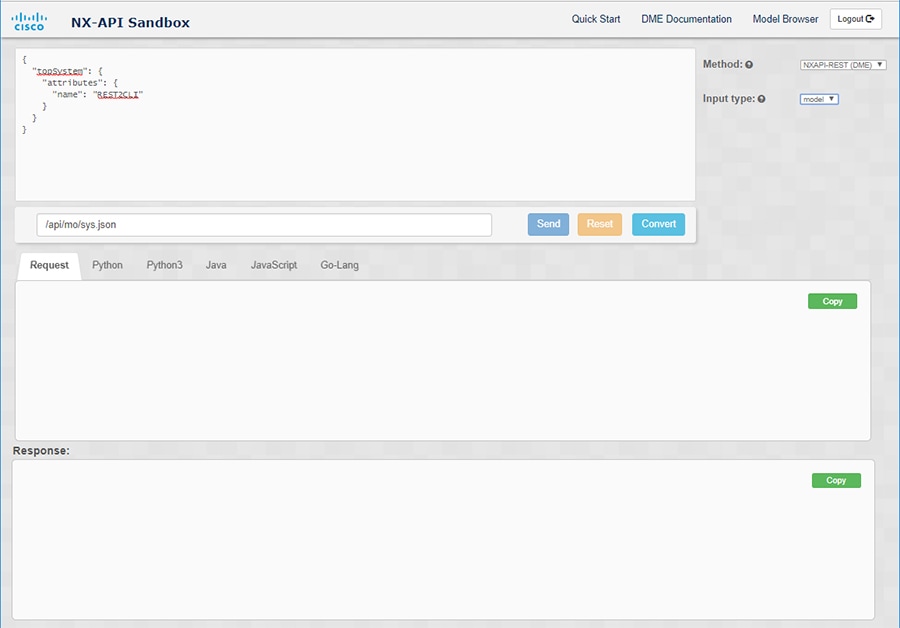
Conversely, when you type an NX-API REST designated name (DN) and payload into the Command pane and select the nx-api rest Message format and the model Command type, Developer Sandbox checks the payload for configuration errors, then the Response pane displays the equivalent CLIs.

注意事項と制約事項

デベロッパー サンドボックスのガイドラインと制限は次のとおりです:

  • サンドボックスで [送信(Send)] をクリックすると、コマンドがスイッチにコミットされ、構成または状態が変更される可能性があります。

  • 一部の機能構成コマンドは、関連する機能が有効になるまで使用できません。 たとえば、BGP ルータを構成するには、最初に [機能 bgp(feature bgp)] コマンドを使用して BGP を有効にする必要があります。同様に、OSPF ルータを構成するには、最初に [機能 ospf(feature ospf)] コマンドを使用して OSPF を有効にする必要があります。これは、[evpn マルチホーミング コア トラッキング(evpn multihoming core-tracking)] などの依存コマンドを有効にする [evpn esi マルチホーミング(evpn esi multihoming)] にも適用されます。機能が機能依存コマンドにアクセスできるようにする方法の詳細については、Cisco Nexus 9000 Configuration Guides Cisco Nexus 3000 Configuration Guides を参照してください。

  • サンドボックスを使用した DN での変換は、CLI 構成の DN を検索する場合にのみサポートされます。DME を使用して CLI 構成コマンドの DN を変換するなど、他のワークフローはサポートされていません。

  • OSPFv2 インターフェイス コマンドのための、CLI からモデルまたは xml への変換は、[no] ip router ospf <tag> area {<area-id-ip> | <area-id-int>} [secondaries none] コマンドを使用してルータ インスタンスとエリアを構成し、インターフェイスで OSPF を明示的に有効にするまでは行われません。

  • コマンド ペイン(上部のペイン)は、最大 10,000 行の入力をサポートします。

  • CLI 入力のメッセージ タイプとして XML または JSON を使用する場合、セミコロンを使用して同じ行の複数のコマンドを区切ることができます。ただし、CLI 入力のメッセージ タイプとして JSON RPC を使用する場合、同じ行に複数のコマンドを入力し、セミコロン ( ; ) で区切ることはできません。

    たとえば、次のように JSON RPC を介してshow hostname コマンドとshow clock コマンドをを送信したいとします。

    Sandbox で、次のように CLI を入力します。
    show hostname ; show clock
    JSON RPC リクエストでは、入力は次のようにフォーマットされます。
    [
      {
        "jsonrpc": "2.0",
        "method": "cli",
        "params": {
          "cmd": "show hostname ; show clock",
          "version": 1
        },
        "id": 1
      }
    ]
    リクエストを送信すると、レスポンスで次のエラーが返されます。
    {
      "jsonrpc": "2.0",
      "error": {
        "code": -32602,
        "message": "Invalid params",
        "data": {
          "msg": "Request contains invalid special characters"
        }
      },
      "id": 1
    }

    この状況は、Sandbox が JSON RPC リクエストの各コマンドを個別のアイテムとして解析し、それぞれに 識別子 を割り当てるために発生します。JSON RPC リクエストを使用する場合、同じ回線で複数のコマンドを区切るために内部句読点を使用することはできません。代わりに、各コマンドを個別の回線に入力すると、リクエストが正常に完了します。

    同じ例を続けて、NX-API CLI で次のようにコマンドを入力します。
    show hostname
    show clock
    リクエストでは、入力は次のようにフォーマットされます。
    [
      {
        "jsonrpc": "2.0",
        "method": "cli",
        "params": {
          "cmd": "show hostname",
          "version": 1
        },
        "id": 1
      },
      {
        "jsonrpc": "2.0",
        "method": "cli",
        "params": {
          "cmd": "show clock",
          "version": 1
        },
        "id": 2
      }
    ]
    応答は正常に完了します。
    [
      {
        "jsonrpc": "2.0",
        "result": {
          "body": {
            "hostname": "switch-1"
          }
        },
        "id": 1
      },
      {
        "jsonrpc": "2.0",
        "result": {
          "body": {
            "simple_time": "12:31:02.686 UTC Wed Jul 10 2019\n",
            "time_source": "NTP"
          }
        },
        "id": 2
      }
    ]

Configuring the Message Format and Command Type

The Message Format and Command Type are configured in the upper right corner of the Command pane (the top pane). For Message Format, choose the format of the API protocol that you want to use. The Developer Sandbox supports the following API protocols:

Table 1. NX-OS API Protocols

Protocol

Description

json-rpc

A standard lightweight remote procedure call (RPC) protocol that can be used to deliver NX-OS CLI commands in a JSON payload. The JSON-RPC 2.0 specification is outlined by jsonrpc.org.

xml

Cisco NX-API proprietary protocol for delivering NX-OS CLI or bash commands in an XML payload.

json

Cisco NX-API proprietary protocol for delivering NX-OS CLI or bash commands in a JSON payload.

nx-api rest

Cisco NX-API proprietary protocol for manipulating and reading managed objects (MOs) and their properties in the internal NX-OS data management engine (DME) model. For more information about the Cisco Nexus 3000 and 9000 Series NX-API REST SDK, see https://developer.cisco.com/site/cisco-nexus-nx-api-references/.

nx yang

The YANG ("Yet Another Next Generation") data modeling language for configuration and state data.

When the Message Format has been chosen, a set of Command Type options are presented just below the Message Format control. The Command Type setting can constrain the input CLI and can determine the Request and Response format. The options vary depending on the Message Format selection. For each Message Format, the following table describes the Command Type options:

Table 2. Command Types

Message format

Command type

json-rpc

  • cli — show or configuration commands

  • cli-ascii — show or configuration commands, output without formatting

xml

  • cli_show — show commands. If the command does not support XML output, an error message will be returned.

  • cli_show_ascii — show commands, output without formatting

  • cli_conf — configuration commands. Interactive configuration commands are not supported.

  • bash — bash commands. Most non-interactive bash commands are supported.

    Note

     
    The bash shell must be enabled in the switch.

json

  • cli_show — show commands. If the command does not support XML output, an error message will be returned.

  • cli_show_ascii — show commands, output without formatting

  • cli_conf — configuration commands. Interactive configuration commands are not supported.

  • bash — bash commands. Most non-interactive bash commands are supported.

    Note

     
    The bash shell must be enabled in the switch.

nx-api rest

  • cli — configuration commands

  • model — DN and corresponding payload.

nx yang

  • json — JSON structure is used for payload

  • xml — XML structure is used for payload

Output Chunking

In order to handle large show command output, some NX-API message formats support output chunking for show commands. In this case, an Enable chunk mode checkbox appears below the Command Type control along with a session ID (SID) type-in box.

When chunking is enabled, the response is sent in multiple "chunks," with the first chunk sent in the immediate command response. In order to retrieve the next chunk of the response message, you must send an NX-API request with SID set to the session ID of the previous response message.

デベロッパー サンドボックスを使用

Using the Developer Sandbox to Convert CLI Commands to REST Payloads


Tip


Online help is available by clicking Quick Start in the upper right corner of the Sandbox window.

Additional details, such as response codes and security methods, can be found in the chapter "NX-API CLI".

Only configuration commands are supported.


Procedure


Step 1

Configure the Message Format and Command Type for the API protocol you want to use.

For detailed instructions, see Configuring the Message Format and Command Type.

Step 2

Type or paste NX-OS CLI configuration commands, one command per line, into the text entry box in the top pane.

You can erase the contents of the text entry box (and the Request and Response panes) by clicking Reset at the bottom of the top pane.

Step 3

Click the Convert at the bottom of the top pane.

If the CLI commands contain no configuration errors, the payload appears in the Request pane. If errors are present, a descriptive error message appears in the Response pane.

Step 4

When a valid payload is present in the Request pane, you can click POST to send the payload as an API call to the switch.

The response from the switch appears in the Response pane.

Warning

 
Clicking POST commits the command to the switch, which can result in a configuration or state change.

Step 5

You can copy the contents of the Request or Response pane to the clipboard by clicking Copy in the pane.

Step 6

You can obtain a Python implementation of the request on the clipboard by clicking Python in the Request pane.


Using the Developer Sandbox to Convert from REST Payloads to CLI Commands


Tip


Online help is available by clicking Quick Start in the upper right corner of the Sandbox window.

Additional details, such as response codes and security methods, can be found in the chapter "NX-API CLI".


SUMMARY STEPS

  1. Select nx-api rest as the Message Format and model as the Command Type.
  2. Enter a DN and payload into the text entry box in the top pane. Then click on the Convert button below the top pane.

DETAILED STEPS


Step 1

Select nx-api rest as the Message Format and model as the Command Type.

Example:

Step 2

Enter a DN and payload into the text entry box in the top pane. Then click on the Convert button below the top pane.

Example:

For this example, the DN is api/mo/sys.json and the NX-API REST payload is:
{
  "topSystem": {
    "attributes": {
      "name": "REST2CLI"
    }
  }
}
When you click on the Convert button, the CLI equivalent appears in the CLI pane as shown in the following image.

Note


The Developer Sandbox cannot convert all payloads into equivalent CLIs, even if the Sandbox converted the CLIs to NX-API REST payloads. The following is a list of possible sources of error that can prevent a payload from completely converting to CLI commands:

Table 3. Sources of REST2CLI Errors

Payload Issue

Result

The payload contains an attribute that does not exist in the MO.

Example:
api/mo/sys.json
{
  "topSystem": {
    "children": [
      {
        "interfaceEntity": {
          "children": [
            {
              "l1PhysIf": {
                "attributes": {
                  "id": "eth1/1",
                  "fakeattribute": "totallyFake"
                }
              }
            }
          ]
        }
      }
    ]
  }
}

The Error pane will return an error related to the attribute.

Example:

CLI

Error unknown attribute 'fakeattribute' in element 'l1PhysIf'

The payload includes MOs that aren't yet supported for conversion:

Example:
api/mo/sys.json
{
  "topSystem": {
    "children": [
      {
        "dhcpEntity": {
          "children": [
            {
              "dhcpInst": {
                "attributes": {
                  "SnoopingEnabled": "yes"
                }
              }
            }
          ]
        }
      }
    ]
  }
}

The Error Pane will return an error related to the unsupported MO.

Example:

CLI

Error The entire subtree of "sys/dhcp" is not converted.


NX-API 開発者サンドボックス:NX-OS リリース 9.2(2)以降

About the NX-API デベロッパー サンドボックス

Cisco NX-API Developer Sandbox は、スイッチでホストされる Web フォームです。NX-OS CLI コマンドを同等の XML または JSON ペイロードに変換し、NX-API REST ペイロードを同等の CLI に変換します。

Web フォームは、次の図に示すように、コマンド(上部のペイン)、要求(中央のペイン)、および応答(下部のペイン)の 3 つのペインを持つ 1 つの画面です。指定名(DN)フィールドは、コマンド ペインとリクエスト ペインの間にあります(下図の POST送信オプションの間にあります)。

リクエスト ペインにも一連のタブがあります。各タブは、PythonPython3JavaJavaScriptGo-Lang の異なる言語を表します。各タブでは、それぞれの言語でリクエストを表示できます。たとえば、CLI コマンドを XML または JSON ペイロードに変換した後、[Python] タブをクリックして、スクリプトの作成に使用できる Python でのリクエストを表示します。

図 2. リクエストと出力応答の例を含む NX-API デベロッパー サンドボックス

コマンド ペインのコントロールを使用すると、NX-API REST などのサポートされている API、モデル(ペイロード)や CLI などの入力タイプ、および XML や JSON などのメッセージ形式を選択できます。使用可能なオプションは、選択した方法によって異なります。

NXAPI-REST(DME)メソッドを選択し、1 つ以上の CLI コマンドをコマンド ペインに入力するか貼り付けて、[変換] をクリックすると、Web フォームはコマンドを REST API ペイロードに変換し、構成エラーをチェックし、要求ペインに結果のペイロードを表示します。次に、ペイロードをサンドボックスからスイッチに直接送信することを選択した場合(POST オプションを選択して [SEND] をクリック)、[応答] ペインに API 応答が表示されます。詳細については、デベロッパー サンドボックスを使用して CLI コマンドを REST ペイロードに変換するを参照してください。

逆に、Cisco NX-API Developer Sandbox はペイロードの設定エラーをチェックし、対応する CLI を [応答] ペインに表示します。詳細については、「デベロッパー サンドボックスを使用した REST ペイロードから CLI コマンドへの変換」を参照してください。

注意事項と制約事項

デベロッパー サンドボックスのガイドラインと制限は次のとおりです:

  • サンドボックスで [送信(Send)] をクリックすると、コマンドがスイッチにコミットされ、構成または状態が変更される可能性があります。

  • 一部の機能構成コマンドは、関連する機能が有効になるまで使用できません。 たとえば、BGP ルータを構成するには、最初に [機能 bgp(feature bgp)] コマンドを使用して BGP を有効にする必要があります。同様に、OSPF ルータを構成するには、最初に [機能 ospf(feature ospf)] コマンドを使用して OSPF を有効にする必要があります。これは、[evpn マルチホーミング コア トラッキング(evpn multihoming core-tracking)] などの依存コマンドを有効にする [evpn esi マルチホーミング(evpn esi multihoming)] にも適用されます。機能が機能依存コマンドにアクセスできるようにする方法の詳細については、Cisco Nexus 9000 Configuration Guides Cisco Nexus 3000 Configuration Guides を参照してください。

  • サンドボックスを使用した DN での変換は、CLI 構成の DN を検索する場合にのみサポートされます。DME を使用して CLI 構成コマンドの DN を変換するなど、他のワークフローはサポートされていません。

  • OSPFv2 インターフェイス コマンドのための、CLI からモデルまたは xml への変換は、[no] ip router ospf <tag> area {<area-id-ip> | <area-id-int>} [secondaries none] コマンドを使用してルータ インスタンスとエリアを構成し、インターフェイスで OSPF を明示的に有効にするまでは行われません。

  • コマンド ペイン(上部のペイン)は、最大 10,000 行の入力をサポートします。

  • CLI 入力のメッセージ タイプとして XML または JSON を使用する場合、セミコロンを使用して同じ行の複数のコマンドを区切ることができます。ただし、CLI 入力のメッセージ タイプとして JSON RPC を使用する場合、同じ行に複数のコマンドを入力し、セミコロン ( ; ) で区切ることはできません。

    たとえば、次のように JSON RPC を介してshow hostname コマンドとshow clock コマンドをを送信したいとします。

    Sandbox で、次のように CLI を入力します。
    show hostname ; show clock
    JSON RPC リクエストでは、入力は次のようにフォーマットされます。
    [
      {
        "jsonrpc": "2.0",
        "method": "cli",
        "params": {
          "cmd": "show hostname ; show clock",
          "version": 1
        },
        "id": 1
      }
    ]
    リクエストを送信すると、レスポンスで次のエラーが返されます。
    {
      "jsonrpc": "2.0",
      "error": {
        "code": -32602,
        "message": "Invalid params",
        "data": {
          "msg": "Request contains invalid special characters"
        }
      },
      "id": 1
    }

    この状況は、Sandbox が JSON RPC リクエストの各コマンドを個別のアイテムとして解析し、それぞれに 識別子 を割り当てるために発生します。JSON RPC リクエストを使用する場合、同じ回線で複数のコマンドを区切るために内部句読点を使用することはできません。代わりに、各コマンドを個別の回線に入力すると、リクエストが正常に完了します。

    同じ例を続けて、NX-API CLI で次のようにコマンドを入力します。
    show hostname
    show clock
    リクエストでは、入力は次のようにフォーマットされます。
    [
      {
        "jsonrpc": "2.0",
        "method": "cli",
        "params": {
          "cmd": "show hostname",
          "version": 1
        },
        "id": 1
      },
      {
        "jsonrpc": "2.0",
        "method": "cli",
        "params": {
          "cmd": "show clock",
          "version": 1
        },
        "id": 2
      }
    ]
    応答は正常に完了します。
    [
      {
        "jsonrpc": "2.0",
        "result": {
          "body": {
            "hostname": "switch-1"
          }
        },
        "id": 1
      },
      {
        "jsonrpc": "2.0",
        "result": {
          "body": {
            "simple_time": "12:31:02.686 UTC Wed Jul 10 2019\n",
            "time_source": "NTP"
          }
        },
        "id": 2
      }
    ]

メッセージ フォーマットと入力タイプの構成

メソッドメッセージ形式、および 入力タイプ は、コマンド ペイン(上部のペイン)の右上隅で構成されます。[メソッド] で、使用する API プロトコルの形式を選択します。Cisco NX-API Developer Sandbox は、次の API プロトコルをサポートしています。

表 4. NX-OS API プロトコル

プロトコル

説明

NXAPI-CLI

XML または JSON ペイロードで NX-OS CLI または bash コマンドを配信するための Cisco NX-API 独自のプロトコル。

NXAPI-REST(DME)

内部 NX-OS データ管理エンジン(DME)モデルで管理対象オブジェクト(MO)とそのプロパティを操作および読み取るための Cisco NX-API 独自のプロトコル。NXAPI-REST(DME)プロトコルは、次の方法から選択できるドロップダウン リストを表示します。

  • POST

  • GET

  • PUT

  • DELETE

Cisco Nexus 3000 および 9000 シリーズ NX-API REST SDK の詳細については、https://developer.cisco.com/site/cisco-nexus-nx-api-references/ を参照してください。

RESTCONF(Yang)

構成および状態データ用の YANG(「Yet Another Next Generation」)データ モデリング言語。

RESTCONF(Yang)プロトコルは、次の方法から選択できるドロップダウン リストを表示します。

  • POST

  • GET

  • PUT

  • PATCH

  • DELETE

メソッドを選択すると、メッセージ形式または入力タイプのオプションのセットがドロップダウン リストに表示されます。メッセージ形式は、入力 CLI を制約し、要求応答の形式を決定できます。オプションは、選択したメソッドによって異なります。

次の表では、各メッセージ形式入力/コマンド タイプ オプションについて説明します。

表 5. コマンド タイプ

方法

メッセージ形式

入力/コマンド タイプ

NXAPI-CLI

json-rpc

  • cli — show または構成コマンド

  • cli_ascii — show または構成コマンド、フォーマットせずに出力

  • cli-array — show コマンド。cli に似ていますが、cli_array を使用すると、データは 1 つの要素のリスト、または角括弧 [ ] で囲まれたアレイとして返されます。

NXAPI-CLI

xml

  • cli_show — コマンドを表示します。コマンドが XML 出力をサポートしていない場合、エラー メッセージが返されます。

  • cli_show_ascii — コマンドを表示、フォーマットせずに出力

  • cli_conf — 構成 コマンド。対話型の構成コマンドはサポートされていません。

  • bash — bash コマンド。ほとんどの非対話型 bash コマンドがサポートされています。

    (注)  

     
    スイッチで bash シェルを有効にする必要があります。

NXAPI-CLI

json

  • cli_show — コマンドを表示します。コマンドが XML 出力をサポートしていない場合、エラー メッセージが返されます。

    (注)  


    Cisco NX-OS リリース 9.3(3) 以降では、cli_show コマンドよりも cli_show_array コマンドが推奨されます。

  • cli_show_array — show コマンドcli_show に似ていますが、cli_show_array を使用すると、データは角括弧 [ ] で囲まれた 1 つの要素のリストまたは配列として返されます。

  • cli_show_ascii — コマンドを表示、フォーマットせずに出力

  • cli_conf — 構成 コマンド。対話型の構成コマンドはサポートされていません。

  • bash — bash コマンド。ほとんどの非対話型 bash コマンドがサポートされています。

    (注)  

     
    スイッチで bash シェルを有効にする必要があります。

NXAPI-REST(DME)

  • cli — CLI からモデルへの変換

  • model — モデルから CLI への変換。

RESTCONF(Yang)

  • json — ペイロードに JSON 構造が使用されます

  • xml — XML 構造がペイロードに使用されます

出力チャンク

JSON および XML NX-API メッセージ形式を使用すると、10 MB のチャンクで大きな show コマンド応答を受信できます。受信すると、チャンクが連結されて、有効な JSON オブジェクトまたは XML 構造が作成されます。出力チャンクを示すサンプル スクリプトを表示するには、次のリンクをクリックし、リリース 9.3x に対応するディレクトリを選択します:Cisco NX-OS NXAPI。


(注)  


チャンク JSON モードの場合、ブラウザーまたは Python スクリプト パーツは有効な JSON 出力を提供しません(終了タグはありません)。チャンク モードを使用して有効な JSON を取得するには、ディレクトリで提供されるスクリプトを使用します。


即時のコマンド応答で最初のチャンクを受け取ります。これには、セッション ID を含む sid フィールドも含まれます。次のチャンクを取得するには、前のチャンクのセッション ID を [SID] テキスト ボックスに入力します。sid フィールドの eoc(コンテンツの終わり)値で示される最後の応答に到達するまで、プロセスを繰り返します。

チャンク モードは、JSON または XML フォーマット タイプおよび cli_show cli_show_array,、または cli_show_ascii コマンド タイプで NXAPI-CLI メソッドを使用する場合に使用できます。チャンク モードの設定の詳細については、チャンク モード フィールドの表を参照してください。


(注)  


NX-API は、最大 2 つのチャンク セッションをサポートします。


表 6. チャンク モード フィールド

フィールド名

説明

チャンク モードを有効にする

[チャンク モードを有効にする(Enable Chunk Mode)] チェック ボックスをクリックしてチェック マークを付けると、チャンクが有効になります。チャンク モードを有効にすると、10 MB を超える応答は、最大 10 MB のサイズの複数のチャンクで送信されます。

SID

応答メッセージの次のチャンクを取得するには、SID テキスト ボックスに前の応答のセッション ID を入力します。

(注)  


使用できる文字は英数字と「_」のみです。無効な文字はエラーを受け取ります。

デベロッパー サンドボックスを使用

デベロッパー サンドボックスを使用して CLI コマンドを REST ペイロードに変換する


ヒント


  • Cisco NX-API デベロッパー サンドボックス ウィンドウの右上隅にあるフィールド名の横にあるヘルプ アイコン( ? )をクリックすると、オンライン ヘルプを利用できます。

  • 応答コードやセキュリティ メソッドなどの詳細については、NX-API CLI の章を参照してください。

  • 構成コマンドはサポートされていません。


Cisco NX-API Developer Sandbox を使用すると、CLI コマンドを REST ペイロードに変換できます。

手順


ステップ 1

[方法(Method)] ドロップダウン リストをクリックし、NXAPI-REST (DME) を選択します。

[入力タイプ] ドロップダウン リストが表示されます。

ステップ 2

[入力(Input)] タイプドロップダウン リストをクリックし、cli を選択します。

ステップ 3

上部ペインのテキスト エントリ ボックスに、NX-OS CLI 構成コマンドを 1 行に 1 つずつ入力するか貼り付けます。

上部ペインの下部にある [リセット(Reset)] をクリックすると、テキスト エントリ ボックス (および [要求(Request)] ペインと [応答(Response)] ペイン) の内容を消去できます。

ステップ 4

[変換(Convert)] をクリックします。

CLI コマンドに構成エラーが含まれていない場合、ペイロードは [要求(Request)] ペインに表示されます。エラーが存在する場合は、説明のエラー メッセージが [応答(Response)] ペインに表示されます。

ステップ 5

(オプション) 有効なペイロードを API 呼び出しとしてスイッチに送信するには、[送信(Send)] をクリックします。

スイッチからのレスポンスは [Response(応答)] ペインに表示されます。

警告

 
[送信(Send)] をクリックすると、コマンドがスイッチにコミットされ、構成または状態が変更される可能性があります。

ステップ 6

(オプション) ペイロード内の MO の DN を取得するには:

  1. [リクエスト(Request)] ペインから、POST を選択します。

  2. [変換(Convert)] ドロップダウン リストをクリックし、[変換 (DN を使用)(Convert (with DN))] を選択します。

ペイロードは、ペイロード内の各 MO に対応する DN を含む dn フィールドとともに表示されます。

ステップ 7

(オプション) 新しい構成で現在の構成を上書きする場合:

  1. [変換(Convert)] ドロップダウン リストをクリックし、[変換(置換用)(Convert(for Replace))] を選択します。[リクエスト(Request)] ペインには、[ステータス(status)] フィールドが[置換(replace)]ように設定されたペイロードが表示されます。

  2. [リクエスト(Request)] ペインから、POST を選択します。

  3. [送信(Send)] をクリックします。

現在の構成は、投稿された構成に置き換えられます。たとえば、次の構成で開始するとします:


interface eth1/2
  description test
  mtu 1501

次に、[変換(置換用)(Convert(for Replace))]を使用して、次の構成を POST します。


interface eth1/2
  description testForcr

mtu 構成が削除され、新しい説明 (testForcr) のみがインターフェイスの下に表示されます。この変更は、show running-config と入力すると確認されます。

ステップ 8

(オプション) [リクエスト(Request)] ペインや [応答(Response)] ペインなどのペインの内容をコピーするには、[コピー(Copy)] をクリックします。それぞれのペインの内容がクリップボードにコピーされます。

ステップ 9

(オプション) リクエストを以下のいずれかのフォーマットに変換するには、[リクエスト(Request)] ペインの適切なタブをクリックします。

  • Python

  • python3

  • Java

  • JavaScript

  • Go-Lang


デベロッパー サンドボックスを使用した REST ペイロードから CLI コマンドへの変換

Cisco NX-API Developer Sandbox を使用すると、REST ペイロードを対応する CLI コマンドに変換できます。このオプションは、NXAPI-REST (DME) メソッドでのみ使用できます。


ヒント


  • Cisco NX-API Developer Sandbox のフィールド名の横にあるヘルプ アイコン( ? )をクリックすると、オンライン ヘルプを利用できます。ヘルプ アイコンをクリックして、それぞれのフィールドに関する情報を取得します。

    応答コードやセキュリティ メソッドなどの詳細については、NX-API CLI の章を参照してください。

  • Cisco NX-API Developer Sandbox の右上隅には、追加情報へのリンクが含まれています。表示されるリンクは、選択した[方法(Method)]によって異なります。NXAPI-REST(DME)メソッドに表示されるリンク:

    • [NX-API リファレンス(NX-API References)]— 追加の NX-API ドキュメントにアクセスできます。

    • [DME ドキュメント(DME Documentation)] — NX-API DME モデル リファレンス ページにアクセスできます。

    • [モデル ブラウザ(Model Browser)] — モデル ブラウザである Visore にアクセスできます。Visore ページにアクセスするには、スイッチの IP アドレスを手動で入力する必要がある場合があることに注意してください。

      https://management-ip-address/visore.html


手順


ステップ 1

[方法(Method)] ドロップダウン リストをクリックし、NXAPI-REST (DME) を選択します。

例:

ステップ 2

[タイプを入力(Input Type)] タイプドロップダウン リストをクリックし、[モデル(model)] を選択します。

ステップ 3

要求ペインの上にあるフィールドに、ペイロードに対応する指定名(DN)を入力します。

ステップ 4

コマンド ペインにペイロードを入力します。

ステップ 5

[変換(Convert)] をクリックします。

例:

この例では、DN は /api/mo/sys.json であり、NX-API REST ペイロードは次のとおりです。
{
  "topSystem": {
    "attributes": {
      "name": "REST2CLI"
    }
  }
}
[変換(Convert)] ボタンをクリックすると、次の図に示すように、同等の CLI が CLI ペインに表示されます。

(注)  


Cisco NX-API Developer Sandbox は、サンドボックスが CLI を NX-API REST ペイロードに変換した場合でも、すべてのペイロードを同等の CLI に変換できません。以下は、ペイロードが CLI コマンドに完全に変換するのを妨げる可能性のあるエラーの原因のリストです。

表 7. REST2CLI エラーの原因

ペイロードの問題

結果

ペイロードに、MO に存在しない属性が含まれています。

例:
api/mo/sys.json
{
  "topSystem": {
    "children": [
      {
        "interfaceEntity": {
          "children": [
            {
              "l1PhysIf": {
                "attributes": {
                  "id": "eth1/1",
                  "fakeattribute": "totallyFake"
                }
              }
            }
          ]
        }
      }
    ]
  }
}

[エラー(Error)] ペインは、属性に関連するエラーを返します。

例:

CLI

要素「l1PhysIf」の不明な属性「fakeattribute」の[エラー(Error)]

ペイロードには、変換がまだサポートされていない MO が含まれています。

例:
api/mo/sys.json
{
  "topSystem": {
    "children": [
      {
        "dhcpEntity": {
          "children": [
            {
              "dhcpInst": {
                "attributes": {
                  "SnoopingEnabled": "yes"
                }
              }
            }
          ]
        }
      }
    ]
  }
}

[エラー(Error)] ペインは、サポートされていない MO に関連するエラーを返します。

例:

CLI

[エラー(Error)] [「sys/dhcp」のサブツリー全体が変換されていません。(The entire subtree of "sys/dhcp" is not converted.)]


デベロッパー サンドボックスを使用して RESTCONF から json または XML に変換する


ヒント


  • Cisco NX-API Developer Sandbox ウィンドウの右上隅にあるヘルプ アイコン( ? )をクリックすると、オンライン ヘルプを利用できます。

  • [サンドボックス] ウィンドウの右上隅にある Yang Documentation リンクをクリックして、Model Driven Programmability with Yang ページに移動します。

  • [サンドボックス] ウィンドウの右上隅にある Yang Models リンクをクリックして、YangModels GitHub サイトにアクセスします。


手順


ステップ 1

[メソッド] ドロップダウン リストをクリックし、[RESTCONF (Yang)] を選択します。

例:

ステップ 2

[メッセージ形式] をクリックし、json または xml を選択します。

ステップ 3

上部ペインのテキスト入力ボックスにコマンドを入力します。

ステップ 4

メッセージ形式を選択します。

ステップ 5

[変換(Convert)] をクリックします。

例:

この例では、コマンドはログ レベル netstack 6 で、メッセージ形式は json です。

例:

この例では、コマンドはログ レベル netstack 6 で、メッセージ形式は xml です。

(注)  


XML または JSON メッセージ形式を使用して、否定された CLI を Yang ペイロードに変換すると、サンドボックスは警告をスローし、[送信] オプションを無効にします。表示される警告メッセージは、メッセージの形式によって異なります。

  • XML メッセージ形式の場合 — 「これは Netconf ペイロードであり、DELETE 操作用に生成されているため、Restconf では SEND オプションが無効になっています!」

  • JSON メッセージ形式の場合 - 「これは、DELETE 操作用に生成される gRPC ペイロードであるため、Restconf では SEND オプションが無効になっています!」

ステップ 6

[リクエスト] ペインの適切なタブをクリックして、リクエストを次の形式に変換することもできます。

  • Python

  • python3

  • Java

  • JavaScript

  • Go-Lang

(注)  


[リクエスト] タブの上の領域にあるドロップダウン メニューから [PATCH] オプションを選択した場合、Java で生成されたスクリプトは機能しません。これは Java の既知の制限であり、予期される動作です。