Cisco Application Policy Infrastructure Controller エンタープライズ モジュール ハードウェア インストレーション ガイド
偏向のない言語
この製品のマニュアルセットは、偏向のない言語を使用するように配慮されています。このマニュアルセットでの偏向のない言語とは、年齢、障害、性別、人種的アイデンティティ、民族的アイデンティティ、性的指向、社会経済的地位、およびインターセクショナリティに基づく差別を意味しない言語として定義されています。製品ソフトウェアのユーザーインターフェイスにハードコードされている言語、RFP のドキュメントに基づいて使用されている言語、または参照されているサードパーティ製品で使用されている言語によりドキュメントに例外が存在する場合があります。シスコのインクルーシブランゲージに対する取り組みの詳細は、こちらをご覧ください。
翻訳について
このドキュメントは、米国シスコ発行ドキュメントの参考和訳です。リンク情報につきましては、日本語版掲載時点で、英語版にアップデートがあり、リンク先のページが移動/変更されている場合がありますことをご了承ください。あくまでも参考和訳となりますので、正式な内容については米国サイトのドキュメントを参照ください。
- Updated:
- 2017年6月28日
章のタイトル: ラックへの Cisco APIC-EM シリーズ アプライアンスの設置
この付録では、ラックに Cisco APIC-EM アプライアンスを設置する方法について説明します。
 (注) |
Cisco APIC-EM シリーズ アプライアンスの設置、操作、または保守を行う前に、『Regulatory Compliance and Safety Information for Cisco UCS C-Series Servers』を参照して重要な安全情報を確認してください。 |
IMPORTANT SAFETY INSTRUCTIONS
 警告 |
This warning symbol means danger.You are in a situation that could cause bodily injury.Before you work on any equipment, be aware of the hazards involved with electrical circuitry and be familiar with standard practices for preventing accidents.Use the statement number provided at the end of each warning to locate its translation in the translated safety warnings that accompanied this device. 警告文 1071 |
SAVE THESE INSTRUCTIONS
アプライアンスの開梱と点検
 注意 |
内部アプライアンスのコンポーネントを取り扱うときは、静電気防止用ストラップを着用し、モジュールのフレームの端のみを持つようにしてください。 |
 ヒント |
後でアプライアンスの輸送が必要になったときに備えて、輸送用の箱を保管しておいてください。 |
(注) |
シャーシは厳密に検査したうえで出荷されています。輸送中の破損や内容品の不足がある場合には、ただちにカスタマー サービス担当者に連絡してください。 |
| ステップ 1 | 段ボール箱からアプライアンスを取り出します。梱包材はすべて保管しておいてください。 |
| ステップ 2 | カスタマー サービス担当者から提供された機器リストと梱包品の内容を照合します。すべての品目が揃っていることを確認してください。 |
| ステップ 3 | 破損の有無を調べ、内容品の間違いや破損がある場合には、カスタマー サービス担当者に連絡してください。次の情報を用意しておきます。 |
次の作業
アプライアンスを設置する準備をします。
アプライアンスの設置の準備
ここでは、Cisco APIC-EM シリーズ アプライアンスの設置準備について説明します。
設置に関するガイドライン
警告 |
システムの過熱を防ぐため、最大推奨周囲温度の 40° C(104° F)を超えるエリアで操作しないでください。ステートメント 1047 |
警告 |
いつでも装置の電源を切断できるように、プラグおよびソケットにすぐ手が届く状態にしておいてください。 ステートメント 1019 |
警告 |
この製品は、設置する建物にショート(過電流)保護機構が備わっていることを前提に設計されています。 保護デバイスの定格 250 V、15 A を超えないようにしてください。ステートメント 1005 |
警告 |
機器の取り付けは各地域および各国の電気規格に適合する必要があります。 ステートメント 1074 |
注意 |
アプライアンスを取り付ける際は、適切なエアーフローを確保するために、レール キットを使用する必要があります。レール キットを使用せずに、ユニットを別のユニットの上に物理的に置く、つまり「積み重ねる」と、アプライアンスの上部にある通気口がふさがれ、過熱したり、ファンの回転が速くなったり、電力消費が高くなったりする原因となる可能性があります。アプライアンスをラックに取り付けるときは、これらのレールによりアプライアンス間で必要な最小の間隔が提供されるので、レール キットにアプライアンスをマウントすることを推奨します。レール キットを使用してユニットをマウントする場合は、アプライアンス間の間隔を余分にとる必要はありません。 |
注意 |
鉄共振テクノロジーを使用する UPS タイプは使用しないでください。このタイプの UPS は、Cisco UCS などのシステムに使用すると、データ トラフィック パターンの変化によって入力電流が大きく変動し、動作が不安定になることがあります。 |
アプライアンスを設置する際には、次のガイドラインに従ってください。
-
アプライアンスを設置する前に、設置場所を検討して準備します。設置場所を計画する際に推奨される作業の参考として、『Cisco UCS Site Preparation Guide』を参照してください。
-
アプライアンスの周囲に、保守作業および適切な通気のための十分なスペースがあることを確認します。このアプライアンスでのエアーフローは、前面から背面に流れます。
-
空調が、「アプライアンスの仕様」に記載された温度要件に適合していることを確認します。
-
キャビネットまたはラックが、次の「ラックに関する要件」の項に記載された要件に適合していることを確認します。
-
設置場所の電源が、「アプライアンスの仕様」に記載された電源要件に適合していることを確認します。使用可能な場合は、電源障害に備えて無停電電源装置(UPS)を使用してください。
ラックに関する要件
ここでは、標準的なオープン ラックの要件について説明します。
次のタイプのラックを使用する必要があります。
機器の要件
このアプライアンス用にシスコが販売しているスライド レールは、取り付けに工具が必要ありません。
サポートされるスライド レール キット
このアプライアンスでは、次の 2 つのレール キット オプションがサポートされます。
Cisco UCS C220 M3 サーバ用のレール キットを使用しないでください。Cisco APIC-EM アプライアンス専用のレール キットが設計されています。
スライド レールの調整範囲およびケーブル マネジメント アームの寸法
このサーバのスライド レールの調整範囲は 24 ~ 36 インチ(610 ~ 914 mm)です。
オプションのケーブル マネジメント アーム(CMA)を使用する場合、長さの要件がさらに追加されます。
スライド レールの取り付け
ここでは、シスコが販売するラック キットを使用して、アプライアンスをラックに設置する方法について説明します。
警告 |
ラックに装置を取り付けたり、ラック内の装置のメンテナンス作業を行ったりする場合は、事故を防ぐため、装置が安定した状態で置かれていることを十分に確認してください。次のガイドラインは、安全に作業を行ってもらうために用意してあります。この装置のみをラックに搭載する場合は、一番下に搭載するようにしてください。ラックにすでに他の装置が搭載されている場合は、最も重いコンポーネントをラックの一番下にして、重い順に下から上へと搭載するようにしてください。 ラックにスタビライザが付いている場合は、スタビライザを取り付けてから、ラックに装置を設置したり、ラック内の装置を保守したりしてください。 ステートメント 1006 |

次の作業
必要に応じて、ケーブル マネジメント アームを取り付けます。
ケーブル マネジメント アームの取り付け(省略可)
次の手順では、ケーブル マネジメント アームを取り付ける方法について説明します。
CMA は左右逆に取り付けることができます。CMA を逆に取り付けるには、取り付け前に「ケーブル マネジメント アームを逆に取り付ける(省略可)」の項を参照してください。
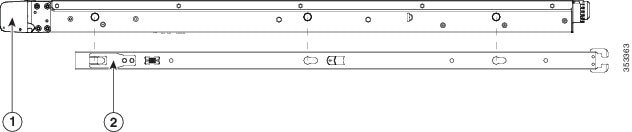
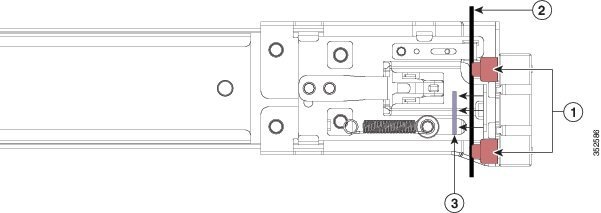
| ステップ 1 | サーバをラックに完全に押し込んだ状態で、サーバから最も離れた CMA アームの CMA タブを、ラック支柱に装着された固定スライド レールの終端にスライドさせます(次の図を参照)。カチッと音がしてロックされるまで、タブをレールの終端にスライドさせます。 | ||||||||
| ステップ 2 | サーバに最も近い CMA タブを、サーバに装着された内側レールの終端にスライドさせます(次の図を参照)。カチッと音がしてロックされるまで、タブをレールの終端にスライドさせます。 | ||||||||
| ステップ 3 | ラックの幅に一致するまで、CMA アセンブリの反対側の終端にある幅調整スライダを引き出します(次の図を参照)。 | ||||||||
| ステップ 4 | 幅調整スライダの終端にある CMA タブを、ラック支柱に装着された固定スライド レールの終端にスライドさせます(次の図を参照)。カチッと音がしてロックされるまで、タブをレールの終端にスライドさせます。 | ||||||||
| ステップ 5 |
各プラスチック製ケーブル ガイドの上部でヒンジ付きフラップを開き、必要に応じてケーブル ガイドを通してケーブルを配線します。
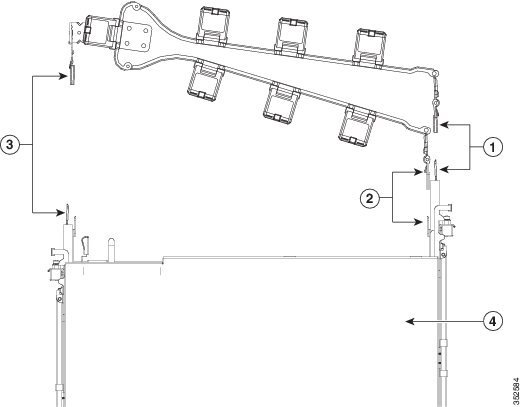
次の表に CMA のコンポーネントを示します。
|
ケーブル マネジメント アームを逆に取り付ける(省略可)
次の手順では、ケーブル マネジメント アームを逆に取り付ける方法について説明します。
| ステップ 1 | CMA アセンブリ全体を 180 度回転させます。プラスチック製ケーブル ガイドは、上を向いたままにしておく必要があります。 | ||||
| ステップ 2 | サーバの背面を向くように、各 CMA アームの終端でタブを反転させます。 | ||||
| ステップ 3 |
幅調整スライダの終端にあるタブを回転させます。タブの外側の金属ボタンを長押しし、サーバの背面を向くようにタブを 180 度回転させます。
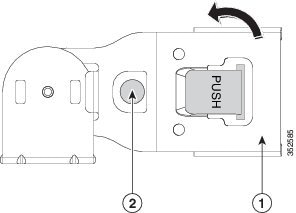
ケーブル マネジメント アームを逆に取り付ける際は、次の図を参照してください。
|
アプライアンスの接続および電源投入
ここでは、アプライアンスの電源をオンにして、接続用の IP アドレスを割り当てる方法について説明します。
| ステップ 1 |
付属の電源コードをアプライアンスの各電源装置に接続し、次に、接地された AC 電源出力に接続します。電源の仕様については、「電源仕様」を参照してください。 最初のブートアップ時には、アプライアンスがスタンバイ電源でブートするまでに約 2 分かかります。 電源ステータスは、次のように電源ステータス LED で確認できます。
|
||
| ステップ 2 |
前面パネルの KVM コネクタに接続されている付属の KVM ケーブルを使用して USB キーボードと VGA モニタを接続します。
|
||
| ステップ 3 | CIMC の設定および使用に関する次の項を参照し、アプライアンスに IP アドレスを割り当てます。 |
LED の確認
Cisco APIC-EM シリーズ アプライアンスが起動して動作中のときに、前面パネルおよび背面パネルの LED の状態を確認します。次のトピックでは、LED の色、電源状態、アクティビティ、および Cisco APIC-EM シリーズ アプライアンスについて表示される重要なステータス インジケータについて説明します。
前面パネルの LED およびボタン
次の表で、アプライアンスの前面パネルの LED およびアプライアンス上のボタンについて説明します。
(注) |
アプライアンスのネットワーク インターフェイスの最小速度は、1 GB/秒である必要があります。 |
| LED 名 |
状態 |
|---|---|
| 前面パネルの LED およびボタン |
消灯:アプライアンスに AC 電力が供給されていません。 オレンジ:アプライアンスはスタンバイ電源モードです。CIMC と一部のマザーボード機能にだけ電力が供給されています。 緑:アプライアンスはメイン電源モードです。すべてのサーバ コンポーネントに電力が供給されています。 |
| ID |
消灯:ID LED は使用されていません。 青:ID LED がアクティブです。 |
| システム ステータス |
緑:アプライアンスは正常動作状態で稼働しています。 緑の点滅:アプライアンスはシステムの初期化とメモリ チェックを行っています。 オレンジの点灯:アプライアンスは縮退運転状態になっており、次のいずれかが原因の可能性があります。 – 電源装置の冗長性が失われている。 – CPU が一致しない。 – 少なくとも 1 つの CPU に障害が発生している。 – 少なくとも 1 つの DIMM に障害が発生している。 – RAID 構成内の少なくとも 1 台のドライブに障害が発生している。 オレンジの点滅:アプライアンスは重大な障害が発生している状態であり、次のいずれかが原因の可能性があります。 – ブートに失敗した。 – 修復不能な CPU またはバス エラーが検出された。 – サーバが過熱状態にある。 |
| ファン ステータス |
緑:すべてのファン モジュールが正常に動作中です。 オレンジの点灯:1 つのファン モジュールに障害が発生しています。 オレンジの点滅:重大な障害。2 つ以上のファン モジュールに障害が発生しています。 |
| 温度ステータス |
緑:アプライアンスは正常温度で稼働中です。 オレンジの点灯:1 つ以上の温度センサーが警告しきい値を超過しています。 オレンジの点滅:1 つ以上の温度センサーが重大しきい値を超過しています。 |
| 電源装置ステータス |
緑:すべての電源装置が正常に動作中です。 オレンジの点灯:1 台以上の電源装置が縮退運転状態にあります。 オレンジの点滅:1 台以上の電源装置が重大な障害発生状態にあります。 |
| ネットワーク リンク アクティビティ |
消灯:イーサネット リンクがアイドル状態です。 緑:1 つ以上のイーサネット LOM ポートでリンクがアクティブになっていますが、アクティビティは存在しません。 緑の点滅:1 つ以上のイーサネット LOM ポートでリンクがアクティブになっていて、アクティビティが存在します。 |
| ハード ドライブ障害 |
消灯:ハード ドライブは正常に動作中です。 オレンジ:ハード ドライブで障害が発生しています。 オレンジの点滅:デバイスの再構成中です。 |
| ハード ドライブ アクティビティ |
消灯:ハード ドライブ スレッドにハード ドライブが存在しません(アクセスなし、障害なし)。 緑:ハード ドライブの準備が完了しています。 緑の点滅:ハード ドライブはデータの読み取り中または書き込み中です。 |
背面パネルの LED およびボタン
次の表で、アプライアンスの背面パネルの LED およびアプライアンス上のボタンについて説明します。
(注) |
アプライアンスのネットワーク インターフェイスの最小速度は、1 GB/秒である必要があります。 |
| LED 名 |
状態 |
|---|---|
| 電源装置障害 |
消灯:電源装置は正常に動作中です。 オレンジの点滅:イベント警告しきい値に達しましたが、電源装置は動作し続けています。 オレンジの点灯:重大障害しきい値に達し、電源装置がシャットダウンしています(たとえば、ファンの障害や過熱状態など)。 |
| 電源装置 AC OK |
消灯:電源装置に AC 電力が供給されていません。 緑の点滅:AC 電力の供給は OK、DC 出力は使用不可。 緑の点灯:AC 電力供給も、DC 出力も OK。 |
| 1 Gb イーサネット専用管理リンク速度 |
消灯:リンク速度は 10 Mbps です。 オレンジ:リンク速度は 100 Mbps です。 緑:リンク速度は 1 Gbps です。 |
| 1 Gb イーサネット専用管理リンク ステータス |
消灯:リンクが確立されていません。 緑:リンクはアクティブです。 緑の点滅:アクティブなリンクにトラフィックが存在します。 |
| 1 Gb イーサネット リンク速度 |
消灯:リンク速度は 10 Mbps です。 オレンジ:リンク速度は 100 Mbps です。 緑:リンク速度は 1 Gbps です。 |
| 1 Gb イーサネット リンク ステータス |
消灯:リンクが確立されていません。 緑:リンクはアクティブです。 緑の点滅:アクティブなリンクにトラフィックが存在します。 |
| ID |
消灯:ID LED は使用されていません。 青:ID LED がアクティブです。 |
アプライアンス コンポーネントの取り付けまたは交換
Cisco APIC-EM アプライアンス コンポーネントの取り付けまたは交換の方法については、『Cisco UCS C220 Server Installation and Service Guide』を参照してください。
 フィードバック