- Preface
- Chapter 1: Cisco MSE Virtual Appliance Overview
- Chapter 2: Cisco MSE Virtual Appliance Licensing
- Chapter 3: Installing the Cisco MSE Virtual Appliance on a VMware Virtual Machine
- Chapter 4: Installing the Cisco MSE Virtual Appliance on a XenServer
- Chapter 5: Installing the Cisco MSE Virtual Appliance on a Hyper-V Platform
- Appendix A: Virtual Machine Setup and Administration
- Appendix B: Command Reference
- Overview of the Process for Installing the Cisco MSE Virtual Appliance On a XenServer
- Verifying Requirements
- Downloading the Cisco MSE Virtual Appliance OVA File
- Importing the MSE Virtual Appliance Using the XenCenter
- Configuring the Basic Settings to Start the MSE Virtual Appliance VM
- Configuring MSE on the Prime Infrastructure
- Synchronizing the Network Design and Tracking Parameters
Installing the Cisco MSE Virtual Appliance on a XenServer
Citrix XenServer is a complete server virtualization platform, optimized for both Windows and Linux virtual servers with all the capabilities required to create and manage a virtual infrastructure.
Citrix XenServer runs directly on server hardware without requiring an underlying operating system, which results in an efficient and scalable system. XenServer works by abstracting elements from the physical machine and allocates them to the Virtual Machines (VMs) running on it.
Citrix XenCenter is the Windows-native graphical user interface for managing Citrix XenServer. Import of MSE virtual appliance onto the XenServer is done using the XenCenter.
This chapter contains the Overview of the Process for Installing the Cisco MSE Virtual Appliance On a XenServer.
Overview of the Process for Installing the Cisco MSE Virtual Appliance On a XenServer
Table 4-1 describes the steps to be followed while deploying the Cisco Mobility Services Engine (MSE) virtual appliance.
|
|
|
|---|---|
1. |
See Verifying Requirements for more information. |
See Downloading the Cisco MSE Virtual Appliance OVA File for more information. |
|
See Importing the MSE Virtual Appliance Using the XenCenter for more information. |
|
See Configuring the Basic Settings to Start the MSE Virtual Appliance VM for more information. |
|
See Configuring MSE on the Prime Infrastructure for more information. |
|
See Synchronizing the Network Design and Tracking Parameters for more information. |
Verifying Requirements
Table 4-2 describes the requirements to verify.
Downloading the Cisco MSE Virtual Appliance OVA File
To download the MSE.ova file, follow these steps:
Step 1![]() Access the Cisco MSE Virtual Appliance image at the following location: http://software.cisco.com/download/navigator.html
Access the Cisco MSE Virtual Appliance image at the following location: http://software.cisco.com/download/navigator.html
Step 2![]() In the Product/Technology Support section, choose Download Software.
In the Product/Technology Support section, choose Download Software.
Step 3![]() In the Select a Product section, navigate to the Wireless software by choosing Products > Wireless > Mobility Services > Cisco Mobility Services Engine Virtual Appliance.
In the Select a Product section, navigate to the Wireless software by choosing Products > Wireless > Mobility Services > Cisco Mobility Services Engine Virtual Appliance.
A list of the latest release software for Cisco Mobility Services Engine Virtual Appliance is available for download.
Step 4![]() In the Latest list, choose 7.6.100.0.
In the Latest list, choose 7.6.100.0.
Step 5![]() You can select any of the following ova files to download:
You can select any of the following ova files to download:
- MSE-XEN-VA-8-0-100-0-Generic.ova—Use this file for a new MSE deployment on a Xen platform.
- MSE-XEN-VA-8-0-100-0-LowEnd.ova—Use this file for a new MSE deployment on a low-end Xen platform.
Step 6![]() Save the installer to your computer in a place that will be easy to find when you start the deployment.
Save the installer to your computer in a place that will be easy to find when you start the deployment.
Importing the MSE Virtual Appliance Using the XenCenter
You can import and export Virtual Machines (VMs) in XenCenter using the Import and Export wizards.
To import an Open Virtualization Archive (OVA) package, follow these steps:
Step 1![]() Launch XenCenter Client application on your desktop and log in using the Administrative privileges.
Launch XenCenter Client application on your desktop and log in using the Administrative privileges.
Step 2![]() Add XenServer to XenCenter if it is not added. You can skip this step if you have already connected the XenCenter to the XenServer host. See this URL for more information: https://support.citrix.com/servlet/KbServlet/download/32306-102-691299/QuickStartGuide_BasicVersion.pdf.
Add XenServer to XenCenter if it is not added. You can skip this step if you have already connected the XenCenter to the XenServer host. See this URL for more information: https://support.citrix.com/servlet/KbServlet/download/32306-102-691299/QuickStartGuide_BasicVersion.pdf.
Step 3![]() Right-click on XenServer in the XenCenter client and choose Import to import the MSE OVA file.
Right-click on XenServer in the XenCenter client and choose Import to import the MSE OVA file.
Step 4![]() In the Import Source page, click Browse to select the MSE OVA file (see Figure 4-1).
In the Import Source page, click Browse to select the MSE OVA file (see Figure 4-1).
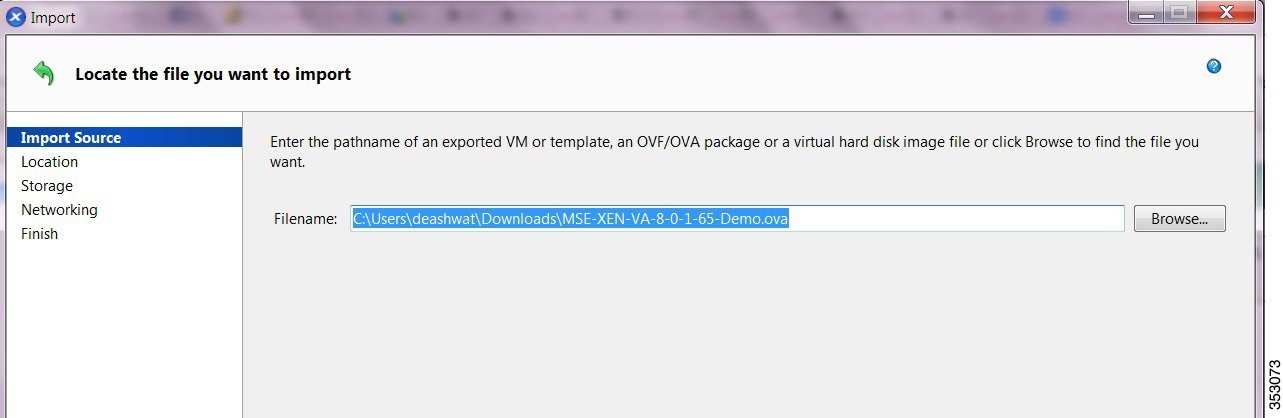
Step 5![]() From the Open dialog box, locate the appropriate.ova file that you downloaded to your computer and click Open.
From the Open dialog box, locate the appropriate.ova file that you downloaded to your computer and click Open.
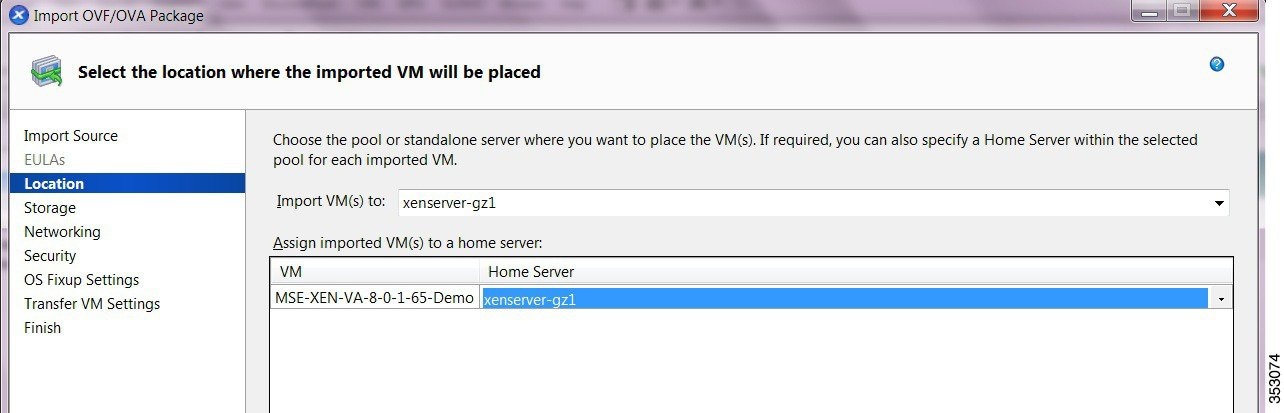
The Location page appears (see Figure 4-2).

Note![]() If the package you are importing includes any EULAs, accept them and click Next to continue. If there are no EULAs included in the package, the wizard skips this step and goes to the next page. Review and accept End User License Agreement (EULA).
If the package you are importing includes any EULAs, accept them and click Next to continue. If there are no EULAs included in the package, the wizard skips this step and goes to the next page. Review and accept End User License Agreement (EULA).
Step 7![]() In the Location page, choose the pool or standalone server where you want to place the VM(s). You can also specify a Home Server within the selected pool for each imported VM.
In the Location page, choose the pool or standalone server where you want to place the VM(s). You can also specify a Home Server within the selected pool for each imported VM.
- From the Import VM(s) to drop-down list, choose the destination pool or standalone server where you want to place the VMs that you are importing and assign them a home server. The Add New Server window appears.
–![]() In the Server text box, enter the host name or IP address of the server you want add.
In the Server text box, enter the host name or IP address of the server you want add.
–![]() In the User name text box, enter the user name for that server.
In the User name text box, enter the user name for that server.
–![]() In the Password text box, enter the password.
In the Password text box, enter the password.
- To assign imported VM(s) to a home server, select the server from the list in the Home Server column (see Figure 4-2). For more information on assigning a home server to new VMs, see the Home Server documentation available at the Citrix Website.
The Storage page appears (see Figure 4-3).
Step 9![]() Configure storage for the imported VMs.
Configure storage for the imported VMs.
On the Storage page, select one or more storage repositories (SRs) to place the virtual disks (see Figure 4-3).
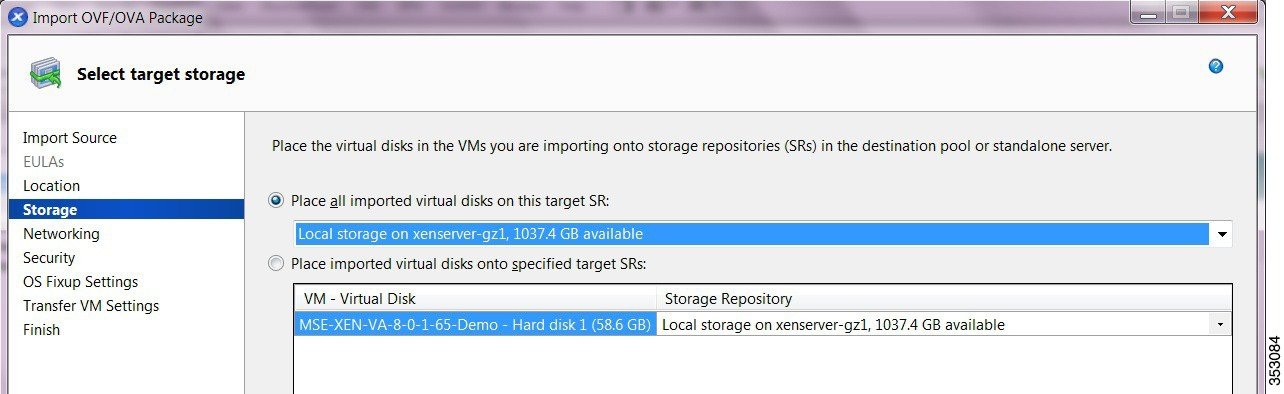
- To place the imported disk images on the same SR, click Place all imported virtual disks on this target SR radio button and select an SR from the list.
- To place the disk images of incoming VMs onto different SRs, click Place imported virtual disks onto specified target SR radio button and select the target SR from the drop-down list in the Storage Repository column.
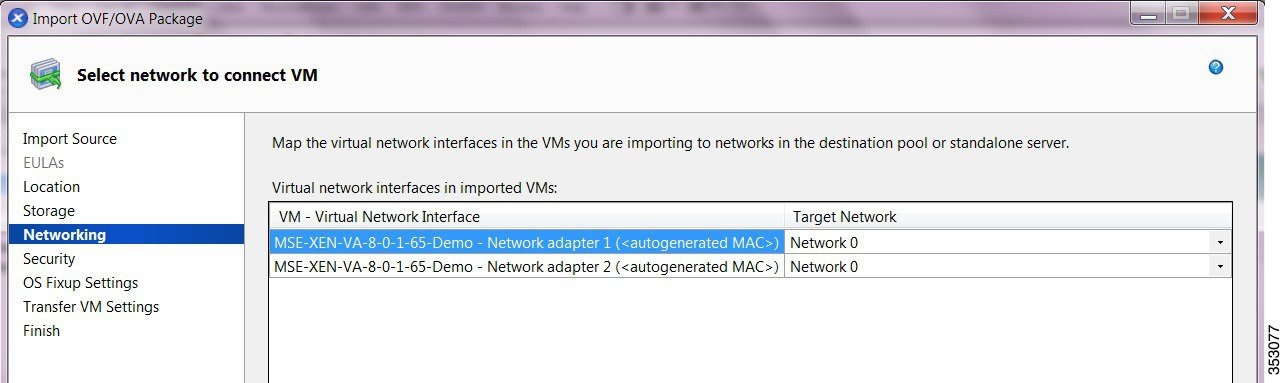
The Networking page appears (see Figure 4-4).
Step 11![]() On the Networking page, map the virtual network interfaces in the VMs you are importing to target networks in the destination pool or standalone server.
On the Networking page, map the virtual network interfaces in the VMs you are importing to target networks in the destination pool or standalone server.
- Select the virtual network interface in the VM-Virtual Network Interface column and select the target network from the drop-down list in the Target Network column (see Figure 4-4).
Step 12![]() Click Next to continue.
Click Next to continue.
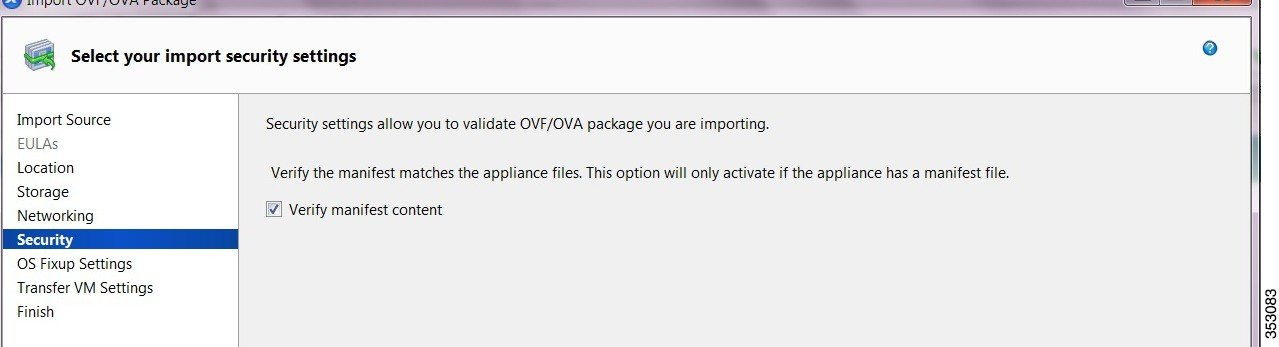
The Security page appears (see Figure 4-5).
Step 13![]() On the Security page, you can set the security settings to validate the OVF/OVA package that you are importing.
On the Security page, you can set the security settings to validate the OVF/OVA package that you are importing.
- Select the Verify manifest content check box to verify if the manifest matches with the appliance files.
Step 14![]() Click Next. The OS Fixup Settings page appears.
Click Next. The OS Fixup Settings page appears.
Step 15![]() Configure the following in the OS Fixup Settings page:
Configure the following in the OS Fixup Settings page:
- If the VMs in the package you are importing were built on a hypervisor other than XenServer, then select the Use Operating System Fixup check box to enable the imported VM to boot correctly on the XenServer. The Operating System Fixup attempts to repair boot device-related problems with imported VMs that might prevent the operating system within the VM from booting in a XenServer environment.
- If you enable the Use Operating System Fixup check box, then you must select an ISO library where the fixup ISO will be copied. Click New ISO library to choose the type of new storage and configure.
- Provide the name of the share where your SR is located in the Share Name text box. You can optionally specify alternative credentials by setting the server options by providing the username and password.
- Click Finish.
Step 18![]() Click Next. The Transfer VM Settings page appears.
Click Next. The Transfer VM Settings page appears.
Step 19![]() On the Transfer VM Settings page, configure the following networking settings:
On the Transfer VM Settings page, configure the following networking settings:
- Select the network on which the temporary VM used to perform the import operations from the Network drop-down list.
- Configure either of the following network settings:
–![]() Automatically obtain network settings using DHCP.
Automatically obtain network settings using DHCP.
Step 20![]() Click Next to continue.
Click Next to continue.
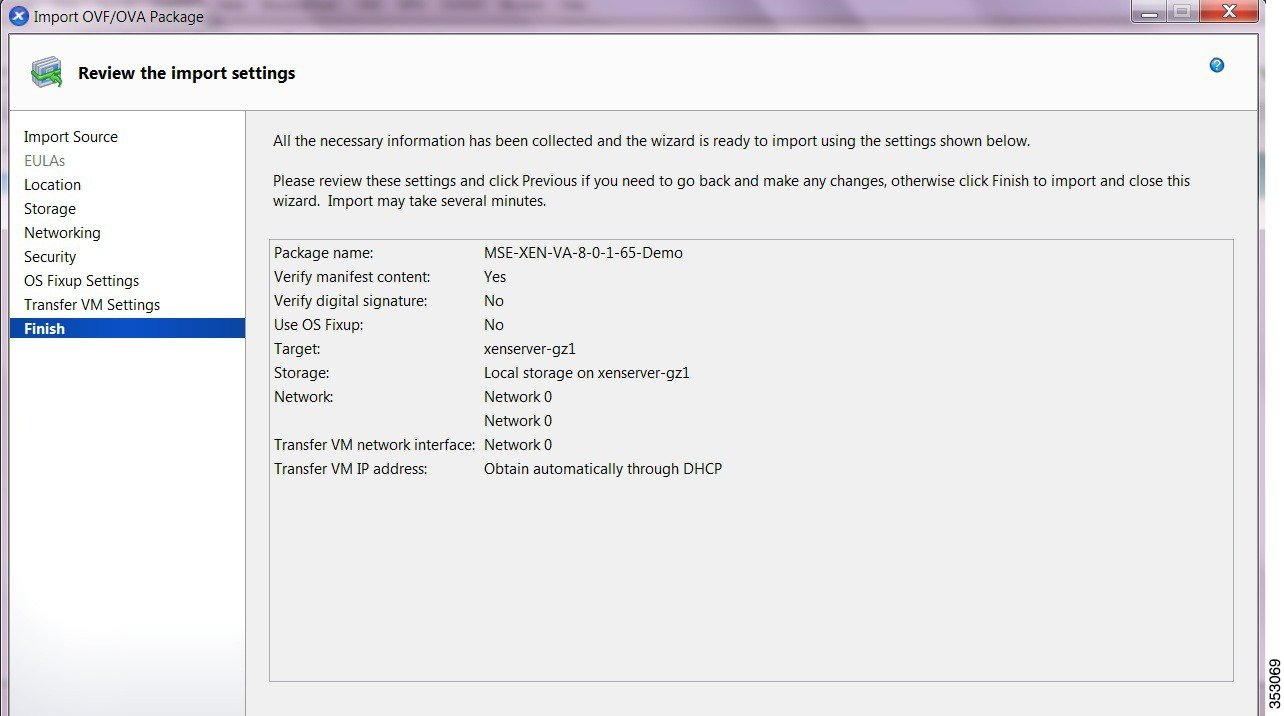
Step 21![]() On the Finish page, review all the import settings and click Finish to begin the import process and close the wizard.
On the Finish page, review all the import settings and click Finish to begin the import process and close the wizard.
Step 22![]() Click the Logs tab in the XenCenter client to check the progress of the OVA import.
Click the Logs tab in the XenCenter client to check the progress of the OVA import.
Step 23![]() The MSE OVA gets imported.
The MSE OVA gets imported.
Figure 4-6 shows the deployed appliance.
Step 24![]() The OVA will be in shutdown state as soon as the import is completed.
The OVA will be in shutdown state as soon as the import is completed.
Step 25![]() Start the Virtual Machine (VM).
Start the Virtual Machine (VM).
Right-click on the imported file and select Start.
Configuring the Basic Settings to Start the MSE Virtual Appliance VM
You have completed deploying the MSE virtual appliance on a new virtual machine. A node for the virtual machine now appears in the resource tree in the XenCenter Client window. After deployment, you need to configure basic settings for the MSE virtual appliance.
To start the MSE setup, follow these steps:
Step 1![]() In the XenCenter Client, click the MSE virtual appliance node in the resource tree.
In the XenCenter Client, click the MSE virtual appliance node in the resource tree.
Step 2![]() Click the Console tab, within the console pane to make the console prompt active for keyboard input. The VM starts booting.
Click the Console tab, within the console pane to make the console prompt active for keyboard input. The VM starts booting.
Step 3![]() Press Enter for the login prompt to appear to initiate the MSE Installation Wizard. The following is displayed:
Press Enter for the login prompt to appear to initiate the MSE Installation Wizard. The following is displayed:
MSE-PUB.pem
Note![]() After the initial installation, you are logged off the newly created VM and you must login to the console panel again.
After the initial installation, you are logged off the newly created VM and you must login to the console panel again.
Step 4![]() The MSE virtual machine shuts down and reboots.
The MSE virtual machine shuts down and reboots.
Note![]() If the MSE does not prompt for setup, enter the following command: /opt/mse/setup/setup.sh.
If the MSE does not prompt for setup, enter the following command: /opt/mse/setup/setup.sh.
[Press Enter to use the default values (yes) to use the Menu options]
Note![]() It is highly recommended that all relevant items must be configured during initial setup to ensure optimum operation of the mobility services engine in your network. The hostname and either the Ethernet-0 (eth0) or the Ethernet-1 (eth1) port must always be configured during the automatic installation.
It is highly recommended that all relevant items must be configured during initial setup to ensure optimum operation of the mobility services engine in your network. The hostname and either the Ethernet-0 (eth0) or the Ethernet-1 (eth1) port must always be configured during the automatic installation.
Note![]() You can rerun the automatic installation script at any time to add or change parameters using this command:
You can rerun the automatic installation script at any time to add or change parameters using this command:
[root@mse]# /opt/mse/setup/setup.sh.
There is no need to re-enter values that you do not want to change during one of these updates.
Note![]() If you do not want to configure an item, enter skip and you are prompted for the next configuration step. Any setting skipped is retained and not modified.
If you do not want to configure an item, enter skip and you are prompted for the next configuration step. Any setting skipped is retained and not modified.
Note![]() Minimal configuration is done for the mobility services engine as part of installation using the console. All configurations beyond the initial setup using the automatic installation is done with the Cisco Prime Infrastructure.
Minimal configuration is done for the mobility services engine as part of installation using the console. All configurations beyond the initial setup using the automatic installation is done with the Cisco Prime Infrastructure.
Step 5![]() Configure the host name
Configure the host name
Step 6![]() Configure eth0 network settings
Configure eth0 network settings
Step 7![]() Configure the DNS Settings:
Configure the DNS Settings:
Step 8![]() Configure the Timezone settings:
Configure the Timezone settings:
Note![]() If your wIPS deployment consists of a Cisco MSE and other devices (such as Cisco WLCs and access points), set the Cisco MSE and the other devices to the same time zone.
If your wIPS deployment consists of a Cisco MSE and other devices (such as Cisco WLCs and access points), set the Cisco MSE and the other devices to the same time zone.
Step 9![]() Configure the Root password:
Configure the Root password:
Note![]() If you do not set the root password, a warning message is displayed when you apply the settings.
If you do not set the root password, a warning message is displayed when you apply the settings.
Step 10![]() Configure the NTP Setup
Configure the NTP Setup
Step 11![]() Configure the Prime Infrastructure password:
Configure the Prime Infrastructure password:
Note![]() If you do not set the password, a warning message appears when you apply the changes. The default PI communication password is admin.
If you do not set the password, a warning message appears when you apply the changes. The default PI communication password is admin.
Step 12![]() Verify the setup information and apply the changes:
Verify the setup information and apply the changes:
Note![]() The next time you log in using root, only the Linux shell prompt appears and not the setup script. You can rerun the setup script at any time to change settings by logging in as root and running /opt/mse/setup/setup.sh.
The next time you log in using root, only the Linux shell prompt appears and not the setup script. You can rerun the setup script at any time to change settings by logging in as root and running /opt/mse/setup/setup.sh.
Step 13![]() To verify the configuration, run the getserverinfo command.
To verify the configuration, run the getserverinfo command.
Step 14![]() To configure the MSE to automatically launch after boot up, enter the following command:
To configure the MSE to automatically launch after boot up, enter the following command:
Step 15![]() Roboot using the following command:
Roboot using the following command:
Note![]() To start the MSE service manually, enter the following command:
To start the MSE service manually, enter the following command:
[root@Xen-8-0-x-x]# service msed start
The setup script generates a log file that can be found at /opt/mse/setup/setup.log.
Configuring MSE on the Prime Infrastructure
See Configuring MSE on the Prime Infrastructure for more information.
Synchronizing the Network Design and Tracking Parameters
See Synchronizing the Network Designs for more information.
 Feedback