Getting Started
Introduction to Cisco Connected Mobile Experiences
Cisco Mobility Services Engine (Cisco MSE) acts as a hardware platform to deploy and run Cisco Connected Mobile Experiences (Cisco CMX). Cisco MSE is delivered in two modes—the physical appliance (box) and the virtual appliance deployed using VMware vSphere Client . Using your Cisco wireless network and location intelligence from Cisco MSE, Cisco CMX helps you create personalized mobile experiences for end users and gain operational efficiency with location-based services.
Cisco CMX helps customers determine the location of devices in their network that can be used for various location based services. The overall location as a platform service from Cisco is known as Cisco Spaces.
For more information about Cisco CMX features for this release, see the Release Notes for Cisco CMX, at:
 Note |
Cisco CMX supports the Cisco Mobility Express wireless network solution. |
Overview of Cisco CMX Services
Cisco CMX enables you to access the following services:
-
DETECT & LOCATE: The Detect & Locate service uses the data provided by Cisco WLCs to calculate the X,Y location (based on 0,0 at the top left hand side of the map) of wireless devices that are detected by the access points that support the wireless LAN (WLAN) to a high degree of precision (generally +/-5 to 7 meters, 90% of the time with standard location technologies and +/- 3 meters, 50% of the time with Hyperlocation technologies). Given the proper physical environment with access points deployed in accordance with Cisco best practices for a location ready environment. The CMX GUI will be able to display the physical location of:
-
Associated Wireless Devices (shown as green dots in default view)
-
Unassociated Wireless Devices (shown as red dots in default view)
-
RF Interferers (Lightning icon)
-
Access Points (Circles)
-
Rogue Access Points
-
Rogue Clients
-
Active Wi-fi RFID Tags (Tag icon)
The background map can display:
-
Inclusion and Exclusion Zones imported from Cisco Prime Infrastructure
-
Analytics Zones created in Cisco CMX
-
Thick Walls
-
GPS Markers
Additionally when passed to the CMX Analytics service, this location information provides visibility into customer movements and behavior throughout the venue and throughout the day. The Cisco CMX Analytics service determines device parameters and can display this information as part of six different unique widgets.
If you choose Location during installation, you will see the following services in Cisco CMX GUI.
-
DETECT & LOCATE: Active for 120 day trial period unless either a CMX base or advanced license is added.
-
ANALYTICS: Active for 120 day trial period unless a CMX advanced license is added.
-
MANAGE
-
SYSTEM
For more information, see Overview of the Detect and Locate Service.
-
-
ANALYTICS: This service provides a set of data analytic tools packaged for analyzing Wi-Fi device locations. It functions as a data visualization engine that helps organizations use their network as a data source for business analysis to understand behavior patterns and trends, which can help them take decisions on how to improve visitor experience and boost customer service.
The ANALYTICS service allows for the creation of six different type of widgets.
-
Device count
-
Dwell time
-
Dwell time breakdown
-
Associated User Report
For more information, see The Cisco CMX Analytics Service.
-
-
MANAGE: This service enables you to manage licenses, users, zones, beacons, and notifications. For more information, see Overview of the Manage Service.
-
SYSTEM: This service enables you to verify the health of the system and view patterns and metrics. For more information, see Managing Cisco CMX System Settings.
For a complete list of new features supported by Cisco CMX for this release, see the Release Notes for Cisco CMX, at:
For more information about Cisco CMX System Messages, see the System Message Guide for Cisco Connected Mobile Experiences (CMX) Release 10.6.3, at:
https://www.cisco.com/c/dam/en/us/td/docs/wireless/mse/10-6-3/cmx_syslog/b_cmx_syslog1063.xlsx
 Tip |
To clean up long queues and long-running processes, we recommend that you schedule a full restart of Cisco CMX once a month during a low activity time, such as late at night or early in the morning. The restart takes approximately 5 minutes to complete. To restart Cisco CMX services, follow these steps:
Contact Cisco Customer Support (https://www.cisco.com/c/en/us/support/index.html) for the patch file. |
Cisco CMX Feature Parity
The following table lists the Cisco CMX feature parity with Cisco Prime Infrastructure and Cisco MSE.
| Feature | Cisco CMX-Cisco Prime Infrastructure | Cisco MSE-Cisco Prime Infrastructure |
|---|---|---|
|
Supported releases |
|
|
|
High Availability (HA) |
Supported |
Supported |
|
RFID tags, wireless connected clients, rogue APs, rogue clients, and interferers |
|
|
|
Client history |
Not supported. This feature is available on Cisco CMX and Cisco DNA Center Release 1.2 or later. |
Supported. |
|
Cisco CMX APIs used by Cisco Prime Infrastructure |
|
|
|
Cisco Prime Infrastructure performs a Cisco CMX API query when the Cisco Prime Infrastructure Map window is displayed. |
Supported. |
- |
Installing Cisco CMX 11.0.0
Cisco CMX Release 11.0.0 does not support inline upgrade from Cisco CMX Release 10.6.3.
For more information about installing Cisco CMX, see "Configuring Cisco CMX Release 11.0.0" in the Cisco Mobility Services Engine Virtual Appliance Installation Guide for Cisco CMX Release 11.0.0 at:
What's New in Cisco CMX Release 11.0.0
This section provides a brief introduction to the new features and enhancements introduced in Cisco CMX Release 11.0.0:
-
Migration from CentOS 7 to AlmaLinux 8: Migrated to an enterprise Linux distribution, AlmaLinux 8, which has fewer vulnerabilities and security patches compared to CentOS 7.
-
Data migration: The Cisco CMX High Availability feature supports data migration from Cisco CMX Release 10.6.3-146 to Cisco CMX Release 11.0.0. For more information, see Data Migration.
-
High Availability: The Cisco CMX High Availability feature is enhanced to include revamped and more comprehensive logs.
-
Expiring certificate alert: New alerts for expiring certificates are displayed in the window.These alerts are generated 30 days before certificate expiry.
-
Token-based Root Access: The root patch is replaced by token-based root access. This feature enables you to generate a root password that is valid for six hours. For more information, see Generate Root Password.
-
New scalable API server: Revamped API server with improvements in response time and concurrency.
-
Cisco CMX Analytics: By default, Cisco CMX Analytics is disabled in Cisco CMX Release 11.0.0. However, you can enable the service if required.
To enable Cisco CMX Analytics, run the cmxctl enable analytics command followed by the cmxctl status analytics command to verify the status. If the status is displayed as Stopped, run the cmxctl start analytics command.
-
Product rebranding: Cisco DNA Spaces is now Cisco Spaces.
-
Critical bug fixes: Includes critical bug fixes.
Data Migration
To migrate data from Cisco CMX Release 10.6.3-146 to Cisco CMX Release 11.0.0-154, follow these steps.
Before you begin
Cisco CMX Release 11.0.0 supports data migration from Cisco CMX Release 10.6.3-146 to the latest Cisco CMX Release 11.0.0-154.
The Cisco CMX server running Cisco CMX Release 10.6.3-146 must be the primary server. You must install the Cisco CMX Release 10.6.3-146 patch on the primary server if you want to migrate data. You must perform a fresh install of Cisco CMX Release 11.0.0-154 and convert it into a secondary server before enabling high availability.
Procedure
|
Step 1 |
On the Cisco CMX server running the image version of Cisco CMX Release 10.6.3-146, run the following commands:
|
||
|
Step 2 |
On the Cisco CMX server running the image version of Cisco CMX Release 11.0.0-154, run the following commands:
|
||
|
Step 3 |
Verify the cmxos date in both the Cisco CMX servers to reflect the same or nearly same date. |
||
|
Step 4 |
From the Cisco CMX server running the image version of Cisco CMX 10.6.3-146, run the cmxha config enable command to enable high availability. |
||
|
Step 5 |
Enter the following information:
In the Monitoring window, the State Overview status changes to Primary is actively synchronizing with secondary server after the high-availability synchronization is complete. This staus change indicates that the data migration is successfully complete. |
||
|
Step 6 |
To disable high availability in the server running Cisco CMX 10.3.6-146, run ther cmxha config disable command. |
||
|
Step 7 |
To change Cisco CMX 11.0.0-154 as the primary server, run the cmxha primary convert command. At this point, Cisco CMX 11.0.0-154 is a standalone setup with all the data migrated from Cisco CMX 10.6.3-146. |
||
|
Step 8 |
(Optional) To troubleshoot errors if any, follow the information in the high availability Monitoring window. View additional logs at:
|
||
|
Step 9 |
Shut down the Cisco CMX server running the image version of Cisco CMX Release 10.6.3-146. |
||
|
Step 10 |
(Optional) Perform the high-availability pairing with another server running the image version of Cisco CMX 11.0.0-154, and verify if both the units are actively synchronizing. |
Generate Root Password
In Cisco CMX Release 11.0.0, the root patch is replaced by a token-based root access. With this feature, you can generate a root password that is valid for six hours.
Procedure
|
Step 1 |
Log in to the Cisco CMX CLI as cmxadmin user. |
|
Step 2 |
To generate a root challenge text, run the cmxctl users get-root-challenge command. The root challenge text is valid for 30 minutes. |
|
Step 3 |
To get the root login key, open a case with Cisco's Support Services Technical Assistance Center (TAC). |
|
Step 4 |
To generate a new password, run the cmxctl users enable-root command. |
|
Step 5 |
Enter the token generated by the cloud support team and the new password. By default, the root access is disabled within six hours. |
|
Step 6 |
(Optional) To manually disable the root access login, run the cmxctl users disable-root command. |
Using the Evaluation License
Cisco CMX ships with a fully functional 120-day evaluation license that is activated after Cisco CMX is installed and started for the first time. The countdown starts when you start Cisco CMX and enable a service.
You must upload a permanent license to Cisco CMX before the evaluation license expires. Two weeks before the evaluation license expires, you will receive a daily alert to obtain a permanent license. If the evaluation license expires, you will not be able to access the Cisco CMX GUI or APIs. Cisco CMX will continue to run in the background and collect data until you add a permanent license.
Note |
After the evaluation license expires, only users with admin privileges can log in to add additional licenses. |
Cisco CMX provides multiple reminders that the evaluation license is about to expire:
-
For two weeks before the evaluation license expires, a daily alert is displayed on the Cisco CMX System > Alerts window.
-
An alert email is sent if you have configured email settings.
-
An alert is displayed when you log in to Cisco CMX.
To add a license, click Add new license from the alert. You can also add a license from the Cisco CMX window. For information about adding permanent licenses, see Managing Licenses.
The Licenses window displays the Cisco CMX licenses and the Cisco Spaces licenses.
Cisco Spaces is a single, scalable, reliable location platform that leverages existing wireless investments to digitize spaces - people and things. There are two licenses for Cisco Spaces, DNA Spaces SEE and DNA Spaces ACT. We recommend that you upload the Term license for Cisco Spaces before the expiry of the evaluation license.
Note |
The license file has a .lic extension. Make sure it is the .lic file that you install on Cisco CMX. The .lic file is available as part of your licensing package and is sent as an email attachment from licensing. Extract the .lic file to your system and upload to Cisco CMX when adding a new license. |
Logging In to the Cisco CMX User Interface
Before you begin
Procedure
|
Step 1 |
Launch the Cisco CMX user interface using Google Chrome 50 or later. |
||
|
Step 2 |
In the browser’s address line, enter https://ipaddress , where ipaddress is the IP address of the server on which you installed Cisco CMX. The Cisco CMX user interface displays the Login window. If SSO is enabled in Cisco CMX, Sign in with SSO option is displayed. For more information about configuring SSO, see Configuring SSO Authentication in Cisco CMX. |
||
|
Step 3 |
Enter your username and password.
|
Configuring SSO Authentication in Cisco CMX
Cisco CMX Release 10.6.2 supports Single Sign-On (SSO) for authenticating users to Cisco CMX. SSO authentication method uses SAML2.0 protocol binding. To take advantage of SSO, CMX users should have an Identity Provider (IDP) configured that supports SAML2.0.
Note |
|
To use SSO in Cisco CMX, you must first configure a service provider (SP) and IDP with all the required information and then enable SSO on Cisco CMX. As a cmxadmin user, you need to run the cmxctl config sso command to manage SSO configurations. When SSO is enbaled, Cisco CMX welcome window is displayed with the Sign In with SSO option.
Users table under Manage tab displays whether the logged in Cisco CMX user is an SSO user or not. As an admin, log in to Cisco CMX when SSO is disabled and change the user role, if required.
The following is a list of prerequistes for configuring SSO:
-
Cisco CMX integrated with SAML 2.0 framework
-
IDP with SAML 2.0 support
-
Cisco CMX with proxy confgured to reach IDP endpoint
The following is a list of limitations while configuring SSO:
-
Only a cmxadmin user can manage SSO configurations. Ensure that you disable SSO before you log in to Cisco CMX.
-
A user with cmxadmin or admin role is exempted from the SSO authentication while logging in to Cisco CMX.
-
Ensure that you configure the SSO settings everytime when you install or generate a new server certificate on Cisco CMX.
-
SSO authentication is not applicable for Web Installer, SSH login, and HA 4242 port login and for API Server user management and API Docs.
We recommend that you run the commands in the order specified below:
Procedure
|
Step 1 |
To setup proxy settings on Cisco CMX, run the following command: |
||
|
Step 2 |
To restart agent, run the following command: |
||
|
Step 3 |
To restart Cisco CMX services, run the following commands:
|
||
|
Step 4 |
To configure SSO on Cisco CMX, run the following command:
|
||
|
Step 5 |
To generate SP metadata file, run the following command: Use the generated file to provide the SP information required by your IDP. |
||
|
Step 6 |
To enable SSO on Cisco CMX, run the following command:
|
||
|
Step 7 |
(Optional) To verify the SSO authentication status on Cisco CMX, run the following command: |
||
|
Step 8 |
Log in to Cisco CMX GUI. |
||
|
Step 9 |
Click Sign in with SSO. The IDP login window is displayed. |
||
|
Step 10 |
Enter the credentials and log in to Cisco CMX. |
Importing Maps and Cisco Wireless Controllers
Cisco CMX relies on incoming Network Mobility Service Protocol (NMSP) data from any of the Cisco Wireless Controllers (Cisco WLCs) added to the system. The following sections describe the process to follow.
Exporting Cisco Prime Infrastructure Maps
To obtain maps for Cisco CMX, you have to export maps from Cisco Prime Infrastructure.
Procedure
|
Step 1 |
Log in to Cisco Prime Infrastructure. |
||
|
Step 2 |
Choose Site Maps from the Maps menu. |
||
|
Step 3 |
Choose Export Maps and click Go . |
||
|
Step 4 |
Select the map to be exported and click Export . The selected map is downloaded to a compressed tar file named ImportExport_xxxx .tar.gz, for example, ImportExport_4575dcc9014d3d88.tar.gz, in your browser’s download directory.
|
Copying the Exported Maps
Use Secure Copy Protocol (SCP) to copy the exported maps to a directory of a server accessible by Cisco CMX.
Importing Maps
You can import maps from Cisco Prime Infrastructure into Cisco CMX using either GUI or CLI.
When you import maps, they are appended to the existing ones in Cisco CMX. When Cisco CMX finds that a campus whose name already exists in Cisco CMX has a different UID in the import map file, Cisco CMX performs a map sync operation under this campus if the override option is set to Yes. For more information about importing maps, see Importing Maps and Controllers into Cisco CMX.
To import maps using the CLI, use the cmxctl config maps import --type FILE --path path to .tar.gz file command.
For more information about Cisco CMX commands, see the Cisco Connected Mobile Experiences (CMX) Command Reference Guide, at:
Note |
|
Adding Controllers
You can add Wireless Controller using CLI or the CMX user interface. If you want to import controllers to Cisco CMX from Prime Infrastructure for:
-
AireOS: Provide SNMP RW credentials for the AireOS WLCs after you import them to successfully add them to Cisco CMX.
-
Catalyst 9800: Provide SSH credentials and enable password details.
Note |
Otherwise, controllers will display in yellow color indicating that SNMP or SSH credentials are missing. Such controllers may not have the NMSP connection active. When the SNMP details are not correct, SNMP Timeout on controller alert will be generated. Ensure that port 16113 is opened on the Controller, so that Cisco CMX can establish the TLS connection (NMSP connection) to the controller. |
To add controllers from the Cisco CMX CLI, run one of these commands:
-
cmxctl config controllers add
-
cmxctl config controllers import [PI/FILE]
For more information about Cisco CMX commands, see the Cisco Connected Mobile Experiences (CMX) Command Reference Guide, at:
To add controllers using Cisco CMX UI, see Importing Maps and Controllers into Cisco CMX.
Note |
|
Enabling or Disabling Cisco CMX Services
-
To enable a Cisco CMX service using the CLI, run the following command:
-
To disable a Cisco CMX service using the CLI, run the following command:
For detailed information about these commands, see the Cisco Connected Mobile Experiences (CMX) Command Reference Guide, at:
Installing Certificates in Cisco CMX
Cisco CMX requires certificates for serving the user interface over SSL/TLS and for other secure connections.
When certificates are imported, there is a validity check that verifies the start date and end date. If the dates are not within the range or if the certificates are going to expire soon (withhin 30 days), UI alarms and audit log messages are generated.
There are two options to install certificates – install self-signed certificates or import external CA-signed certificates. Following sections describes these 2 options in detail.
Note |
CMX Certificate is used for both Server and Client. Hence the Certificate Signing Request (CSR) contains Extended Key Usage as follows:
We recommend that while sending the CSR to Certificate Authority (CA), ensure that the signed certificate includes both TLS Web Server Authentication and TLS Web Client Authentication as in the CSR. If the signed server certificate is missing TLS Web Client Authentication values in Extended Key Usage extension of the certificate, then certificate will get imported successfully but CMX services will fail to start and eventually crash. If the signed certificate has both TLS Web Server Authentication and TLS Web Client Authentication values in Extended Key Usage extension, then server certificate will get imported successfully and all CMX services will start successfully. |
Installing a Self-Signed Certificate
Procedure
|
Step 1 |
Log in to Cisco Connected Mobile Experiences (Cisco CMX) CLI as cmxadmin user. |
|
Step 2 |
Run the following commands: |
|
Step 3 |
Press Enter to restart the Cisco CMX services. |
|
Step 4 |
To view the installed certificates, run the cmxctl config certs show command. |
Installing a CA-Signed Certificate
If you want to get Cisco CMX server certificates signed by an external Certificate Authority (CA), follow the below steps:
Procedure
|
Step 1 |
To clear current certificates, run the cmxctl config certs clear command. |
||
|
Step 2 |
To generate Certificate Signing Request (CSR), run the cmxctl config certs createcsr command. |
||
|
Step 3 |
SCP the CSR and the private key files to another system. The following example shows how to scp the key files to another system: |
||
|
Step 4 |
Send the CSR file to the CA who is going to sign your Cisco CMX certificate. |
||
|
Step 5 |
Once the CA has signed your CMX server certificate, you will receive 2 certificates files – CMX server certificate and CA’s own certificate chain.
|
||
|
Step 6 |
Combine the private key (from step 2) with signed CMX server certificates (from CA) into a single file and save it as a .pem file. To combine private key and signed server certificate, copy and paste the signed certificate and private key into a text editor. The following example shows the format of the final certificate.
|
||
|
Step 7 |
SCP the CA certificate file (from step 5) and key-certificate files (from step 6) to Cisco CMX. The following example shows how to SCP the certificate files. |
||
|
Step 8 |
On Cisco CMX server, run the cmxctl config certs clear command to clear or remove any old or stale certificate files. |
||
|
Step 9 |
On Cisco CMX server, run the cmxctl config certs importcacert command to import CA certificate. |
||
|
Step 10 |
Enter a password and repeat it for all the other password prompts, when prompted for password. |
||
|
Step 11 |
To import server certificate and private key (combined into single file), run the cmxctl config certs importservercert command. |
||
|
Step 12 |
Select a password and repeat it for all the password prompts. |
||
|
Step 13 |
Press Enter to restart the Cisco CMX services. |
||
|
Step 14 |
To view the installed certificates after Cisco CMX services is restarted, run the cmxctl config certs show command. |
Generating a CSR for Third-Party Certificate and Installing on Cisco CMX
You can generate a Certificate Signing Request (CSR) to get a third-party certificate and download a chained certificate to Cisco CMX.
Procedure
|
Step 1 |
Connect to Cisco CMX CLI. |
||
|
Step 2 |
Access as root and go to the certificate directory. |
||
|
Step 3 |
Create a folder for the CSR and the key file.
|
||
|
Step 4 |
Generate the CSR and key file. |
||
|
Step 5 |
Sign the CSR by the third-party. |
||
|
Step 6 |
To get the certificate from Cisco CMX and sent it to the third-party, run the cat command to open the CSR. |
||
|
Step 7 |
Copy and paste the output into a .txt file or change the extension based on the requirements of the third-party, for example, |
||
|
Step 8 |
Create the certificate chain to import into Cisco CMX. |
||
|
Step 9 |
To create the final certificate, copy and paste the signed certificate into a .txt file with the private key, intermediate certificate, and root certificate. |
||
|
Step 10 |
Save the certificate as a .pem file. This following example shows the format of the final certificate: |
||
|
Step 11 |
To transfer the final certificate into Cisco CMX from your computer, open your SFTP application and connect to Cisco CMX with the admin credentials. |
||
|
Step 12 |
Drag and drop the chained certificate to the folder /home/cmxadmin/.
|
||
|
Step 13 |
Change the permission of the final certificate and owner. |
||
|
Step 14 |
Move the certificate to the folder that contains the private key, for example, |
||
|
Step 15 |
Ensure that everything is properly built and you receive an OK message. |
||
|
Step 16 |
Install the final certificate and reboot Cisco CMX. |
||
|
Step 17 |
(Optional). If you run Cisco CMX 10.3.1 or above, you might encounter the bug CSCvh21464: CMX WEBUI doesnt use the installed self signed or third party certificate. This bug prevents Cisco CMX to update the certificate path. To work around this issue, create two soft-links to point to the new certificate and private key, and reload Cisco CMX. The following example shows how to workaround this issue: |
||
|
Step 18 |
Open the Cisco CMX GUI. |
||
|
Step 19 |
To open the certificate, click the Secure tab next to the URL and review the details. 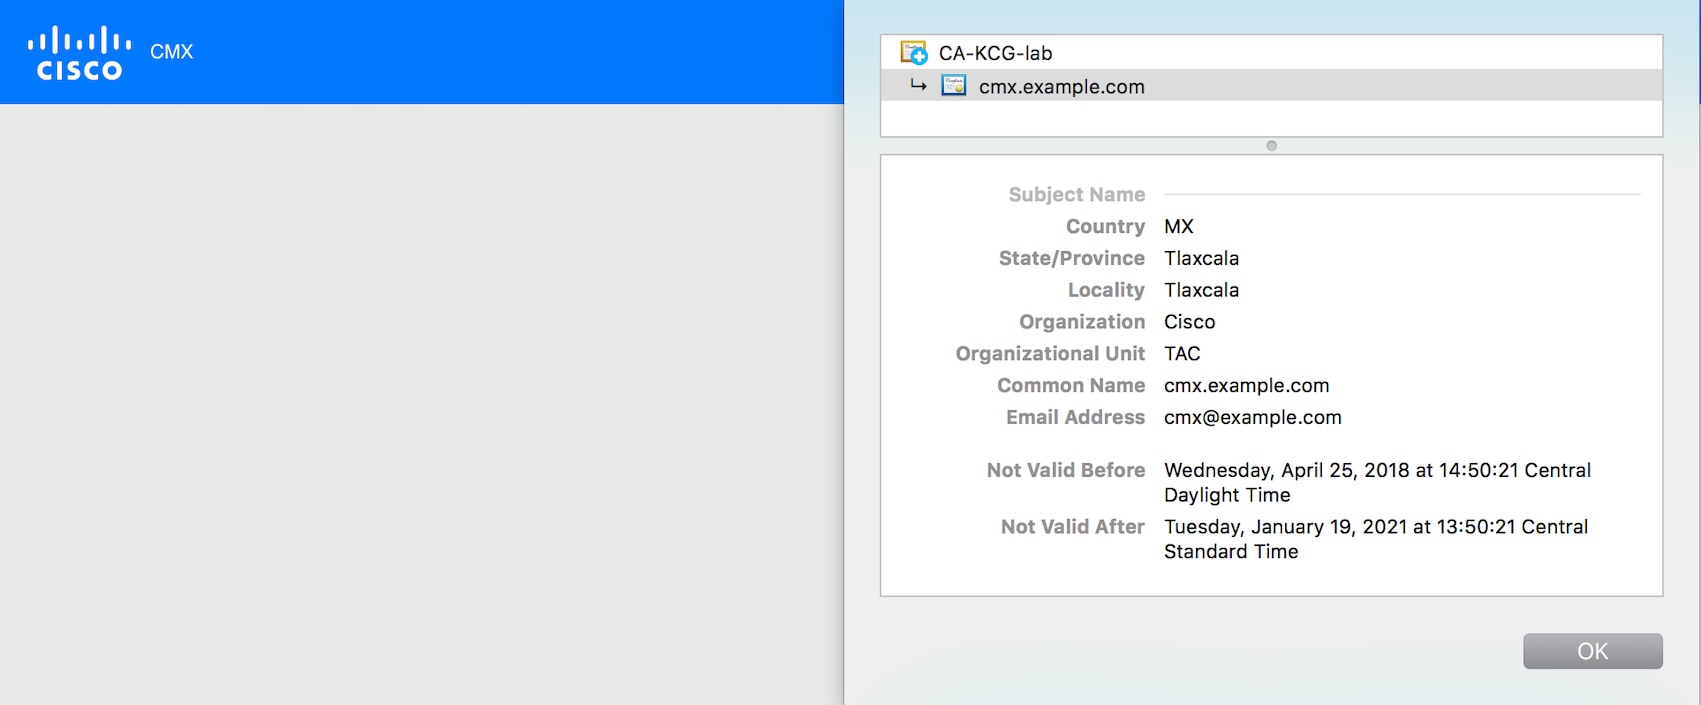 |
OCSP Support for Certificates
The Online Certificate Status Protocol (OCSP) is an Internet protocol used for obtaining the revocation status of certificates. OCSP is newer, better, and faster way to validate certificate revocations. OCSP does not require special configuration.
Cisco CMX Release 10.6.1 provides OCSP and OCSP Stapling support. OCSP stapling cron job is scheduled to run once a day and update haproxy with OCSP response (without need of restart). OCSP feature, OCSP validation and stapling gets triggered automatically when the server certificate being installed/imported contains OCSP URI.
If the server certificate does not contain OCSP URI, then OCSP feature (OCSP cron job) is not triggered.
Wildcard Certificate Support for Cisco CMX
Cisco CMX supports wildcard characters in CommonName (CN) and SubjectAlternativeName (SAN). Certificate Signing Request (CSR) can be generated with wildcards in both these fields of the CSR.
Installing a CA-Signed Certificate for High Availability in Cisco CMX
You must install CA-signed certificates seperately on primary and secondary servers for High Availability (HA) in Cisco CMX.
Before you begin
Ensure that the High Availability pair is not created. If HA is already paired, break the pair and proceed to install the CA-signed certificate.
Procedure
|
Step 1 |
Install CA-signed certificates on primary server.
|
||
|
Step 2 |
Install CA-signed certificates on secondary server. The CA-signed certificate installation process is the same as primary server. However, you just consider the below limitations:
After certificates are successfully installed on both primary and secondary servers, you must restart the CMX services. |
||
|
Step 3 |
Press Enter to restart the Cisco CMX services. |
||
|
Step 4 |
Enable HA pairing. |
Adding Users and Managing Roles
Using the MANAGE service in Cisco CMX, you can create new users and assign roles to them based on the tasks they have to perform, that is, enabling role-based access control.
The following list displays the types of users:
-
Admin users—An admin user can access all the services and functionalities (based on the license type) of Cisco CMX.
-
Others—An admin user can create other users and assign roles to them.
The following is a list of roles that can be assigned to users:
-
System
-
Manage
-
Analytics
-
Read Only
-
Location
-
Admin
For more information about the creation of users and assignment of roles, see Managing Users.
Using the Cisco CMX Setup Assistant
The Cisco CMX Setup
Assistant pop-up helps you through the basic steps before you start using your
system. The Cisco CMX Setup Assistant is automatically displayed when you log
in to Cisco CMX. To relaunch the Cisco CMX Setup Assistant, click the Help
(![]() )icon.
)icon.
REST APIs Version 3 Support in Cisco CMX
Prior to Cisco CMX Release 10.6.3, V3 API support was available for wireless clients only. In Cisco CMX Release 10.6.3, REST API V3 support is extended to the following additional devices:
-
Wi-Fi Tags
-
Rogue Clients
-
Rogue Access Points (AP)
-
Interferers
Note |
Note that BLE tags tracking is excluded from the V3 APIs. The BLE tags tracking support is not available from Cisco CMX Release 10.6.3 onwards. |
Supporting Active Clients Version 3 API
Cisco CMX release 10.4 supports new active clients version 3 API under Location REST API. The new Active Clients v3 API allows frequent requests without impacting other services such as location service. The new Node.js processes API requests in the API v3.The location service sends the local notifications to the API server and active clients are tracked in the API server memory.
The Active Clients v3 API has its own user ID and password for accessing the REST APIs. Use the cmxos apiserver command to define the unique user ID and password. The Cisco CMX web UI username and passwords will not work for API v3.
Note |
Active Clients v3 API under Location API documentation section includes better parameter testing. Active Clients Version 2 API has been deprecated in Cisco CMX 10.4 release. |
Active Clients v3 API supports these additional parameters:
-
mapHierarchy
-
manufacturuer
-
macAddressSearch
-
associated/probing
The following log files are located in the directory /opt/cmx/var/log/apiserver for troubleshooting:
-
cmxapiserver.pid: Processes ID file for the top process.
-
server.log: Log file for messages and errors
-
stdout.log: Standard output messages
Getting APIs
To obtain the following APIs, use the https://cmx-ip-address /apidocs/ URL:
-
Configuration REST APIs for configuring different aspects of Cisco CMX.
-
Location-based REST APIs for finding location-specific details about visitors.
-
Analytics-based REST APIs for finding analytical data on visitors.
-
Presence-based REST APIs for finding presence data on visitors.
Note |
|
Restricted CLI
In Cisco CMX, Linux commands are restricted to prevent unauthorized users from inadvertently modifying the system configuration. This is to control access to the Cisco CMX so that users can be prevented from running the commands that a normal user should never run under normal operations or standard troubleshooting situations. Also, the restricted access prevents users from modifying the system configuration.
The following table lists the commands allowed in the Restricted CLI.
|
Command |
Description |
|---|---|
| cat |
Prints file contents. |
| cp |
Copies file. |
| df |
Prints the file system disk space usage. |
| du |
Prints the file space usage. |
| grep |
Prints the lines matching a pattern. |
| ifconfig |
Displays the network interface configuration. |
| ls |
Lists the directory contents. |
| nslookup |
Queries the internet name servers. |
| passwd |
Changes the cmxadmin password. |
| ping |
Sends Internet Control Message Protocol (ICMP) echo requests to network device. |
| pwd |
Prints the current or working directory. |
| route |
Displays the routing table. |
| rm |
Removes the files. |
| scp |
Secures the remote copy files. |
| sftp |
Secures file transfer. |
| ssh |
Use Secure Shell (SSH) to connect with the client. |
| tail |
Outputs the last part of a file. |
| top |
Displays the Linux process. |
| wget |
Network downloader |
Encrypting Cisco CMX Connection to Remote Syslog Server Using IPSec Protocol
To enable IPSec on Cisco CMX, follow the below steps:
Before you begin
You should enable audit settings, remote syslogging, and configure IP address of remote syslog server. You should import CA certificate of the remote syslog server into Cisco CMX using the cmxctl config certs importrsyslogca<certificate-file> command.
You should perform configuration changes on Remote syslog server for strongwan library to establish IPSec tunnel. You should configure IP address and hostname for Cisco CMX and CA certificate (/opt/cmx/srv/certs/ca.crt) on remote syslog server and then start the IPSec service and connection.
Note |
Currently, Cisco CMX supports only one syslog server configuration. |
Procedure
|
Step 1 |
Run the cmxctl config ipsec enable command to enable IPSec. The default authentication type for IPSec is “PUBKEY”/Public Key. The authentication type is set when you run the cmxctl config ipsec enable command. |
|
Step 2 |
Run the cmxctl config ipsec status command to view the IPSec status and security association details. |
|
Step 3 |
(Optional) Run the cmxctl config ipsec authtype command to change the default authentication type from Public Key (PUBKEY) to Pre-Shared Key (PSK). Cisco CMX generates a new PSK as shown in the above example. You should configure the PSK on remote syslog server and restart the IPSec service. |
|
Step 4 |
Run the cmxctl config ipsec restart command to restart IPSec on Cisco CMX. |
|
Step 5 |
(Optional) Run the cmxctl config ipsec status command to view the authentication type. |
About Cisco CMX Integration with Cisco DNA Center
Cisco DNA Center supports the integration of Cisco Connected Mobile Experiences (CMX) for wireless maps. With the Cisco CMX integration, you can get the exact location of your wireless clients, rogue access points and interferers on the floor map within the Cisco DNA Center user interface.
Depending on your requirements, you can create Cisco CMX settings either at the global level or at the site, building, or floor level. For a small enterprise, you can assign Cisco CMX at the global level, which is the parent node. All children inherit their settings from the parent node. For a medium enterprise, you can assign Cisco CMX at the building level and for a small enterprise, you can assign Cisco CMX at the floor level.
For more information about Cisco DNA Center, see the Cisco DNA Center User Guide at:
Note |
Cisco CMX should be anonymized for security purposes. |
Create Cisco CMX Settings
Procedure
|
Step 1 |
In the Cisco DNA Center GUI, click the Menu icon ( |
||
|
Step 2 |
From the External Services section, click DNA Spaces/CMX Servers. The DNA Spaces/CMX Servers window appears. |
||
|
Step 3 |
From the CMX Servers table, click Add. |
||
|
Step 4 |
Complete the fields in the Add CMX Server slide-in pane:
|
||
|
Step 5 |
Click Add. Result: The Cisco CMX server is added successfully. |
||
|
Step 6 |
To assign a Cisco CMX server to a site, building, or a floor, click the Menu icon and choose . |
||
|
Step 7 |
Click the Wireless tab. |
||
|
Step 8 |
In the left tree view menu, select either Global or the area, building, or floor that you are interested in. |
||
|
Step 9 |
In the DNA Spaces/CMX Servers section, use the drop-down list, choose the Cisco CMX server. |
||
|
Step 10 |
Click Save. The Create CMX Settings page appears. After the Cisco CMX is added, if you make any changes to the floor on the Network Hierarchy page, the changes are synchronized automatically with the Cisco CMX. When the Cisco CMX is synced, Cisco DNA Center starts querying the Cisco CMX for the client location and displays the location on the floor map. |
||
|
Step 11 |
From the floor map, you can do the following:
|
||
|
Step 12 |
If the Cisco CMX was down when you made changes, you must synchronize manually. To do so, on the Network Hierarchy page, hover your cursor over the ellipsis |
||
|
Step 13 |
To edit the Cisco CMX server details or delete a Cisco CMX server, do the following:
|
 ) and choose
  next to the building or floor on which you made the changes in the left tree pane, and then choose
 For Cisco CMX Authentication Failure
-
Check if you are able to log in to the Cisco CMX web GUI with the credentials that you provided at the time of CMX settings creation on Cisco DNA Center.
-
Check if you are able to log in to the Cisco CMX console using SSH.
-
Check if you are able to exercise Cisco CMX REST APIs using the API Documentation link on the Cisco CMX GUI.
If Clients Do Not Appear on the Cisco DNA Center Floor Map
-
Check if the Cisco wireless controller on the particular floor is configured with CMX and is active.
-
Check if the Cisco CMX GUI shows clients on the floor map.
-
Use the Cisco DNA Center Maps API to list the clients on the floor: curl -k -u <user>:<password> -X GET /api/v1/dna-maps-service/domains/<floor group id>/clients?associated=true
Remote HTTPS Server Support for Windows OS
The remote HTTPS server is not enforcing HTTP Strict Transport Security (HSTS) and also not sending the HTTP information. HSTS is an optional response header configured on the server to instruct the browser to only communicate using HTTPS. The lack of HSTS allows downgrade attacks, SSL-stripping man-in-the-middle attacks, and weakens cookie-hijacking protections.
The remote host also supports the use of SSL ciphers that operate in Cipher Block Chaining (CBC) mode. These cipher suites offer additional security over Electronic Codebook (ECB) mode, but has the potential to leak information if used improperly.
To enable HTST on the Windows OS, follow these steps:
Procedure
|
Step 1 |
Choose . |
|
Step 2 |
Click HTTP Response Headers. |
|
Step 3 |
In the Actions panel, click Add. |
|
Step 4 |
In the Add Custom HTTP Response Headers dialog box, enter the value: 2 Value: max-age=31536000. |
|
Step 5 |
Confirm the changes and close IIS Manager. |
|
Step 6 |
To redirect users to visitors to the HTTPS URL, follow these steps:
|
What to do next
We recommend that you disable CBC as it is running on EBC mode for SSL Cipher Block Chaining Cipher Suites.
Support for Proxy with Basic Authentication
To set the proxy server address with basic authentication enabled, use the cmxos sysproxy proxy command. When you use the command, you must provide the username and password in the proxy server URL. The proxy server URL format is:
http://<username>:<password>@<hostname/ip>:<port>
For example: cmxos sysproxy proxy http://myuser:mypassword@myproxyhost:3128
During runtime, a client URL (curl) call is made through Cisco CMX to ensure that the proxy is reachable. The curl call includes the username and password in the server URL. If the proxy is not reachable, an error is displayed. You can
view the proxy logs to verify if the call reaches proxy successfully.
 Feedback