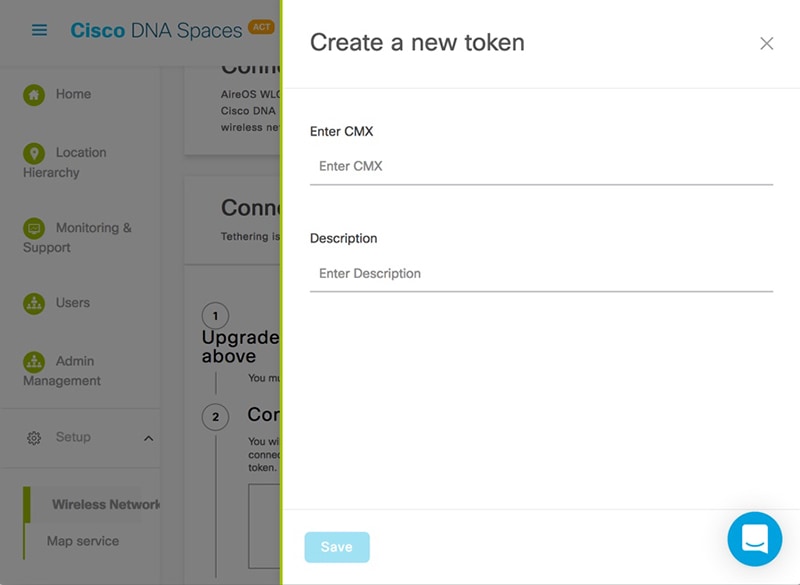
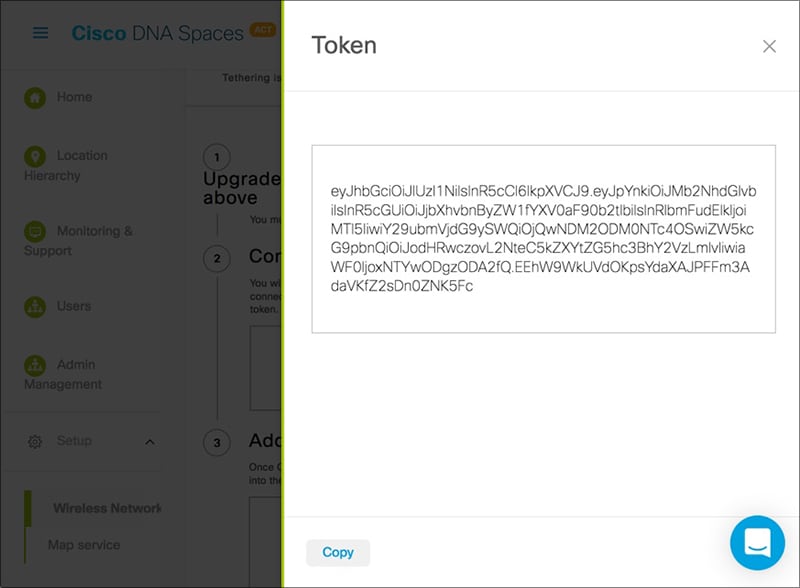
Managing Cisco CMX Configuration

Overview of the Manage Service

The Cisco Connected Mobile Experiences (Cisco CMX) MANAGE service comprises the following tabs, which help you perform a variety of tasks to effectively manage the Cisco CMX configuration, including, but not restricted to those listed here:


Note


All the Manage service tasks can be performed only by users with corresponding user roles. For information on user roles, see User Roles.

Managing Perimeters and Zones on Location Maps

A perimeter is an all-inclusive zone where clients are always inside of this. The individual zones are inside the perimeter.


Note


In Cisco CMX Release 10.2.3, the ability to create and delete a perimeter on location maps is no longer available.


Viewing Campus, Building, Floor, and Zone Details

Procedure


Step 1

Log in to Cisco Mobile Connected Experiences (Cisco CMX).

Step 2

Choose MANAGE > Locations.

Step 3

In the left pane of the window that is displayed, click Campus, Building, Floor, or Zone depending on the area you want to view.

Items corresponding to the area selected are displayed as boxes.

Step 4

Click the curved arrow at the top-right corner of each item box to view details pertaining to that item.

This opens the Zone Editor map view, displaying a floor map.

Note

 
The curved arrow at the top-right corner of a floor box is called the Go to map view arrow. This arrow is available on the box of items at any level. For example, for a building, this opens the first floor. For a campus, this opens the first floor of the first building. You can then switch to other buildings and floors in that campus.

Adding a Campus Address

When you import maps from Cisco Prime Infrastructure, the campus addresses are not imported automatically. You must set them manually in the Locations tab.

Before you begin

Ensure that you successfully import maps from Cisco Prime Infrastructure and you can view the imported map hierarchy under the Detect and Locate service.

Procedure


Step 1

In Cisco CMX, choose Manage > Locations.

Step 2

In the left pane of the window that is displayed, click Campus.

The Campus Item panel is displayed.

Step 3

In the Address field, enter a valid address. You can choose the right address from the drop-down list that is displayed.

Step 4

Click Enter to save the address.

Step 5

Navigate to Detect & Locate tab.

The campus address is displayed on the world map in the Activity Map window.


Managing Tags

You can add tags to a campus, building, floor, or zone.

Procedure


Step 1

Log in to Cisco Mobile Connected Experiences (Cisco CMX).

Step 2

Choose MANAGE > Locations.

Step 3

From the right panel, choose the item for which you want to add the tag.

Step 4

Click the Tag icon at the top-right corner of the window.

The Location Tag Manager window is displayed with available tags.

Step 5

In the Create New Tag field, enter a new name for the tag and press Enter.

Step 6

(Optionaly) Click on any existing tag to see all the geo items that are tagged against it.


Creating an Inclusion or Exclusion Region

The Create Inclusion/Exclusion feature allows you to create inclusion and exclusion regions on a floor.
  • Inclusion regions define areas within a floor where wireless devices will be either inside or snapped on the boundary (due to weak coverage). There will be one inclusion region per floor only. When there is no inclusion region defined in the floor maps, Cisco CMX creates a default inclusion region that is the same as the floor dimension. We recommend having one inclusion region on a floor to correctly bound the clients on floor area.

  • Exclusion regions define areas within a floor which are inside an inclusion region. In an exclusion region, wireless devices will be ignored. There could be multiple exclusion regions per floor.

Defining inclusion and exclusion regions can help you focus Cisco CMX processing to just those areas of the map where you want to manage your wireless devices, and ignore others.

Procedure


Step 1

Log in to Cisco Connected Mobile Experiences (Cisco CMX).

Step 2

Choose Manage > Locations.

Step 3

In the left pane, click Floor.

Step 4

To go to the map view of the floor, click the arrow on the top right of the floor tile view. The Zone Editor window is displayed with a list of icons to the right.

Step 5

To add a new inclusion region:

  1. Click the + icon to create an inclusion region on the map. If you already have an inclusion region, creating a new inclusion region will overwrite the existing region.

  2. Double-click to finish creating the inclusion area. The inclusion region is displayed in green.

  3. In the Create a Inclusion dialog box, click Add.

To add an exclusion region, click the – icon and draw the exclusion area on the inclusion area.


Creating a Perimeter

Procedure


Step 1

Log in to Cisco Mobile Connected Experiences (Cisco CMX).

Step 2

Choose MANAGE > Locations.

Step 3

In the left pane of the window that is displayed, click Zone.

The zone is used for the analytics purpose.

The Zone Item boxes are displayed.

Step 4

Click the Subzone in the corresponding zone.

Step 5

In the Zone Editor window, click the CREATE A PERIMETER icon.

The cursor changes to a drawing tool.

Step 6

Click each point that you want to designate as a vertex of the perimeter. Double-click the last vertex point to complete marking the vertices of the perimeter and closing the perimeter.

When you double-click the last vertex point, the CREATE A PERIMETER dialog box opens.

Step 7

Click Add to add this perimeter to the floor.

Figure 1. A Perimeter and its Vertices

1

Dark gray area indicating an area encircled by the perimeter.

3

Dark gray bar indicating the perimeter.

2

Purple indicating vertices of the perimeter.


Deleting a Perimeter

Procedure


Step 1

Log in to Cisco Mobile Connected Experiences (Cisco CMX).

Step 2

Choose MANAGE > Locations.

Step 3

In the left pane of the window that is displayed, click Zone.

The Zone Item boxes are displayed.

Step 4

Click the Subzone in the corresponding zone.

Step 5

In the Zone Editor window, click the Edit Perimeter icon.

Step 6

Click inside the perimeter to be deleted.

The perimeter will be highlighted in gray.

Step 7

Click the Trash icon.

Step 8

In the DELETE PERIMETER confirmation dialog box, click Confirm to delete the perimeter.


Editing a Perimeter

Procedure


Step 1

Log in to Cisco Mobile Connected Experiences (Cisco CMX).

Step 2

Choose MANAGE > Locations.

Step 3

In the left pane of the window that is displayed, click Zone.

The Zone Item boxes are displayed.

Step 4

Click the Subzone in the corresponding zone.

Step 5

In the Zone Editor window, click the Edit Perimeter icon.

Step 6

Click inside the perimeter that is to be edited.

The perimeter will be highlighted in gray and the vertices in purple.

Step 7

Drag the purple vertices to modify the shape of the perimeter.

Step 8

After you have the required shape, click outside the perimeter. This saves the new shape.


Creating a Zone

Procedure


Step 1

Log in to Cisco Mobile Connected Experiences (Cisco CMX).

Step 2

Choose MANAGE > Locations.

Step 3

In the left pane of the window that is displayed, click Zone.

The Zone Item boxes are displayed.

Step 4

Click the Subzone in the corresponding zone.

Step 5

In the Zone Editor window, click the Draw Polygon Zone icon.

The cursor will change to a drawing tool.

Step 6

Click each point that you want to designate as a vertex of the perimeter. Double-click the last vertex point to complete marking the vertices of the perimeter and for closing the perimeter see the figure below.

When you double-click the last vertex point, the CREATE A NEW ZONE dialog box is displayed.

Step 7

Click Add to add this zone to the corresponding floor.

An Item pane pertaining to this zone is displayed on the right side of the window. You can add existing tags from the drop-down list, or add a new tag.

Note

 
Zones cannot be outside the floor map and they cannot overlap. Overlapping zones can be created using Cisco Prime Infrastructure.
Figure 2. A Zone and its Vertices

1

A zone named Lab.

3

Purple indicating vertices of the zone.

2

Gray bar indicating the perimeter.

4

Other zones on the map.


Deleting a Zone

Procedure


Step 1

Log in to Cisco Mobile Connected Experiences (Cisco CMX).

Step 2

Choose MANAGE > Locations.

Step 3

In the left pane of the window that is displayed, navigate to the zone that you want to delete.

Step 4

Click the Trash icon.

The DELETE ZONE confirmation dialog box is displayed.

Step 5

Click Confirm.


Editing a Zone

Procedure


Step 1

Log in to Cisco Mobile Connected Experiences (Cisco CMX).

Step 2

Choose MANAGE > Locations.

Step 3

In the left pane of the window that is displayed, click Zone.

The Zone Item boxes are displayed.

Step 4

Click the Subzone in the corresponding zone.

Step 5

In the Zone Editor window, click the Gear icon to view the zone editing options.

Step 6

To change the shape of the zone, use the Pencil icon to reshape the zone by moving the vertices.

The DELETE ZONE confirmation dialog box is displayed.

Step 7

To move the zone, use the drag tool, denoted by the Hand icon, to drag the zone around. Click the Hand icon, move the cursor to the center of the zone, where it will change to an Arrow icon. You can then drag the zone.

Step 8

Click outside the zone to save your changes.

Note

 
Zones cannot be outside the floor map and they cannot overlap. Overlapping zones can be created using Cisco Prime Infrastructure.

Managing Licenses

To view the list of licenses that your Cisco CMX system has, log in to Cisco CMX and choose MANAGE > Licenses. The list of licenses is displayed in the Licenses window.

Figure 3. Licenses Window

Cisco CMX has the following license models:

  • CMX Default: Includes access to Cloud Apps (for enabling connection to Cloud applications) and License (for Base or Advanced License installation) features, MANAGE and SYSTEM services, and sending Northbound notifications.

  • CMX Base License: Includes RSSI Location Calculation, GUI access to DETECT, MANAGE, and SYSTEM services. It supports Permanent and Term licenses.


    Note


    The Cisco CMX Base License no longer provides access to Cisco CMX Hyperlocation or Partner Stream. The Cisco CMX Advanced License is required to access these services. Cisco CMX Hyperlocation, Cisco CMX Connect, Cisco CMX Advance Location services migrated from Cisco CMX Base License to Cisco CMX Advance license will continue to work after upgrade from Cisco CMX 10.3.x release. However, an alert is generated every 24 hours for license upgrade. A new Cisco CMX installation will require a Cisco CMX Advance license.
  • Cisco Spaces EXTEND: Includes base features and enables the IT team to utilize Cisco CMX. It connects to the Cisco Catalyst Center or Cisco Prime Infrastructure, providing access to Cisco CMX cloud business insights. To use this service, the IT team must have a Cisco CMX hardware appliance, and cloud tethering occurs via the Cisco CMX appliance.

    The EXTEND license caters specifically to IT users, offering business insights services like Wi-Fi adoption metrics, business metrics, benchmarks, right-now metrics, and location hierarchy within Cisco Spaces.

  • Cisco Spaces ACT: Includes both base and advanced features, encompassing the full suite of Cisco CMX capabilities. This license grants access to Cisco's digitization toolkits and services withinCisco Spaces, including Cisco Spaces: Captive Portal, Cisco Engage, Cisco Spaces: Asset Locator, Cisco Spaces: IoT Services, Detect and Locate, as well as API and SDK access.


    Note


    To utilize Cisco Spaces alongside Cisco CMX with CMX APIs, you are required to obtain the Cisco Spaces ACT licenses.


Note


  • Cisco CMX Release 10.3 supports High Availability. For more information, see Enabling High Availability for Cisco CMX.

  • Cisco CMX comes with a 120-day full-functionality evaluation license. All the access points (APs) connected to Cisco CMX must be licensed.

  • CMX Evaluation licenses are not synchronized between Cisco CMX High Availability (HA) pairs. Once the evaluation license expires on the primary server, Cisco CMX HA will not invoke failover to the secondary server. You must add a permanent license to make the HA setup functional.

  • Cisco CMX permanent licenses will be synchronized between the primary and secondary servers in the CMX HA pair. You need not upload the permanent licenses on the secondary server.


Add a License

Procedure


Step 1

Log in to Cisco CMX.

Step 2

Choose MANAGE > Licenses.

Step 3

Click Add License. The TERMS AND CONDITIONS dialog box is dispalyed.

Step 4

To accept the terms and conditions, enter your name, and then click Accept & Continue.

When you accept and proceed to install a certificate, a dialog box is displyed with a message indicating that you can use only the Analytics or Location features.

The UPLOAD LICENSE dialog box is displayed.

Step 5

Click Browse to select the corresponding license file, and then click Upload. Ensure that you to select a license file with the .lic extension.

Note


Cisco CMX uses license files with the .lic extension. This file is made available when you place an order for any of the Cisco CMX per Access Point SKUs, for example, Cisco DNA Spaces EXTEND.

The license file is available as part of your licensing package and will be attached to an email from licensing. Extract the .lic file to your system and upload to Cisco CMX when adding a new license.

Step 6

In the Licenses window, click See Installed Licenses to view the list of installed licenses. You can view the License Name, CMX Base (APs), CMX Advanced (APs), Install Date, and Expiry Date for the insatlled licenses.


Delete a License

Procedure


Step 1

Log in to Cisco CMX.

Step 2

Choose MANAGE > Licenses.

Step 3

In the Licenses window, click See Installed Licenses to view the list of installed licenses.

Step 4

In the Action column adjacent to the license you want to delete, click Delete.

Note


Note that only nonevaluation type licenses can be deleted.

The DELETE LICENSE dialog box is displayed.

Step 5

Click Delete License to proceed with the deletion.


Managing Users

Cisco Connected Mobile Experiences (Cisco CMX) is shipped with a default admin user account and password. An admin user can add, edit, and delete other users.

Adding a User

Procedure


Step 1

Log in to Cisco Mobile Connected Experiences (Cisco CMX).

Step 2

Choose MANAGE > Users.

The Users window, where all the current users are listed, is displayed.

Step 3

Click + New User at the bottom of the table.

The ADD NEW USER dialog box is displayed.

Step 4

Enter the details and select one or more roles for the user from the Roles drop-down list.

For information about the roles available for selection, see User Roles.

Note


The password for the new user must be mimimum of eight characters.

Step 5

Click Submit.


User Roles

Your Cisco Connected Mobile Experiences (Cisco CMX) system comes with the following services, depending on whether or not you have the license for that service:

  • SYSTEM service (included with Cisco CMX base license)

  • MANAGE service (included with Cisco CMX base license)

  • DETECT & LOCATE service (included with Cisco CMX base license)

  • CONNECT service (included with Cisco CMX base license)

  • ANALYTICS service (provided only with Cisco CMX advanced license; not included with Cisco CMX base license)

When setting up users in Cisco CMX, you can select one or more roles for each user. Each role provides access privileges to one or more services, provided your license includes those services.

See the table below for a description of the access privileges associated with each role.

Table 1. User Roles and Associated Access Privileges

Role

Allows

Admin

Read/Write access to all the services

System

Read/Write access to the service

Manage

Read/Write access to the service

Location

Read/Write access to the service

Analytics

Read/Write access to the service

Connect

Read/Write access to the service

Connect Experiences

  • Read/Write access to Connect Experiences in the CONNECT & ENGAGE service
  • Read-only access to all the settings in the CONNECT & ENGAGE service

  • No access to the Dashboard in the CONNECT & ENGAGE service

Read Only

Read-only access to all the services


Note


  • A user can be allocated the System, Manage, Location, Analytics, and Connect roles. This allows the user to function like an admin user. Such nonadmin users can be deleted by admin users, but not vice-versa.

  • Only an admin user can delete another admin user.

  • An admin or Connect user has both read/write access to the Policy Plans. However, Connect Experience users only have Read access to the Policy plans page.


Changing the Default Admin Password

Procedure


Step 1

Log in to Cisco Mobile Connected Experiences (Cisco CMX).

Step 2

Choose MANAGE > Users.

The Users window, where new users can be added and the roles of existing users modified, is displayed.

Step 3

Click Edit in the Actions column adjacent the admin user.

This opens the EDIT USER dialog box for that admin user.

Step 4

Change the default factory-shipped admin password.

Step 5

Click Submit.


Editing User Information

Procedure


Step 1

Log in to Cisco Mobile Connected Experiences (Cisco CMX).

Step 2

Choose MANAGE > Users .

The Users window, where all the current users are listed, is displayed.

Step 3

Click Edit in the Actions column adjacent the user whose details you want to edit.

The EDIT USER dialog box is displayed.

Step 4

Edit the details of the user. Note that the username cannot be edited.

For information about user roles, see User Roles.

Step 5

Click Submit.


Deleting a User

Procedure


Step 1

Log in to Cisco Mobile Connected Experiences (Cisco CMX).

Step 2

Choose MANAGE > Users.

Step 3

Click Delete in the Actions column adjacent the user whose details you want to delete.

The DELETE USER confirmation dialog box is displayed.

Step 4

Click Delete User to proceed with the deletion.


Managing Notifications from Applications

You can set up notifications for your own applications and for third-party applications. The Notifications feature supports the following:

  • HTTP receiver

  • MAC address scrambling, which is enabled by default

  • Two message formats, JSON and XML

  • Alerts

  • Network configuration change notification

  • REST notification over HTTPS

The following sections describe the notifications-related tasks that you can perform:

Create a New Notification

Procedure


Step 1

Log in to Cisco Mobile Connected Experiences (Cisco CMX).

Step 2

Choose MANAGE > Notifications.

The Notifications window is displayed.

Step 3

Click New Notification.

The CREATE NEW NOTIFICATION dialog box is displayed.
Figure 4. Create New Notification

Step 4

Enter the following parameters to configure the new notification:

  • Name: Enter a name for the new notification name.

  • Type: From the Type drop-down list, choose the notification type.

    For a description of the available notification types, see the table below. When specifying the details, note that:

    • If a location hierarchy is selected, the hierarchy will be the specific area filter for that notification.

    • If a MAC address is entered, the MAC address will be a filter for that notification.

    Table 2. Notification Types

    Notification Type

    Used for

    Absence

    Generating a notification when a client is undetected for more than 15 minutes.

    Area Change

    Generating a notification when a device changes its location between campuses, buildings, or floors.

    Association

    Generating a notification when a client is associated or unassociated.

    Battery Life

    As part of RFID telemetry, Cisco CMX receives battery information which are of type Low, Medium, and Normal. Depending on the condition(s) set in the notification rule, notifications are generated for tags reporting similar battery status.

    Note


    This notification is applicable for RFID tag only.

    Chokepoint

    As part of RFID telemetry, Cisco CMX receives chokepoint details when a tag encounters it. A notification is generated when Cisco CMX detects an encountered mac that matches the chokepoint mac from notification rule.

    Note


    This notification is applicable for RFID tag only.

    Emergency

    As part of RFID telemetry, Cisco CMX receives event information which are of type Any, Unknown, Panic Button, Detached, and Tampering. Depending on the condition(s) set in the notification rule, notifications are generated for tags reporting similar events.

    Note


    This notification is applicable for RFID tag only.

    In/Out

    Generating a notification when a device is detected as moving into or moving out of a specific area in the location hierarchy.

    Location Update

    Generating a notification when a device's location is being recalculated.

    The Location Update notification is based on the RSSI from the different APs that detect the device.

    Movement

    Generating a notification when a device moves more than a specified distance.

    Network Design Changed

    Generating a notification when maps are changed.

  • Conditions: Depending on the notification type selected, the Conditions parameters are displayed. Enter the required conditions for the new notification.

    Note

     
    • For some notifications types such as Association, Absence, and so on, you must provide Device Type as a condition parameter. The Device Type field on the Create New Notification window provides these options: All, RFID Tag, Client, BLE Tag, and Interferer. For notification types Area Change, In/Out, Location Update, and Movement, the Device Type condition has the following additional options: Rogue Client and Rogue AP.

    • For the In/Out notification type, if the In option is selected in the Condition field, this warning message is displayed: Please make sure to add 'Out' condition with same Hierarchy. Conversely, if the Out option is selected in the Condition field, this warning message is displayed: Please make sure to add 'In' condition with same Hierarchy.

    • For the Location Update, In/Out, and Movement notification type, choose the device status from the Status drop-down list. The association status for the client device are All, Probing Only, and Associated. This condition helps to filter the clients by their association status and sends notifications only for the filtered subset of client devices.

    • For the Location Update notification, Cisco CMX provides a new Status option for the Client device type. Use this option to filter notifications to either associated or probing devices. If the Status option is not selected, the default option (All) is considered, and then notifications are sent for both associated and probing clients.

    • For the Location Update notification with device type as BLE tag, Cisco CMX will receive details such as UUID, Major, Minor fields in the payload.

    • To view In/Out notification details for all locations, we recommend that you configure seperate In/Out notifictions for each hierarchy created in the Activity Map window.

    • For the notification type Battery Life, the conditions All and Any indicates the same battery life status. You can either select All or Any to incule all available battery life statues conditions to create the notification.

    • For the notification type Emergency, the conditions All and Any indicates the same emergency status condition. You can either select All or Any to incule all condition types to create the notification.

  • MacAddress: Enter the MAC address. The defaul is all.

  • Receiver: From the Receiver drop-down list, choose the receiver type as HTTP, HTTPS, or Email. For HTTP and HTTPS receiver, you must provide the host address, port number, and url.

    Note


    When FIPS mode is enabled in Cisco CMX and the receiver is selected as HTTPS, you must import a CA certificate corresponding to that receiver. Use the Browse field to import CA certificate which is signed with northbound notification receiver's server certificate.

    The imported CA certificate is used to validate receiver's certificate when Cisco CMX tries to establish TLS connection to the receiver to send notifications to it.

    If northbound notification receivers were added prior to enabling FIPS mode in Cisco CMX, you must edit individual northbound notification receiver and then import CA certificate or remove and add the northbound notification receiver again.

  • HTTP Headers: Enter the HTTP header inputs for Key and Value. Click the plus icon to add more custom HTTP headers to the notification. You can add a maximum of three custom HTTP headers.

    Note

     
    HTTP headers are manadatory for northbound notifications to connect to third party services.
  • MAC Hashing: Click to disable the MAC hashing. By default, MAC hashing is enabled.

  • Username Hashing: Click to disable the username hashing. By default, username hashing is enabled.

  • Message Format: From the Message Format drop-down list, choose the format as JSON or XML.

  • Salt: Enter a secret hash key.

Step 5

Click Create. The new notification is created and displayed in the Notifications window.

We recommend that you maintain a maximum of five active northbound notifications for better performance. Currently, there is no enforcement for validating total active northbound notifications.


Making Changes to Notifications


Note


If you are a non-admin user, you can make changes to only those notifications that were created by you. A non-admin user cannot make changes to notifications created by other users.

The following are the changes that you can make to notifications:

Enabling and Disabling a Notification

When a notification is created, it is enabled by default.

Procedure
  • To disable a notification, in the NOTIFICATIONS window, under the Status column adjacent the notification, click Enabled.

    The label changes to Disabled and the notification is disabled.
  • To enable a notification, in the NOTIFICATIONS window, under the Status column adjacent the notification, click Disabled.

    The label changes to Enabled and the notification is enabled.

Editing a Notification

Procedure

Step 1

To edit a notification, in the NOTIFICATIONS window, under the Actions column adjacent the notification, click Edit.

The EDIT NOTIFICATION dialog box is displayed.

Step 2

Edit the details of the notification, as required.

Note

 
You cannot edit the name of the notification.

Viewing Northbound Notifications

You can now view northbound notifications from the Cisco CMX UI and CLI. Cisco CMX does not support authentication for Northbound notifications.

To view Northbound Notifications:

Procedure

Step 1

Log in to Cisco Connected Mobile Experiences (Cisco CMX).

Step 2

Choose Manage > Notifications.

Step 3

Under the Actions column for an existing notification, click Details to view additional information about the notification.

You can also view the northbound notification details in the Edit Notifications window. Optionally, from the CLI, use the cmxctl metrics notification command to view the northbound notifications.


Viewing Northbound Notification Attributes

The following table lists the Northbound Notification attributes:

Table 3. Northbound Notification

Type

Description

Notification Type

What type of notification this output describes (For example, locationupdate)

Subscription Name

The name of the notification created in CMX (user provided)

Event ID

Unique for notification identification per event

Location Map Hierarchy

The Hierarchy string that shows campus, building, floor, and zone (if applicable)

Location Coordinate

XY location for the device

Geo Coordinate

GPS location for device, if GPS markers are set

Confidence Factor

Represents a square box of where the client should be, lower means better location accuracy

AP Mac Address

The AP that the client is connected to

Associated

Shows if this device is associated or not

Username

The username of this Associated client if using 802.11x

IP address

If this client is associated, what IP address(es) are assigned to it, can include IPv4 and IPv6 addresses

Note


Some client devices uses Extended Unique Identifier (EUI-64) to auto-generate the IPv6 address. In this scenario, MAC address of the device is displayed in the IPv6 address field too. When the controller sends the client data to Cisco CMX using NMSP, IPv6 address and MAC address of the device is displayed in the northbound notification. However, Cisco CMX hashes the IPv6 address to comply with privacy regulations as per General Data Protection Regulation (GDPR).

SSID

The SSID of the client is Associated

Band

802.11 band the device is it connected to

Floor Id

Long value representing hieracrchy, would not use

Floor Ref Id

New to 10.3.1, represents a long for what hierarchy it is on (Floor Id might be rounded if the number is large enough due to a conversion from long to double), only is filled in for location update, recommended for use

Entity

What type of device is it, Client (normal devices), RFID Tag (these are devices that send a chirp on an interval), Interferers (Devices that are connected to APs or are APs that aren’t on the network controlled by a controller on this CMX)

Device Id

MAC address of device

Last Seen

Timestamp of packet last received from controller for this device

Raw Location

-

Area Global Id List

-

Tag Vendor Data

For RFID tags, information that was encoded in packets we received like battery life or something like that.

Manufacturer

Based on the first half of the MAC address of this device

Timestamp

When the notification is generated

status

Refers to what the status of the device is - IDLE(0), AAA_PENDING(1), AUTHENTICATED(2),

ASSOCIATED(3), POWERSAVE(4), DISASSOCIATED(5), TO_BE_DELETED(6), PROBING(7),

BLACK_LISTED(8), WAIT_AUTHENTICATED(256), WAIT_ASSOCIATED(257);

rssiEntries

Displays the Access Points information used for determining the location of the device.

"rssiEntries": [
{
"apMacAddress": "6c:8b:d3:ef:d4:60",
"band": "IEEE_802_11_B",
"slot": 2,
"antennaIndex": 0,
"rssi": -55,
"lastHeardSecs": 7
},
{
"apMacAddress": "6c:8b:d3:b2:ba:60",
"band": "IEEE_802_11_B",
"slot": 2,
"antennaIndex": 0,
"rssi": -69,
"lastHeardSecs": 2
}
] 

Managing Proxy Settings for Notifications

In Cisco CMX, configure proxy settings for notifications that need to pass through specific proxy when sending notification to client devices. If proxy is set in Cisco CMX, you need to set the no_proxy variable for all notification addresses that need not go through the proxy.

Procedure

Step 1

To verify the current proxy settings, run the cmxos sysproxy show command.

The following is a sample output:
[cmxadmin@cmx-nortech ~]$ cmxos sysproxy show
USE_PROXY=1
HTTP_PROXY_URL=""
HTTPS_PROXY_URL=http://proxy.esl.cisco.com:80
FTP_PROXY_URL=""
NO_PROXY_LIST=192.0.2.1

Note


The proxy variable required for CMX notifications is the HTTPS_PROXY_URL.If this variable is set and you are not getting the notification, follow the below steps to configure the no_proxy variable.

Step 2

To set the no_proxy variable, run the sysproxy no_proxy host name: port command, wherein the host name is domain associated with your host machine IP address, for example, cmxos sysproxy no_proxy 192.0.2.1:8000

To find out the domain name, run the host ip addresss command and identify the domain name pointer value.

If you have multiple domain values, enter all of them as comma seperated no_proxy values in the command, for example, cmxos sysproxy no_proxy no_proxy_value1, no_proxy_value2: port number .

For example, cmxos sysproxy no_proxy 192.0.2.1,example.com:8000

Step 3

Run the following commands to restart the agent and location services.cmxctl agent restart cmxctl location restart .

The notifications will be send to your client devices as per the notification type configuration. If the notificqation listener is outside the Cisco firewall, set proxy using the cmxos sysproxy http_proxy command. If the notification listener is within Cisco firewall, use the cmxos sysproxy no_proxy command to add all IP addresses that do not require a proxy setting.

The following table lists the commands used for setting proxy:

Table 4. Cisco CMX Proxy Setting Commands

Scenario

Cisco CMX Proxy Command

Cisco WSA Proxy Version

Squid Version - By default, uses web socket connection method.

McAfee Web Gateway Version

Northbound notifications with listener inside Cisco Firewall

cmxos sysproxy no_proxy 192.0.2.1

Proxy is not used

Proxy is not used

Proxy is not used

Northbound notifications with external listener in AWS cloud (outside of Cisco firewall)

To send to the cloud use the following:

http://ip address:9094/api/v1/notify

To check the cloud instance use the following REST API:

http://ip address:9094/api/v1/notifications

cmxos sysproxy http_proxy <hostname>:<port_number>

For example, cmxos sysproxy http_proxy example.com:80/

cmxctl agent restart

cmxctl location restart

Yes

Yes

Yes

BLE

(HTTPS, web socket: defaults, supports HTTP as well)

cmxos sysproxy https_proxy<hostname>:<port_number>

For example, cmxos sysproxy http_proxy example.com:80/

cmxctl agent restart

cmxctl location restart

Yes

Yes

Yes

Connect (SMS & FB)

(HTTP & HTTPS)

cmxos sysproxy https_proxy<hostname>:<port_number>

For example, cmxos sysproxy http_proxy example.com:80/

cmxctl agent restart

cmxctl location restart

Yes

Yes

Yes


Deleting a Notification


Caution


A notification delete action takes effect immediately without a delete confirmation dialog box being displayed.
Procedure

To delete a notification, in the NOTIFICATIONS window, in the Actions column adjacent the notification, click Delete. The notification is immediately deleted.


Managing the Cisco CMX Cloud Apps

Cisco CMX helps you to calculate the location of connected devices. This location information can be shared with various other CMX apps that are available as cloud services. Most of these cloud services are configured using a set of Northbound notifications from Cisco CMX to the Cisco CMX application hosted on the cloud.


Note


An outbound proxy is required for connecting to the Cisco CMX applications. To set the up outbound proxy, see Setting Up Outbound Proxy.


Procedure


Step 1

Log in to Cisco CMX.

Step 2

Choose MANAGE > Cloud Apps.

The Cloud Application window displays the cloud application name, description, documentation links, web interface login links, and the enable and disable options for the cloud apps.

Figure 5. Cloud Apps

Step 3

Manage cloud apps using the available options. The cloud apps that are available are:

  • Cisco DNA Spaces—A single, scalable, reliable location platform that leverages the existing wireless investments to digitize spaces, including people and things. Cisco DNA Spaces is a cloud-based location platform that provides a single pane for all Location services. From Cisco CMX, you can choose to configure location updates to services enabled in Cisco DNA Spaces.

Step 4

Use the options available in the Links and Actions colum to access documentaion and connect with the required cloud app:

  • Documentation—Click to access the documentation for the corresponding Cloud App.

  • Login—Click to log in to the required cloud app.

  • Enable— To enable a cloud app, click the Enable option in the Actions column for the required cloud app. After you enable the cloud app, you will be able to view the Update or Disable options.

    Note

     
    If you enable a cloud app through Manage > Cloud Apps, Cisco CMX continues to send notifications to the cloud app even though the Cisco CMX license has expired. However, if you enable a cloud app from Manage > Notification, Cisco CMX stops sending notifications to the cloud app if the Cisco CMX license is expired.

To enable Cisco DNA Spaces, follow these steps:

Note

 
To enable the Cisco DNA Spaces service, you must have a Cisco DNA Spaces account. Cisco DNA Spaces uses location data to gain insights into the behavior of people and things in any place with wireless connectivity – such as retail, hospitality, healthcare, carpeted enterprise, and higher education allowing you to make informed business decisions, optimize operations, and improve experiences.

Note that for a set of 60k clients and 50k RFID tags, system needs around 10 Mbps line between Cisco CMX and Cisco DNA Spaces Cloud.

  1. In the Actions column, click Enable.

  2. In the dialog box that is displayed, enter the token to enable Cisco DNA Spaces.

    The token can be obtained from Cisco DNA Spaces dashboard. You must create a new Cisco CMX wireless network and retrieve the token. For more information, see Creating and Retrieving the Token Using Cisco CMX Tethering.

  3. Check the Sync Zones check box to automatically synchronize zone information from Cisco CMX to Cisco DNA Spaces. This option is enabled by default.

    Note


    After you import the maps, you can use the Manage services to update maps, edit zones or exclusion regions and these changes are automatically reflected in Cisco DNA Spaces. To achieve this enhanced tethering feature, you must configure the proxy settings to Cisco CMX with HTTPS.

  4. Click Save.

    After a successful connectivity is established between Cisco CMX and Cisco DNA Spaces, you can use the Map Sync feature to push maps from Cisco Maps to Cisco DNA Spaces.

    Cisco CMX auto sync maps to Cisco DNA Spaces whenever a new map is uploaded or existing map is updated. We recommend that you use the Map Sync option when there is some error or discrepancy between both system.

To enable Cisco BLE Management, for example, follow these steps:

  1. In the Actions column, click Enable.

    Note

     
    To enable the Cisco BLE Management service, you must have a Cisco BLE Management account.
  2. In the dialog box that is displayed, enter the token number to enable Cisco BLE Management.

    The token to enable Cisco BLE Management can be obtained from the Cisco BLE Management service available in Cisco DNA Spaces. In the Cisco BLE Management, use the Setup tab to generate token.

  3. Click Save & Enable.

    We recommend that you verify the outbound proxy configuration, Cisco WLC 8.7, and Cisco 4800 APs setup to successfully complete the cloud app enabling process.

Step 5

Use the Notifications section to view the notification name, receiver details, total number of notifications sent, acknowledged notification count, unacknowledged notification count, success percent, failure percent, and latency.

Figure 6. Cloud Apps Notification

Note

 
  • When Cisco CMX and Cisco DNA Spaces have an established connection, Cisco CMX provides traffic-related notifications such as the destination of the traffic and the amount of traffic sent to Cisco DNA Spaces.

  • To reset a notification, click the Reset option in the Actions column against each notification.


Creating and Retrieving the Token Using Cisco CMX Tethering

Use the Cisco DNA Spaces dashboard to create a new wireless network for Cisco CMX. A token is generated for each Cisco CMX wireless network that is added to Cisco DNA Spaces. Cisco CMX requires these tokens to manage Cisco DNA Spaces. To generate a token, you must first create a Cisco CMX wireless network using the Cisco DNA Spaces dashboard.

To create a Cisco CMX wireless network in Cisco DNA Spaces, and to retrieve the token, perform the following steps:

Procedure


Step 1

Log in to Cisco DNA Spaces.

Step 2

In the Cisco DNA Spaces dashboard, choose Setup > Wireless Networks.

Step 3

In the Get your wireless network connected with Cisco DNA Spaces area, click Add New.

The Connect your wireless network window is displayed two options - Cisco AireOS/Catalyst and Cisco Meraki.

Step 4

Click Select for Cisco AireOS/Catalyst.

Step 5

In the window that is dispalyed, click Select for Via CMX On-Prem.

The Connect your wireless network window is displayed two options - 10.5 and below and 10.6 or later.

Step 6

Click Select for 10.6 or later.

Prerequisites for Cisco CMX Tethering is displayed. You must have Cisco WLC version 8.0 and above and Cisco CMX 10.6 and later.

Step 7

Click Customize Setup.

A Connect via Cisco CMX Tethering network bar is displayed in the Wireless Networks window.

Figure 7. Connect via CMX Tethering Network Bar

Step 8

Click the drop down arrow at the far right of the Connect via Cisco CMX Tethering network bar.

Step 9

To add a new Cisco CMX Tethering token, click Create New Token that is displayed as Step 2.

The Create New Token window is displayed.
Figure 8. Create Cisco CMX Token

Note

 
  • A token is mandatory to connect and configure Cisco DNA Spaces from Cisco CMX dashboard.

  • You must connect to https://<your cmx IP> from any browser to configure the token.

Alternatively, in the Cisco DNA Spaces dashboard, you can also click the Wi-Fi icon at the top-right of the window, and then click Wireless Network Status to add a Cisco CMX wireless network. In the Wireless Network Status window that is displayed, click Cisco CMX from the left panel.

Step 10

In the Create a new token window that is displayed, enter a new name and description for the Cisco CMX network connector.

Step 11

Click Save.

Step 12

Click View Tokens to display the Cisco CMX Tethering tokens.

The newly added token is listed on the Cisco Tethering Tokens window. A Cisco CMX wireless network is shown as active after its establishes connection with Cisco DNA Spaces. You can also view the first heard and last heard timestamp details in this window.

Step 13

In the Cisco Tethering Tokens window, click the View Access Token icon adjacent to the token you added.

Step 14

In the dialog box that is displayed, enter your Cisco DNA Spaces login credentials, and click Submit.

The token is displayed.
Figure 9. Token

Step 15

Click Copy to copy the token. Use this token to enable Cisco DNA Spaces in Cisco CMX under Manage > Cloud Applications tab.

After Cisco CMX is connected to Cisco DNA Spaces, follow steps 16-19 to add Cisco CMX into the location hierarchy using the Cisco DNA Spaces dashboard.

Step 16

In the Connect via CMX Tethering network bar, click Add CMX.

Step 17

Choose a location where you want to import Cisco CMX and click Next.

Step 18

In the Display Name field, add a new name.

Step 19

Choose the sites you want to import and click Import.

The selected campuses, buildings, and floors are imported into the location hierarchy.

Click View Location Hierarchy to view already added Cisco CMX.


Polling Access Point Information Using NMSP

If your network deployment has Catalyst 9800 Wireless Controller, you need to allow Cisco CMX to poll AP information over NMSP. This is a one time procedure and the configuration will be saved across Cisco CMX service restarts and software upgrades. If you want to poll AP information, use the following commands:

Procedure


Step 1

Connect to Cisco CMX through the console.

Step 2

Run the cmxctl config featureflags configuration.apimport false command to disable api import.

Step 3

Run the cmxctl agent restart command to restart the CMX agent.

Step 4

Run the cmxctl configuration stop command to stop Cisco CMX configuration.

Step 5

Run the cmxctl configuration start command to restart the configurations.

Step 6

Run the cmxctl nmsplb stop command to stop the Load Balancer service used for NMSP messages to Location services.

Step 7

Run the cmxctl nmsplb start command to restart the Load Balancer service used for NMSP messages.


Setting Up Outbound Proxy

If your Cisco CMX on-premise setup requires a forward proxy for internet access, you must configure the proxy and restart your Cisco CMX services. Proxy setting is mandatory if Cisco CMX wants to communicate with cloud. For example, Cisco BLE Management requires the HTTP_PROXY and HTTPS_PROXY environment variables to be set as proxy, and the NO_PROXY environment variable set as local host.

Procedure


Step 1

Connect to Cisco CMX via SSH.

Step 2

To set up a proxy, run the following commands in the same sequence:

  1. cmxos sysproxy proxy http://<proxy><port #>

  2. cmxos sysproxy proxy https://<proxy><port #>

  3. cmxos sysproxy no_proxy localhost,127.0.0.1,company.com

Step 3

To stop and restart the agent and Cisco CMX services, run the following commands in the same sequence:

  1. cmxos stop -a

  2. cmxctl agent start

  3. cmxctl start


Setting Up Outbound Proxy in HA-Enabled Setup

To set up outbound proxy in an HA-enabled setup, follow these steps:

Procedure


Step 1

Connect to Cisco CMX via SSH.

Step 2

To set up a proxy, run the cmxos sysproxy show command on the primary server.

Step 3

To ensure that the no_proxy list is configured, run the NO_PROXY_LIST=localhost 127.0.0.1,primary-ip,secondary-ip command.

Step 4

If no_proxy is not set or is configured incorrectly, run the cmxos sysproxy no_proxy localhost 127.0.0.1,primary-ip,secondary-ip command to set the no_proxy list. Ensure that you replace the primary-ip and secondary-ip with the primary and secondary IP address of the HA setup.

Step 5

Log out of the Cisco CMX services, and log in again.

Step 6

To view the proxy settings in the environment, run the env | grep -i proxy command.

Step 7

To view the proxy settings on the secondary server, run the cmxos sysproxy show command. We recommend that you wait for five minutes to reflect the proxy settings on secondary.

Step 8

To view the proxy settings in the environment of the secondary server, run the env | grep -i proxy command.

Step 9

To restart the Cisco CMX services, run the cmxctl agent restart .


Configuring Basic CMX Settings

The GUI allows you to set up maps, Cisco WLC, and mail server.

Procedure


Step 1

Log in to Cisco Mobile Connected Experiences (Cisco CMX).

Step 2

Click SYSTEM.

The SETUP ASSISTANT window is displayed.

Step 3

Click Next to set up the New UI Password.

The Maps and Controllers window is displayed.

Step 4

Choose either Default or the Advanced option.

  • In the Default window, provide Cisco Prime Infrastructure credentials such as Username, Password, and IP Address, and click Import Controllers and Maps. This imports the Controllers and maps from Cisco Prime Infrastructure.

  • In the Advanced window, provide the map and Cisco WLC information, and click Next.

Note

 
If the Override checkbox is checked, the import will override the existing entries.

Step 5

In the Mail Server window that is displayed, enter the corresponding details.

Step 6

Click Next to complete the configuration.


Root User Changes

In releases prior to Cisco CMX 10.2, all the processes used the root user role. This has been changed in Cisco CMX 10.2 by introducing two new user roles: cmx and cmxadmin. The cmx user is a no-login user who owns all the processes, except postgres. The cmxadmin is the primary user who performs all the administrative tasks.

The root user is not disabled; this user can still be used for installation and debugging. You cannot directly log in to root through SSH or console. First you have log in as cmxadmin and then issue the su command to go to the root user level.


Caution


Do not use the root user account; unless explicitly directed to do so by the Cisco Technical Assistance Center team.