Configurations Steps for Domain Filtering
Domain Filtering Overview
Domain Filtering is a new enhancement that is being introduced as part of the 8.3 release. This enhancement complements the Application Visibility Control (AVC) filtering currently available on the WLC. AVC filtering only supports the protocols and applications that are defined in the Protocol Pack for a given AirOS release allowing specific applications to be dropped, marked or rate-limited.
Domain Filtering
builds upon AVC by using the NBAR2 engine to look deeper into the application
layer matching on both the application type (e.g. HTTP) and host (e.g.
www.cisco.com). In the 8.3 release administrators can now define ACLs and rules
which can be applied to WLANs, Interfaces or Local Policies to either permit or
deny HTTP traffic destined to specific hosts providing greater flexibility and
control.
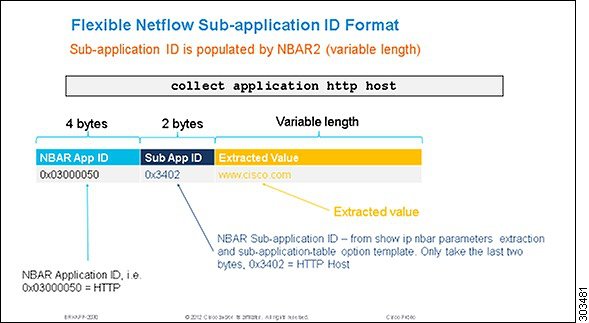
Domain Filtering is based on the NBAR2 engines filtering capabilities using field extraction. The latest NBAR2 engine supports 120 custom applications. URLs can be defined as a custom application and be classified by the engine:
-
URLs are classified using ACLs defined on the WLC. Each ACL has rules defined that determine the URLs to be matched.
-
The NBAR2 engine is configured to extract the URL field (if present) in the packets passed to it. Field extraction is performed per flow to optimize performance.
-
The WLC passes HTTP packets to the NBAR2 engine to extract the URL. If present, the NBAR2 engine returns the host-name (for example www.cisco.com) as the URL to the WLC.
-
The WLC implements filtering logic for the extracted URLs and takes the appropriate forwarding action (i.e. permit or denies the flow).
Considerations
-
This release supports a maximum of 100 x URL ACLs:
-
Each ACL supports a maximum of 64 rules.
-
Each rule has either a permit or deny action. At least one permit rule must be defined per URL ACL for traffic to be permitted.
-
Each ACL has an implicit “deny all rule” as the last rule. If a URL does not match any of the rules, it is dropped by the WLC.
-
Each rule is inspected in order of precedence (lowest to highest). The first rule in the ACL that is matched is applied to the flow.
-
Each rule supports a maximum length 32 characters.
-
Each rule must match the exact subdomain, domain and top level domain you wish to match (example www.cisco.com, tools.cisco.com or partners.cisco.com).
-
Partial matches using wildcards or regular expressions are not supported in this release (example. www.c*.com or *.cisco.com).
-
No support for folders, file-names or extensions is provided in this release (example www.cisco.com/resources/index.html). A rule matching www.cisco.com will be applied to www.cisco.com/c/en/us/support.index.html as well as http://www.cisco.com/c/en/us/buy.html.
-
One wildcard (*) rule with a permit or deny action is supported per ACL. The wildcard matches all URLs.
-
-
-
No support for AVC Profiles for matched URLs is provided in this release. URL ACLs and rules are defined separately then applied to WLANs, Interfaces or Local Policies.
-
No support for IPv6 in this release (IPv4 support only).
-
No support for PI is provided in this release.
 Note | This release supports HTTP URLs only. HTTPS URL support will be introduced in a later release. |
Configurations Steps for Domain Filtering
Enabling Domain Filtering
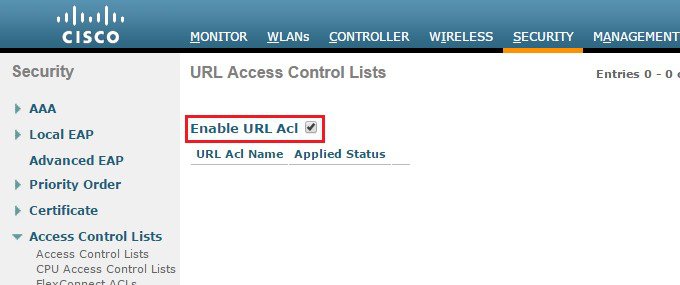
Domain filtering is globally disabled on the WLC by default and must be enabled before the NBAR2 engine can inspect and filter HTTP based URLs. The following step demonstrates how to globally enable Domain Filtering on a WLC.
Enabling Domain Filtering using GUI
To enable domain filtering using GUI, perform the following steps:
 |
Enabling Domain Filtering using CLI
To enable domain filtering using CLI, perform the following steps:
Access Control Lists and Rules
Domain filtering determines which HTTP based URLs to permit or deny using ACLs and rules that are assigned to WLANs, Interfaces or individual client sessions by way of Local Policies. The following steps demonstrate how to create URL based ACLs and rules for two common scenarios:
Access Control Lists
Access Control Lists using GUI
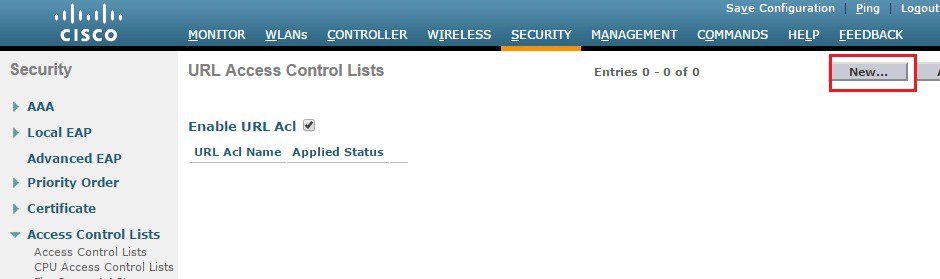
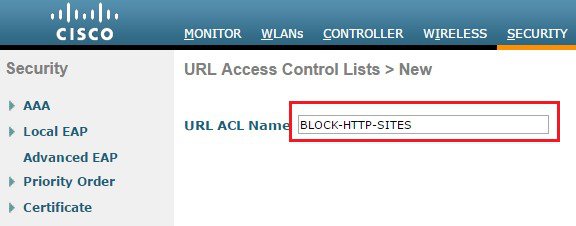
To enable access control lists using GUI, perform the following steps:
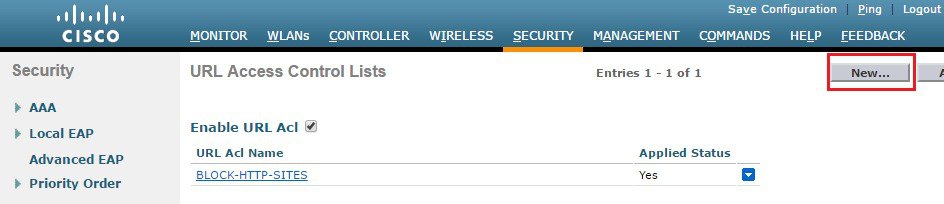
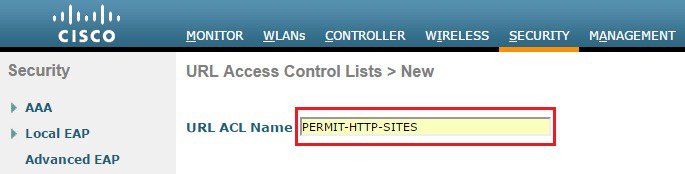
Access Control Lists using CLI
Rules–Blacklisting Example
The following configuration steps demonstrate how to use rules to deny access to specific HTTP URLs (commonly referred to as blacklisting). In this example an ordered list of URLs is defined with a deny action to block access to specific requested HTTP based URLs. As the ACL itself has an implied deny, a wildcard permit rule is added as the last rule to provide access to all other requested HTTP URLs.
Rules Blacklisting using GUI
To enable rules blacklisting using GUI, perform the following steps:
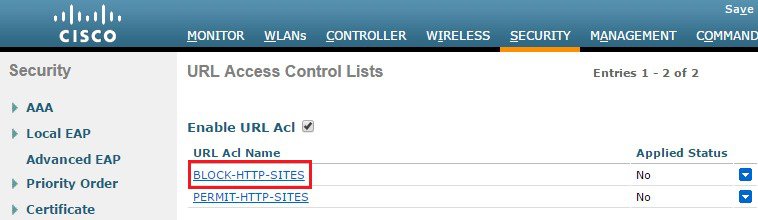
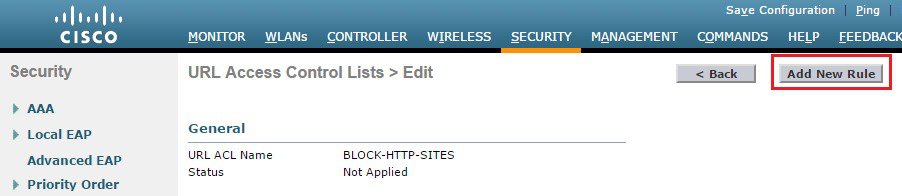
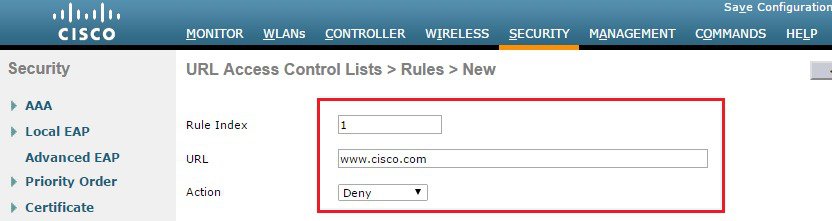
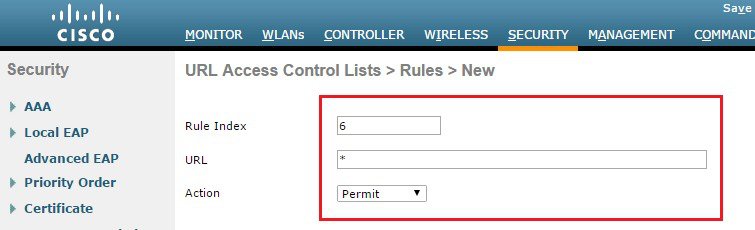
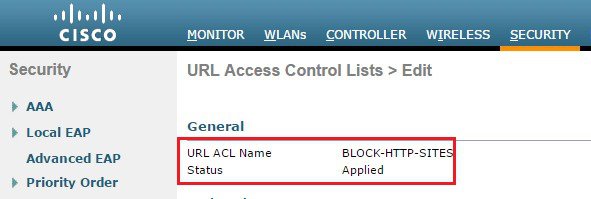
Rules Blacklisting using CLI
To enable rules blacklisting using CLI, perform the following steps:
| Step 1 | Create rules
for the ACL named
BLOCK-HTTP-SITES.
(Cisco Controller) > config acl url-acl rule add BLOCK-HTTP-SITES 1 (Cisco Controller) > config acl url-acl rule url BLOCK-HTTP-SITES 1 www.cisco.local (Cisco Controller) > config acl url-acl rule action BLOCK-HTTP-SITES 1 deny (Cisco Controller) > config acl url-acl rule add BLOCK-HTTP-SITES 2 (Cisco Controller) > config acl url-acl rule url BLOCK-HTTP-SITES 2 www.nba.local (Cisco Controller) > config acl url-acl rule action BLOCK-HTTP-SITES 2 deny ! ! Configuration Suppressed for rules 3 - 5 ! (Cisco Controller) > config acl url-acl rule add BLOCK-HTTP-SITES 6 (Cisco Controller) > config acl url-acl rule url BLOCK-HTTP-SITES 6 * (Cisco Controller) > config acl url-acl rule action BLOCK-HTTP-SITES 6 permit |
| Step 2 | Apply the
ACL.
(Cisco Controller) > config acl url-acl apply BLOCK-HTTP-SITES |
| Step 3 | Verify the
ACL rules.
(Cisco Controller) > show acl url-acl detailed BLOCK-HTTP-SITES
RuleIndex   Action                  URL                    Hit Count
--------- ----------- ---------------------------------- -------------
     1        Deny     www.cisco.com                            0
     2        Deny     www.nba.com                              0
     3        Deny     www.disney.com                           0
     4        Deny     www.nfl.com                              0
     5        Deny     www.united.com                           0
     6      Permit     *                                        0
|
| Step 4 | Verify the
ACL has been applied. The Applied status field for the
BLOCK-HTTP-SITES ACL will change from
No to
Yes.
(Cisco Controller) > show acl url-acl summary URL ACL Feature Enabled ACL Counter Status Disabled ---------------------------------------- URL ACL Name Applied --------------- ------- BLOCK-HTTP-SITES Yes ALLOW-HTTP-SITES No |
Rules–Whitelisting Example
The following configuration steps demonstrate how to use rules to only permit access to specific HTTP URLs (commonly referred to as whitelisting). In this example an ordered list of URLs is defined with a permit action to allow access to specific requested HTTP based URLs. As the ACL has an implied deny, access to all other requested HTTP URLs will be blocked.
Rules Whitelisting using GUI
To enable rules whitelisting using GUI, perform the following steps:
| Step 1 | From the WLC
main menu choose
SECURITY >
Access Control Lists > URL ACLs. Click on the
URL ACL
Name to add rules.
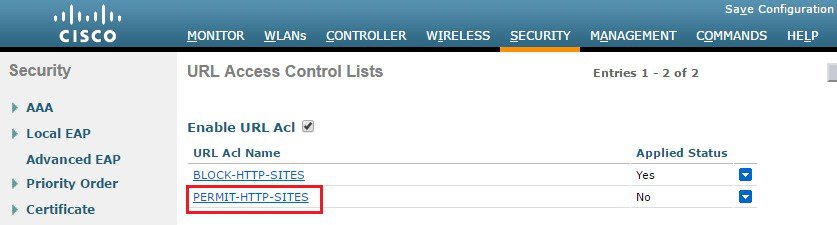 |
| Step 2 | Click
Add New
Rule.
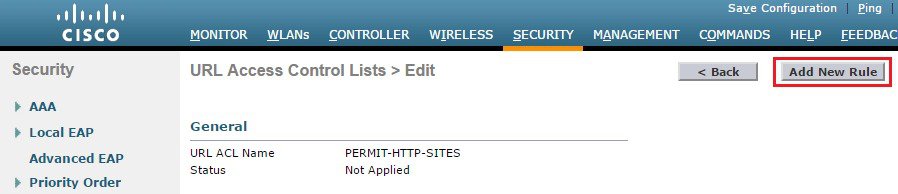
|
| Step 3 | Enter a
Rule Index
then define a
URL to
match and
Action. In
this example the URL
www.cisco.com has been defined as the first rule with the
action set to
Permit.
Click
Apply. Add
additional
Permit
rules as required.
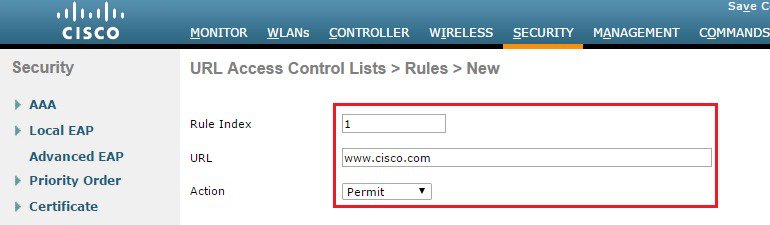 |
| Step 4 | Verify your
rules are correct then click
Apply All.
The
Status
field changes from
Not
Applied to
Applied.
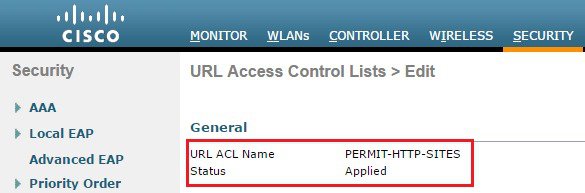 |
Rules Whitelisting using CLI
To enable rules whitelisting using CLI, perform the following steps:
| Step 1 | Create rules
for the ACL named
ALLOW-HTTP-SITES.
(Cisco Controller) > config acl url-acl rule add ALLOW-HTTP-SITES 1 (Cisco Controller) > config acl url-acl rule url ALLOW-HTTP-SITES 1 www.cisco.local (Cisco Controller) > config acl url-acl rule action ALLOW-HTTP-SITES 1 permit |
| Step 2 | Apply the
ACL.
(Cisco Controller) > config acl url-acl apply ALLOW-HTTP-SITES |
| Step 3 | Verify the
ACL rules
(Cisco Controller) > show acl url-acl detailed ALLOW-HTTP-SITES
RuleIndex   Action                  URL                    Hit Count
--------- ----------- ---------------------------------- -------------
     1      Permit     www.cisco.com                            0
|
| Step 4 | Verify the
ACL has been applied. The Applied status field for the
ALLOW-HTTP-SITES ACL will change from
No to
Yes.
(Cisco Controller) > show acl url-acl summary
URL ACL Feature                  Enabled
ACL Counter Status               Disabled
----------------------------------------
URL ACL Name       Applied
---------------    -------
BLOCK-HTTP-SITES     Yes
ALLOW-HTTP-SITES     Yes
|
Enabling Hit Counters
Hit counters can be optionally enabled to monitor the number of rule hits for each URL ACL. Hit counters are useful for troubleshooting ACLs as the counters are incremented by one as each rule is matched. The following step demonstrates how to globally enable ACL hit counters on a WLC.
Enabling Hit Counters using GUI
To enable hit counters using GUI, perform the following steps:
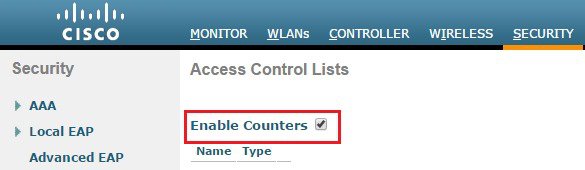
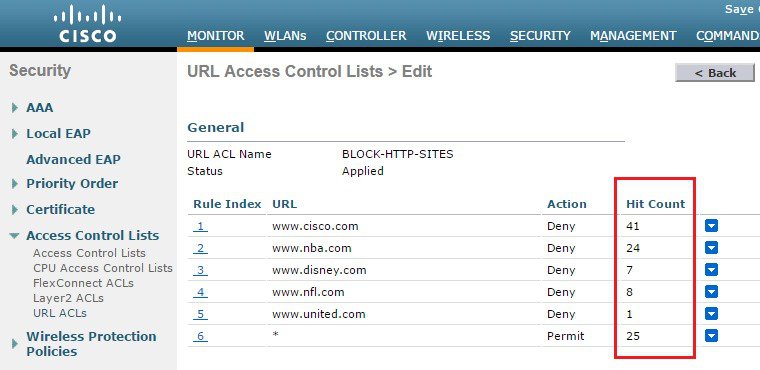
Enabling Hit Counters using CLI
To enable hit counters using CLI, perform the following steps:
| Step 1 | Globally
enable ACL Hit Counters.
(Cisco Controller) > config acl counter start |
| Step 2 | Verify
enablement. The
ACL Counter
Status field changes from
Disabled
to
Enabled.
(Cisco Controller) > show acl url-acl summary URL ACL Feature Enabled ACL Counter Status Enabled ---------------------------------------- URL ACL Name Applied --------------- ------- BLOCK-HTTP-SITES Yes ALLOW-HTTP-SITES Yes |
| Step 3 | View the Hit
Counters for a specific ACL. In this example the Hit Count for the ACL named
BLOCK-HTTP-SITES is displayed.
(Cisco Controller) > show acl url-acl detailed BLOCK-HTTP-SITES
RuleIndex   Action                  URL                    Hit Count
--------- ----------- ---------------------------------- -------------
     1        Deny     www.cisco.com                            41
     2        Deny     www.nba.com                              24
     3        Deny     www.disney.com                           7
     4        Deny     www.nfl.com                              8
     5        Deny     www.united.com                           1
     6      Permit     *                                        25
|
Applying Access Control Lists
URL ACLs can be assigned dynamically to clients using Local Policies or directly to WLANs or Interfaces:
-
Local Policy–The URL ACL is applied to all clients assigned the Local Policy. URL ACLs assigned using Local Policies have the highest priority and will override URL ACLs assigned to the WLAN or Interface.
-
WLANs – The URL ACL is applied to all clients associated to the WLAN (unless a URL ACL is assigned to a client using a Local Policy). URL ACLs assigned to a WLAN will override a URL ACL assigned to an Interface.
-
Interfaces – The URL ACL is applied to all traffic forwarded specific interface.
The following steps demonstrate how to assign URL ACLs on a WLC to WLANs, Interfaces and Local Policies.
WLANs
Accessing WLANs using GUI
To access WLANs using GUI, perform the following steps:
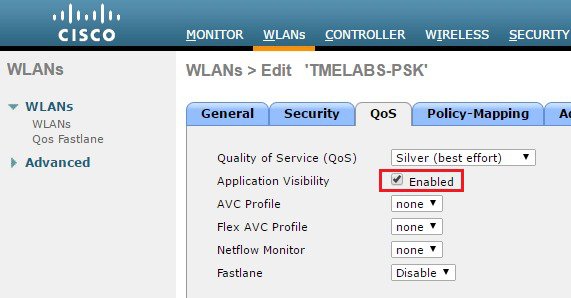
| Step 1 | From the WLC
main menu chooseWLANs >
WLANs. Select a
WLAN ID to
modify the access to the
QoS tab.
Verify
Application
Visibility is enabled.
 | ||
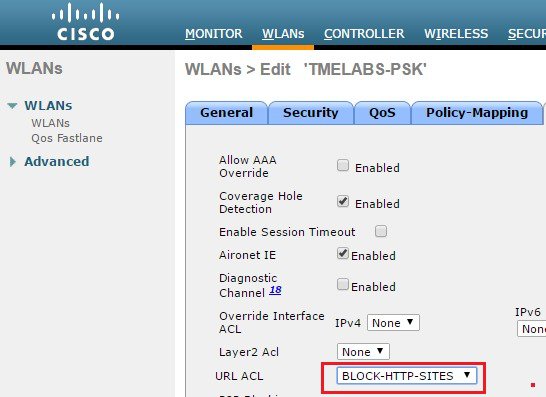
| Step 2 | Access the
Advanced
Tab then assign the desired
URL ACL.
Click
Apply.
|
Accessing WLANs using CLI
To access WLANs using CLI, perform the following steps:
| Step 1 | Disable the
target WLAN. In this example WLAN id
1 is
disabled. The WLC does not allow you to assign the ACL if the target WLAN is
enabled.
(Cisco Controller) > config wlan disable 1
| ||
| Step 2 | Assign the
URL ACL to the WLAN. In this example the ACL named
BLOCK-HTTP-SITES is assigned to WLAN
1.
(Cisco Controller) > config wlan url-acl 1 BLOCK-HTTP-SITES
| ||
| Step 3 | Re-enable the
disabled WLAN.
(Cisco Controller) > config wlan enable 1
| ||
| Step 4 | Verify the
ACL assignment. If no ACL has been assigned to the WLAN, the
WLAN URL
ACL field will show
unconfigured.
(Cisco Controller) > show wlan 1
WLAN Identifier.................................. 1
Profile Name..................................... TMELABS-PSK
Network Name (SSID).............................. TMELABS-PSK
Status........................................... Enabled
MAC Filtering.................................... Disabled
!
! Output Suppressed
!
WLAN Layer2 ACL.................................. unconfigured
WLAN URL ACL..................................... BLOCK-HTTP-SITES
mDNS Status...................................... Enabled
!
|
Interfaces
Interfaces using GUI
To access interfaces using GUI, perform the following steps:
 |
Interfaces using CLI
To access interfaces using CLI, perform the following steps:
| Step 1 | Disable the
WLANs using the target Interface. In this example WLAN id
3 is
mapping clients
vlan25.
The WLC does not allow you to assign the ACL to an Interface if there are any
active WLANs using the interface.
(Cisco Controller) > config wlan disable 3 | ||
| Step 2 | Assign the
URL ACL to the WLAN. In this example the ACL named
BLOCK-HTTP-SITES is assigned to WLAN
1.
(Cisco Controller) > config interface url-acl vlan25 BLOCK-HTTP-SITES
| ||
| Step 3 | Re-enable the
disabled WLAN.
(Cisco Controller) > config wlan enable 3
| ||
| Step 4 | Verify the
ACL assignment. Note if no ACL has been is assigned to the Interface, the
WLAN URL
ACL field will show
unconfigured.
(Cisco Controller) > show interface detailed vlan25
Interface Name................................... vlan25
MAC Address...................................... 4c:00:82:71:4f:af
IP Address....................................... 192.168.25.22
IP Netmask....................................... 255.255.255.0
IP Gateway....................................... 192.168.25.1
!
! Output Suppressed
!
IPv4 ACL......................................... Unconfigured
URL ACL.......................................... BLOCK-HTTP-SITES
!
|
Local Policies
Local Policies using GUI
To access local policies using GUI, perform the following steps:

|
Local Policies using CLI
To access local policies using CLI, perform the following steps:
| Step 1 | Assign the
ACL to the target Local Policy. In this example the ACL named
BLOCK-HTTP-SITES is assigned to a Local Policy named
STUDENTS.
(Cisco Controller) > config policy STUDENTS action url-acl enable BLOCK-HTTP-SITES
| ||
| Step 2 | Verify the
ACL assignment.
(Cisco Controller) > config interface url-acl vlan25 BLOCK-HTTP-SITES
| ||
| Step 3 | Re-enable the
disabled WLAN.
(Cisco Controller) > config wlan enable 3 | ||
| Step 4 | Verify the
ACL assignment. Note if no ACL has been assigned to the Local Policy, the
URL ACL
field will show
<none>.
(Cisco Controller) > show POLICY STUDENTS
Policy Index..................................... 1
Match Role....................................... STUDENTS
Match Eap Type................................... <none>
IPv4 ACL......................................... <none>
URL ACL.......................................... BLOCK-HTTP-SITES
FlexConnect Client ACL........................... <none>
QOS.............................................. BRONZE
!
! Output Suppressed
!
|
 Feedback