Migration
Upgrade Dial Plan Model 8.1(x) to 8.1(4)
 Note | If model migration cannot be completed in a single maintenance window for all the locations within a cluster, then no new 8.1(4) model features should be provisioned until all the locations within a cluster have been migrated; otherwise, this will lead to inconsistencies in provisioning and operations between locations, and potential call routing errors that will impact end user service. The subsequent model migration maintenance windows should be scheduled as soon as possible, to fully complete the model migration for the remaining locations within a cluster. |
| Step 1 | Obtain 8.1(4) Dial Plan Model. See Load the Dial Plan Model. |
| Step 2 | Back up Cisco Unified Communications Domain Manager 8.1(x). |
| Step 3 | Back up each Cisco Unified Communications Manager. See Cisco Hosted Collaboration Solution, Release 10.6(1) Maintain and Operate Guide. |
| Step 4 | Determine customizations to the Model, if any. Update Model. |
| Step 5 | Ensure that Bulk Loaders are available (if applicable). Download the Bulk Loaders from http://software.cisco.com/download/navigator.html?mdfid. To locate the files for this release, navigate as follows: Downloads Home > Cisco Products > Unified Communications > Call Control > Hosted Collaboration > Cisco Hosted Collaboration Solution (HCS) > Cisco Hosted Collaboration Solution Version 10.0 > Unified Communications Domain Manager (CUCDM) Bulk Loaders. |
| Step 6 | Load the new Cisco Unified Communications Domain Manager Dial Plan Model. |
| Step 7 | Run InitlPPBX command for Cisco Unified Communications Manager that is to be migrated, to apply any new or modified CSSs and Partitions at a cluster level. |
| Step 8 | Use the Dial Plan Migration (dpmig) Tool to extract site information. Verify the Site Summary information and make any adjustments if required. See Extract Data from Cisco Unified CDM and Collect Information Using the dpmig Tool. |
| Step 9 | Use the dpmig Tool to compare the Cisco Unified Communications Manager with the previous Dial Plan Model. This step identifies any customizations that might have been done to the Model. See Audit the Dial Plan Using the dpmig Tool. |
| Step 10 | Use the dpmig Tool (Generate command) to generate a Migration Report based on the 8.1(4) Dial Plan Model. This report is a delta file between what is provisioned in the Cisco Unified Communications Manager and what should have been provisioned to the Cisco Unified Communications Manager. The report is generated based on the Site Summary and the new Dial Plan Model. See Verify and Edit the Dial Plan Using the dpmig Tool. Make adjustments if required to the Migration Report. |
| Step 11 | Migrate the Dial Plan Using the dpmig Tool. |
| Step 12 | Perform MACD operations to verify model migration. |
| Step 13 | Perform PGW model migration, if required. |
Load the Dial Plan Model
Base data and dial plan models are Excel spreadsheets that you upload to Unified Communications Domain Manager. The model files:
-
Define Unified Communications Domain Manager call behavior.
-
Contain domain-specific configuration objects, such as Unified Communications Manager route patterns, partitions, route filters, calling search spaces (CSS) and PGW MML commands.
-
Are generally spread over multiple device-specific files. For example, the Unified Communications Manager model and PGW model are two different files.
-
May depend on other model files, and the wrong upload sequence can cause errors.
Cisco Unified Communications Domain Manager requires the model packages delivered with the solution to be uploaded into the system. Unified Communications Domain Manager will construct various tables in its database from the model templates and call on the data according to the transactions running on the system.
-
Generic Dial Plan (G1) (site code + extension): All directory numbers, voicemail pilots, and mailbox numbers follow the site location code + extension format.
-
Flat Dial Plan (G2) (extension only): Consists of flat 4- to 11-digit dialing across all locations and supports unique directory number assignment across locations.
-
Shared Instance Dial Plan (G3) (extension only): Based on the Flat Dial Plan (G2) and modified to support customer-specific dialing and routing in deployments that use Shared Instance.
The procedure that follows provides instructions for loading all types of dial plans. By default, you can load the base data, and USA and United Kingdom dial plan model files (for North America and Great Britain, respectively). If you are a service provider with a customer in another country, you must also download the country-specific dial plan model file. For example, if all your customers are in Italy, you may choose to load the Country Dial Plan for Italy only. If a country-specific dial plan model file does not exist for the country, you can download a dial plan model file for a country that has a similar dial plan, and then customize it.
Note | If a new country dial plan is required, contact your Cisco representative for assistance. |
After you load a country dial plan you are able to go back, if desired, by loading the previous model or models. But if you migrated any customers to the new dial plan, you cannot go back without some manual intervention. In this case, you restore the Cisco Unified Communications Manager from the version that was saved before the migration, and then load the older dial plan back on Cisco Unified Communications Domain Manager.
Consult the latest versions of the following documents: Cisco Hosted Collaboration Solution, Release 10.6(1) End-User Provisioning Guide and Cisco Unified Communications Domain Manager Documentation for Cisco HCS, available at http://www.cisco.com/en/US/partner/products/ps11363/prod_maintenance_guides_list.html.
| Step 1 | Download the
base data and country dial plan model file package from the
http://software.cisco.com/download/navigator.html?i=!mmd. To locate the package files
for this release, navigate as follows:
Downloads Home>Cisco Products>Unified
Communications>Call Control>Hosted Collaboration>Cisco Hosted
Collaboration Solution (HCS)>Cisco Hosted Collaboration Solution Version
N.N.N>Cisco Unified Communications Domain Manager (CUCDM) Dial
Plans.
Select the zip file for the Dial Plan Model you want to install. The final package you use will depend on the following criteria: | ||||||
| Step 2 | Schedule a new
Bulk Loader job and load the following files:
| ||||||
| Step 3 | Schedule a new
Model Loader job and load the following network component model files:
| ||||||
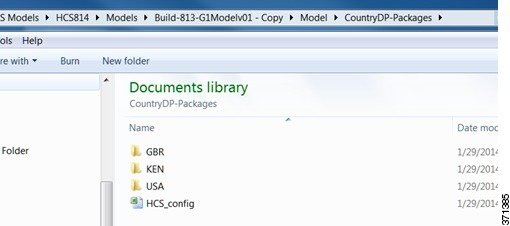
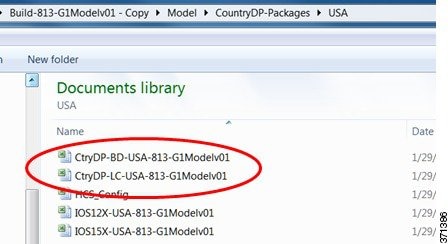
| Step 4 | Load the
country-specific Dial Plan files you downloaded in Step 1, into the
CountryDP-Packages directory. Repeat Steps 4 and 5 as required to load all the
country dial plans.
| ||||||
| Step 5 | Schedule a
new Model Loader job and perform one of the following tasks:
| ||||||
| Step 6 | Check log files for errors. | ||||||
| Step 7 | Continue with call testing. |
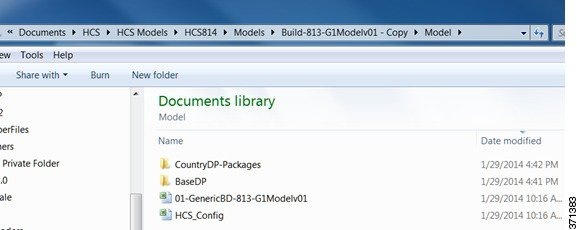
Base Data
The Base Data directory consists of two files:
The Base Data files are loaded using the Bulk Loader in Unified Communications Domain Manager.
Note | Be sure that you are using the latest Bulk Loader files. Download the base data from http://software.cisco.com/download/navigator.html?mdfid. To locate the latest files for this release, navigate as follows: Downloads Home > Cisco Products > Unified Communications > Call Control > Hosted Collaboration > Cisco Hosted Collaboration Solution (HCS) > Cisco Hosted Collaboration Solution Version 10.0 > Unified Communications Domain Manager (CUCDM) Bulk Loaders>. |
When you load new base data, existing base data is not overwritten.
Base Data Models
Note | For country dial plan specific base data, please refer to Cisco HCS Country Dial Plans. |
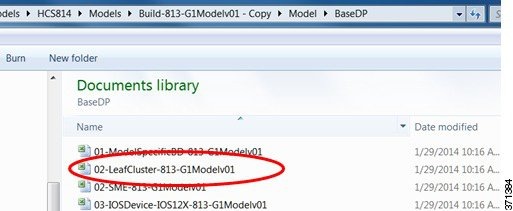
Network Component Models
Using the Dial Plan Model Migration Tool
Use the Cisco HCS Dial Plan Model Migration Tool (dpmig tool) to migrate a Cisco Unified Communications Domain Manager-based Cisco Unified Communications Manager from any 8.(x) version of the Dial Plan model to the latest Cisco Unified Communications Domain Manager 8.1(x) Dial Plan model.
All calls handled by Cisco Unified Communications Manager (Cisco Unified Communications Manager) are controlled by the Dial Plan rules that you implement by configuring the following elements:
- Route Partitions
- Calling Search Spaces (CSS)
- Translation patterns
- Route patterns
- Calling transformation patterns
Each element can be customer-specific, country-specific, or location-specific (site). The generic template definition of these elements is published in a standard format in a base Dial Plan worksheet and the country-specific Dial Plan worksheet.
When a new Dial Plan model is loaded on Cisco Unified Communications Domain Manager, the system automatically updates some of the tables in the Unified CM when InitIPPBX is performed. Only the elements related to the following transactions are updated:
To update the remaining Cisco Unified Communications Manager elements to match the newer Dial Plan model, apply the difference between the old model and the new model to Cisco Unified Communications Manager. This process is referred to as Model Migration.
The Cisco Unified Communications Domain Manager Migration Tool supports Add, Update, or Delete operations for translation patterns, route patterns and transformation patterns. The Migration worksheet specifies all the transactions that can be automated using the Migration Tool. All remaining elements must be manually updated on Cisco Unified Communications Manager. The manual process of migrating the Dial Plan Model can be difficult and error-prone.
To simplify the model migration and to minimize manual intervention, use the automated Dial Plan Model Migration (dpmig) Tool. Obtain the latest version of the dpmig Tool from https://software.cisco.com/download/type.html?mdfid=286281672&flowid=73042 by selecting HCS Utilities, and the Dial_Plan_Migration_Tool-vx.x.zip file (where x.x is the tool version number).
The Dial Plan Migrator dpmig.jar is platform independent and requires only the Java Runtime Environment Version 1.7.0_45 or later.
The dpmig tool is supported on Apple and Microsoft Windows (7.0 and 2003 R2) for all G1, G2, and Shared Instance Dial Plans with Cisco Unified Communications Manager 8.2 or later.
Take the following steps to upgrade the Dial Plan using the dpmig tool:
- Back up Cisco Unified Communications Manager and Cisco Unified Communications Domain Manager.
- Upgrade the Cisco Unified Communications Domain Manager platform.
- Upgrade the Cisco Unified Communications Domain Manager software.
- Upload the new Dial Plan Model (G1, G2, and Shared Instance) on Cisco Unified Communications Domain Manager.
- Extract data from Cisco Unified Communications Domain Manager.
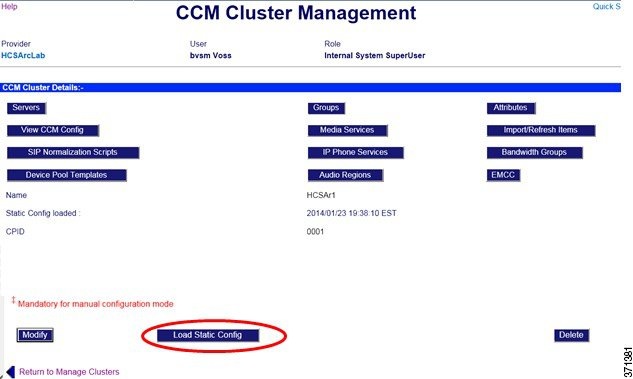
- Load Static Config of Cisco Unified Communications Domain Manager (also referred to as InitlPPBX).
- Migrate the Dial Plan.
- Upgrade Cisco Unified Communications Manager.
- Extract Data from Cisco Unified CDM
- Load Static Config
- Collect Information Using the dpmig Tool
- Audit the Dial Plan Using the dpmig Tool
- Verify and Edit the Dial Plan Using the dpmig Tool
- Migrate the Dial Plan Using the dpmig Tool
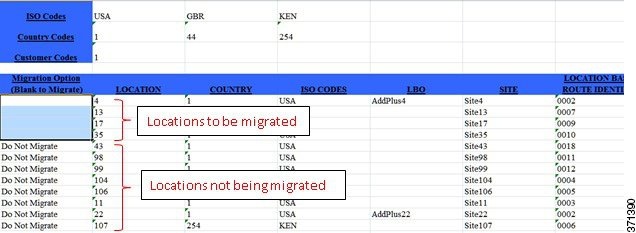
Extract Data from Cisco Unified CDM
Before you migrate the Dial Plan, extract data from Cisco Unified Communications Domain Manager (Unified CDM), such as customer information, location information, country code, and ISO codes. The following procedure extracts location information for all the customer locations, so run it only once during Dial Plan Migration (unless new locations are added before the migration of each Cisco Unified Communications Manager (Unified CM) is completed).
Complete the following before performing this procedure:
- Back up Unified CDM and Unified CM. For more information, see the Cisco Hosted Collaboration Solution, Release 10.6(1) Maintain and Operate Guide.
- Upgrade the Unified CDM platform and software.
- Upload the new Dial Plan Model on Unified CDM.
- Obtain the latest version of the dpmig tool from https://software.cisco.com/download/type.html?mdfid=286281672&flowid=73042 by selecting HCS Utilities, and the Dial_Plan_Migration_Tool-vx.x.zip file (where x.x is the tool version number).
- Back up Unified CM.
- Perform InitIPPBX of Unified CM. See Load Static Config.
What to Do Next
Load Static Config
When you run Load Static Config (InitlPPBX), the Cisco Unified Communications Domain Manager performs the following transactions in the Dial Plan Model:
|
Collect Information Using the dpmig Tool
Perform this procedure to compare the current Cisco Unified Communications Manager (Unified CM) with the existing, preupgrade Cisco Unified Communications Domain Manager (Unified CDM) Dial Plan. The comparison identifies any customizations to Unified CM. This procedure extracts Unified CM cluster information such as customer information, location information, country codes, and ISO codes. This information is specified in the Summary sheet of <file>_collect.xls.
| Step 1 | From the
command line, enter
java -Xmx2g
-jar dpmig<nn>.jar (where <nn> is the version number of the
Migration Tool).
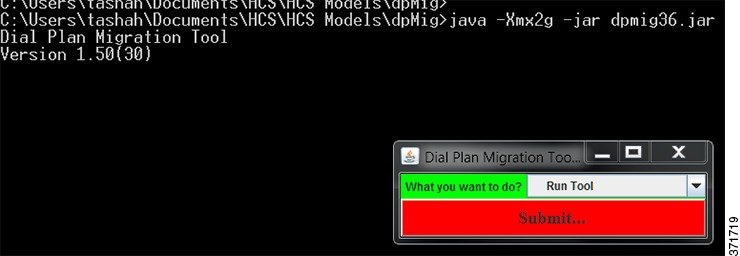 | ||||||||||||||||||||||||||||||||||||||||||||||||
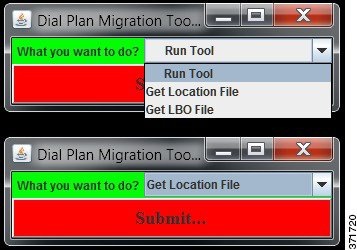
| Step 2 | Click Submit. The Migration Tool displays the Collect operation. | ||||||||||||||||||||||||||||||||||||||||||||||||
| Step 3 | Specify the
Report file prefix (for example, 814v00h) and click
Submit.
 | ||||||||||||||||||||||||||||||||||||||||||||||||
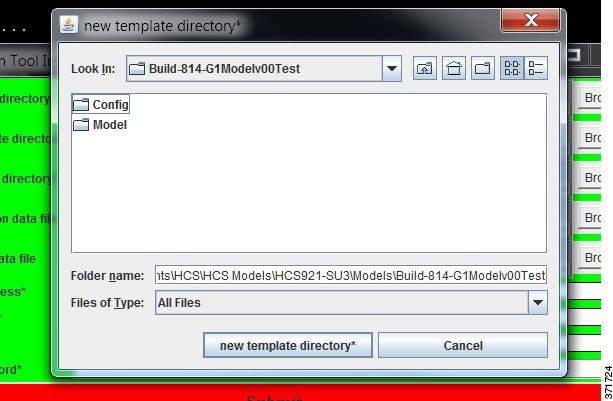
| Step 4 | Click
Yes.
The
Migration Tool displays fields for the active template directory, new template
directory, cucdm location data file, and cucdm LBO data file.
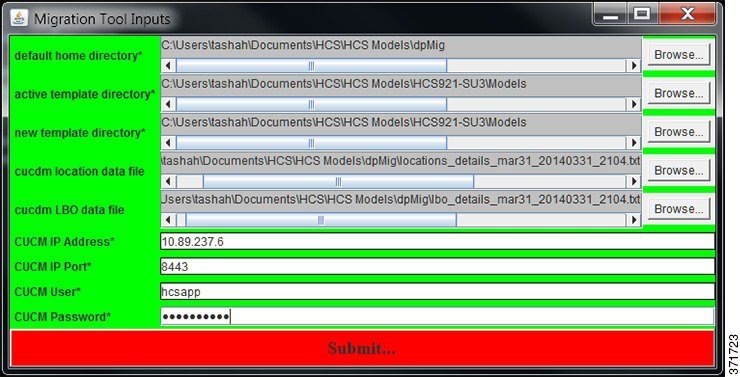 | ||||||||||||||||||||||||||||||||||||||||||||||||
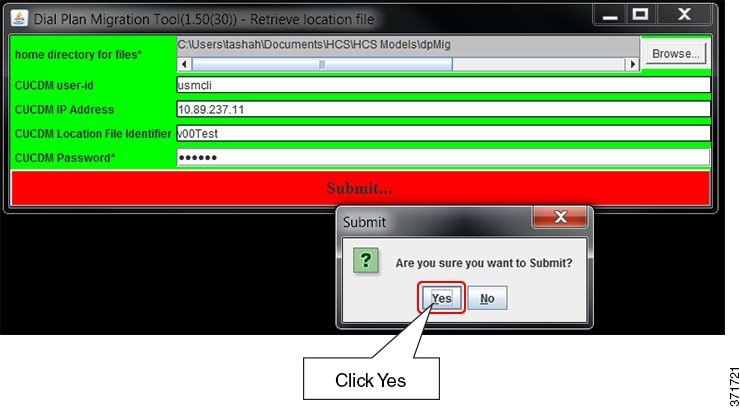
| Step 5 | Click
Browse to locate the following information:
| ||||||||||||||||||||||||||||||||||||||||||||||||
| Step 6 | Enter the Unified CM IP address. | ||||||||||||||||||||||||||||||||||||||||||||||||
| Step 7 | Enter the Unified CM IP Port (default 8443). | ||||||||||||||||||||||||||||||||||||||||||||||||
| Step 8 | Enter the Unified CM username and password. | ||||||||||||||||||||||||||||||||||||||||||||||||
| Step 9 | Click
Submit.
The
following information is generated:
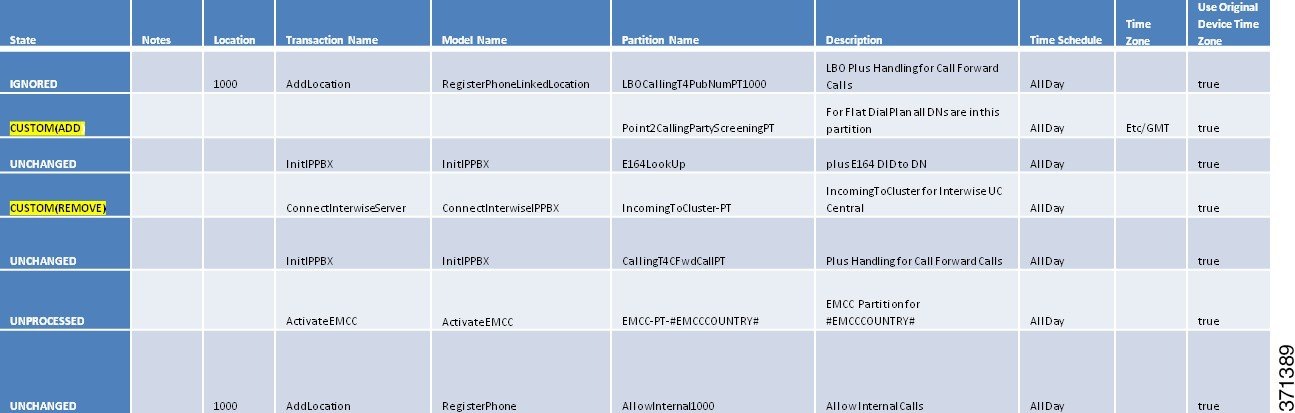
The dpmig tool generates a Summary page as shown in the following figure. Row 9 and all subsequent rows list the locations configured in Unified CM. There is one row for each location (site). Row 2 lists all Transactions in the Dial Plan Model that are ignored by the dpmig tool (see Table 1 ). You can add more transactions to the row, which are then ignored by the tool. Row 3 lists some of the Route Partitions (see Table 2). The dpmig tool ignores all the Translation and Route Patterns associated with these Route Partitions. 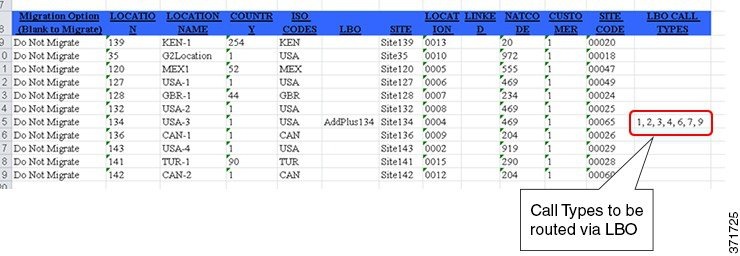
|
What to Do Next
Audit the Dial Plan Using the dpmig Tool
Compare the current Cisco Unified Communications Manager (Unified CM) with the existing, preupgrade Cisco Unified Communications Domain Manager (Unified CDM) Dial Plan. The comparison identifies any customizations to Unified CM.
Note | This procedure is mandatory when upgrading from Cisco HCS Release 8.6(2) and Release 8.6(2)SU1+ to Cisco HCS Release 10.6(1). |
| Step 1 | From the
command line, enter
java -Xmx2g
-jar dpmig<nn>.jar (where <nn> is the version number of the
Migration Tool).
| ||
| Step 2 | Click Submit. | ||
| Step 3 | From the
dropdown menu, select
Audit and enter the same file prefix that you used
in the procedure
Collect Information Using the dpmig Tool.
 | ||
| Step 4 | Click
Submit.
  Each element (row) provides the following information:
| ||
| Step 5 | Review each
sheet of the Route Partitions, Calling Search Spaces, Translation Patterns,
Route Patterns and Calling Transformation Patterns in the
<filename>_audit.xls file. A mismatch between Unified
CM and the preupgrade Dial Plan Model appears as one of the following:
|
What to Do Next
Perform manual migration steps. See Verify and Edit the Dial Plan Using the dpmig Tool.
Verify and Edit the Dial Plan Using the dpmig Tool
Review the <filename>_audit.xls file and perform any necessary changes before migrating the Dial Plan.
Complete Audit the Dial Plan Using the dpmig Tool.
Migrate the Dial Plan Using the dpmig Tool
Use the Dial Plan Model Migration Tool to read the records from the <filename>_generate.xls file and apply the changes to the Cisco Unified Communications Manager.
ADD and UPDATE operations are performed in the following order: Route Partitions > Calling Search Spaces > Translation Pattern > Route Patterns > Calling Transformation Patterns.
For the REMOVE operation, the order is reversed: Calling Transformation Patterns > Route Patterns > Translation Pattern > Calling Search Spaces > Route Partitions.
Note | Initially, migrate a few locations to verify the call flows based on the new model. When you are satisfied with the results, you can migrate the remaining locations. |
Note | When you are not migrating all locations, ensure that you do not remove any partitions or CSSs (location agnostic) that may be required for the locations that are not being migrated.
|
| Step 1 | From the
command line, enter
java -Xmx2g
-jar dpmig<nn>.jar (where <nn> is the version number of the
Migration Tool).
|
| Step 2 | Click Submit. |
| Step 3 | From the dropdown menu, select Migrate. |
| Step 4 | Click
Submit.
This
command updates the Dial Plan by processing only those records from the
<filename>_generate.xls with a state of ADD, UPDATE,
or REMOVE. When successful, the state changes to Processed(ADD),
Processed(UPDATE), and Processed(REMOVE). If a transaction fails, the state of
the transaction is not updated.
<filename>_migrate.xls is generated. An error message
is displayed in the Note column.
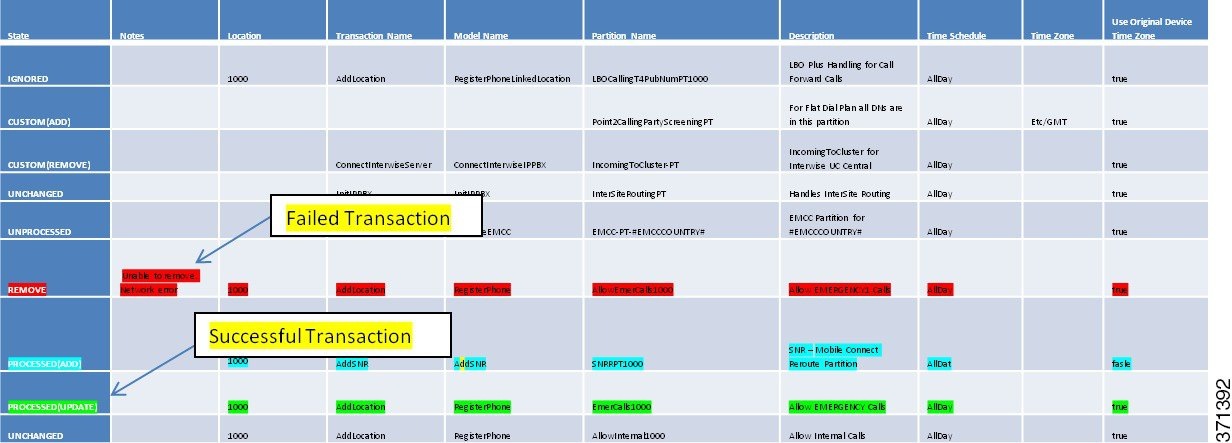
If more locations are to be migrated, then rename the file to file_generate.xls, identify the locations to be migrated, and re-run the migration step until all locations have been migrated. After all locations are migrated, modify the location agnostic transaction from #REMOVE to REMOVE to remove the location agnostic elements. |
| Step 5 | Review
<filename>_migrate.xls for records with the following
states: ADD, UPDATE, and REMOVE. Any files that were not updated can be
manually corrected in the
Cisco Unified
Communications Manager
or updated in the
<filename>_migrate.xls report file and then saved as<filename>_generate.xls. Repeat this procedure if
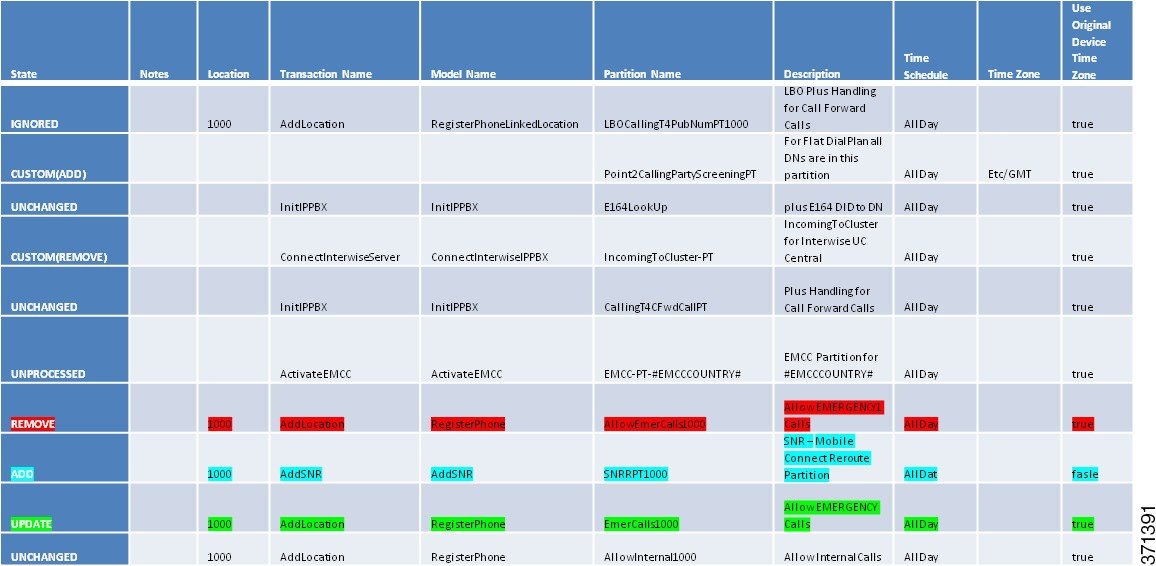
needed. A sample of the Migration Report is shown in the following figure.
 |
| Step 6 | Perform tests to ensure that there is no impact to the behavior of Cisco Unified Communications Domain Manager 8.1(x) model-related base release-set features for customers. To test functionality, place actual calls using the system, or use the Dialed Number Analyzer Tool. For more information on the Dialed Number Analyzer Tool, see http://www.cisco.com/c/en/us/support/unified-communications/unified-communications-manager-callmanager/products-maintenance-guides-list.html. |
| Step 7 | If errors are detected during the validation phase after using the dpmig Tool, you can change the transaction state and any of its attributes in the report to reapply the transaction on the Cisco Unified Communications Manager. For example, an ADD transaction can be REMOVED or UPDATED and changes can be processed. At any point if full fallback is required, use the backed-up version of Cisco Unified Communications Domain Manager 8.1(x)) and Cisco Unified Communications Manager to restore the original version of the Dial Plan model. |
 Feedback