Optional Configuration Tasks

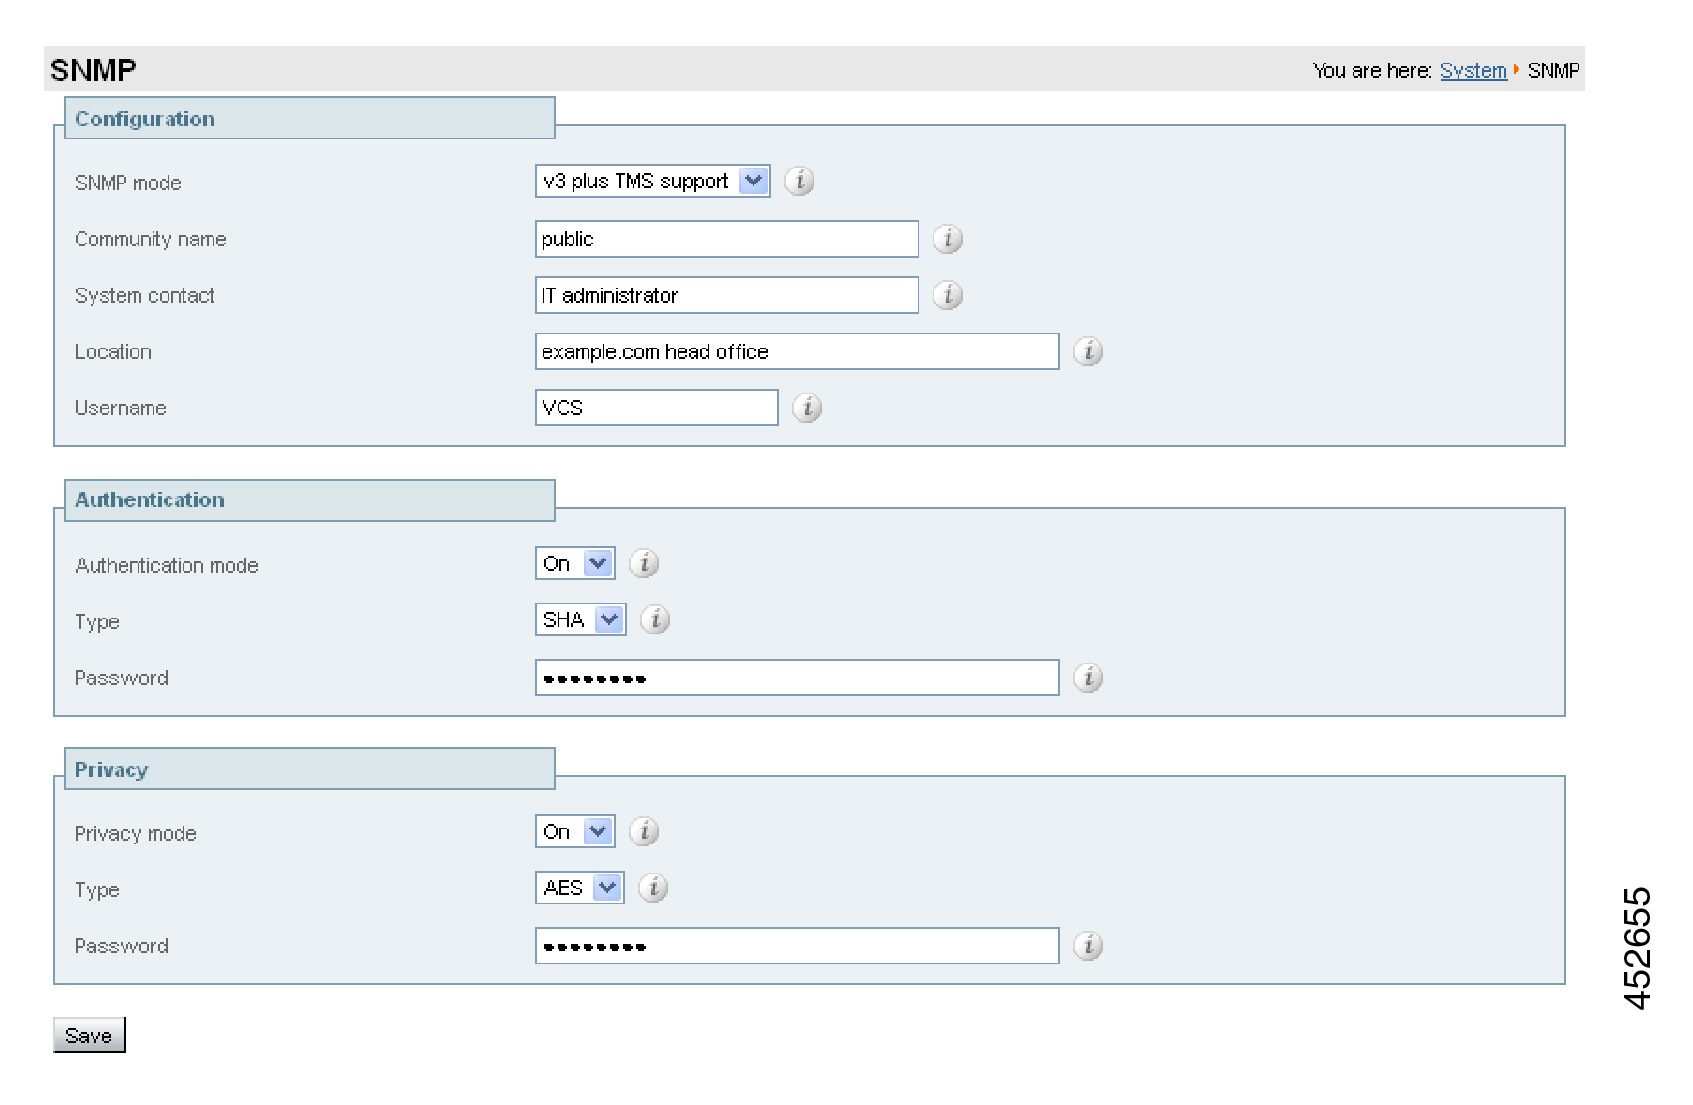
Task 15: Configuring Routes to a Neighbor Zone (Optional)

You can optionally set up neighbor zones and associated search rules on the Expressway-C to route calls to other systems. To another Expressway for example, or to a Cisco VCS, Cisco Meeting Server, or Unified CM.

Example: Cisco VCS Neighbor Zone

This example assumes that you want to route calls toward devices that are registered to a Cisco VCS. The devices have an address (destination alias) in the format < <alias>@vcs.domain>.


Note

You may need more rules or transforms if any H.323 devices have registered E.164 numbers or H.323 IDs without a domain portion.


To Configure a Neighbor Zone to the Cisco VCS:

Procedure

Step 1

Go to Configuration > Zones > Zones.

Step 2

Click New.

Step 3

Configure the fields as follows, and leave all other fields with their default values:

Expressway-C

Expressway-E

Name

Enter Neighbor zone to VCS

Not applicable

Type

Neighbor

H.323 Mode

On

H.323 Port

Enter 1719

SIP Mode

On

SIP Port

Enter 5061

SIP Transport

TCP

Location Peer 1 address

Enter the address of the Cisco VCS neighbor system

Step 4

Click Create zone.


To Configure the Search Rule to Route Calls to the Cisco VCS:

Procedure

Step 1

Go to Configuration > Dial plan > Search rules.

Step 2

Click New.

Step 3

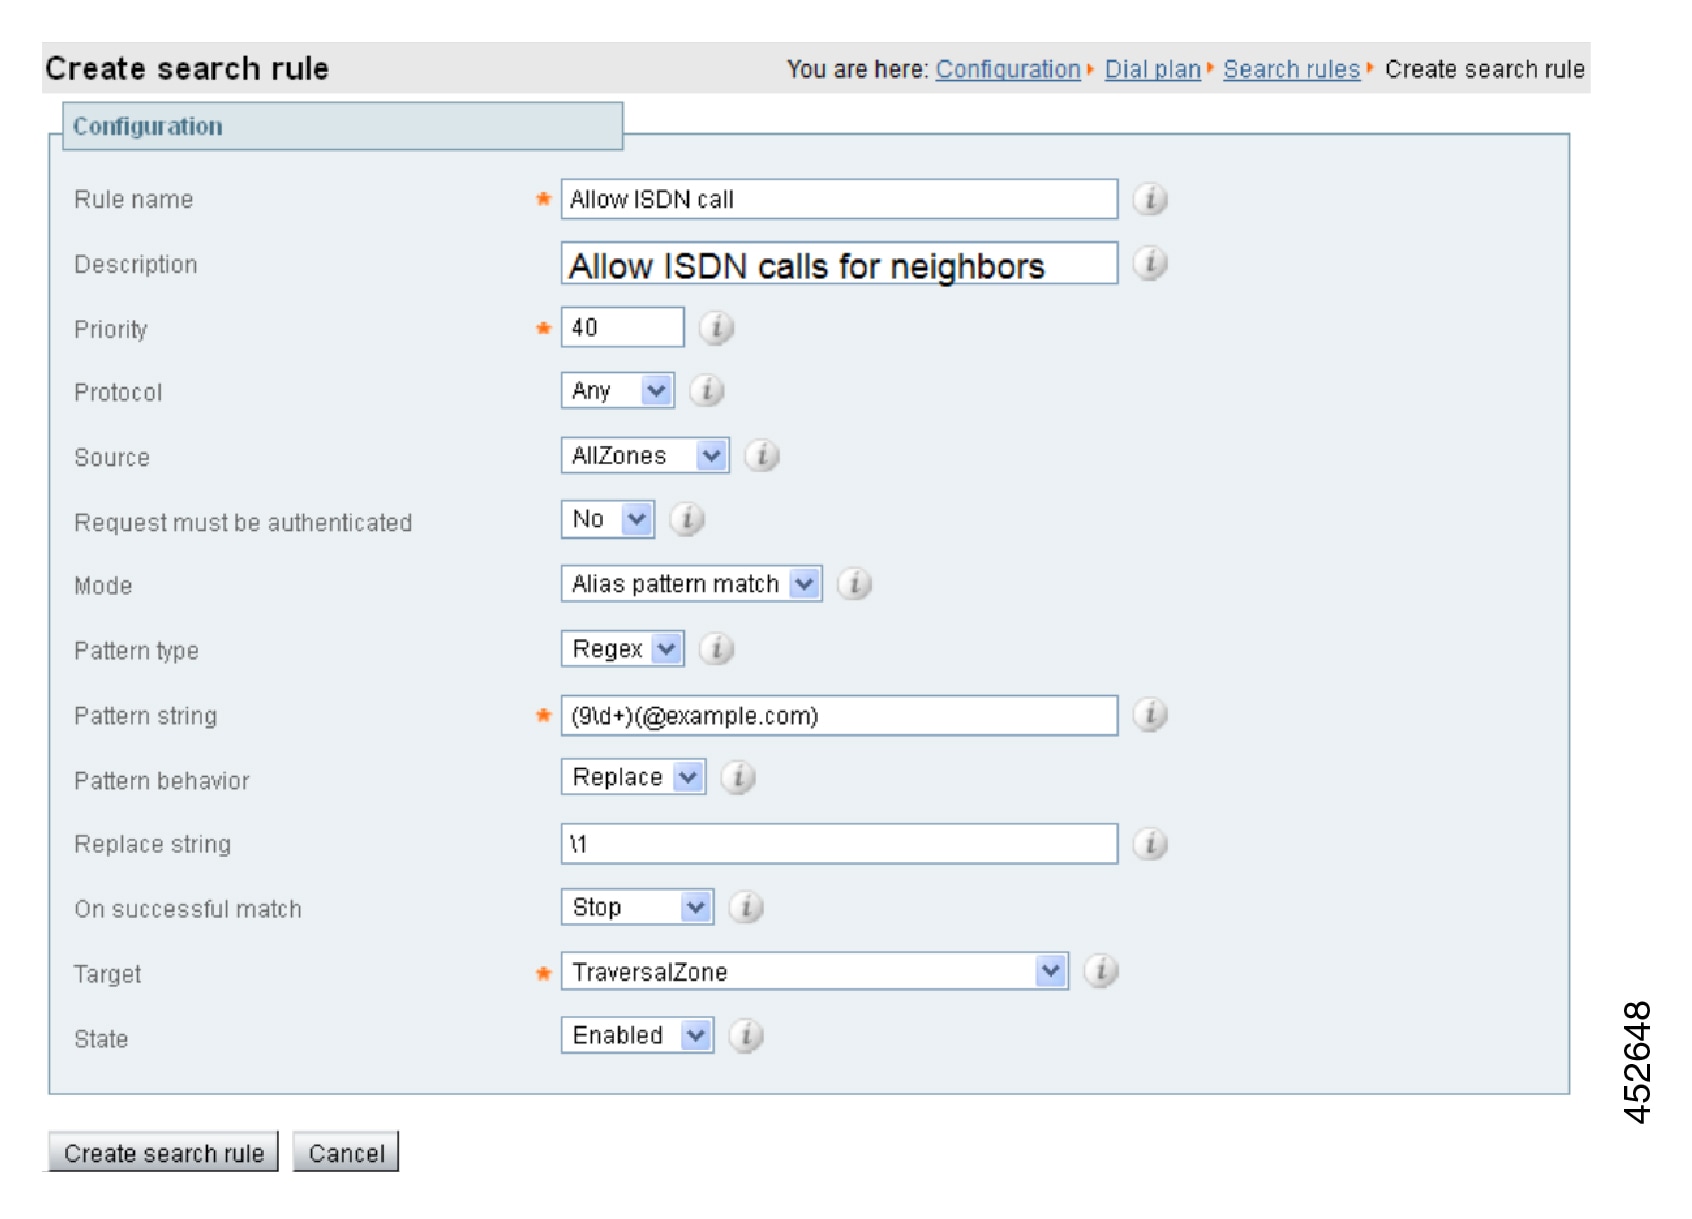
Configure the search rule fields as follows:

Expressway-C

Expressway-E

Rule name

Enter Route to VCS

Not applicable

Description

Enter Search VCS neighbor zone

Priority

Enter 100

Protocol

Any

Source

Any

Request must be authenticated

No

Mode

Alias pattern match

Pattern type

Suffix

Pattern string

Enter @vcs.domain

Pattern behavior

Leave

On successful match

Continue

Target

Neighbor zone to VCS

State

Enabled

Step 4

Click Create search rule.


Task 16: Configuring Cisco TMS (Optional)

The following configuration enables the Expressway system to be integrated to a Cisco TelePresence Management Suite (Cisco TMS).

Points to note:

  • Further configuration tasks are also required on Cisco TMS to fully integrate the Expressway with the TMS server. For details, see Cisco TMS Administrator Guide on the TMS Maintain and Operate Guides page.

  • Enabling SNMP speeds up the Expressway - TMS integration process, but is not essential.

  • Expressway-E integration with TMS requires additional firewall / NAT configuration. Expressway-E needs to access port 80/443 on Cisco TMS from outside the firewall. See Appendix 3: Firewall and NAT Settings.

To Enable and Configure SNMP:

Procedure


Step 1

Go to System > SNMP.

Step 2

Configure the SNMP fields as follows:

Expressway-C

Expressway-E

SNMP mode

v3 plus TMS support

Same as Expressway-C

Community name

Check that it is public

System contact

Enter IT administrator

Location

Enter example.com head office

Username

Enter VCS

Authentication mode

On

Type

SHA

Password

Enter ex4mpl3.c0m

Privacy mode

On

Type

AES

Password

Enter ex4mpl3.c0m

Step 3

Click Save.


To Configure the Necessary External Manager (Cisco TMS) Parameters:

Procedure


Step 1

Go to System > External manager.

Step 2

Configure the fields as follows:

Expressway-C

Expressway-E

Address

Enter 10.0.0.14

Same as Expressway-C

Path

Enter tms/public/external/management/

SystemManagementService.asmx

Protocol

Select HTTP or HTTPS

Certificate verification mode

Select On or Off

The certificate is only verified if the value is On and the protocol is set to HTTPS. If you switch this on then Cisco TMS and Expressway must have appropriate certificates.

Step 3

Click Save.


Task 17: Configuring Logging (Optional)

The following configuration enables event logs to be sent to an external logging server using the SYSLOG protocol.

  • The Local event log verbosity setting controls the granularity of event logging. 1 is the least verbose, 4 the most.

  • We recommend a minimum level of 2. This provides both system and basic signaling message logging.

The Expressway-E needs further firewall / NAT configuration for external logging. See Appendix 3: Firewall and NAT Settings for details.

To Configure a Logging Server:

Procedure


Step 1

Go to Maintenance > Logging.

Step 2

Configure the fields as follows:

Expressway-C

Expressway-E

Local event log verbosity

2

2

Remote syslog server 1: Address

Enter 10.0.0.13

Enter 10.0.0.13

Remote syslog server 1: Message Format

IETF syslog format

IETF syslog format

Step 3

Click Save.


Task 18: Configuring Registration Restriction Policy (Optional)

You can limit the aliases that endpoints can register, using either an Allow list or a Deny list. This is an example of how to configure Allow list registration restrictions:

To Configure Allow List Registration Restrictions:

Procedure


Step 1

Go to Configuration > Registration > Allow List.

Step 2

Click New.

Step 3

Create an allow pattern by configuring the following fields. This example limits registrations to endpoints which register with an identity that contains "@example.com".

Expressway-C

Description

Enter Only allow registrations containing “@example.com”

Pattern type

Regex

Pattern string

Enter .*@example\.com

Step 4

Click Add Allow List pattern.


To Activate the Registration Restriction:

Procedure


Step 1

Go to Configuration > Registration > Configuration.

Step 2

Configure the Restriction policy as follows:

Expressway-C

Restriction policy

Allow List

Step 3

Click Save.


Task 19: Configuring Device Authentication Policy (Optional)

Authentication policy is applied by the Expressway at the zone and subzone levels. It controls how the Expressway challenges incoming messages (for provisioning, registration, phone books, and calls) from that zone or subzone and whether those messages are rejected, treated as authenticated, or treated as unauthenticated within the Expressway.

Each zone and subzone can set its Authentication policy to Check credentials, Do not check credentials, or Treat as authenticated.

  • Registration authentication is controlled by the Default Subzone configuration (or the relevant alternative subzone).

  • Initial provisioning subscription request authentication is controlled by the Default Zone configuration.

  • Call and phone book request authentication is controlled by the Default Subzone (or relevant alternative subzone) if the endpoint is registered, or by the Default Zone if the endpoint is not registered.

By default, zones and subzones are configured as Do not check credentials.

Using Delegated Credential Checking

If you have enabled device authentication in your network (by using an Authentication policy of Check credentials) and you have remote workers (outside the enterprise) with SIP devices, you should consider enabling delegated credential checking. In summary, this would require you to:

  • Set up a secure traversal zone between the Expressway-E and the Expressway-C.

  • Enable the Expressway-E and the Expressway-C's SIP settings, traversal zones and required SIP domains for delegated credential checking.

  • Configure the Expressway-C with the relevant authentication mechanisms.

This means that remote workers can now register to the Expressway-E (assuming it has its SIP registration proxy mode set to Off) and be authenticated securely via the Expressway-C against an authentication mechanism inside the enterprise.

See Device Authentication on Expressway Deployment Guide for full information on configuring device authentication and delegated credential checking.

Task 20: Configuring Registration by Remote Endpoints (Optional)

This task applies if you want to support registration of remotely located endpoints, such as home workers. To do this, you configure the Expressway-E to proxy incoming remote SIP registration requests on to the Expressway-C. Then, if a proxied request meets any relevant conditions, the Expressway-C registers the requesting endpoint.


Note

Currently we do not support proxy registration by remote H.323 endpoints.


To Configure the Registration by Remote Endpoints

To allow proxy registration by remote SIP endpoints, you configure the Expressway-E protocol settings:

Procedure


Step 1

Go to Configuration > Protocols > SIP.

Step 2

In the Registration Controls section, set "SIP registration proxy mode" according to your security requirements.

We recommend setting it to Proxy to known only, which forwards proxied requests only to known neighbor and traversal server zones.


Task 21: Configuring B2B Federation for Video Calls (Optional)

Description

This section applies if you want to federate voice, video, and content calls with another standards based organization. Federation in this context means to connect users in two or more organizations, using collaboration technologies. In this B2B deployment, it enables users in your organization to call users in a different, known organization. (The target domain and the edge technology of the other organization are known.)

We illustrate an example deployment, the signaling connections, and some sample dial plan rules. The diagrams show Unified CM as the primary standards-based call control agent on-premises, but Expressway could alternatively be the registrar and call control agent. (And the deployment could apply to any third-party, standards-based solution.) For example purposes, this section uses stdsdomain1.com to indicate the external organization, and assumes Expressway-E is at the edge of that domain.

Supported Systems

  • On premises SIP collaboration environments.

  • Call control can be Cisco Unified Communications Manager-centric, or Expressway or third party centric.

  • Cisco collaboration clients in other organizations

Prerequisites

  • Expressway X8.9 or later.

  • (If used - optional) Cisco Unified Communications Manager 10.x or later.

  • DNS. An internal DNS configured with forward and reverse lookups for Expressway-E, Expressway-C.

  • External DNS. An external DNS configured with forward lookup for the Expressway-E cluster FQDN.

  • NTP. All servers must be internally synchronized to the same time source.

  • Basic configuration. We assume that the Expressway traversal pair is installed, and basic configuration is done. Including certificate creation and install, and traversal server and client zones. Clustering is optionally supported.

Signaling and Dial Plan

Figure 1. Outbound Call Signaling
Table 1. Sample Outbound Dial Plan Rules

Arrow #

Rule Hosted On

From

Pattern and Logic

To

1

SIP registrar (this example assumes a Cisco Unified Communications Manager)

This entry does not apply if Expressway is the registrar. In that case, call routing from endpoints registered to Expressway-C (local zone) is covered from source zone "CUCM" in the next entry.

Locally-registered endpoints

SIP route pattern *@stdsdomain1.com

If the registrar is an Expressway or VCS, then On successful match Stop.

Trunk/neighbor zone to Expressway-C

2

Expressway-C

Source zone "CUCM"

Match alias pattern .*@stdsdomain1\.com

On successful match Stop

Traversal client zone

3

Expressway-E

Traversal server zone

Match alias pattern .*@stdsdomain1\.com

On successful match Stop

DNS zone

Figure 2. Inbound Call Signaling
Table 2. Sample Dial Plan Rules for Inbound Call Flow

Arrow #

Rule Hosted

From

Pattern and Logic

To

4

Expressway-E

Default zone

Standards-based SIP variant, and alias pattern .*@ciscoexample\.com

On successful match Stop

Traversal server zone

5

Expressway-C

Traversal client zone

Standards-based SIP variant, and alias pattern .*@ciscoexample\.com

On successful match Stop

Zone to standards-based SIP registrar

If Expressway is the registrar, this rule should instead target the Local Zone.

Using Collaboration Solutions Analyzer

Collaboration Solutions Analyzer is created by Cisco Technical Assistance Center (TAC) to help with deployment validation (and log file analysis). You can use the Business to Business Call Tester component to validate and test calls.


Note

You need a customer or partner account to use Collaboration Solutions Analyzer. Details about using are provided in the Expressway Release Notes.


Configuration Overview


Note

Coexistence with Mobile and Remote Access


If you have B2B federation to Unified CM as well as Mobile and Remote Access (MRA), you must configure the SIP trunk profile to listen on a different port. Unified CM listens on (TCP/TLS) 5060/5061 for line-side communications from MRA endpoints. The trunk you use for B2B traffic must listen on a different TCP or TLS port—if available, we recommend using 5560 for TCP or 5561 for TLS.

Required Elements

The following elements are needed:

  • Expressway-C and Expressway-E, with traversal zones between them.

    Use UC traversal zones if you have MRA on this pair.

  • Neighbor zone to the registrar, unless all endpoints register to Expressway-C.

  • Neighbor zone to Cisco Meeting Server(s) if the deployment uses Meeting Server spaces.

Expressway-E TURN server is not required for this deployment, and Meeting Server is optional.

Process Summary

  1. Expressway-E: Create a DNS zone on Expressway-E. (Configuration > Zones > Zones with type = DNS)

  2. (Not required if Expressway-C is the registrar) Expressway-C: Create a neighbor zone from Expressway-C to the on-premises SIP registrar. (Configuration > Zones > Zones with type = Neighbor)

  3. (Not required if Expressway-C is the registrar) SIP registrar: Trunk/neighbor from the on premises SIP registrar to Expressway-C.

    If the registrar is Unified CM, see Cisco Expressway SIP Trunk to Unified CM Deployment Guide on the Expressway Configuration Guides page.

  4. Create domain-based search rules and a dial plan.

Dial Plan Description

  1. (Not required if Expressway-C is the registrar) CUCM / SIP registrar: Route calls addressed to the federated domain to the Expressway-C.

    CUCM example: create a route pattern for the *@stdsdomain1.com domain.

  2. Expressway-C: Route any calls from the local zone if Expressway-C is the registrar, or from any zone if you have some endpoints registered on Cisco Unified Communications Manager and others on Expressway-C, for pattern .*@stdsdomain1\.com. To the traversal client zone.

  3. Expressway-E: Route any calls from the traversal server zone, for pattern .*@stdsdomain1\.com. To the DNS zone.

  4. Expressway-E: Route any calls from the default zone, for pattern .*@example\.com. To the traversal server zone.

  5. Expressway-C: Route any calls from the traversal client zone, for pattern .*@example\.com. To the registrar neighbor zone.

External DNS Records

The external DNS needs to be configured with the records required for your deployment. This table contains some example records that may apply:

Table 3. DNS Configuration Summary

Purpose

Record type

Example entry

Port

Resolves to target

Resolve Expressway-E cluster FQDN to peer IP addresses

A/AAAA

expe.example.com

Public IP address of one Expressway-E cluster peer.

Create one record for each peer in the Expressway-E cluster (Up to 6 records).

Discover destination for calls to third party standards-based infrastructure domain

(Outside of your control, but needs to be there for federation to succeed)

SRV

_sip._tcp.ciscob2bexample.com.

or

_sips._tcp.ciscob2bexample.com.

5060 or 5061

Public address of standards-based edge server / cluster

Discover user destination for calls from standards-based business to business federation, SIP TCP

SRV

_sip._tcp.example.com.

5060

FQDN of Expressway-E cluster, eg. expe.example.com

Discover user destination for calls from standards-based business to business federation, SIP TLS

SRV

_sips._tcp.example.com.

5061

FQDN of Expressway-E cluster, eg. expe.example.com

Internal DNS Records

If you can split your DNS to give different results internally, then we recommend that you create different records for the following purposes. These records must be resolvable by Expressway-C.

Table 4. DNS Configuration Summary

Purpose

Record type

Example entry

Port

Resolves to

For Expressway-C to resolve the Federation Routing IM/P FQDN of the IM and Presence Service cluster

A

IMP1-public.ciscoexample.com

IP address of the IM and Presence Service publisher

Task 22: Restricting Access to ISDN Gateways (Optional)

We recommend that you restrict unauthorized access to any ISDN gateway resources (also known as toll-fraud prevention). Some methods to achieve this are described here.

In these examples, an ISDN gateway is registered to the Expressway-C with a prefix of 9. And / or it has a neighbor zone specified that routes calls starting with a 9.

Expressway-E

Two search rules are created on the Expressway-E:

  • Both rules have a pattern string that matches calls directed at the ISDN gateway. (In this example calls prefixed with a 9.)

  • The first rule has a Source of All zones. This allows calls from registered endpoints and neighbor zones to pass through to the traversal zone.

  • The second rule is similar to the first rule but has a Source of All. So it includes nonregistered endpoints (which are excluded from the previous rule). They can be stopped by defining the Replace string as "do-not-route-this-call."

  • Both rules stop any further search rules from being looked at (On successful match = Stop).

To Create the Search Rules:

Procedure

Step 1

Go to Configuration > Dial plan > Search rules.

Step 2

Click New.

Step 3

Configure the fields as follows:

Expressway-E

Rule name

Enter Allow ISDN call for example

Description

Enter Allow ISDN calls for registered devices and neighbors

Priority

Enter 40

(these rules must be the highest priority in the search rule configuration)

Protocol

Any

Source

All zones

Request must be authenticated

No

Mode

Alias pattern match

Pattern type

Regex

Pattern string

Enter (9\d+)(@example.com)

Pattern behavior

Replace

Replace string

Enter \1

On successful match

Stop

Target

TraversalZone

State

Enabled

Step 4

Click Create search rule.

Step 5

Click New.

Step 6

Configure the fields as follows:

Expressway-E

Rule name

Enter Block ISDN call for example

Description

Enter Blocks everything (including nonregistered endpoints)

Priority

Enter 41

Protocol

Any

Source

Any

Request must be authenticated

No

Mode

Alias pattern match

Pattern type

Regex

Pattern string

Enter (9\d+)(.*)(@example.com)

Pattern behavior

Replace

Replace string

Enter do-not-route-this-call for example

On successful match

Stop

Target

TraversalZone

State

Enabled

Step 7

Click Create search rule.


Expressway-C

This example describes how to configure the Expressway-C to stop calls that come in through the gateway, from being able to route calls back out of the gateway.

To do this, you load some specially constructed CPL onto the Expressway-C and configure its Call policy mode to use Local CPL.

Creating a CPL File

The CPL file can be created in a text editor.

Here are two example sets of CPL. In these examples:

  • "GatewayZone" is the neighbor zone to the ISDN gateway.

  • "GatewaySubZone" is the subzone to the ISDN gateway (required if the gateway registers the 9 prefix to the Expressway).

  • Calls coming into the ISDN gateway and hitting a FindMe do not ring devices that use the gateway. So for example, calls forwarded to a mobile phone are disallowed.

This example CPL excludes any checking of whether the calling party is authenticated:


<?xml version="1.0" encoding="UTF-8" ?> 
<cpl xmlns="urn:ietf:params:xml:ns:cpl"
xmlns:taa="http://www.tandberg.net/cpl-extensions"
xmlns:xsi="http://www.w3.org/2001/XMLSchema-instance"
xsi:schemaLocation="urn:ietf:params:xml:ns:cpl cpl.xsd"> 
<taa:routed> 
  <taa:rule-switch> 
   <!--Check that gateway is not hairpinning call - Neighbor zone --> 
   <taa:rule originating-zone="GatewayZone" destination="9.*"> 
     <!-- Calls coming from the gateway may not send calls back out of this gateway --> 
     <!-- Reject call with a status code of 403 (Forbidden) --> 
     <reject status="403" reason="ISDN hairpin call denied"/> 
  </taa:rule> 
  <!-- Check that gateway is not hairpinning call - Subzone for registered gateway --> 
  <taa:rule originating-zone="GatewaySubZone" destination="9.*"> 
    <!-- Calls coming from the gateway may not send calls back out of this gateway --> 
    <!-- Reject call with a status code of 403 (Forbidden) --> 
    <reject status="403" reason="ISDN hairpin call denied"/> 
  </taa:rule> 
  <taa:rule origin=".*" destination=".*"> 
    <!-- All other calls allowed --> 
   <proxy/> 
  </taa:rule> 
 </taa:rule-switch> 
</taa:routed> 
</cpl>

This example CPL also ensures that the calling party is authenticated:


<?xml version="1.0" encoding="UTF-8" ?> 
<cpl xmlns="urn:ietf:params:xml:ns:cpl" 
xmlns:taa="http://www.tandberg.net/cpl-extensions" 
xmlns:xsi="http://www.w3.org/2001/XMLSchema-instance" 
xsi:schemaLocation="urn:ietf:params:xml:ns:cpl cpl.xsd"> 
<taa:routed> 
 <taa:rule-switch> 
     <!-- Check that calling party is authenticated --> 
     <taa:rule authenticated-origin="" destination="9.*"> 
     <!-- Reject call with a status code of 403 (Forbidden) --> 
    <reject status="403" reason="ISDN call denied as unauthenticated caller"/> 
 </taa:rule> 
 <!-- Check that gateway is not hairpinning call - Neighbor zone --> 
 <taa:rule originating-zone="GatewayZone" destination="9.*"> 
   <!-- Calls coming from the gateway may not hairpin and send calls back out --> 
  <!-- Reject call with a status code of 403 (Forbidden) --> 
  <reject status="403" reason="ISDN hairpin call denied"/> 
 </taa:rule> 
 <!-- Check that gateway is not hairpinning call - Subzone for registered gateway --> 
 <taa:rule originating-zone="GatewaySubZone" destination="9.*"> 
    <!-- Calls coming from the gateway may not hairpin and send calls back out --> 
   <!-- Reject call with a status code of 403 (Forbidden) --> 
  <reject status="403" reason="ISDN hairpin call denied"/> 
 </taa:rule> 
 <taa:rule origin=".*" destination=".*"> 
    <!-- All other calls allowed --> 
   <proxy/> 
 </taa:rule> 
 </taa:rule-switch> 
</taa:routed> 
</cpl>

Loading the CPL onto Expressway-C

To configure the Expressway-C to use the CPL:

Procedure


Step 1

Go to Configuration > Call Policy > Configuration.

Step 2

Click Browse.... Select the CPL file you created in the previous step from your file system.

Step 3

Click Upload file.

  • If the file upload succeeds, you see a "File upload successful" message.

  • If you receive an "XML invalid" message, correct the problems with the CPL file and upload it again.

Step 4

Select a Call policy mode of Local CPL.

Step 5

Click Save.