Skill Targets

Skill Targets Subsystem

After you define a peripheral, you must define the skill targets associated with the peripheral. The following figure shows the elements in a skill targets subsystem.

Figure 1. The Skill Targets Subsystem


Skill targets are the entities that the system software chooses to handle calls at a peripheral: services, skill groups, and agents.

The other members in the skill target subsystem define relationships among skill targets:

  • Agents are members of skill groups.

  • Skill groups are members of services.

  • An enterprise skill group is a collection of skill groups, usually from different peripherals.

  • An enterprise service is a collection of services, usually from different peripherals.

The rest of this chapter describes how to define these skill targets and establish the relationships among them.

Services

You must provide information about each service associated with a peripheral. A service is a type of caller need that the peripheral handles; for example, sales, support, and information might all be services.

Use the Service Explorer to configure services and their associated records.

Service Explorer

The following sections show you how to use the Service Explorer to view and configure a service and its associated routes, peripheral targets, and labels.

View Service

To view a service, follow these steps:

Procedure

Step 1

In the Configuration Manager menu, select Tools > Explorer Tools > Service Explorer. The Service Explorer window appears.

Step 2

In the Select filter data box, select the peripheral associated with the service you want to view. You can choose the name from the drop-down list.

Note


Once you have saved a service record to the Unified ICM database, you cannot change the peripheral to which it is associated.

Step 3

Select any other filters you want. None in the Optional filter box means all services associated with the selected peripheral will be displayed.

Step 4

Click Retrieve. This lists in the tree list box the names of retrieved services.

Note


A tree object is unassigned if it was made by another configuration tool and was not assigned (mapped) to a parent object; for example, a label might not have been assigned to a peripheral target or a route might not have been assigned to a service, and so on.

Step 5

In the tree list box, select a service to display its configuration information on the right side of the window.

Step 6

If the service has a route associated with it, click its icon in the tree list box to display its configuration information. Do the same for a peripheral target associated with the route and a label associated with the peripheral target.


Service Explorer Tab Descriptions

The tables in the following sections describe the fields in the Service Explorer records.

Service Tab

This tab allows you to view (and define or edit, if you have maintenance access) the properties of the selected service.

A service is the type of caller need that a peripheral handles; for example, Sales, Support, and Information.

Table 1. Service Tab Field Descriptions

Field

Description

Media routing domain (required)

(selection list) The MRD associated with the service.

Peripheral number (required)

The number of this service as understood by the selected peripheral. Use the application number, gate number, split number, or skill number. This value must be unique among all services for a peripheral, but need not be unique across peripherals.

Peripheral name (required)

The local name for the peripheral's service. This value must be unique among all services associated with the peripheral, but need not be unique across peripherals. For example, each peripheral can have a service named Sales.

Name (required)

The enterprise name of the service. This name must be unique among all the services in the enterprise. If you click in this box after entering the peripheral name, the software automatically creates this name by appending the peripheral name to the selected peripheral. For example: Boston_PG_1.Sales.

Config param

(optional) A string of parameters the Unified ICM system sends to the peripheral to initialize the service.

Service level type (required)

For Unified Contact Center Enterprise (Unified CCE) peripherals and for non-voice MRDs, the value of this field is always 1 ("ignore abandoned calls") since you cannot track abandoned calls in these cases. The Configuration Manager tools do not allow this field to be changed for Unified CCE peripherals and non-voice MRDs.

Service level threshold (required)

Default value at runtime. This can be overriden for individual services (Service table). If not, this value is used if valid. If this entry is negative, the default is obtained from the ServiceLevelThreshold table, the MRDomain table. Default entry is –1, which must be displayed in text, and not as a number.

Peripheral service level type

Ignored for non-voice services.

No longer used by peripheral

Indicates that this was originally configured by Peripheral Auto Config and this service is no longer used by the peripheral.

Advanced Tab

This tab allows you to view (and define or edit, if you have maintenance access) advanced properties of the selected service.

Table 2. Advanced Tab Field Descriptions

Field

Description

Peripheral service level type (required)

Type of service level calculation to be used in the Peripheral Service Level fields of the Service Real Time and Service Half Hour tables.

Schedule name

Identifies an imported schedule associated with the service.

Extension

The extension number for the skill group. For all other peripheral types, leave this field blank.

Service Members Tab

This tab allows you to view service members information for the service that is currently selected. If you have maintenance access, this tab also lets you add or remove service members.


Note


A service can support a maximum of 350 skill groups.


Table 3. Service Members Tab Field/Button Descriptions

Field/Button

Description

Field

Current Service Members

This window lists the names of all the skill groups that are members of the selected service.

Primary

Use the Primary checkbox to indicate whether a skill is a primary group (the default) for the service or a backup group. You can have more than one primary skill group.

Skill Group Name

To add a service member, click this button. Then in the Add Service Member window, select the name of a skill group from the list of available records and click OK.

Buttons

Add

Add an enterprise name for the skill group. This name must be unique among all skill groups in the enterprise.

Remove

To remove a service member, select a skill group in the Current service members window and click this button.

Route Tab

A route is a value returned by a routing script that maps to a target at a peripheral; that is, a service, skill group, agent, or translation route. In this case, the route maps to the selected service.

Table 4. Route Tab Field Descriptions

Field

Description

Name (required)

The enterprise name of the route.

Description

Additional information about the route.

Peripheral Target Tab

The DNIS tab allows you to view (and define, delete, or edit, if you have maintenance access) the DNIS properties of the selected peripheral target. A peripheral target is a combination of a network trunk group and a DNIS (Dialed Number Identification Service) value, which the system software uses to indicate the destination for a call.

A DNIS is a string of digits indicating the number dialed by a caller and how the call will be handled by the ACD, PBX, or VRU.

Table 5. DNIS Tab Field Descriptions

Field

Description

DNIS

Dialed Number Identification Service (DNIS). Usually a string of digits indicating the number dialed by a caller and how the call will be handled by the ACD, PBX, or IVR. Sometimes the string may include letters. The exact content of this field is dependent on the external hardware the system software interfaces with. The Unified ICM system itself has no dependency on the contents of this field being in any particular format. The system software uses the DNIS and trunk group to indicate the destination for a call.

The Logger enforces the following rule: If a peripheral target (DNIS) is attached to a route, the route must have its Service field populated.

Description

Additional information about the peripheral target.

Network trunk group

(drop-down list) The enterprise name of the network trunk group associated with the peripheral target.

Label Tab

The Label tab allows you to view (and create, delete, or edit, if you have maintenance access) the properties of the selected label. A label (or routing label) is a value that the Unified ICM system returns to a routing client to map to a target, which, in this case, is the selected service on the selected peripheral.

Table 6. Label Tab Field Descriptions

Field

Description

Routing Client (required)

The label value.

Label (required)

Additional information about the peripheral target.

Label type

(drop-down list) The valid types depend on the type of routing client. Select one valid type for your routing client. Check with your carrier for the latest information about supported label types. Typical types are Normal, DNIS Override, Busy, Ring, and Post-Query.

Customer

The customer associated with the label.

Description

Additional information about the label.

Modifying, Defining, and Deleting Services

The following sections show you how to modify, define, and delete services.

Modify a Service

To modify a service, do the following:

Procedure

Step 1

Follow the steps for viewing a service.

Step 2

Edit the configuration information.

Note


You cannot modify fields that are greyed out.

With the mouse, you can select an object and then move it to another part of the tree, as long as its object type belongs in that tree location. For example, to move a route to another service, select it and then move the pointer to that service. When that service becomes highlighted, lift your finger off the mouse. You can also use the Bulk Configuration tool to take the output of a switch and create 20 or 30 labels. Then, using the Service Explorer, you can attach the labels to an appropriate location.

When you make a modification, the Changed icon appears next to the selected item in the tree list box.

Step 3

Click Save.


The modified data is saved in the Unified ICM database and the Changed icon is removed from the edited object in the tree list box.

Define a Service or Associated Record

To define a service and/or its associated records, follow these steps:

Procedure

Step 1

In the Configuration Manager menu, select Tools > Explorer Tools > Service Explorer. The Service Explorer window appears.

Step 2

In the Select filter data box of the Explorer window, click Retrieve. This enables the Add Service button.

Step 3

Click Add Service. A new service appears in the tree list box with a To Be Inserted icon

next to it. Tabbed fields also appear on the right for the new service's configuration information.

Step 4

Fill in the tabbed fields.

Step 5

Click Add Route and fill in its configuration records.

Step 6

Click Add Peripheral Target and also Add Label and fill in those records.

Selecting an item in the tree list box enables the Add button for more items of that type and for the associated item immediately beneath it in the tree, if it can have one.

Step 7

If desired, set security settings on the records.

Step 8

Click Save.


Delete a Record

To delete a record:

Procedure

Step 1

In the Explorer tree list box, select the item or associated items whose records you want to delete.

Note

 
Deleting any item in the tree list box with branches beneath it also deletes those branches. For example, if you delete a service, you also delete its associated route, peripheral target, and label, if it has such. Deleting a label deletes only that label.

Step 2

Click Delete. This places a Marked for Deletion icon next to the selected item in the tree list box. This also toggles the Delete button to Undelete.

To undelete an item marked for deletion, select it in the tree list box and click Undelete.

Step 3

Click Save.

This deletes from the database items marked for deletion and removes them from the tree list box. Once you do this, you cannot undelete deleted items.


Skill Groups

Enter information about each skill group associated with each peripheral. A skill group is a collection of agents that share a common set of skills.

Use the Configuration Manager's Skill Group Explorer to view, modify, or define a skill group.

Skill Group Explorer

The following sections show you how to use the Skill Group Explorer to view and configure a skill group and its associated routes, peripheral targets, and labels.

View a Skill Group

To view a skill group, follow these steps:

Procedure

Step 1

In the Configuration Manager's menu, select Tools > Explorer Tools > Skill Group Explorer. The Skill Group Explorer window appears.

Step 2

In the Select filter data box, select the peripheral associated with the skill group you want to view. You can choose the name from the drop-down list of peripheral enterprise names.

Step 3

Select any other filters you want. None in the Optional filter box means all skill groups associated with the selected peripheral will be displayed.

Step 4

Click Retrieve. This lists in the tree list box names of skill groups.

Step 5

In the tree list box, select a skill group to display its configuration information on the right side of the window.

Step 6

If the skill group has a route associated with it, click its icon in the tree list box to display its configuration information. Do the same for a peripheral target associated with the route and a label associated with the peripheral target.

Note

 
A tree object is unassigned if it was made by another configuration tool and was not assigned (mapped) to a parent object; for example, a label might not have been assigned to a peripheral target or a route might not have been assigned to a service, and so on.

Skill Group Explorer Tab Descriptions

The tables in the following sections describe the tabbed fields in the Skill Group Explorer records.

Skill Group Tab

The Skill Group tab allows you to view (and edit, if you have maintenance access) the properties of the currently selected skill group. A skill group is a collection of agents that share a common set of skills.

Table 7. Skill Group Tab Field Descriptions

Field

Description

Media routing domain (required)

(selection list) The MRD associated with the skill group.

Note

 
An MRD can associate with one or more skill groups, but a skill group can associate with only one MRD.

Peripheral Number (required)

The skill group number as known by the peripheral. This value must be unique among all skill groups for a peripheral, but need not be unique across peripherals.

Note


Change this number from 0 unless you want this to be the default skill group.

Peripheral Name (required)

The local name for this skill group. This value must be unique among all skill groups associated with the peripheral, but need not be unique across peripherals. For example, each peripheral can have a skill group named International_Orders.

Note

 
The peripheral name in the filter box is its enterprise name, not this name.

Note

 
Sub-skill groups are not supported in Unified CCE 9.0. Support for sub-skill groups continues, however, for Unified ICM 9.0 - and thus for TDM peripheral gateways.

For skill groups that support sub-skill groups, sub-skill group names are comprised of the base skill group name plus a suffix. A suffix can have a maximum of 4 characters. Therefore, the maximum length for a base skill group name is 28 characters when you plan to have sub-skill groups.

Name (required)

An enterprise name for the skill group. This name must be unique among all skill groups in the enterprise. If you click in this box after entering the peripheral name, the software automatically creates this name by appending the peripheral name to the selected peripheral. For example: Boston_PG1.International_Orders.

Available Holdoff Delay

The number of seconds to wait after a call ends before recording the agent as Available.

Priority

(read-only) Indicates the routing priority of this base group for the skill. The value 0 indicates a base skill group. This is the default when there is only one skill-group and there are no priorities. For sub-skill group priorities please refer to the Sub Skill Group tab as well as the Subgroup Mask tab.

Extension

Enter the extension number associated with the skill group. For all other peripheral types, leave this field blank.

ICM picks the agent

Checked, indicates that the system software selects the agent to handle a request, not just the service or skill group. In a Unified CCE environment, the Central Controller handles the post routing of requests to agents. Choose the option for all skill groups that you configure for the Unified CCE.

Unchecked, indicates another entity, typically an ACD, does the agent selection (after the system software has sent a call to an ACD skill group). In legacy ICM Enterprise deployments, the ICM central controller determines which Automated Call Distributor (ACD) has the appropriate service or skill group to handle a request and the ACD selects the actual agent to handle the call. The ICM central controller pre-routes calls by targeting an ACD and the ACD post-routes calls by selecting the agent.

This option applies to pre-routed requests.

Note

 
The Enterprise Gateway feature introduces a layer of complexity to IPTA. The Unified CCE Central Controller pre-routes voice calls to a Unified CCE system, and the Unified CCE central controller selects the agent to handle the calls. In this configuration, the Central Controller can route only voice calls to the Unified CCE system; it cannot route non-voice requests, such as text chat and email, or Outbound Option requests. Non-voice requests and Outbound Option requests are routed internally by the Unified CCE system.

ConfigParam

(optional) A string of parameters the system software sends to the peripheral to initialize the skill group.

Description

Additional information about the skill group.

No longer used by peripheral

Indicates that this skill group was originally configured by Peripheral Auto Config and is no longer used by the peripheral.

Skill Group Members Tab

The Skill Group Members tab allows you to view skill group member information for the currently selected skill group. If you have maintenance access, this tab also lets you add or remove skill group members. It also lets you assign this skill group as the default skill group for one or more agents.


Note


This tab is only enabled if no sub-skill groups are configured for this base skill group.
Table 8. Skill Group Members Tab Field Descriptions

Field/Button

Description

Current skill group members

This window lists the names of all the agents that are members of the selected skill group.

Agent name

The name of an agent in the skill group.

Add

To add a skill group member, click this button. Then in the Add Skill Group Member window, select the name of an agent from the list of available records and click OK.

Remove

To remove an agent, select an agent name in the Current skill group members window and click this button.

Subgroup Mask Tab

The Subgroup Mask tab allows you to view (and edit, if you have maintenance access) the number of sub-skill groups on the currently selected peripheral. This tab is enabled only if the selected peripheral can have sub-skill groups. A subgroup mask defines sub-skill groups.


Important


Sub-skill groups are not supported for Unified CCE; however, they are supported for certain TDM peripheral gateways. Sub-skill groups are also not supported for non-voice skill groups. That is, you cannot create sub-skill groups for these media classes: single-session chat, multi-session chat, blended collaboration, and email.

Note


For all peripherals that support sub-skills, the Skill Group Explorer automatically creates the sub-skills (primary, secondary, and so on) as defined by the peripheral subgroup mask. This tab allows you to change the sub-skill mask on a skill–group–by–skill–group basis.
Table 9. Subgroup Mask Tab Field Descriptions

Field

Description

Override Peripheral Default Mask

If this box is not checked, the default sub-skill groups for the selected peripheral are created. Checking this box enables the sub-skill group check boxes.

Sub-skill group check boxes

Check the box for each sub-skill group you want to generate.

Uncheck the box for each sub-skill group that you want to delete.

Upon saving, the unchecked sub-skill groups are marked deleted in the database for reporting purposes only. To permanently delete these sub-skill groups once they are no longer needed, use the Deleted Object tool.

If these sub-skill groups are not permanently deleted, configuring a sub-skill group with the same priority by checking off the corresponding checkbox in the Subgroup Mask tab causes the error message "Failed to update the database. The enterprise name that was entered is already in use."

Sub Skill Groups Tab

Sub-skill groups are not supported for Unified CCE.

The Sub Skill Groups tab allows you to view (and edit, if you have maintenance access) the sub-skill group properties of the currently selected peripheral. This tab is enabled only if the selected peripheral has sub-skill groups.

Table 10. Sub Skill Groups Tab Descriptions

Item

Description

Associated sub skill groups

The list of sub-skill groups associated with the peripheral.

Priority

The names of the sub-skill groups associated with the peripheral.

Agents in the selected sub-group

The priority level of the sub-skill groups: 1=primary; 2=secondary; 3=tertiary; and so on. The value 0 indicates a base skill group. This is the default when there is only one skill group and there are no priorities.

Agents in the selected sub-group

The list of agents in the selected sub-skill group.

Agent name

The names of the agents in the selected sub-skill groups.

Add

To add an agent to the selected sub-skill group, click this button, and in the Add Skill Group Member dialog, select a name and click OK.

Remove

To remove an agent from the selected sub-skill group, select that agent's name and click Remove.

Route Tab

The Route tab allows you to view (and define, delete, or edit, if you have maintenance access) the properties of the selected route.

A route is a value returned by a routing script that maps to a target at a peripheral; that is, a service, skill group, agent, or translation route. In this case, the route maps to a skill group.

Table 11. Route Tab Field Descriptions

Field

Description

Skill group priority

Set to 0 if the route is assigned to the base skill group.

Name (required)

The enterprise name of the route.

You might derive the enterprise name for the route from the skill group and service associated with it. For example, you might have a route associated with the Dallas.TeleSales service and the Dallas.Sales skill group. You might name the route Dallas.TS_Sales.

Description

Additional information about the route.

Service Name

(selection list) The name of the service associated with the route.

Every route must be associated with a service for it to be functional. By choosing a service, you are implicitly associating the route with the peripheral for that service. For a new route, the drop-down list contains all the services defined for the selected peripheral (or PG, in the case of a service array).

If you select None as the service name, the route cannot be associated with a peripheral and you can move the route to the UNASSIGNED list.

Once a route has a service selected, it can no longer be moved to the UNASSIGNED list. However, it can be moved within the appropriate tool to another skill target. For example, in the Skill Group Explorer, you can move a route to another skill group; in the Service Explorer, you can move a route to another service; and in the Agent Explorer, you can move a route to another agent.

Peripheral Target Tab

The Peripheral Target tab allows you to view (and define, delete, or edit, if you have maintenance access) the DNIS properties of the selected peripheral target. A peripheral target is a combination of a trunk group and a DNIS value.

A peripheral target is associated with a service, skill group, agent, or translation route at a peripheral. Each peripheral target is also associated with a route that can be returned by a routing script.

A DNIS is a string of digits indicating the number dialed by a caller and how the call will be handled by the ACD, PBX, or VRU.

Note that peripheral target refers to a trunk group and DNIS value. Skill target refers to the entity at the peripheral to which the call is dispatched.

Table 12. Peripheral Target Tab Descriptions

Field

Description

DNIS (required)

Dialed Number Identification Service (DNIS). Usually a string of digits indicating the number dialed by a caller and how the call will be handled by the ACD, PBX, or IVR. Sometimes the string may include letters. The exact content of this field is dependant on the external hardware the system software interfaces with. The Unified ICM system itself has no dependency on the contents of this field being in any particular format. The system software uses the DNIS and trunk group to indicate the destination for a call.

The Logger enforces the following rule: If a peripheral target (DNIS) is attached to a route, the route must have its Service field populated.

Description

Additional information about the peripheral target.

Network Trunk Group

The enterprise name of the network trunk group associated with the peripheral target.

Label Tab

The Label tab allows you to view (and create, delete, or edit, if you have maintenance access) the properties of the selected label.

A label (or routing label) is a value that the Unified ICM system returns to a routing client to map to a target, which, in this case, is the selected skill group on the selected peripheral.

Table 13. Label Tab Field Descriptions

Field

Description

Routing client (required)

The enterprise name of the routing client associated with the label.

The Logger enforces the following rule: If a peripheral target (DNIS) is attached to a route, the route must have its Service field populated.

Label (required)

The label value.

Label type (required)

(drop-down list) The valid types depend on the type of routing client. Select one valid type for your routing client. Check with your carrier for the latest information about supported label types. Typical types are Normal, DNIS Override, Busy, Ring, and Post-Query.

Customer

(optional) The customer associated with the label.

Description

Additional information about the label.

Modifying, Defining, and Deleting Skill Groups

The following sections show you how to modify, define skill groups.

Modify a Skill Group

To modify a skill group, follow these steps:

Procedure


Step 1

Follow the steps to view a skill group.

Step 2

Edit the configuration information.

With the mouse, you can select an object and move it to another part of the tree, as long as its object type belongs in that tree location. For example, to move a route to another skill group, select it and move the pointer to that skill group. When that skill group becomes highlighted, lift your finger off the mouse. You can also use the Bulk Configuration tool to take the output of a switch and create 20 or 30 labels. Then, using the Explorer, you can attach the labels to an appropriate location.

Note


You cannot modify fields that are greyed out.

You cannot update the Peripheral field. To modify the Peripheral Number, you can use the Cisco Unified Contact Center Management Portal (CCMP).

When you make a modification, the Changed icon appears next to the selected item in the tree list box.

Step 3

Click Save.

The modified data is saved in the Unified ICM database and the Changed icon is removed from the edited object in the tree list box.


Define a Skill Group or Its Associated Records


Note


Skill groups on the Child Central Controller contains an example of how to configure skill groups for a child deployment.

To define a skill group and/or its associated records, follow these steps:

Procedure


Step 1

In the Configuration Manager's menu, select Tools > Explorer Tools > Skill Group Explorer. The Skill Group Explorer window appears.

Step 2

In the Select filter data area of the Explorer window, click Retrieve. This enables the Add Skill Group button.

Step 3

Click Add Skill Group. A new skill group appears in the tree list box with a To Be Inserted icon next to it. Tabbed fields also appear on the right for the new skill group's configuration information.

Step 4

Fill in the tabbed fields.

Note


These fields are not automatically populated.

Step 5

Click Add Route and fill in its configuration records.

Step 6

Click Add Peripheral Target and also Add Label and fill in those records.

Selecting an item in the tree list box enables the Add button for more items of that type and for the associated item immediately beneath it in the tree, if it can have one.

Step 7

If desired, set security settings on the records.

Step 8

Click Save.


Skill groups on the Child Central Controller

Access the Configuration Manager on the Child Administration & Data Server to configure skill groups.

Configure Skill Groups on the Child Central Controller

Use the Configuration Manager Skill Group Explorer Tool to configure skill groups SG01 and SG02 on the Child Central Controller.

To configure skill groups on the Child Central Controller:

Procedure

Step 1

Start the Skill Group Explorer Tool.

Step 2

On the Main window of the Agent Explorer Tool, click Retrieve.

Step 3

Click Add Skill Group.

The Skill Group tab appears.

Step 4

Complete all the fields and click OK.

The skill group name appears in the list, as with all Explorer tools.

Step 5

Select the Skill Group Member tab and click Add.

The Add Skill Group Member dialog appears.

Step 6

Select the agents to add to the skill group, then click OK.

The agents become members of the skill group.

Step 7

Select the skill group in the tree list, then click Add Route.

The Route tab appears.

Step 8

Provide the Route Name and click Save.

The route name appears in the tree list and the skill group is added to the peripheral.

Step 9

Repeat this to add one more skill group.

Step 10

Click Save, then Close to exit the Skill Group Explorer Tool.


Skill Groups–to–Services Mapping

When you define services and skill groups, you can establish the mappings of skill groups to services. Each skill group can be mapped to zero, one, or more services; each service can be mapped to zero, one, or more skill groups.

You can define some service member skill groups as being primary for the service. The system software uses the primary attribute in determining the destination for a call to the service. For example, the Longest Available Agent (LAA) for a service is really the LAA for primary groups configured for that service.

Map Skill Groups to Services

To map skill groups to services, follow these steps:

Procedure


Step 1

Within the Configuration Manager menu, select Tools > Explorer Tools > Service Explorer. The Service Explorer window appears.

Step 2

Select the filters you want and click Retrieve. The retrieved services appear in the list box.

Step 3

Select the service you want and click the Service Members tab.

Step 4

This step depends on whether you want to add or to remove skill groups:

  1. To remove skill groups, select a skill group's name and click Remove.

  2. To add skill groups, click Add and in the Add Service Member dialog, select the skill groups and click OK.

    The available skill groups are all those defined for the selected peripheral.

Step 5

In the Service Members tab, select the Primary check box for any skill groups that you want to be primary.

Step 6

When finished, in the Skill Group Explorer window, click Save.


Skill Groups Per Agent Limit

Unified ICM and Unified CCE impose a default limit on the number of skill groups that you can assign to a single agent. Once this limit is reached, more skill groups cannot be assigned.

You can use the Configuration Limit Tool to specify your own limit on the number of skill groups that can be assigned to an agent. For optimum performance, you can specify a limit far lower than the system default. For performance considerations in choosing a skill groups per agent limit, see the Solution Design Guide for Cisco Unified Contact Center Enterprise.


Warning


Setting a default value for skill groups per agent that is higher than the system default can adversely affect system performance. Cisco does not support configurations that exceed the default value.


Caution


The Configuration Limit tool is a command-line tool utility from the bin directory of all Unified ICM and Unified CCE Administration & Data Servers. Access is limited to users with privileges for the Setup or Config Groups in Active Directory for the chosen customer instance. For more information about the Configuration Limit tool, see the Outbound Option Guide for Unified Contact Center Enterprise.


Change Skill Groups Per Agent Limit

To change the skill groups per agent limit using the Configuration Limit tool, complete the following steps:

Procedure


Step 1

From the Windows menu, select Start > Run, type configlimit , and then click Enter.

Note


Run the Configuration Limit tool on the same machine as the Distributor for the instance you want to configure. If more than one instance of the Administration & Data Server is installed on the Distributor machine, use the Select Administration Server tool to select the instance you want to configure.

Step 2

To view currently configured parameter limits, run the following command:

cl /show 

Step 3

To change the skill groups per agent limit, enter a command in the following format:

cl /id 1 /value [ConfigLimitCurrentValue] [/update] 

Where:

  • id 1 = the ID of the skill groups per agent limit.

  • ConfigLimitCurrentValue = the parameter limit. In this case, the parameter limit is the skill groups per agent limit.

For example, to change the skill groups per agent limit to 5, enter the following:

cl /id 1 /value 5 /update

Note


Using the Configuration Limit tool, you can change the ConfigLimitCurrentValue only. You cannot change the ConfigLimitDefaultValue.


Additional Requirements

Lowering the Limit

If you have modified the skill groups per agent limit to be lower than the system default, no additional changes are necessary. The new, lower limit will be enforced immediately. Note that the new limit will not affect agents whose existing skill group membership exceeds the new limit until the next attempt to add a new skill group for those agents. At that time, the new limit will be enforced, preventing you from adding additional skill groups.

Exceeding the Default Limit

If you modified the skill groups per agent limit to be higher than the system default (despite the preceding warning), certain deployments require additional changes to your system to use the new limit. These additional changes (listed in the following sections) also allow you to add more skill groups.

Persons

Associate every agent with a person record. The person record stores the login name, first name, last name, and password. On Unified ICM you can have multiple agents per person. An agent is an "extension" of a person on a given peripheral.

The Person List tool allows you to list the persons currently defined in the Unified ICM database, to define new ones, and to view, edit, or delete the records of existing ones.


Note


If you are using the Enterprise Chat and Email feature, you can create Agents in CCE Configuration Manager. Creating Agents in the Enterprise Chat and Email makes them available in Configuration Manager. However, if you create the agent in Configuration Manager, you must enable the agent in Enterprise Chat and Email.


Available person records are records that have not been mapped to any agent records (including logically deleted ones) at the peripheral selected in the Agent Explorer. To free a person associated with a logically deleted agent, use the Configuration Manager's Deleted Objects tool to permanently delete the logically deleted agent.

Select Filter Data

Use the Select filter data box to select and retrieve data from the database. Until you retrieve database data, no data is displayed.

Optional Filter

None means no optional filtering. All data is displayed for the selected records.

The optional fields to filter on differ by record type according to both the fields in a record and the fields considered useful as filters.

Condition Filter

Table 14. Option Filters

If the selected Optional Filter is

Then

None

The Condition filter is ignored.

A text filter (for example, Description)

Select one of the text conditions (Contains, Ends With, Starts With, Is Blank) and enter an appropriate entry in the Value field.

A numeric filter (for example, Trunk Number)

Select one of the numeric conditions (Equal, Greater Than, Less Than, Not Equal) and enter an appropriate entry in the Value field.

The available numeric conditions can change depending on the record data. For example, Equal or Not Equal might be the only choices.

Value

The entry in this field is based on the selections made in the Optional Filter and Condition fields. If None is selected in the Optional Filter field, this field is ignored.

Save

Checked, indicates the current settings are saved so that when you next open the List tool for this type of record, the current settings will be selected. However, no data is displayed until you click the Retrieve button.

Retrieve

This button displays the data selected in the Select filter data box.

Cancel Filter Changes

If you change the Optional Filter settings after a Retrieve, clicking this button resets the filter settings back to the preceding ones.

Person List Tool Tab Descriptions

Following are the Person List tool tab descriptions:

Attributes Tab

Allows you to view (and define, delete, or edit, if you have maintenance access) the properties of the selected person.

Table 15. Person List Tool Tab Field Descriptions

Field

Description

First name (required)

The selected agent's first name; for example: John. The system automatically fills in the name fields after you select a person.

Last name (required)

The selected agent's last name; for example: Smith.

Login name (required)

The selected agent's login name; for example: jsmith.

The login name supports the use of all characters from 33 to 126 in the ASCII character set, except for the following: double quotation mark ("), forward slash (/), backward slash (\), square brackets ([ ]), colon (:), semicolon (;), pipe (|), equal to (=), comma (,), plus sign (+), asterisk (*), question mark (?), angle brackets (< >), hash (#), percent (%), and SPACE.

Note

 
In the System Information tool, the administrator can set whether or not person login names are case sensitive.

Domain name

(optional) The domain name of the selected agent's login.

Password

(optional) An MD5 encrypted password, used for authentication by Unified ICM and by applications integrated with Unified ICM. The password is restricted to the 7-bit printable ASCII characters (any of the 94 characters with the numeric values from 32 to 126). Control characters (for example, “tab”) and international characters are not allowed. This means passwords cannot be entered in a non-Western alphabet, such as Kanji.

Note

 
In the System Information tool, the administrator can set the number of required characters for person passwords. A person password is case sensitive.

Change Password

Click to change your password.

Note

 
Enables the Password and Confirm Password fields.

Confirm Password

Used when changing your password.

Description

(optional) Additional information about the person.

Enable logins (optional)

(optional) Checked, indicates that this person is currently allowed to access the system. Unchecked, indicates the person is not allowed to access the system. A typical use of this is to temporarily suspend a person's access to the system during vacation or certain hours, and to do so without disturbing any of the entered information for this person.

Note

 
This option is not and will not be supported by ACDs or soft ACDs. This option is also currently not supported by Unified CCE voice phones.
Change Your Password

Follow these steps to change your password:

Procedure

Step 1

Click Change Password.

Step 2

Enter your new password in the enabled Password field.

Step 3

Re-enter your new password in the enabled Confirm password field to ensure you have typed it correctly.

Step 4

Click Save to set your new password.


Agents

An agent is a person who handles calls from a peripheral or supervises those who do. You need to set up each agent associated with each peripheral.

An agent gadget is an application which handles calls from a peripheral. You need to set up each agent gadget associated with each peripheral.

Use the Configuration Manager's Agent Explorer to configure agents.

Modify Agent Record

To view or modify agents records, follow these steps:

Procedure


Step 1

In the Configuration Manager menu, select Tools > Explorer Tools > Agent Explorer. The Agent Explorer window appears.

Step 2

In the Select filter data box, select the peripheral with which the agent is associated. Enter any other filters you want and click Retrieve.

The retrieved enterprise names for the agents are displayed in the list box.

Step 3

Select the agent name whose properties you want to view and use the tabs on the right side of the window to view the properties.

Step 4

Edit the properties appropriate. See the online help if you have questions.

Step 5

When finished, in the Agent Explorer window, click Save.


Create an Agent

An agent is a person who handles calls from a peripheral or supervises those who do. You need to set up each agent associated with each peripheral.

When you create a new agent, you can also identify the agent as a supervisor.


Note


Agent Configuration on the Child Central Controller contains an example of how to configure agents for a child deployment.

Caution


Adding an agent is no longer allowed, in the following conditions:
  1. Out of Compliance expiry: The system is operating with an insufficient number of licenses and system in enforcement mode.

  2. Authorization expiry: The system has not communicated with Cisco Smart Software Manager, or satellite for 90 days and the system has not automatically renewed the entitlement authorizations.

  3. Evaluation expiry: The license evaluation period expired.


To create an agent:

Procedure


Step 1

In the Configuration Manager menu, select Tools > Explorer Tools > Agent Explorer. The Agent Explorer window appears.

Step 2

In the Select filter data box, select the peripheral with which the agent is to associated and click Retrieve. This enables the Add Agent button.

Step 3

Click Add Agent.

Step 4

In the property tabs on the right side of the window, enter the appropriate property values. (See the online help for field definitions.) Use the Agent tab to define the agent (and optionally designate the agent as a supervisor) and the Skill Group Membership tab to map the agent to any skill groups.

Note

 
An agent team can have only one primary supervisor. There is no upper limit to the number of secondary supervisors for a team. Refer to the online help for instructions on how to assign a primary supervisor.

Step 5

When finished, click Save.


Agent Configuration on the Child Central Controller

Access the Configuration Manager on the Child Administration & Data Server to configure agents.

Configure Agents on the Child Central Controller

Use the Configuration Manager Agent Explorer tool to configure agents on the Child Central Controller.


Note


When you configure an agent on the Child Central Controller, the agent is automatically assigned to a default skill group. However, if you log onto the parent to view the agent (that you configured on the child), the default skill group appears in the list of assigned skill groups and not in the default skill group box.


To configure agents on the Child Central Controller:

Procedure

Step 1

Start the Agent Explorer tool.

Step 2

On the Main window of the Agent Explorer tool, click Retrieve.

Step 3

Click Add Agent.

The Agent tab appears.

Step 4

Complete all the fields except the Password and the Peripheral Name fields.

The agent name information appears in the list, as with all Explorer tools.

Step 5

Repeat this process to add at least three agents.

Step 6

Click Save, and then Close to exit the Agent Explorer tool.


Designate Agent Supervisor

You can identify an agent as a supervisor.

If you define an agent as a supervisor:

  • If single sign-on is disabled either globally or for the agent you want to designate as a supervisor, the supervisor must have an Active Directory account. If the supervisor does not have an Active Directory account, the designation fails.

  • If single sign-on is enabled either globally or for the agent you want to designate as a supervisor, you must enter the individual's name in the format that your identity provider requires.

To create an agent who is a supervisor:

Procedure


Step 1

In the Configuration Manager menu, select Tools > Explorer Tools > Agent Explorer. The Agent Explorer window appears.

Step 2

In the Select filter data box, select the peripheral with which the agent is to associated and click Retrieve. This enables the Add Agent button.

Step 3

Click Add Agent.

Note


You must add the agent supervisor, as both member and supervisor, to the Member tab on the agent team list. To get the benefit from the Team layout in Finesse, the agent supervisor must be a member of the team.

Step 4

In the property tabs on the right side of the window, enter the appropriate property values. Use the Agent Tab to define the agent and designate the agent as a supervisor. Use the Skill Group Membership Tab to map the agent to any skill groups. (See the Configuration Manager online help for more information.)

Note

 
An agent team can have only one primary supervisor. There is no upper limit to the number of secondary supervisors for a team. Refer to the online help for instructions on how to assign a primary supervisor.

Step 5

When finished, click Save.


Agent Explorer Tab Descriptions

The tables in the following sections describe the tabbed fields in the Agent Explorer.

Agent Tab

The Agent tab allows you to view (and define, delete, or edit, if you have maintenance access) the properties of the selected agent's account. The tab also allows you to designate an agent as a supervisor.


Note


If the Cisco Contact Center Gateway Peripheral owns records, the skill groups might be automatically configured. However, subskill groups might be allowed for configuration in the Unified CCE. The Person record remains available for assignment to other Agents on other Peripherals.


When you identify an agent as a supervisor, a verification that the supervisor has an Active Directory account occurs. An Active Directory account is not created if no account exists.

If you define an agent as a supervisor and single sign-on is enabled either globally or for the supervisor individually:

  • The supervisor's user name and login name must match.

  • You must enter the supervisor's login name as a fully qualified User Principal Name (UPN) and include the domain (for example, jsmith@cisco.com).

  • A supervisor with no Active Directory account is added to the User_Group table.

If the supervisor does not have an Active Directory account and single sign-on is disabled either globally or for the agent, you cannot select the agent to be a supervisor. A supervisor who is not enabled for single sign-on requires an Active Directory account.

Table 16. Agent Tab Options

Field

Description

Select Person

Click this button to select a person to associate with the agent record. You can select a person for a new agent, an existing agent, or a temporary agent.
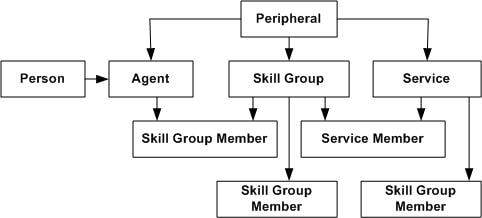
To create an agent record, associate a person with the agent. For an existing agent record, you can select a different person (from the current one selected) to associate with that agent record.

If you select a person for a temporary agent, you make that agent a permanent one. You cannot demote an agent to be a temporary one.

An agent's personal information is stored in the Person table of the database.

Personal information

Enable logins (optional)

Checked, indicates that this person is currently allowed to access the system. Unchecked, indicates that the person is not allowed to access the system.

You can use this to temporarily suspend a person's access to the system during vacation or certain hours. This approach does not disturb any of the entered information for the person.

Note

 
ACDs or soft ACDs do not support this option. Unified CCE voice phones do not currently support this option. However, Enterprise Chat and Email does support this option.

Enable single sign-on (SSO)

When the global SSO Enabled setting is Hybrid, check this check box to require an agent associated with this Person to log in with SSO authentication. Uncheck the check box to require Unified CCE authentication.

This check box is disabled when the global SSO Enabled setting is Enabled or Disabled.

Important


You cannot change the SSO state of a person who meets either of these conditions:

  • The person record is linked to user records on multiple peripherals.

    Remove the user records from all but one peripheral before changing the SSO state of this person.

  • The person is a supervisor.

    Remove the supervisor status before changing the SSO state of this person.

First name (required)

The selected agent's first name. For example: John.

The system automatically fills in the name fields after you select a person.

Last name (required)

The selected agent's last name. For example: Smith.

Temporary (appears only if agent is a temporary one)

This label and check box appear next to the first name field only if the selected agent is a temporary agent created by the CallRouter.

In this case, the name-related fields are dimmed. To change this agent to a permanent agent, uncheck this check box, fill in the required fields, and click Save. The check box no longer appears.

Login name (required)

The selected agent's login name.

The login name must be unique within the enterprise. The login name must also be represented with the domain name. For example, ABC@test.com.

The login name can be any valid ASCII character (that is, from 33 to 126 in the ASCII character set), except for the following: double quotation mark ("), forward slash (/), backward slash (\), square brackets ([ ]), colon (:), semicolon (;), pipe (|), equal to (=), comma (,), plus sign (+), asterisk (*), question mark (?), angle brackets (< >), hash (#), percent (%), and SPACE.

The behavior of this field changes depending on whether SSO is enabled, whether you check Supervisor, and whether you set a default domain name in the Configuration Manager's System Information dialog.

For agents (Supervisor unchecked):

  • SSO-enabled (globally or individually)—Enter the name as required by your SSO identity provider.

  • Non-SSO—Enter the name according to your organization's policy.

    Note


    If you have set a default domain name for your solution, it does not append to the login name for an agent.

For supervisors (Supervisor checked):

  • SSO-enabled (globally or individually)—Enter the name as required by your SSO identity provider.

  • Non-SSO with a default domain name set—If you enter a login name without a domain name, the Agent Explorer Tool appends the default domain name to the login name before attempting to validate it with Active Directory. If the login name validates, the Agent Explorer Tool creates the User_Group record with the default domain name.

  • Non-SSO without a default domain name set—Enter a login name in UPN format. If the login name does not include a domain, a message appears indicating that a domain is required. The tools unchecks the Supervisor check box because the validation fails.

Change Password

Click to change your password.

Note


This enables you to change your password and confirm the change.

Change Password is available only for non-sso agents

Password (optional)

An MD5 encrypted password, used for authentication by Unified CCE and by applications integrated with Unified CCE.

This password is used only when the global SSO Enabled setting is Disabled or when the global SSO Enabled setting is Hybrid and the Enable single sign-on (SSO) check box is not checked.

Note

 
In the System Information tool, the administrator can set the number of required characters for passwords.

Note

 
A password is case sensitive.

The password is limited to 32 characters. The password is restricted to the 7-bit printable ASCII characters (any of the 94 characters with the numeric values from 32 to 126). Control characters (for example, 'tab') and international characters are not allowed. This means passwords cannot be entered in a non-Western alphabet, such as Kanji.

Confirm password

Retype the password.

Agent information

Enterprise Name (required)

An enterprise name for the agent that is unique within the enterprise.

When you define a new agent and you click this field after entering the agent's first and last name, the system, by default, enters the enterprise name as the peripheral with the agents's first and last names.

For example: Boston_PG_1.Smith_John where Boston_PG_1 is the peripheral and Smith_John is the agent's last and first name.

Peripheral name (optional)

The name of the agent as known to the peripheral; for example: service_expert1. The peripheral name is equivalent to the agent name.

AgentID: Peripheral number (required)

The agent sign-in ID assigned at the peripheral. The peripheral number is equivalent to the agent ID.

Enter the Peripheral number for a voice agent or agent enabled for voice.

If you create an agent without assigning the agent to a skill group and you leave the Peripheral number blank, the number is auto-generated. When this occurs, the agent cannot be assigned to a voice skill group. This is because the auto-generated peripheral designates the agent as non-voice.

Supervisor

Check the check box if the agent is also a supervisor. (Uncheck the check box for an agent who is no longer a supervisor.)

Note


If your agent is also a supervisor, before you check the Supervisor check box, ensure that the agent has an Active Directory account.

Skill Group Membership Tab

The Skill Group Membership tab lists the skill groups in which the selected agent is a member and enables a supervisor to add (or remove) the selected agent to (or from) a skill group.

Table 17. Skill Group Membership Tab Field Descriptions

Field/Button

Description

Skill Group Name

The skill groups in which the selected agent is a member.

Add

Click this button to add the selected agent to a skill group. In the Add Skill Group Member dialog, select the skill group you want and click OK.

Remove

Click this button to remove the selected agent from the selected skill group.


Note


To save any edits made in this tab, in the Agent Explorer window, click Save.


Agent to Skill Group Assignment

After you have set up skill groups and agents, enter the assignments of agents to skill groups as configured for the peripheral. Each agent can belong to zero, one, or more skill groups.

You can use the Configuration Manager's Skill Group Explorer to map agents to skill groups.

Assign Agents to a Skill Group

Follow these steps to assign agents to a skill group:

Procedure

Step 1

Within the Configuration Manager menu, select Tools > Explorer Tools > Agent Explorer. The Agent Explorer window appears.

Step 2

Select the filters you want and click Retrieve. The retrieved agents appear in the list box.

Step 3

Select the agent you want assign to a skill group and click the Skill Group Membership tab.

Step 4

This step depends on whether you want to add or remove an agent. On the Skill group membership tab:

  1. To remove the selected agent from a skill group, select the appropriate skill group and click Remove.

  2. To add the selected agent to a skill group, click Add, and in the Add Skill Group Member dialog, select the appropriate skill group and click OK.

Step 5

When finished, in the Agent Explorer window, click Save.


Enable or Disable Agent Data at a Peripheral and Define an Agent Distribution

Follow these steps to enable/disable agent data at a peripheral and define an agent distribution:

Procedure


Step 1

In the Configuration Manager menu, select Tools > Explorer Tools > PG Explorer. The PG Explorer window appears.

Step 2

Click Retrieve.

Step 3

In the tree list box, expand the appropriate logical controller and select the peripheral.

Step 4

In the Agent Distribution tab, select or deselect the Enable agent reporting check box.

Step 5

In the Agent Distribution Entries list box, select an existing distribution site or create a new one by clicking New and entering values for the following fields:

  1. Administration & Data Server site name. The Admin site name for the Primary/Secondary Pair (Site) name, as specified in the Web Setup tool.

  2. Agent real time data. If checked, enables the flow of agent real time data from the peripheral to the Administration & Data Server. Unchecked, disables the flow of agent real time data.

  3. Agent historical data. If checked, enables the flow of agent historical data from the peripheral to the Administration & Data Server. Unchecked, disables the flow of agent historical data.

Step 6

Click Save to apply your changes.


Agent State Trace

You can set Agent State Trace to track every state (available, talking, and so on) that an agent passes through. To turn on this feature for an agent, in the Agent Explorer, on the Advanced tab, check the Agent State Trace check box.


Note


When you enable Agent State Trace, the system tracks every state change for each agent you select. This puts an added load on system software resources, such as network bandwidth and database space, and can impact system performance. You may only track up to 100 agents with Agent State Trace at any one time. You should also take the added load into account when planning your system capacity.

When you check the Enable agent reporting check box, configure the Agent distribution entries in the PG Explorer tool, and check the Agent State Trace check box, the Agent_State_Trace table in the database is populated.

Agent Configuration Data from Peripheral

An automatic call distribution (ACD) requires all the available agents to be configured to allow the agents to log in to the call handling devices with their peripheral number (Agent ID) or peripheral name, password, and so on. Also, these agents are configured to handle specific categories of calls based on Skill Group. There are some other data elements configured on the ACD such as last name, first name, and other class of services.

The Unified ICM Agent Level Reporting requires these agents to be configured in Unified ICM to identify them with full name, peripheral name, or enterprise name on both the real-time and historical reports.

The agentcfg.exe command line tool provides a process of configuring the agent configuration data elements available on an ACD into the Agent table in the Unified ICM database. This can also be automated by scheduling the process to run as an AT job at a specific time during a day. The frequency of scheduling the agent configuration process depends on your requirements.

Each peripheral requires the Agent configuration process to run.

Import Agent Data

Follow these steps to import agent data:

Procedure

Step 1

Retrieve the agent configuration data from the peripheral.

Step 2

Form all the information in a tab-delimited text file with one row per agent. Each row of the file must contain the following fields, in order:

PeripheralNumber FirstName LastName Description PeripheralName

Step 3

To import data from the file into the system software, enter one of the following commands at the command prompt: AgentCfg <Peripheral ID or Peripheral Name> <Input file name> [<Second input file>] [<Option>]

These variables are defined as:

  1. <Peripheral ID or Peripheral Name>:

    Peripheral ID or Peripheral Name of the peripheral that you want to configure.

  2. <Input file name>:

    The name of the input file contains the agent or skill group member configuration data on the ACD in the appropriate format (described in the next section). The file must contain header information, otherwise the tool assumes the data is for the Agent table.

    Full or relative path is allowed.

  3. <Second input file>:

    If the first file contains Agent data, the second file must contains Skill Group Member data. If the first file contained Skill Group Member data, the second file must contain Agent data.

    If no files contain headers, it is assumed that Agent data is in the first file and Skill Group Member data is in the second file. If headers are provided, the files may be specified in either order.

    Full or relative path is allowed.

  4. <Option>:

    /show Only - show configuration changes without committing to the database.

    /nodelete - the tool will not perform any delete operations. All inserts and updates will be saved.

    Example:

    1. AgentCfg.exe peripheral1 c:\temp\agentData.txt c:\temp\skillGrpMemData.txt

      This example will configure both agent and skill group member data for peripheral1.

    2. AgentCfg.exe peripheral1 c:\temp\skillGrpMemData.txt

      This example will configure skill group member data for peripheral. The file must contain header information.

Step 4

When the system software invokes the AgentCfg command, it performs the following steps for each line in the input file:

The following steps are performed for each line in the input file:

  1. The system software attempts to match the PeripheralNumber value to a configured agent for the peripheral.

    If it finds a match, it proceeds directly to step b.

    If it cannot find a match, it creates a new agent row in the database using the data from the input file, and proceeds to step b.

  2. The system software checks to see if the "temporary" flag is set. If it is, it updates the existing record.

  3. The system software checks whether the peripheral name values also match.

    If the FirstName and LastName values match, the system software updates the existing record with the given Description and PeripheralName values. (If the existing record was for a temporary agent, the agent is no longer temporary after the update.)

    If the values do not match, the system software marks the existing record as deleted and inserts a new row with the data from the input file. If an agent is configured for the peripheral in the database, but is not listed in the input file, the system software marks the agent as deleted in the database.

  4. The system software does a loop through the Skill Group Member input file container and compares the records in the file with those in the database:

    • If the record is found in the file but does not exist in the database, the record is inserted.

    • If the record is found in the database but does not exist in the file, the record is deleted.


Input File Formats

When using the AgentCfg.exe tool to import data, the input files must be formatted as described below. Note that the _ _TABLE and _ _COLUMNS entries, and the line below each are together considered the header. The header is not always required. The beginning of this section indicates when headers are needed.

Agent Configuration Data File

The input file must contain the list of all the agents configured on the ACD for that peripheral in the following format:

_ _TABLE

Agent

Indicates the name of the table to which the data will be configured. The table name is always Agent (do not change this line).

_ _COLUMNS

Indicates the tab-delimited column names that correspond to the data values (do not change this line). The columns need to be in the order shown below:

PeripheralNumber<tab>FirstName<tab>LastName<tab>Description<tab>PeripheralName

1045<tab>F1045<tab>L1045<tab>Auto Configured by Router<tab>F1045.L1045

1046<tab>F1046<tab>L1046<tab>Auto Configured by Router<tab>F1046.L1046

1047<tab>F1047<tab>L1047<tab>Auto Configured by

Router<tab>F1047.L1047<eof>

The following indicates the tab delimited data values that correspond to the column names:

1045<tab>F1045<tab>L1045<tab>Auto Configured by Router<tab>F1045.L1045

Skill Group Member Configuration Data File

Note that the __TABLE and __COLUMNS entries and the line below each are together considered the header. The header is not always required.

The input file contains the list of all the skill group member data as a relation between skill group and agents, which configured on the ACD for that peripheral in the following format:

_ _TABLE

Skill_Group_Member

Indicates the name of the table to which the data will be configured. The table name is always Skill_Group_Member (do not change this line).

_ _COLUMNS

Indicates the tab delimited column names that correspond to the data values (do not change this line). The columns need to be in the order shown below.

SkillGroupEnterpriseName <tab> AgentPeripheralNumber SkillGroupExterprise1<tab>1045 SkillGroupExterprise2<tab>1046 SkillGroupExterprise1<tab>1046

SkillGroupEnterpriseName is the ExterpriseName of the skill group that the agent belongs to.

AgentPeripheralNumber is the agent's login ID assigned at the switch, which is the same as the above Agent Peripheral Number.

The following indicates the tab delimited data values that correspond to the column names:

SkillGroupExterprise1<tab>1045

Manage Security

The system generates agent passwords using advanced hashing.

Advanced hashing helps you to ensure greater security of agent passwords in non-SSO mode. To enforce advanced hashing of agent passwords, you must enable the Enforce button under the tab, Manage Security.


Note


Local and Setup Administrators can perform enforcement.


Before you enforce the global switch, consider the following to ensure that the agent authentication is successful.

  1. All the PG's must be version 12.6 (1) or later.

  2. All the agent passwords must be re-entered.

When you disable Enforce, the system authenticates passwords using old and advanced hashing. When you enable Enforce, the system authenticates passwords only using advanced hashing.


Note


You will be able to disable the global switch from the API. For more information, on how to disable the global switch in UCCE deployment, see Agent Security API at https://www.cisco.com/c/en/us/support/customer-collaboration/unified-contact-center-enterprise/products-programming-reference-guides-list.html


Enterprise Data

Within a script, you often want to examine a set of possible targets on different peripherals before deciding where to send the call. For example, if you are routing a sales call, you might want to check the Sales skill groups at each call center to find which has the longest available agent or shortest expected delay.

An enterprise service is a set of services that can be referenced in a script. The individual services can be associated with different peripherals. Similarly, an enterprise skill group is a set of skill groups that can be referenced in a script. The individual skill groups can be associated with different peripherals.

In addition to using them within a script, you can track enterprise services and enterprise skill groups through monitoring screens and reports. This allows you to easily follow the performance, for example, of all Support services within the system.

Enterprise Services

Within a routing script, you can use an enterprise service as a shorthand for a set of services. You might want to scan several services to find, for example, the service with the shortest expected delay. Within the script, you can specify individual services to scan or, if you have an enterprise service defined, you can simply specify the enterprise service.

Assign Specific Services

Follow these steps to create an enterprise service and assign specific services:

Procedure


Step 1

In the Configuration Manager menu, select Tools > List Tools > Enterprise Service List. The Enterprise Service List window appears.

Step 2

In the Select filter data box, select the filters you want and click the Members tab. This enables the Add button and lists the currently defined enterprise services for the selected business entities.

Step 3

Click Add.

Step 4

In the Attributes tab, enter values for the following fields:

  1. Name. A name for the enterprise service. This name must be unique among all enterprise services in the system.

  2. Business Entity. Reserved for future use.

  3. Description. Any other information you want about the enterprise service. Any other information you want to add about the enterprise service.

Step 5

Click Save to save the changes.

Step 6

Click the Attribute tab.

Step 7

In the Attribute tab, click Add.

Step 8

In the Add Services dialog, select the services you want to add and click OK. The dialog closes and the selected services are listed as members in the Attribute tab.

Step 9

When finished, click Save to save the changes.


Enterprise Skill Groups

Just as you can use an enterprise service as a shorthand for a collection of services, so you can use an enterprise skill group as a shorthand for a collection of skill groups. The skill groups can be defined on different peripherals.

Create an enterprise skill group

Follow these steps to create an enterprise skill group:

Procedure


Step 1

In the Configuration Manager menu, select Tools > List Tools > Enterprise Skill Groups List. The Enterprise Skill Group List window appears.

Step 2

In the Select filter data box, select the filters you want and click Retrieve. This enables the Add button and lists the currently defined skill groups for the selected business entities.

Step 3

Click Add, and in the Attributes tab, enter values for the following fields:

  1. Name. A name for the enterprise skill group. This name must be unique among all enterprise skill groups in the system.

  2. Business Entity. Reserved for future use.

  3. Description. Any other information you want to add about the enterprise skill group.

Step 4

Click Save to save the changes.

Step 5

Click the Members tab.

Step 6

In the Members tab, click Add.

Step 7

In the Add Enterprise Skill Group Member dialog, select the skill groups you want to add and click OK. The dialog closes and the selected skill groups are listed as members in the Members tab.

Note


The Skill Group list includes base skill groups as well as primary and secondary groups for those switches that support them. Typically, add either the base group or the associated primary and secondary groups, but not all three, to the enterprise skill group.

Step 8

Click Save to save the changes to the database.


Precision Queue Configuration

Precision queues are a combination of steps that include attributes, defined terms for the selected attributes, wait times, and Consider If formulas.

Precision queues are configured using the CCEAdmin > Organization Setup > Skills > Precision Queue

For more information on precision queues and precision routing, see the Cisco Unified Contact Center Enterprise Features Guide at http://www.cisco.com/en/US/products/sw/custcosw/ps1844/products_feature_guides_list.html.