Certificate Management for Secured Connections

Certificates

Unified CCE solution supports both RSA and ECDSA certificates. These certificates can be enabled on the following Unified CCE solution components—Cisco Unified CVP, Cisco Finesse, Cloud Connect, CUIC, Cisco VVB, Cisco IdS, and ECE.

Self-Signed Certificates

Self-signed certificates (as the name implies) are signed by the same entity whose identity they certify, as opposed to being signed by a certificate authority. Self-signed certificates are not considered to be as secure as CA certificates, but they are used by default in many applications.

Unified CCE Certificate Management Utilities

The following certificate management utilities can be used to secure machine-to-machine communication (for example, communication between the Cisco Finesse server and the CTI server), and manage interactions between web applications:

  • Cisco SSL Encryption Utility used for web applications (Unified CCE Administration, WebSetup, and ISE).

  • CiscoCertUtil used for creating and installing self-signed certificates and CA-signed certificates for use in machine-to-machine communications.

  • Diagnostic Framework Cert Utility used for Diagnostic Portico applications.


Note


The Unified CCE Certificate Monitoring service monitors the self-signed and CA-signed certificates and keys that are used for certificate management. The service alerts the system administrator about the validity and expiry of these certificates. For more information, see the Serviceability Guide for Cisco Unified ICM/Contact Center Enterprise at http://www.cisco.com/c/en/us/support/customer-collaboration/unified-contact-center-enterprise/products-installation-and-configuration-guides-list.html


SSL Encryption Utility


Note


Although this utility currently has its original name, the SSL Encryption Utility now configures web applications for use with TLS.


Unified CCE web servers are configured for secure access (HTTPS). Cisco provides SSL Encryption Utility (SSLUtil.exe) to help you configure web servers for use with TLS.

Operating system facilities such as IIS can also accomplish the operations performed by the SSL encryption utility; however, the Cisco utility simplifies the process.

SSLUtil.exe is located in the <ICMInstallDrive>\icm\bin folder. You can invoke the SSL Encryption Utility in standalone mode or automatically as part of setup.

The SSL Encryption Utility generates log messages pertaining to the operations that it perform. When it runs as part of setup, log messages are written to the setup log file. When the utility is in standalone mode, the log messages appear in the SSL Utility Window and the <SystemDrive>\temp\SSLUtil.log file.

The SSL Encryption Utility performs the following major functions:

  • SSL Configuration

  • SSL Certificate Administration

TLS is available for Unified CCE web applications installed on Windows Server. You can configure Internet Script Editor for TLS.

By default, RSA certificate will be active and used by CCE web applications such as Unified CCE Administration console, WebSetup, and ISE.

To use ECDSA certificate for CCE web applications, use the SSLUtil -crtecdsabind console command to bind the ECDSA certificate to the default IIS port. This will internally unbind the RSA certificate and make the ECDSA certificate active.

For example, run the following command in the SSLUtil utility console, where curve_name is optional and supports all NIST curves:

sslutil -crtecdsabind <curve_name>. By default, the curve is P384.

Do the following to generate the new EDCSA certificate:

  1. Delete the following files available at ICMInstallDrive>\icm\ssl\

    • host_ecdsa.pfx

    • host_ecdsa.crt (hidden file)

  2. Run the SSLUtil -crtecdsabind command from the SSL Encryption utility console available at ICMInstallDrive\icm\bin

  3. Do the following to revert to the RSA certificate:

    1. Launch SSL Encryption utility tool, and go to Certificate Administration tab.

    2. To uninstall and deactivate the existing ECDSA certificate, click Uninstall.

    3. To activate the RSA certificate, click Install.


Note


The ECDSA certificate can be generated and installed only via the command line.


TLS Installation During Setup

By default, setup enables TLS for the Unified CCE Internet Script Editor application.


Note


You must restart the SSL Configuration Utility if you use IIS manager to modify TLS settings while the utility is open.

The SSL Configuration Utility can be used to create self-signed certificates, to install the certificates in IIS, and to remove certificates from IIS. When invoked as part of setup, the SSL Configuration Utility sets TLS port in IIS to 443 if it is found to be blank.

To use TLS for Internet Script Editor, accept the default settings during installation and the supported servers use TLS.

During setup, the utility generates a self-signed certificate, imports it into the Local Machine Store, and installs it on the web server. Virtual directories are enabled and configured for TLS with 256-bit encryption.


Note


During setup, if a certificate exists or the web server has an existing server certificate installed, a log entry is added and no changes take effect. Use the utility in standalone mode or use the IIS Services Manager to make certificate management changes.


Encryption Utility in Standalone Mode

In standalone mode, the SSL Configuration Utility displays the list of Unified ICM instances installed on the local machine. When you select an instance, the utility displays the installed web applications and their SSL settings. You can then alter the SSL settings for the web application.

The SSL Configuration Utility also facilitates the creation of self-signed certificates and the installation of the created certificate in IIS. You can also remove a certificate from IIS using this tool. When invoked as part of setup, the SSL Configuration Utility sets TLS port in IIS to 443 if it is found to be blank.

CiscoCertUtil Utility

The CiscoCertUtil utility helps you manage certificates on any Contact Center Enterprise machine for machine-to-machine secure communication across components. Examples of machine-to-machine secure communications are Finesse to CTI Server (CG), Dialer to CG, MRPG to ECE, and VRU PG to CVP, and so on.

The TLS-enabled components use this utility to set up certificates, and the Contact Center Enterprise setup uses this utility to generate and install certificates.

The CiscoCertUtil utility is supported on servers running Windows Server. It performs the following functions:

  • Generates RSA and ECDSA selfsigned certificates.

  • Generates RSA and ECDSA certificate signing requests (CSR).

  • Installs remote certificates to the local machine certificate store under the Personal/ROOT/CA folder.

  • Deletes certificates from the local machine certificate store under the Personal/ROOT/CA folder.

  • Generates selfsigned certificates in the PEM format, which is an X509 extension.

  • Generates the corresponding key with the filename host.key.

  • Does not validate any certificate.

  • Does not create any log file pertaining to the operations that it performs. If there are errors, the error log appears on the console.


    Note


    Use the CiscoCertUtil utility to install or delete selfsigned certificates only.


How to use CiscoCertUtil Utility:

CiscoCertUtil [/generateCert /curve <mandatory for ECDSA> <optional curveName>]|/generateCSR /curve <mandatory for ECDSA> <optional curveName>|/f<Optional> |/remove <cert_name> <optional_cert_store - my/root/ca>||/install <cert_file> <optional_cert_store - my/root/ca>| |/list]| commands.

Where:

  1. /list displays a list of certificates that are present in the local machine store under personal (LOCAL_MACHINE/MY), root (LOCAL_MACHINE/ROOT) and ca (LOCAL_MACHINE/CA) store.

  2. /generateCert generates a selfsigned RSA certificate with the filename host.pem and a key with the filename host.key. The selfsigned certificate is copied to <install_drive>:\icm\ssl\rsa folder. If the key exists, the same key is used to generate the selfsigned certificate host.pem. An RSA key length of 2048 bits is used.

    /generateCert /curve The command generates a selfsigned ECDSA certificate with the P384 curve as default: The /generateCert /<curve_name>. The file host.pem and key file host.key are copied to <install_drive>:\icm\ssl\ecdsa folder. If the key exists, the same key is used to generate the selfsigned certificate, host.pem. The curve name is optional. The curve name is P256 for secp256k1 and P384 for secp384r1. CiscoCertUtil Utility tool supports all OpenSSL NIST curves. The /generateCert command does not overwrite the host.key and host.pem. To overwrite the existing selfsigned certificate, use the following command: /generateCert/f. This command overwrites host.key and host.pem if already available in the system.

  3. /generateCSR The command generates a CSR with the filename host.csr and a key with the filename host.key, which is a private key. The host.csr file is then sent to Certification Authority to obtain the digital identity certificate. If the key exists, the same key is used to generate host.csr.

    /generateCSR/curve The command generates ECDSA CSR with P384 as the default curve.


    Note


    When you generate a certificate signing request (CSR), you will be prompted to key in the Organization Unit (OU). Based on the RFC5280 standard and baseline requirement, the Organization Unit is not required. You can leave this field blank so that the Certificate Authorities will not include the field in the certificate.

    Use the openssl req -in <csr_file> -noout -text command to validate the presence of the Organization Unit field.


  4. /remove <certificate_name> removes the certificate <cert_name> from the local machine certificate store under the Personal folder. If the command fails to run, an error message appears. To display the list of certificates that are present, use the /list command.

  5. /install <cert_file> <optional_cert_store – my/root/ca> installs the certificate that is mentioned as <cert_file> into the local machine certificate store under the Personal (my) or Trusted root (root) or Intermediate Certificate Authorities (CA) folder based on the option provided. If no option is provided, the certificate will be installed in the Personal folder. If the command fails to run, an error message appears.

    An example of this command:
    CiscoCertUtil /install c:\icm\ssl\certs\host.pem.
  6. /help displays the usage of the commands.


    Note


    If the remove command fails, use the list command to verify whether the certificate you attempted to remove is present in the local machine certificate store.

    Note


    During CCE installation, selfsigned certificates for RSA and ECDSA are already generated. RSA certificate is available at <Install_drive>\icm\ssl\RSA, and ECDSA certificate is available at <Install_drive>\icm\ssl\ecdsa. Run the following commands to generate new certificates (in cases where the certificate key is compromised or if the selfsigned certificate has expired):

    • /generateCert to generate RSA certificate.

    • /generateCert /curve to generate ECDSA certificate.


Diagnostic Framework Certificate Manager Utility

Diagnostic Framework Certificate Manager utility can perform the following tasks:

Before you begin

The Diagnostic Framework Certificate Manager utility is a command line utility used to manage certificate creation and binding for the Diagnostic Portico. It is installed at <ICM_Drive>:\icm\serviceability\diagnostics\bin\DiagFwCertMgr.exe.

Procedure


Step 1

Create self-signed RSA or ECDSA certificate.

Step 2

Store the certificate in local computer personal certificate store.

Step 3

Bind the certificate to windows HTTP service on a given port.

Step 4

Remove a certificate binding from the windows HTTP service on a given port.

Step 5

Delete the self-signed certificate from the personal certificate store on the local computer.

Step 6

Validate the certificate binding to HTTP service for Diagnostic Framework service.

The following section explains the usage of the utility:

DiagFwCertMgr /task:<task_name> [/port:<port_number>] [/certhash:<certificate_thumbprint>] [/logpath:<logfile_path>]

Where:

  • /task: specifies the task to be performed.

  • /port: specifies the port number used by the service. This is optional as the port number is automatically read from the service configuration file (DiagFwSvc.exe.config).

  • /certhash: specifies the SHA-1 thumbprint of the certificate. This is required only when binding a specific certificate, which exists in the certificate store, to a port.

  • /logpath: specifies the path where the log file should be created. By default, it is the current folder.

By default RSA certificate will be enabled. However, installer will also generate ECDSA certificate, import it the local store, and update ECDSA certificate hash in HKLM\SOFTWARE\Cisco Systems, Inc.\ICM\Serviceability\ DiagnosticFramework\SelfSignedCertECDSAForDiagFwSvc.

To enable ECDSA, you must use the BindCertFromStore command with /certhash argument with the ECDSA hash available in the registry. For more commands, refer to the table below.
Table 1. Diagnostic Framework Certificate Manager Utility Tasks

Task

Description

CreateAndBindCert

Creates a self-signed certificate in the local computer personal certificate store and binds it with HTTP service on the given port.

(Used by ICM-CCEInstall)

BindCertFromStore

Looks up the certificate provided by /certhash argument in certificate store and binds it with the HTTP service on the given port.

UnbindCert

Removes the certificate binding from the specified port, does not modify any certificate in the store.

UnbindAndDeleteCert

Removes the certificate binding from the specified port. Also, deletes the self-signed certificate created by CreateAndBindCert option.

(Used by ICM-CCE Uninstall)

ValidateCertBinding

Verifies the certificate binding on the specified port and confirms its presence in the local computer certificate store.

CreateAndAddToStoreCertECDSA

Creates and stores the self-signed ECDSA certificate in the local computer certificate store without binding it to the port.

CheckAndCreateStoreCertECDSA

Checks if the certificate is present in the store and creates only if it is NOT present.

CreateAndBindCertECDSA

Creates a self-signed ECDSA certificate in the local computer certificate store and binds it with HTTP service on the given port.

DeleteCertECDSA

Deletes the self-signed ECDSA certificate.

UnbindAndDeleteCertECDSA

Removes the certificate binding from the specified port. Also, deletes the self-signed ECDSA certificate created by CreateAndBindCertECDS option.

Diagnostic Framework Certificate Manager utility stores the thumbprints (SHA-1 hash) of the self-signed certificate created by the utility, and of the certificate used by the Diagnostic Framework service. The thumbprints are stored in the registry at the following locations:

  • HKLM\SOFTWARE\Cisco Systems, Inc.\ICM\Serviceability\ DiagnosticFramework\SelfSignedCertCreatedForDiagFwSvc
  • HKLM\SOFTWARE\Cisco Systems, Inc.\ICM\Serviceability\ DiagnosticFramework\CertUsedByDiagFwSvc

Note


For more information see, Serviceability Guide for Cisco Unified ICM/Contact Center Enterprise at https://www.cisco.com/c/en/us/support/customer-collaboration/unified-contact-center-enterprise/products-installation-and-configuration-guides-list.html


Enabling ECDSA for Unified CCE Solutions

Before enabling ECDSA on the solution components—CVP, Cisco Finesse, Cloud Connect, Cisco Unified Intelligence Center, Voice Browser, IDS, and ECE—the administrator must ensure that the solution component’s ECDSA certificate is exported and installed on the other component’s certificate store for the interface to become active.

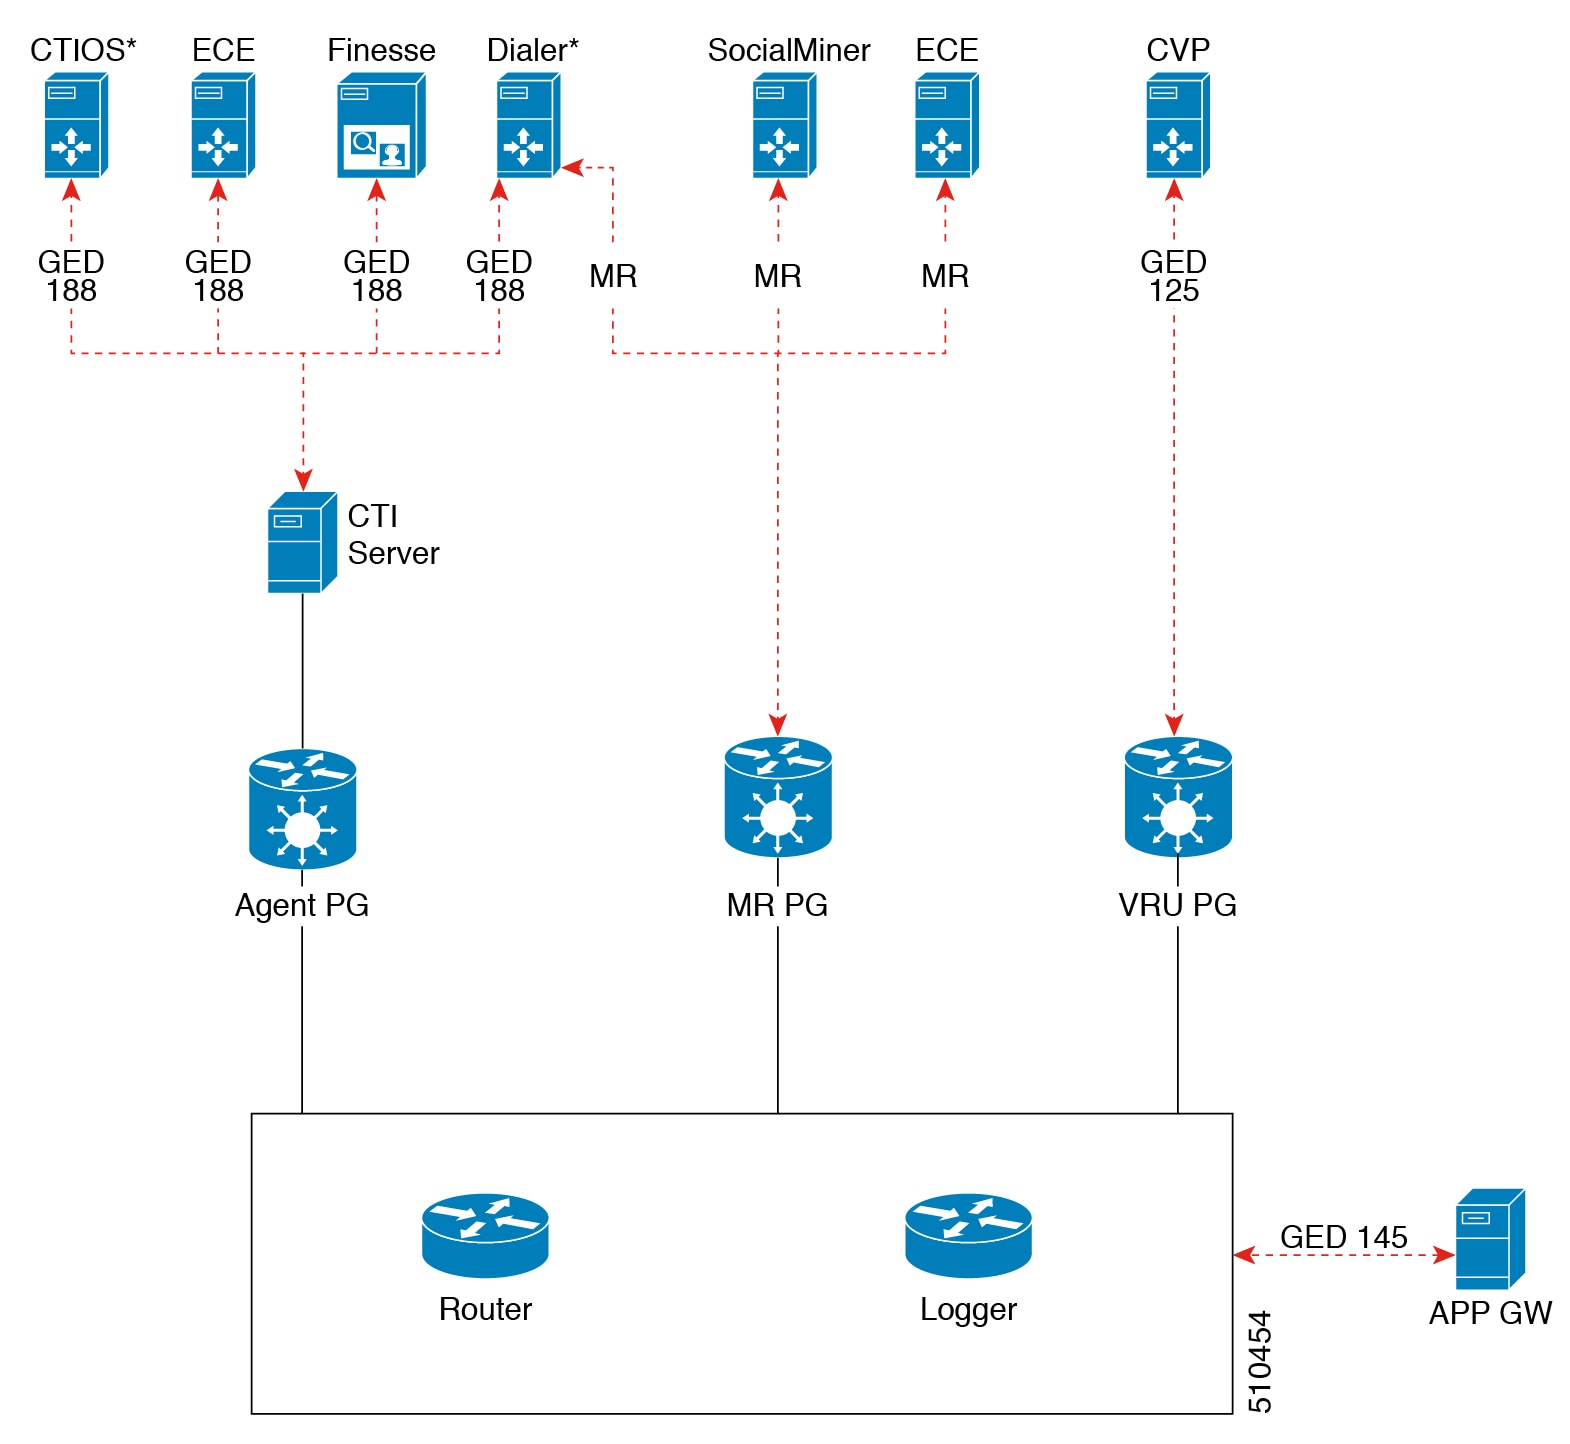
For example, before enabling ECDSA on the CTI Server, the CTI Server's ECDSA certificate has to be copied and installed on Cisco Finesse, ECE, and Dialer. Before enabling ECDSA on Cisco Finesse, the Cisco Finesse ECDSA certificate has to be copied and installed on the CTI server. This is required for 2-way authentication which is enabled by default on the CTI Server-to-Finesse interface.

The administrator can enable ECDSA individually on each solution component, after the certificate exchange is completed. The administrator has the option to enable ECDSA on different solution components across multiple maintenance windows.


Note


A component operates on ECDSA only if the server is configured to use ECDSA.


For details about which components act as servers in various use cases, refer to the table Server-Client Matrix for Secured Connections at Manage Secured PII in Transit.

Considerations for enabling ECDSA

Before enabling ECDSA, the administrator should be aware of the following:

  • After enabling or disabling ECDSA, the changes will take effect only after you reboot the system.

  • In a one-way trust on the TLS interface, the component acting as client must have the server ECDSA certificate in its store.

  • In a two-way trust on the TLS interface, both the client and the server components should have the peer ECDSA certificate in their store.

  • Ensure to have mutual ECDSA certificates that are installed on high availability enabled components for seamless failover in secured mode.

  • ECDSA can be enabled in any order on the solution components that support it. However, it is recommended to enable it first on the server component.

  • If you want to enable CA-signed ECDSA certificate for a specific channel, the entire certificate chain must be enabled for ECDSA.

  • If Cisco Finesse is enabled for ECDSA and Cisco Finesse IP Phone Agent (IPPA) is used in your deployment, you must ensure that Cisco Unified Communications Manager is also enabled for ECDSA so that the Cisco Finesse IPPA phones can establish a secure channel with both Cisco Finesse and Cisco Unified Communications Manager. To enable ECDSA in Cisco Unified Communications Manager, see Security Guide for Cisco Unified Communications Manager at https://www.cisco.com/c/en/us/support/unified-communications/unified-communications-manager-callmanager/products-maintenance-guides-list.html.

  • Servers that are enabled with the ECDSA mode use ECDSA certificate and ciphers. Client with either RSA or ECDSA certificate can connect to the server. For more information, refer to the table Server-Client Matrix at Manage Secured PII in Transit.

By default, self-signed ECDSA certificate exists in each solution component except where it is specified as not available (for example, CVP). The self-signed certificate can be overridden with CA certificate if necessary.

RSA certificates will be used as the default cryptography algorithm. ECDSA can be enabled or disabled as and when required.

Manage Secured PII in Transit

The Contact Center Enterprise solution handles customer sensitive Personally Identifiable Information (PII) that include credit card information, PIN, and other sensitive details. Such sensitive information is sent across the system in ECC variables and can be exploited.

The transport channels such as GED 188, GED 125, GED 145, and MR carry PII and are susceptible to exploitation. It is therefore necessary to secure the transport channels that carry PII and protect them from any threats.

Securing PII is also necessary to adhere to the regulatory security compliance. The CCE solution uses the TLS protocol to enable security of the transport channels that carry PII.


Note


The communication channels between the Central Controller and PG are not secure. For end-to-end solution security, use the IPSec Network Isolation Zone.


Figure 1. Secured Connection Example

The following table lists the use cases for secured connections, the corresponding server-to-client matrix, and the protocol used:

Use Case

Server

Supported Client

Protocol

Secured self-service communications: To secure self-service communications, enable secured connection in CVP and VRU PG.

CVP

VRU PG

GED 125

Secured outbound calls: To secure outbound calls, enable secured connection in the CTI server, Dialer, and Media Routing PG.

CTI Server

Dialer

GED 188

Dialer

MR PG

Media Routing Protocol

Secured agent desktop communications: To secure the communications with Cisco Finesse Server and CTI OS, enable mixed-mode connection in the CTI server. Next, enable secured connection in the Cisco Finesse Server or in CTI OS, as applicable.

CTI Server

Cisco Finesse

GED 188

CTI OS

Secured third-party integration: To secure third-party integration with CCE, enable secured connection in the application gateway servers and clients.

Application Gateway Servers

Application Gateway Clients

GED 145

Secured multi-channel communications:To secure multi-channel communications, enable secured connection between:

  • ECE (Services Server) and MR PG (Client)

  • Customer Collaboration Platform (CCP) and MR PG (Client)

  • CTI server and ECE (Client)

ECE

MR PG

Media Routing Protocol

Customer Collaboration Platform

CTI Server

ECE

GED 188

To establish secured connection between a server and a client, you need to create mutual authentication by using one of the following security certificates:

  • Self-signed Certificate

  • Third-party CA Signed Certificate

  • RSA certificate and keys stored in <install_drive>:\icm\ssl\rsa.

  • ECDSA certificate and keys stored in <install_drive>:\icm\ssl\ecdsa.

    Based on the RSA or ECDSA deployment, please choose the corresponding certificate from the above-mentioned folder.

CTI Server–Dialer Secure Connection for RSA and ECDSA

To establish secured connection between the CTI Server and Dialer by exchanging self-signed certificates, perform the following steps:

  1. Copy and install the self-signed certificate available on the CTI Server (RSA or ECDSA folder as required) into the Dialer. If a valid certificate is not already available, you have to generate a new certificate. For more information, see Manage Certificates.

  2. Copy and install the self-signed certificate that is available on the Dialer (RSA or ECDSA folder as required) into the CTI Server.


    Note


    If the client and the server are on the same machine, the security certificate that is available on the machine needs to be placed on the trusted store once, by the server or the client. The second attempt to place the certificate on the trusted store will fail. For more information, see CiscoCertUtil Utility.


  3. Check the Enable Secured Connection check box in the CTI Server Component Properties screen, and in the Outbound Option Dialer Properties screen, to ensure that the security is enabled.

  4. Check the ECDSA enabled flag in the registry folder HKLM\SOFTWARE\WOW6432Node\Cisco Systems,Inc.\ICM\Cisco SSL Configuration. It should be false for RSA and true for ECDSA.

    Ensure that appropriate certificates are exchanged before changing the registry value.

For more information, see:


Note


Exchange certificates and establish secured connection separately on both Side A and Side B of the Unified CCE solution.


Note


If you add, delete, or renew a certificate, restart the service to establish a new connection.


Dialer-MR PG Secure Connection for RSA and ECDSA

To establish secured connection between the Dialer and MR PG by exchanging self-signed certificates, perform the following steps:

  • Copy and install the self-signed certificate available on the Dialer (RSA or ECDSA folder as required) into the MR PG. If a valid certificate is not already available, generate a new certificate. For more information, see Managing Self-Signed Certificates.

  • Copy and install the self-signed certificate that is available on the MR PG (RSA or ECDSA folder as required) into the Dialer.

  • Check the Enable Secured Connection check box in the MRPIM Properties window and in the Outbound Option Dialer Properties window to ensure that the security is enabled.

  • Check the ECDSA enabled flag in the registry folder HKLM\SOFTWARE\WOW6432Node\Cisco Systems,Inc.\ICM\Cisco SSL Configuration. It should be false for RSA and true for ECDSA.

    Ensure that appropriate certificates are exchanged before changing this registry value.

CCP-MR PG Secure Connection for RSA and ECDSA

To establish a secured connection between CCP and MR PG by exchanging self-signed certificates, perform the following steps:

Procedure


Step 1

Check the Enable Secured Connection check box in the MRPIM Properties window and in CCP to ensure that the security is enabled using VOS CLI.

Step 2

Copy and install the self-signed certificate available on the CCP (RSA or ECDSA folder as required) Tomcat store into MR PG using the CiscoCertUtil utility. For more information, see the CiscoCertUtil Utility section. If a valid certificate is not already available, generate a new certificate. For more information, see Manage Certificates.

Step 3

Copy and install the self-signed certificate that is available on MR PG (RSA or ECDSA folder as required) into CCP using the keytool utility.

Step 4

Import the certificate in the respective component trust store/keystore.

Note


In Unified CCE deployments, the certificate should be installed at ICM install drive>\ssl\cacerts in Unified CCE AW VM. Use the following command:

keytool -import -file <path where the self-signed certificate is copied > -alias <FQDN of the component Server> -keystore <install_drive>:\ssl\cacerts

Step 5

Check the ECDSA enabled flag in the registry folder HKLM\SOFTWARE\WOW6432Node\Cisco Systems,Inc.\ICM\Cisco SSL Configuration. It should be false for RSA and true for ECDSA.

Ensure that appropriate certificates are exchanged before changing this registry value.


VRU PG–CVP Secure Connection for RSA and ECDSA

To establish secured connection between the VRU PG and Cisco Unified CVP by exchanging self-signed certificates, perform the following steps:

  • Copy the certificate (RSA or ECDSA as required) from Cisco Unified CVP to VRU PG and install using the command:

    ciscoCertutil /install <cert_file> along with the parameter optional_cert_store -my/root/ca.

  • Copy the VRU PG certificate (RSA or ECDSA folder as required) and install it on the Cisco Unified CVP. For more details, see the Configuration Guide for Cisco Unified Customer Voice Portal at https://www.cisco.com/c/en/us/support/customer-collaboration/unified-customer-voice-portal/products-installation-and-configuration-guides-list.html.

  • Check the Enable Secured Connection check box in the VRUPIM Properties window to ensure that the security is enabled.

  • Check the ECDSA enabled flag in the registry folder HKLM\SOFTWARE\WOW6432Node\Cisco Systems,Inc.\ICM\Cisco SSL Configuration. It should be false for RSA and true for ECDSA.

    Ensure that appropriate certificates are exchanged before changing the registry value.

CTI Server–Finesse Secure Connection for RSA or ECDSA

This interface uses tomcat certificate on Finesse. To establish secured connection between the CTI Server and Finesse by exchanging self-signed certificates, perform the following steps:

  • Copy the certificate (RSA or ECDSA as required) from Finesse to CTI Server and install using the command ciscoCertutil /install <cert_file> along with the parameter optional_cert_store -my/root/ca.

    For more information on how to generate Finesse Certificate, see Cisco Finesse Administration Guide at https://www.cisco.com/c/en/us/support/customer-collaboration/finesse/products-maintenance-guides-list.html.

  • Copy the CTI-Server certificate from RSA or ECDSA folder as required and upload it in Finesse.

  • Check the Enable Secured Connection check box on the CTI Server Component Properties screen.

  • Check the ECDSA enabled flag in the registry folder HKLM\SOFTWARE\WOW6432Node\Cisco Systems,Inc.\ICM\Cisco SSL Configuration. It should be false for RSA and true for ECDSA.

    Ensure that appropriate certificates are exchanged before changing this registry value.

    Establish secured connection between the other servers and clients that are specified in the table Server-Client Matrix for Secured Connections at Manage Secured PII in Transit. It is critical to note that based on deployment (RSA or ECDSA), appropriate certificate needs to be exchanged between the components.

For information on secured connections between the other components, see the following guides:

Locations for Certificates and Keys

Store the certificates, intermediate and trusted certificates, and keys at the following directories in the respective machines:

Certificates and Keys

Location

Certificates

<install_drive>:\icm\ssl\certs (cert in use)

<install_drive>:\icm\ssl\ecdsa (ecdsa)

<install_drive>:\icm\ssl\rsa (rsa)

Intermediate and Trusted Certificate

<install_drive>:\icm\ssl\trust-certs

The trusted certificate may be stored in this location and installed from here into Windows cert store.

Keys

<install_drive>:\icm\ssl\keys (keys in use)

<install_drive>:\icm\ssl\ecdsa (ecdsa)

<install_drive>:\icm\ssl\rsa (rsa)

The steps to generate and install certificates are provided in following section.

Manage Certificates

Managing Certificates for Finesse

Refer to the following steps for security certificate management for Finesse server.

Exporting a Certificate from Finesse Server

Use this procedure to export security certificates from the Finesse server.

Procedure

Step 1

Sign in to Cisco Unified Operating System Administration console on Finesse server.

Use the FQDN path of the Finesse server (http://FQDN of Finesse server:8443/cmplatform) to sign in.

Step 2

Select Security > Certificate Management.

Step 3

Click Find.

Step 4

Perform one of the following steps based on whether the Tomcat certificate is listed or not:

  • If the Tomcat certificate is not listed:

    • Click Generate New.

    • Reboot the VOS server when the certificate generation is complete.

    • Restart this procedure.

  • If the Tomcat certificate is listed:

    • Click the certificate to select it. Click Download .pem file and save the file to your desktop.

    • Ensure that the certificate you select includes the hostname for the server.

Note

 
Follow the above procedure to download ECDSA certificate. The name of the certificate is Tomcat-ECDSA.

What to do next

Perform these steps for all the Finesse server nodes.

Importing a Certificate to Finesse Server

Use this procedure to import security certificates to the Finesse server.


Note


The following steps are applicable for certificates of key types of RSA and ECDSA.
Procedure

Step 1

Sign in to Cisco Unified Operating System Administration on Finesse server.

Use the FQDN path of the Finesse server (http://FQDN of Finesse server:8443/cmplatform) to sign in.

Step 2

Select Security > Certificate Management.

Step 3

Click Upload Certificate.

Step 4

Select Certificate Name > tomcat-trust.

Step 5

Click Browse.

Browse to the location of the CTI Server certificate with the .pem file extension.

Step 6

Select the file and click Upload File.


What to do next

Repeat steps 3 to 6 for the remaining unloaded certificates.

After you upload all the certificates, restart the system using utilis system restart.

To enable ECDSA certificate for VOS components, follow the steps at Enabling ECDSA for VOS components

Generate and Copy CA Certificates of Unified CCE Components

If you are using Certificate Authority (CA) certificates for mutual authentication of CCE machines, do the following:

  1. Sign in to the required Unified CCE component machine as an administrator. For example, if you want to generate CA-signed certificate of MR PG, sign in to the MR PG machine as an administrator.

  2. Generate CSR using CiscoCertUtil. Use appropriate command for CSR generation for RSA/ECDSA as specified in CiscoCertUtil tool using the /generateCSR command.

    This command generates a host.csr file and sends the CSR to a trusted Certificate Authority for sign-off. To generate a new CSR, see CiscoCertUtil Utility.

  3. Obtain the CA-signed application certificate, Root CA certificate, and Intermediate Authority certificate.

  4. Copy the CA-signed application certificate file into the appropriate folder (<install_drive>:\icm\ssl\rsa or <install_drive>:\icm\ssl\ecdsa) as applicable.

  5. Ensure registry ECDSA enabled flag is set appropriately at HKLM\SOFTWARE\WOW6432Node\Cisco Systems,Inc.\ICM\Cisco SSL Configuration.

  6. Restart the services

  7. Install the CA-signed application certificate using the command CiscoCertUtil / install <cert file > <optional cert store>. Certificate store can be my, root or ca with default being my when not specified. You can also manually install the CA Certificate to Windows trust store, if not already installed or present. You can verify if certificate is installed properly using windows certlm.msc utility in personal, Trusted Root or Intermediate Certificate Authorities based on option specified in install command. Default is Personal if no option is provided.


Note


For VOS components, the procedure to upload or download the CA certificate is similar to the procedure to download the ECDSA certificate, except that, for ECDSA, the certificate purpose as tomcat-ECDSA instead of tomcat.


Generate and Copy CA Certificates of VOS Components

Each time you sign-in, the browser validates the certificate presented by the server. If the certificate is not signed by a trusted root Certificate Authority (CA), the browser will typically not allow the connection until the user explicitly allows it. In order to avoid this, you must obtain a root certificate signed by a CA and install it onto the VOS components.
Procedure

Step 1

Generate CSR.

  1. Sign in to the Cisco Unified OS Administration page using the URL: https://<FQDN>/cmplatform.

  2. Select Security > Certificate Management > Generate CSR.

  3. After the successful generation, click Download CSR.

  4. Use the CSR to obtain the signed application certificate and the CA root certificate from the CA.

Step 2

After receiving the certificates, open the Cisco Unified OS Administration page using the URL: https://<FQDN>/cmplatform.

Step 3

Select Security > Certificate Management > Upload Certificate.

Step 4

Select the certificate name from the Certificate Name list.

Step 5

To upload the root certificate:

  1. In the Upload dialog box, select tomcat trust from the drop-down list.

  2. Browse to the file and click Open.

  3. Click Upload File.

Step 6

To upload the application certificate:

  1. In the Upload dialog box, select tomcat from the drop-down list.

  2. In the Root Certificate text box, enter the name of the CA root.

  3. Browse to the file and click Open.

  4. Click Upload File.

Step 7

Restart the services.

For more information about CA-signed certificates, see the Security topics in the Unified OS Administration online help.


Manage CCE Web Application Security (HTTPS)


Note


Starting release 12.6(2), Unified CCE web applications (like CCE Admin, Web Setup, Diagnostic Portico and Internet Script Editor tools) will use only HTTPS to communicate with the interface.


For the procedure to generate and bind the RSA certificate, see CCE Certificate Management Utilities.

Before you begin

Unified CCE Installer generates both the RSA and the ECDSA certificates for all the Unified CCE web applications such as Unified CCE Administration, WebSetup, ISE and DiagnosticPortico. By default, it binds the RSA certificate to the HTTPS port. However, the administrator can change the binding to use the ECDSA certificate for web applications.

Procedure to enable ECDSA for WebSetup, Unified CCE Admin, and ISE webservices

Before you begin

SSL Encryption Utility tool is used to generate certificates for WebSetup, Unified CCE and ISE. Installer generates ECDSA certificate (host_ecdsa.pfx) under <install_drive>:\icm\ssl and imports to windows local store.

Follow the procedure below to bind ECDSA certificate to IIS port.

Procedure

Step 1

Login to Unified CCE VM, where SSLUtility based webservices are used. Open the command prompt and run the sslutil -crtecdsabind command.

Step 2

To verify, in IIS Manager server, go to Site Binding. Select Port 443.

SSL certificate with friendly name Cisco ICM SSL ECDSA Certificate will be binded.

Note

 
  1. ECDSA certificates can be generated and bound only with the command line option.

  2. For CA certificate, the administrator can use Windows tools (IIS manager) to generate and bind to IIS port 443.

  3. To revert to RSA or to bind with different curve certificate, see SSL Encryption Utility in the Security Guide for Cisco Unified ICM/Contact Center at https://www.cisco.com/c/en/us/support/customer-collaboration/unified-contact-center-enterprise/products-installation-and-configuration-guides-list.html

Note


P384 curve is used when curve_name is not specified.

For CA certificate, the administrator can generate CSR and install self-signed certificates to the Windows store. For more information, see Secured PII in Transit in the Security Guide for Cisco Unified ICM/Contact Center at https://www.cisco.com/c/en/us/td/docs/voice_ip_comm/cust_contact/contact_center/icm_enterprise/icm_enterprise_12_6_1/configuration/guide/ucce_b_security-guide_12_6_1.html


Procedure to enable ECDSA for Diagnostic Portico Web service

Before you begin
Diagnostic Portico certificate is generated using the DiagFwCert tool. Installer will generate and import the ECDSA certificate for Diagnostic Portico. The ECDSA certficate is generated and stored in certstore and has to be manually bound using the following procedure:
Procedure

Step 1

Stop the service in Diagnostic Framework through Windows service control.

Step 2

Open the command prompt and change the directory to <ICM_Drive>:\icm\serviceability\diagnostics\bin.

Note


Before binding, ensure that the certificate is placed in the personal store. For more information, see CiscoCertUtil Utility.

Step 3

To bind the Cisco ICM Diagnostic certifcate ECDSA, run the DiagFwCertMgr.exe /task:BindCertFromStore /certhash:certificate_thumbprint command.

Note


Get the certificate_thumbprint from registry key SelfSignedCertECDSAForDiagFwSvc available under the path HKEY_LOCAL_MACHINE\SOFTWARE\Cisco Systems, Inc.\ICM\Serviceability\DiagnosticFramework

Step 4

After you bind, validate the command DiagFwCertMgr/task:ValidateCertBinding and confirm from the output if the certificate binding with the current port is valid.

For more information about DiagFwCertMgr utility, see Certificate Management in Serviceability Guide for Cisco Unified ICM/Contact Center Enterprise at https://www.cisco.com/c/en/us/support/customer-collaboration/unified-contact-center-enterprise/products-installation-and-configuration-guides-list.html.

Step 5

Restart the Diagnostic Framework service. You can use the commands:

  • sc stop diagfwsvc

  • sc start diagfwsvc

Note


For CA certificate, the administrator can use Windows tool to generate and bind. For more information, refer to the TechNotes at https://www.cisco.com/c/en/us/support/docs/customer-collaboration/unified-contact-center-enterprise/200755-Configure-HTTPS-Access-for-UCCE-Diagnost.html


Enabling ECDSA for Unified CCE Component

Enabling ECDSA is applicable for all the secured interfaces of Unified CCE, Packaged CCE and Cisco Hosted Collaboration Solution for Contact Center deployment. By default, ECDSA is disabled and advised to be enabled during maintenance windows.

Secured interface components are divided into two categories—web services and Unified CCE core.

The applications under the web services are:

  • WebSetup

  • Unified CCE Administration

  • DiagnosticPortico

  • ISE

The applications under the Unified CCE core component services are:

  • CTI Server

  • Dialer

  • Application Gateway

  • MR PG and VRU PG

How to enable ECDSA for Unified CCE core components

Before you begin

Refer to the section Manage Secured PII in Transit on how to enable ECDSA for Unified CCE component.

Procedure

Step 1

For secure connections, exchange the certificate based on the server-to-client matrix table. For details on how to do this, see Manage Secured PII in Transit for ECDSA.

Step 2

To enable ECDSA, set the ECDSAEnabledRegistry flag available at HKLM\SOFTWARE\WOW6432Node\Cisco Systems,Inc.\ICM\Cisco SSL Configuration to True, in both the local and the remote box.

Step 3

The system will restart the Unified CCE. Once the reboot is complete, ECDSA mode is enabled.

Note

 
  1. ECDSA will be enabled only after the system restart.

  2. System restart time is as per RebootWaitSecs (default is 5 mins). This can be modified.

Note


For CA certificate, the administrators, can generate CSR and install the signed certificates to the Windows store. For more information, see Manage Secured PII in Transit in Security Guide for Cisco Unified ICM/Contact Center Enterprise at https://www.cisco.com/c/en/us/td/docs/voice_ip_comm/cust_contact/contact_center/icm_enterprise/icm_enterprise_12_6_1/configuration/guide/ucce_b_security-guide_12_6_1.html

To disable ECDSA, set the ECDSAEnabled Registry flag to False. The system will automatically activate the RSA certificate, available under <install_Drive> :\icm\ssl\rsa.


Enabling ECDSA for VOS components

Before you begin

Perform the following steps to enable ECDSA for VOS components.

Procedure


Step 1

Login to the system CLI and run the set command set tls server cert_type ecdsa to enable ECDSA. VOS component server restarts once you run the command.

Step 2

Login to the Cisco Unified OS Administration (https://<FQDN of the component server>:8443/cmplatform).

Step 3

Navigate to Security > Certificate Management > Find.

Download ECDSA certificate from tomcat-trust with -EC suffix.

For more information, on how to download the ECDSA certificate, see Download the Server Certificate from VOS Node

Import the certificate in the respective component trust store/keystore.

Note


In Unified CCE deployments, the certificate should be installed at ICM install drive>\ssl\cacerts in Unified CCE AW VM. Use the following command:

keytool -import -file <path where the self-signed certificate is copied > -alias <FQDN of the component Server> -keystore <install_drive>:\ssl\cacerts

Step 4

Restart the Tomcat services after importing the certificate.


What to do next

Refer to Other System CLI Commands
  1. set tls server cert_type rsa – to set the certificate type as RSA.

  2. show tls server cert_type – to show the current certificate type.

Access Platform Web Applications using Chrome Browser

This section is applicable only if you are using Chrome based browsers (Google Chrome or Edge Chromium) to access the Platform web applications, such as Cisco Unified OS Administration, Cisco Unified Serviceability or Disaster Recovery System.

This section is also applicable for Cisco Unified Intelligence Center Administration web application on CUIC nodes.

If you are using self-signed certificates, add the certificates to the Client OS trust store to access the administrative web applications.


Note


Chrome needs the self-signed certificate to have Subject Alternative Name extension to load the administrative web applications. If the self-signed certificate does not have Subject Alternative Name, regenerate the certificate from Cisco Unified OS Administration.

Download the Server Certificate from VOS Node

Run the show server tls cert_type command on your server and identify the certificate type that your server uses. For more information see show server tls cert_type in Administration Console User Guide for Cisco Unified Intelligence Center at https://www.cisco.com/c/en/us/support/customer-collaboration/unified-intelligence-center/products-maintenance-guides-list.html

This section provides instructions to download the server certificate from VOS node.

Procedure

Step 1

Log in to the Cisco Unified OS Administration page using the URL: https://<FQDN>:8443/cmplatform

Step 2

Go to Security and select Certificate Management.

The Certificate List screen appears.

Step 3

In Find Certificate List where do the following:

  1. Select Common Name in the first dropdown.

  2. Select begins with in the second dropdown.

  3. Enter the host name of the node in the search box.

  4. Click Find.

    The list of Certificates is displayed with their Common Name and Key Type. For ECDSA, the Key Type is EC and for RSA, the Key Type is RSA.

Step 4

Based on the certificate type required for your server, click the Common Name link of the tomcat-trust certificate in the search result.

Step 5

In the new window, click Download .DER File or Download .PEM File and save it.


Add Certificate to Trusted Root Certification Authorities on Windows Client System

To add the certificate to the Trusted Root Certification Authorities on Windows Client system, do the following:

Procedure

Step 1

In the Control Panel search for Manage User Certificates and click Manage User Certificates.

The certmgr - [Certificates - Current User] window appears.

Step 2

Select Certificates - Current User > Trusted Root Certification Authorities > Certificates.

Step 3

Right-click Certificates and click All Tasks > Import and then click Next.

Step 4

Browse and select the downloaded certificate file, click Next and then click Finish.

Step 5

In the Security Warning window, click Yes.

A window pops up to confirm that the import was successful.

Close the Manage User Certificates window and close all browser sessions.

Reopen the Chrome browser and clear the browser cache. Log in to the platform web application.

For example: https://<FQDN>:8443/cmplatform. The Chrome browser now shows the lock symbol to indicate that it is a trusted connection.


Add Certificate to Keychain Access in Mac Client Machine

This section is applicable for Mac OS Catalina version 10.15 and above. To add the certificate to Keychain Access in Mac Client machine, do the following:

Procedure


Step 1

On the Mac client machine, under Applications > Utilities select Keychain Access.

Step 2

In the left pane, select System and from the center pane, select the Certificates tab.

Step 3

Drag and drop the downloaded certificate on to the list of displayed certificates. (Provide the credentials for authentication, if prompted.)

Step 4

Double-click the newly imported certificate and click the expand icon beside Trust.

Step 5

In When using this certificate dropdown, select Always trust and close the window.


Certificate Management for Customer Collaboration Platform

Control Customer Collaboration Platform Application Access

Access to Customer Collaboration Platform Administration UI is restricted to clients that have been explicitly granted access using the Admin CLI. For any modification to the allowed list to take effect, Cisco Tomcat must be restarted.


Note


IP address range and subnet masks are not supported.

utils whitelist admin_ui list

This command displays all the allowed IP addresses. This list is used to authorize the source of the incoming requests.

Syntax

utils whitelist admin_ui list

Example
admin: utils whitelist admin_ui list

Admin UI whitelist is:
10.232.20.31
10.232.20.32
10.232.20.33
10.232.20.34

utils whitelist admin_ui add

This command adds the provided IP address to the allowed list of addresses.

Syntax

utils whitelist admin_ui add

Example
admin:utils whitelist admin_ui add 10.232.20.33

Successfully added IP: 10.232.20.33 to the whitelist

Restart Cisco Tomcat for the changes to take effect

utils whitelist admin_ui delete

This command deletes the provided IP address from the allowed list.

Syntax

utils whitelist admin_ui delete

Example
admin:utils whitelist admin_ui delete 10.232.20.34

Successfully deleted IP: 10.232.20.34 from the whitelist

Restart Cisco Tomcat for the changes to take effect

Obtaining a CA-Signed Certificate

Each time you sign-in, the browser validates the certificate presented by the server. If the certificate is not signed by a trusted root Certificate Authority (CA), the browser will typically not allow the connection until the user explicitly allows it. In order to avoid this, you must obtain a root certificate signed by a CA and install it onto Customer Collaboration Platform. Also, you must upload the certificate onto the VOS components.

After You Upload the Certificates

For the uploaded certificates to take effect, do the following:

  1. Restart the XMPP Service. (SSH to Customer Collaboration Platform and enter the command utils service restart CCP XMPP Server as an administrator in the Commad Line Interface).

  2. Restart the Cisco Tomcat service. (SSH to Customer Collaboration Platform and enter the command utils service restart Cisco Tomcat as an administrator in the Command Line Interface).

Obtaining a Self-Signed Certificate

Browsers handle self-signed certificates in different ways. The sections below describe how to handle self-signed certificates on the browsers supported for Customer Collaboration Platform.

Internet Explorer and Self-Signed Certificates

When using an IE browser on a Windows machine, make sure your DNS server is properly configured and you can resolve the fully qualified Customer Collaboration Platform hostname to the Customer Collaboration Platform address. Use a signed certificate from a trusted certificate authority (like Verisign).

If you use a self-signed certificate (which is what is installed with Customer Collaboration Platform), follow these steps to avoid getting certificate warnings each time you sign in.

  • In your Start menu, right click on IE and select "Run as Administrator".

  • Enter the URL for your Customer Collaboration Platform server in the address bar.

  • When prompted by the security warning, click on Continue to this website (not recommended).

  • Your address bar turns red and you see a certificate error next to the address bar. Select the certificate error.

  • Select View certificates at the bottom of the popup. This opens a certificate dialog.

  • On the General tab, select Install Certificate....

  • The certificate export wizard launches. Click Next.

  • When prompted for where to store the certificates, select Place all certificates in the following store, then click Browse and select Trusted Root Certification Authorities.

  • Click Ok, then click Next and Finish to complete the certificate import wizard.

  • Click Yes when prompted about importing the certificate.

  • Close and restart your browser to access Customer Collaboration Platform.

Firefox and Self-Signed Certificates

Due to changes in the Firefox security model, there are additional self-signed certificates that must be accepted to use the Customer Collaboration Platform web application on Firefox.

When accessing a Customer Collaboration Platform server using a newly installed Firefox browser (any version), Firefox attempts to connect to the main port that Customer Collaboration Platform uses first (port 443). If it cannot connect, it prompts the user to accept the self-signed certificate.


Note


If pop ups are blocked, you are given instructions on how to manually launch the certificate page. Also, if the certificate window is closed before the certificate is accepted, the page will automatically re-launch.


  • If prompted, click I Understand the Risks, then click Add Exception.

  • Click Confirm Security Exception.

Next, Firefox attempts to connect to port 7443 (the secure XMPP port). With Firefox, a second self-signed certificate must now be accepted to use this port. Customer Collaboration Platform displays a "Checking Connectivity..." screen during this process

If the"Checking Connectivity..." screen persists after a few seconds, click Continue to proceed to the Firefox certificate acceptance screen (as above).

Click I Understand the Risks, then Add Exception, and Confirm Security Exception again.

Users need only go through this process the first time they use a new Firefox browser and self-signed certificates. After the certificates are in place, users may not see the "Checking Connectivity..." screen (or it will appear briefly and proceed to the Customer Collaboration Platform sign on screen).

Google Chrome and Self-Signed Certificates

When accessing a Customer Collaboration Platform server using Google Chrome Browser, it attempts to establish a Private secure connection using port 7443.

  • After keying in the Server IP address in Chrome, the browser displays a connection warning stating "Your Connection is not private." To proceed with a secure connection, click Advanced.

  • Click Proceed to <Server IP Address>. Next, Chrome attempts to connect to port 7443 (the secure XMPP port).

  • The browser displays "Checking connectivity." Click Continue to proceed. This opens another Chrome tab, where you are prompted with another connection warning.
  • Click Advanced.
  • Upon clicking "Proceed to <Server IP Address>", the Customer Collaboration Platform log on page is displayed.

Note


Users need to go through this process only the first time they use a new Chrome browser and self-signed certificates.


Transport Layer Security (TLS) Requirement

Contact center enterprise solutions use Transport Layer Security (TLS). Refer to your browser's documentation for details on how to configure support for TLS. See the Contact Center Enterprise Compatibility Matrix at https://www.cisco.com/c/en/us/support/customer-collaboration/unified-contact-center-enterprise/products-device-support-tables-list.html for the supported TLS versions.


Note


For backward compatibility with the earlier versions of clients, you can downgrade the Unified CCE Windows systems to earlier versions of TLS by following Microsoft procedures.

If you apply security hardening without configuring support for TLS, your browser cannot connect to the web server. An error message indicates that the page is either unavailable or that the website is experiencing technical difficulties.