Get started with Manage Digital Channels gadget
After signing in to the Finesse desktop, you must explicitly sign in to the Manage Digital Channels gadget and manually change the digital channels state to Ready. You must be in the Ready state to receive tasks for interaction. There's no explicit sign-out for this gadget.
 Note |
To sign out of Finesse desktop, all the channels (voice and digital) must be in Not Ready state. |
Before you begin
-
Ensure that your administrator has configured the Manage Digital Channels gadget and you have access to it.
-
Ensure that your Finesse desktop has internet connectivity with the required bandwidth and latency as specified in the Cisco Finesse Administration Guide, so that it can load the Manage Digital Channels gadget from the cloud datacenter.
Procedure
|
Step 1 |
Sign in to Finesse desktop. |
||
|
Step 2 |
From the left pane, select Manage Digital Channels. The Manage Digital Channels Sign In dialog appears. |
||
|
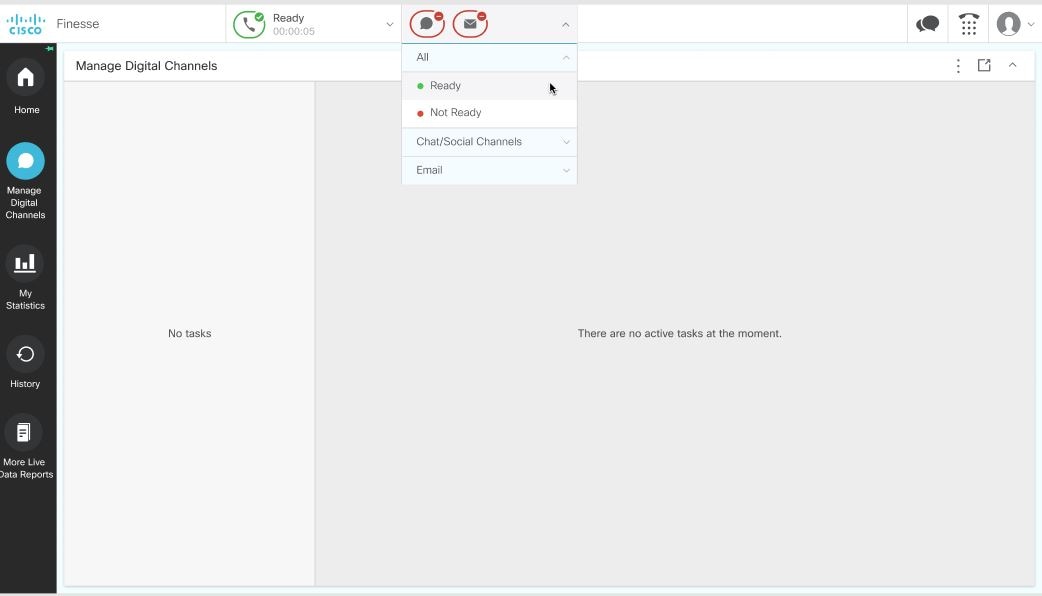
Step 3 |
Click Sign In. The gadget signs in to all the digital channels (Chat/Social Channels and Email) that are configured for the user. The digital channel icons that are available at the top of the window, display your status. After you successfully sign in, by default all the digital channels are in Not Ready state.
|
||
|
Step 4 |
Click the drop-down arrow next to the Chat/Social Channels and Email icons. The following list appears:
Under each channel, there's an option to move the channel to Ready or Not Ready state. The Not Ready reasons for voice and digital channels are the same.
|
||
|
Step 5 |
Select Ready to be available for the required digital channel. |
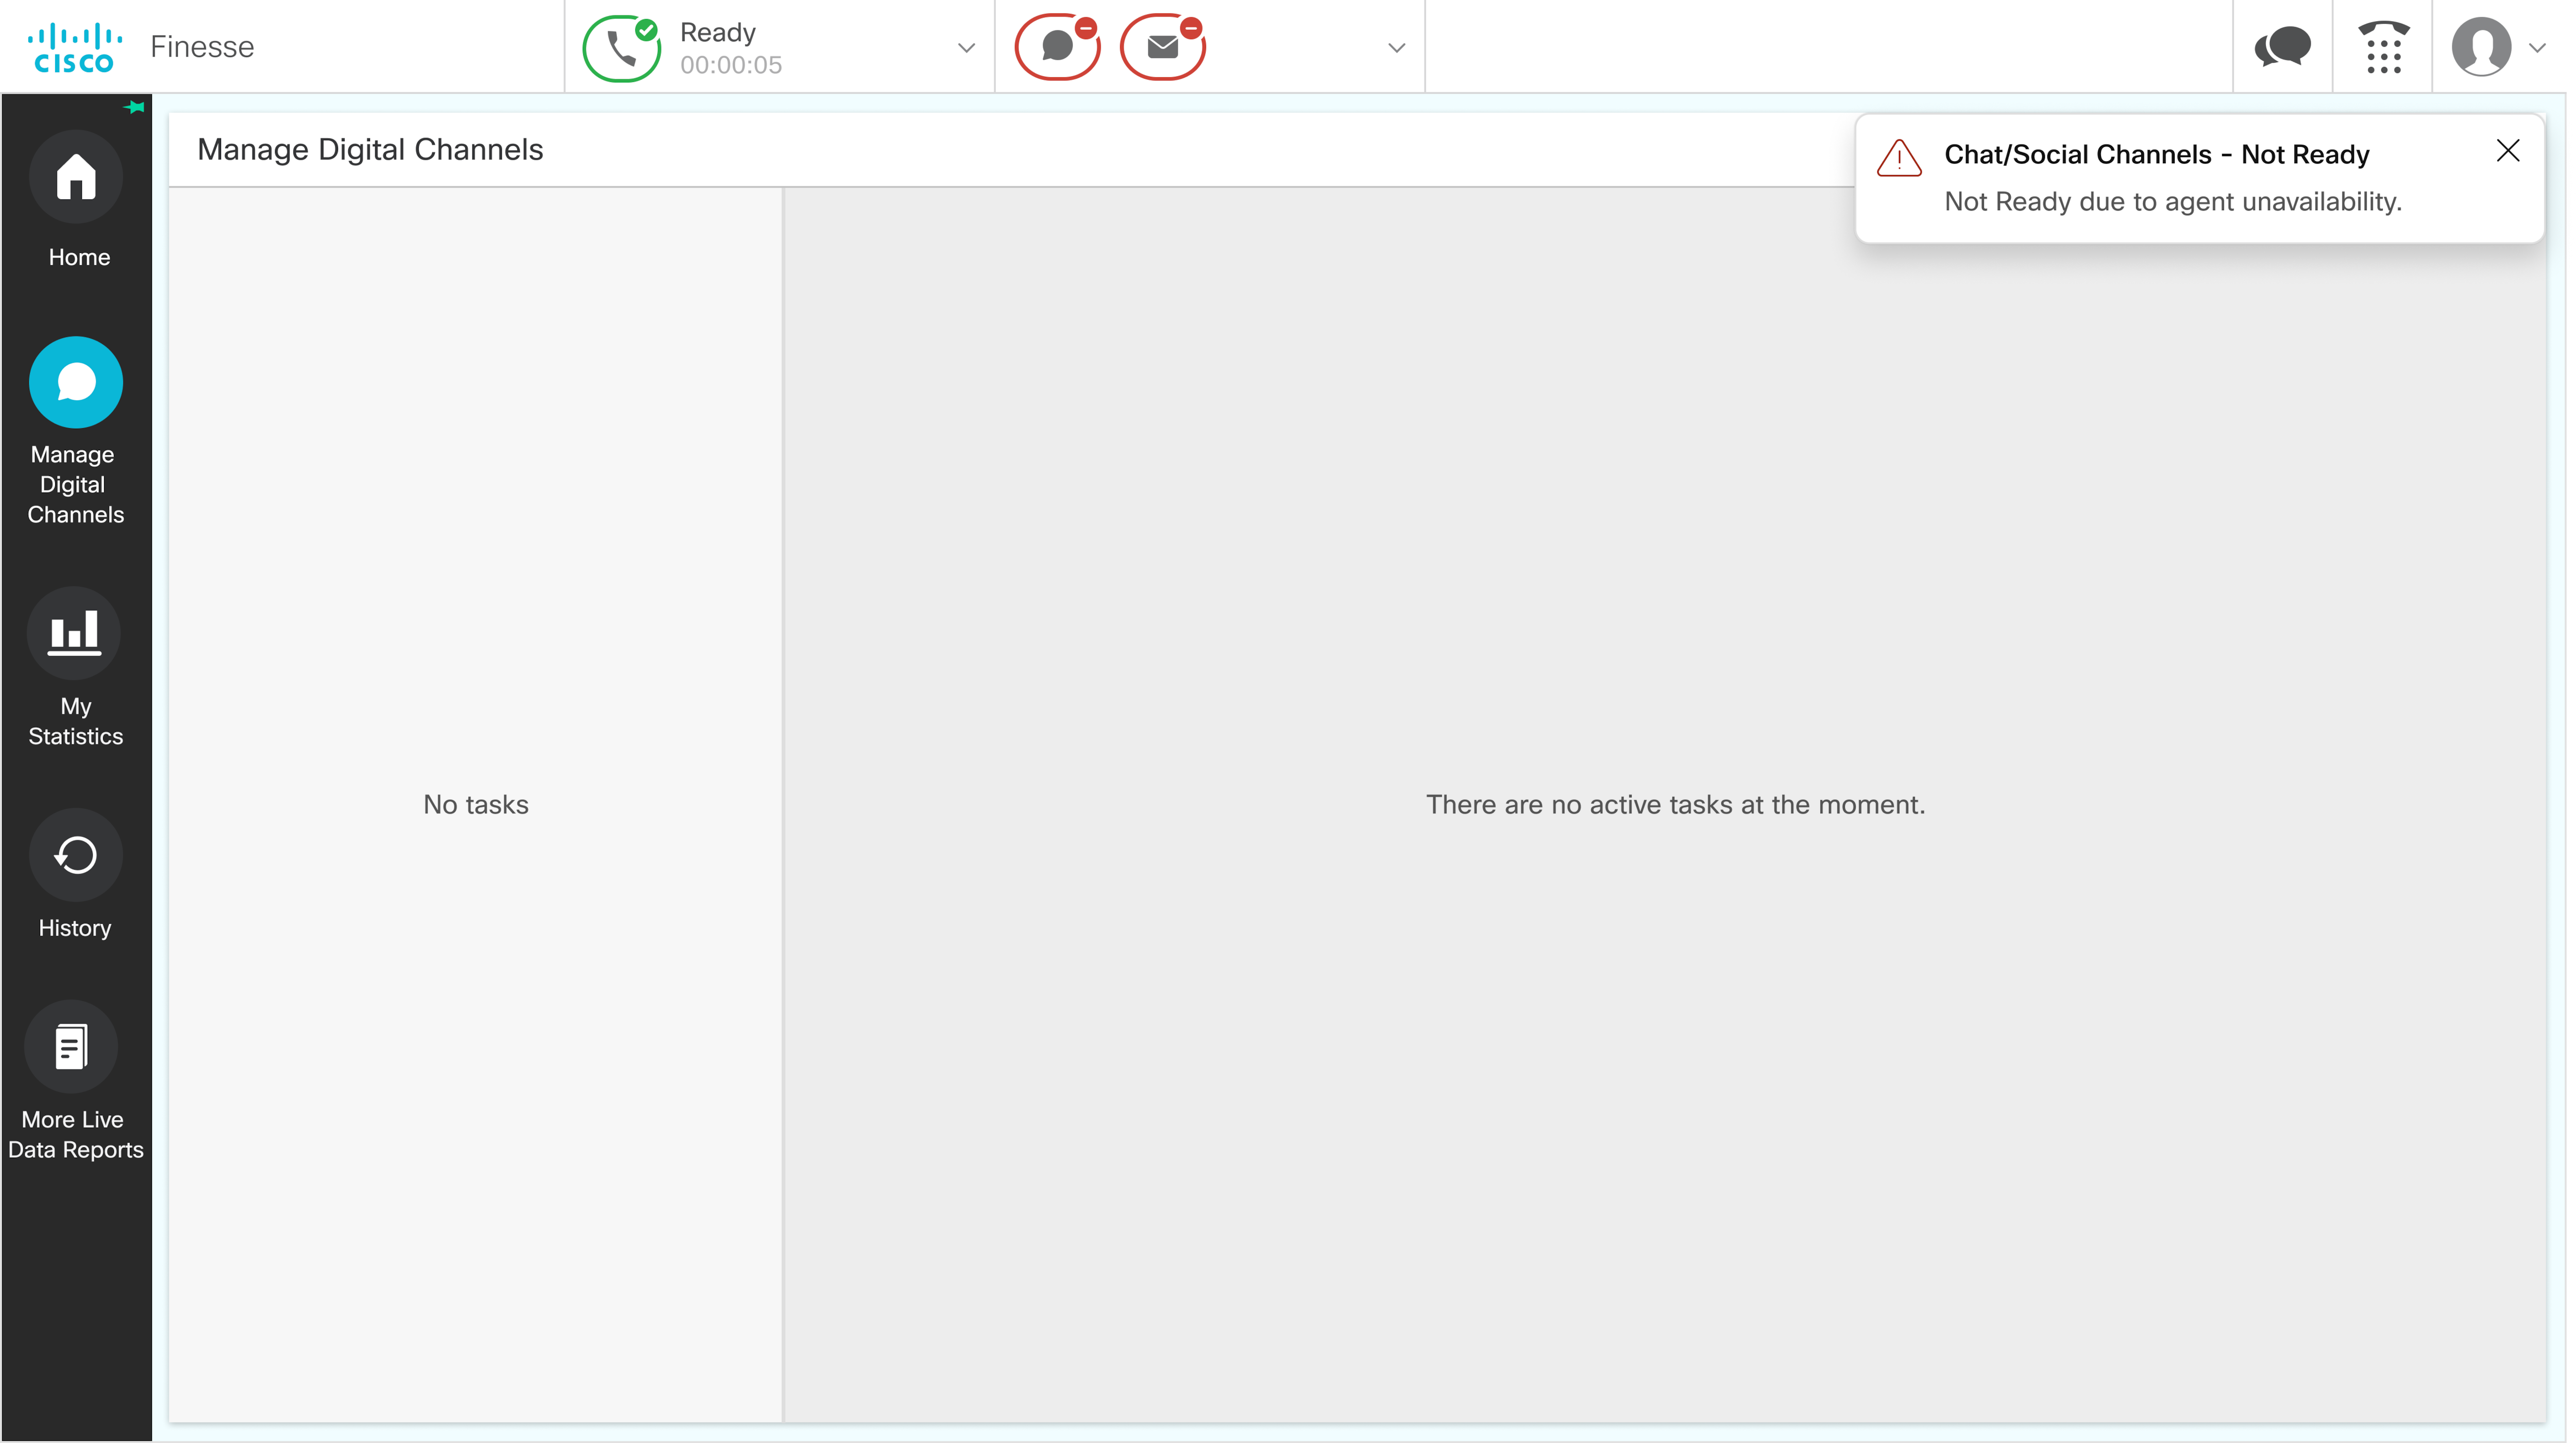
If any of the digital channels fail to change their state to Ready, a pop over notification appears on the top-right corner of the window. The gadget retries to sign in for the configured number of times.
The digital channels have a visual representation for different states as shown in the following table:
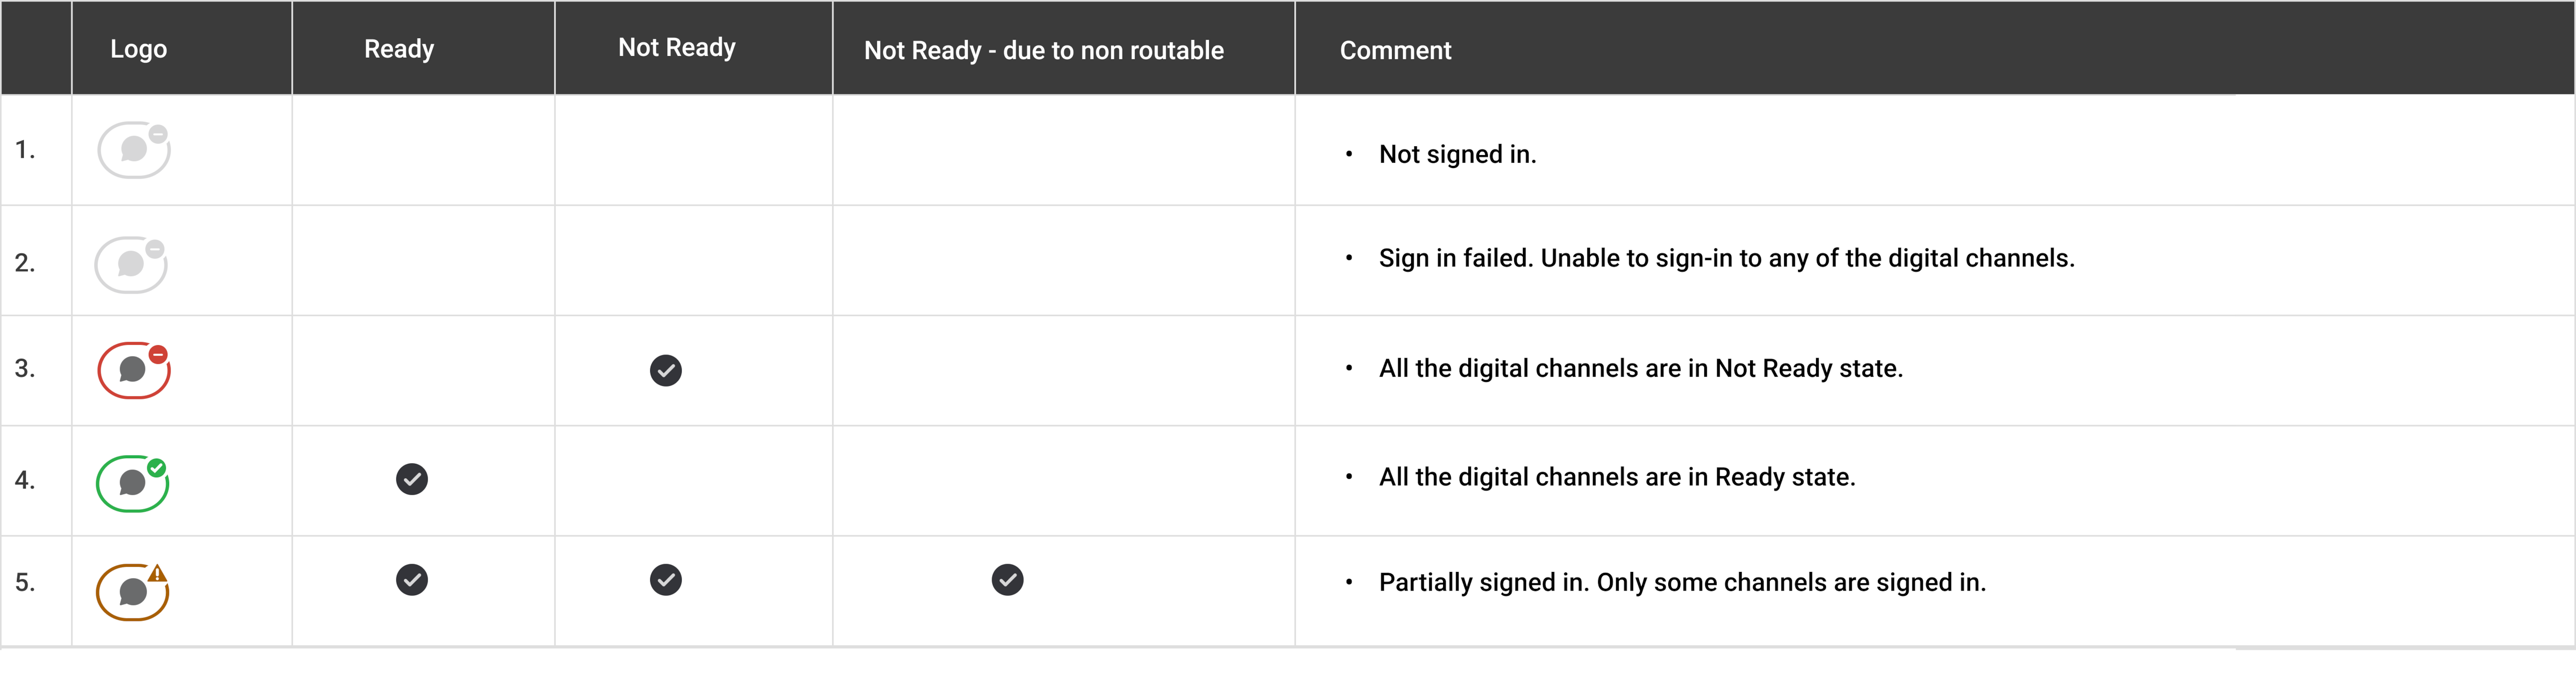
State change of digital channels
If you don’t accept an interaction before a stipulated time, a pop-over notification appears at the top-right corner of the window and the digital channels state changes to Not Ready automatically.
When any of the Chat/Social Channels go to the Not Ready state, all the Chat/Social Channels go to the Not Ready state. You can continue to use the active tasks but no new tasks are presented. If you sign out, the active tasks are Closed or Transferred as per the administration configuration. You must manually change the respective channel state to Ready to start receiving tasks again.
When you manually change your state to Not Ready, you must select an appropriate reason to indicate why you’re changing your state to Not Ready. Always select a Not Ready reason specifically for Chat/Social Channels and Email. The specific Not Ready reasons aren’t available for the All option. The specific Not Ready reasons take precedence over the Not Ready option for All. For example, if you’ve selected a custom not ready reason such as Not Ready Lunch, when you select the Not Ready option from the All option, there’s no change. However, if you have selected Not Ready from the All option and later select Not Ready Lunch, then the state changes to Not Ready Lunch.
When changing the state, it’s possible for any of the media types that are under Chat/Social Channels to fail due to network issues or other such conditions. If this happens, the icon indicates the partial state as shown in the table. You must manually change the respective media state to Ready to start receiving tasks again.
Accept Tasks
When you're in Ready state, you start receiving pop over notifications from customers for all the digital channels. The notifications are presented at the bottom-right corner of the window. The notifications display the customer details (that the administrator has configured) with the Accept button.
Click Accept to start an interaction. When you accept a new task, the new task is appended to the existing Tasks list and becomes active. Ensure that you accept the incoming interactions within the predefined time as shown in the countdown timer. Otherwise, the interactions get routed to the next available agent and your state changes to Not Ready automatically.
You can also interact with multiple customers on multiple channels at the same time. Accept the notifications that are presented to you for various digital channels.
If you are not active on the Finesse desktop and don't accept an incoming interaction within the configured time, a toaster notification appears on the system once the interaction times out, indicating that you missed the interaction and your status is changed to Not Ready.
Note |
The number of tasks that are presented to you for each digital channel (LiveChat, SMS, Email, Facebook Messenger, WhatsApp, and Apple Messages for Business is configured by your administrator. Different media may have different accept timers as per the configuration. |
The following table lists the results of not accepting a task within the predefined time for each channel:
|
Media Notification |
State Change to Not Ready |
Notes |
|---|---|---|
|
|
|
Only Email channel is changed to the Not Ready state. |
|
Live Chat |
Chat/Social Channels |
First the Live Chat becomes Not Routable and then all the media under Chat/Social Channels are changed to the Not Ready state. |
|
SMS |
When Live Chat is set up alongside other social media channels, Live Chat switches to "Not Ready" before the others. However, if Live Chat and social media channels are mapped to the same MRD, the state change happens instantly. | |
|
Facebook Messenger |
||
|
|
||
|
Apple Messages for Business |
View Tasks window
When you accept any digital interaction, a Task window is displayed. For example, if you accept an email task, a Task window is displayed for the Email channel.
By default, the Task window is maximized and includes the following:
-
Tasks list
-
Customer details
-
Interaction pane
-
Typing area
Note |
When the Task window is loaded, if you accept a voice call, the voice channel displays at the top and the Task window is pushed down. This happens only when the voice channel is configured as a page level gadget. |
Tasks list
The Tasks list appears on the left side of the Task window. It lists all your digital channel interactions. The number of tasks that has to be handled by you for each digital channel (Live Chat, SMS, Email, Facebook Messenger, WhatsApp, and Apple Messages for Business) is configured by your administrator.
When you accept a new task, the new task is appened to the existing Tasks list and becomes active. All digital channels have their specific icons for identification. By default, all the interactions display the following:
-
Icon
-
Queue name
-
Timer
-
Customer name or any other data that is configured by the administrator
Note
This field is always in bold font.
The timer indicates the time duration of the interaction. Below the timer of each interaction, the unread messages number is highlighted. When you select an interaction that has unread messages, the highlight and the number are removed for that interaction. If you receive a voice call, the timer may stop as per the configuration.
Administrators can configure more details that have to be displayed, so that it's easy for you to identify and interact. Some of the details that the administrator can configure are as follows:
-
Customer name
-
Contact number
You can collapse and expand this list using a mouse or shortcut keys. Expand the list to view any new messages from existing interactions. You can traverse through the list using the Up and down arrows of the keyboard. In between interactions, if you've moved out of the Manage Digital Channels gadget and then receive messages from ongoing interactions:
-
If you haven't pinned the navigation pane, a pop over notification is displayed at the top-right corner of the Task window, the unread messages number is incremented and highlighted.
-
If you’ve pinned the navigation pane, displays a red dot next to the Manage Digital Channels gadget in the navigation pane.
-
If the gadget is part of a multi-tab, displays a red dot on top of the Manage Digital Channels gadget tab.
Customer details
The customer details display the customer information that is configured by your administrator. It also displays the customer name (or any other data that is configured by the administrator), timer, Transfer button, and End button at the top of the details. It is next to the Tasks list. It displays a maximum of 10 fields. If more than 10 fields are configured, a scroll bar appears. You can collapse and expand the customer details area using a mouse or shortcut keys.
As per the configuration, you can edit some or all the customer details. When you hover the mouse over an editable field, the color of the field is shaded and displays a copy icon. To edit the customer details:
-
Click on the editable field.
-
Make the necessary changes and click Save.
Displays the success or failure messages at the bottom-left corner in the Customer details area.
-
Click Revert to cancel the changes and retain the previous values.
If you edit any of the fields, not save, and click Transfer or End, the gadget displays the Unsaved Changes dialog box. You can continue without saving or cancel to come back to the Task window and save the changes.
Interaction pane
The interaction pane appears on the right side of the Tasks list and below the Customer Details area. This pane lists all the interactions that you’re having with a particular customer. When loading for the first time, it displays a loading message. If there’s a failure to load the data and if you think that it’s a temporary issue, click Try Again to reload the data.
 Feedback