VXML Server Configuration

Configure VXML Server (Standalone)

The Unified CVP VXML Server is a J2EE-compliant application server that provides a complete solution for rapidly creating and deploying dynamic VoiceXML applications. You can install the Unified CVP VXML Server as a standalone component, without the Call Server component. The Unified CVP VXML Server (Standalone) is designed to handle self-service VoiceXML applications.

Procedure


Step 1

On the Unified CVP Operations Console, select Device Management > Unified CVP VXML Server (standalone).

Step 2

Click Add New to add a new VXML Server (standalone) or click Use As Template to use an existing template to configure the new VXML Server (standalone).

Step 3

Click the following tabs and configure the settings based on your call flow:

  1. General tab. For more information, see General Settings.

  2. Device Pool tab. For more information about adding, deleting and editing device pool, see Add or Remove Device From Device Pool.

Step 4

Click Save to save the settings in the Operations Server database. Click Save and Deploy to deploy the changes to the VXML Server page.


Configure VXML Server

Beginning with Unified CVP 11.5(1) Release, the Call Server IVR service is moved to the VXML Server. As a result, the VXML Server now handles the creation of VXML pages that implement the Unified CVP microapplications. To configure the IVR settings on VXML Server, on the IVR tab, see IVR Service Settings.

Before you begin

  • Obtain the hostname or IP address of the VXML Server during the installation of the Cisco Unified Customer Voice Portal (CVP) software.

  • Install and configure at least one Call Server. To install Call Server, see Installation and Upgrade Guide for Cisco Unified Customer Voice Portal. To configure a Call Server, see Configure Call Server.


    Note


    Do not install a Call Server if you are adding a Unified CVP VXML Server (standalone).


  • Review Cisco Unified Call Studio scripts, noting any of the following items you want to include or exclude from Unified CVP VXML Server reporting data:
    • Application names

    • Element types

    • Element names

    • Element fields

    • ECC variables

Procedure


Step 1

Log in to the Operations Console and click Device Management > Unified CVP VXML Server.

Step 2

Click Add New.

Note


To use an existing VXML Server as a template for configuring a new VXML Server, select a VXML Server from the list of available VXML Servers. Click Use As Template, and perform Steps 3 to 5.

Step 3

Click the following tabs and modify the default values of fields, if necessary:

  1. General. See General Settings.

  2. Configuration. See Configuration Settings.

  3. Device Pool. See Add or Remove Device From Device Pool.

  4. Infrastructure. See Infrastructure Service Settings.

Step 4

Click Save & Deploy.

Note


Click Save to save the changes on the Operations Console and configure the VXML Server later.

Step 5

Restart the following services:

  • Cisco CVP VXML Server

  • Cisco CVP WebServicesManager
  • Cisco CVP Call Server


Configure VXML Server (Standalone) with ICM Lookup Call Flow Model

The following procedure describes how to configure the Unified CVP VXML Server (standalone) with ICM Lookup call flow model.:

Procedure


Step 1

Copy the following files from the Unified CVP VXML Server CD to the gateway flash memory using tftp:

CVPSelfService.tcl

critical_error.wav

For example:

copy tftp: flash:CVPSelfService.tcl

copy tftp: flash:CVPSelfServiceBootstrap.vxml

copy tftp: flash:critical_error.wav

Step 2

Define the Unified CVP VXML Server applications on the gateway. The following lines show an example configuration:


service CVPSelfService flash:CVPSelfServiceBootstrap.vxml
!
service [gateway application name] flash:CVPSelfService.tcl
param CVPBackupVXMLServer 12.34.567.890
param CVPSelfService-port 7000
param CVPSelfService-app [name of application on the VXML Server, exactly how it appears]
param CVPPrimaryVXMLServer 12.34.567.891

Note

 
CVPSelfService is required. Backup server is optional. For Tomcat Application Server, set the port to 7000.

After completing the gateway configuration, run the following to load and activate the applications:


call application voice load CVPSelfService
call application voice load [gateway application name]

Step 3

Define a dial-peer for the gateway application, for example:


dial-peer voice [dial-peer unique ID] voip /* for IP originated call */
service [gateway application name]
incoming called-number [dialed number]
dtmf-relay rtp-nte
codec g711ulaw
!
dial-peer voice [dial-peer unique ID] pots /* for TDM originated calls */
service [gateway application name]
incoming called-number [dialed number]
direct-inward-dial

Step 4

Optionally, create another dial peer to do transfers using the Unified ICME label that is returned.

Step 5

Create the application in Call Studio. In the Call Studio application, the ReqICMLabel has two exit states: error and done. The done path grabs a transfer element to transfer the caller to that label. The gateway needs another dial peer to transfer the label it gets from this process (see Step 4). If you want to do real transfers, you must have the transfer element set up inside the Call Studio application.

Step 6

Drag the ReqICMLabel element onto the application created in Call Studio and configure it.

Note

 
This step is necessary to obtain a label from Unified ICME. For more information, see Pass Data to Unified ICME.

Step 7

Save and deploy the application from Call Studio using the VoiceXML Service on the Operations Console.

Step 8

Install the Call Server, selecting only the Core Software component.

Step 9

Configure the Unified CVP VXML Server to communicate with the Call Server through the Operations Console.

Step 10

Transfer the application using File Transfer to the Unified CVP VXML Server. This automatically deploys the application on the selected Unified CVP VXML Server.


Configure the Unified CVP VXML Server (Standalone) Call Flow Model (Without ICM Lookup)

The following procedure describes how to configured Unified CVP VXML Server (standalone) call flow model:

Procedure


Step 1

Copy the following files from the Unified CVP VXML Server CD to the gateway flash memory using tftp:

CVPSelfService.tcl

critical_error.wav

For example:


            copy tftp: flash:CVPSelfService.tcl
            copy tftp: flash:CVPSelfServiceBootstrap.vxml
            copy tftp: flash:critical_error.wav
                                

Step 2

Define the Unified CVP VXML Server applications on the gateway. The following lines show an example configuration:


      service CVPSelfService flash:CVPSelfServiceBootstrap.vxml
      !
      service [gateway application name] flash:CVPSelfService.tcl
      param CVPBackupVXMLServer 10.78.26.28
      param CVPSelfService-port 7000
      param CVPSelfService-app [name of application on the VXML Server, exactly how it appears]
      param CVPPrimaryVXMLServer 10.78.26.28
                                

Note

 
CVPSelfService is required. Backup server is optional. For the Tomcat Application Server, set the port to 7000.

After completing the gateway configuration, run the following to load and activate the applications:


         call application voice load CVPSelfService
         call application voice load [gateway application name]
                                

Step 3

Define a dial-peer for the gateway application, for example:


        dial-peer voice [dial-peer unique ID] voip /* for IP originated call * /
        service [gateway application name]
        incoming called-number [dialed number]
        dtmf-relay rtp-nte
        codec g711ulaw
        !
        dial-peer voice [dial-peer unique ID] pots /* for TDM originated calls */
        service [gateway application name]
        incoming called-number [dialed number]
        direct-inward-dial
                                

Step 4

Create the application in Call Studio. This application must have the same name as the CVPSelfService-app defined in the gateway configuration above.

Step 5

If there is an Operations Console, save and deploy the Call Studio application locally. Create a Unified CVP VXML Server (Standalone) configuration, and upload and transfer the application script file to the required Unified CVP VXML Server or Unified CVP VXML Server (standalone).

Note


See User Guide for Cisco Unified CVP VXML Server and Unified Call Studio.

Step 6

If Operations Console is not deployed, save and deploy the Call Studio Application to the desired installed Unified CVP VXML Server. Then, on the Unified CVP VXML Server, run the deployallapps.bat file (c:/Cisco/CVP/VXMLServer/admin directory).

Note


See User Guide for Cisco Unified CVP VXML Server and Unified Call Studio.


Sample Gateway Configuration

Unified CVP VXML Server:


application
 service CVPSelfService flash:CVPSelfServiceBootstrap.vxml
 service HelloWorld flash:CVPSelfService.tcl
 param CVPBackupVXMLServer 10.78.26.28
 param CVPSelfService-app HelloWorld
 param CVPSelfService-port 7000
 param CVPPrimaryVXMLServer 10.78.26.28
dial-peer voice 4109999 voip /* for IP originated call */
 service HelloWorld
 incoming called-number 88844410..
 dtmf-relay rtp-nte
 codec g711ulaw
 dial-peer voice 4109999 voip /* for TDM originated call */
 service HelloWorld
 incoming called-number 88844420..
 direct-inward-dial

Takeback and Transfer in VoiceXML Scripts

Unified CVP provides the following takeback and transfer methods that you invoke from a VoiceXML script:e

  • Two B-Channel Transfer (TBCT) - A call transfer standard for ISDN interfaces. This feature enables a Cisco voice gateway to request an NI-2 switch to directly connect two independent calls. The two calls can be served by the same PRI or by two different PRIs on the gateway.

  • Hookflash Relay - A brief interruption in the loop current that the originating call entity (PBX or Public Switch Telephone Network switch) does not interpret as a call disconnect. Instead, once the PBX or Public Switch Telephone Network switch senses the hookflash, it puts the current call on hold and provides a secondary dial tone, which allows Unified CVP VXML Server to transfer the caller to another destination.

  • SIP Refer - VoiceXML applications can use a SIP REFER transfer instead of a blind or bridged transfer. This allows Unified CVP to remove itself from the call, to free up licensed Unified CVP VXML Server ports. Unified CVP cannot run further call control or IVR operations after the label has been run.

Configure Two B-Channel Transfer

This procedure describes now to configure Two B-Channel Transfer (TBCT) with Unified CVP from a VoiceXML script.

Procedure


Step 1

Configure the originating gateway for TBCT call transfer.

Step 2

Locate the following files on the Unified CVP VXML Server and copy them to flash memory on the gateway, using the tftp command:

en_holdmusic.wav

en_pleasewait.wav

survivability.tcl

CVPSelfService.tcl

CVPSelfServiceBootstrap.vxml

Step 3

Add the following lines to the gateway:


service takeback flash:survivability.tcl
param icm-tbct 1

Step 4

Configure the CVPSelfService application, as follows:


service [gateway application name] flash:CVPSelfService.tcl
param CVPBackupVXMLServer 10.78.26.28
param CVPSelfService-port 7000
param CVPSelfService-app [name of application on the VXML Server, exactly how it appears]
param CVPPrimaryVXMLServer 12.34.567.891

Note

 
CVPSelfService is required. Backup server is optional. For Tomcat Application Server set the port to 7000.

Step 5

From command line mode:


call application voice load takeback
call application voice load CVPSelfService

Step 6

Specify the target destination for the TBCT transfer either by entering the number manually, or dynamically by using caller input.

  1. Manually. In the SubdialogReturn node in the Unified CVP VXML Server application, next to Caller Input in the Settings Tab, enter TBCT<target_destination_number>, where target_destination_number is the target destination of the TBCT transfer. For example:

    TBCT8005551212

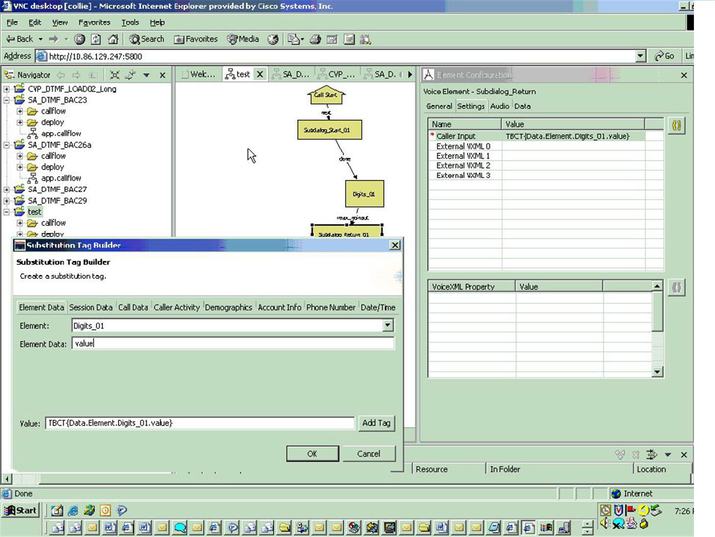
  2. Dynamically. The target destination is created dynamically using input entered by the caller during the call. Click the Substitution icon next to the Caller Input variable and select substitution values. For example:


Configure Hookflash Relay

The following procedure describes how to configure Hookflash Relay for use with Unified CVP from VoiceXML scripts.

Procedure


Step 1

Configure the originating gateway for Hookflash Relay call transfer.

Step 2

Locate the following files on the Unified CVP VXML Server and copy them to flash memory on the gateway.

en_holdmusic.wav

en_pleasewait.wav

survivability.tcl

en_0.wav en_1.wav

en_2.wav en_3.wav

en_4.wav

en_5.wav

en_6.wav

en_7.wav

en_8.wav

en_9.wav

en_pound.wav

en_star.wav

Step 3

Add the following lines to the gateway:

service hookflash flash:survivability.tcl 

Step 4

If you have not already done so, configure the CVPSelfService application:


service [gateway application name] flash:CVPSelfService.tcl
param CVPBackupVXMLServer 10.78.26.28
param CVPSelfService-port 7000
param CVPSelfService-app [name of application on the VXML Server, exactly how it appears]
param CVPPrimaryVXMLServer 10.78.26.28

Note

 
CVPSelfService is required. Backup server is optional. For the Tomcat Application Server set the port to 7000.

Step 5

From the command line mode:


call application voice load hookflash
call application voice load CVPSelfService

Step 6

In the SubdialogReturn node in the Unified CVP VXML Server application, next to Caller Input in the Settings Tab, enter HF8005551212, replacing 8005551212 with the target destination of the hookflash transfer.

The label can also be defined dynamically using digits entered by the caller in conjunction with the Unified CVP VXML Server substitution tags. If the switch requires a pause after the hookflash, insert commas between the HF and the transfer number. Each comma represents 100ms.


Configure SIP REFER

To configure SIP REFER for use with Unified CVP VXML Server from a VoiceXML script, follow this procedure:

Procedure


Step 1

Configure the gateway through the Configure the Unified CVP VXML Server (Standalone) Call Flow Model (Without ICM Lookup) or Configure VXML Server (Standalone) with ICM Lookup Call Flow Model procedure, according to your implementation.

Note

 
The incoming dial-peer running the CVPSelfService application must be a VoIP dial-peer, not a POTS dial-peer.

Step 2

Specify the target destination for the REFER transfer in the Call Studio application by entering the number manually, or dynamically using caller input.

  1. Manually — In the SubdialogReturn node in the Unified CVP VXML Server application, next to CallerInput in the Settings tab, enter RF<target_destination_number>, where target_destination_number is the target destination of the REFER transfer. For example, RF8005551212.

  2. Dynamically — The target destination is created dynamically using input entered by the caller during the call. Click the Substitution icon next to the Caller Input variable and select the substitution values.

Step 3

The following configuration must be added to the gateway configuration for the handoff to survivability.tcl to occur and to send the REFER:

service takeback flash:survivability.tcl

VXML Server Settings

General Settings

You can configure settings that identify the VXML Server and choose a primary, and optionally, a backup Call Server to communicate with the Reporting Server. You can also enable secure communications between the Operations Console and the Unified CVP VXML Server.

To configure General settings, on the General tab, enter or modify the field values, as listed in the following table:

Table 1. VXML Server General Settings

Field

Description

Default

Values

Restart Required

General

IP Address

The IP address of the VXML Server

None

A valid IP address

No

Hostname1

The hostname/IP address of the VXML Server.

None

A valid DNS name, which includes uppercase and lowercase letters, the numbers 0 through 9, and a dash.

No

Description

Enter additional information about the VXML Server.

None

Up to 1024 characters

No

Trunk Group ID

This option is used for Gateway trunk reporting if you checked the Enable Gateway Trunk Reporting check box for the Call Server that is associated with this Gateway.

None

300

1 to 65535

No

Location ID

View the location ID for the Gateway.

None

Blank, if not assigned to a system-level configuration location.

No

Enable secure communication with the Ops console

Select to enable secure communications between the Operations Server and this component. The device is accessed using SSH and files are transferred using HTTPS.

None

Checked or unchecked

Yes

Device Version

Lists the release and build number for this device.

Read-only

Read-only

No

Unified CVP Call Servers

Primary Unified CVP Call Server

The VXML Server uses the message service on this Call Server to communicate with the Reporting Server and to perform an ICM lookup. Select a primary Call Server from the drop-down list. The drop-down list includes all Call Servers added to the Operations Console.

None

Not applicable

Yes—Restart Call Server and VXML Server

Backup Unified CVP Call Server

The VXML Server uses the message service on this Call Server to communicate with the Reporting Server and perform an ICM lookup if the primary Call Server is unreachable. Select a backup Call Server from the drop-down list. The drop-down list includes all Call Servers that were added to the Operations Console.

None

Not applicable

Yes—Restart Call Server and VXML Server

1 If secure communication is being used, ensure that the hostname/IP address specified in the hostname field must match the CN or SAN field value of the TLS certificate being used; or an equivalent mapping of the same exists in DNS or local hosts file. Usage of FQDN (Fully Qualified Domain Name) is also recommended for the same purpose.

Configuration Settings

Use Configuration settings to enable the reporting of Unified CVP VXML Server and call activities to the Reporting Server. When the reporting is enabled, the Unified CVP VXML Server reports on call and application session summary data. Call summary data includes call identifier, start and end time stamps of calls, ANI, and Dialed Number Identification Service (DNIS). Application session-data includes application names, session ID, and session time stamps.

If you choose Detailed Reporting, Unified CVP VXML Server application details are reported, including element access history, activities within the element, element variables, and element exit state. Customized values that you add in the Add to Log element configuration section in Unified Call Studio applications are also included in reporting data. You can also create report filters that define which data is included and excluded from the report.

To add configuration settings on VXML Server, on the Configuration tab, enter or modify the field values, as listed in the following table:

Table 2. VXML Server Configuration Settings

Field

Description

Default

Values

Restart Required

Configuration

Enable Reporting for this Unified CVP VXML Server

Indicates whether the VXML Server sends data to the Reporting Server. If this check box is unchecked, no data is sent to Reporting Server, and reports do not contain any VXML application data.

Checked

Checked or unchecked

No

Enable Reporting for VXML Application Details

Indicates whether VXML application details are reported.

Unchecked

Checked and unchecked

No

Max. Number of Messages

Define the maximum number of reporting messages that are saved in a file if both Primary and Backup Call Servers become unreachable. (Limited by amount of free disk space.)

100,000

Not applicable

Not applicable

VXML Applications Details: Filters

Inclusive Filters

List of applications, element types, element names, element fields, and ECC variables to include in reporting data.

None

A semicolon-separated list of text strings. The wildcard character, asterisk (*), is allowed within each element in the list.

For information about filter syntax and rules, see Inclusive and Exclusive VXML Reporting Filters.

Yes

Exclusive Filters

List of applications, element types, element names, and element fields, and ECC variables to exclude from reporting data.

None

A semicolon-separated list of text strings. The wildcard character, asterisk (*), is allowed within each element in the list.

For information about filter syntax and rules, see Inclusive and Exclusive VXML Reporting Filters.

Yes

Infrastructure Service Settings

To configure infrastructure settings, on the Infrastructure tab, enter or modify the field values, as listed in the following table:

Table 3. VXML Server Infrastructure Settings

Field

Description

Default

Values

Restart Required

Configuration: Thread Management

Maximum Threads

The maximum thread pool size in the VXML Server Java Virtual Machine.

300

100 to 1000

Yes

Advanced

Statistics Aggregation Interval

Interval during which the VXML Server publishes statistics.

30 minutes

10 to 1440 minutes

Yes

Log File Properties

Max Log File Size

Enter the maximum size of a log file in megabytes before a new log file is created. The log file name follows this format: CVP.DateStamp.SeqNum.log.

For example: CVP.2006-07-04.00.log

Every midnight, a new log file is automatically created with a new date stamp. Also, when a log file exceeds the maximum log file size, a new one with the next sequence number is created. For example, when CVP.2006-07-04.00.log reaches 5 MB, CVP.2006-07-04.01.log is created automatically.

Note

 
To increase the log file size, go to C:\Cisco\CVP\conf, open log4j_vxml.xml file and update the MaxFileSize value as shown:

<param name="MaxFileSize" value="10000000"/>

Save the file and restart VXML Server to deploy the changes.

10 MB

1 through 100 MB

Yes

Max Log Directory Size

Enter the maximum size of the directory containing VXML Server log files.

Note


Modifying the value to a setting that is below the default value might cause logs to be rolled over quickly. Consequently, log entries might be lost, which can affect troubleshooting.

20,000 MB

500 to 500000 MB

  • The value of Max Log File Size must be less than Max Log Directory Size.

  • The value of the Max Log File size must be greater than 1.

  • The value of Max Log directory Size or Max Log File Size must not be greater than 5000.

Yes

Configuration: Primary Syslog Settings

Primary Syslog Server

Hostname or IP address of Primary Syslog Server to send syslog events from a CVP Application.

None

Valid IP address or hostname.

No

Primary Syslog Server Port Number

Port number of Primary Syslog Server.

None

Any available port number. Valid port numbers are integers between 1 and 65535.

No

Primary Backup Syslog Server

Hostname or IP address of the Primary Backup Syslog Server to send syslog events from a CVP Application when the Syslog Server cannot be reached.

None

Valid IP address or hostname.

No

Primary Backup Syslog Server Port Number

Port number of Primary Backup Syslog Server.

None

Any available port number. Valid port numbers are integers between 1 and 65535.

No

Configuration: Secondary Syslog Settings

Secondary Syslog Server

Hostname or IP address of Secondary Syslog Server to send syslog events from a CVP Application.

None

Valid IP address or hostname.

No

Secondary Syslog Server Port Number

Port number of Secondary Syslog Server.

None

Any available port number. Valid port numbers are integers between 1 and 65535.

No

Secondary Backup Syslog Server

Hostname or IP address of the Secondary Backup Syslog Server to send syslog events from a CVP Application when the Syslog Server is not reachable.

None

Valid IP address or hostname.

No

Secondary Backup Syslog Server Port Number

Port number of Secondary Backup Syslog Server.

None

Any available port number. Valid port numbers are integers between 1 and 65535.

No

Enable Active and Standby VXML Server

This feature enables failover mechanism for VXML Servers.

If the active VXML Server fails, then the configured backup VXML Server takes over.

Configuration in CVP

Enable the active/standby VXML Server feature in CVP by modifying the sip.properties.

SIP.UseBackupIVRSS=true

Configuration in Gateway

Enable the active/standby VXML Server feature in Gateway by configuring a backup VXML server.

Example:

If the active VXML Server's hostname is Callserver1 with the IP address 10.1.1.1 and the backup VXML Server's hostname is Callserver2 with the IP address 10.2.2.2, then the backup VXML Server is configured as:


service bootstrap flash:bootstrap.tcl
  paramspace english index 0
  paramspace english language en
  paramspace english location flash
  paramspace english prefix en
  param Callserver1  10.1.1.1
  param Callserver1-backup 10.2.2.2

Configuration in Cisco VVB

Enable the active/backup VXML Server feature in Cisco VVB by configuring a backup VXML server.

This can be done using CLI command utils vvb add host-to-ip <hostname> <ip_address>

Example

utils vvb add host-to-ip Callserver1 10.1.1.1 
utils vvb add host-to-ip Callserver1-backup 10.2.2.2  

Voice XML Service

The VoiceXML Service provides Unified ICME call control capabilities and data to the Reporting Service.

The VoiceXML Service

  • Resides outside of the Call Server that gives call control capabilities to the Standalone Mode.

  • Is the connection between the VXML Server and the ICM Service that feeds data to the Reporting Service.

  • In a Standalone Mode with ICM Lookup deployment:

    • Interacts with the VXML Server and the ICM Service to do call control piece

    • Interacts with VXML Server and Reporting Service to populate the Reporting database.


Note


For more information, see Pass Data to Unified ICME.

VXML Server Reporting

VXML Server applications can function in a wide range of paradigms, from the VXML Server virtually controlling the entire user interaction to performing individual interactions on a scale similar to that of the Unified CVP micro-applications. Between these extremes, you can design the VXML Server applications to implement specific transactions. For example, in a banking application a transaction can consist of all the user interactions required to successfully complete a balance transfer or a telephone bill payment. The high-level menus which the user can use to select a particular type of transaction is controlled by the Unified ICME routing script, using standard Unified CVP micro-applications, such as Menu and Play Media. Once a particular transaction type is chosen, the Unified ICME routing script issues an External VoiceXML micro-application to invoke the appropriate VXML Server application which implements that transaction type. Once the VXML Server application completes, control returns to the Unified ICME routing script for further menus. Typically, audit information about the transaction is returned, and can be stored in the Unified ICME database. It is also determines whether the transaction was successful, or it needs to be transferred or queued to an agent, and so on.

While Unified ICME VRU Progress reporting capabilities are always in effect, they compliment VXML Server applications most effectively when this transaction-oriented design is used. The customer defines a Unified ICME CallType for each type of transaction, and uses the audit information returned from the VXML Server to determine how to set the Unified ICME's VRUProgress variable. The setting selected dictates how the transaction is counted in the aggregate VRU reporting fields in the CallTypeHalfHour table.

VRU reporting enhancements are described in the Unified ICME 6.0(0) and online help.

Inclusive and Exclusive VXML Reporting Filters

Use Inclusive and Exclusive VXML filters to control the data that the Unified CVP VXML Server feeds to the Reporting Server.

Data feed control is crucial for the following purposes:

  • Save space in the reporting database.

  • Preserve messaging communication bandwidth.

VXML Inclusive and Exclusive Filter Rules

  • Filters are case sensitive.

  • By default, all items except the Start, End, Subdialog_Start and Subdialog_End elements are filtered from reporting data unless they are added to an Inclusive Filter. The Subdialog_Start and Subdialog_End elements are never filtered from reporting data unless reporting is disabled on the Unified CVP VXML Server.

  • The Exclusive Filter takes precedence over the Inclusive Filter. For example, if an application name is in the Exclusive Filter, then the items of that applications are excluded from reporting data even if a particular field or element is listed in the Inclusive filter.

  • The Inclusive/Exclusive filters can have one of the following syntaxes:

    • Appname.ElementType.ElementName.FieldName
    • AppName.*.*.SESSION:Varname

    Note


    This syntax indicates session variables.
  • Use a semicolon (;) to separate each item in a filter. For example, ElementA ; ElementB is valid.

  • Use a single wildcard (*) anywhere within the application name, element type, element name, or field name.

  • Form element types, element names, and field names that contain alphanumeric characters, underscores, and a space character.

  • Use an application name that contains alphanumeric characters and underscores, without a space. For example, A_aa.B_bb.*C_cc_DD.E_ee_F* is valid.

VXML Filter Wildcard Matching Examples

Table 4. Examples - VXML Filter Wildcard Matching

Filter

What It Matches

MyApplication.voice.*.*

Matches all voice elements in MyApplication

*.voice.*.*

Matches all Voice elements in all applications

MyApplication.*.*.var*

Matches all fields in MyApplication that start with the string var

MyApplication.*.*.*3

Matches all fields in MyApplication that end with 3

MyApplication.*.*.SESSION:Company

Matches the Company session variable in MyApplication

Configure Inclusive and Exclusive VXML Reporting Filters

Procedure


Step 1

Choose Device Management > Unified CVP VXML Server.

The Find, Add, Delete, Edit Unified CVP VXML Servers window appears.

Step 2

Search for a VXML Server.

Step 3

From the list of matching records, choose the Unified CVP VXML Server that you want to edit.

Step 4

Click Edit.

The Unified CVP VXML Server Configuration window opens to the General Tab.

Step 5

Select the Configuration Tab, then configure Unified CVP VXML Server properties.

Step 6

In the VXML Applications Details: Filters pane, enter an inclusive filter that defines the VXML elements to include in data sent to the Reporting Server.

Step 7

(Optional) Enter an exclusive filter that excludes some of the data specified by the inclusive filter.

Step 8

Click Save to save the settings in the Operations Console database or click Save & Deploy to save and apply the changes to the Unified CVP VXML Server.

Step 9

Restart the VXML Server and the primary and backup Call Servers.


Create Policy Based QoS

To create a Windows-policy-based QoS, refer to the Microsoft site.

VXML Server with Unified ICME

This section describes how to integrate VoiceXML and Unified ICME scripts.

Integrate VoiceXML Scripts with Unified ICME Scripts

This section describes how to integrate the Unified CVP VXML Server into the Unified CVP solution. This process involves:

  • Creating a Unified ICME script with ECC variables configured for Unified CVP VXML Server.

  • Creating a VRU Script to run in the Unified ICME script.

Procedure

Step 1

Specify the URL (remove and port number) of the Unified CVP VXML Server that you want to reach, for example:

http://10.78.26.28:7000/CVP/Server?application=HelloWorld

In the example, 10.78.26.28 is the IP address of the Unified CVP VXML Server, 7000 is the port number, and the application name is HelloWorld. The values are delimited by a colon (:).

Note

 
7000 is the default port number for a Unified CVP VXML Server. The new port for Unified CVP 4.0 and later is 7000 for Tomcat with Unified CVP VXML Server.

Step 2

In the Unified ICME script, first set the media_server ECC variable to:

http://10.78.26.28:7000/CVP

Step 3

Set the app_media_lib ECC Variable to "..", (literally two periods in quotes).

Step 4

Set the user.microapp.ToExtVXML[0] ECC variable to: application=HelloWorld

Note

 
This example indicates that the Unified CVP VXML Server will run the HelloWorld application. To run a different application, change the value of user.microapp.ToExtVXML[0].

Step 5

Set the UseVXMLParams ECC Variable to N.

Step 6

Create a Run External Script node within the Unified ICME script with a VRU Script Name value of GS,Server,V.

Note

 
Remember to link this node to the nodes configured in the previous steps.
  • The timeout value set in the Network VRU Script should be substantially greater than the length of the timeout in the Unified CVP VXML Server application. Use this timeout only for recovery from a failed Unified CVP VXML Server.

  • Always leave the Interruptible check box in the Network VRU Script Attributes tab checked. Otherwise, calls queued to a Unified CVP VXML Server application might stay in the queue when an agent becomes available.

Step 7

After you configure the Unified ICME script, configure a corresponding Unified CVP VXML Server script with Call Studio.

The Unified CVP VXML Server script must:

  • Begin with a Unified CVP Subdialog_Start element (immediately after the Call Start element)

  • Contain a Unified CVP Subdialog_Return element on all return points (script must end with a Subdialog_Return element)

  • The Unified CVP Subdialog_Return element must include a value for the call input

  • To enable reporting, you must add Data Feed/SNMP loggers


Correlate Unified CVP and Unified ICME Logs with Unified CVP VXML Server Logs

When using the Unified CVP VXML Server option in the Unified CVP solution, you can correlate Unified CVP/Unified ICME logs with VoiceXML logs by passing the Call ID to the Unified CVP VXML Server by URL. Building upon the URL used in the previous example, the URL is as follows:

http://10.78.26.28:7000/CVP/Server?application=Chapter1_HelloWorld&callid=XXXXX-XXXXX-XXXXXX-XXXXXX


Note


Unified CVP VXML Server (by default) receives callid (which contains the call GUID), _dnis, and _ani as session variables in comprehensive mode even if the variables are not configured as parameters in the ToExtVXML array. If the variables are configured in ToExtVXML then those values are used. These variables are available to VXML applications as session variables, and they are displayed in the Unified CVP VXML Server log. This change is backwards compatible with the following script. That is, if you have added the following script, you do not need to change it. However, if you remove this script, you save an estimated 40 bytes of ECC variable space .
To configure logging, in the Unified ICME script, use the formula editor to set ToExtVXML[1] variable. Set the value of ToExtVXML[1] variable to concatenate("callid=",Call.user.media.id):

Note


  • Always include "callid" when sending the call to the Unified CVP VXML Server using the Comprehensive call flow model. The Call ID can also be used in Unified CVP VXML Server (standalone) solutions.

  • When you concatenate multiple values, use a comma for the delimiter.

  • The value of ICMInfoKeys must contain RouterCallKey, RouterCallDay, and RouterCallKeySequenceNumber separated by a “-“.

    For example, concatenate("ICMInfoKeys=",Call.RouterCallKey,"-",Call.RouterCallDay,"-",Call.RouterCallKeySequenceNumber).

See Feature Guide - Writing Scripts for Unified Customer Voice Portal for more information.


Error Codes for VXML Server

The following are some of the error codes that you may see with the VXML Server application:

  • Error Code 40 -- System Unavailable

    This is returned if the VXML Server is unavailable (shutdown, network connection disabled, and so forth).

  • Error Code 41 -- App Error

    This is returned if a Unified CVP VXML Server application error occurs (For example, a java exception).

  • Error Code 42 -- App Hangup

    This is returned if the Hang Up element is used instead of the Unified CVP Subdialog_Return element.


    Note


    If the application is configured correctly, this does not occur.
  • Error Code 43 -- Suspended

    This is returned if the Unified CVP VXML Server application is suspended.

  • Error Code 44 -- No Session Error

    This is returned when an emergency error occurs (for example, an application is called that has not been loaded in the Unified CVP VXML Server application).

  • Error Code 45 -- Bad Fetch

    This is returned when the Unified CVP VXML Server encounters a bad fetch situation. This code is returned when either a .wav file or an external grammar file is not found.

IP Address Modification

This section describes how to change the IP address of Call Server, VXML Server, and the Reporting Server. Follow this sequence for changing the IP Address of the devices:

  1. Reporting Server

  2. VXML Server

  3. Call Server

  4. OAMP Server

Procedure


Step 1

Select the device from the Operations Console to change the IP address.

Step 2

From the menu bar of the device, select the device and click Use As Template.

Step 3

Assign the new IP address to the device and change the Host Name temporarily, which you will revert in Step 8, and click Save.

Note


Do not click the Save and Deploy option until you have changed the physical server to the new IP address.

Step 4

Delete the device from the Operations Console before changing the IP address of the server.

Step 5

Configure the new IP address on the local server.

Step 6

Go to C:\Cisco\CVP\bin\UpdateRMIServerIP\updatermiserverip.bat and double-click the batch file to update the IP address in the windows registry and the wrapper.conf file.

Step 7

From the Operations Console, select the device and change the Host Name to the original one. Click Save and Deploy for the device. (Restart the server if network-related message is seen).

Step 8

Restart the server.

Note

 
  1. Make sure to change the configuration of VXML Application, Gateway, VVB, ICM PIM, Proxy, and CUCM to reflect the new Call Server IP address.

  2. Associate Reporting Server to the Call Server.

  3. Delete the existing Media Server and create a new one with the Call Server IP address and deploy the Media Server.


What to do next

Change the IP address of the OAMP Server.

Proxy Settings in VXML Server for Virtual Agent–Voice

For Virtual Agent–Voice to function, the VXML server must be connected to the internet. Enable direct access to the internet or configure HTTP proxy settings in the VXML server. To configure HTTP proxy settings in VXML server, perform the following steps:

  1. Open Windows regedit in the VXML server.

  2. Go to HKEY_LOCAL_MACHINE\SOFTWARE\WOW6432Node\Apache Software Foundation\Procrun 2.0\VXMLServer\Parameters\Java\Options.

  3. Add the following entries:

    -Dhttps.proxyHost=<proxy-server hostname or fqdn>
    -Dhttps.proxyPort=<port>
  4. Restart the CVP VXML server from Windows services.