Management of Prompts, Grammars, Documents, and Custom Files

Unified CCX applications can make use of many auxiliary files that interact with callers, such as scripts, pre-recorded prompts, grammars, and custom Java classes.

To manage these auxiliary files, you must complete the following tasks:

  • Provision telephony and media resources.

  • Provision Unified CCX subsystem, if required.

  • Provision additional subsystems, if required.

  • Configure Cisco script applications.

Depending on your particular Unified CCX implementation, your applications might make use of some or all of the file types described in the following sections.

Manage Prompt Files

Many applications make use of pre-recorded prompts stored as .wav files, which are played back to callers to provide information and elicit caller response.

Several system-level prompt files are loaded during Unified CCX installation. However, any file you create needs to be made available to the Unified CCX Engine before a Unified CCX application can use them. This is done through the Unified CCX cluster's Repository datastore, where the prompt, grammar, and document files are created, stored, and updated.


Note

Support for High Availability and remote servers is available only in multiple-server deployments.


The Unified CCX Server's local disk prompt files are synchronized with the central repository during Unified CCX Engine startup and during run-time when the Repository datastore is modified.

To access the Prompt Management page, perform the following steps:

Procedure


Step 1

From the Unified CCXAdministration menu bar, choose Application > Prompt Management.

Step 2

The Prompt Management web page opens to display the following fields and buttons.

Field or Button

Description

Language

Lists the location of the items listed in the Name column.

Folder

Path of the current item selected in the Name column with respect to the root folder.

Name

Name of the language.

Size

The size of the prompt file prefixed with KB. The file size is converted from bytes to KB.
Note 

This column is usually blank on the root page because the items on this page are usually folders.

Date Modified

The date and time when the document was last uploaded or changed along with time zone.

Modified by

The user ID of the person who performed these modifications.

Delete

Click Delete icon to remove the folder and its contents from the repository.

Rename

Click Rename icon to rename the folder in the repository.

Refresh

Click Refresh icon to refresh the folder in the repository.

Create Language

Displays a dialog box that lets you create a new language folder.

Upload Zip Files

Displays a dialog box that lets you locate and upload a zip file.
Note 

The zip file must contain language folders in the root directory. Be sure to place the grammar files in folders and then zip the folders.

When you click a hyperlink (if configured) in the Name folder column, a secondary page appears. From this page, you can create a new subfolder or upload a new prompt.


Manage Grammar Files

The Unified CCX system uses specific grammars when recognizing and responding to caller response to prompts. A grammar is a specific set of all possible spoken phrases and Dual Tone Multi-Frequency (DTMF) digits to be recognized by Unified CCX applications and acted upon during run time.

Several system-level grammar files are loaded during Unified CCX installation. However, any file you create needs to be made available to the Unified CCX Engine before a Unified CCX application can use them. This is done through the Unified CCX cluster's Repository datastore, where the grammar files are created, stored, and updated.


Note

Support for High Availability and remote servers is available only in multiple-server deployments.


The Unified CCX Server's local disk grammar files are synchronized with the central repository during Unified CCX Engine startup and during run-time when the Repository datastore is modified.

To access the Grammar Management page, perform the following steps:

Procedure


Step 1

From the Unified CCXAdministration menu bar, choose Applications > Grammar Management.

Step 2

The Grammar Management web page opens to display the following fields and buttons.

Field or Button

Description

Language

Lists the location of the items listed in the Name column.

Folder

Path of the current item selected in the Name column with respect to the root folder.

Codec

The codec chosen during installation for this Unified CCX server. Display only.

Name

Name of the language folder.

Size

The size of the grammar file prefixed with KB. The file size is converted from bytes to KB.

This column is usually blank on the root page as the items on this page are usually folders.

Date Modified

The date and time when the document was last uploaded or changed along with time zone.

Modified by

The user ID of the person who performed these modifications.

Delete

Displays a dialog box that lets you delete an existing language folder.

Rename

Displays a dialog box that lets you rename an existing language folder.

Refresh

Refreshes the specified folder in the repository.

Create Language

Displays a dialog box that lets you create a new language folder.

Upload Zip Files

Displays a dialog box that lets you locate and upload a zip file.
Note 

The zip file must contain language folders in the root directory. Be sure to place the grammar files in folders and then zip the folders.

When you click a hyperlink (if configured) in the Name folder column, a secondary page appears. From this page, you can create a subfolder or upload a new Prompt, Grammar, or Document.


Manage Document Files

Documents might consist of .txt, .doc, .jsp, or .html files. Documents can also include custom classes and Java Archive (JAR) files that allow you to customize the performance of your Unified CCX system.

Several system-level document files are loaded during Unified CCX installation. However, any file you create needs to be made available to the Unified CCX Engine before a Unified CCX application can use them. This is done through the Unified CCX cluster’s Repository datastore, where the document files are created, stored, and updated.


Note

Support for High Availability and remote servers is available only in multiple-server deployments.


The Unified CCX Server's local disk document files are synchronized with the central repository during Unified CCX Engine startup and during run-time when the Repository datastore is modified.

To access the Document Management page, perform the following steps:

Procedure


Step 1

From the Unified CCXAdministration menu bar, choose Applications > Document Management.

Step 2

The Document Management web page opens to display the following fields and buttons.

Field or Button

Description

Language

Lists the location of the items listed in the Name column.

Folder

Path of the current item selected in the Name column with respect to the root folder.

Name

Name of the language folder.

Size

The size of the grammar file prefixed with KB. The file size is converted from bytes to KB.

This column is usually blank on the root page as the items on this page are usually folders.

Date Modified

The date and time when the document was last uploaded or changed along with time zone.

Modified by

The user ID of the person who performed these modifications.

Delete

Displays a dialog box that lets you delete an existing language folder.

Rename

Displays a dialog box that lets you rename an existing language folder.

Refresh

Refreshes the specified folder in the repository.

Create Language

Displays a dialog box that lets you create a new language folder.

Upload Zip Files

Displays a dialog box that lets you locate and upload a zip file.
Note 

The zip file must contain language folders in the root directory. Be sure to place the grammar files in folders and then zip the folders.

When you click a hyperlink (if configured) in the Name folder column, a secondary page appears. From this page, you can create a subfolder or upload a new Prompt, Grammar, or Document.


Language Management

The topics in this section describe the procedure for managing languages.

Create New Language

Follow this procedure to create a new Prompt, Grammar, or Document language folder in the Repository datastore:

Procedure


Step 1

From the Unified CCXAdministration menu bar, choose Applications > Prompt Management or Grammar Management or Document Management.

The corresponding Management web page opens.

Step 2

Click Create New Folder or Create Language icon that displays in the tool bar in the upper, left corner of the window or the Create New Folder or Create Language button that displays at the bottom of the window.

The Create New Folder or Create Language dialog box opens.

Step 3

Perform any one of the following actions:

  • Select a value from the Language drop-down list.

  • If you are unable to find a particular language or if the Language drop-down list is empty, click Edit button to add a new Language. The Explorer User Prompt dialog box opens. Enter the name of the new language in the Language Name field and click OK.

Step 4

Click Create.

A new language folder Name appears on the summary web page.

Note 

Ensure that the language created is supported in the Script Editor. For more information on the list of languages supported by the Script Editor, see the "Language Class and Code Specifications on the Web" section of the Cisco Unified Contact Center Express Expression Language Reference Guide at https://developer.cisco.com/docs/contact-center-express/#language-class-and-code-specifications-on-the-web.


Rename Language

Follow this procedure to rename a Prompt/Grammar/Document language folder in the Repository datastore:

Procedure


Step 1

From the Unified CCXAdministration menu bar, choose Applications > Prompt Management or Grammar Management or Document Management.

The corresponding Management web page opens.

Step 2

Select the Rename icon against the folder you want to rename.

The Rename Folder dialog box opens.

Step 3

From the Select Language Folder To Rename field, choose the name of the folder to be renamed.

Step 4

In the Rename Folder To field, enter the new name.

Step 5

Click Rename.

The web page then refreshes itself to provide a summary and status. Click Return to Document Management to navigate to the respective Prompt or Grammar or Document Management page.


Delete Language

Follow this procedure to delete a Prompt/Grammar/Document language folder in the Repository datastore:

Procedure


Step 1

From the Unified CCXAdministration menu bar, choose Applications > Prompt Management or Grammar Management or Document Management.

The corresponding Management web page opens.

Step 2

Select the Delete icon against the respective folder, that you want to delete.

A dialog box opens to confirm the Delete action for the specific folder.

Step 3

Click OK to delete.


Upload Zip Files to Language Folder

In addition to adding Prompt or Document files individually, you can upload multiple files from a Zip file.


Note

The maximum upload file size is 20 MB, whether it is a single file or a Zip file.


Tip

Be sure to upload (or download) large zip files in Prompt, Grammar and Document Management pages during off-peak hours.


Procedure


Step 1

From the Unified CCXAdministration menu bar, choose Applications > Prompt Management or Grammar Management or Document Management.

The corresponding Management web page opens.

Step 2

Click Upload Zip Files icon that displays in the tool bar in the upper, left corner of the window or the Upload Zip Files button that displays at the bottom of the window to upload a new prompt or zip file.

The Upload Document dialog box opens.

Step 3

Enter the path for the script file or click Browse to locate the script or the zip file containing the script files. Select the required script file and click Open.

Note 

You can upload only files with extension .aef or .zip.

Step 4

Click the Upload button to upload the new script to the repository. A dialog box confirms the successful upload of the files.

Note 

If you try to upload invalid script files, the upload will be unsuccessful and an error message will be displayed on the upload dialog box. You can also create user-defined directories using "Create a New folder" option and uploads scripts to those directories.

Step 5

By default, the files are unzipped after uploading. If you want to change this option, uncheck the Unzip after uploading check box.

Caution 

In the Documents Management summary web page, you have the option to zip or to unzip the file before uploading. By default, this check box is checked to unzip the file before uploading. Ensure to uncheck the check box if you want to upload it as a zipped file.

The maximum upload file size of the Zip file is 20 MB.

Step 6

The contents of the zip file is uploaded to the folder. On successful uploading of the zip file, the status icon is updated accordingly. Click Return to Document Management button to go back to the respective Management web page.


Upload of Prompt Files

Prompts are messages that the Unified CCX system plays back to callers. Unified CCX applications often use prompts to obtain caller response so that the Unified CCX system can transfer calls, receive account information, and perform other functions.

To use prompts in your Unified CCX applications, you must first create a folder to store them. You can then record and upload new user prompts, delete prompts, and modify existing prompts.

You store pre-recorded prompts as .wav files. The Unified CCX system also allows users to record spoken names, which you can upload to be used in the playback of prompts.


Note

  • Unified CCX supports audio playback of RIFF header .wav files only though your MRCP vendor may support multiple .wav file header formats.

  • Unified CCX supports u-Law and A-Law prompts when G.711 voice codec is selected.

  • Ensure that your prompt file (.wav) size is minimum of one byte. If you try to upload a prompt file that is less than one byte, the following error message is displayed:

    Failed to upload file with path:


ScanSoft uses RIFF headers. When generating a .wav file prompt specifically for Nuance, ensure that you consider the server playing the prompt:

  • If the prompt is played by the Nuance Speech Server, the .wav file requires a SPHERE header.

  • If the prompt is played by the Unified CCX server, the .wav file requires a RIFF header.

Nuance provides a tool to convert .wav files from RIFF headers to SPHERE headers.

Managing prompts can include one or more of the following activities:

  • Creating a folder: You must create a folder to store the .wav files that the Unified CCX system uses as prompts.

  • Recording a prompt: You can record prompts by using Recording Step in Unified CCX or any third-party utility.

  • Upload one or more prompts: You can replace any of the stored prompts used by Cisco script applications with a different .wav file by uploading the new.wav file. If necessary, you can also add spoken name prompts. Some Unified CCX applications play back the pre-recorded names of the people that callers are trying to reach, to allow the caller to confirm the transfer of the call.


    Note

    In a HA setup, subscriber goes to Partial Service state while recording a prompt by using Unified CCX or uploading prompts.


Record a Prompt

You can record prompts and save in .wav format to be used in Unified CCX applications. You can use any third-party recording application to record prompts. You can save the prompts for the standard:

  • G711- The G711 is a freely distributed public domain codec that has several recording options and is available to any sound recording application. You can save the prompts in μ-Law or A-Law. While saving a prompt file, ensure that the 8.000 kHz, 8 Bit, Mono 7 kb/sec attribute is selected.

  • G729 - The G729 is a freely distributed public domain codec and has several recording options. Some of these options are included in Microsoft Windows systems and are available to any sound recording application.

After you record a prompt, upload the prompt, associate the prompt with an application, and run the application to ensure that the prompt is playing properly.

Add Spoken-Name Prompts

Some Unified CCX applications play back the pre-recorded names of people that callers are trying to reach, to allow callers to confirm the transfer of a call.

To upload .wav files of the spoken names of users, complete the following steps.

Procedure


Step 1

From the Unified CCXAdministration menu bar, choose Tools > User Management > Spoken Name Upload.

Step 2

The Spoken Name Prompt Upload web page opens with the following fields:

Field

Description

User Id

Unique identifier of the user for which the spoken name is to be uploaded. This is a mandatory field.

Codec

The codec chosen during installation for this Unified CCX server. Display only.

Spoken Name (.wav)

Location of the .wav file. This is a mandatory field.

Step 3

In the User Id field, enter an ID number that will identify the user.

Step 4

In the Spoken Name (.wav) field, enter the path for a .wav file or click Browse to navigate to the directory that contains the Spoken Name .wav file.

The Choose File dialog box opens. Select the required script file and click Open.

Step 5

Click Upload icon that displays in the tool bar in the upper, left corner of the window or click the Upload button that displays at the bottom of the window to upload the file.

Step 6

Repeat this process as needed to upload all spoken name .wav files.


Management of Custom Files

Use the Custom File Configuration web page to configure the classpath location of custom classes.

Specify Custom Classpath Entries

Use the Custom Classes Configuration web page to specify the available classpath entries.

Procedure


Step 1

From the Unified CCXAdministration menu bar, choose System > Custom File Configuration.

The Custom Classes Configuration web page opens. You can:

  • Select required entries from the Available Classpath Entries list and arrange them in the order you want.

  • Use the arrow icons to move items between the Available Classpath Entries and Selected Classpath Entries lists.

Step 2

Click Update when your selections are complete.

Click Upload Custom Jar Files icon that displays in the tool bar in the upper, left corner of the window or the Upload Custom Jar Files button that displays at the bottom of the window to upload Jar files. The Document Management web page opens.


AAR File Management


Caution

Ensure that the contents of the AAR file are correct and conform to the specifications detailed in this section. If you upload AAR files that do not conform to these specifications, the Unified CCX Engine may not function as designed. Consequently, you need to manually reconfigure some of the applications uploaded through AAR.

AAR files are archives of prompt, grammar, document, scripts, applications, and custom classes that you use as building blocks for applications and extensions.

An AAR file can be simple—for instance, consisting of a single prompt—or complex—for example, containing all the prompts for all languages application uses, the workflow, and the configuration information for an application.

An AAR file is essentially a zip file that contains an optional META-INF directory. The META-INF directory, if it exists, stores configuration data, including security, versioning, extensions, and services.

You create AAR files using Java tools. After creating a file, you need to upload it to Unified CCX.

The following example shows a sample AAR Main Manifest and a sample AAR Application Manifest.

Sample AAR Main Manifest

Manifest-Version: 1.1Created-By: 1.4.2_05 (Sun Microsystems Inc.)
Built-By: aaruser
Sealed: false
Cisco Unified CCX-Version: 9.0(1)
Class-Path: 
Application-List: customApp1.mf customApp2.mf
Subsystem-List: sub1.mf sub2.mf
Palette-List: Custom1 Custom2
Custom1-Palette-Name: Category1
Custom2-Palette-Name: Category2
Custom1-Step-List: step1.mf
Custom2-Step-List: step2.mf step3.mf
Implementation-Title: AAR Test File
Implementation-Version: 4.5(1)
Implementation-Vendor: Cisco Systems, Inc.
Implementation-Vendor-Id: 12345
Implementation-URL: https://www.cisco.com

Sample AAR Application Manifest

Application-Version: 1.1Created-By: 1.4.2_05 (Sun Microsystems Inc.)
Built-By: aaruser
Sealed: false
Implementation-Title: AAR Application MF
Implementation-Version: 9.0(1)
Implementation-Vendor: Cisco Systems, Inc.
Implementation-Vendor-Id: 12345
Implementation-URL: https://www.cisco.com
Application-Name: Custom AA
Application-Type: Cisco Script Application
Application-Description: Cisco Unified CCX Cisco Custom Application
Application-Id: 100
Max-Sessions: 300
Enabled: true
Script: SSCRIPT[aa.aef]
Default-Script: SSCRIPT[aa.aef]
Initial-Script: SSCRIPT[aa.aef]
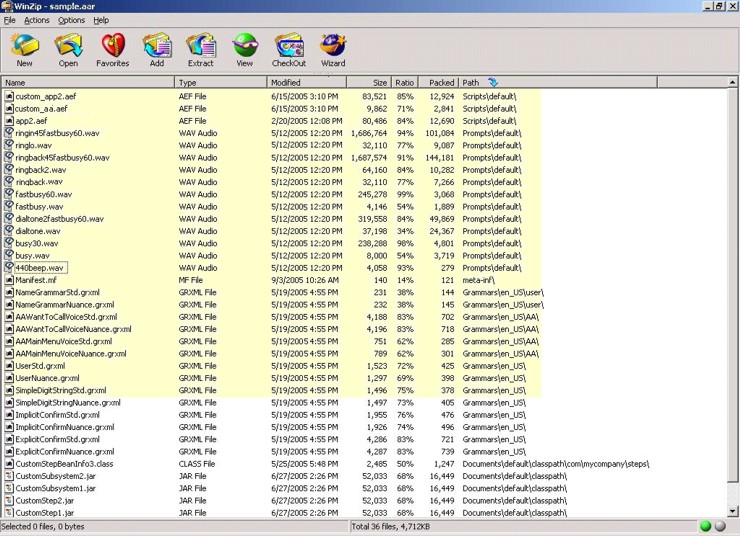
Figure 1. Sample AAR File. The figure below shows a sample AAR file.


To deploy custom applications, steps, and subsystems through an AAR file, you must first create the AAR file using a jar or zip tool and then upload the file through the Unified CCX Administration web page.

AAR File Creation

You create an AAR file using a jar or WinZip tool.

An AAR file format is similar to a Zip file format. It includes an optional META-INF directory, which is used to store configuration data, including security, versioning, extension, and services.

Upload AAR Files

To upload an AAR file, complete the following steps.

Procedure


Step 1

From the Unified CCXAdministration menu bar, choose Applications > AAR Management.

The AAR Management web page opens to display the following fields and buttons.

Field or Button

Description

Enter a Valid AAR File to Upload

You can either enter the name of the AAR file or click Browse button next to this field to navigate to the directory in which the file is located. This is a mandatory field.

Overwrite existing files

Enable this checkbox in case you want to overwrite the existing files.

Upload

Click this button to upload the AAR file.

Clear

Click this button to clear the selected file.

Enter the path for the AAR file or click Browse button to upload the file. The Choose File dialog box opens. Select the required script file and click Open.

Step 2

Click Upload.

The contents of the AAR file are uploaded to the respective folders.

Note 

Unified CCX generates an error if the AAR file is not formatted correctly or is missing some custom files.


META-INF Directory

Unified CCX uses the following files and subdirectories in the META-INF directory to configure applications, extensions and services:

  • MANIFEST.MF. The file used to define extension and application related data.

  • applications. This directory stores all application configuration files.

Directories for Prompts, Grammars, Documents, and Scripts

The AAR files features also provides directories to store prompts, grammars, documents, and scripts to be uploaded to the Repository.

The AAR directory structure mirrors the function of the Unified CCX Prompt, Grammar, Documents, and Scripts Management web pages. Each directory corresponds to each language for which to install prompts, grammars, documents and scripts. Languages are defined using the Java Locale standard, and the special default directory is used for prompts, grammars, and documents that are common to all languages.

Only Unified CCX supported prompt files and extensions are allowed within each directory. The maximum length of each individual folder name and file name within a directory is 64 characters.

Prompts Directory

The Prompts directory stores prompts that must be uploaded to the prompt repository (to make it seem like they were uploaded through Unified CCX Prompt Management).

Grammars Directory

The Grammars directory stores grammars that must be uploaded to the grammar repository (to make it seem like they were uploaded through Unified CCX Grammar Management).

Documents Directory

The Documents directory stores documents that must be uploaded to the document repository (to make it seem like they were uploaded through Unified CCX Document Management).

Scripts Directory

The Scripts directory stores scripts that must be uploaded to the script repository (to make it seem like they were uploaded through Unified CCX Script Management).


Note

The Script directory must define a single directory named default under which all script files must be listed.


AAR Manifest

An AAR file manifest consists of a main section followed by a list of sections for individual AAR file entries, each separated by a newline.

Information in a manifest file contains name-value pairs—which are also referred to as headers or attributes. Groups of name-value pairs are known as a section; sections are separated by empty lines.

The following table describes the expected syntax of the manifest file.

Table 1. Manifest File Syntax

Name

Value

section:

*header +newline

nonempty-section:

+header +newline

newline:

CR LF | LF | CR (not followed by LF)

header:

name: value

name:

alphanum *headerchar

value:

SPACE *otherchar newline *continuation

continuation:

SPACE *otherchar newline

alphanum:

{A-Z} | {a-z} | {0-9}

headerchar:

alphanum | - | _

otherchar:

any UTF-8 character except NUL, CR and LF

Note 

To prevent corruption of files sent through email, do not use "From" to start a header.

The main section, which is terminated by an empty line:

  • Contains security and configuration information about the AAR file itself, as well as the applications or extensions that this AAR file is defining.
  • Defines main attributes that apply to every individual manifest entry. No attribute in this section can have its name equal to "Name".

The individual sections define various attributes for directories or files contained in this AAR file. Not all files in the AAR file need to be listed in the manifest as entries. The manifest file itself must not be listed. Each section must start with an attribute with the name as "Name", and the value must be a relative path to the file or directory.

If there are multiple individual sections for the same file entry, the attributes in these sections are merged. If a certain attribute has different values in different sections, the last one is recognized.

Attributes that are not understood are ignored. Such attributes may include implementation-specific information used by applications.

The following table describes the specification for any file that can be archived in the AAR.

Table 2. Syntax for AAR Files

Name

Value

manifest-file

main-section newline *individual-section

main-section

version-info newline *main-attribute

version-info

Manifest-Version: version-number

version-number

digit+{.digit+}*

main-attribute

(any legitimate main attribute) newline

individual-section

Name: value newline *perentry-attribute

perentry-attribute

(any legitimate perentry attribute) newline

newline

CR LF | LF | CR (not followed by LF)

digit

{0-9}

Attribute Types

Attributes that appear in the main section are called main attributes. Attributes that appear in individual sections are called per-entry attributes. Some attributes appear in both the main and individual sections, in which case the per-entry attribute value overrides the main attribute value for the specified entry.

Main Attributes

Main attributes are the attributes that are present in the main section of the manifest:

General main attributes as shown in the following table.

Table 3. General Main Attributes

Attribute

Description

Manifest-Version

The manifest file version. The value is a legitimate version number.

Created-By

The version and the vendor of the java implementation on top of which this manifest file is generated. This attribute is generated by the jar tool.

Cisco Unified CCX-Version

The minimum Unified CCX version release compatible with the AAR file. Unified CCX-version is the accumulation of the Unified CCX release, Unified CCX Service Release, and Unified CCX Engineering Special defined in that order. For example, if the AAR file is compatible with Cisco Unified CCX release 4.5(1)_Build705, SR1_Build001, ES2_Build002, the Cisco Unified CCX-Version would be defined as 4.5(1)SR1ES2_Build002. Only the last build number is taken. So for instance, if the AAR file is compatible with Cisco Unified CCX release 4.5(1)_build705, SR1_Build001, then the Cisco Unified CCX-Version is 4.5(1)SR1_Build001. As a last example, if AAR file is compatible with Cisco Unified CCX release 4.5(1)_Build705 and above, then Cisco Unified CCX-Version would be 4.5(1)_Build705.

Class-Path

The directories or JAR files that need to be installed and accessed by scripts directly. Entries are separated by one or more spaces. The Unified CCX class loader uses the value of this attribute to construct its internal search path where each entry is defined relative to the /Documents/default/classpath directory in this AAR file.

Application-List

The application configuration files from the META-INF/applications/ directory to be installed. Entries are separated by one or more spaces.

Subsystem-List

The subsystem configuration files from the META-INF/subsystems/ directory to be installed. Entries are separated by one or more spaces.

Palette-List

The step palettes that need to be installed. Each palette listed in this attribute will have a set of additional attributes that the Unified CCX editor uses to specify the palette name and the palette steps to install. Entries are separated by one or more spaces.

Palette-Name

The unique name of the palette to define in the Unified CCX editor where the specified steps will be grouped and accessible.

Step-List

The step configuration files from the META-INF/steps/ directory to be installed under the palette. Entries are separated by one or more spaces.

Attribute defined for extension identification: Extension-Name

This attribute specifies a name for the extension contained in the AAR file. The name should be a unique identifier.

The following tables shows attributes defined for extension and directory versioning and sealing information. These attributes define features of the extension which the AAR file is a part of. The values of these attributes apply to all the directories in the AAR file, but can be overridden by per-entry attributes.

Table 4. Implementation Category in Main Attributes

Attribute

Description

Implementation-Title

The title of the extension implementation.

Implementation-Version

The version of the extension implementation.

Implementation-Vendor

The organization that maintains the extension implementation.

Implementation-Vendor-Id

The ID of the organization that maintains the extension implementation.

Implementation-URL

The URL from which the extension implementation is downloaded.

Sealed

Defines if this AAR file is sealed. Sealing a directory means that the files uploaded to the corresponding repository will not be modifiable once installed unless the AAR file is reinstalled. If set to true, then all directories in the AAR file default to be sealed, unless individually defined otherwise. If set to false, then all directories are modifiable.

Per-entry Attributes

Per-entry attributes apply only to the individual AAR file entry with which the manifest entry is associated. If the same attribute also appears in the main section, then the value of the per-entry attribute overwrites the main attribute value.

  • Example 1: If AAR file a.aar has the following manifest content, then all the files archived in a.aar are sealed, except US English prompts. If the same attributes also appeared in an entry representing a parent directory of another entry, then the value of the per-entry attribute overwrites the parent directory per-entry attribute value.

    Manifest-Version: 1.1 Created-By: 1.2 (Sun Microsystems Inc.) 
    Sealed: true 
    Name: Prompts/en_US/ 
    Sealed: false
  • Example 2: If AAR file a.aar has the following manifest content, then all the US English prompts archived in a.aar are sealed, except US English prompts located in the AA/ directory.

    Manifest-Version: 1.1 Created-By: 1.2 (Sun Microsystems Inc.) 
    Name: Prompts/en_US/ 
    Sealed: true
    Name: Prompts/en_US/AA/
    Sealed: false

The per-entry attributes fall into the following groups:

  • Attributes defined for file contents: Content-Type

    This attribute specifies the MIME type and subtype of data for a specific file entry in the AAR file. The value should be a string in the form of type/subtype. For example, image/bmp is an image type with a subtype of bmp (representing bitmap). This indicates that the file entry is an image with the data stored as a bitmap. RFC 1521 and 1522 discuss and define the MIME types definition.

  • Attributes defined for directory versioning and sealing information:

    These are the same set of attributes defined in Table 2 for the main attributes. When used as per-entry attributes, these attributes overwrite the main attributes for the individual file specified by the manifest entry.

META-INF Directory Attributes

The Unified CCX recognizes the x.MF file in the applications, subsystems, and steps subdirectories in the META-INF directory and interprets each to configure applications, subsystems, and steps respectively. The x is the base file name as listed on the Application-List main attribute of the manifest file. The X.MF file contains one section defining the configuration of a particular application.

Application Subdirectory Attributes

The following table describes the syntax of the manifest file for the application subdirectory.

Table 5. Application Subdirectory Manifest File Syntax

Name

Value

application-file

version-info newline *application-attribute

version-info

Application-Version: version-number

version-number

digit+{.digit+}*

application-attribute

(any legitimate application attribute) newline

newline

CR LF | LF | CR (not followed by LF)

digit

{0-9}

The application attributes fall into the following groups:

Table 6. Application Attributes

Attribute

Description

Application-Version

The application configurations file version. The value is a legitimate version number. For example, Cisco Unified CCX Release 4.5 starts with version 1.1.

Application-Name

The unique name of the application (see Unified CCX Application Management).

Application-Type

The type of the application (Cisco Script Application, Busy, Ring-No-Answer.

Application-Description (optional)

The description for the application (see Unified CCX Application Management).

Application-Id

A unique identifier for the application (see Unified CCX Application Management).

Max-Sessions

The maximum number of sessions for the application (see Unified CCX Application Management).

Enabled

The application is enabled if the value is set to true (see Unified CCX Application Management). If the value is set to false, the case is ignored.

Script

The main script of a Cisco Script Application (see Unified CCX Application Management). The value must be relative to the Scripts directory. Unified CCX does not support configuring script parameters.

Default-Script

The default script of a Cisco Script Application, Unified ICME Translation or Post Routing application (see Unified CCX Application Management). The value must be relative to the Scripts directory. Unified CCX does not support configuring script parameters.

Initial-Script

The initial script of a Unified CCX Post Routing application (see Unified CCX Application Management). The value must be relative to the Scripts directory. Unified CCX does not support configuring script parameters.

  • Attributes defined for application versioning and sealing information: These attributes define features of the application to which the AAR file belongs. These attributes are the same as those listed in Main Attributes.