Cisco IP Phone 6800 Key Expansion Module

Cisco 6800 Series Key Expansion Module Setup Overview

The Cisco IP Phone 6800 Key Expansion Module add extra programmable buttons to the phone. The programmable buttons can be set up as speed-dial buttons, or phone feature buttons.
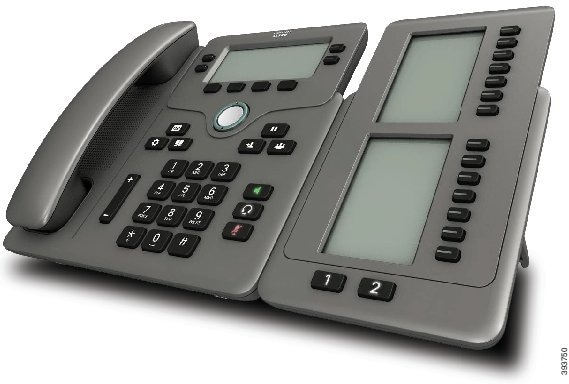
The Cisco IP Phone 6851 Multiplatform Phone supports only one key expansion module. The key expansion module provides 14 lines or programmable buttons, and two pages. Each page contains 14 lines or buttons.

Configure the Key Expansion Module with the Phone Web Interface

You can add number of supported key expansion modules from the phone web interface.

You can also configure the parameters in the phone configuration file with XML(cfg.xml) code.

Before you begin

Access the phone administration web page. See Access the Phone Web Interface.

Procedure


Step 1

Select Voice > Att Console.

Step 2

From the Number of Units list, select 1 as the number of supported key expansion modules.

You can also configure the parameter in the configuration file (cfg.xml) by entering a string in the following format:

<Number_of_Units ua="na">2</Number_of_Units>

Default: 0

Step 3

Click Submit All Changes.


Configure a Speed Dial on a Key Expansion Module

You can configure speed dial on a key expansion module line. The user can then press the line key to call a frequently dialed number.

You can also configure the parameters in the phone configuration file with XML(cfg.xml) code.

Before you begin

Access the Phone Web Interface.

Procedure


Step 1

Select Voice > Att Console.

Step 2

Select a key expansion module line key on which to enable the speed dial.

Step 3

Enter a string in this format:

fnc=sd;ext=9999@$PROXY;vid=n;nme=xxxx

where:

  • fnc= sd means function=speed dial

  • ext= 9999 is the phone that the line key calls. Replace 9999 with numbers.

  • vid=n is the line index of the phone.

  • nme= XXXX is the name displayed on the phone for the speed-dial line key. Replace XXXX with a name.

You can also configure the parameter in the configuration file (cfg.xml) by entering a string in the following format:

<Unit_n_Key_m>fnc=sd;ext=9999@$PROXY;vid=n;nme=xxxx

Step 4

Click Submit All Changes.


Configure Call Park on a Key Expansion Module line

You can enable call park on a key expansion module line. The user can then use the line to park a call. and then retrieve the call either from own phone or another phone.

Before you begin

Access the phone administration web page. See Access the Phone Web Interface.

Procedure


Step 1

Select Voice > Att Console.

Step 2

Select a key expansion module line key on which to enable the call park.

Step 3

Enter a string in this format:

fnc=prk;ext=9999@$PROXY;vid=n;nme=xxxx

where:

  • fnc= prk means function=call park
  • ext= 9999 is the phone that the line key calls. Replace 9999 with numbers.
  • vid=n is the line index of the phone.

  • nme= XXXX is the name displayed on the phone for the call park line key. Replace XXXX with a name.

You can also configure an XML service on key expansion module key. Enter the string in this format:

fnc=xml;url=http://xml.service.url;nme=name


Configure the Busy Lamp Field on a Key Expansion Module

You can configure the busy lamp field on a key expansion module line so that the user can monitor a coworker's availability to receive a call.

Before you begin

Access the phone administration web page. See Access the Phone Web Interface.

Procedure


Step 1

Select Voice > Att Console.

Step 2

Select a key expansion module line key.

Step 3

Enter a string in this format:

fnc=blf;sub=xxxx@$PROXY;usr=8888@$PROXY.

Where:

  • fnc= blf means function=busy lamp field
  • sub= the URI to which the SUBSCRIBE message is sent. This name must be identical to the name defined in the List URI: sip: parameter. xxxx is the name that is defined in List URI: sip: parameter. Replace xxxx with the exact defined name. $PROXY is the server. Replace $PROXY with the server address or name.
  • usr= the BroadSoft user being monitored by BLF with 8888 as the phone being monitored. Replace 8888 with the exact number of the monitored phone. $PROXY is the server. Replace $PROXY with the server address or name.
Step 4

(Optional) To enable the busy lamp field to work with both speed dial and call pickup enter a string in the following format:

fnc=blf+sd+cp;sub=xxxx@$PROXY;usr=yyyy@$PROXY.

Where:

sd= speed dial

cp= call pickup

You can also enable busy lamp field only with call pickup or speed dial. Enter the string in the following format:

fnc=blf+cp;sub=xxxx@$PROXY;usr=yyyy@$PROXY

fnc=blf+sd;sub=xxxx@$PROXY;usr=yyyy@$PROXY

You can also configure the parameter in the configuration file (cfg.xml) by entering a string in the following format:

<Unit_1_Key_2_ ua="na">fnc=blf;ext=3252@$PROXY;nme=BLF_3252</Unit_1_Key_2_>
Step 5

Click Submit All Changes.


Configure the Voicemail PLK on a Key Expansion Module Button

You can configure the voicemail Programmable Line Key (PLK) on a Key Expansion Module button for the users to monitor a specified voicemail account of a user or a group.

The voicemail PLK can monitor both the voicemail of an extension and the voicemail account of another user or a group. Monitoring the voicemail of another user or a group requires the support from the SIP proxy.

For example, if the users belong to a customer service group. This feature allows the users to monitor both their voicemails and the group's voicemails.

If you configure speed dial for the same button, the users can press the button to make a speed dial to the assigned extension.

Before you begin

One or more expansion modules have been installed on the phone.

Access the phone administration web page. See Access the Phone Web Interface.

Procedure


Step 1

Select Voice > Att Console.

Step 2

Select an expansion module button on which to configure the voicemail PLK.

Step 3

Enter a string in this format:

  • For MWI only:

    fnc=mwi;sub=group_vm@domain;vid=1;nme=Group;
  • For MWI + Speed Dial:

    fnc=mwi+sd;ext=8000@domain;sub=group_vm@domain;vid=1;nme=Group;
  • For MWI + speed dial + DTMF:

    fnc=mwi+sd;ext=8000 ,4085283300#,123456#@domain;sub=group_vm@domain;vid=1;nme=Group;

For more information about the string syntax, see String Syntax for Voicemail PLK.

You can also configure this parameter in the phone configuration file (cfg.xml). The parameter is line-specific. Enter a string in this format:

<Unit_1_Key_1_ ua="na">fnc=mwi+sd;ext=8000 ,4085283300#,123456#@domain;
sub=group_vm@domain;vid=1;nme=Group;</Unit_1_Key_1_>
Step 4

In the General section, add mwi or mwi;sd in the field Customizable PLK Options.

Parameter in the configuration file (cfg.xml):

<Customizable_PLK_Options ua="na">mwi;sd</Customizable_PLK_Options>

After the configuration, users can configure the corresponding features on the expansion module button.

Step 5

Click Submit All Changes.


Access Key Expansion Module Setup

After you install a key expansion module on the phone and configure it on the phone web page, the phone automatically recognizes the key expansion module.

When the phone automatically recognizes the key expansion module, you can then choose the Details softkey for additional information about the selected key expansion module.

Procedure


Step 1

On the phone, press Applications .

Step 2

Press Status > Accessories.

Installed and configured key expansion module display in the list of accessories.


Adjust the Contrast of Key Expansion Module LCD from the Phone Web Page

You can adust the LCD contrast of the Key Expansion Module from the phone web page and the value gets updated on the phone. You can modify this value from the phone.

Before you begin

Access the phone administration web page. See Access the Phone Web Interface.

Procedure


Step 1

Select Voice > Att Console.

Step 2

In the General section, enter a value in the Attendant Console LCD Contrast field.

Valid values: 4 to 12

Step 3

Click Submit All Changes.


Change the Display Mode of Key Expansion Module from the Phone Web Page

You can modify the busy lamp field (BLF) label of Key Expansion Module line. The labels can be displayed by name, extension, or both. The change updates the phone. You can also modify the display mode from the phone.

Before you begin

Access the phone administration web page. See Access the Phone Web Interface.

Procedure


Step 1

Select Voice > Att Console.

Step 2

In the General section, select the type of display mode from the BLF Label Display Mode field.

Step 3

Click Submit All Changes.


Enable the User to Configure Features on Key Expansion Module Line Keys

You can enable the user to configure features on the line keys of the key expansion module. The user can then add any of the configured features to the dedicated line keys. For the supported features, see Configurable Features on Line Keys.

Before you begin

  • Access the phone administration web page. See Access the Phone Web Interface.

  • Ensure that the line keys of the key expansion module are not in the Inert mode.

Procedure


Step 1

Select Voice > Att Console.

Step 2

In the General section, configure the Customizable PLK Options parameter with the codes of your desired features defined in Configurable Features on Line Keys.

Example: You configure this parameter with blf;shortcut;dnd;. The user can call up the feature list with a long-press on a key expansion module line key. The feature list looks like:

1 None

2 BLF presence

4 Menu shortcut

3 Do not disturb

The user can then select a feature or a menu shortcut to add to the line key.

You can also configure this parameter in the configuration file (cfg.xml) with a string in this format:
<Customizable_PLK_Options ua="na">blf;shortcut;dnd;</Customizable_PLK_Options>
Step 3

Click Submit All Changes.


Add a Menu Shortcut to a Key Expansion Module Line Key

You can add a menu shortcut to a line key of the attached key expansion module. Then, the user can press the configured line key to access the menu.

Before you begin

Access the phone administration web page. See Access the Phone Web Interface.

Procedure


Step 1

Select Voice > Att Console.

Step 2

Go to the Unit (n) section, where n is unit number of the key expansion module.

Step 3

Configure the Unit n Key m field, where n is unit number of the key expansion module, and m is the key number.

fnc=shortcut;url=userpref;nme=User preferences

where:

  • fnc= shortcut means function=phone menu shortcut.

  • url= userpref is the menu to open with this line key. It's the User preferences menu in this example. For more shortcut mappings, see Menu Shortcuts Mapping on PLK and PSK.

  • nme= XXXX is the menu shortcut name displayed on the key expansion module screen. If you don't specify a display name, the line key displays the target menu item. In the example, the line key displays User preferences.

You can also configure the parameter in the configuration file (cfg.xml) with a string in this format:

<Unit_n_Key_m_ ua="na">fnc=shortcut;url=userpref;nme=User preferences</Unit_n_Key_m_>

where n is the unit number of the key expansion module, and m is the key number.

Step 4

Click Submit All Changes.


Add an Extended Feature to a Key Expansion Module Line Key

You can add a feature to a line key of the attached key expansion module. Then, the user can press the line key to access the feature. For the supported features, see Configurable Features on Line Keys.

Before you begin

Access the phone administration web page. See Access the Phone Web Interface.

Procedure


Step 1

Select Voice > Att Console.

Step 2

Go to the Unit (n) section, where n is unit number of the key expansion module.

Step 3

Configure the Unit n Key m field, where n is unit number of the key expansion module, and m is the key number.

fnc=dnd

The user can turn on or off Do not disturb mode with the line key. For more feature codes, see Configurable Features on Line Keys.

You can also configure the parameter in the configuration file (cfg.xml) with a string in this format:

<Unit_n_Key_m_ ua="na">fnc=dnd</Unit_n_Key_m_>

where n is the unit number of the key expansion module, and m is the key number.

Step 4

Click Submit All Changes.


Shut Down a Line Key on a Key Expansion Module

You can shut down a line key on a key expansion module by setting the Inert mode for it from the phone web page. When the key expansion module line key is in the Inert mode, it is disabled thoroughly. For example, the key expansion module LED is disabled (including LED behavior), no icon or text displays next to the key expansion module line key, and the key expansion module button is not responsive. In a word, it is completely unavailable.

Before you begin

Access the phone administration web interface. See Access the Phone Web Interface

Procedure


Step 1

Select Voice > Att Console.

Step 2

Go to the Unit (n) section, where n is unit number of the key expansion module.

Step 3

Configure the Unit n Key m field, where n is unit number of the key expansion module, and m is the key number.

fnc=inert;

where fnc=inert means function=inert.

You can also configure the parameter in the configuration file (cfg.xml) with a string in this format:

<Unit_n_Key_m_ ua="na">fnc=inert;</Unit_n_Key_m_>

where n is the unit number of the key expansion module, and m is the key number.

Step 4

Click Submit All Changes.