Your Phone

The Cisco IP Phone 7800 Series

The Cisco IP Phones 7811, 7821, 7841, and 7861 deliver easy-to-use, highly-secure voice communications.

Figure 1. The Cisco IP Phone 7800 Series
The Cisco IP Phone 7800 Series

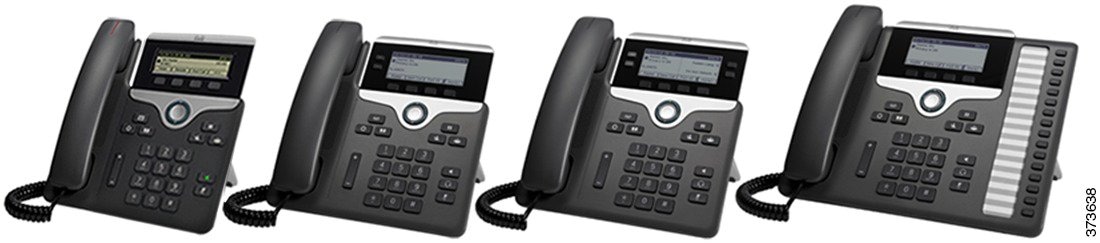
The following table shows the major features for the Cisco IP Phone 7800 Series.

Table 1. Cisco IP Phone 7800 Series Major Features

Features

7811

7821

7841

7861

Screen

Greyscale, no backlight

Greyscale, with backlight

Greyscale, with backlight

Greyscale, with backlight

Lines

1

2

4

16

Fixed feature keys

8

9

9

9

Your phone must be connected to a network and configured to connect to a call control system. The phones support many functions and features, depending on the call control system. Your phone might not have all functions available, based on the way your administrator has set it up.

When you add features to your phone, some features require a line button. But each line button on your phone can support only one function (a line, a speed dial, or a feature). If your phone's line buttons are already in use, your phone won't display any additional features.

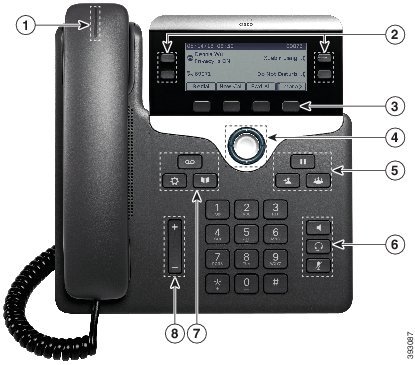
To check which phone model you have, press Applications and select Phone information. The Model number field shows your phone model.

New and Changed Information

New and Changed Information for Firmware Release 12.7(1)

The following table shows the changes made for Firmware Release 12.7(1).

Table 4. Cisco IP Phone 7800 User Guide Revisions for Firmware Release 12.7(1)

Revision

Updated Section

Updated for Select Key LED and Energy Savings.

Energy Savings

Turn Off the Select Key LED for Energy Save Mode

Updated for E-hook.

Enable electronic hookswitch control on your phone

Updated for hunt group calls on Call Alert

Answer a Call Within Your Hunt Group

Cisco Headset 500 Series Firmware Release 1.5 Change

General changes

In certain circumstances, users who dialed a number that was busy received the reorder tone. With this release, the user hears the busy tone.

New section Phone Icons

New and Changed Information for Firmware Release 12.6(1)

The following table shows the changes made for Firmware Release 12.6(1).

Table 5. Cisco IP Phone 7800 User Guide Revisions for Firmware Release 12.6(1)

Revision

Updated Section

Added a section about sharing a network connection between phone and computer.

Share a Network Connection with Your Phone and Computer

New and Changed Information for Firmware Release 12.5(1)SR3

All references into Cisco Unified Communications Manager documentation have been updated to support all Cisco Unified Communications Manager releases.

The following table shows the changes made for Firmware Release 12.5(1)SR3.

Table 6. Cisco IP Phone 7800 User Guide Revisions for Firmware Release 12.5(1)SR3

Revision

Updated Section

Added support for Reset Headset Settings

Reset Cisco Headset settings from your phone

New topic

Phone Keypad Characters

New topic

Share a Network Connection with Your Phone and Computer

New and Changed Information for Firmware Release 12.5(1)SR2

No user guide updates were required for Firmware Release 12.5(1)SR2.

Firmware Release 12.5(1)SR2 replaces Firmware Release 12.5(1) and Firmware 12.5(1)SR1. Firmware Release 12.5(1) and Firmware Release 12.5(1)SR1 have been deferred in favor of Firmware Release 12.5(1)SR2.

New and Changed Information for Firmware Release 12.5(1)SR1

All references into Cisco Unified Communications Manager documentation have been updated to support all Cisco Unified Communications Manager releases.

The following table shows the changes made for Firmware Release 12.5(1)SR1.

Table 7. Cisco IP Phone 7800 User Guide Revisions for Firmware Release 12.5(1)SR1

Revision

Updated Section

Connect with Activation Code Onboarding

Connect with Activation Code Onboarding

Cisco Headset 561 and 562 Multibase

Multibase for Cisco Headset 560 Series

New and Changed Information for Firmware Release 12.5(1)

All references into Cisco Unified Communications Manager documentation have been updated to support all Cisco Unified Communications Manager releases.

The following table shows the changes made for Firmware Release 12.5(1).

Table 8. Cisco IP Phone 7800 User Guide Revisions for Firmware Release 12.5(1)

Revision

Updated Section

Whisper Paging on Cisco Unified Communications Manager Express

Intercom Calls

Disable handset so audio path can be kept on headset

Audio Path Selection

Cisco Headset 561 and 562

Cisco Headset 500 Series

New and Changed Information for Firmware Release 12.1(1)SR1

No updates were required for firmware release 12.1(1)SR1.

New and Changed Information for Firmware Release 12.1(1)

The following table shows the changes made for Firmware Release 12.1(1).

Table 9. Cisco IP Phone 7800 Series User Guide Revisions for Firmware Release 12.1(1).

Revision

Updated Section

Updated for Cisco Headset 531 and Cisco Headset 532.

Cisco Headset 500 Series

New and Changed Information for Firmware Release 12.0(1)

No updates were required for firmware release 12.0(1).

New and Changed Information for Firmware Release 11.7(1)

No user guide updates were required for firmware release 11.7(1).

New and Changed Information for Firmware Release 11.5(1)SR1

The following table shows the changes made for Firmware Release 11.5(1)SR1.

Table 10. Cisco IP Phone 7800 User Guide revisions for Firmware Release 11.5(1)SR1.

Revision

Updated Section

Updated for MLPP and Do not disturb support

Turn On Do Not Disturb

Prioritized Calls

Answer a Priority Call

New and Changed Information for Firmware Release 11.5(1)

This User Guide has been streamlined and restructured to improve the customer experience.

The following table shows the changes made for Firmware Release 11.5(1).

Table 11. Cisco IP Phone 7800 User Guide revisions for Firmware Release 11.5(1).

Revision

Updated Section

Added the following section for Postpone a Phone Upgrade

Phone Firmware and Upgrades

New and Changed Information for Firmware Release 11.0

This User Guide has been streamlined and restructured to improve the customer experience.

The following table shows the changes made for Firmware Release 11.0(1).

Table 12. Cisco IP Phone 7800 User Guide revisions for Firmware Release 11.0(1).

Revision

Updated Section

Added the following section for Problem Report Tool support

Report All Phone Issues

Revised the following sections for cBarge and Barge

Shared Lines

Revised the following sections for Do Not Disturb(DND)

Turn On Do Not Disturb

Feature Support

This document describes all the features that the device supports. However, not all features may be supported with your current configuration. For information on supported features, contact your administrator.

Phone Setup

Your administrator sets up your phone and connects it to the network. If your phone is not set up and connected, contact your administrator for instructions.

Adjust the Handset Rest

If your phone is wall-mounted or if the handset slips out of the cradle too easily, you may need to adjust the handset rest to ensure that the receiver does not slip out of the cradle.

Figure 2. Adjust the Handset Rest

Handset Rest Adjustment procedure

Procedure


Step 1

Remove the handset from the cradle and pull the plastic tab from the handset rest.

Step 2

Rotate the tab 180 degrees.

Step 3

Hold the tab between two fingers, with the corner notches facing you.

Step 4

Line up the tab with the slot in the cradle and press the tab evenly into the slot. An extension protrudes from the top of the rotated tab.

Step 5

Return the handset to the handset rest.


Change the Viewing Angle of Your Phone

You can change the angle of the phone, except the Cisco IP Phone 7811, to eliminate glare on the screen.

Procedure


Step 1

Unplug the phone from the network.

Step 2

Place the phone so that the keypad faces the desktop.

Step 3

Grasp one side of the footstand with one hand and place your other hand on the phone.

Step 4

Hold down the phone and pull up on the footstand.

Step 5

Turn the footstand over.

Step 6

Push the footstand back into the phone until the stand locks into place.

Step 7

Place the phone upright and plug it into the network.


Connect to the Network

You need to connect the phone to the network.

  • Wired network connection—The phone is plugged into the network with an Ethernet cable.

After connecting the phone to the network, your phone may be set up for:

  • Mobile and Remote Access Through Expressway—If your administrator sets up Mobile and Remote Access Through Expressway and you connect your phone to the network, it connects to the Expressway server.

Share a Network Connection with Your Phone and Computer

Both your phone and your computer must connect to your network to function. If you only have one Ethernet port, then your devices can share the network connection.

Before you begin

Your administrator must enable the PC port in Cisco Unified Communications Manager before you can use it.

Procedure

Step 1

Connect the phone SW port to the LAN with an Ethernet cable.

Step 2

Connect your computer to the phone PC port with an Ethernet cable.


Connect with Activation Code Onboarding

If your network has been configured to support this feature, then you can use Activation Code Onboarding to connect to your company's phone network.

Enter an Activation Code

Activation codes are used to set up your new phone. They can only be used once, and expire after 1 week. Contact your administrator if you don't know your code or if you need a new one.

Procedure

Step 1

Enter your activation code on the activation screen.

Step 2

Press Submit.


Connect to Expressway

You can use Mobile and Remote Access Through Expressway to connect into your corporate network when you are working away from your office. Because your phone does not have a TFTP address configured, the phone displays a Welcome screen to begin the sign-in process.

Before you begin

If you have been using your phone at the office or with a VPN, reset your service mode before you connect to Expressway.

If you need to connect to Mobile and Remote Access Through Expressway on-premise, restart your phone and press Select when prompted.

Procedure

Step 1

Enter your activation code or service domain on the Welcome screen and press Continue.

Step 2

Enter your username and password.

Step 3

Press Submit.


Change the Service Mode

When your phone connects to the existing server, you hear a beep tone that exists for 5 seconds. You also view an alert message window which indicates that you can change the service mode to Huron.

Procedure

Step 1

To change the service mode:

  • Press the Select key on the phone.
  • Select Settings > Admin Settings > Reset Settings > Service Mode.
Your phone deactivates your VPN, and then restarts.

Step 2

Press Reset to change the service to Huron.

Step 3

Press Cancel to retain the existing service.


Replace Your Existing Phone with a New Phone

You can change your phone model. The change can be required for a number of reasons, for example:

  • You have updated your Cisco Unified Communications Manager (Unified CM) to a software version that doesn't support the phone model.

  • You wants a different phone model from their current model.

  • Your phone requires repair or replacement.

Limitation: If the old phone has more lines or line buttons than the new phone, the new phone doesn't have the extra lines or line buttons configured.

The phone reboots when the configuration is complete.

Before you begin

Your administrator needs to set up Cisco Unified Communications Manager to enable the phone migration.

You need a new phone that hasn't been connected to the network or previously configured.

Procedure


Step 1

Power off the old phone.

Step 2

Power on the new phone.

Step 3

If prompted, enter your activation code.

Step 4

Select Replace an existing phone.

Step 5

Enter the primary extension of the old phone.

Step 6

If the old phone had a PIN assigned, enter the PIN.

Step 7

Press Submit.

Step 8

If you have several devices, select the device to replace from the list and press Continue.


Activate and Sign In to Your Phone

You may need to activate or sign in to your phone. Activation happens once for your phone, and connects the phone to the call control system. Your administrator gives you your sign-in and activation credentials.

Sign In to Your Phone

Before you begin

Get your user ID and PIN or password from your administrator.

Procedure


Step 1

Enter your user ID in the User ID field.

Step 2

Enter your PIN or password in the PIN or Password field, then press Submit.


Sign In to Your Extension from Another Phone

You can use Cisco Extension Mobility to sign in to a different phone in your network and have it act the same as your phone. After you sign in, the phone adopts your user profile, including your phone lines, features, established services, and web-based settings. Your administrator sets you up for the Cisco Extension Mobility service.

Before you begin

Get your user ID and PIN from your administrator.

Procedure


Step 1

Press Applications .

Step 2

Select Extension Mobility (name can vary).

Step 3

Enter your user ID and PIN.

Step 4

If prompted, select a device profile.


Sign Out of Your Extension from Another Phone

Procedure


Step 1

Press Applications .

Step 2

Select Extension Mobility.

Step 3

Press Yes to sign out.


Sign into Extension Mobility with Your Cisco Headset

You can use Cisco Extension Mobility to sign in to a different phone in your network and have it act the same as your phone. After you sign in, the phone adopts your user profile, including your phone lines, features, established services, and web-based settings. Your administrator sets you up for the Cisco Extension Mobility service.

Headset sign-in is supported for Mobile and Remote Access (MRA).

You plug your Cisco Headset 500 Series into someone else's phone. The headsets need to use the Y-cable to access this feature.

If your headset is not mapped to your user ID, the first time you perform this procedure, phone may prompt you to map the headset to your ID and the Cisco Unified Communications Manager maps the headset to your user record. The prompt depends on configuration settings for the phone. When your headset is mapped to you, the phone gets your user ID, based on the headset serial number, and displays your ID in the Extension Mobility sign-in screen.


Note


If the headset is upgrading or you're on a call, the association can't be made. Wait until the upgrade is finished or the call is finished before you perform this procedure.


When you unplug the headset or the USB adapter, you are signed out of Extension Mobility after a delay unless you confirm the sign-out.

You are also automatically signed out of Extension Mobility after a predetermined inactivity time.

Before you begin

A headset firmware upgrade can't be in progress.

The phone must be idle.

Procedure


Step 1

Plug your headset into the phone.

Step 2

If prompted, enter your user ID and PIN to map the headset to your user information.

If the headset has been already associated with another user, choose Yes to sign the user out.

Step 3

In the Extension Mobility screen, enter your user ID and PIN, and press Submit.

Step 4

If prompted, select a device profile.

Step 5

When finished, unplug your headset.

Step 6

Press Sign out.


Self Care Portal

You can customize some phone settings with the Self Care portal web site, which you access from your computer. The Self Care portal is part of your organization's Cisco Unified Communications Manager.

Your administrator gives you the URL to access the Self Care portal, and provides your user ID and password.

In the Self Care portal, you can control features, line settings, and phone services for your phone.

  • Phone features include speed dial, do not disturb, and your personal address book.

  • Line settings affect a specific phone line (directory number) on your phone. Line settings can include call forwarding, visual and audio message indicators, ring patterns, and other line-specific settings.

  • Phone services can include special phone features, network data, and web-based information (such as stock quotes and movie listings). Use the Self Care Portal to subscribe to a phone service before you access it on your phone.

The following table describes some specific features that you configure with the Self Care portal. For more information, see the Self Care portal documentation for your call control system.

Table 13. Features Available on the Self Care Portal

Features

Description

Call forward

Use the number that receives calls when call forward is enabled on the phone. Use the Self Care portal to set up more complicated call forward functions, for example, when your line is busy.

Additional phones

Specify the additional phones such as your mobile phone that you want to use to make and receive calls with the same directory numbers as your desk phone. You can also define blocked and preferred contacts to restrict or allow calls from certain numbers to be sent to your mobile phone. When you set up additional phones, you can also set up these features:

  • Single number reach—Specify whether the additional phone should ring when someone calls your desk phone.

  • Mobile calls—If the additional phone is a mobile phone, you can set it up to allow you to transfer mobile calls to your desk phone or desk phone calls to your mobile phone.

Speed dial

Assign phone numbers to speed-dial numbers so that you can quickly call that person.

Speed-Dial Numbers

When you dial a number on your phone, you enter a series of digits. When you set up a speed-dial number, the speed-dial number must contain all the digits you need to make the call. For example, if you need to dial 9 to get an outside line, you enter the number 9 and then the number you want to dial.

You can also add other dialed digits to the number. Examples of additional digits include a meeting access code, an extension, a voicemail password, an authorization code, and a billing code.

The dial string can contain the following characters:

  • 0 to 9

  • Pound (#)

  • Asterisk (*)

  • Comma (,)—This is the pause character, and gives a 2 second delay in the dialing. You can have several commas in a row. For example, two commas (,,) represent a pause of 4 seconds.

The rules for dial strings are:

  • Use the comma to separate the parts of the dial string.

  • An authorization code must always precede a billing code in the speed-dial string.

  • A single comma is required between the authorization code and the billing code in the string.

  • A speed-dial label is required for speed dials with authorization codes and additional digits.

Before you configure the speed dial, try to dial the digits manually at least once to ensure that the digit sequence is correct.

Your phone does not save the authorization code, billing code, or extra digits from the speed dial in the call history. If you press Redial after you connect to a speed-dial destination, the phone prompts you to enter any required authorization code, billing code, or additional digits manually.

Example

To set up a speed-dial number to call a person at a specific extension, and if you need an authorization code and billing code, consider the following requirements:

  • You need to dial 9 for an outside line.

  • You want to call 5556543.

  • You need to input the authorization code 1234.

  • You need to input the billing code 9876.

  • You must wait for 4 seconds.

  • After the call connects, you must dial the extension 56789#.

In this scenario, the speed-dial number is 95556543,1234,9876,,56789#.

Buttons and Hardware

The Cisco IP Phone 7800 Series has distinct hardware types:

  • Cisco IP Phone 7811 No buttons on either side of the screen

  • Cisco IP Phone 7821 Two buttons on the left side of the screen

  • Cisco IP Phone 7841 Two buttons on either side of the screen

  • Cisco IP Phone 7861 16 buttons at the right edge of the phone

Figure 3. Cisco IP Phone 7800 Series Buttons and Features
Cisco IP Phone 7800 Series with 8 callouts clockwise from the handset. Number 1 points to light strip on the handset. Number 2 points to the 4 buttons on either side of the phone screen. Number 3 points to the 4 buttons along the bottom of the phone screen. Number 4 points to the round navigation cluster near the bottom of the phone screen. Number 5 points to the three buttons on the top right side of the phone. Number 6 points to the three buttons on the lower right side of the phone. Number 7 points to the three buttons on the top left side of the phone. Number 8 points to the volume button.

The following table describes the Cisco IP Phone 7800 Series buttons and hardware.

Table 14. Cisco IP Phone 7800 Series Buttons and Features

1

Handset and Handset light strip

Indicates whether you have an incoming call (flashing red) or a new voice message (steady red).

2

Programmable feature buttons and line buttons

Feature button Access your phone lines, features, and call sessions.

For more information, see Softkey, Line, and Feature Buttons.

The Cisco IP Phone 7811 does not have programmable feature buttons or line buttons.

3

Softkey buttons

Softkey button Access functions and services.

For more information, see Softkey, Line, and Feature Buttons.

4

Navigation cluster

Navigation ring and Select Navigation cluster button. Scroll through menus, highlight items, and select the highlighted item.

5

Hold/Resume, Conference, and Transfer

Hold/Resume Hold/Resume button Place an active call on hold and resume the held call.

Conference Create a conference call.

Transfer Transfer a call.

6

Speakerphone, Mute, and Headset

Speakerphone Toggle the speakerphone on or off. When the speakerphone is on, the button is lit.

Mute Toggle the microphone on or off. When the microphone is muted, the button is lit.

Headset Toggle the headset on. When the headset is on, the button islit. To leave headset mode, you pick up the handset or select Speakerphone .

The Cisco IP Phone 7811 does not have a Headset button.

7

Contacts, Applications, and Messages

Contacts Access personal and corporate directories.

Applications Access call history, user preferences, phone settings, and phone model information.

Messages Autodial your voice messaging system.

8

Volume button

Adjust the handset, headset, and speakerphone volume (off hook) and the ringer volume(on hook).

Phone Keypad Characters

The phone keypad allows you to enter letters, numbers, and special characters. You press the Two (2) to Nine (9) keys to get the letters and numbers. You use the One (1), Zero (0)), Asterisk (*), and Pound (#) keys for special characters. The following table lists the special characters for each key for the English locale. Other locales will have their own characters.

Table 15. Special Characters on the Keypad

Keypad Key

Special Characters

One (1)

/ . @ : ; = ? -_ & %

Zero (0)

(space) , ! ^ ' " |

Asterisk (*)

+ * ~ ` < >

Pound (#)

# $ £ ◻ \ ( ) { } [ ]

Navigation

Use the outer ring of the Navigation cluster to scroll through menus and to move between fields. Use the inner Select button of the Navigation cluster to select menu items.

Navigation Cluster

If a menu item has an index number, you can enter the index number with the keypad to select the item.

Softkey, Line, and Feature Buttons

You can interact with the features on your phone in several ways:

  • Softkeys, located below the screen, give you access to the function displayed on the screen above the softkey. The softkeys change depending on what you are doing at the time. The More ... softkey shows you that more functions are available.

  • Feature and line buttons, located on either side of the screen, give you access to phone features and phone lines.

    • Feature buttons—Used for features such as Speed dial or Call pickup, and to view your status on another line.

    • Line buttons—Used to answer a call or resume a held call. When not used for an active call, used to initiate phone functions, such as the missed calls display.

Feature and line buttons illuminate to indicate status.

  • Line button Green, steady LED—Active call or two-way intercom call

  • Line button Green, flashing LED—Held call

  • Line button Amber, steady LED—Privacy in use, one-way intercom call, or logged into a Hunt Group

  • Line button Amber, flashing LED—Incoming call or reverting call

  • Line button Red, steady LED—Remote line in use (shared line or Line Status) or Do Not Disturb (DND) active

  • Line button Red, flashing LED—Remote line on hold

Your administrator can set up some functions as softkeys or as feature buttons. You can also access some functions with softkeys or the associated hard button.

Phone Screen Features

The phone screen shows information about your phone such as directory number, active call and line status, softkeys, speed dials, placed calls, and phone menu listings. The screen is made up of three sections: the header row, the middle section, and the footer row.

Figure 4. Cisco IP Phone 7800 Screen
Cisco IP Phone 7800 screen

The following table describes the Cisco IP Phone screen components.

Table 16. Cisco IP Phone Screen Information

1

At the top of the screen is the header row. The header row displays the phone number, current date and time, as well a number of icons. The icons display when features are active.

2

The middle of the phone screen displays the information associated with the line and feature buttons on the phone.

3

The bottom row of the screen contains the softkey labels. Each label indicates the action for the softkey button below the screen.

Phone Icons

Your phone screen displays many icons. This section gives images of the common icons

Icons are in color or grayscale, depending on the screen.

Lines

Icon

Description

handset

Line/Directory Number

handset with bars to the left

Speed dial

up and down arrows

Intercom

two vertical bars

Held call

handset with audio arcs

Active call

Shared Lines

Icon

Description

handset with upward lines

Incoming call on shared line.

red handset with audio arcs

Shared line active by another user.

Recents

Icon

Description

handset with left arrow

Incoming call

handset with right arrow

Outgoing call

handset with left arrow over the top

Missed call

Clean the Phone Screen

Procedure

If your phone screen gets dirty, wipe it with a soft, dry cloth.

Caution


Do not use any liquids or powders on the phone because they can contaminate the phone components and cause failures.


Differences Between Phone Calls and Lines

We use the terms lines and calls in very specific ways to explain how to use your phone.

  • Lines—Each line corresponds to a directory number or intercom number that others can use to call you. You have as many lines as you have directory numbers and phone line icons. Depending upon how your phone is configured, you could have up to 16 lines.

  • Calls—Each line can support multiple calls. By default, your phone supports four connected calls per line, but your administrator can adjust this number according to your needs.

    Only one call can be active at any time; other calls are automatically placed on hold.

    Here is an example: If you have two lines and each line supports four calls, then you could have up to eight connected calls at one time. Only one of those calls is active and the other seven are held calls.

Power Requirements

The following Cisco-approved power adaptors must be used with the Cisco IP Phone 7800 Series:

  • Phihong adapter (PSC18U-480); Rating: 48 VDC 0.38A

  • Delta adapter (EADP-18VB B); Rating: 48 VDC 0.375A

Phone Firmware and Upgrades

Your phone comes pre-installed with firmware that is specific to the call control system.

Occasionally, your administrator upgrades the phone firmware for you. This upgrade happens when you are not using your phone because the phone resets to use the new firmware.

Postpone a Phone Upgrade

When new firmware is available, the Ready to upgrade window is displayed on your phone and a timer begins a 15-second countdown. If you do nothing, the upgrade proceeds.

You can postpone your firmware upgrade for 1 hour and up to 11 times. The upgrade is also postponed if you make or receive a phone call.

Procedure


Select Delay to postpone a phone upgrade.


View the Progress of a Phone Firmware Upgrade

During a phone firmware upgrade, you can view the upgrade progress.

Procedure


Step 1

Press Applications .

Step 2

Select Phone information > Show detail.

Step 3

Press Exit.


Energy Savings

Your administrator can reduce the amount of power your phone screen uses with the following options:

  • Power Save—The backlight or screen turns off when the phone is inactive for a set interval.

  • You can manage the backlight.

  • Power Save Plus—Your phone screen turns on and off at times that are based on your work schedule. If your work hours or work days change, you can contact your administrator to reconfigure your phone.

For example, your administrator can set your phone to alert you 10 minutes before it turns off. You get a message that your phone is turning off soon and you get notifications at these intervals:

  • Four rings at 10 minutes before power off

  • Four rings at 7 minutes before power off

  • Four rings at 4 minutes before power off

  • 15 rings at 30 seconds before power off

If your phone is active, it waits until it has been inactive for a set interval before it notifies you of the pending power shutdown.

The Cisco IP Phone 7811 doesn't support Power Save or Power Save Plus.

Turn On Your Phone

When your phone turns off to save energy, the phone screen is blank and the Select button lights up.

Procedure


Press Select to turn your phone back on.


Additional Help and Information

If you have questions about the functions available on your phone, contact your administrator.

The Cisco website (https://www.cisco.com) contains more information about the phones and call control systems.

Accessibility Features

Cisco IP Phones provide accessibility features for the vision impaired, the blind, and the hearing and mobility impaired.

For detailed information about the accessibility features on these phones, see http://www.cisco.com/c/en/us/support/collaboration-endpoints/unified-ip-phone-7800-series/products-technical-reference-list.html.

You can also find more information about accessibility at this Cisco website:

http://www.cisco.com/web/about/responsibility/accessibility/index.html

Troubleshooting

You may experience issues related to the following scenarios:

  • Your phone cannot communicate with the call control system.

  • The call control system has communication or internal problems.

  • Your phone has internal problems.

If you experience problems, your administrator can help troubleshoot the root cause of the problem.

Find Information About Your Phone

Your administrator may ask for information about your phone. This information uniquely identifies the phone for troubleshooting purposes.

Procedure

Step 1

Press Applications .

Step 2

Select Phone information.

Step 3

(Optional) Press Show detail to view the active load information.

Step 4

Press Exit.


Report Call Quality Issues

Your administrator may temporarily configure your phone with the Quality Reporting Tool (QRT) to troubleshoot performance problems. Depending on the configuration, use the QRT to:

  • Immediately report an audio problem on a current call.

  • Select a general problem from a list of categories and choose reason codes.

Procedure

Step 1

Press Report quality.

Step 2

Scroll and select the item that closely matches your problem.

Step 3

Press the Select softkey to send the information to your system administrator.


Report All Phone Issues

You can use the Cisco Collaboration Problem Report Tool (PRT) to collect and send phone logs, and to report problems to your administrator. If you see a message that the PRT upload has failed, the problem report is saved on the phone and you should alert your administrator.

Procedure

Step 1

Press Applications .

Step 2

Select Phone information > Report.

Step 3

Enter the date and time that you experienced the problem in the Date of problem and Time of problem fields.

Step 4

Select Problem description.

Step 5

Select a description from the displayed list, then press Submit.


Lost Phone Connectivity

Sometimes your phone loses its connection to the phone network. When this connection is lost, your phone displays a message.

If you are on an active call when the connection is lost, the call continues. But, you don't have access to all normal phone features because some functions require information from the call control system. For example, your softkeys might not work as you expect.

When the phone reconnects to the call control system, you'll be able to use your phone normally again.

For more information on phone registration, please visit Manual phone registration.

Cisco One-Year Limited Hardware Warranty Terms

Special terms apply to your hardware warranty and services that you can use during the warranty period.

Your formal Warranty Statement, including the warranties and license agreements applicable to Cisco software, is available at: Product Warranties.