Push Notifications (On-Premises Deployments)

Push Notifications Overview

When your cluster is enabled for Push Notifications, Cisco Unified Communications Manager and the IM and Presence Service use either the Apple, or Google cloud’s Push Notification service to send push notifications to compatible Cisco Jabber or Webex clients that run on iOS or Android devices. Push Notifications let your system communicate with the client, even after it has entered into background mode (also known as suspended mode). Without Push Notifications, the system may not be able to send calls or messages to clients that have entered into background mode.

The encrypted payload in the Push Notification includes the following PII information:

  • Display Name

  • Display Number

  • Hunt Pilot DN

Following table details the support matrix for Apple Push Notification Service (APNS) and Local Push Notification Service (LPNS).

Table 1. Support Matrix for APNS and LPNS

Unified CM

IM and Presence Service

Cisco Expressway (is MRA is deployed)

Cisco Jabber

Webex App

Mobile Operating System

Comments

Apple—APNS Messaging

11.5(1)SU2

11.5(1)SU2

X8.9.1

11.8.1

N/A

12

Requires connectivity with Apple and Cisco cloud.

Apple—APNS Calling

11.5(1)SU3

11.5(1)SU3

X8.10.1

11.9.0

40.6

12

Apple—APNS CallKit

11.5(1)SU8 and 12.5(1)SU3 and 14

NA

X12.6

12.9

40.6

13

Apple—APNS China region

12.5(1)SU3 and 14

12.5(1)SU3

X12.6

12.9 MR

41.4

13

Android— FCM

12.5(1)SU3 and 14

12.5(1)SU3

X12.6.2

12.9.1

40.8

8.0

Requires connectivity with Google and Cisco cloud.

Apple—LPNS

14SU3

NA

Not Supported

14.2

43.6

16.5

Supported in WiFi deployment

For Unified Communications Manager and IM and Presence Service deployments, Push Notifications are used by the following clients:

Table 2. Compatible Clients That Use Push Notifications (On-Premises Deployments)

Communication Type

Clients that Use Push Notifications

Operating System

Partner Cloud Service

Local Push Connectivity

Calls

Cisco Jabber on iPhone or iPad

Cisco Webex on iPhone or iPad

iOS

Apple Push Notification service (in Apple cloud)

Supported from Unified CM version 14SU3 and Webex App 43.6 or later or Cisco Jabber 14.2 or later.

Calls

Cisco Jabber on Android

Cisco Webex on Android

Android

Android Push Notification service (in Google cloud)

Not Supported

Messages *

Cisco Jabber on iPhone or iPad

iOS

Apple Push Notification service (in Apple cloud)

Not Supported

Messages *

Cisco Jabber on Android

Android

Android Push Notification service (in Google cloud)

Not Supported

* For messaging, Webex App clients register to the Webex App cloud rather than the IM and Presence Service.


Note


For minimum release information for specific Push Notifications features on both iOS and Android, see Minimum Releases and Feature Support for Push Notifications.

How Push Notifications Work

At startup, Cisco Jabber clients that are installed on Android and iOS platform devices register to Unified Communications Manager and the IM and Presence Service while Webex App clients that run on Android or iOS register to Unified Communications Manager for calling and the Webex App cloud for messaging. In addition, the Jabber and Webex clients also register to the Google or Apple cloud, depending on which platform they are running. So long as the client remains in foreground mode, calls or messages can be sent to the client directly.

However, once the client moves to background mode (for example, this may happen to maintain battery life), the standard communication channels are unavailable, preventing direct communication with the client. Push Notifications provides an alternative channel to reach the clients through the partner clouds (Apple or Google).


Note


Cisco Jabber and Webex App clients are considered to be running in suspended mode if any of the following conditions are true:

  • The Cisco Jabber or Webex App is running off-screen (in the background).

  • The Android or iOS device is locked.

  • The Android or iOS device screen is turned off.


Figure 1. Push Notifications Architecture

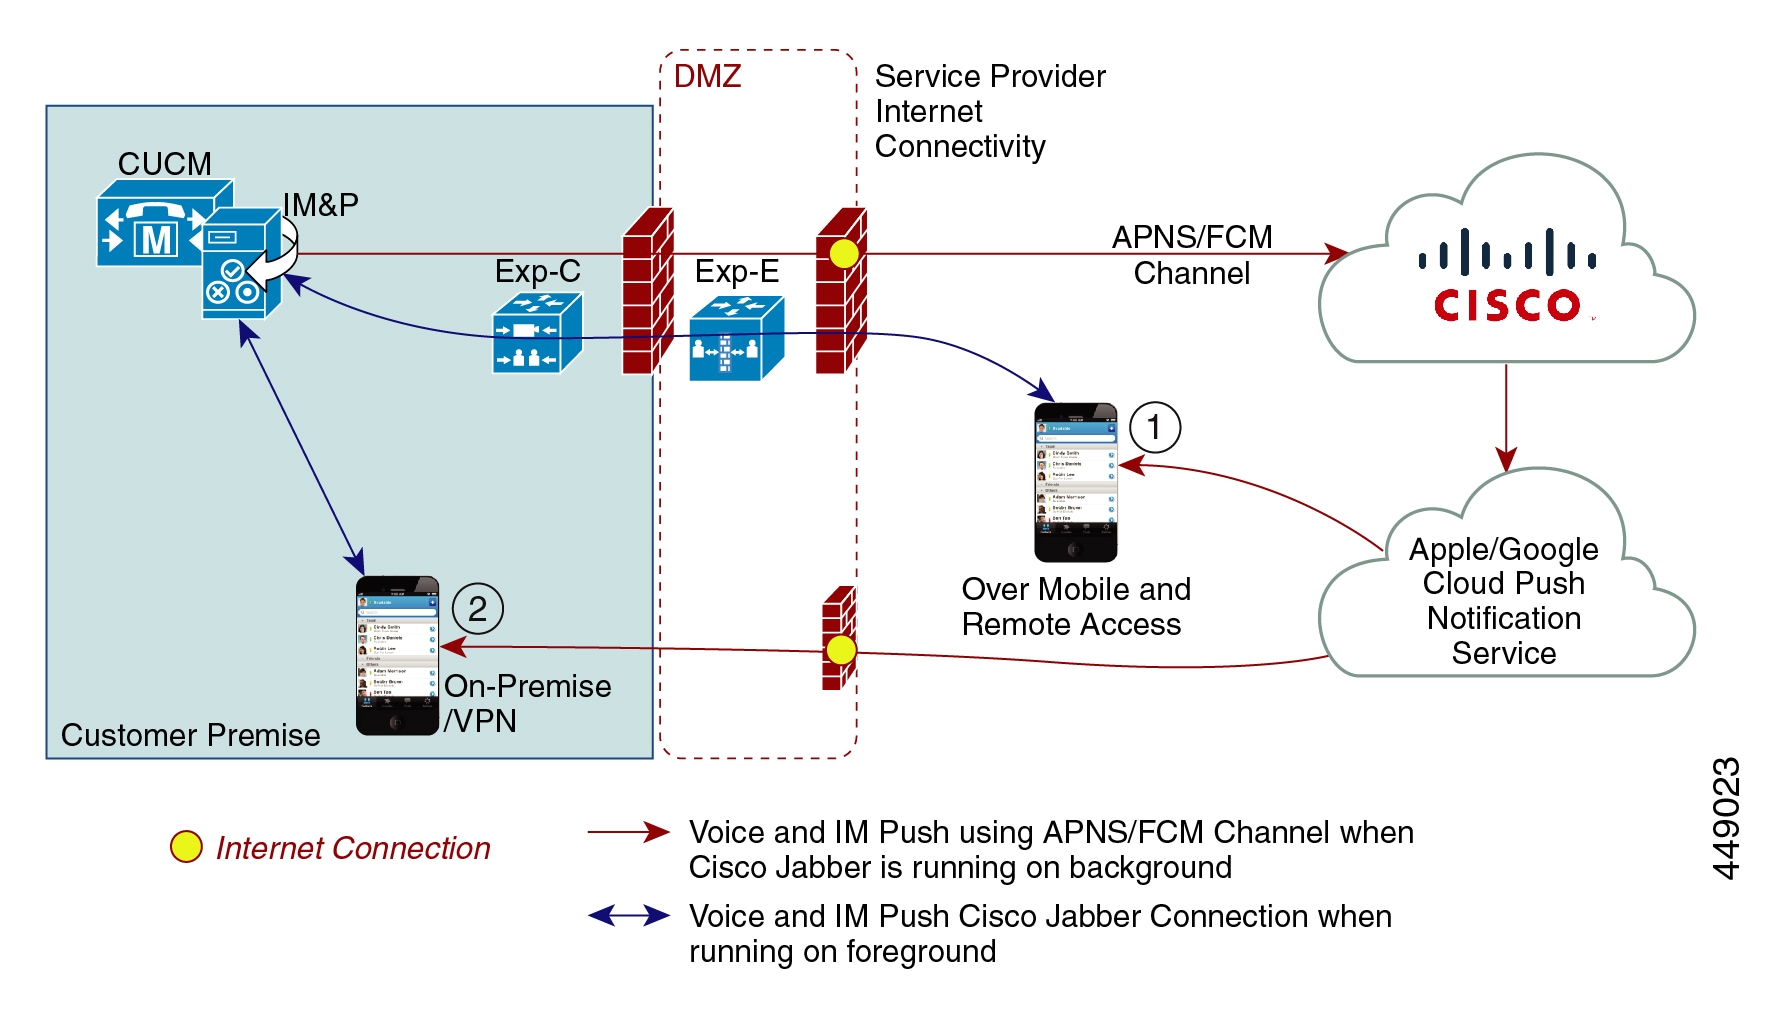
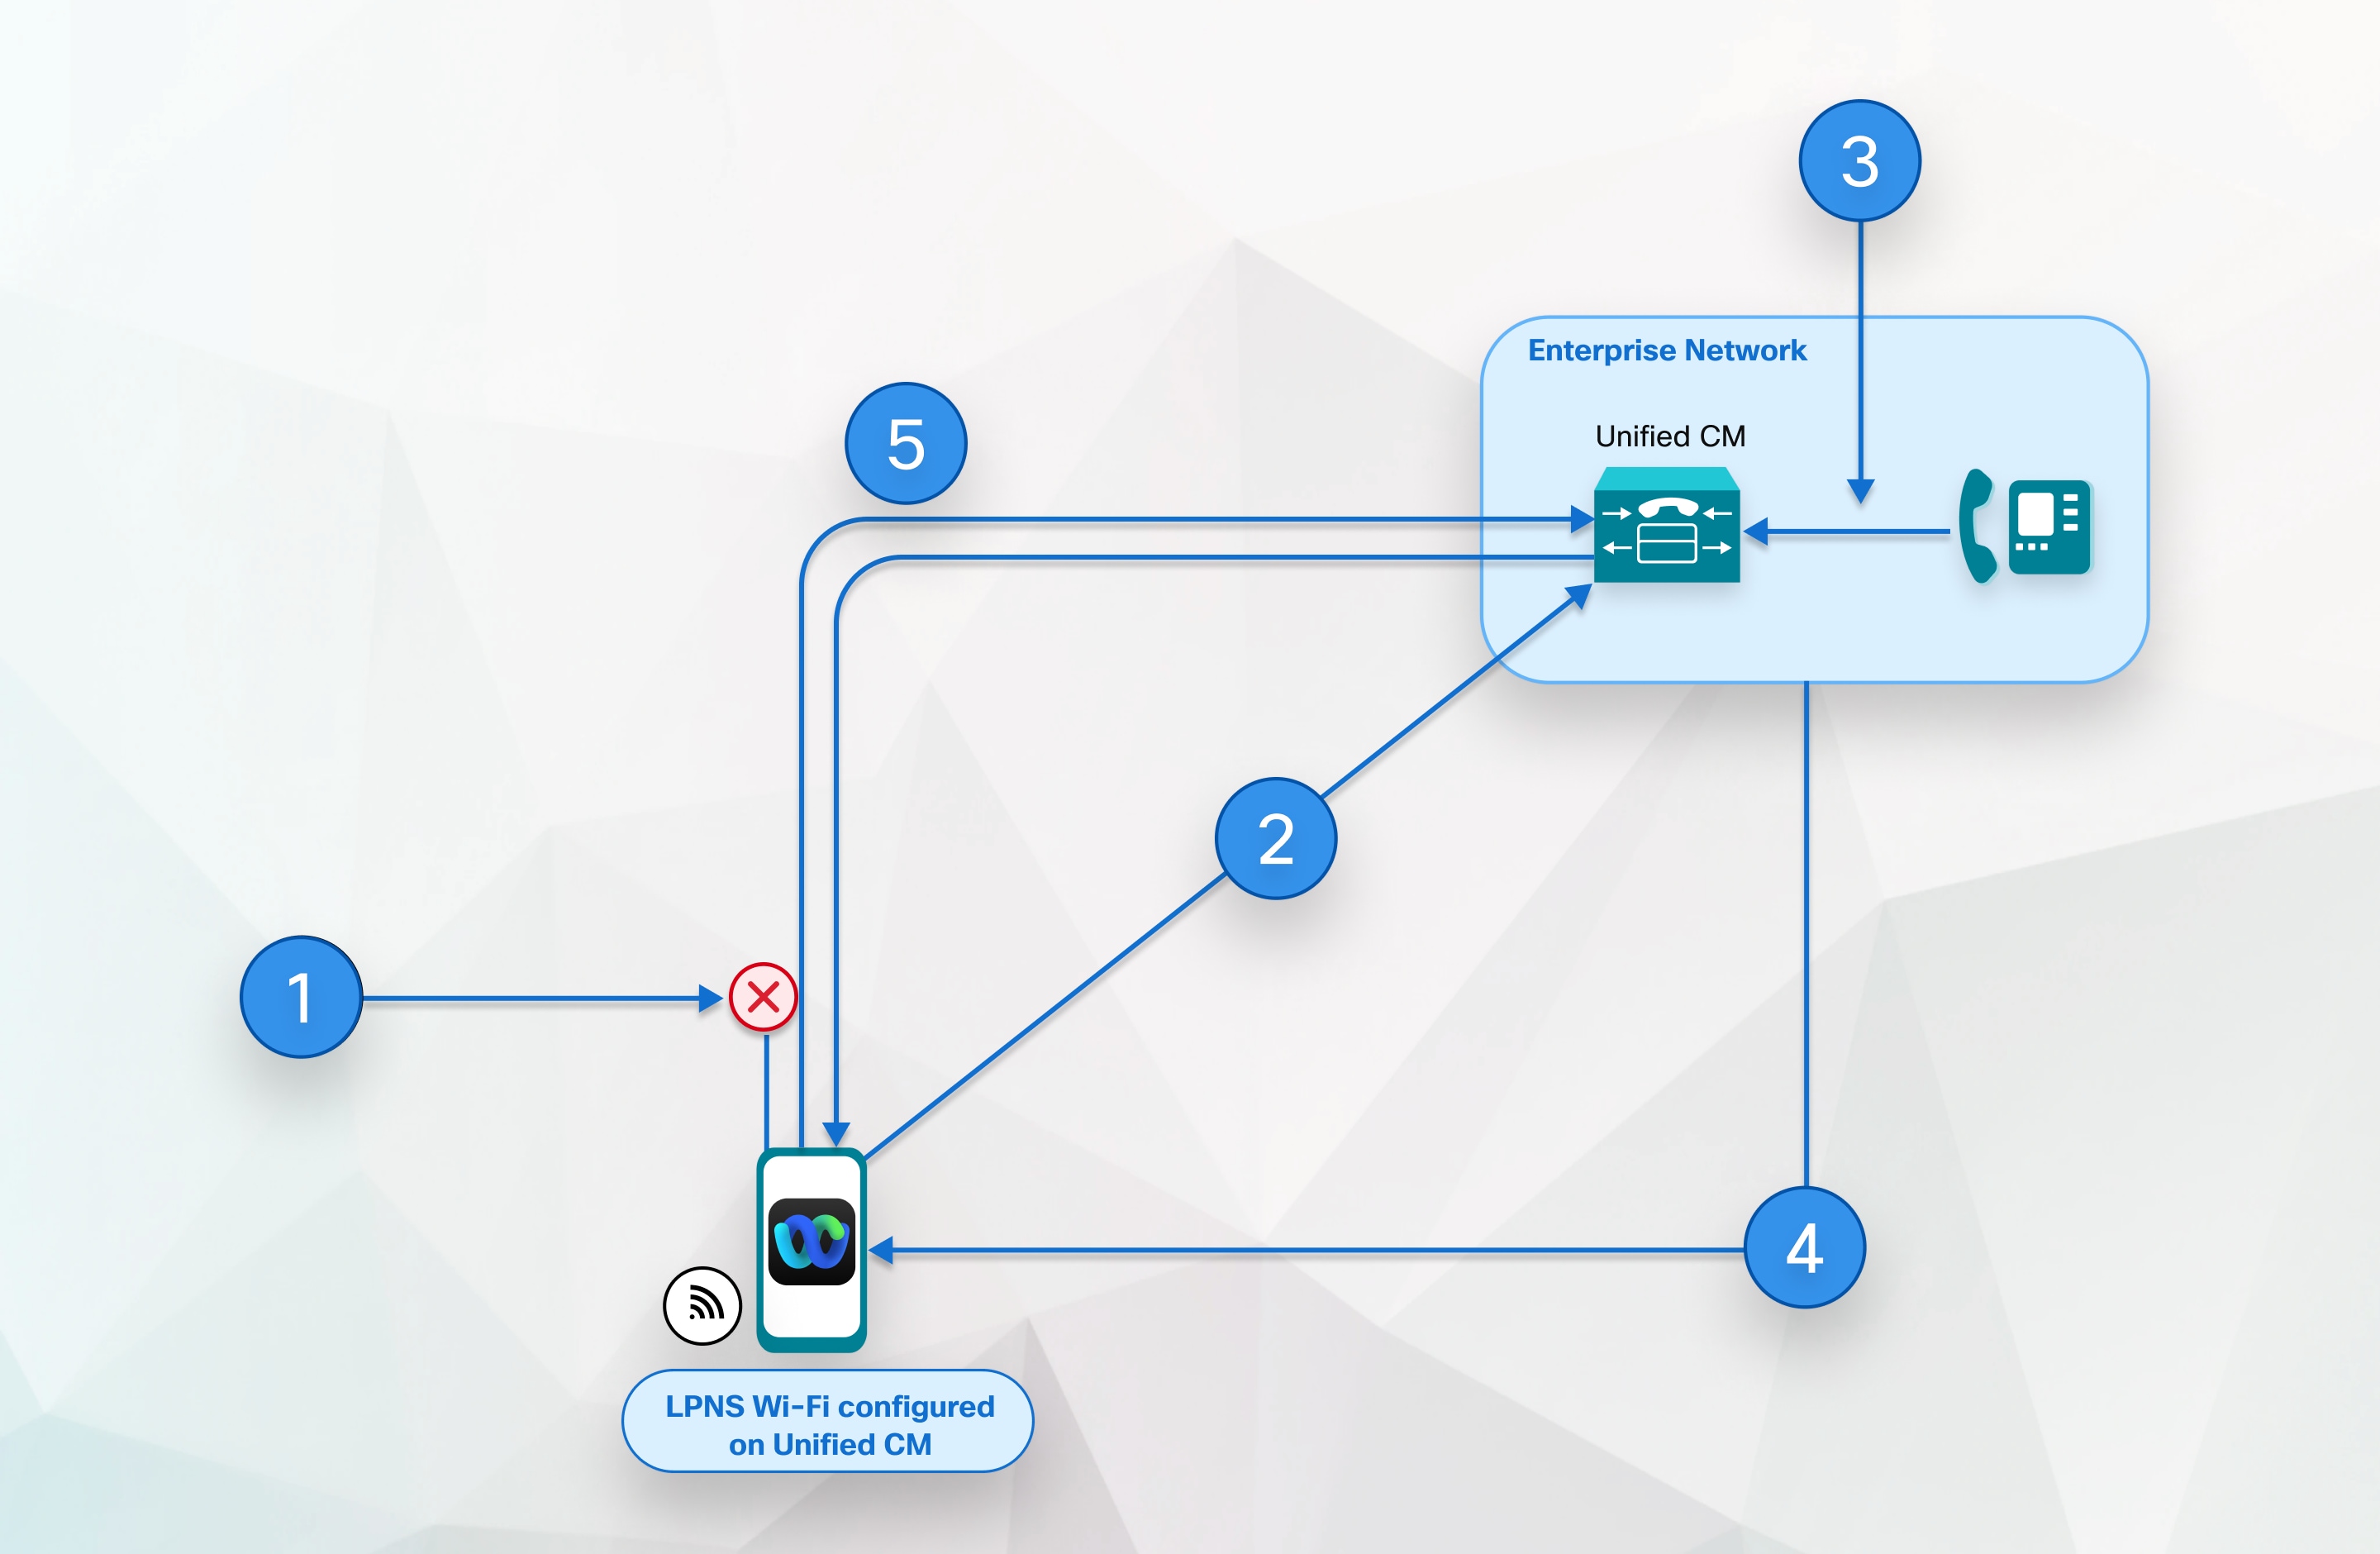
The above diagram displays what happens when Cisco Jabber for Android and iOS clients run in the background or are stopped. Because the standard channel is unavailable, the push notification is sent to the Push REST service in the Cisco cloud, which forwards the notification to the appropriate partner cloud (Apple or Google), which then forwards the push notification to the client. The client then reregisters to the on-premises deployment in order to accept the call or message.

The figure illustrates: (1) an MRA deployment where a Jabber client connects with an on-premises Unified Communications Manager and IM and Presence Service deployment through Expressway, and (2) a Cisco Jabber for Android or iOS client that connects directly to the on-premises deployment from within the enterprise network.


Note


For Jabber users who have simultaneously logged in to Windows and iOS devices:

  • If two users are in an active call, and another user sends a message, a push notification is sent to the iOS device.

  • If a user is not in an active call, and another user sends a message, no push notification is sent to the iOS device.


Push Notifications Behavior

The following table shows Push Notifications client behavior with on-premises deployments of Unified Communications Manager and the IM and Presence Service.


Note


Webex App clients use the Webex App cloud for messaging rather than an on-premises IM and Presence Service.

Note


Webex App and Cisco Jabber on IOS will always display as a Video Call due to limitations in the Apple IOS CallKit.
Table 3. Push Notifications Behavior for Cisco Jabber or Webex Clients on iOS or Android

Cisco Jabber or Webex client is in...

Running iOS12

Running iOS13 and above versions or Android

Foreground Mode

Voice and Video Calls

Unified CM sends calls to Cisco Jabber or Webex clients directly using the SIP channel.

In addition, Unified CM sends a Push Notification to clients that are in foreground mode. However, the Push Notification doesn't get used to establish the call—the standard SIP channel is used instead.

Messages (Jabber only)

The IM and Presence Service sends messages to Cisco Jabber directly using standard communication channels. The IM and Presence Service doesn't send Push Notifications to clients that are in foreground mode.

Voice and Video Calls

Unified CM sends calls to Cisco Jabber or Webex clients directly using the SIP channel.

In addition, Unified CM sends a Push Notification to clients that are in foreground mode. However, the Push Notification doesn't get used to establish the call—the standard SIP channel is used instead.

Messages (Jabber only)

The IM and Presence Service sends messages to Cisco Jabber directly using the standard communication channel. The IM and Presence Service doesn't send Push Notifications to clients that are in foreground mode.

Background Mode

Voice and Video Calls

SIP channel is unavailable. Unified CM uses the Push Notifications channel. Upon receiving the push notification, the client reregisters to Unified CM and receives the SIP INVITE via the SIP channel.

Messages (Jabber only)

Standard channel is unavailable. The IM and Presence Service uses Push Notifications channel to send the IM notification to Jabber. When the user clicks the notification, the client moves to foreground mode, resumes the session with the IM and Presence Service, and downloads the message.

Note

 
While the client is in background mode, the Presence status is Away.

Voice and Video Calls

SIP channel is unavailable for calls. Unified CM uses the Push Notifications ‘VoIP’ channel. Upon receiving the push notification, the client launches CallKit with Caller ID, reregisters to Unified CM, and receives the SIP INVITE via the SIP channel. The user can then answer the call.

Messages (Jabber only)

Standard channel is unavailable. The IM and Presence Service uses Push Notifications ‘message’ channel to send the IM notification to Jabber. When the user clicks the notification, the client moves to foreground mode, resumes the session with the IM and Presence Service, and downloads the message.

Note

 
While the client is in background mode, the Presence status is Away.

Apple Push Notification

Cisco Jabber and Cisco Webex clients that run on iOS (for example, Cisco Jabber on iPhone and iPad) receive Push Notifications from the Apple Push Notification service, which runs in the Apple cloud.

From Cisco Jabber 12.9 release, all new iOS applications and updates will be built using iOS 13 and above versions. Under iOS 13, Apple processes Push Notifications for suspended applications differently than it did with iOS 12:

  • Push Notifications under iOS 13 are delivered using a "VoIP" channel for calls and a separate "Message" channel for messaging. This is in contrast to iOS 12 where all Push Notifications traffic are delivered using the same channel.

  • Push Notifications is mandatory for Apple iOS clients as of August 2020.

  • The iOS client, upon receiving the notification, launches CallKit immediately to indicate an incoming call.

  • Push Notifications "VoIP" traffic includes caller identity information (Display Name, Number), which the client uses to populate the CallerID field in CallKit. If the External Presentation Name and Number is configured, Push Notification displays the customized identification Name and Number on the supported devices. If not, the original name and number of the calling party are displayed on the called party device.

  • Missed Call Notification: A second Push Notification is sent to the push-enabled device when the caller disconnects the outgoing call that is in progress. The Push Notification is also sent if the push-enabled device does not register an incoming call within 13 seconds.

  • Shared Line: When the Push Notification enabled device that has a shared line with another device receives the call, and the shared device answers the call, the Push Notification enabled device receives the second push notification stating the call has been answered from the other device.

  • Push Notifications of type "VoIP" are considered high priority and are delivered without delay.


Note


See Minimum Releases and Feature Support for Push Notifications for detailed information as to which Push Notifications features are supported with which Unified CM release.

The following image provides a breakdown of what happens when a VoIP Push Notification is sent under iOS13 and above versions.

Figure 2. VoIP Push Notification Behavior When Sent Under iOS13 and Above Versions

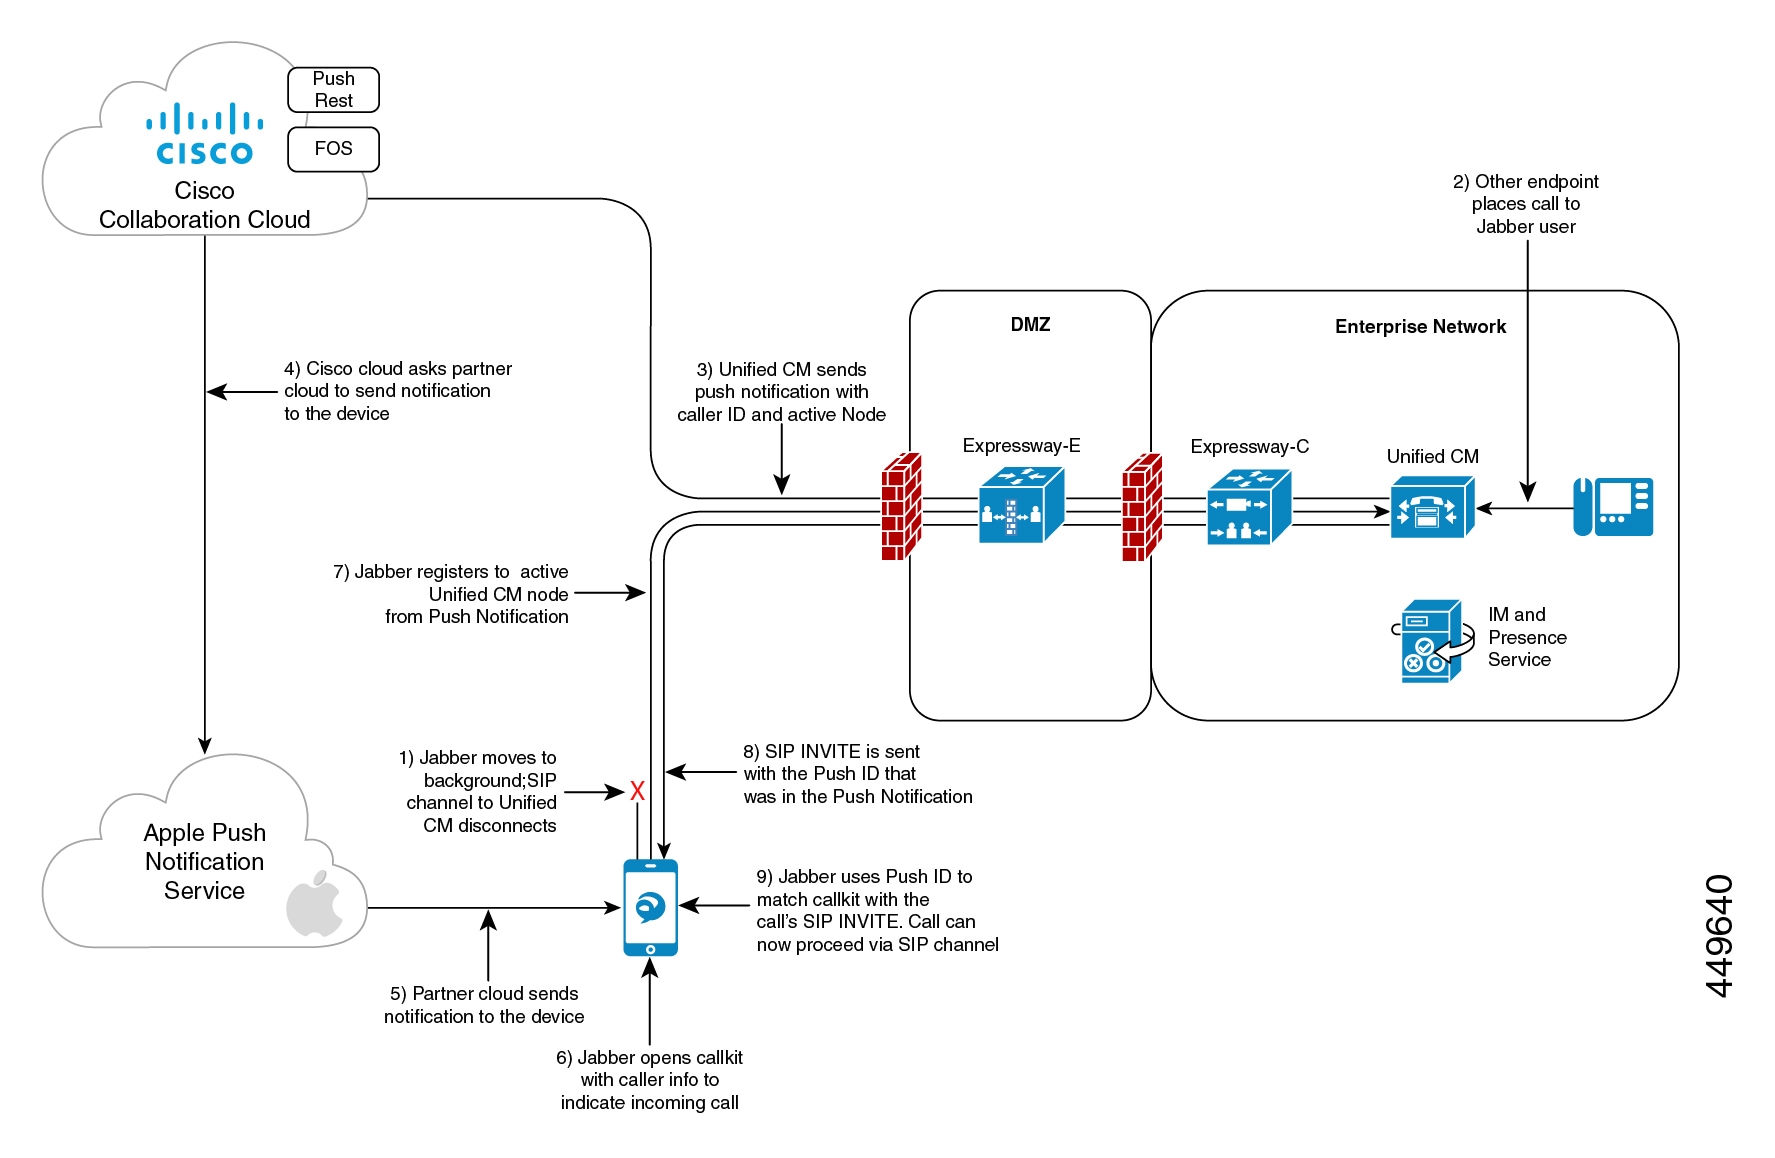
Comparison of Push Notification Calling Experience for Cisco Jabber or Webex App Clients with iOS13 or Above Versions and APNS Changes

The following table describes the user experience behavior when the Client is upgraded and Server that is not upgraded or the Client is not upgraded and the Server is upgraded.

Locked Screen

Unlocked Screen

Cisco Jabber 12.9

  • Client gets the push notification.

  • CallKit view along with CallerID of the caller is displayed on the screen.

  • Users can answer or reject call from the CallKit without unlocking the device.

  • Client gets the push notification.

  • CallKit view along with CallerID of the caller is displayed in the incoming call notification.

  • Cisco Jabber app launches when a user answers the call with caller details (Caller Name and Caller ID).

Cisco Jabber 12.8 and earlier

  • Client gets the push notification.

  • The notification causes Cisco Jabber app to register and users see call information in it.

  • Users can answer the call from locked device,

  • Client gets the push notification.

  • The notification causes Cisco Jabber app to register and users see call information in it.

  • Users can answer the call directly from the app.


Note


There is no change in user experience behavior for message push notifications.


Cloud Security for Push Notifications

Security is central to our push for Cisco Jabber and Cisco Webex architecture. All Push Notifications content is encrypted using a 256-bit Advanced Encryption Standard (AES) key that is defined by Cisco Jabber and Cisco Webex when the user signs in; the key could also be updated by the client periodically. All content sent as part of Push Notification is encrypted.

Cisco's cloud push service requires encrypted payloads and will reject anything that is not encrypted before transmission to the Apple or Google cloud. All communications with Cisco's cloud push service is secured using Transport Layer Security (TLS). This ensures that any content pushed through APNS is encrypted.

The PushRest service doesn't cache any payload that it gets from On-premise servers. The PushRest service is a proxy and passes the information to the Apple or Google cloud.

All Personal Identifying Information (PII) is encrypted. The only information outside of service details that isn't within the encrypted payload, but which is sent over a secure TLS connection is:

  • Push Target that is, the client (APNS or FCM as the case maybe)-generated token for a particular push session device, rotated occasionally or changed in subsequent sign-ins.

  • Tracking ID (client-generated ID for each messaged use in debugging if any issues occur)

iOS13 Push Notification (China Region)

Unified Communications Manager supports VoIP call Push Notifications for Cisco Jabber or Webex clients that are running on iOS13 or above version devices. In addition, the IM and Presence Service supports message Push Notifications for Cisco Jabber clients that run on iOS13 or above version devices. When we get any incoming call to a Push Notification-enabled device that is in the Mainland China region, the clients running on iOS devices cant show CallKit view due to regulatory requirements. Instead, a message notification with Caller-ID details such as name or number is displayed.

Cisco Jabber and Cisco Webex clients on iOS13 and above version in Mainland China region:

  • Can’t show CallKit view when it gets VoIP call Push Notification message.

  • The VoIP call Push Notification message causes the application to show a message toast with information about the incoming call and Caller-ID.

This allows the end-user to be assured of the caller's identity before answering the call. Tap on the message notification for the application to start and register with Unified Communications Manager. After successful registration, the Unified Communications Manager routes the incoming call to the application.


Note


We recommend that the user quickly tap on the message notification on the Cisco Jabber and Cisco Webex client for Unified Communications Manager to route calls to the user. If the user doesn’t tap on the message notification within the set time (13 seconds), the incoming call doesn’t alert the receiver over a CallKit and a missed call message notification is sent to the user.

China region Push Notification is for iOS devices only and the minimum release is 12.5(1)SU3. It’s not supported on Android devices.

Cisco Jabber 12.9 MR is required. The IM and Presence Service Push Notification is not impacted by this regulation.


Android Push Notification

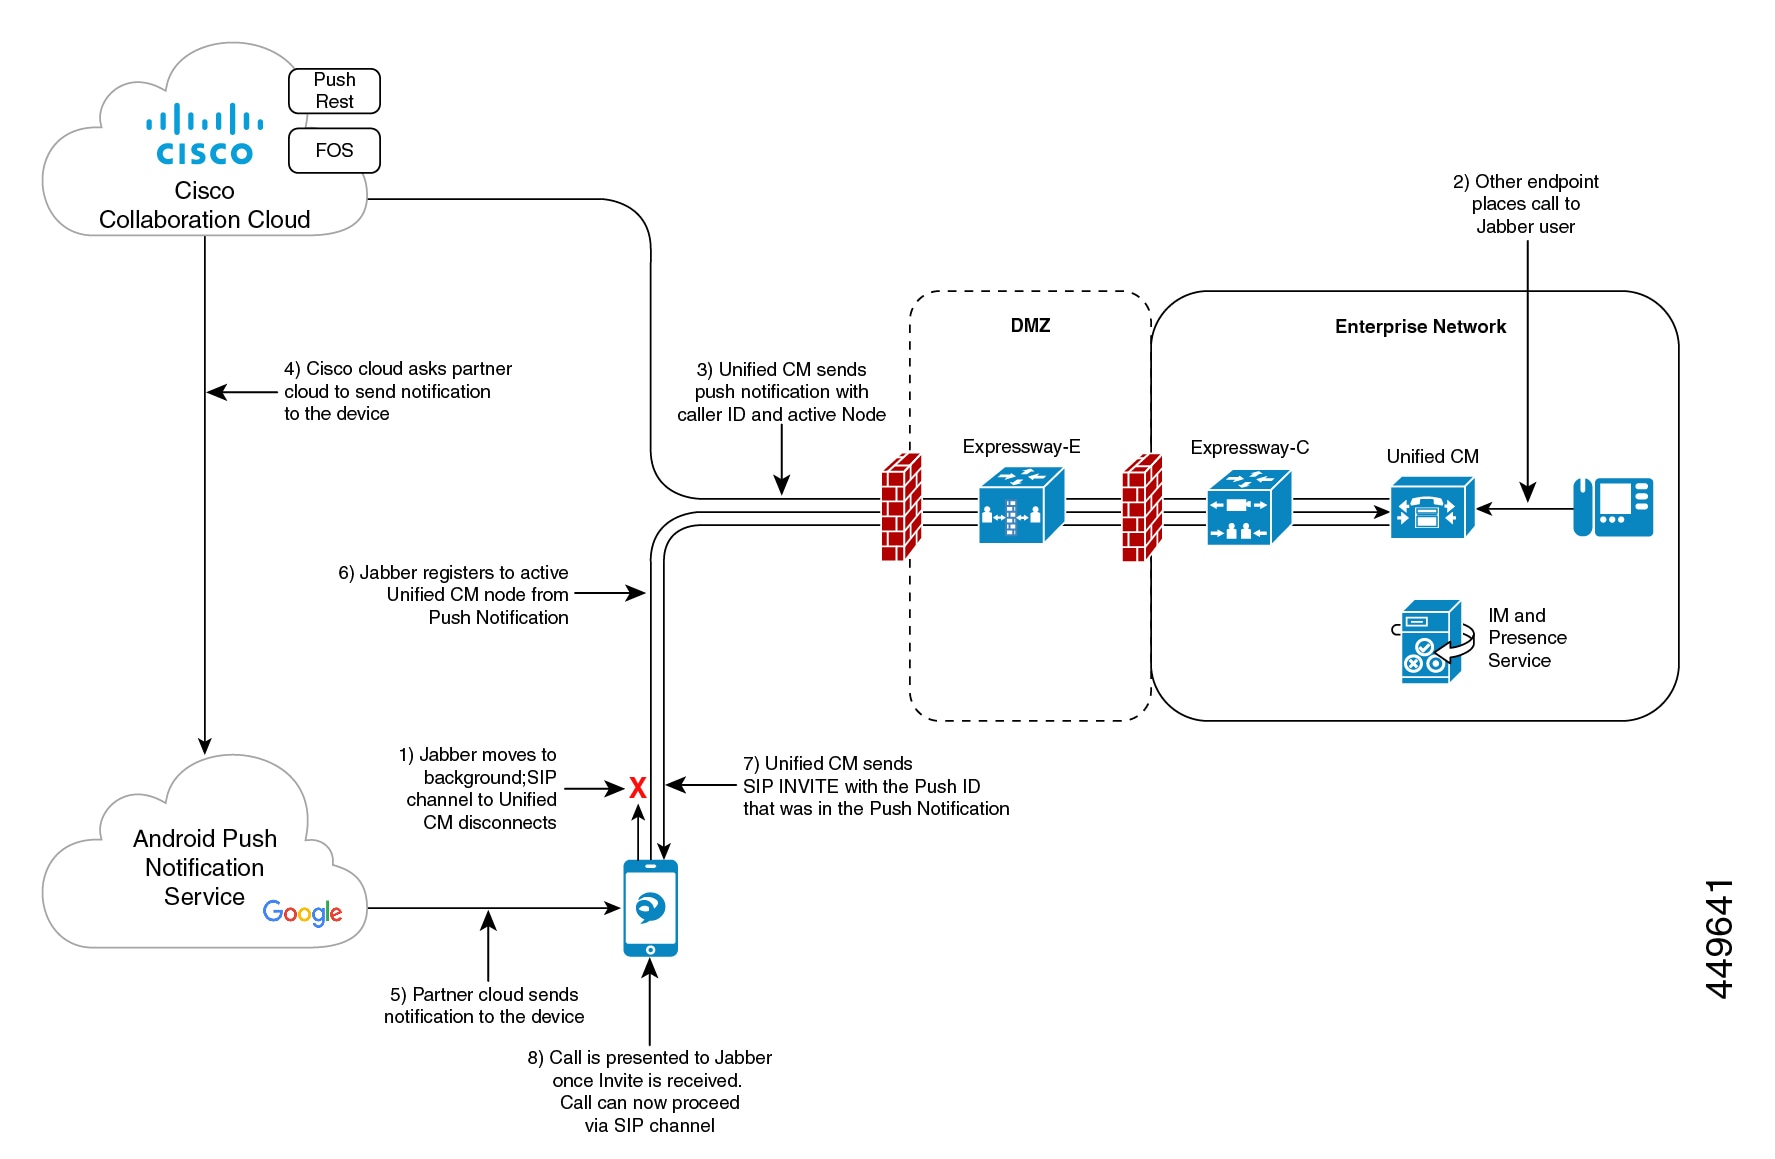
As of 12.5(1)SU3, Unified Communications Manager supports VoIP Push Notifications for Cisco Jabber or Webex clients that run on Android devices. In addition, the IM and Presence Service supports messaging Push Notifications for Cisco Jabber on Android clients.

When there's an incoming call, the Unified Communications Manager Push Notification Service (CPNS) sends a push notification over the Google cloud to the Android clients that is running in suspended or background mode. After receiving the notification, the Cisco Jabber or Webex client registers back to Unified Communications Manager to receive the call.


Note


  • Android Push Notification for Cisco Webex is only for voice call notifications. For messaging, Cisco Webex doesn't use an on-premises IM and Presence Service server.

    If IM and Presence Service 12.5 SU3 is deployed with Expressway X12.6 and Cisco Jabber 12.9 versions, then the bug ID CSCvv12541 doesn't apply and Cisco Jabber users on Android wouldn't face any problems.

  • On Android, there's no guarantee that the foreground service always works on the Cisco Jabber or Webex client, when the applications are running in the background. Cisco Jabber or Webex client may still be terminated by the Android OS sometimes. For example, during a memory constraint or system components update. Hence, we recommend that you enable Cisco Cloud Onboarding to use FCM (Firebase Cloud Messaging) which ensures that you receive chat messages (Cisco Jabber Only) and calls while the Cisco Jabber or Webex client is in the background.


Figure 3. Android Push Notification Call Processing for Background Mode

Note


As part of Cisco Jabber and Cisco Webex client user sign-in with Android push notifications service from the Google cloud, the subscriber services FCM (Firebase Cloud Messaging) and FCM: dev are supported.


Push Notification in case of Unified Communications Manager Failover

Unified Communications Manager Group is a prioritized list of up to three redundant servers to which devices can register. Each group contains a primary node and up to two backup nodes. The order in which you list the nodes determine their priority with the first node being the primary node, the second being the backup node, and the third being the tertiary node.

In the Unified Communication Manager, device pools provide a common set of configurations for a group of devices and allow you to configure devices according to their specific location information. You can assign a device to a Cisco Unified Communications Manager Group through the Device Pool Configuration.

When Cisco Jabber or Cisco Webex clients move to the background or suspended state and the primary node on which clients are registered, goes out of network or crashes, then any calls made to the Cisco Jabber or Cisco Webex will trigger a Push Notification from the Unified CM.

Previously, Cisco Jabber or Cisco Webex tried to register to the node it had previously registered to, but the registration failed. Now, it subsequently tries to connect to the active nodes in its device pool to register back successfully. This process of discovering the current active node to which Cisco Jabber or Cisco Webex clients must register results in a loss of time.

The Unified Communications Manager Push Notification Service (CPNS) aims to avoid the loss or delay by helping Cisco Jabber or Cisco Webex register to the correct active node, whenever a Push Notification is sent. This Push Notification request contains the current active node information and enables the clients to quickly register back to the same node or to the current active node.


Note


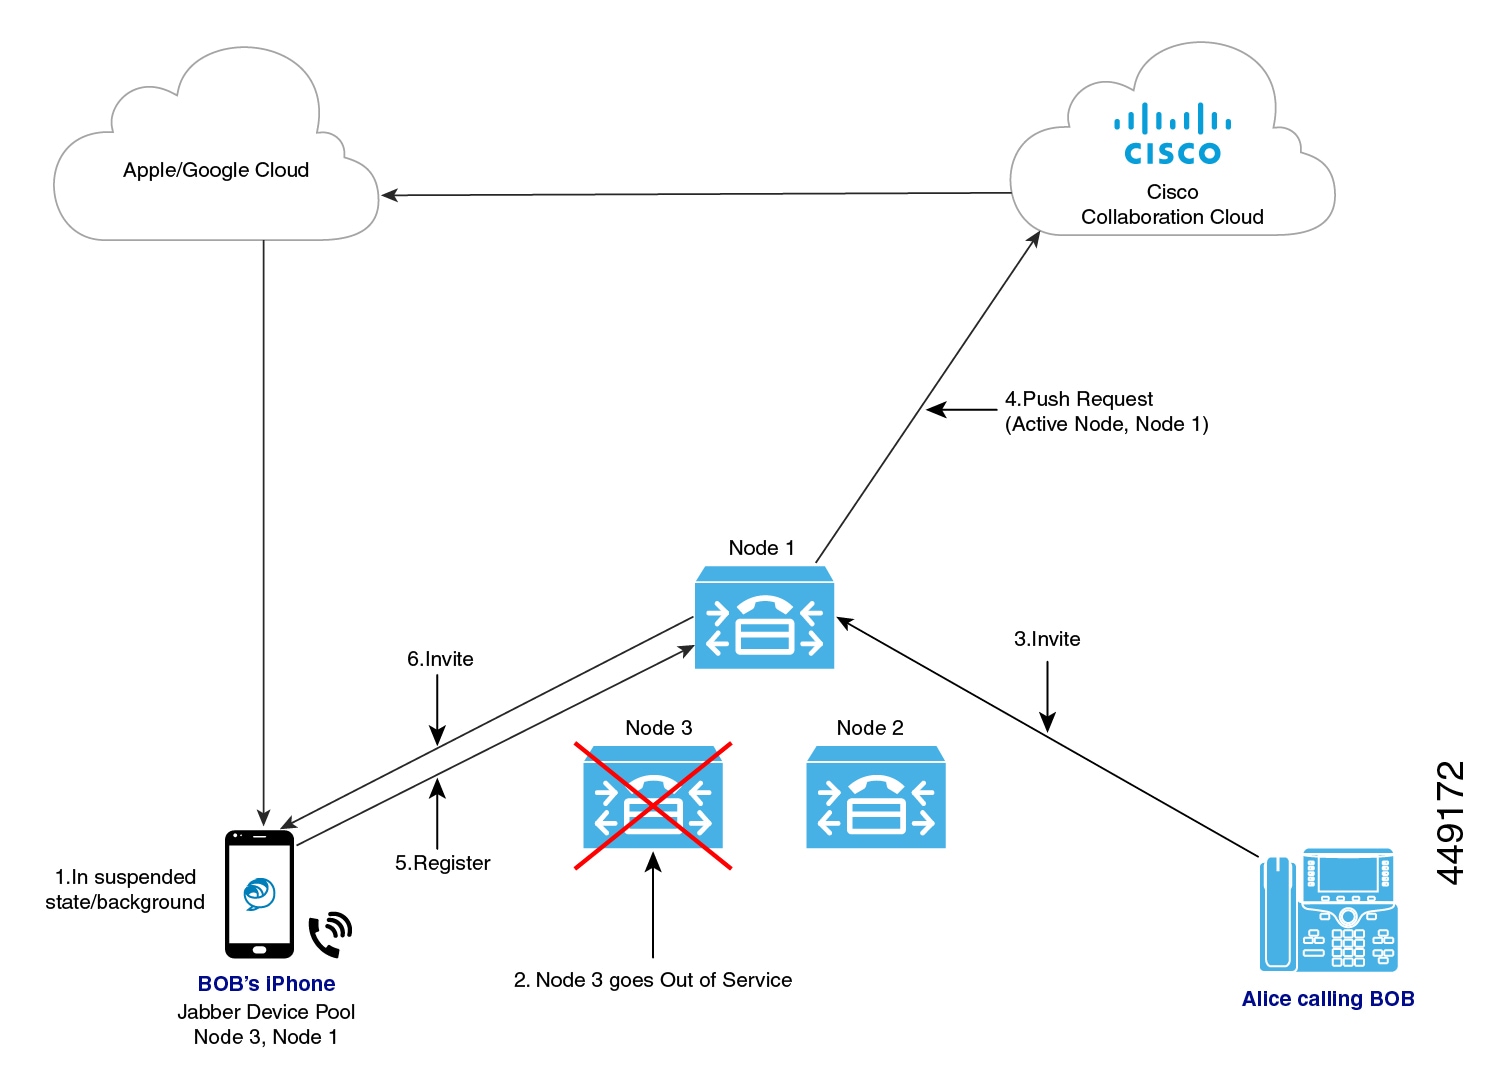
The active node is only included in the Push Notification from 12.5(1)SU3 release onwards.


Figure 4. Push Notification for Incoming Call

The following image illustrates a Unified Communications Manager failover example where the primary node goes out of service while the client is in background mode or suspended state. Upon receiving an incoming call for the client, the Unified Communications Manager sends the push notification with the backup node highlighted as the active node, as the primary registration node is down. Upon receiving the push notification, the client registers to the backup node.

Proxy Support for Cloud Connection

For some deployments, you may need to use a proxy server to connect to the Cisco cloud. This is particularly true if your on-premise deployment is behind a company firewall that does not allow direct access to the cloud.

Unified Communications Manager supports the Cisco Web Security Appliance as an HTTPS proxy server. However, you can use any HTTP or HTTPS proxy server that supports one of the below call flows. Note that if you decide to use an HTTP proxy with authentication enabled, we recommend that you configure digest authentication for the proxy server for credential security.

Supported Call Flow for HTTPS Proxy

Supported Call Flow for HTTP Proxy

Capacity Requirements for Proxy Servers

Use the Proxy Server Capacity Calculator for Push Notifications to estimate capacities that your Proxy Server must be able to handle. Enter the information that applies to your deployment and the calculator outputs the number of transactions that your HTTP(S) Proxy server must be able to handle for Push Notifications deployments.

DNS Requirements for Proxy Servers

  • For the Unified Communications Manager to proxy server connection, if you use a FQDN address for the proxy server, DNS is used to connect to the proxy server. If the proxy server FQDN resolves to multiple IP addresses, Unified Communications Manager tries the first IP address and waits two seconds before moving on to the second address.

  • After sending a push notification, Unified Communications Manager waits five seconds for a confirmation before trying the second address.

  • For the proxy server to Cisco cloud connection, we recommend that you configure the proxy server with a low failover rate in order to speed up the failover process for connection failures.

  • If you are deploying the Cisco Web Security Appliance, the FQDN must map to the WSA’s virtual IP address.


Note


The default Time To Live (TTL) for proxy IP addresses is one hour. As a result, if an IP address is changed, it may take up to one hour for that change to be available for DNS requests.

Push Notifications High Availability for IM and Presence

Push Notifications High Availability provides failover and redundancy for Push Notifications-enabled IM and Presence sessions for Cisco Jabber Android and iOS clients. With this feature, the IM and Presence Service saves the IM session in the local in-memory database (IMDB), which gets replicated automatically to the in-memory database on the subcluster backup node. This ensures that the backup node has the session information and can take over the session without user action from the user.

IM History

When Push Notifications High Availability is configured, the Cisco Jabber user does not lose the chat history when failover occurs.

Unread Message Queue when Jabber is in Suspended Mode

For Push Notifications-enabled IM sessions, when a Cisco Jabber for Android and iOS clients moves into suspended mode, the IM and Presence Service sends Push Notifications to the clients, but stops sending unread instant messages, Presence updates, and other XMPP stanzas (for example, chat room invites). Instead, these messages are queued on the local server until the client clicks on a Push Notification, or reenters foreground mode.

There is a limitation involving the unread message queue for Push Notifications-enabled IM sessions where Cisco Jabber is in suspended mode. In some failover use cases, the unread message queue is lost. See "Redundancy and Failover Use Cases" for a description of when this occurs.

Redundancy and Failover Use Cases

The following use cases are covered by this feature:

  • Node failure (automatic failover)—If a node fails suddenly, the backup node takes over the IM session and Push Notifications continue to be sent to the Cisco Jabber user, this time from the backup node. Users can continue working without any user action or loss of IM history. However, the unread messages that were queued on the failed server while client was in suspended mode, and which had not yet been sent to the clients, are lost.

  • Node shutdown (manual failover)—If a node is shut down gracefully, the backup node takes over the IM session and Push Notifications continue to be sent, this time from the backup node. Users can continue working without any user action or loss of IM history. The unread messages that were queued on the original node, and which were waiting to be sent to the Jabber client, are lost temporarily when the backup node takes over. However, after the original node comes back up, and the user falls back to the original node, that message queue is retrieved, and is sent to the user.

  • Cisco XCP Router crash—If the Cisco XCP Router crashes suddenly, once the router comes back up, the node resumes the session and continues to send Push Notifications. The IM history is maintained, and Cisco Jabber users can continue working without any user action. However, the unread messages that were queued on the server prior to the router crash, and which had not yet been sent to the client, are lost

  • Cisco XCP Router restarts—If an administrator restarts the Cisco XCP Router, such as may happen after a configuration update, both the IM history and the unread message queue are maintained. Once the router restarts, the IM and Presence Service resumes sending Push Notifications. The unread message queue is sent once the Jabber client logs in again.


Note


For voice and video calls, redundancy and failover is handled by Cisco Unified Communications Manager Groups.


Supported Re-login Rate during HA Event for Push v3 Enabled Devices

This sections provides you the information about how to calculate the client relogin rate during HA event for PUSH v3 enabled devices depending on your deployment need.

This procedure assumes that you have 15,000 OVA and it is distributed in the following order:

  • 2,000 users registered to the IM and Presence Publisher node are Push v3 enabled,

  • 5,500 users registered to IM and Presence Publisher node directly are not Push enabled, and

  • 7,500 users registered to IM and Presence Subscriber node directly and are not Push enabled.

In case of High Availability event, the supported failover rate should be 4 users/sec, or lower. You can achieve this rate using the following measurement:

If the client re-login lower limit is set to 200, then the client re-login upper limit should be set to 2075, so that the re-login rate is calculated in the following manner:

7500/(2075-200)= 4 users/sec


Note


  • The above result is measured for UCS-C220-M4S Intel Xeon CPU E5-2660 v4@2.00GHz platform.

  • This calculation is applicable to IM and Presence Release 11.5 deployments only.


Minimum Releases and Feature Support for Push Notifications

Minimum Releases

The following table highlights minimum releases for basic Push Notifications support.


Note


For minimum releases that are required for specific Push Notifications features, refer to the table Feature Support for Push Notifications.

Operating System

Minimum Releases for Push Notifications

iOS16.5 and above (LPNS)

  • Unified Communications Manager 14SU3

  • Cisco Jabber 14.2

  • Cisco Webex App 43.6

  • Not supported for IM and Presence Service messaging

  • Not supported on Android

iOS12 (APNS)

Note

 
Not Supported. Refer to https://www.cisco.com/c/en/us/support/docs/field-notices/705/fn70555.html for more details.
  • Unified Communications Manager 11.5(1)SU4 or higher (Recommended: 11.5(1)SU7 or 12.5(1)SU2)

  • IM and Presence Service 11.5(1)SU4 or higher (Recommended: 11.5(1)SU7 or 12.5(1)SU2)

  • Cisco Jabber 11.9 (Recommended: 12.8)

  • Cisco Expressway X8.10.1—if MRA is deployed (Recommended: X12.6)

iOS13 and above (APNS)

  • Unified Communications Manager 11.5(1)SU8 for 11.x releases, 12.5(1)SU3 for 12.x releases

  • IM and Presence Service 11.5(1)SU8 for 11.x releases, 12.5(1)SU3 for 12.x releases

  • Cisco Jabber 12.9

  • Cisco Expressway X12.6 (if MRA is deployed)

Note


If upgrading to minimum releases and push notifications feature is already enabled, you must upgrade all IM and Presence service clusters first before upgrading Expressway.

If upgrading Expressway to the version X12.7 or higher, and the IM and Presence service to the version higher than 11.5(1)SU8 or 12.5(1)SU3, and push notifications feature is already enabled, at least one IM and Presence service cluster needs to be upgraded before Expressway upgrade is started.

Android

  • Unified Communications Manager 12.5(1)SU3 or higher releases

  • IM and Presence Service 12.5(1)SU3 or higher releases

  • Cisco Jabber 12.9.1

  • Cisco Expressway X12.6.2 (if MRA is deployed)

    For more information, see the latest X12.6.2 Expressway release notes.

Note


If upgrading to minimum releases and push notifications feature is already enabled, you must upgrade all IM and Presence service clusters first before upgrading Expressway.

If upgrading Expressway to the version X12.7 or higher, and the IM and Presence service to the version higher than 11.5(1)SU8 or 12.5(1)SU3, and push notifications feature is already enabled, at least one IM and Presence service cluster needs to be upgraded before Expressway upgrade is started.

Feature Support

The following table outlines Push Notifications features that are supported with specific Unified Communications Manager releases.

Unified CM Release

iOS12

iOS13 and above versions

Android

iOS16.5

11.5(1)SU4 - SU7

Basic Push Notification support

Single Push Notification channel

Basic Push Notification support

Single Push Notification channel

No support

Basic Cloud Push Notification support

11.5(1)SU8

Basic Push Notification support

Single Push Notification channel

Basic Push Notification support

Caller ID in Push Notification

Separate channels for calls and messages

No support

Basic Cloud Push Notification support

12.5(x) up to SU2

Basic Push Notification support

Single Push Notification channel

Basic Push Notification support

Single Push Notification channel

No support

Basic Cloud Push Notification support

12.5(1)SU3

Basic Push Notification support

Single Push Notification channel

Basic Push Notification support

Caller ID in Push Notification

CallerID supports External Presentation Name and Number

Registration node in Push Notification

Separate channels for calls and messages

Basic Push Notification support

Registration node in Push Notification

Separate channels for calls and messages

Basic Cloud Push Notification support

14SU3

No support

No support

Basic Push Notification support

Registration node in Push Notification

Separate channels for calls and messages

Local Push not supported

Local Push Notification support for calls. Messaging is not supported

Basic Push Notification support

Caller ID in Push Notification

Caller ID supports External Presentation Name and Number

Registration node in Push Notification

Push Notifications Prerequisites

The following are the prerequisites to onboard Push Notifications for on-premises deployments:

  • Domain Name System must be configured in both Unified Communications Manager and IM and Presence Service and must be able to resolve externally routable addresses.

  • The Unified Communications Manager Push Notification Service (CPNS) must run on all nodes and the CallManager must connect only to local CPNS. To ensure a functional push notification, it is mandatory to enable CPNS at the local node.

  • Connectivity must be enabled from Unified Communications Manager and IM and Presence Service over port 443 for the following connections to the Cisco cloud:

    • Fusion Onboarding Service at fos-a.wbx2.comUnified Communications Manager connects to this service for Push Notification subscription requests. Unified CM communicates with the Fusion Onboarding Service (FOS) to provision a Common Identity (CI) machine account.

    • Push REST service at push.webexconnect.comUnified Communications Manager and IM and Presence Service connect to this service to send Push Notifications.

    • Common Identity service at idbroker.webex.comUnified Communications Manager and IM and Presence Service authenticates to this service before sending a Push Notification.


    Note


    Add fos-a.wbx2.com, push.webexconnect.com and idbroker.webex.com to the SSL Decryption Exclusion list in the firewall.


  • For messaging Push Notifications to Cisco Jabber, the Instant Messaging must be enabled, and the Multiple Device Messaging and Stream Management features must be configured on the IM and Presence Service. For details, see the Configuration and Administration of the IM and Presence Service.

  • Push Notifications depends on the following network services, which were introduced with Release 11.5(1)SU3. You can confirm that these services are running in the Control Center - Network Services window of Cisco Unified Serviceability. Both services are enabled by default.

    • Cisco Push Notification Service—handles the Push Notification for voice and video calls.

    • Cisco Management Agent Service—handles the sending of troubleshooting information that is related to Push Notifications.

  • The iOS or Android device must be configured to allow notifications from the Cisco Jabber application.

  • If you require a proxy server for the cloud connection, see Proxy Support for Cloud Connection for HTTP(S) proxy support.

  • If you are deploying Cisco Jabber on iPhone or iPad clients, the EnableVoipSocket parameter setting must be false for Voice Push Notifications to work. You can configure the parameter in the UC Service Configuration window of Cisco Unified CM Administration (choose Jabber Client Configuration as the service type and look under the Options section to set the parameter).

    You can also edit the parameter in an XML editor. See the Parameters Reference Guide for Cisco Jabber for detailed information on the parameter.

Licensing Prerequisites

  • For 11.5(x) releases, Unified Communications Manager uses Cisco Prime License Manager for licensing. As part of the Push Notifications onboarding process, you must synchronize licenses in Prime License Manager.

  • For 12.x and later releases, Unified Communications Manager uses Smart Licensing for licensing. Smart Licensing must be configured before you onboard the cluster for Push Notifications. For details on how to set up Unified Communications Manager for Smart Licensing, see the "Smart Software Licensing" chapter of the System Configuration Guide for Cisco Unified Communications Manager.

  • From Release 12.5(x) and onward, Push Notifications is not supported when Smart Licensing is configured with Specific License Reservation. The Specific License Reservation feature must be disabled for Push Notifications to work.

Certificate Prerequisites

  • If MRA is configured, you must exchange certificates between Unified Communications Manager, the IM and Presence Service, and Cisco Expressway-C. We recommend that you use CA-signed certificates with the same CA for each system. In this case:

    • Install the CA root certificate chain on each system (for Unified Communications Manager and the IM and Presence Service install the certificate chain to the tomcat-trust store).

    • For Unified Communications Manager, issue a CSR to request CA-signed Cisco Tomcat and Cisco CallManager certificates.

    • For the IM and Presence Service, issue a CSR to request CA-signed Cisco Tomcat certificates.


    Note


    If you use different CAs, you must install each CA's root certificate chain on Unified Communications Manager, IM and Presence Service, and Expressway-C.


    Note


    You can also use self-signed certificates for both Unified Communications Manager and the IM and Presence Service. In this case, you must upload onto Expressway-C the Cisco Tomcat and Cisco CallManager certificates for Unified Communications Manager and a Cisco Tomcat certificate for the IM and Presence Service.


Push Notifications Configuration Task Flow

Complete the following tasks to configure Cisco Unified Communications Manager and IM and Presence Service clusters for Push Notifications.

Before you begin

Push Notifications Prerequisites

Procedure

  Command or Action Purpose

Step 1

Synchronize Licenses

Release 11.5(1)SUx only. Synchronize your system licensing in Cisco Prime License Manager. This is a mandatory task regardless of whether you have added new licenses.

Note


You can skip this task for Cisco Unified Communications Manager Release 12.0(1) and later as Prime License Manager is replaced by Smart Licensing.

Step 2

Open Ports for Push Notifications

Open the ports that are required for Push Notifications.

Step 3

Enable Push Notifications

Onboard the Cisco Unified Communications Manager and IM and Presence Service clusters for Push Notifications.

Step 4

Enable Push Notifications High Availability

For IM and Presence deployments, enable Push Notifications High Availability.

Step 5

Configure OAuth Refresh Logins

Complete this set of tasks to deploy OAuth Refresh Logins for faster Cisco Jabber logins.

Step 6

Refresh Settings from Expressway-C

On the Expressway-C, refresh your Unified Communications Manager servers to allow for a resync of the Authz certificate. After you are done, restart the Expressway-C.

Step 7

Restart Expressway-E

If you are deploying the IM and Presence Service, you must restart Expressway-E.

Step 8

Configure Troubleshooting Options

Configure troubleshooting parameters that determine how often Cisco Unified Communications Manager sends Push Notifications alarms to the Cisco Cloud, and for which alarm severities.


Note


For Mobile and Remote Access (MRA) deployments with Cisco Expressway, see the Mobile and Remote Access via Cisco Expressway Deployment Guide for information about Push Notifications with Expressway.


Synchronize Licenses

For 11.5(1)SU systems, use this procedure in Cisco Prime License Manager to synchronize your system licensing. This is a mandatory task to enable Push Notifications for on-premises deployments, regardless of whether you have updated your licensing.

Note


This task is required for Cisco Unified Communications Manager 11.5(1)SU releases only. You can skip this task for Release 12.0(1) and higher as Smart Licensing replaces Prime License Manager.

Before you begin

For details on licensing, including procedures for adding licenses or product instances, refer to the Cisco Prime License Manager User Guide.

Procedure


Step 1

In Cisco Prime License Manager, select the Product Instance tab.

Step 2

Click Synchronize Licenses.


Open Ports for Push Notifications

Ensure that the following ports are open for Push Notifications support from Cisco Unified Communications Manager and the IM and Presence Service.

Table 4. Port Requirements for Push Notifications

From

To

Port and Protocol

Description

Unified CM and IM and Presence Service

Cisco cloud

443/TLS

HTTPS-based communications for Push Notifications:

  • Subscription requests from Unified CM publisher node to Fusion Onboarding Service at fos-a.wbx2.com

  • Authentication requests to Common Identity Service at idbroker.webex.com

  • Push notifications to the Push REST service at push.webexconnect.com

This port should be open for all cluster nodes.


Note


Note


In addition, port 9966 is used internally by the Cisco Push Notification Service to communicate with the Cisco CallManager Service on all Unified Communications Manager cluster nodes. This port must be open in the firewall if communication between nodes in your cluster pass through a firewall (for example, the nodes are located in a different subnet if as an example they are clustered over the WAN). In this case, this port must be open in the firewall so that these services can communicate.

Enable Push Notifications

Use this procedure to enable Push Notifications within the Cisco Unified Communications Manager and the IM and Presence Service cluster.

Before you begin

Make sure of the following:

  • Port 443 must be open from the Unified Communications Manager publisher node for outbound HTTPS requests.

  • Both the Cisco Push Notification Service and the Cisco Management Agent Service network services must be running in Cisco Unified Serviceability. Both services are enabled by default.

Procedure


Step 1

Log in to the Cisco Unified Communications Manager publisher node.

Step 2

From Cisco Unified CM Administration, choose Advanced Features > Cisco Cloud Onboarding.

The page may take a minute to load while Unified Communications Manager checks whether the Cisco cloud is reachable, and whether certificates are present.

Step 3

Click the Generate Voucher button to synchronize system licensing.

Step 4

Check the Enable Push Notifications check box.

Step 5

Check the I want Cisco to manage the Cisco Cloud Service CA Certificates required for this trust check box to have the system update certificates automatically.

Note


If you check this check box, Cisco installs your cloud certificate requirements automatically. However, if a new certificate requirement is added that was not included in the file that you used to install your system, you may need to obtain cloud certificates manually. For information on uploading certificates manually, see Certificates for Cloud Connection.

Step 6

If you require an HTTP(S) Proxy to reach the Cisco cloud, check the Enable HTTP(S) Proxy check box and enter the server details.

Note


Cisco supports Basic and Digest authentication for the proxy server. The recommended authentication method is digest authentication.

Step 7

Click Save.

Step 8

Restart the Cisco Tomcat service on all nodes in the cluster to install Cisco-managed certificates.

  1. Log in to the Command Line Interface.

  2. Run the utils service restart Cisco Tomcat command.

    After the Cisco Tomcat service restarts, the Status in the Cisco Cloud Onboarding Configuration window displays the message "Cisco Cloud Onboarding Pending".

Step 9

In the Cisco Cloud Onboarding Configuration window, make sure that the Enable Push Notifications and the I want Cisco to manage the Cisco Cloud Service CA Certificates required for this trust check boxes are still checked. You may need to recheck them.

Step 10

(Optional) Configure troubleshooting settings to ensure that system issues can be resolved quickly. See the online help for field descriptions.

  1. Check the Send Troubleshooting Information to the Cisco Cloud check box.

  2. Check the Send encrypted PII to the Cisco Cloud for troubleshooting check box.

Step 11

Click Save.

The cluster initiates a Push Notifications subscription request. When the request completes, and Push Notifications is enabled, the Status displays the message "Cloud Onboarding Completed".

Note


Restart the Unified Communications Manager Push Notification Service (CPNS).

Step 12

If your deployment includes the IM and Presence Service, restart the Cisco XCP Config Manager and Cisco XCP Router service for all IM and Presence Service cluster nodes:

  1. Click the Control Center - Network Services link that appears in the Status area of the Cisco Cloud Onboarding window. If no link appears, log in to the Cisco Unified Serviceability interface and select Tools > Control Center - Network Services.

  2. From the Server drop-down list, choose the IM and Presence database publisher node, and click Go.

  3. Select the Cisco XCP Config Manager service and click Restart.

  4. Select the Cisco XCP Router service and click Restart.

  5. Repeat this step for all IM and Presence cluster nodes.

Note


If you get a message that says "No phones are enabled in the Device Defaults page to use Activation Code Onboarding", it doesn't mean that the onboarding has failed, but it indicates that no devices in the Device Defaults window have been configured to use the activation code for the On-premise Onboarding method.


Note


The Unified Communications Manager Push Notification Service (CPNS) needs to be restarted whenever there are updates in the Unified CM onboarding page.


Note


Restarting the Cisco XCP Router does not update the Status message in the Cisco Cloud Onboarding Configuration window. If you complete the above procedure for all nodes and then return to the Cisco Cloud Onboarding Configuration window, the Status message will still say that you need to restart the Cisco XCP router. However, you need restart it only once on each IM and Presence cluster node.


Note


To disable Push Notifications, uncheck the Enable Push Notifications check box and click Save. After saving, restart the Cisco XCP Router on all IM and Presence Service cluster nodes.


Enable Push Notifications High Availability

Use this procedure to confirm that Push Notifications High Availability is enabled on the IM and Presence Service. This feature is required to provide redundancy and failover for Cisco Jabber on Android or iOS clients that are in suspended mode.

Note


Cisco Webex clients use the Cisco Webex cloud for messaging rather than the IM and Presence Service.

Procedure


Step 1

From Cisco Unified CM IM and Presence Administration, choose System > Service Parameters.

Step 2

From the Server drop-down, choose an IM and Presence node.

Step 3

From the Service drop-down, choose Cisco XCP Router (Active).

Step 4

Under Push Notifications (Clusterwide), set the Push Notifications High Availability service parameter to Enabled.

Step 5

Click Save.

Step 6

If you edited the setting of this service parameter, restart the Cisco XCP Router on all IM and Presence nodes. Otherwise, you can go to the next task:

  1. From Cisco Unified Serviceability, choose Tools > Control Center - Network Services.

  2. From the Server drop-down, choose an IM and Presence cluster node and click Go.

  3. Select Cisco XCP Router and click Restart.

  4. Repeat this procedure on all IM and Presence cluster nodes.


Configure OAuth Refresh Logins

Complete these tasks to set up OAuth Refresh Logins, an optional feature that provides a faster login for Cisco Jabber and Cisco Webex clients.

Note


OAuth Refresh Logins are enabled by default in Cisco Expressway, but are disabled by default in Unified Communications Manager. If you use the default settings for both systems, a configuration mismatch occurs.


Procedure

  Command or Action Purpose

Step 1

Configure OAuth Refresh Logins in Unified Communications Manager

Configure Refresh Logins with OAuth access tokens and refresh tokens in Unified Communications Manager.

Note


OAuth Refresh Logins are an optional deployment in Unified Communications Manager.

Step 2

Confirm OAuth Configuration in Expressway

If you have Cisco Expressway deployed, make sure that the OAuth Refresh Login configuration on Expressway matches your Unified Communications Manager configuration.

Step 3

Enable OAuth on Unity Connection

In Cisco Unity Connection, enable OAuth Refresh Logins and assign the Unified Communications Manager publisher node as an Authz server.

Configure OAuth Refresh Logins in Unified Communications Manager

Use this procedure in Unified Communications Manager to configure Refresh Logins with OAuth access tokens and refresh tokens for Cisco Jabber and Cisco Webex clients. OAuth Refresh Logins provide a streamlined login flow that doesn't require users to re-login after network changes.


Note


To ensure compatibility, make sure that the various Unified Communications components of your deployment all support refresh logins. Once OAuth Refresh Logins are enabled, disabling the feature requires you to reset all Jabber and Webex clients.


Caution


We recommend that you enable OAuth Refresh Logins, which are disabled by default in Unified Communications Manager, but are enabled by default in Cisco Expressway. If you are have both systems deployed, and you are using the default settings, you must either enable Refresh Logins in Unified Communications Manager or disable them in Cisco Expressway. Otherwise, a configuration mismatch results.


Procedure

Step 1

From Cisco Unified CM Administration, choose System > Enterprise Parameters.

Step 2

Under SSO Configuration, do either of the following:

  • Choose the OAuth with Refresh Login Flow enterprise parameter to Enabled to enable OAuth Refresh Logins.
  • Choose the OAuth with Refresh Login Flow enterprise parameter to Disabled to disable OAuth Refresh Logins. This is the default setting.

Step 3

If you enabled OAuth Refresh Logins, configure expiry timers for access tokens and refresh tokens by configuring the following enterprise parameters:

  • OAuth Access Token Expiry Timer (minutes)—This parameter specifies the expiry timer, in minutes, for individual OAuth access tokens. The OAuth access token is invalid after the timer expires, but the Jabber client can request and obtain new access tokens without the user having to re-authenticate so long as the refresh token is valid. The valid range is from 1 - 1440 minutes with a default of 60 minutes.
  • OAuth Refresh Token Expiry Timer (days)—This parameter specifies the expiry timer, in days, for OAuth refresh tokens. After the timer expires, the refresh token becomes invalid and the Jabber client must re-authenticate to get a new refresh token. The valid range is from 1 - 365 days with a default of 60 days.

Step 4

Click Save.

Note

 
Once you've saved the configuration, reset all Cisco Jabber and Webex clients.

What to do next

Make sure that the OAuth Refresh Login configuration in Cisco Expressway matches your Unified Communications Manager setting. For details, Confirm OAuth Configuration in Expressway.

Confirm OAuth Configuration in Expressway

If you have Cisco Expressway deployed, make sure that the OAuth Refresh Login configuration on Expressway matches your Unified Communications Manager configuration.


Note


OAuth Refresh Logins are enabled by default in Cisco Expressway, but are disabled by default in Unified Communications Manager. If you use the default settings for both systems, a configuration mismatch occurs. In Unified Communications Manager, OAuth Refresh Logins are configured via the OAuth with Refresh Login Flow enterprise parameter.


Procedure

Step 1

Sign in to Cisco Expressway-C.

Step 2

Choose Configuration > Unified Communications > MRA Access Control.

  • If OAuth Refresh Logins are enabled in Unified Communications Manager, set the Authorize by OAuth token with refresh setting to On. This is the default setting.
  • If OAuth Refresh Logins are disabled in Cisco Unified Communications Manager, set the Authorize by OAuth token with refresh setting to Off.

Step 3

Click Save.


Enable OAuth on Unity Connection

If you are deploying OAuth Refresh Logins for Jabber, use this procedure to enable the feature in Unity Connection. As part of your configuration, you must also assign the Unified Communications Manager publisher node as an Authz server.
Procedure

Step 1

Enable OAuth Refresh Logins on Cisco Unity Connection:

  1. From Cisco Unity Connection Administration, choose System Settings > Enterprise Parameters.

  2. Configure the settings under SSO and OAuth Configuration.

  3. Set the OAuth with Refresh Login enterprise parameter to Enabled.

  4. Click Save.

Step 2

Add the Unified Communications Manager publisher node as the Authz server for Cisco Unity Connection:

  1. From Cisco Unity Connection Administration, choose System Setting > Authz Server.

  2. Do one of the following:

    • Select the server to edit an existing Authz server configuration.

    • Click Add New to add a new Authz server.

  3. Configure the fields on the page.

  4. Click Save.


Refresh Settings from Expressway-C

Use this procedure to refresh settings on Cisco Expressway for Push Notifications. This will allow Expressway to sync configurations and certificates with Unified Communications Manager.


Note


For detailed information on Cisco Expressway configurations, see the Cisco Expressway Administrator Guide for your release at the Expressway Maintain and Operate Guides page.


Procedure


Step 1

Log in to Expressway-C.

Step 2

Refresh the Cisco Unified Communications Manager Administration servers:

  1. On the Expressway-C, go to Configuration > Unified Communications > Unified CM servers .

  2. Click Refresh Servers.

    Expressway synchronizes the Authz certificate with Unified Communications Manager.

Step 3

After the servers refresh, restart the Expressway-C. Until the restart, Expressway-C doesn’t recognize the push capability on the IM and Presence Service, and does not send PUSH messages to Cisco Jabber clients:

  1. Select Maintenance > Restart options.

  2. Click Restart.


Restart Expressway-E

An Expressway-E restart is required for Push Notifications with instant messages. After you enable Push Notifications on the IM and Presence Service you must restart Expressway-E. Until the restart, Expressway-E cannot recognize the push capability on IM and Presence Service, and does not send PUSH messages to the Jabber clients.

Note


If your deployment does not include the IM and Presence Service, you can skip this task.

Procedure


Step 1

Log in to Expressway-E.

Step 2

Select Maintenance > Restart options

Step 3

Click Restart.


Configure Troubleshooting Options

Use this procedure on the Unified Communications Manager publisher node to configure parameters that determine how often you send Push Notifications alarms to the Cisco cloud, and for which alarm severities.

Before you begin

The Cisco Management Agent Service network service must be running for Unified Communications Manager to send Push Notifications alarms to the Cisco Cloud. You can confirm that the service is running in the Control Center - Network Services window of Cisco Unified Serviceability. The service is enabled by default.

Procedure


Step 1

Log in to the Command Line Interface.

Step 2

To configure how often Push Notifications alarms are sent to the cloud, run the utils managementAgent alarms pushfrequency <minutes > command where <minutes> represents an integer between 5 and 90 minutes. The default value is 30 minutes.

Step 3

To configure the minimum alarm severity for sending Push Notifications alarms to the Cisco Cloud, run the utils managementAgent alarms minpushlevel <alarm_level> command where <alarm_level> represents the minimum severity. Push Notifications alarms below this severity will not be sent to the Cisco Cloud.

For Push Notifications, the <alarm_level> options from most-to-least severe are as follows:

  • Critical

  • Error (Default value)

  • Warning

  • Notice

  • Information

Step 4

If you want to send Push Notifications alarms to the Cisco Cloud immediately, and can't wait for the scheduled upload, run the utils managementAgent alarms pushnow command.


APNS Voucher Generation from Release 12.0 Onwards

In Release 11.5, Prime License Manager(PLM) generates, the voucher needed for APNS. With PLM going away in 12.0, this functionality is provided by Cisco Smart Software Manager (CSSM) and CSSM Satellite.

Fresh Install or Upgrade from a Version Before 11.5(1)SU2 Which Does Not Have Push Notification Feature

In Release 12.0, smart licensing is used instead of PLM. Register the Unified CM to Smart License Manager (SLM) and synchronize the voucher to Unified CM by clicking Generate Voucher on Cisco Cloud Onboarding UI. Then proceed with the onboarding process which is slightly different compared to the process for 11.5(1)SU2.

Upgrade from 11.5(1)SU2 to 12.0 and Later Releases

In this scenario, Unified CM goes to evaluation mode. Before the evaluation mode expires, register the Unified CM to SLM.

  • Voucher code that is synchronized from PLM is removed from the database during the upgrade.

  • If the Unified CM was onboarded before the upgrade, push notifications continue to work until the provisioning is allowed. Push notifications do not work once provisioning is disabled by smart licensing. But if push notifications are disabled during the evaluation mode, re-onboarding would be possible only after the new vouchers are synchronized from SLM and onboarding is done through the new onboarding process.

  • If the Unified CM was not onboarded before the upgrade, the Unified CM must be registered to CSSM or CSSM Satellite. The voucher must be synchronized to Unified CM by clicking Generate Voucher on the Cisco Cloud Onboarding UI and onboarding must be done using the new onboarding process.

  • We recommend that the you disable push notifications before upgrade and re-onboard using the new onboarding flow after the upgrade.

Push Notifications Troubleshooting

Push Notifications impacts many different components, some of which are hosted locally and some of which are in the cloud. It's important to configure Push Notifications troubleshooting so that Cisco TAC has the required information to troubleshoot system issues proactively.

Send Troubleshooting information to Cisco Cloud

By default, Unified Communications Manager sends Push Notifications troubleshooting information to the Cisco Cloud at regular intervals. Cisco may use this information for proactive debugging of Push Notifications and system components. This speeds up system troubleshooting by ensuring that Push Notifications alarms can be accessed quickly by Cisco TAC.

This option is enabled by default after Push Notifications is enabled, but administrators can disable it in the Cisco Cloud Onboarding Configuration window. When this option is enabled, Cisco Unified Communications Manager also generates a Customer Cluster ID and saves the ID in the customer's home Unified Communications Manager cluster. Customers who call Cisco TAC for Push Notifications issues must provide the ID so that TAC personnel can locate the customer's Push Notifications alarms.

Personally-Identifiable Information (PII) Encryption

You can also configure Unified Communications Manager to encrypt personally-identifiable information (PII) that is saved with the Push Notifications alarms. PII data includes any data that allows you to identify a specific person, such as a username, hostname, or device name. Select the Send encrypted PII to the Cisco Cloud for Troubleshooting option to enable this feature.

To provide greater security, the Cisco Support Token that decrypts the PII data is provided only in the Cisco Cloud Onboarding Configuration window of the customer's Unified Communications Manager server. Cisco cannot decrypt this data unless you provide the token. Customers who call Cisco TAC for Push Notifications issues must provide the token (assuming that PII encryption is configured) so that TAC can read the encrypted information with the Push Notifications alarms.

If you don't select this option, no personally identifiable information is sent to the Cisco Cloud.

CLI Commands for Troubleshooting Push Notifications

Push Notifications provides the following CLI commands, which can be run on the Unified Communications Manager publisher node for troubleshooting:

  • utils managementAgent alarms pushfrequency—Run this command to configure the interval following which Cisco Unified Communications Manager sends Push Notifications alarms to the Cisco Cloud. The default value is 30 minutes.

  • utils managementAgent alarms pushlevel—Run this command to configure the minimum severity level for which Cisco Unified Communications Manager sends Push Notifications alarms to the Cisco Cloud. The default severity is Error.

  • utils managementAgent alarms pushnow—Run this command to upload Push Notifications alarms to the Cisco Cloud immediately, without waiting for the interval to expire.

Traces

You can also run traces on the Cisco Management Agent Service and the Cisco Push Notification Service. By default, traces are set to the Info level and get saved to the following location:

  • Cisco Management Agent Service—/var/log/active/cm/trace/cmas/log4j/

  • Cisco Push Notification Service—/var/log/active/cm/trace/ccmpns/log4j/

For details on how to configure trace, refer to the "Traces" chapter of the Cisco Unified Serviceability Administration Guide.

Cloud Services Reachability

Verify that you're able to establish connectivity with push.webexconnect.com and idbroker.webex.com from all the nodes in the Unified CM cluster. Also, check if any of your IP addresses are listed under the blocked IP address list. To verify that your IP address isn't on the blocked IP address list, see: https://help.webex.com/en-us/article/WBX1831/Unable-to-Reach-or-Access-Webex-Site.

Upgrades from 11.5(1)SU2 with Push Notifications Enabled

If you are upgrading from the 11.5(1)SU2 release and you had Push Notifications enabled in the old release, you must disable Push Notifications in the current release and then follow the onboarding process to enable Push Notifications once again. This is required due to API changes in this release that were not a part of the 11.5(1)SU2 release. Your upgraded system will not be able to send troubleshooting logs to the Cisco Cloud unless you disable Push Notifications and then follow the onboarding process for this release.

After you upgrade your system to the new release, do the following:

Procedure

  Command or Action Purpose

Step 1

Disable Push Notifications

Follow these steps:

  1. From Cisco Unified CM Administration, choose Advanced Features > Cisco Cloud Onboarding

  2. Uncheck the following check boxes:

    • Enable Push Notifications

    • Send Troubleshooting information to the Cisco Cloud

    • Send encrypted PII to the Cisco Cloud for troubleshooting

  3. Click Save.

Step 2

Enable Push Notifications for this release.

For the full onboarding process, see Push Notifications Configuration Task Flow.

Update Refresh Token Manually

If you receive a 400 Bad Request message then your machine access token to the Push Notifications service has expired and you need to update the access token manually. Follow this process to update your access token manually.

Step

Details

Step 1

Install a new Cisco Unified Communications Manager server using the same version as the affected machine

For installation instructions, see the Installation Guide for Cisco Unified Communications Manager and the IM and Presence Service.

Step 2

License your new node

See the "Smart Software Manager" chapter of the System Configuration Guide for Cisco Unified Communications Manager

Step 3

Upload the necessary certificate chains to tomcat-trust and onboard your new node for Push Notifications

Follow the onboarding instructions in this document.

Step 4

Verify that onboarding was successful

Restart the Cisco Push Notification Service by running the utils service restart Cisco Push Notification service command.

View logs and ensure that a token was retrieved successfully.

Step 5

Get the refresh token from your new machine

On the original node with the expired token obtain machine details by running the run sql select * from machine account details CLI command.

Step 6

Get the machine details from your original node

Run the run sql * from machineaccountdetails CLI command.

Step 7

Update the customer's refresh token

Run the run sql update machineaccountdetails set refreshtoken=<actual_token_text> CLI command

Step 8

Update the refresh token across your cluster

Run the following CLI command on all nodes across the Unified Communications Manager and IM and Presence Service clusters:

run sql select refreshtoken from machineaccountdetails

Push Notifications Interactions and Restrictions

The following feature interactions and restrictions have been observed with Push Notifications.

Table 5. Feature Interactions and Restrictions for Push Notifications

Feature

Interactions and Restrictions

NAT and Firewall Connections

We recommend that you configure NAT and Firewall devices to keep idle TCP connections to the Push REST service open for at least 30 minutes. Push notifications do not get retried on new TCP connections when an error occurs on an existing connection. Keeping existing connections open ensures that errors are not introduced due to premature termination by NAT and Firewall devices.

Voice calls

For voice and video calls, where the client is in suspended mode, there may be a delay in connecting a call while the Push Notifications channel is established. After 5 seconds, if Unified CM hasn't received a ring back from the iOS device, Unified CM provides a ring on the calling device.

If there is a delay in the Push Notifications process that prevents Unified CM from offering the call to the IOS device, Unified CM drops the call after 13 seconds.

Push Notifications High Availability

High Availability is supported on the IM and Presence Service for Push Notifications deployments as of 11.5(1)SU3. If Push Notifications is enabled, and a node fails over, the following occurs for Cisco Jabber for Android and iOS clients:

  • For Cisco Jabber clients in foreground mode, the client logs in automatically to the backup node, which takes over until the main node recovers. There is no interruption in services, either when the backup node takes over, or when the main node recovers.

  • For Cisco Jabber clients in background mode, the backup node takes over, but there is delay before any Push Notifications are sent. Because the Jabber client is in background mode, it does not have an active connection to the network so it doesn’t sign in automatically to the backup node. The backup node must recreate JSM sessions for all failed over users who were in background mode before any Push Notifications can be sent.

    The length of the delay depends on the system load. Testing has shown that for a 15,000 user OVA with users evenly distributed in an high-availability pair, it takes 10–20 minutes for Push Notifications to be sent following a failover. This delay is observed when the backup node takes over, and again after the main node recovers.

Note

 
In the event of a node failure or unexpected crash of the Cisco XCP Router, the user's IM session, including the IM history, is maintained without the need for any user action. However, if the Cisco Jabber for Android and iOS clients was in suspended mode, it will be unable to retrieve unread messages that were queued on the server when it crashed.

Stopping Push Notifications

If you want to stop Push Notifications from being delivered to your device, log out of the Cisco Jabber or Webex application.

Multiple Device Messaging (MDM)

If a user use Cisco Jabber client for desktop alongside Cisco Jabber client for mobile, push notifications follow the last active session rule. This means that push notifications would be sent to the Cisco Jabber client for mobile only if one of the following conditions is met:

  • Cisco Jabber client for mobile was the last client that the user interacted with before both the clients became inactive.

  • Cisco Jabber client for desktop was inactive for over 300 seconds.

  • Cisco Jabber client for desktop is signed out.

Local Push Notification Service


Important


This section is applicable from Release 14SU3 onwards.


Note


  • iOS devices running on iOS16.5 or later with Webex App 43.6 or later or Cisco Jabber 14.2 or later support this feature. Ensure that your iOS device is connected in on-premises mode.

  • In this release, Local Push Notification Service (LPNS) supports notification for voice calls only.

  • LPNS is not supported on Android devices and MRA users.


    Note


    MRA users continue to receive push notifications through APNs channels. Setting up LPNS does not preclude this condition.

Currently, Webex App does not receive incoming VoIP call notifications when an iOS device operates in a Wi-Fi constrained network with no internet connection. For example, hospitals, cruise ships, airplanes, and so on. Due to lack of internet connectivity, the device does not have access to the APNS. Users expect to receive calls without any delay. However, with APNS a call is received after a few seconds delay caused by network latency. LPNS helps to resolve this issue.

When Webex App registers to the Unified Communications Manager and joins a provisioned Wi-Fi network that provides LPNS, the Webex App starts receiving notifications about incoming and missed calls. The notification displays the name and number of the calling party.

When the client is in any of the configured Wi-Fi networks, it establishes a persistent local connection to the Unified Communications Manager server. When the iOS device receives a push notification, it first tries to send it on the local server. when that fails, it sends it over the Apple Push server.

LPNS Prerequisites

To enable Local Push Notifications for on-premises deployments, onboard the Unified CM clusters for APNS. For more information, see Enable Push Notifications.


Note


You do not have to perform Step 12 in the referenced section.

You can check if LPNS is running in the CM Services area of the Control Center - Network Services window of Cisco Unified Serviceability. If available, it is listed as Cisco Local Push Notification Service. By default, this service is enabled.


Open Ports for LPNS

Ensure that the following ports are open for LPNS support from the Unified Communications Manager.

Table 6. Port Requirements for LPNS

From

To

Port and Protocol

Description

Webex App

Unified Communications Manager

9560/Secure WebSocket

Note


The LPNS in a cluster uses the 9560 port to enable the mesh for High Availability.

How Local Push Connectivity Works

At startup, Webex App clients that are installed on the iOS platform register to the Unified CM for calling. Until the client remains in foreground mode, Unified CM directly sends the calls to the client. When the client is in any of the configured Wi-Fi networks, it establishes a local connection to the Unified CM server. When the Webex App receives a push notification, it tries to send it on the local server first. If that fails, it sends the push notification over the Apple Push Server.

The Webex App keeps a secure persistent connection with the Unified CM when the device is connected to the Wi-Fi network. The Unified CM delivers the incoming call notifications over this connection to the Webex App. The WebSocket connection is maintained as long as the device is connected to that specified network. If the Webex App is killed or the phone reboots, the LPNS WebSocket connection is reestablished to the Unified CM server as long as it remains connected to the specified Wi-Fi network.

To enable efficient usage of resources, the LPNS server must know whenever the OAuth token expires or the Webex App client moves out of the specified Wi-Fi network. This is done using keepalive messages. The client sends a keepalive message to the LPNS server every 120 seconds. The LPNS server acknowledges this message and maintains the WebSocket connection. If the LPNS server doesn't receive a keepalive message (either due to token expiry or the Webex App client disconnecting from the Wi-Fi network) within 120 seconds, it closes the connection to the client and sends a 401 error message.


Note


In addition to the above, LPNS session for a particular iOS device would be closed:

  • when a user logs off.

  • when a signed-in user is deleted.

  • when a device is deleted.

  • when a user moves from a provisioned Wi-Fi to a non provisioned Wi-Fi


The following image provides a breakdown of the process that takes place when a VoIP Local Push Notification is sent in a private network to an iOS device.

Figure 5. VoIP Local Push Notification Behavior in a Private Network When Sent to an iOS Device
  1. Webex App in background; SIP channel to Unified CM disconnects.

  2. Webex App remains connected through WebSocket until device is connected to Wi-Fi and user is logged in.

  3. Webex App receives an incoming call.

  4. Unified CM buffers invite and sends local push notification to Webex App through WebSocket.

  5. Webex App is woken up, registers to Unified CM, and a SIP channel is established.

Configure Wi-Fi SSID

To enable LPNS notifications, you must first configure the Wi-Fi SSID.

Before you begin

Ensure that you have enabled the OAuth with Refresh Login Flow enterprise parameter. For more information about this parameter, see the Common Enterprise Parameters section in the System Configuration Guide for Cisco Unified Communications Manager.

Procedure


Step 1

From Cisco Unified CM Administration, choose User Management > User Settings > UC Service.

Step 2

Click Add New.

Step 3

From the UC Service Type drop-down, select Jabber Client Configuration (jabber-config.xml) and click Next.

Step 4

Enter the Name and Description for the Wi-Fi SSID.

Step 5

In the Jabber Configuration Parameters area:

  1. From the Section drop-down, select Phone.

  2. From the Parameter drop-down, select LocalPushSSIDList.

  3. For Value, enter the Wi-Fi address ID. Alphanumeric characters are valid.

    You can enter up to ten IDs each separated by a semicolon.

Step 6

Click Save.


Associate Jabber Service Profile to the End User

After you configure the Wi-Fi SSID, you must create a service profile and associate it with an end user.

Procedure


Step 1

From Cisco Unified CM Administration, choose User Management > User Settings > Service Profile.

Step 2

Click Add New.

Step 3

Enter the Name and Description for the Jabber Service Profile.

Step 4

Click Save.

Step 5

In the Jabber Client Configuration (jabber-config.xml) area, from the Mobile drop-down, select the UC service profile that you had created in the previous step.

Step 6

Click Save.

Step 7

From Cisco Unified CM Administration, choose User Management > End User and click Find.

The end user list appears.

Step 8

Click the User ID of the chosen end user.

Step 9

In the Service Settings area, from the UC Service Profile drop-down, select the Jabber Service Profile that you had created in steps 3–4 and click Save.

The devices that are associated with the selected end user get configured with the selected Jabber Service Profile. The jabber-config.xml file with the selected configuration settings gets downloaded to the Webex App.


LPNS Behavior If There Is Unified Communications Manager Failover

Unified Communications Manager Group is a prioritized list of up to three redundant servers to which devices can register. Each group contains a primary node and up to two backup nodes. The order in which you list the nodes determine their priority with the first node being the primary node, the second being the backup node, and the third being the tertiary node.

In the Unified CM, device pools provide a common set of configurations for a group of devices and allow you to configure devices according to their specific location information. You can assign a device to a Cisco Unified Communications Manager Group through the Device Pool Configuration.

When the LPNS service on the primary node goes down, Webex App client detects it and connects to the next priority node in the device pool.

When the LPNS service on the primary node is up, the Webex App client continues to remain connected to the node to which it had previously established a WebSocket session. The client does not attempt to fallback to higher priority node unless the current active session is closed or broken.

Client checks if a higher priority node is available before doing failover. This hunting of highest priority node before establishing a session results in a delay until a session comes through. LPNS is not able to deliver push notifications until the client connects back to one of the available LPNS servers.

High Availability of LPNS for Remote LPNS Push Call Handling

High Availability of LPNS provides failover and redundancy for the LPNS sessions of iOS Webex App clients. It ensures that active session information of every client is known to every node on which LPNS is running. This ensures seamless delivery of push notification to client irrespective of where the device's current active call processing node is.

LPNS Interactions and Restrictions

The following feature interactions and restrictions have been observed with LPNS.

Table 7. Feature Interactions and Restrictions for LPNS

Feature

Interactions and Restrictions

Network Address Translation (NAT) and Firewall Connections

We recommend that you configure NAT and firewall devices to maintain the client-WebSocket connection to the LPNS.

LPNS High Availability

High availability is guaranteed on the Unified Communications Manager provided the Webex App attempts to fail over to the next available Unified Communications Manager that is configured in its Call Manager Group. If the client WebSocket failover happens, the iOS device registers to the Unified Communications Manager whenever the Webex App moves to the foreground. Then, Unified Communications Manager delivers voice call notifications through the established WebSocket.

Certificate Requirement

  • We do not recommend Self-signed certificates for the LPNS feature due to ioS certificate requirements. For more info, see https://support.apple.com/en-us/HT211025.

  • We recommend public CA-signed certificate confirming to iOS certificate requirements (certificate expiry duration less than 397 days) while using LPNS.

  • If you're using a private CA-Signed certificate confirming to iOS certificate, ensure that you import the certificates into the iOS trust store.

  • LPNS deployment must meet Apple's certificate requirements.