Installation of Cisco Business Edition 7000H/M

Design Your Deployment

Review the following topics to design your deployment.

Plan Your UC Applications

Before You Begin:

Ensure that your Cisco Business Edition 7000 server is rack-mounted and connected to power and data networks. For instructions, refer to the Quick Start Guide for Cisco Business Edition that was packaged with your server. You can also download a copy at:

https://www.cisco.com/c/en/us/support/unified-communications/business-edition-7000/products-installation-guides-list.html

Before you begin any installation, plan which UC applications you are going to install.

For information on the UC applications that are available for installation, and on how to design your Business Edition collaboration deployment refer to the following sites:

  • Cisco Business Edition 6000 and Cisco Business Edition 7000 Co-residency Policy Requirements—This document contains information on the Cisco virtualized applications that are available for installation on a Cisco Business Edition 7000 system and the conditions that you must meet to run those applications and any third-party applications on a Business Edition server.

    https://www.cisco.com/c/en/us/support/unified-communications/business-edition-7000/products-implementation-design-guides-list.html

  • Unified Communications in a Virtualized Environment—This website contains information on Cisco Collaboration Virtualization applications and how to design your deployment.

    http://www.cisco.com/go/virtualized-collaboration

  • Preferred Architecture Guides for Enterprise —Preferred Architecture documents and CVD guides offer prescriptive, end-to-end system solutions for Collaboration and Voice deployment. The design overviews provide a basic understanding of the products and their roles in the Preferred Architectures, including high-level best practices. The CVD guides provide more detailed design and deployment recommendations that help streamline the implementation of Preferred Architectures.

    http://www.cisco.com/go/pa

  • Enterprise Collaboration CVD Guides—Enterprise CVDs provide detailed design and step-by-step deployment information for collaboration solutions that are built on the Cisco Business Edition 7000. These CVDs are based on the core recommendations of the Preferred Architectures, and in some cases, they offer more solution designs as extensions or alternatives to the Preferred Architectures.

    http://www.cisco.com/go/pa

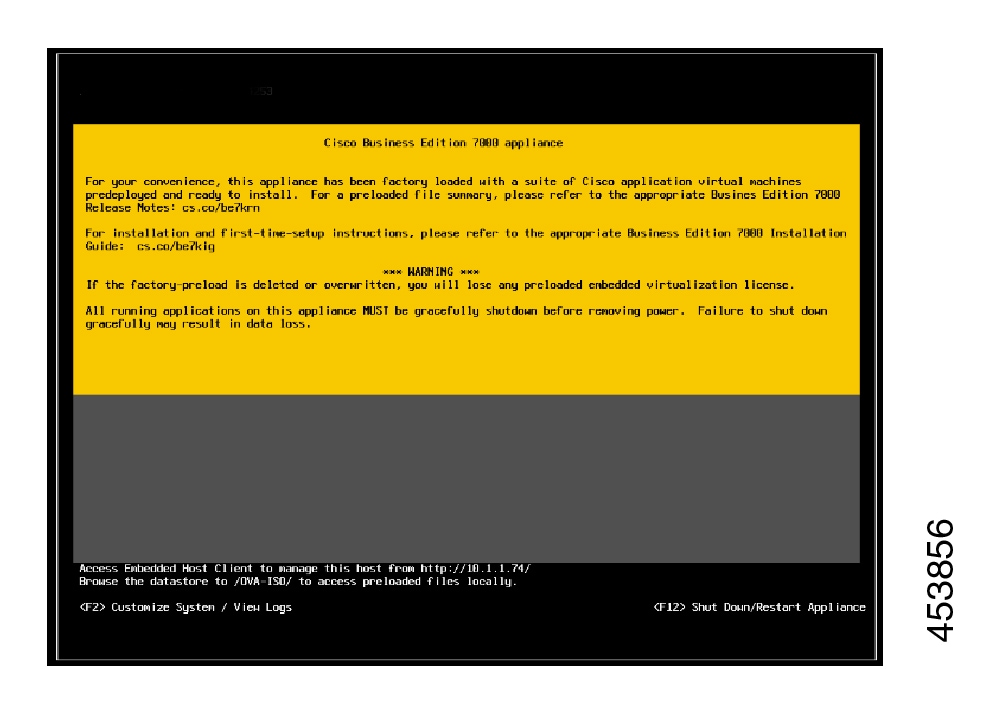
  • Business Edition 7000 Software Load Summary—Preload Summary documents provide information on ISO and OVA files that are pre-loaded in your server's datastore.

    https://www.cisco.com/c/en/us/support/unified-communications/business-edition-6000/products-release-notes-list.html

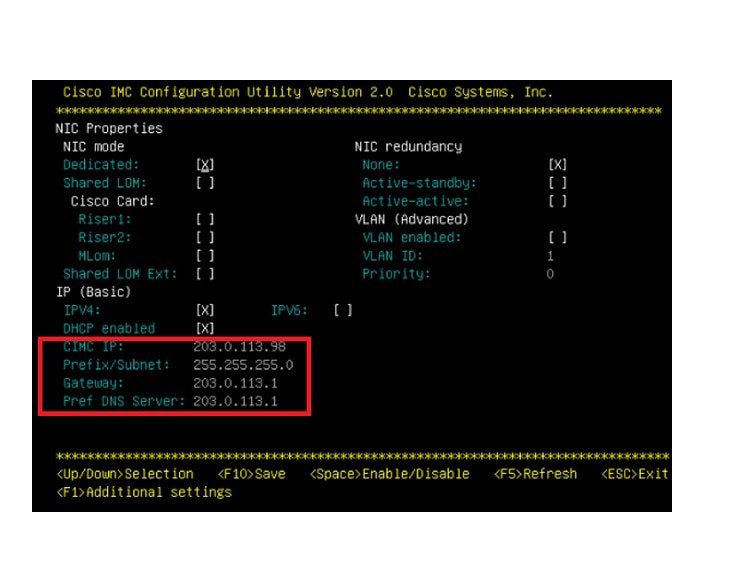
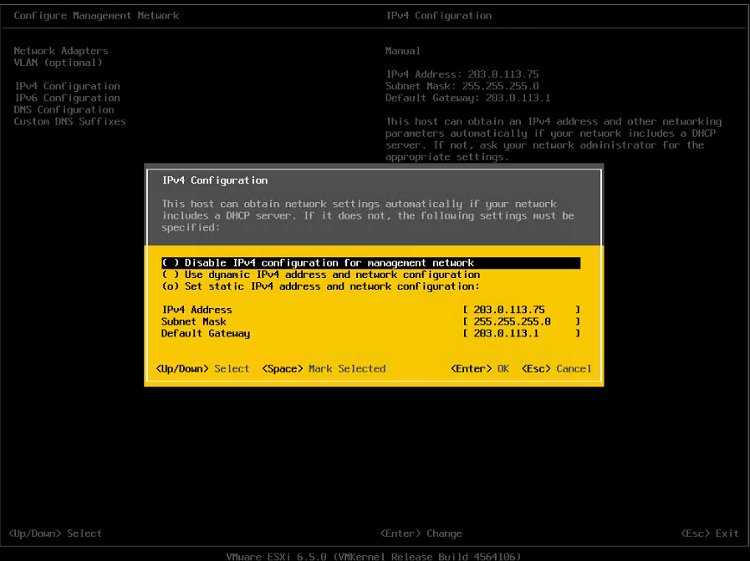
Collect Required Network Information

Before you begin the installation, collect the following network information for your solution.

Collect the following network settings for your installation:

  • Subnet mask

  • Gateway IP Address

  • VMware vSphere ESXi management IP address

  • Cisco Integrated Management Controller (CIMC) IP address

  • UC application IP addresses

  • DNS server IP address

  • UC application hostnames

  • (Optional) Domain name

  • NTP server IP address

  • Time zone

  • (Optional) SMTP server


Note


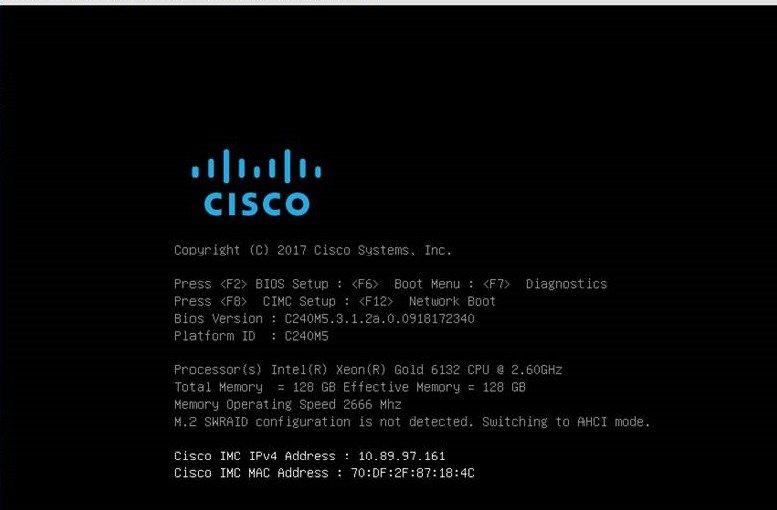
For general information on the Cisco UCS C240 M5SX server used in Cisco Business Edition 7000, see the Cisco UCS C240 M5 Server Installation and Service Guide. Cisco Intersight, Cisco UCS Manager, Cisco CIMC Supervisor do not support managing BE7000 appliances.


For the full range of possible configuration settings options, consult Cisco UCS C240 M5 Rack Server (Small Form Factor Disk Drive Model) Spec Sheet, Cisco UCS C Server Installation and Service Guide and docs.vmware.com.

Available physical ethernet ports depend on the appliance model:

  • All M5 appliance models include modular LAN on motherboard ports as described in the Cisco UCS C240 M5 Rack Server (Small Form Factor Disk Drive Model) Spec Sheet.

  • BE7000M and BE7000H models include additional ports via a network interface card. It is not supported on any appliance model to add network interface cards, add virtual interface cards, or change included network interface card.

Available VMware vSphere ESXi configuration settings options depend on what license is being used. If your appliance is using an embedded virtualization license,VMware vSphere ESXi distributed virtual switch features are not enabled.

Set Up Your Appliance

Review the following topics before you begin your installation.

Installation of Virtualization and Application Software

This section describes the tasks that you must perform to install virtualization and application software on your Business Edition 7000, using the factory preload.

Preloaded File Types in the Datastore

In addition to pre-deployed virtual machines, Cisco Business Edition servers are shipped with selected Collaboration application software that is pre-loaded on the datastore. Following is a breakdown of the file types for application installs:

  • ISO Files—An ISO file is a DVD image containing application install files (for example, Bootable_UCSInstall_UCOS_12.5.1.10000-22.sgn.iso).

    An ISO file is present for a UC application only if the OVA file for that application does not include the application software.

  • OVA Files—Each UC application has an associated Open Virtualization Archive (OVA) file, which is used to package and deploy the virtual machine. There are two types of OVAs for Business Edition servers:

    • Some OVAs (e.g. cucm_12.5_vmv13_v1.0.ova) are templates that define the VM, but do not include any application software. For those applications, there is an associated ISO file in the datastore (for example, Bootable_UCSInstall_UCOS_12.5.1.10000-22.sgn.iso). For the installation, you must deploy the OVA template and install the software using the associated ISO file.

    • Other OVA files define the VM and include the application software (for example, Bootable-CiscoPagingServer_12.5.1.ova). For these applications, there is no ISO file. You can deploy the VM and install the software using the OVA file.

For information on which ISO and OVA files are pre-loaded in your server's datastore, refer to the preload summary for your server at the http://www.cisco.com/c/en/us/support/unified-communications/%20business-edition-7000/products-release-notes-list.html.


Note


Cisco recommends that you archive the OVA-ISO directory locally. If there is a hardware failure, replacement hardware does not include a factory preload. If the factory preloaded software is either deleted, overwritten, or lost, then manual rebuild of preloaded software is required. Restore to the factory default capability is not supported.


Installation Task Flow of Cisco Business Edition 7000H/M

Perform the following tasks to install software on your Cisco Business Edition 7000 server.

Procedure
  Command or Action Purpose

Step 1

Configure Cisco Integrated Management Controller

Configure CIMC for your Business Edition 7000 server.

Step 2

Customize Virtualization Software Remote AccessCustomize Virtualization Software Remote Access

Configure the pre-installed VMware vSphere ESXi software on the appliance.

Step 3

Delete Unused or Unwanted Virtual Machines

Delete any pre-deployed VMs that you do not require.

Configure Cisco Integrated Management Controller

Cisco Integrated Management Controller (CIMC) is the management interface for the Cisco UCS appliance. CIMC runs within the appliance, allowing remote administration, configuration, and monitoring of the appliance through web or SSH command-line access.

Complete the following tasks to configure CIMC on a Business Edition 7000 appliance for customized and preconfigured deployments.

Complete the following tasks to Configure Cisco Integrated Management Controller:

Procedure
  Command or Action Purpose

Step 1

Power on and Initial CIMC Setup

Step 2

Complete the CIMC Configuration

Power on and Initial CIMC Setup

Use this procedure to power on the appliance and begin the basic Cisco Integrated Management controller (CIMC) configuration.

Before you begin

Ensure that the Business Edition 7000 appliance has been rack-mounted, connected to a power supply, connected to the data network, and that a monitor and keyboard are connected to the appliance, as described in the Quick Start Guide.

Procedure

Step 1

Verify that power is connected and that the power button LED is orange.

Step 2

Push the appliance power button and verify that it changes to green.

Step 3

Watch the boot process on the monitor.

Step 4

When the blue Cisco logo appears, press F8 to enter the CIMC configuration dialog.

Figure 1. Press F8 at the CIMC Boot Screen

Step 5

When prompted, enter the username admin and create a new password.

Step 6

On the CIMC configuration screen, complete the following details:

  • CIMC IP address
  • Subnet mask
  • Gateway IP address
Figure 2. Enter the CIMC IP Address Details


Step 7

When complete, press F10 to save your changes and boot the system.


Complete the CIMC Configuration

Use this procedure to configure DNS and NTP settings in the CIMC interface.

Before you begin
Power on the server and begin basic Cisco Integrated Management Controller(CIMC) configuration.
Procedure

Step 1

In a web browser, enter the CIMC IP address and log in with the username admin and the password that you created in the previous task.

Step 2

From the left hand menu, select the Admin tab, and click Network.

Step 3

In the main screen, select the Network Settings tab.

Step 4

From Common Properties, change the Hostname setting to the CIMC hostname.

Step 5

From IPv4 Properties, change Preferred DNS Server to the IP address that you have specified for the DNS server.

Step 6

In the main screen, select the NTP Settings tab.

Step 7

Check the Enable NTP check box.

Step 8

In the Server 1 field, enter the NTP server IP address.

Step 9

Select Save Changes from the bottom right hand corner of the page.


Configure VMware vSphere Hypervisor

Complete the following tasks to set up the VMware vSphere hypervisor:

Procedure
  Command or Action Purpose

Step 1

Customize VMware vSphere hypervisor Remote Access.

Step 2

Access and Configure the VMware vSphere hypervisor.

Customize Virtualization Software Remote Access

Follow this procedure to customize the VMware vSphere ESXi to enable remote access from your PC using the VMware Embedded Host Client.


Note


BE7000 appliances are factory loaded with ESXi 7.0 and vmfs6. If you want to change the vmfs version, check application support and note you will have to rebuild the appliance.


Procedure

Step 1

When the hypervisor boots, the ESXi Direct Console User Interface displays on the monitor as shown in the following figure.

Figure 3. Console Screen After ESXi Loads

Step 2

Press F2 to enter the System Customization menu as shown in the following figure.

Figure 4. ESXi System Customization Menu. The default username is root and default password is c!SCo123.

Step 3

After logging in, you must change the default password. Choose Configure Password to change the password.

If your applications are predeployed, skip to 5 .

Step 4

To assign a static IP address, select the Configure Management Network menu, and follow the instructions on the screen to change "IP Configuration".

Figure 5. Assign Static IP Address to ESXi Host

Step 5

Connect your PC to the data network, and browse to the new hypervisor IP address.

Figure 6. Hypervisor Welcome Page


Access and Configure Virtualization Software

Some Business Edition applications require the host to have a valid time reference. Follow these steps to access the ESXi host to configure NTP and configure fault tolerance for network interface cards (NICs) using the NIC teaming feature, view preinstalled applications, and browse the datastore to verify the preloaded collaboration application software.

Procedure

Step 1

Browse to the "https://[ESXI-HOST-IP-Address]/ui/" to access VMware Embedded Host Client.

Figure 7. Access Virtualization Software Using VMware Embedded Host Client

Step 2

Use the login credentials that you previously configured.

Step 3

If selected at time of quoting, BE 7000 appliances are factory loaded with a Collaboration embedded OEM license for Cisco Business Edition Embedded Virtualization Basic Plus . If you want to use this license, it is ready for use. If you want to re upload or version-upgrade this license, follow these steps:

  1. Locate your license document that has license serial number for the Cisco Business Edition Embedded Virtualization license . For installations, license serial number ships from the factory along with the appliance. For version-upgrades, license serial number ships from the My Cisco Entitlements (MCE)" on cisco.com.

  2. Navigate to Manage > License > Assign License.

  3. Type in or copy or paste the license serial number from the license document. Never add these licenses into vCenter.

  4. Click Check License to validate the license key.

Note


"Embedded virtualization licenses do not work the same way as general-purpose vSphere ESXi licenses or Partner Activation Codes (PAC). They are hardcoded to 2-CPU, pre combined, and cannot split or expand through myvmware.com. They are neither a VMware Partner Activation Code (PAC) nor a Cisco Product Authorization Key (PAK). They are pre activated, no registration or activation on myvmware.com or cisco.com required. They does not support installation through vCenter, license pooling in vCenter, or any vCenter features.

For more details, see Appendix A.

Step 4

Configure NTP settings:

  1. Navigate to Manage > System > Time & date.

  2. Click Edit settings to launch the Edit time configuration screen.

  3. Check Manually configure the date and time on this host check box.

  4. Update the Time.

  5. Check the Use Network Time Protocol (enable NTP client) check box.

  6. Select Start and stop with host from NTP service startup policy drop-down.

  7. Type the IP address of NTP server in NTP servers. If you want to add multiple NTP servers, type the IP address of NTP servers that are separated by commas.

  8. Click Save.

Step 5

(Optional) Configure fault tolerance by using the NIC teaming feature in VMware:

  1. Navigate to the Networking > Management Network.

  2. Click Edit settings to launch Edit port group- Management Network.

  3. In the Edit port group- Management Network screen, enter the name, VLANID, Virtual switch.

  4. Expand NIC teaming, enter the required details.

  5. Click Save to add the NIC that is connected to the data network.

Note


By default, only one NIC is enabled for the hypervisor and identified as vmnic0.

Step 6

Browse the datastore:

  1. Navigate to Storage > Datastore to list the datastores in the Business Edition appliance.

  2. Select datastore1.

  3. Click the Datastore browser. You can view the Preloaded Collaboration Virtual Machines and preloaded software.

Note


You must select the VMFS6 file type while creating the datastore.

Figure 8. Browse Datastore to View Preloaded Collaboration Virtual Machines and Preloaded Software

Step 7

(Optional) Cisco recommends that you archive the OVA-ISO directory locally. If a appliance fails, the replacement hardware will not include preloaded content.


Delete Unused or Unwanted Virtual Machines

You can optionally delete unused or unwanted preloaded files to free up disk space or make room for subsequent installations in the following scenarios:

  • If you want to deploy a new application version or patch level than the existing factory-preloaded application.

  • If you do not want to run a particular preloaded application and its files.

Procedure

Step 1

Log in to VMware Embedded Host Client.

Figure 9. Delete Any VMs That You Are Not Using

Step 2

Expand Virtual Machines and locate the virtual machine that you want to delete.

Step 3

If the VM has a green triangle, right-click the icon and select Power > Power Off.

The green arrow disappears as the VM powers off.

Step 4

Right-click the VM and select Delete.

Step 5

Repeat this procedure for each virtual machine that you wish to remove.


Set Up Your Applications

Perform the following tasks to set up your applications on Cisco Business Edition 7000 appliance.

Procedure

  Command or Action Purpose

Step 1

Deploy Virtual Machine OVAs

Deploy virtual machine OVAs for each UC application that you want to install.

Step 2

Customize Virtual Machines for Cisco Unity Connection

If your Business Edition 7000 deployment includes Cisco Unity Connection, customize the Unity Connection VM.

Step 3

Associate Application ISO Files to Virtual Machines

For UC application installations that require an ISO file, mount the ISO file on the application VM.

Note

 
For a list of applications that use ISO installation files, see the Preload Summary for your appliance.

Step 4

Install UC Applications Using Touchless Installation

Optional. Use touchless installation to install any of the following core UC applications:

  • Cisco Unified Communications Manager

  • IM and Presence Service

  • Cisco Unity Connection

  • Cisco Unified Contact Center Express

Note

 
If you prefer, you can use manual installation for these applications.

Step 5

Install UC Applications Manually

Use the manual interactive process to install any remaining UC applications.

Deploy Virtual Machine OVAs

For each application that you want to run, requires one of the preloaded virtual machine OVA files. If a new version is preferred, then it is recommended to delete the existing version.

Depending on the preloaded application, the OVA contains any of the following applications:

  • Fully installed ready to run application

  • Partially installed application

  • VM configuration alone for an empty virtual machine

For more details, see the Preload File Summaries in Release Notes at the http://www.cisco.com/c/en/us/support/unified-communications/business-edition-7000/products-release-notes-list.html.


Note


The OVA template files that contain empty virtual machines are deployed in seconds, while larger OVA files that contain partially or fully installed applications can take longer to deploy.


Caution


If you rebuild your appliance to use ESXi 6x, then ensure proper operation of your appliance and any embedded virtualization licenses, ensure it is running ESXi 6.5 U2 or greater, with the Cisco UCS-specific image of ESXi.

Procedure


Step 1

On the VMware Embedded Host Client, navigate to the Virtual Machines.

Step 2

Right-click the Virtual machines and select the Create/Register VM.

Step 3

Select Deploy a virtual machine from an OVF or OVA file as select creation type.

Step 4

Specify a meaningful name for the virtual machine.

Step 5

Browse and select the source OVA template file on your PC. For application and filename mapping, see the Build Summary PDF in the datastore OVA-ISO directory, or download from here: https://www.cisco.com/c/en/us/support/unified-communications/business-edition-7000/products-release-notes-list.html.

Step 6

Select the datastore in which to store the configuration and disk files.

Step 7

Select the deployment options.

Step 8

If prompted to accept license agreements, continue to click Next.

Step 9

Select the deployment options.

Step 10

If prompted for the Disk Format, specify Thick Provision Lazy Zero.

Step 11

Review your settings selection before finishing the wizard.

Step 12

Click Next.

Step 13

Deploy VMs for all your UC applications before proceeding to the next task.

If your system includes Cisco Unity Connection, then Customize Virtual Machines for Cisco Unity Connection. Otherwise, Associate Application ISO Files to Virtual Machines.


Customize Virtual Machines for Cisco Unity Connection

For Customized installations, use this procedure to configure your Cisco Unity Connection virtual machine settings to ensure optimum performance.

Preconfigure

Before you begin

For Customized installations, use this procedure to configure your Cisco Unity Connection virtual machine settings to ensure optimum performance. Deploy Virtual Machine OVAs

Procedure


Step 1

On VMware Embedded Host Client, navigate to the Virtual Machines.

Step 2

Right click the Unity Connection entry and select Edit Settings.

Step 3

If you want to use the Unity Connection, or Unified, or Integrated Messaging, do the following:

  1. Select the Virtual Hardware tab.

  2. Select the CPU menu and set the number of Cores per Sockets to 2.

  3. In the Reservation tab, increase the reservation to 5.06MHz.

    For more information, see the https://www.cisco.com/c/en/us/td/docs/voice_ip_comm/connection/12x/supported_platforms/b_12xcucspl.html.


Associate Application ISO Files to Virtual Machines

If you have deployed a skip-install OVA that contains any of the following partially installed applications, skip this step.

  • Cisco Unified Communications Manager

  • IM and Presence Service

  • Cisco Unity Connection

  • Cisco Unified Contact Center Express

  • Cisco Emergency Responder

If you have deployed an OVA that contains ready to run fully installed applications, skip this step.

For all other OVA files that contain only VM configurations of empty virtual machines, use this procedure to associate the ISO installation files that is used to complete the installation.


Note


For an up to date list of installation files for your appliance, see the Preload Summary for your appliance in the datastore OVA-ISO directory or at: https://www.cisco.com/c/en/us/support/unified-communications/business-edition-7000/products-release-notes-list.html.

Procedure


Step 1

In the VMware Embedded Host Client, select the UC application virtual machine.

Step 2

Click Edit .

Step 3

From Virtual Hardware tab, select CD/DVD Drive 1.

Step 4

Select Datastore ISO File from CD/DVD Drive 1 drop-down list.

Step 5

Browse to the datastore and locate the application ISO file.

Step 6

Select the file and click Select.

Step 7

In CD/DVD Drive 1, check the Connect at power on check box under the Status.

Step 8

Repeat this procedure for each application that you want to install that includes an ISO file.


Install UC Applications Using Touchless Installation

Touchless installation allows you to install multiple UC applications and virtual machines of an application simultaneously, across the different hosts if necessary, without having to interact with the system while the install process runs. While you must prepare the system, touchless installation can save time, particularly if you want to install multiple applications. If you are installing only one or two applications, you may prefer to follow the manual procedure in the following section.

Use touchless installation to install the following applications:

  • Cisco Unified Communications Manager

  • IM and Presence Service

  • Cisco Unity Connection

  • Cisco Unified Contact Center Express

  • Cisco Prime Collaboration Deployment

Procedure

  Command or Action Purpose

Step 1

Generate Answer Files

Generate answer files (AFG files) for UC applications.

Step 2

Create Virtual Floppy Images

Use your AFG files to create virtual floppy images.

Step 3

Upload Virtual Floppy Images to Datastore

Upload your virtual floppy images to the datastore.

Step 4

Mount Virtual Floppy on Virtual Machines and Set Boot Option

Mount each virtual floppy on the corresponding UC application VM.

Step 5

Run Touchless Installation

Run the touchless installation of your UC applications. We recommend that you run your installations simultaneously.

Generate Answer Files

Use this procedure to generate answer files for the touchless installation of your UC applications.


Tip


We recommend that you create application-specific folders (for example, UCM, IMP, CUC, CCX) in which to save the generated files so that you do not get the files mixed up.
Procedure

Step 1

Go to the online answer file generator at: https://www.cisco.com/c/en/us/applicat/content/cuc-afg/index.html.

Step 2

From the Product drop-down list, select the UC application for which you want to generate answer files.

Step 3

Select the Version that you want to install.

Step 4

Complete the remaining fields with the installation details that you want to configure on the appliance. For example, you can assign items such as passwords, IP addressing, and DNS settings.

Step 5

Click Generate Answer Files to generate the platformConfig.xml file for that UC application.

Each UC application generates a platformConfig.xml file. Cisco Unified Communications Manager also generates a clusterConfig.xml file.

Step 6

Save the generated answer files as follows:

  • For Cisco Unified Communications Manager, save both the platformConfig.xml and clusterConfig.xml files in the UCM folder.
  • For other UC applications, save the platformConfig.xml file in the relevant application folder.

Step 7

Repeat these steps for each UC application for which you want to use touchless installation.


Create Virtual Floppy Images

Use this procedure to create virtual floppy images from the answer files. You will use the virtual floppy images in your touchless installation.


Tip


We recommend that you follow the recommended naming conventions for your .flp files.


Before you begin
  1. You can use Winimage to create the virtual floppy images. You can download Winimage from http://www.winimage.com/download.htm. You can also use other tools, such as BFI, to create virtual floppy images.

  2. Generate Answer Files

Procedure

Step 1

In Winimage, select File > New.

Step 2

From the Standard format, select 1.44 MB and click OK.

Step 3

Drag the platformConfig.xml file for the UC application onto the Winimage window.

Step 4

When prompted to inject the file into Winimage, click Yes.

Step 5

Cisco Unified Communications Manager only. Drag the clusterConfig.xml file onto the Winimage window.

Step 6

Select File > Save As.

Step 7

Save the file as a virtual floppy image (.flp file) using the following naming conventions:

  • Cisco Unified Communications Manager—ucm.flp
  • IM and Presence Service—imp.flp
  • Cisco Unity Connection—cuc.flp
  • Cisco Unified Contact Center Express—ccx.flp

Step 8

Repeat this procedure for each UC application for which you want to use touchless installation.


Upload Virtual Floppy Images to Datastore

Use this procedure to upload the virtual floppy images to the datastore.

Before you begin
Create Virtual Floppy Images
Procedure

Step 1

Start the VMware Embedded Host Client.

Step 2

Select Storage.

Step 3

Right-click on a datastore and Browse the datastore.

Step 4

Navigate to the destination directory and click the Upload icon.

Step 5

Upload the vFloppy images to the AFG folder.

Step 6

At the Upload/Download warning, click Yes.

Step 7

Close the Datastore Browser window.


Mount Virtual Floppy on Virtual Machines and Set Boot Option

Use this procedure to mount the UC application virtual floppy images on their corresponding VM.


Note


This step is not required for predeployed VMs as they are already configured.


Before you begin
Upload Virtual Floppy Images to Datastore
Procedure

Step 1

In the VMware Embedded Host Client, select the UC application virtual machine.

Step 2

Select Virtual Machine.

Step 3

Click Edit.

Step 4

From the Virtual Hardware tab, select Floppy drive.

Step 5

Select Use existing floppy image.

Step 6

Browse to the datastore and locate the virtual floppy image.

Step 7

Select the file and click OK.

Step 8

Under Status, enable the Connect at power on option.

Step 9

Click the VM Options tab. Under Boot Options, check the Force BIOS setup, and then click Save.

Step 10

Repeat this procedure for each UC application for which you want to perform touchless installation.


Run Touchless Installation

After you have mounted your virtual floppy drives to your application VMs, run the touchless installation process. We recommended that you run all of your touchless installations simultaneously.

Note


If your VM is predeployed, you need to perform step 6 only.


Procedure

Step 1

In the VMware Embedded Host Client, right-click the VM and select the Console > Open console in new window.

A console window opens.

Step 2

Click the Power On icon in the console toolbar to power on the virtual machine.

Step 3

When the BIOS screen appears, configure the following boot order:

  1. CD-ROM

  2. Hard Drive

  3. Removable Devices

  4. Network

Step 4

Save the settings and exit the console.

The UC application installation commences immediately.

Step 5

Repeat these steps for each UC application that you want to install.

Step 6

Once the installations are complete, remove the vFloppy configurations from the virtual machines.


Install UC Applications Manually

Use this procedure to follow the interactive install process to install any UC applications that do not have a touchless install option such as Cisco Emergency Responder.

Procedure


Step 1

In the vSphere Client, power on the VM for the application that you want to install.

Step 2

Right-click the VM, and choose the Console > Open console in new window.

A console window appears.

Step 3

Follow the screen prompts to install the application from the console.

Step 4

If you are using the manual method to install both Cisco Unified Communications Manager and IM and Presence Service, once the Cisco Unified Communications Manager publisher node installation completes, do the following:

  1. From the VMware Embedded Host console, log in to the Cisco Unified Communications Manager CLI.

  2. Run the set network cluster subscriber dynamic-cluster-configuration 24 command.

  3. Open a VMware Embedded Host console window for the IM and Presence or subscriber virtual machine.

  4. Power On the virtual machine.

  5. Enter the configuration information for the application to complete the installation.

Step 5

Repeat this procedure for each UC application that you want to install.