Configure Emergency Responder and RedSky—National E911 Service Provider

RedSky or Intrado Integration with Emergency Responder—Overview


Important


Although Emergency Responder uses the name National E911 Service Provider for all configuration tasks, both the RedSky and Intrado National E911 Service Providers are approved 3rd party National Emergency Calling Service Provider with Emergency Responder. From Release 14SU2 onwards, any specific reference to National E911 Service Provider should be understood to mean either National E911 Service Provider, depending on your chosen provider. Also, PKCS12 format is no longer supported from 14SU2 release onwards.

E911 comprises of two parts: Location Conveyance and Call Completion. Cisco Emergency Responder (Emergency Responder) integrates with National E911 Service Provider like RedSky for automated Location update, MSAG (Master Street Address Guide) for a User input location and Call Completion. For location with visibility on infrastructure (On-premises), Emergency Responder can send automated ERL-ELIN information or updates to RedSky. For locations where there is no visibility on associated infrastructure (Off-premises), Emergency Responder can help send user input location against User DID to RedSky.

Emergency Responder automatically finds and tracks the dispatchable locations of all your devices as they move throughout the enterprise so you can comply with E911 regulations.

Emergency Responder tracks Cisco IP Phones through Switch Port or Access Point or IP Subnet or Manually configured. Emergency Responder maintains the status of the phones (On-premises, Off-premises, unlocated), and passes on any ALI or ELIN information to RedSky. Phone users rely on Unified CM to route their emergency calls to RedSky and the designated emergency provider.

For Off-premises phones, if the user's phones current location has not been previously defined, the user is directed to the Emergency Responder Off-Premises User web page to create a new location. After the new location has been defined and the address has been validated, emergency calls placed from off-premises phones will then be completed through the RedSky.


Note


RedSky Integration is supported when Emergency Responder system is enabled in FIPS mode.

Set Up and Test RedSky or Intrado E911 Service Connectivity

After you have received confirmation that your company’s emergency service account has been created with RedSky, you must configure Emergency Responder to communicate with the RedSky service for On-premises or Off-premises phones.

You must complete the tasks described in the following procedure before creating Intrado ERLs.


Important


Although Emergency Responder uses the name Intrado for all configuration tasks, both Intrado and Redsky are approved 3rd party National Emergency Calling Service Provider with Emergency Responder. Any specific reference to Intrado should be understood to mean either Intrado or Redsky, depending on your chosen provider.

Note


You must configure the IP address of the DNS server to resolve the URLs provided by RedSky before completing these tasks. See Cisco Unified Operating System Administration Web Interface for Emergency Responder.

Procedure


Step 1

Configure the following items in the Intrado VUI Settings page:

  • Upload the certificate provided by RedSky.

  • Validate the certificate.

  • Configure RedSky Account Information.

Step 2

Configure Route Patterns for routing calls to RedSky on the Emergency Responder server.

Step 3

Configure Route Patterns and gateway for routing calls to RedSky on Unified CM server.

Step 4

Create Intrado ERL and verify the validity and consistency of the ALI data in the RedSky database.

Step 5

Assign Intrado ERL to the phones discovered under IP subnet.


Configure Emergency Responder for RedSky Integration

Use the following workflow to guide you through the setup of your RedSky feature.

Procedure

  Command or Action Purpose

Step 1

Set Up Intrado VUI Settings

Keep the account information and a certificate from RedSky handy before you configure the Intrado VUI Settings.

Step 2

Set Up a RedSky Route Pattern

Configures the route patterns for routing the call to RedSky.

Set Up Intrado VUI Settings

Before you can configure Intrado VUI settings, you must have your account information and a certificate from RedSky.


Note


To continue emergency service support when there is a failover to the Emergency Responder subscriber, you must upload the same certificate file to the Emergency Responder subscriber separately.

Note


From Release 14SU2 onwards, the only supported certificate extension is .bcfks. A new certificate must be obtained from your National E911 Service Provider and perform the following procedure to upload the new certificate.

Procedure


Step 1

From Emergency Responder, choose System > Intrado VUI Settings.

Step 2

Click Upload Certificate.

Step 3

Use the Browse button to locate the RedSky certificate file, highlight the file, and click the Upload button.

Step 4

Enter the Certificate Password and the VUI URL specified by the provider.

Step 5

Click Test and Validate.

A successful result means Emergency Responder was able to establish a secure connection to RedSky’s location update service.

Step 6

Enter the Account Information.

  • VUI Schema URL

  • RedSky Account ID

  • Set MyE911 for location Updates: True

    Note

     
    In case the remote users are not updating their locations using MyE911 or Remote Location Manager when Off-premises, set the MyE911 for Location Updates flag to False.

Step 7

Click Test Connectivity to verify whether Emergency Responder can successfully connect to the customer-specific account through the Intrado VUI.

On the 'Test Intrado Connectivity' pop-up window, the Test Results section should show status “200 OK” after pressing the Connect button. This response indicates that both the certificate and account information are valid. If the above steps are successful, then the Intrado related features like Intrado ERL and Off-Premise ERL are now unlocked.

For more information about the Intrado VUI settings, see Intrado VUI Settings.


Set Up a RedSky Route Pattern

Before any emergency calls can be completed by RedSky E911 Service, you must configure at least one route pattern for routing emergency calls to RedSky. Since all emergency calls that are routed to a National Emergency Calling Service provider use the same path, only 1 Intrado route pattern is needed. Connection redundancy is accomplished through Unified CM route list and route group configuration, so defining additional Intrado route patterns is not required.

Procedure


Step 1

From Cisco ER Administration, choose System > Telephony Settings.

Step 2

Under Intrado Route Pattern Settings, enter the Intrado Route/Translation Pattern and click the Add button.


Configure Emergency Responder and Unified CM for RedSky E911 Service Integration for On-premises Phones

Use the following workflow to guide you through the setup of your RedSky E911 Service feature for On-premises devices after you have confirmed your emergency service support with RedSky.

Procedure

  Command or Action Purpose

Step 1

Set Up RedSky ERLs

Configures the ERLs for RedSky.

Step 2

Add Scheduled Intrado Updates

Creates ALI and Secondary Status update schedules between Emergency Responder and RedSky.

Step 3

Update Scheduled Intrado Update

In case, you want to update the schedules, peform this task.

Set Up RedSky ERLs

Before you begin

You must first configure Intrado route patterns before you can add any Intrado ERLs.

Note


Intrado ERLs differ from conventional ERLs in the following ways:
  • You can only select route patterns from a preconfigured list in the Telephony Settings web page.

  • You can query and validate ALI data from Intrado by using Intrado VUI (Validation & Update interface).

  • You must submit ALI data (TN Update) to Intrado by using Intrado VUI before an emergency call can be successfully routed.


Procedure


Step 1

From Emergency Responder, choose ERL > Intrado ERL > Intrado ERL (Search and List).

Step 2

Click the Add New ERL button.

Emergency Responder opens the Add New ERL window. See Find Intrado ERL for a detail explanation of each field.

Step 3

Fill in the ERL Information.

Step 4

Click ALI Details.

Emergency Responder opens the ALI Information window.

Step 5

Enter the ALI Information. The "ALI Information section", Cisco Emergency Responder Administration Web Interface Appendix A, contains detailed explanations of each field.

Note

 
To help match Emergency Responder ERL names with the corresponding RedSky Location entry, fill in the Comments field of the ALI record with the ERL Name.

Note

 
The ALI Location field must be less than 20 characters to be accepted by RedSky. All entries longer than 20 characters is rejected.

Note

 
Query from Intrado is not supported with RedSky.

Step 6

After entering the ALI Information, make the Add New ERL window the active window if it is not, and click Insert.

Emergency Responder saves the ERL and its ALI to the local database.

Note

 
Level of service is not supported for RedSky.

What to do next


Important


In case you have existing ERLs and need to migrate the existing conventional ERLs to RedSky ERLs and vice versa, use the ERL Migration Tool page to migrate the ERLs.

Add Scheduled Intrado Updates

To ensure consistency between Emergency Responder’s Intrado ERL’s and the National Emergency Calling Service Provider, you can create ALI and Secondary Status update schedules between Emergency Responder and Intrado. A scheduled ALI update sends newly created TN records to Intrado. A scheduled Secondary Status update sends queries to Intrado requesting information about records with errors that have been corrected.

Procedure


Step 1

Choose ERL > Intrado ERL > Intrado Schedule from Emergency Responder.

Step 2

Choose the days of the week and the time of day that you want to schedule an update.

Step 3

Check the Enable Schedule check box if you want to activate this schedule.

Step 4

Choose either ALI Update Schedule or Secondary Status Update Schedule.

Step 5

Click Add to add the schedule to the list of schedules.


Update Scheduled Intrado Update

Procedure


Step 1

From Emergency Responder, choose ERLIntrado ERLIntrado Schedule.

Step 2

Click the Edit link adjacent to the schedule that you want to update.

Step 3

Choose the days of the week and the time of day.

Step 4

Check the Enable Schedule check box to activate this schedule.

Step 5

Click Update to change the schedule on the list of schedules.

Emergency Responder should be configured using traditional tracking methods and the ERL/ELIN will be delivered to RedSky or Intrado over the customer defined transport (SIP or PRI). Basically, by selecting the RedSky or Intrado, ERL sends the call to RedSky or Intrado.


Configure Emergency Responder and Unified CM for RedSky E911 Service Integration for Off-premises Users

Use the following workflow to guide you through the setup of your RedSky E911 Service feature for Off-premises users after you have confirmed your emergency service support with RedSky.

Procedure

  Command or Action Purpose

Step 1

Verify Off-Premises MyE911 Service Settings

Ensure that the Intrado VUI configuration settings has the MyE911 for Location Updates flag set to True.

Step 2

Set Up RedSky Off-Premise ERLs

Ensure to configure RedSky route patterns before you can add the RedSky Off-Premise ERLs.

Step 3

Configure a Phone

Create or update a device in Unified CM for off-premise.

Step 4

Associate Devices to End User

Associates the phone or device to an end user.

Step 5

Configure IP Subnet for Off-Premise Users in Emergency Responder

Defines the IP subnet for off-premise phone and associated ERL.

Step 6

Instruct Users to Set and Configure Remote Teleworker Emergency Calling For Off-Premises Locations

Off-premises phone users need to add locations and associate their devices to those locations.

Verify Off-Premises MyE911 Service Settings

When Emergency Responder is integrated with a National Emergency Calling Service Provider like RedSky and remote users will be using an application to set their location, Cisco Emergency Responder must be then configured to pass the calls to the National Provider without the users configuring their location settings in the system. If the remote users are updating their locations using an application connecting RedSky (Over the Top), Emergency Responder must be configured to pass the calls from those users directly to the National Service Provider by configuring the MyE911 Location Updates option. For example, applications that can set the off-premise location of a user are RedSky MyE911, Intrado Remote Location Manager, and Cisco Webex App.

Procedure


Step 1

From Cisco ER Administration page, navigate to System > Intrado VUI Settings.

Step 2

Set the MyE911 for Location Updates drop-down to True if Cisco Jabber and Webex App are using MyE911 or Remote Location Manager to set the users location when Off-premises.

Note

 
In case the remote users are not updating their locations using MyE911 or Remote Location Manager to set the users location when Off-premises, set the flag to False.

Set Up RedSky Off-Premise ERLs

You must first configure RedSky route patterns before you can add any RedSky ERLs.

Procedure


Step 1

From Emergency Responder, choose ERL > Intrado ERL > Off-Premises ERL (Search and List).

Step 2

Click the Add New ERL button.

Emergency Responder opens the Add New ERL window. See Off-Premises ERL for a detail explanation of each field.

Step 3

Fill in the ERL Name and Description Information.

Step 4

Select the Route/Translation Pattern defined for reaching RedSky and any user that should be notified when an Off-premises call has been placed.

Note

 
When configuration the Off-Premises ERL, there is no option to set an ELIN. This is because the calling party number is the calling party’s number. By passing the user’s calling party, RedSky can uniquely identify the caller and their specific location.

Note

 
Query from Intrado is not supported with RedSky.

Step 5

Click Insert.

Note

 
Level of service is not supported for RedSky.

Configure a Phone

Perform these steps to update a phone to in Unified Communications Manager to send the location selection service to phones when they are Off-premise.

Note


This setting is only applicable to Cisco IP Phones. Soft clients (like Cisco Jabber and Webex App) cannot use this procedure.

Procedure


Step 1

From Cisco Unified CM Administration interface, select the phone that is Off-premise.

Step 2

In the Device Information section, select the Owner as User and set the Owner User ID to the user that this device is assigned to.

Step 3

In the Phone Configuration window, check the Require off-premise location option to activate the device for off-premises location check upon registration. Off-premises location check is required to determine if the phone is off-premise and the user must select a location before allowing outbound calls.

Step 4

Click Save.

Step 5

In the Association area, click Line [1]-Directory Number.

Note

 
Extensions may be longer than 10 digits, but a leading + is not currently supported by Emergency Responder.

Step 6

Configure the external phone number mask to ensure that the directory number defined on the line will be a fully qualified 10-digit E.164 number after the mask is applied.

Note

 
The phone number mask must contain at least 1 X to be valid.

Step 7

Click Save and on the phone page, click Apply Configuration.

Note

 
Ensure that the status of the configured phone is in the Registered state.

Associate Devices to End User

Any user with devices that will be using the Off-premises feature must be defined in Unified CM with the devices that are assigned to the user. All devices should be associated with the user on both the Owner ID field and in the End User page as Controlled Devices.

Procedure


Step 1

From Cisco Unified CM Administration, choose User Management > End User menu option to find the end user.

Step 2

In the Device Information pane, click Device Association.

Step 3

To find all records in the database, Click Find.

Step 4

From the Device association for (this user) pane, choose the devices that you want to associate with this end user by checking the box to the left of the device names.

Use the buttons at the bottom of the window to select and deselect devices to associate with the end user.

Step 5

Repeat the preceding steps for each device that you want to assign to the end user.

Step 6

To complete the association, click Save Selected/Changes.


Configure IP Subnet for Off-Premise Users in Emergency Responder

Use the Configure IP Subnet page to define an IP Subnet for devices that are Off-premise. The IP Subnet should be the IP Address of the Expressway-C inside address or the IP Subnet of a VPN concentrator for client VPN session or Hardware VPN solutions.

Procedure


Step 1

From Cisco ER Administration, choose ERL Membership > IP subnets and click Add new IP subnet.

Step 2

Enter the Subnet ID and Mask details.

Step 3

Click Search ERL to select the ERL you want to assign to the subnet.

Step 4

In the ERL Search Parameters, set the find value to Off-Premise ERL and click Find.

Step 5

Click the radio button next to the Off-Premises ERL (defined previously) and click Select ERL.

Step 6

Click Insert to add the subnet on the Configure IP Subnet page.


Instruct Users to Set and Configure Remote Teleworker Emergency Calling For Off-Premises Locations

Add New Location

Before a user can associate a location to their phone or device, the user must first enter a location into Emergency Responder’s Off-Premises User Page. All locations defined in Emergency Responder are user-specific. Each user must add their own locations. When a user has multiple locations, each location must have a unique name to identify that unique location.
Procedure

Step 1

Log in to the Cisco Emergency Responder Off-Premises User page at https://<CER_FQDN>/ofpuser using the end user credentials.

Note

 
Emergency Responder Off-Premises User page does not support SSO logins.

Step 2

From the Cisco Emergency Responder Off-Premises User page, select Locations and click Add New Locations.

Enter a valid address. The location name will be used to identify this address when you associate your phone with this address.

Step 3

Click Validate to verify the address with your National Provider.

Step 4

If the address validation fails, the user must correct the address before saving the location.

Step 5

Click Save to save the location information in Emergency Responder.

Note

 
Saving the location does not immediately update the National Emergency Calling Service Provider, but stores the location information in Emergency Responder. When a user selects the location from the device, the stored address information is sent to the National Provider to update the address for the user’s E.164 number.

Associate Your Location to Your Phone

After a user defines a location in Emergency Responder, the user should associate and verify that the device is associated to the desired location.
Procedure

Step 1

From the Cisco Emergency Responder Off-Premises User page, choose Phones.

Step 2

To associate a location to a phone, click the corresponding Assign link.

Note

 
If there are multiple devices, it does not matter which assign link you select since all of them will associate the address to the DID number listed.

Step 3

In the Associate Location page, select the desired location from the Select New Location drop-down list. The new location becomes active when you click the Associate Location button.

The Status field show displays that the “Location Association Is Successful.” This indicates that the address is valid and has been updated with the National Emergency Calling Service Provider.

Step 4

Once the location is associated, the device on the Phones page should display devices that are registered with an IP address that is considered off-premise with a status as Off Premises and the Associated Location should match the one that was selected. Additionally, ensure that the Direct Inward Dial (DID) is a properly formatted 10-digit NANP number.


Verify the Remote Teleworker Off-Premises Locations in Emergency Responder


Note


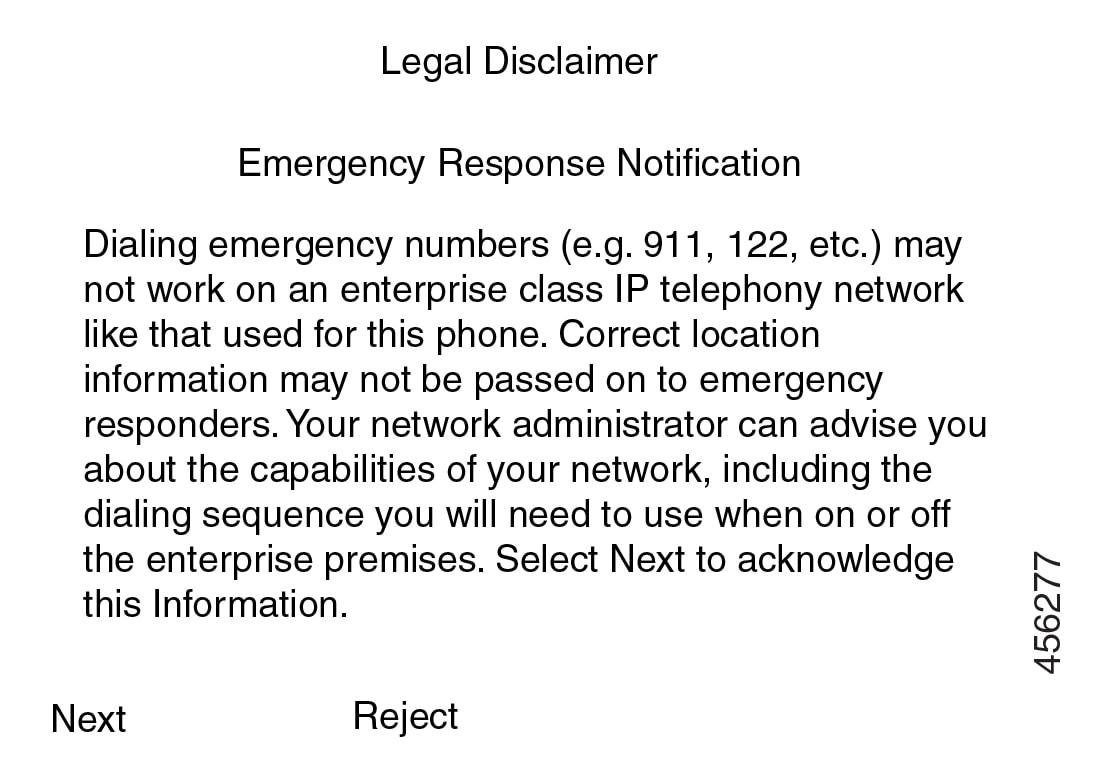
If the remote or Off-premises user chooses not to update their current location, the Disclaimer prompts the user to acknowledge that calls may be restricted until the location is updated. Outbound calls and 911 calls will not work until the user associates their device to a configured location.

As the System Administrator, you can configure to select and mandate location update so that the device user has to acknowledge the disclaimer and provide current location information before the device is enabled for normal use. (From Cisco Unified CM Administration, choose System > E911 Messages to configure the mandatory location update disclaimer message.)


Procedure


Step 1

Reset the phone or device.

After the phone has rebooted and after 2-5 seconds after registering, the device should display the Remote Teleworker legal notification. At this point, the remote teleworker location selection process should start.

Step 2

Ensure that the following legal disclaimer message appears on the phone.

Step 3

Click Next.

You will get the details of all the locations added through Cisco Emergency Responder Off-premises URL.

Step 4

Using the toggle buttons on the phone or device, choose a location and press the Select button.

A few seconds later, the phones user interface should indicate the successful settings of the off-premises user’s location.

Any error encountered during the setting of the location from the phone must be resolved through Emergency Responders Off-Premises User Page or working with the system administrator.


What to do next

Administrators should instruct the users on how to validate the accuracy of the E911 address based on the user-defined setting. This process should follow the company’s procedure for emergency address validation. When a user dials 911 as per the company process for validating the emergency dispatch address, the call should be routed to public-safety answering point (PSAP) using the off-premises ERL and the address reported by the PSAP should be the address currently assigned to the device through the Cisco Emergency Responder Off-Premises User Page.

All calls originating from On-premise devices route the National Emergency Calling Service Provider using the Intrado Route/Translation pattern. For On-Premise devices, Emergency Responder sends the ERL for the On-premise location to RedSky or Intrado to reach the correct PSAP for the calling party.