Provisioning OS Images through Orchestration Workflow Tasks

This chapter contains the following sections:

Orchestration Workflow Tasks for PXE Boot

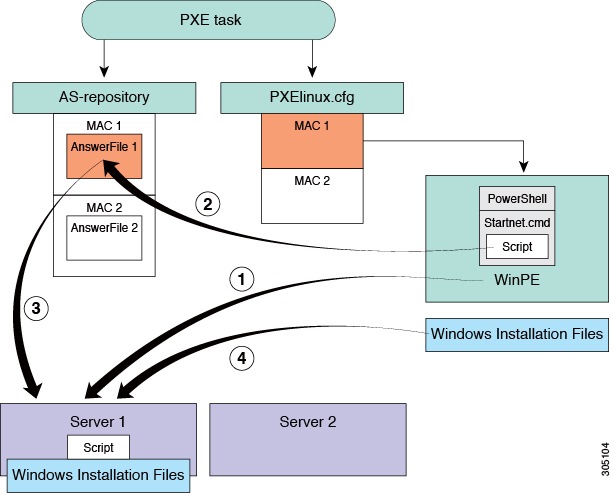
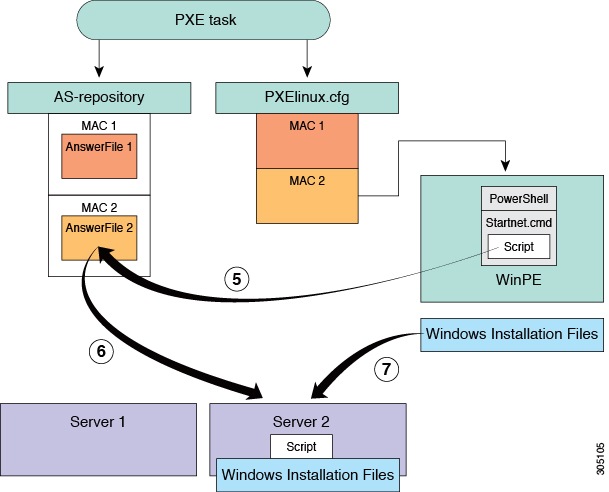
The orchestration workflow tasks for PXE boot enable you to create workflows within Cisco UCS Director that use the functionality of Cisco UCS Director Bare Metal Agent.

When you include any of the PXE boot tasks in an orchestration workflow, the task prepares the Bare Metal Agent environment to receive a PXE install request for a physical or virtual machine.

The values for each input required within the task can be supplied in one of the following ways:

  • As user inputs by the user who executes the workflow

  • Through outputs from a previous task in the workflow

  • Through admin inputs that are assigned by the Cisco UCS Director user who creates the workflow

The following orchestration workflow tasks are available:

  • Setup PXE Boot task

  • Setup PXE Boot with BMA Selection task

  • Setup Windows PXE Boot task

  • Monitor PXE Boot task

  • Remove PXE Boot Setup task


Note

To set up a PXE boot for a Windows Server operating system, you must use the PXE boot setup task that is defined specifically for Windows. To set up a PXE boot for all other supported operating systems, use the Setup PXE Boot task or the Setup PXE Boot with BMA Selection task.


You can access these workflow tasks in the Network Services area of the Cisco UCS Director Workflow Designer Task Library.

Most inputs and outputs are the same for the Setup PXE Boot task, the Setup PXE Boot with BMA Selection task, and the Setup Windows PXE Boot task, with the following notable exceptions:

  • The Setup PXE Boot with BMA Selection task has an input field for selecting the target Bare Metal Agent.

  • The Setup PXE Boot task does not have an option to select the target Bare Metal Agent. This legacy workflow task uses the default Bare Metal Agent as the target Bare Metal Agent.

  • The Setup Windows PXE boot task has an input field for selecting the target Bare Metal Agent.


Tip

For the legacy Setup PXE Boot task, the default Bare Metal Agent is the first Bare Metal Agent added. However, you can change the default Bare Metal Agent. See Changing the Default Bare Metal Agent Account.


Prerequisites for Workflows with PXE Boot Tasks

If you plan to create orchestration workflows that include one or more of the PXE boot tasks, your Cisco UCS Director and Cisco UCS Director Bare Metal Agent environment must meet the following prerequisites:

  • Cisco UCS Director has been installed and the network interface configured as described in the appropriate Cisco UCS Director installation guide.

  • Cisco UCS Director is reachable through a web browser and you can log in.

  • Cisco UCS Director Bare Metal Agent has been installed as described in Installing Cisco UCS Director Bare Metal Agent.

  • The required network/VLAN has been configured as the native, or default, VLAN on the server. For example, for a Cisco UCS server, edit the vNIC template associated with the server and choose the PXE network/VLAN as the native VLAN. You can perform this configuration through an orchestration workflow.

  • Each Bare Metal Agent account that you want to use in a workflow has been set up, is active, has a tested connection, and has services that have been enabled and started.

Execution of the Setup PXE Boot Tasks

The following Setup PXE Boot tasks are available for use in workflows:

  • Setup PXE Boot task

  • Setup PXE Boot with BMA Selection task

  • Setup Windows PXE Boot task

Each time that one of these tasks is executed within a workflow, Cisco UCS Director uses the following values for the inputs to complete a set of configuration files for that particular PXE request:

  • Dynamic values received from previous tasks in the workflow or from the user at run-time.

  • Static values that you enter when you create the workflow.

  • Template configuration files—the ks.cfg Kickstart files—that were created when the chosen operating system was added to Bare Metal Agent. For more information about these files, see Sample Operating System Configuration Template Files.

When the workflow is executed, Bare Metal Agent and Cisco UCS Director use the values gathered through the task and perform the following steps to prepare for a PXE installation request on the specified server:

Step Action Notes

1

Creates a new directory in the Cisco UCS Director Bare Metal Agent VM that corresponds to the PXE ID request in the /opt/cnsaroot/web/ks-repository/ directory.

You can view these PXE requests and PXE IDs on the PXE Boot Requests tab for a pod in Cisco UCS Director.

2

Adds the required unique configuration files to the /opt/cnsaroot/web/ks-repository/PXE_ID directory for the PXE installation specific to this request, including the ks.cfg, or Kickstart Configuration, file. Depending upon the operating system, other configuration files might be added to this directory, such as the boot.cfg file required for an ESXi installation.

For example, to create the customized ks.cfg file for the PXE installation,Cisco UCS Director takes the template ks.cfg file from the /opt/cnsaroot/templates/Operating_System/ directory and fills in the variables provided in the Setup PXE Boot task. This customized ks.cfg file is saved in a directory that corresponds to the PXE ID, such as /opt/cnsaroot/web/ks-repository/PXE_ID.

3

Creates a file corresponding to the MAC address of the server in the /opt/cnsaroot/pxelinux.cfg/ directory in the Bare Metal Agent VM.

The workflow appends "01-" to the MAC address of the server to create the filename. This file includes information about where the image files are located and is generated through the pxe.cfg file in the /opt/cnsaroot/templates/Operating_System/ directory.


Note

Bare Metal Agent automatically creates Windows answer files for the supported operating systems. The same answer file is used for local boot and SAN boot. The Windows installation does not support multi-path SAN boot, but you can use a single path workflow to achieve SAN boot.


Determining the Windows OS Edition

The exact Windows OS edition is required for successful PXE boot of a Windows Server image. You must enter the exact character string used by Windows PE (WinPE). This string is case sensitive. The Windows OS edition follows a consistent naming convention. Some examples of OS editions are as follows:

Windows Server 2008 R2 SERVERSTANDARD
Windows Server 2008 R2 SERVERSTANDARDCORE
Windows Server 2008 R2 SERVERENTERPRISE
Windows Server 2008 R2 SERVERENTERPRISECORE
Windows Server 2008 R2 SERVERDATACENTER
Windows Server 2008 R2 SERVERDATACENTERCORE
Windows Server 2008 R2 SERVERWEB
Windows Server 2008 R2 SERVERWEBCORE
Windows Server 2012 SERVERSTANDARD
Windows Server 2012 SERVERSTANDARDCORE
Windows Server 2012 R2 SERVERSTANDARD
Windows Server 2012 R2 SERVERSTANDARDCORE
Windows Server 2012 R2 SERVERDATACENTER
Windows Server 2012 R2 SERVERDATACENTERCORE

Procedure


Step 1

Navigate to the extracted ISO files for the Windows OS image.

Step 2

For a Windows 2012 R2 image, navigate to C:\win2k12r2\sources\install.wim and use a PowerShell cmdlet to find the edition.

An example of the use of this cmdlet is as follows:

 
PS C:\Windows\system32> Get-WindowsImage -ImagePath 
C:\win2k12r2\sources\install.wim
Index       : 1
Name        : Windows Server 2012 R2 SERVERSTANDARDCORE
Description : Windows Server 2012 R2 SERVERSTANDARDCORE
Size        : 6,653,342,051 bytes
Index       : 2
Name        : Windows Server 2012 R2 SERVERSTANDARD
Description : Windows Server 2012 R2 SERVERSTANDARD
Size        : 11,807,528,410 bytes
Index       : 3
Name        : Windows Server 2012 R2 SERVERDATACENTERCORE
Description : Windows Server 2012 R2 SERVERDATACENTERCORE
Size        : 6,653,031,430 bytes
<etcetera>
 
Step 3

For a Windows 2008 image, use the DISM.EXE syntax from the computer on which you installed the WAIK tools.

An example of the use of this syntax is as follows:

 
C:\Program Files\Windows AIK\Tools\>dism 
/get-wiminfo /wimfile:e:\\Win2k8r2x64\sources\install.wim
Deployment Image Servicing and Management tool
Version: 6.1.7600.16385
Details for image : e:\Username_Windowsbits\Win2k8r2x64\sources\install.wim
Index : 1
Name : Windows Server 2008 R2 SERVERSTANDARD
Description : Windows Server 2008 R2 SERVERSTANDARD
Size : 10,510,503,883 bytes
Index : 2
Name : Windows Server 2008 R2 SERVERSTANDARDCORE
Description : Windows Server 2008 R2 SERVERSTANDARDCORE
Size : 3,563,695,852 bytes
<etcetera>
 

Inputs for the Setup PXE Boot Task

The following table describes the inputs for the Setup PXE Boot task. Because the information for one or more of these inputs can be obtained from a previous task or from a user at run-time, the values for these inputs can be dynamic and change with each execution of the workflow.


Note

For legacy Setup PXE Boot tasks, the default Bare Metal Agent is the first Bare Metal Agent added. However, you can change the default Bare Metal Agent. See Changing the Default Bare Metal Agent Account.


Table 1. Setup PXE Boot Task Inputs
Input Description

Network Boot Manager drop-down list

Choose the network boot manager that you want to use. Choose one of the following:

  • PXE—PXE supports only TFTP protocol

  • iPXE-BIOS—iPXE-BIOS supports HTTP protocol by default

  • iPXE-UEFI—iPXE-UEFI supports TFTP protocol by default. However, you can modify the ipxe-uefi.cfg to support the HTTP protocol. See Setting Up UEFI as Network Boot Manager.

The default option is PXE.

OS Type drop-down list

The OS image that you want this PXE or iPXE boot request to install on the server. The drop-down list includes all OS images that have been created and are available for PXE or iPXE installation.

Server MAC Address

The MAC address of the server that requires the PXE or iPXE installation. This input is typically mapped to the MAC address output from the Create UCS Service Profile task.

IP Configuration Type drop-down list

Choose the configuration type. Choose one of the following:

  • Static

  • DHCP

Server IP Address field

The IP Address that you want to assign to the server. This IP address is given to the server after the PXE or iPXE installation process is complete, and is the final IP address for the server. This field is displayed only when you select the Static option in the IP Configuration Type drop-down list.

This IP address can be on a different network or subnet than the PXE or iPXE network or Management network that you configured for Bare Metal Agent.

Server Net Mask field

The subnet mask that you want to assign to the server after the PXE or iPXE installation process is complete. This field is displayed only when you select the Static option in the IP Configuration Type drop-down list.

Server Host Name field

The hostname that you want to assign to the server after the PXE or iPXE installation process is complete.

Server Gateway field

The default gateway IP address that you want to assign to the server after the PXE or iPXE installation process is complete. This field is displayed only when you select the Static option in the IP Configuration Type drop-down list.

Server Name Server field

(Optional) The DNS server that you want the server to use. This field is displayed only when you select the Static option in the IP Configuration Type drop-down list.

If no DNS server is required, leave this input blank.

Management VLAN field

(Optional) The VLAN ID that you want to assign to the management interface on the server after the PXE or iPXE installation process is complete.

This setting is typically used in ESX/ESXi deployments where VLAN tagging is prevalent on the virtual switch. It sets the VLAN ID for tagging on the management vmkernel port.

Root Password field

The password that you want to assign to the root user on the server.

Timezone field

The time zone in which you want to configure the server.

Additional Parameters interface

Interface to add, edit, or delete single-line parameters that are used additionally for the PXE or iPXE boot request. You can add multiple parameters using this interface.

To add an additional parameter, click (+). In the Add Additional Parameter box that appears, enter the parameter name and the value for the parameter. Use the Edit button to modify the parameter name or its value. Use the Delete button to delete a parameter.

For example, you can use an additional parameter to customize the ks.cfg file template and provide a value for the parameter here. The parameter is then updated with the appropriate value in the ks.cfg file template.

Suppose the existing firewall configuration in ks.cfg is as follows:


# Firewall configuration
firewall --disabled

You can customize the configuration as following:


# Firewall configuration
firewall —$FIREWALL_CONFIG

In the Additional Parameter interface here, you can include FIREWALL_CONFIG as the parameter name and provide the value as disabled. The value of the parameter can also be mapped to a user input ${variable}. This parameter is updated with the appropriate value in the ks.cfg file template.

The ks.cfg file templates used by Bare Metal Agent are available in /opt/cnsaroot/templates/IMAGE_CATALOG_NAME/ks.cfg. For example, the ks.cfg file for CentOS 6.0 is available in /opt/cnsaroot/templates/CentOS60/ks.cfg

Note 

In the template files to retain dollar sign ($) and backslash (\), you must include a backslash (\) before the character.

Inputs for the Setup PXE Boot with BMA Selection Task

The following table describes the inputs for the Setup PXE Boot with BMA Selection task. Because the information for one or more of these inputs can be obtained from a previous task or from a user at run-time, the values for these inputs can be dynamic and change with each execution of the workflow.


Note

The Setup PXE Boot with BMA Selection task does not support the Windows OS and does not accept inputs for that OS.


Table 2. Setup PXE Boot with BMA Selection Task Inputs
Input Description

Network Boot Manager drop-down list

Choose the network boot manager that you want to use. Choose one of the following:

  • PXE—PXE supports only TFTP protocol

  • iPXE-BIOS—iPXE-BIOS supports HTTP protocol by default

  • iPXE-UEFI—iPXE-UEFI supports TFTP protocol by default. However, you can modify the ipxe-uefi.cfg to support the HTTP protocol. See Setting Up UEFI as Network Boot Manager.

The default option is PXE.

Target BMA field

The Bare Metal Agent accounts that have been added to Cisco UCS Director and are available for use.

OS Type drop-down list

The OS image that you want this PXE or iPXE boot request to install on the server. The drop-down list includes all OS images that have been created and are available for PXE or iPXE installation.

Server MAC Address

The MAC address of the server that requires the PXE or iPXE installation. This input is typically mapped to the MAC address output from the Create UCS Service Profile task.

IP Configuration Type drop-down list

Choose the configuration type. Choose one of the following:

  • Static

  • DHCP

Server Address field

The IP Address that you want to assign to the server. This IP address is given to the server after the PXE or iPXE installation process is complete and is the final IP address for the server. This field is displayed only when you select the Static option in the IP Configuration Type drop-down list.

This IP address can be on a different network or subnet than the PXE or iPXE network or Management network that you configured for Bare Metal Agent.

Server Net Mask field

The subnet mask that you want to assign to the server after the PXE or iPXE installation process is complete. This field is displayed only when you select the Static option in the IP Configuration Type drop-down list.

Server Host Name field

The hostname that you want to assign to the server after the PXE or iPXE installation process is complete.

Server Gateway field

The default gateway IP address that you want to assign to the server after the PXE or iPXE installation process is complete. This field is displayed only when you select the Static option in the IP Configuration Type drop-down list.

Server Name Server field

(Optional) The DNS server that you want the server to use. This field is displayed only when you select the Static option in the IP Configuration Type drop-down list.

If no DNS server is required, leave this input blank.

Management VLAN field

(Optional) The VLAN ID that you want to assign to the management interface on the server after the PXE or iPXE installation process is complete.

This setting is typically used in ESX/ESXi deployments where VLAN tagging is prevalent on the virtual switch. It sets the VLAN ID for tagging on the management vmkernel port.

Root Password field

The password that you want to assign to the root user on the server.

Timezone field

The time zone in which you want to configure the server.

Additional Parameters interface

Interface to add, edit, or delete single-line parameters that are used additionally for the PXE or iPXE boot request. You can add multiple parameters using this interface.

To add an additional parameter, click (+). In the Add Additional Parameter box that appears, enter the parameter name and the value for the parameter. Use the Edit button to modify the parameter name or its value. Use the Delete button to delete a parameter.

For example, you can use an additional parameter to customize the ks.cfg file template and provide a value for the parameter here. The parameter is then updated with the appropriate value in the ks.cfg file template.

Suppose the existing firewall configuration in ks.cfg is as follows:


# Firewall configuration
firewall --disabled

You can customize the configuration as following:


# Firewall configuration
firewall —$FIREWALL_CONFIG

In the Additional Parameter interface here, you can include FIREWALL_CONFIG as the parameter name and provide the value as disabled. The value of the parameter can also be mapped to a user input ${variable}. This parameter is updated with the appropriate value in the ks.cfg file template.

The ks.cfg file templates used by Bare Metal Agent are available in /opt/cnsaroot/templates/IMAGE_CATALOG_NAME/ks.cfg. For example, the ks.cfg file for CentOS 6.0 is available in /opt/cnsaroot/templates/CentOS60/ks.cfg

Note 

In the template files to retain dollar sign ($) and backslash (\), you must include a backslash (\) before the character.

Inputs for the Setup Windows PXE Boot Task

The following table describes the inputs for the Setup Windows PXE Boot task. Because the information for one or more of these inputs can be obtained from a previous task or from a user at run-time, the values for these inputs can be dynamic and change with each execution of the workflow.


Note

Bare Metal Agent automatically creates Windows answer files for supported Windows operating systems. You can use the same answer file for local boot and SAN boot. The Windows installation does not support multi-path SAN boot, but you can use a single path workflow to achieve SAN boot.


Table 3. Setup Windows PXE Boot Task Inputs
Input Description

Network Boot Manager drop-down list

Choose the network boot manager that you want to use. Choose one of the following:

  • PXE—PXE supports only TFTP protocol

  • iPXE-BIOS—iPXE-BIOS supports HTTP protocol by default

  • iPXE-UEFI—iPXE-UEFI supports TFTP protocol by default. However, you can modify the ipxe-uefi.cfg to support the HTTP protocol. See Setting Up UEFI as Network Boot Manager.

The default option is PXE.

Target BMA field

The Bare Metal Agent accounts that have been added to Cisco UCS Director and are available for use.

OS Type drop-down list

The OS image that you want this PXE boot request to install on the server. The drop-down list includes all OS images that have been created in Bare Metal Agent and are available for PXE installation.

Enable Hyper-V role for Windows Server 2016 check box

Check this check box if you want to enable Hyper-V role for Windows server 2016. This field is displayed when you choose the Windows 2016(x64) option in the OS Type drop-down list.

Note 

If you want to enable Hyper-V on Windows 2012 and Windows 2012 R2, you should add the <selection name="Microsoft-Hyper-V" state="true" /> in the answer files available in BMA (under <package> in <servicing> node). The answers files for Windows 2012 R2 and Windows 2012 are available in /opt/cnsaroot/templates/Win2k12R2x64/autounatted.xml and /opt/cnsaroot/templates/Win2k12x64/autounattend.xml location respectively.

Server MAC Address

The MAC address of the server that requires the PXE installation. This input is typically mapped to the MAC address output from the Create UCS Service Profile task.

OS Flavor Name field

The Windows OS edition name is required for successful PXE boot of a Windows Server image. You must enter the exact character string used by Windows PE (WinPE). This string is case sensitive. For example, enter SERVERSTANDARD or SERVERENTERPRISE. For more information, see Determining the Windows OS Edition.

This value is used in the Windows answer file, which requires the correct name of the edition for the image installation process. The OS edition might be different for each type of Windows OS image.

Organization Name field

The name of the organization that is associated with the OS product key.

This value is used by the Windows answer file. It could be a division within your company or the company name.

Product Key field

The product key (sometimes called the license key or software key) for the OS.

Host Name field

The hostname that you want to assign to the server after the PXE installation process is complete. Make sure the name complies with NetBIOS name restrictions.

Administrator Password field

The password that you want to assign to the administrative user on the server.

Confirm Password field

The password that you want to assign to the administrative user on the server.

IP Configuration Type drop-down list

Choose the configuration type. Choose one of the following:

  • Static

  • DHCP

Server Address field

The IP Address that you want to assign to the server. This field is displayed only when you select the Static option in the IP Configuration Type drop-down list.

Server Net Mask field

The subnet mask that you want to assign to the server after the PXE installation process is complete. This field is displayed only when you select the Static option in the IP Configuration Type drop-down list.

Server Gateway field

The default gateway IP address that you want to assign to the server after the PXE installation process is complete. This field is displayed only when you select the Static option in the IP Configuration Type drop-down list.

Server Name Server field

The DNS server that you want the server to use. This field is displayed only when you select the Static option in the IP Configuration Type drop-down list.

Timezone field

The time zone in which you want to configure the server.

Disk Partition Size (GB) field

The size, in GB, of the partition designated for the OS.

Additional Parameters field

Interface to add, edit, or delete single-line parameters that are used additionally for the PXE boot request. You can add multiple parameters using this interface.

To add a parameter, click (+). In the Add Additional Parameter box that appears, enter the parameter name and the value for the parameter. Use the Edit button to modify the parameter name or its value. Use the Delete button to delete a parameter.

For example, you can use parameters to provide the minimum requirements for the Windows answer file. You can define parameters and their values to enhance the answer file to meet the requirements of your environment. These parameters are updated with the appropriate values in the Answer file template.

The answer file templates used by Bare Metal Agent are available in the following locations:

  • Windows 2012 R2 x64—/opt/cnsaroot/templates/Win2k12R2x64/autounattend.xml

  • Windows 2012 x64—/opt/cnsaroot/templates/Win2k12x64/autounattend.xml

  • Windows 2008 R2 x64—/opt/cnsaroot/templates/Win2k8R2x64/autounattend.xml

Note 

In the template files to retain dollar sign ($) and backslash (\), you must include a backslash (\) before the character.

Outputs from the Setup PXE Boot Task and Setup Windows PXE Boot Task

The following table describes the outputs from both the Setup PXE Boot task and the Setup Windows PXE Boot task.

Table 4. Setup PXE Boot and Windows PXE Boot Task Outputs
Input Description

OUTPUT_PXE_BOOT_ID

The ID of the PXE boot request that was set up through the workflow task.

Creating a PXE Boot Request in Cisco UCS Director

Before you begin

Create the OS image template that you want to use for the PXE boot in Bare Metal Agent.

Procedure


Step 1

Choose Administration > Physical Accounts.

Step 2

On the Physical Accounts page, click Bare Metal Agents.

Step 3

Click the row for the Bare Metal Agent account in which you want to set up the PXE boot request.

Step 4

From the More Actions drop-down list, click View Details.

Step 5

Click PXE Boot Requests.

Note 

You can also create a PXE Boot Request by choosing Physical > Compute and navigating to the pod, in the left pane, in which you want to set up the PXE boot request.

Step 6

Click Add PXE Request.

Step 7

On the Add PXE Boot Request screen, complete the following fields:

Name Description

Network Boot Manager drop-down list

Choose the network boot manager that you want to use. Choose one of the following:

  • PXE—PXE supports only TFTP protocol

  • iPXE-BIOS—iPXE-BIOS supports HTTP protocol by default

  • iPXE-UEFI—iPXE-UEFI supports TFTP protocol by default. However, you can modify the ipxe-uefi.cfg to support the HTTP protocol. See Setting Up UEFI as Network Boot Manager.

The default option is PXE.

Server MAC Address field

The MAC address of the server that requires the PXE or iPXE installation.

Host Name field

The hostname to be assigned to the server after the PXE or iPXE installation process is complete.

Root Password field

The password that you want to assign to the root user on the server. You need to re-enter this password in the next field to confirm it.

Note 

Apply your organization's guidelines for maintaining the security of this password.

PXE Request for Windows check box

Check this check box if the PXE boot request is for a Windows OS.

After you check this check box, a set of Windows-specific fields appears in this dialog box.

IP Configuration Type drop-down list

Choose the configuration type. Choose one of the following:

  • Static

  • DHCP

Server Address field

The IP Address that you want to assign to the server. This field is displayed only when you select the Static option in the IP Configuration Type drop-down list.

Server Net Mask field

The subnet mask that you want to assign to the server after the PXE or iPXE installation process is complete. This field is displayed only when you select the Static option in the IP Configuration Type drop-down list.

Server Gateway field

The default gateway IP address that you want to assign to the server after the PXE or iPXE installation process is complete. This field is displayed only when you select the Static option in the IP Configuration Type drop-down list.

Server Name Server field

The DNS server that you want the server to use. This field is displayed only when you select the Static option in the IP Configuration Type drop-down list.

OS Type drop-down list

Choose the OS image that you want this PXE or iPXE boot request to install on the server. The drop-down list includes all OS image templates that have been created and are available for PXE or iPXE installation.

This drop-down list displays in a different location in the dialog box, depending upon whether you check the PXE Request for Windows check box.

Management VLAN field

(Optional) The VLAN ID that you want to assign to the management interface on the server after the PXE or iPXE installation process is complete.

This setting is used in ESX/ESXi deployments where VLAN tagging is implemented on the virtual switch. It sets the VLAN ID for tagging on the management vmkernel port.

OS Flavor Name field

(Required for a Windows OS only) The Windows OS edition name is required for successful PXE or iPXE boot of a Windows Server image. You must enter the exact character string used by Windows PE (WinPE). This string is case sensitive. For example, enter SERVERSTANDARD or SERVERENTERPRISE. For more information, see Determining the Windows OS Edition.

This value is used in the Windows answer file, which requires the correct name of the edition for the image installation process. The OS edition name might be different for each type of Windows OS image.

Organization Name field

(Required for a Windows OS only) The name of the organization that is associated with the OS product key.

This value is used by the Windows answer file. It could be a division within your company or the company name.

Product Key field

(Required for a Windows OS only) The product key (sometimes called the license key or software key) for the OS.

Timezone drop-down list

Choose the time zone in which you want to configure the server.

Disk Partition Size (GB) field

(Required for a Windows OS only) The size, in GB, of the partition designated for the OS.

Additional Parameters interface

Interface to add, edit, or delete single-line parameters that are used additionally for the PXE or iPXE boot request. You can add multiple parameters using this interface.

To add a parameter, click (+). In the Add Additional Parameter box that appears, enter the parameter name and the value for the parameter. Use the Edit button to modify the parameter name or its value. Use the Delete button to delete a parameter.

For example, for a Windows OS, you can use parameters to provide the minimum requirements for the Windows answer file. You can define parameters and their values to enhance the answer file to meet the requirements of your environment. These parameters are updated with the appropriate values in the Answer file template.

The answer file templates used by Bare Metal Agent are available in the following locations:

  • Windows 2012 R2 x64—/opt/cnsaroot/templates/Win2k12R2x64/autounattend.xml

  • Windows 2012 x64—/opt/cnsaroot/templates/Win2k12x64/autounattend.xml

  • Windows 2008 R2 x64—/opt/cnsaroot/templates/Win2k8R2x64/autounattend.xml

Server IP Address field

The static IP address that you want to assign to the server. This IP address is given to the server after the PXE or iPXE installation process is complete, and is the final IP address for the server.

This IP address can be on a different network or subnet than the PXE network or Management network that you configured for Bare Metal Agent.

Network Mask field

The subnet mask that you want to assign to the server after the PXE or iPXE installation process is complete.

Gateway field

The default gateway IP address that you want to assign to the server after the PXE or iPXE installation process is complete.

Server Name Server field

The DNS server that you want the server to use.

If no DNS server is required, leave this field blank.

Target BMA drop-down list

Choose the Bare Metal Agent that you want to use for this PXE or iPXE boot request. The Bare Metal Agent that you choose determines which OS images are available for the PXE or iPXE boot request.

Step 8

Click Submit.


Information about the new PXE Boot Request will appear as a new row in the PXE Boot Request , displaying the ID assigned to this request. The information includes the current Status of this request.

What to do next

After the PXE or iPXE boot request is in the Submitted state, you must set up the PXE or iPXE environment to create the Cisco UCS Director configuration files. You can activate a PXE or iPXE boot request that has a status of Submitted by selecting it and clicking Setup PXE Environment.

Viewing the PXE Request Configuration Files

Procedure


Step 1

Choose Physical > Compute.

Step 2

Choose Administration > Physical Accounts.

Step 3

On the Physical Accounts page, click Bare Metal Agents.

Step 4

Click the row for the Bare Metal Agent account in which you want to set up the PXE boot request.

Step 5

From the More Actions drop-down list, click View Details.

Step 6

Click PXE Boot Requests.

Note 

You can also create a PXE Boot Request by choosing Physical > Compute and navigating to the pod, in the left pane, in which you want to set up the PXE boot request.

Step 7

Click the row for the PXE boot request for which you want to view the configuration file details.

Step 8

From the More Actions drop-down list, click View Configuration Files.

Step 9

Choose the configuration file type from the Select the file drop-down list

The View configuration files window displays the configuration details of the selected file for a PXE request.


PXE Boot States

The following are the PXE boot states for PXE boot requests in Cisco UCS Director:

  • Submitted—The PXE boot request has been submitted to Cisco UCS Director.

  • Environment Setup—A Submitted PXE boot request has been transferred to Bare Metal Agent and that the environment required to perform a PXE boot is ready in Bare Metal Agent.

  • In Progress—The bare metal server has communicated with Bare Metal Agent and the PXE configuration files and image files are being downloaded.

  • Ready—The PXE boot process is complete. The server has booted with the newly installed operating system and Bare Metal Agent received a success notification from the server that it is ready.

  • Failed—The PXE boot process started, but Bare Metal Agent did not receive a success notification from the server after the defined wait period expired.

  • Archived—The PXE Request task included a rollback or delete.

Monitor PXE Boot Setup Task

When included in an orchestration workflow, the Monitor PXE Boot task monitors a particular PXE ID request until

  • The PXE boot is ready.

  • The maximum number of hours specified is reached before the PXE boot is ready.

Inputs for the Monitor PXE Boot Task

The following table describes the inputs for the Monitor PXE Boot Task:

Table 5. Monitor PXE Boot Task Inputs
Input Description

PXE Boot Id

The ID of the PXE boot request that you want to monitor through the workflow.

Max Wait time (Hours)

The maximum length of time, in hours, that you want the task to wait for the PXE boot request to be ready.

Outputs from the Monitor PXE Boot Task

The Monitor PXE Boot task has no outputs.

Remove PXE Boot Setup Task

When included in an orchestration workflow, the Remove PXE Boot Setup task removes the directory and files that are created by the Setup PXE Boot task for a particular PXE ID request.

Inputs for the Remove PXE Boot Setup Task

The following table describes the inputs for the Remove PXE Boot Setup Task.

Table 6. Remove PXE Boot Setup Task Inputs
Input Description

PXE Boot Id

The ID of the PXE boot request for which you want to remove the setup directory and files.

Outputs from the Remove PXE Boot Setup Task

The Remove PXE Boot Setup task has no outputs.

Injecting Drivers When Installing RHEL 7 or CentOS 7 on UCS Modular Servers

When you install RHEL 7 or CentOS 7 on the UCS servers, manually inject drivers through the PXE.cfg file. The PXE.cfg file is available in the following location: /opt/cnsaroot/templates/(RHEL 7/CentOS 7 OS Catalog name).

The default PXE.cfg file contains the following line:
append initrd=images/(RHEL 7/CentOS 7 OS Catalog name)/isolinux/initrd.img ramdisk_size=9216 noapic acpi=off ip=dhcp ks=$PXE_KS_URL 
ksdevice= inst.repo=http://$PXE_NATIVE_WEBSERVER/(RHEL 7/CentOS 7 OS Catalog name) net.ifnames=0 biosdevname=0

Note

Here RHEL 7/CentOS 7 OS Catalog name is the name of the OS image provided in the ISO extractor script while creating the RHEL 7 or CentOS 7 OS image template in Bare Metal Agent.


To inject the drivers, update the location of the drivers in the PXE.cfg file by updating the line as shown below:
append initrd=images/(RHEL 7/CentOS 7 OS Catalog name)/isolinux/initrd.img ramdisk_size=9216 noapic acpi=off ip=dhcp ks=$PXE_KS_URL 
ksdevice= inst.repo=http://$PXE_NATIVE_WEBSERVER/(RHEL 7/CentOS 7 OS Catalog name) inst.dd=http://$PXE_NATIVE_WEBSERVER/ 
(RHEL 7/CentOS 7 OS Catalog name )/(name of the driver disk) net.ifnames=0 biosdevname=0

The driver disk should be in the ISO image format and placed in the following location: /opt/cnsa/images/(RHEL 7/CentOS 7 OS Catalog name)/


Note

  • Download the driver ISO image from the UCS Servers download page on the Cisco website.

  • The parameter inst.dd helps load the driver images during PXE install.


Simultaneous Provisioning of Windows Server Operating Systems

You can use Bare Metal Agent to run parallel workflows and simultaneously deploy Windows server images on multiple bare metal servers.

Prerequisites for Simultaneous Deployment

To ensure that you can perform simultaneous deployment of Windows Server operating system images, you must perform the appropriate configuration required for the versions of the operating system that are described in the following topics, including:

  • Adding the PowerShell packages to the WinPE.wim file

  • Updating startnet.cmd with the IP addresses and other information required for your environment

Bare Metal Workflows

You do not need to make any changes to your existing bare metal provisioning workflows to support simultaneous deployment of Windows server operating systems.

A PXE boot task in a workflow can only provision one server with a Windows operating system. You cannot use a single PXE boot task to provision multiple servers, but you can execute PXE boot tasks simultaneously multiple times.

Maximum Number of Simultaneous Deployments

The maximum number of simultaneous deployments is dependent upon the bandwidth of your TFTP and PXE networks.

Minimum Supported Level of Bare Metal Agent

Simultaneous deployment of Windows server operating systems requires a minium of Bare Metal Agent, Release 5.4. It is not supported in earlier releases of Bare Metal Agent.

Files and Folders Used In Simultaneous Deployment

The following files and folders are used during simultaneous deployment of Windows operating systems:

PXElinux.cfg File

The PXElinux.cfg file contains the MAC addresses for each of the servers and points to the WinPE.wim file.

Samba Folder

The /samba folder contains a folder for each of the following items. Additional information about the script and folder is provided below.

  • Windows images to be deployed on the bare metal servers

  • EnRoute.ps1 script

  • as-repository folder

AS-Repository Folder

The /samba/as-repository folder contains a folder for each MAC address of the servers for which a Windows operating is to be deployed. The PXE boot task creates and stores a separate Windows answer file for each of these servers in the appropriate MAC address folder. This folder might not be created until after the first PXE boot workflow is run.

EnRoute.ps1 Script

The EnRoute.ps1 script determines which Windows answer file in the as-repository folder belongs to the server that is being provisioned. If desired, you can customize this script. However, when you add the Bare Metal Agent to Cisco UCS Director, the script in the as-repository folder will revert to the default script without the customizations.

Windows Answer File

The Windows answer file contains settings and values that are used during the deployment of a Windows operating system. This answer file is typically named unattend.xml. During simultaneous deployment, a separate Windows answer file is created in each MAC address folder and then sent to the server to be used during the Windows operating system setup.

When the installation is successfully completed, the name of the answer file is changed to include "Completed."

For more information, see the Microsoft TechNet article on Understanding Answer Files.

Example: Simultaneous Deployment of Windows Server Operating Systems

This example describes what actions Bare Metal Agent performs when you execute two workflows at the same time, with each workflow designed to provision a bare metal server with a Windows operating system. The illustrations below describe how server 1 and server 2 are provisioned when the PXE tasks in the workflows are executed.

Figure 1. Server 1 Provisioning

Server 1 actions for simultaneous deployment of Windows operating systems

When the PXE boot task is executed in the workflow that provisions Server 1, the steps shown in the above illustration occur:

Step

Action

1

Server 1 boots up. The WinPE.wim file, together with its PowerShell packages and Startnet.cmd, is copied to the server.

2

The Startnet.cmd calls the EnRoute.ps1 script from the /samba folder on the Bare Metal Agent VM.

A folder is created under /samba/as-repository/ with MAC address of Server 1 as its name, for example, /samba/as-repository/MAC 1, and a Windows answer file is placed into that folder.

3

The EnRoute.ps1 script compares the MAC address on Server 1 with the MAC address folders available in the /samba/as-repository folder and finds the Windows answer file for Server 1 in the /samba/as-repository/MAC 1 folder.

4

Using the Windows answer file, the appropriate Windows operating system (shown as Windows installation files) is installed on Server 1.

When the installation is successfully completed, the name of the answer file is changed to include "Completed."

Figure 2. Server 2 Provisioning

Server 2 provisioning of Windows operating system

At the same time as Server 1 is being provisioned, when the PXE boot task is executed in the workflow that provisions Server 2, the steps shown in the above illustration occur:

Step

Action

5

Server 2 boots up. The WinPE.wim file, together with its PowerShell packages and Startnet.cmd, is copied to the server.

The Startnet.cmd calls the EnRoute.ps1 script from the /samba folder on the Bare Metal Agent VM.

A folder is created under /samba/as-repository/ with MAC address of Server 2 as its name, for example, /samba/as-repository/MAC 2, and a Windows answer file is placed into that folder.

6

The EnRoute.ps1 script compares the MAC address on Server 2 with the MAC address folders available in the /samba/as-repository folder and finds the Windows answer file for Server 2 in the /samba/as-repository/MAC 2 folder.

7

Using the Windows answer file, the appropriate Windows operating system (shown as Windows installation files) is installed on Server 2.

When the installation is successfully completed, the name of the answer file is changed to include "Completed."