Managing a Virtual Infrastructure

This chapter contains the following sections:

About Managing VMware Clouds

Cisco UCS Director supports VMware through vCenter (ESX 3.5, ESX/ESXi 4.x, 5.x, 6.0 and 6.5). Cisco UCS Director automatically discovers all existing virtual machines (VMs) and images in the newly added cloud account. Typically, the discovery process takes about 5 minutes. You can also add VMware clouds


Note


The term “cloud” refers to one vCenter installation.


Cisco UCS Director supports inventory collection and VM provisioning using multiple datacenters and clusters. When creating a VMware cloud, you can choose the option to discover and select multiple datacenters and clusters. Once you add a discovered datacenter and cluster to a cloud, you cannot de-select them from the cloud by editing it. However, you can edit the cloud to add extra datacenters and clusters.


Note


Cisco UCS Director does not support the creation of clouds that use the same vCenter account. If there are duplicate accounts, you cannot create a VMware Cloud. In addition, if there are duplicate accounts, VM provisioning fails and an error appears in the status for the virtual account. The Test Connectivity function also fails with the error message. This error also occurs if the same server with the same combination of clusters is used in different clouds.

To disable this functionality, you can manually modify the vmware.properties file in the cd /opt/infra/inframgr directory to allow duplicate account IDs by setting the allowDuplicateClouds field to true. By default the field is set to false.


When upgrading from a previous release, all duplicate accounts display a failed connection status. Though an error message displays, all the actions can still be executed on the VMs.

Creating a VMware Cloud

When creating a VMware cloud, you can specify a datacenter and clusters in one of the following ways:

  • Within the credential policy

  • In the VMware Datacenter and VMware Cluster fields

  • From the Discover Datacenters / Clusters check box


Note


Either a datacenter within the credential policy or the VMware datacenter and VMware cluster can be selected. Specifying the datacenter in the Add Cloud screen and in the credential policy form results in an error.


Procedure


Step 1

Choose Administration > Virtual Accounts.

Step 2

On the Virtual Accounts page, click Virtual Accounts.

Step 3

Click Add.

Step 4

On the Add Cloud screen, complete the required fields, including the following:

Name Description

Cloud Type drop-down list

Displays the available cloud types. Choose VMware.

Note


The following fields are displayed when VMware is chosen. Other cloud types display fields that are specific to that cloud type.

Cloud Name field

The cloud name. The name cannot include single quotes.

Note


Each cloud requires a unique name in Cisco UCS Director. Once a cloud has been added, all reports refer to the cloud using the Cloud Name.

Server Address field

The vCenter server address

Use Credential Policy check box

Check this check box if you want to use a credential policy for this account rather than enter the information manually.

Use Credential Policy drop-down list

If you checked Use Credential Policy, choose the crednetial policy that you want to use from this drop-down list.

This field is only displayed if you choose to use a credential policy.

Server User ID field

The vCenter server username.

Server Password field

The vCenter server password.

Server Access Port field

The server port number.

Server Access URL field

The server access URL.

VMware Datacenter field

The data center name on the vCenter account.

Discover Datacenters / Clusters check box

Check this check box to discover and use any VMware datacenters and associated VMware clusters.

VMware Cluster field

The name of the VMware cluster in the vCenter account.

This name allows you to discover, monitor, and manage the specified pod's resources. Leave the field blank if the entire vCenter account is managed by Cisco UCS Director.

Select Datacenters / Clusters field

Check the associated datacenters and clusters you want to use.

Note


This field is visible only when you check the Discover Datacenters / Clusters check box.

Enable SRM check box

Check this check box to enable Site Recovery Manager (SRM) for the account.

Primary SRM Server Address field

The IP address of the primary SRM server.

Note


This field is visible only when you check the Enable SRM check box.

Primary SRM Server User ID field

The user ID for the primary SRM server.

Note


This field is visible only when you check the Enable SRM check box.

Primary SRM Server Password field

The password of the user for the primary SRM server.

Note


This field is visible only when you check the Enable SRM check box.

Primary SRM Server Access Port field

The port number for the primary SRM server. For SRM version 6.0, enter 9086 as the port number.

Note


This field is visible only when you check the Enable SRM check box.

Remote SRM Server User ID field

The user ID for the remote SRM server.

Note


This field is visible only when you check the Enable SRM check box.

Remote SRM Server Password field

The password of the user ID for the remote SRM server.

Note


This field is visible only when you check the Enable SRM check box.

Use SSO check box

Check this check box to use Single Sign-On (SSO) for authentication.

The SSO option is only available for Virtual SAN (VSAN). SSO credentials are required for VM provisioning using storage profiles on the Virtual SAN cluster.

SSO Server Address field

The IP address of the Single-Sign On server.

Note


This field is visible only when you check the Use SSO check box.

SSO Server User ID field

The user ID for the SSO server.

Note


This field is visible only when you check the Use SSO check box.

SSO Server Password field

The password of the user ID for the SSO server.

Note


This field is visible only when you check the Use SSO check box.

SSO Server Access URL field

The URL for SSO server access.

Note


This field is visible only when you check the Use SSO check box.

SSO Server Access Port field

The port number. For vCenter version 5.x, enter 7444 as the port number.

Note


This field is visible only when you check the Use SSO check box.

Server Access URL field

The URL for server access.

Description field

The description of the cloud.

Contact Email field

The contact email address for the cloud.

Location field

The location.

Pod drop-down list

Choose the converged infrastructure pod.

When you choose a pod name, the VMware cloud account is made available in the converged infrastructure stack.

Note


You cannot add more than one virtual account to a virtual SAN pod.

Service Provider field

The service provider’s name.

Step 5

Click Add.


Configuring Inventory Data Collection Schedule for Virtual Accounts

Procedure


Step 1

Choose Administration > Virtual Accounts.

Step 2

On the Virtual Accounts page, click Virtual Accounts.

Step 3

Click Inventory Scheduler.

Step 4

On the Inventory Scheduler screen, complete the required fields, including the following:

Name Description

Task Type drop-down list

Displays the available task types. Choose Inventory Collector or Event Collector.

System tasks field

Choose the system tasks.

Step 5

Click Next and complete the required fields, including the following:

Name

Description

Task Execution drop-down list

ChooseEnable.

Schedule Type drop-down list

Specify the schedule type. It can be one of the following options:

  • Fixed Delay—Implies the time period between the completion of one task execution and the initiation of the next task execution.

  • Fixed Rate—Implies the time period between successive tasks executions. If there is a delay in the execution of one task or if one task takes longer to execute than its scheduled time, it results in delays in subsequent task executions. These tasks will not run concurrently.

Hours

Choose a number from the dropdown list.

If you chose Fixed Delay as the schedule type, then this number indicates the time gap, in hours, between the completion of one task exection and the initiation of the next task execution.

If you chose Fixed Rate, then this number indicates time period, in hours, between successive task executions.

Enable Custom Frequency check box

Check this check box to enable a custom frequency for the system task.

Recurrence Type drop-down list

Specify the recurrence schedule. It can be one of the following:

  • No End

  • Only Once

This field is displayed only when you check the Enable Custom Frequency check box.

Start Time field

Specify the date and time for the recurrence schedule.

This field is displayed only when you check the Enable Custom Frequency check box.

Frequency drop-down list

Choose a frequency. It can be one of the following:

  • Hourly

  • Daily

  • Weekly

  • Monthly

Note


This field is displayed only when you select No End in the Recurrence Type drop-down list.

Frequency Interval drop-down list

Choose a frequency interval from the drop-down list. The values in this list vary depending on the frequency you have specified.

This field is displayed only when you check the Enable Custom Frequency check box.

Step 6

Click Submit.


Downloading the PowerShell Agent Installer

The PowerShell Agent is installed on Windows Server 2008 R2 or Windows Server 2012 64-bit virtual machines.

Procedure


Step 1

Choose Administration > Virtual Accounts.

Step 2

On the Virtual Accounts page, click PowerShell Agents.

Step 3

Click Download Installer.

Step 4

In the Download Agent Installer screen, check if your system meets the listed installation requirements.

Step 5

If the requirements are met, click Submit.

The Opening PSASetup. exe dialog box prompts you to save the executable file.

Step 6

Click Save File.

The file is saved to your system’s download location.

Step 7

Install the PSASetup. exe file on your Windows Server 2008 R2 or Windows Server 2012 64-bit virtual machine (VM).


Creating a PowerShell Agent

Procedure


Step 1

Choose Administration > Virtual Accounts.

Step 2

On the Virtual Accounts page, click PowerShell Agents.

Step 3

Click Add.

Step 4

In the Add Agent screen, complete the required fields, including the following:

Name Description

Agent Name field

The agent name.

Agent Address field

The agent address.

Agent Access Port field

The agent access port number.

Access Key field

The access key.

Description field

The description of the agent.

Step 5

Click Submit.


Verifying Cloud Discovery and Connectivity

Testing the Connection

Procedure


Step 1

Choose Administration > Virtual Accounts.

Step 2

On the Virtual Accounts page, click Virtual Accounts.

Step 3

Choose the VMware account that you want to test.

Step 4

Click Test Connectivity.

There is no progress bar that displays the results of the connectivity test. Use the Summary tab to verify that the cloud account is added and its data is collected.

Step 5

Choose Virtual > Compute.

Step 6

Click Summary.

It can take a few minutes to complete autodiscovery and populate the data.

Step 7

Choose the cloud name to view its status details.


Viewing vCenter Plug-ins

Procedure


Step 1

Choose Administration > Virtual Accounts.

Step 2

On the Virtual Accounts page, click Plugins.


Provisioning Virtual Machines in Cisco UCS Director

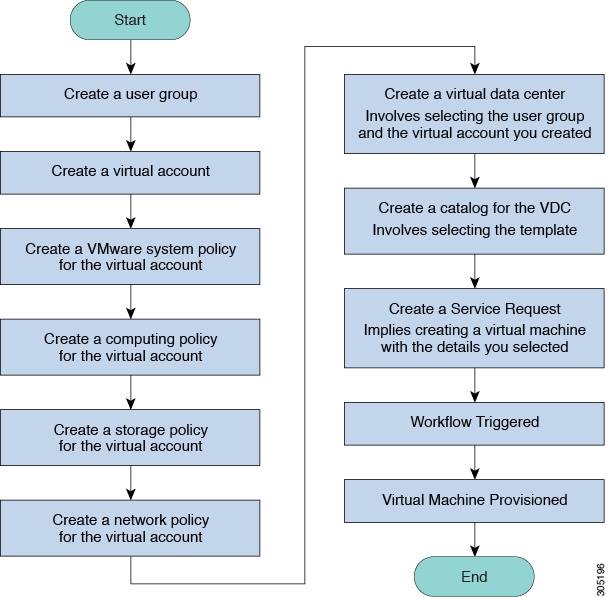
Provisioning virtual machines in Cisco UCS Director is a multi-step process. It involves steps such as creating a virtual account, creating policies, and creating catalogs and service requests. Prior to starting this task, as an administrator, determine the following:

  • The cluster in which the VM must be deployed

  • The datastores within the cluster that are available for VM provisioning

  • The available network within the cluster in which the VM must be deployed


Attention


In the absence of this information, if you select invalid datastores or an incorrect network for a cluster, VM provisioning in Cisco UCS Director fails.


The process of provisioning a VM in Cisco UCS Director can be summarized as:

  1. Create a user group.

    For more information, see Creating a User Group.

  2. Create a virtual account.

    A VM is provisioned within a virtual account in Cisco UCS Director. For more information, see Creating a VMware Cloud.

  3. Create a VMware system policy.

    This policy defines the system-specific information for the VM. You must specify the VM naming template to use, the OS to be configured, and the domain in which the VM must be provisioned. For more information, see Configuring a System Policy.

  4. Create a VMware computing policy.

    Computing policies determine the compute resources that can be used during provisioning to satisfy group or workload requirements. The cluster that you specify in this policy determines the choices you make in subsequent policies. For more information, see Creating a Computing Policy.

  5. Create a storage policy.

    A storage policy defines resources such as the datastore scope, type of storage to use, minimum conditions for capacity, latency, and so on. For more information, see Adding and Configuring a Storage Policy.

  6. Create a network policy.

    The network policy defines resources such as network settings, DHCP or static IP, and the option to add multiple vNICs for provisioning VMs. For more information, see Configuring a Network Provisioning Policy.

  7. Create a virtual data center.

    A Virtual Data Center (VDC) is an environment that combines virtual resources, operational details, rules, and policies. While creating a VDC, select the user group that you created for VM provisioning, and select the cloud that you specified while creating the policies. Based on the cloud account that you select, all the subsequent policy-related fields are populated. For more information, see Adding a Virtual Data Center.

  8. Create a catalog to select a template.

    You can self-provision virtual machines (VMs) using predefined catalog items. A catalog defines parameters such as the cloud name and the group name to which the VM is bound. For more information, see Publishing a Catalog.

  9. Create and submit a service request.

    You can use the self-service provisioning feature to create a service request to provision virtual machines (VMs), services, or applications. The service request process produces a provisioning workflow for VM creation. For more information, see Creating a Service Request with Catalog Type—Standard.

    After you submit a service request, a workflow is triggered, and the VM is provisioned.

The following image illustrates the workflow to provision a VM in Cisco UCS Director.

Figure 1. Workflow for Provisioning a Virtual Machine in Cisco UCS Director