Using Self-Service Provisioning

This chapter contains the following sections:

Self-Service Provisioning

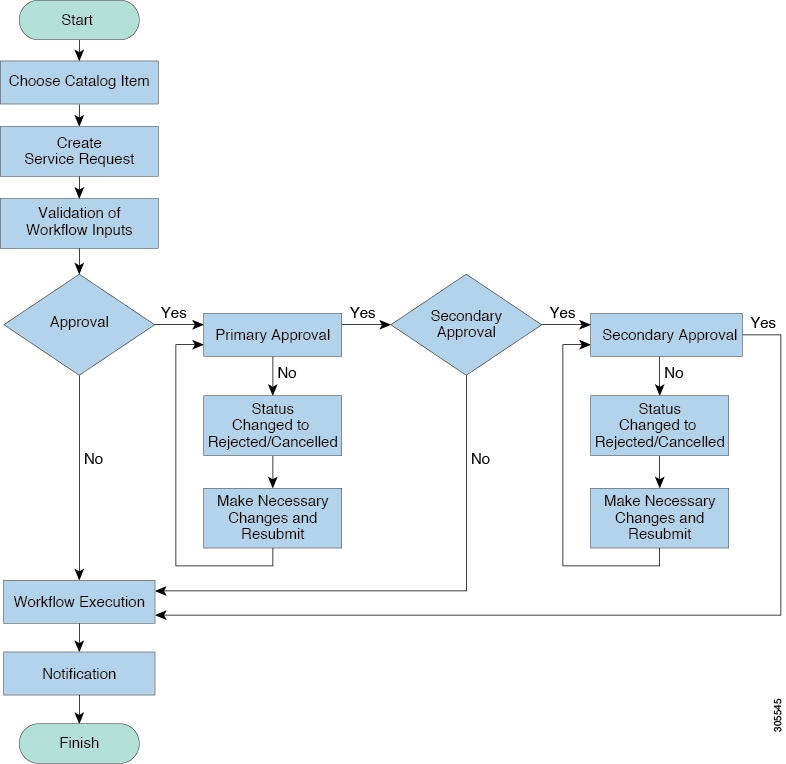
You can provision virtual machines (VMs) or applications through self-service provisioning. To provision a VM or an application using self-service provisioning, you must first create a service request. This action initiates a VM-creation workflow that includes the following:

  • Budget validation

  • Dynamic resource allocation

  • Approval

  • Provisioning

  • Lifecycle setup

  • Notification about the status of service requests

Service Requests

You can use the self-service provisioning feature to create a service request to provision virtual machines (VMs), services, or applications. The service request process produces a provisioning workflow for VM creation that includes the following actions:

  • Budget validation

  • Dynamic resource allocation

  • Approvals

  • Provisioning

  • Lifecycle setup and notification


Note

If you change the number of CPU Cores or memory allocation while in the Deployment Configuration screen, the total cost is automatically updated and displayed.


To provision a VM or execute an orchestration workflow, you must first create a service request. If desired, you can require approval from one or two administrators or designated users before the VM is provisioned or the workflow executed. VMs can be immediately approved or scheduled to be approved within a maximum of 90 days from the original request.

Creating a Service Request with Catalog Type—Standard

Procedure


Step 1

Choose Organizations > Service Requests.

Step 2

On the Service Requests page, click Service Requests.

Step 3

Click Create Request.

Step 4

On the Create Request screen, choose Standard as the catalog type.

Step 5

Click Submit.

Step 6

On the Create Service Request screen, complete the following fields:

Name

Description

Catalog Selection Request Screen

VM Ownership

Customer Organization radio button

Select this radio button to choose the customer organization for which a VM is provisioned.

Customer Organizations field

Click Select to choose the customer organizations for which you want to provision the VM.

Customer organizations that have valid vDCs are displayed.

Note 

This field is visible only when you select the Customer Organizations radio button.

If you chose Create Service Request from the Catalog screen, then the group list that is displayed is dependent on the user groups you select in the left pane

User radio button

Select this radio button to choose the users to whom you want a VM is provisioned.

User field

Click Select to choose the users to whom you want to provision the VM. This list is populated with users from groups which allow resource assignment to users.

Note 

Currently, only VMs that are in a VMware cloud can be assigned to a specific end user.

If you chose Create Service Request from the Catalog screen, then the user list that is displayed is dependent on the user groups you select in the left pane.

VM Access Sharing

Users with Access Privilege field

Click Select to choose users who can only access VM information.

The selected users can only access the VM. They cannot perform any administrative tasks.

Users with Manage Privilege field

Click Select to choose users who can only manage the VM.

The selected users can perform administrative tasks on the VM.

Catalog Type drop-down list

Displays the catalog type. It can be one of the following:

  • Standard

  • Advanced

  • Service Container

  • VDI

Note 

Advanced is used for Orchestration Workflow.

Select Catalog drop-down list

Choose the catalog that is used for VM provisioning.

If you chose Create Service Request from the Catalog screen, then you cannot select a catalog.

Perform deployment assessment check box

Check this check box to perform an assessment of the budget allocation, resource limits and resource availability prior to submitting a service request. After you check this check box, the summary of the assessment is displayed in the Deployment Assessment pane.

Important 

This option is visible only for VMware catalogs, and for catalogs that are not ISO-based.

Step 7

Click Next.

Step 8

On the Provisioning Configuration screen, complete the following fields:

Name

Description

Select vDC drop-down list

Choose a vDC for the service request.

VM Name field

Specify a name for the VM.

If you do not specify a name, the system will automatically generate a VM name.

Guest OS field

Click Select to choose a Guest OS for the service request.

Number of vCPUs drop-down list

Choose the number of vCPUs from the drop-down list.

This field is populated and editable only if you checked Allow Resizing of VM while creating the VMware computing policy.

Memory drop-down list

Choose the memory capacity from the drop-down list.

This field is populated and editable only if you checked Allow Resizing of VM while creating the VMware computing policy.

Category field

Click Select to choose an application category that is different from the one specified while creating the catalog.

Step 9

Click Next.

Step 10

On the Deployment Configuration screen, complete the following fields:

Name

Description

Select VDC drop-down list

The VDC on which the VM is provisioned.

VDCs are defined by the administrator.

VM Name or VM Prefix field

The VM name or prefix.

Comment field

Any comments relating to the deployment configuration.

Provision drop-down list

Choose either Now or Later.

Choose Now to set provisioning for any time within the next 90 days. When you choose Later, a calendar for the Day, drop-down lists for the Hour and Minute, and radio buttons for AM or PM appear.

Days calendar

The number of days after which the VM is terminated.

Note 

This option appears when Power OFF the VM After is checked.

Hours drop-down list

Choose the number of hours after which the VM is terminated.

Note 

This option appears when Power OFF the VM After is checked.

Minutes drop-down list

Choose the number of minutes after which the VM is terminated.

Note 

This option appears when Power OFF the VM After is checked.

Lease Time check box

Check to indicate that a lease time is configured for the VM.

Default Cost Computation Period Settings

Important 

If you checked the Disable displaying cost details check box while adding or modifying the VDC, then this information is not displayed.

Charge Duration drop-down list

Choose a duration for which the cost is calculated. By default, this duration is set to Monthly.

Month field

Specify the number of months to be included in the cost computation

Note 

This field is displayed only when you select Monthly in the Charge Duration drop-down list.

Day field

Specify the number of days to be included in the cost computation

Note 

This field is displayed only when you select Daily in the Charge Duration drop-down list.

Hours field

Specify the number of hours to be included in the cost computation

Note 

This field is displayed only when you select Hourly in the Charge Duration drop-down list.

Step 11

Click Next.

Step 12

On the Custom Specification screen, complete the following fields:

Name

Description

CPU Cores drop-down list

Choose the CPU cores for the VM being provisioned.

Note 

This list opens if the resizing option is chosen on the Computing Policy screen.

Cores Per Socket drop-down list

Choose the cores per socket for the VM being provisioned. The number of cores per socket available is specified in the VM computing policy.

The values displayed are based on the VM computing policy and the CPU count selected. The values in the Cores Per Socket drop-down list are divisors of the CPU count. For example, if the CPU count is 4, and the allowed sockets per core specified in the VM computing policy are 1, 2, 3, and 4, the Cores Per Socket drop-down list displays 1, 2, and 4 as available options.

Memory drop-down list

Choose the amount of memory for the VM being provisioned.

Note 

This list opens if the resizing option is chosen on the Computing Policy sreen.

Approximate SR Cost Estimate field

Displays an approximate SR cost based on the values you provided in the Default Cost Computation Period Settings fields.

Important 

If you checked Disable displaying cost details while adding or modifying the VDC, then this information is not displayed.

Storage Tier drop-down list

Choose an option to customize storage entries for the VM being provisioned.

Note 

This custom list opens if the Virtual Storage Catalog was enabled when the chosen catalog was created.

See more information about the creation of a virtual storage catalog in Policies. See more information about enabling this option during catalog creation in About Managing Catalogs.

Disk Datastores table

Choose the preferred hard disk size for VM provisioning. The list of available datastores depends upon the scope conditions specified in the storage policy. You can enable or disable this option in the storage policy.

Choose a disk from the table, and click the pencil icon to select a datastore.

Note 

You can edit the size of the disk if you have enabled the Allow Resizing of Disk option in the storage policy.

Step 13

To choose a datastore for a disk, choose a disk from the list and click the Pencil icon.

Step 14

Click Select to view available datastores.

Step 15

Choose a datastore from the list and click Select.

Step 16

Click Submit.

Step 17

(Optional) For templates with multiple disks, you must choose a datastore for each disk.

Step 18

On the Custom Specification screen, click Select to view available VM Networks.

Note 

This option is available only if Allow end user to select optional NICs or Allow end user to choose portgroups are checked in the network policy associated with the VDC selected for this VM provisioning service request. For more information, see Adding a Network Policy.

Step 19

Choose a VM Network from the list and click Select.

Step 20

Click Next.

Step 21

Complete the details on the Custom Workflow screen.

Note 

Custom workflow inputs apply if the catalog chosen for VM provisioning has Post Provisioning Custom Actions enabled. In this procedure, the post-provisioning workflow allows users to specify custom inputs.

Step 22

Click Next.

Note 

The list of available datastores depends upon the scope conditions specified in the storage policy. You can choose only one datastore for each disk category (System, Data, Database, Swap, and Log).

Step 23

If you checked Perform deployment assessment, then review the report of the assessment displayed on the Deployment Assessment screen.

If this assessment report identifies errors, then you must return to the previous panes and rectify the errors before submitting the request. If the assessment report shows no errors, then click Next.

Step 24

Review the summary for the service request.

Step 25

Click Submit.


Creating a Service Request with Catalog Type—Advanced

By choosing the advanced catalog type during the creation of a service request, you can execute orchestration workflows. The steps for creating an advanced catalog are much the same as those for creating a standard catalog.

Procedure


Step 1

Choose Organizations > Service Requests.

Step 2

On the Service Requests page, click Service Requests.

Step 3

Click Create Request.

Step 4

In the Create Request screen, choose Advanced as the catalog type.

Step 5

Click Submit.

Step 6

On the Catalog Selection screen, choose the Group, Catalog Type (Advanced), and the Catalog (workflow).

Step 7

Click Next.

Step 8

On the Custom Workflow screen, provide the custom workflow input values.

If you want to provision a VM using this service request, then you must select a standard catalog in this screen. If you select an advanced catalog, then VM provisioning will fail.

Step 9

Click Next.

Step 10

Review the summary of the service request.

All information that you entered in the previous screens is displayed in this summary screen.

Note 

While provisioning a VM with a service request using an advanced catalog, be sure to have included the following information while creating the service request:

  • Include the following workflow tasks in the VM provisioning workflow:

    • VMware VM Provision Inputs

    • Resource Allocation Configuration

    • VM Provision Engine

  • Include the following custom workflow inputs of respective input types:

    • vDC

    • Catalog or image

  • The Disable displaying cost details check box is not checked.

If all of these conditions are met, the summary screen of the service request will display the approximate service request cost.

Step 11

Click Submit.


Creating a Service Request with Catalog Type—Bare Metal

Before you begin

You should have created a bare metal catalog, and a provisioning policy.

Procedure


Step 1

Choose Organizations > Service Requests.

Step 2

On the Service Requests page, click Service Requests.

Step 3

Click Create Request.

Step 4

On the Create Request screen, choose Bare Metal as the catalog type.

Step 5

Click Submit.

Step 6

On the Create Service Request screen, complete the required fields, including the following:

Name

Description

Catalog Selection pane

Select Group drop-down list

Select a user group from the list of groups that already exist in the system.

Catalog Type drop-down list

You cannot edit this field. It displays Bare Metal.

Select Catalog drop-down list

Select a catalog from the drop-down list. It displays the list of bare metal catalogs you created.

Perform Deployment Assessment check box

Check to run a deployment assessment with the specified information.

Step 7

Click Next.

Step 8

On the Bare Metal Deployment Configuration screen, complete the required fields, including the following:

The following table lists the fields displayed for Cisco UCS Manager accounts.

Name

Description

Server drop-down list

While creating the bare metal provisioning policy, if you checked Allow Users to Select Servers, then you can use this drop-down list to choose the servers on which you want the server provisioned.

After you select a server, resource information such as CPU, memory and Storage details displayed. This information is displayed only if you checked Show Server Resources to User while creating the bare metal server provisioning policy.

Note 

If you did not check Allow Users to Select Servers, then this field is not editable. It is populated with the server name that matches the criteria specified in the provisioning policy.

Charge Duration drop-down list

Choose a duration for which the cost is calculated. By default, this duration is set to Monthly.

Month field

Specify the number of months to be included in the cost computation.

Note 

This field is displayed only when you select Monthly in the Charge Duration drop-down list.

Day field

Specify the number of days to be included in the cost computation.

Note 

This field is displayed only when you select Daily in the Charge Duration drop-down list.

Hours field

Specify the number of hours to be included in the cost computation.

Note 

This field is displayed only when you select Hourly in the Charge Duration drop-down list.

Approximate SR Cost Estimate field

Click the Compute SR Cost Estimate option to view the cost estimate. This cost estimate calculated based on the information that you have entered on this screen.

Attention 

If a cost model is not associated with the provisioning policy, then all cost-related fields such as Charge Duration, and the Approximate SR Cost Estimate fields are not displayed. If a cost model is associated with the policy, then these fields are displayed.

If you are creating a service request for Cisco UCS Central accounts, complete the required fields, including the following:

Name

Description

Domain Group drop-down list

You can choose a domain group. The available groups are determined by the domain groups selected in the bare metal server provisioning policy.

Domain Name drop-down list

This list displays the domain names that were selected in the bare metal server provisioning policy.

Server drop-down list

This list displays the servers that are available in the chosen domain name.

CPU field

Displays the CPU details.

Memory field

Displays memory information.

Storage field

Displays storage-related information.

This field is not editable.

OS image drop-down list

Choose an OS image from the drop-down list.

This field is populated based on the domain mapping parameters specified in the bare metal server provisioning policy. By default, Target BMA and OS Image selected in the policy are used for provisioning. However, if you have specified any domain mapping parameters in the policy, then the OS image selected in the mapped domains takes preference over the default images.

Step 9

On the Custom Workflow screen, specify a Service Profile name.

Step 10

Click Next.

Step 11

Review the deployment assessment summary for the service request.

This information is displayed only if you checked Perform deployment assessment on the Catalog Selection screen.

Step 12

Review the summary for the service request.

Step 13

Click Submit.


What to do next

After you click Submit, the workflow is triggered, and the bare metal servers are provisioned. After the workflow is completed, the bare metal server is displayed in the selected group. In addition, the chargeback cycles are initiated for the servers.

If you want to change the cost model for the server, then you must edit the cost model selection in the bare metal provisioning policy.

Service Request Workflow and Details

After you create a service request, you can check its status and workflow, cancel the request, resubmit the request, and so on. These actions are controlled by the toolbar buttons at the top of the service request lists.

Service Request Workflow

The Workflow Status box displays details about the service request and the workflow steps. A typical service request workflow to provision a VM includes the following steps:

  1. Initiation—Service request is initiated by the user.

  2. Resource Allocation—Required resources, such as virtual compute, are allocated to the VM.

  3. Approval—VM provisioning is approved, if required. During this step, an email is sent to the approvers defined in the catalog chosen for VM provisioning. If you selected user groups for approval, then an email is sent to all users in the selected groups.

  4. Provision—VM is created and provisioned.

  5. Set Up Lifecycle Schedule—Lifecycle scheduling is configured with the setup, scheduled times, and termination times.

  6. Notify—User is notified by email that the VM has been created and provisioned.

Following is a graphical representation of the workflow.

Figure 1. Catalog Service Request Workflow


Optional service request workflow steps include Budget Watch and Check Resource Limits:

  • Budget Watch—An administrator has to enable budgeting for a group. This step determines if a sufficient budget is available for provisioning a new VM in that group.

  • Check Resource Limits—Resource limits for a group must be enabled by an administrator. This step determines if sufficient resources are available for provisioning a new VM in that group.

Any user who has been assigned the Read-Group Service Request permission can view the progress of a service request.

Service Request Details

Service Request details include items under Overview, Ownership, Catalog Information, and the Current Status of the service request, as follows:

Name Description

Overview

Request ID

The service request ID number.

Request Type

The type of request (in this case, creating a VM).

VDC

The VDC where the VM is provisioned.

Image

The image from which the VM is provisioned.

Request Time

The time of the service request creation.

Request Status

The status of the service request as Complete, Canceled, Failed, and so on.

Comments

Any comments.

Ownership

Group

The group to which the service request initiating user belongs.

Initiating User

The user who has initiated the service request.

Duration Hours

The amount of time that the VM is active. If this time is defined, the VM is deleted after the specified time.

Scheduled Time

The time at which the VM is provisioned. If defined, the VM is provisioned at 6 a.m. on the scheduled date. If not defined, the VM is provisioned when the workflow steps for the service request are complete.

Catalog Information

VDC Owner Email

The email ID provided by the administrator when creating a VDC.

Approving Users

The user (if defined) who must approve the service request for VM provisioning.

Catalog Name

The catalog item name from which the VM is provisioned.

Catalog Description

The catalog item description.

Service Request Cost

The cost (projected) of provisioning the VM. This cost is determined based on the Cost Model that is defined for the catalog item.

You can view the status of each workflow step. Details such as warning or error messages and the time of the request are also displayed. The workflow steps are color-coded to indicate their status:

Color Code Description

Gray

The step is incomplete.

Green

The step completed successfully.

Red

The step failed. The reason for failure is also described.

Blue

More input is required for the step to complete. For example, an approver was defined for a service request, and until the request is approved, this step is incomplete.


Note

Approvers may look under the Approvals tab to see their assigned service requests.


Viewing the Workflow Status of a Service Request

Procedure


Step 1

Choose Organizations > Service Requests.

Step 2

Choose a user group.

The default is All User Groups, which lists all service requests.

Step 3

On the Service Requests page, click Service Requests.

Step 4

Click the row with the service request for which you want to view the workflow status.

Step 5

Click View Details and click Workflow Status to see the details and status of the service request.


Viewing Log Details for a Service Request

Procedure


Step 1

Choose Organizations > Service Requests.

Step 2

Choose a user group.

The default is All User Groups, which lists all service requests.

Step 3

On the Service Requests page, click Service Requests.

Step 4

Click the row with the service request for which you want to view the service request log.

Step 5

Click View Details, and click Log.


About Scheduling a Service Request

You can schedule VM provisioning for a later date using Deferred Provisioning. The default provisioning is at 8.30 a.m. on the date of scheduling. Once a new date is set, the VM provisioning status in the workflow displays the change.

Scheduling Service Requests

Procedure


Step 1

Choose Organizations > Service Requests.

Step 2

On the Service Requests page, click Service Requests.

Step 3

Click Create Request.

Step 4

Choose the group, catalog type, and catalog. See Creating a Service Request with Catalog Type—Standard.

Step 5

Click Next.

Step 6

Choose the Later option for the Provision field, and the provisioning date on the Service Request screen.

Step 7

Click Next until the Summary screen appears.

Step 8

Click Submit.


About Resubmitting a Service Request

You can resubmit a failed service request. A service request could fail for the following reasons:

  • Budget limit (if defined by administrator) is exceeded for the group under which the VM is being provisioned.

  • Resource limits (if defined by administrator) are exceeded for the group under which the VM is being provisioned.

  • Provisioning could fail if a service request lacks relevant information.

When a service request is resubmitted, the process starts again from the workflow step that failed in the earlier submissions. For example, if a service request fails in the Resource Allocation workflow (Step 2), when this service request is resubmitted, the process is re-initiated from that step.

Resubmitting a Service Request

Procedure


Step 1

Choose Organizations > Service Requests.

Step 2

Choose a user group.

The default is All User Groups, which lists all service requests.

Step 3

On the Service Requests page, click Service Requests.

Step 4

Click the row with the service request to that you want to resubmit.

Step 5

Click Resubmit Request.


Other Service Request Functions

Canceling a Service Request

As an administrator in the system, you can cancel any service request that has been created. If you are an MSP admin, or a group admin, you can cancel service requests that you have created, and those created by users in member groups that you manage.

Procedure


Step 1

Choose Organizations > Service Requests.

Step 2

Choose a user group.

The default is All User Groups, which lists all service requests.

Step 3

On the Service Requests page, click Service Requests.

Step 4

Click the row with the service request that you want to cancel.

Step 5

Click Cancel Request.

Step 6

Click Submit to cancel the service request.


Rolling Back a Service Request

You can roll back a service request when a service request is created using orchestration workflow or fenced container deployment.

Procedure


Step 1

Choose Organizations > Service Requests.

Step 2

Choose a user group.

The default is All User Groups, which lists all service requests.

Step 3

On the Service Requests page, click Service Requests.

Step 4

Click the row with the service request that you want to roll back.

Step 5

From the More Actions drop-down list, choose Rollback Request.

Step 6

On the Rollback Service Request screen, select the tasks in the service requests that must be rolled back.

By default, all of the tasks in the service request are checked.

Step 7

(Optional) Check Abort rollback, if any rollback task fails.

Step 8

Click Submit.


Archiving a Service Request

Procedure


Step 1

Choose Organizations > Service Requests.

Step 2

Choose a user group.

The default is All User Groups, which lists all service requests.

Step 3

On the Service Requests page, click Service Requests.

Step 4

Click the row with the service request that you want to archive.

Step 5

Click Archive.

Step 6

On the Archive Request screen, click Archive.

On the Service Requests page, you can click Archived Service Requests to view all the archived requests.


What to do next

If you need to use this archived service request at a later time, you can re-instate it. For more information, see Reinstating an Archived Service Request.

Deleting Service Requests

You can delete archived service requests from Cisco UCS Director. The deleted service requests are removed permanently from Cisco UCS Director.

You can enter archived service requests to delete in one of two ways:

  • By selecting the service requests on the Archived Service Requests screen and clicking Delete Requests.

  • By clicking Purge Requests and entering the IDs of the archived service requests.

Both methods result in the permanent removal of the specified service requests. The only difference is the method of data entry.

You can delete only archived service requests. For information about archiving service requests, see the current release of the Cisco UCS Director Administration Guide. Because active service requests cannot be archived, you cannot delete service requests that are in progress, or that contain child service requests that are in progress.

You also cannot delete a service request that has a rollback that is in progress or that has failed. For example, say that you submit a rollback for service request (SR) 100 that generates a rollback service request SR 101. You cannot delete SR 100 while SR 101 is in progress. Furthermore, you cannot delete SR 100 if SR 101 fails.

To delete service requests, do the following:

Procedure


Step 1

Choose Organizations > Service Requests.

Step 2

On the Service Requests page, click Archived Service Requests.

Step 3

You can either enter service request IDs using the keyboard or choose service requests from the Archived Service Requests report.

To enter service request IDs, skip to the next step. To choose service requests instead, do the following:

  1. Choose all the service requests that you want to delete.

    Note 

    Select multiple items as you would in any other application on your system. For example, in Windows, hold down the Ctrl key to choose more items or Shift to choose a range of items.

    When you choose one or more service requests, the Delete Request icon appears.

  2. Click Delete Request.

  3. On the Delete Request screen, click Delete.

Step 4

To enter service requests, do the following:

  1. Click Purge Requests.

  2. In SR IDs on the Delete Request screen, enter the IDs of the service requests that you want to delete . Use hyphens to indicate ranges of IDs and commas to separate ranges or individual IDs; for example: 101-111, 113, 116-118.

  3. Click Delete.


Viewing Service Requests for a Particular Group

Procedure


Step 1

Choose Organizations > Service Requests.

Step 2

Choose a user group.

The default is All User Groups, which lists all service requests.

Step 3

On the Service Requests page, click Service Requests.


All of the service requests for the selected user group are displayed.

Searching the Records of Service Requests for a Group

Procedure


Step 1

Choose Organizations > Service Requests.

Step 2

On the Service Requests page, click Service Requests.

Step 3

Click Search and Replace.

Step 4

On the Search and Replace screen, enter the search terms in the search fields. You must enter the following information:

  • Asset Identity

  • Asset Type

  • New Asset Identity

  • Selected SRs

Step 5

Click Submit.


Exporting a Report of Service Requests for a Group

Procedure


Step 1

Choose Organizations > Service Requests.

Step 2

On the Service Requests page, choose the user group.

Step 3

On the Service Requests page, click Service Requests.

Step 4

Click Export Report.

Step 5

On the Export Report screen, choose the report format.

The report format can be PDF, CSV, or XLS.

Step 6

Click Generate Report.

After the report is generated, the Download option appears.

Step 7

Click Download to open the report and to save it on your system.


Reinstating an Archived Service Request

Procedure


Step 1

Choose Organizations > Service Requests.

Step 2

On the Service Requests page, click Archived Service Requests.

Step 3

Click the row with the service request that you want to reinstate.

Step 4

Click Unarchive.


Service Request Approval Process

Before the VM is provisioned, a service request must be approved by a specified approver or approvers named in the VDC. You have an option to define one or two approvers for a group.

  • Once created, the service request workflow has a step requiring VM approval that displays the name of the approver.

  • A service request notification email is sent to the approvers. Approvers may view all pending requests under the Approvals tab.

  • Once approved is granted, VM provisioning is initiated.


Note

For more information about defining approvers, see Virtual Data Centers.


Approving a Service Request

Procedure


Step 1

Choose Organizations > My Approvals.

Step 2

Click the row with the service request that you want to approve.

Step 3

(Optional) To verify the details, click View Details.

You can view the Workflow and Input/Output information and click Close.

Step 4

Click Approve.

Step 5

Add comments on the Service Request screen if necessary.

Step 6

Click Approve.


Rejecting a Service Request

Procedure


Step 1

Choose Organizations > My Approvals.

Step 2

Click the row with the service request that you want to reject.

Step 3

(Optional) Verify the details by clicking View Details and then click Close.

Step 4

Click Reject.

Step 5

Add comments on the Service Request screen if necessary.

Step 6

Click Reject.


Viewing Approval Information on Service Requests

Procedure


Step 1

Choose Organizations > My Approvals.

Step 2

Click My Approvals.

All approvals that are either already approved or pending approval are listed.


Searching the Records of Service Request Approvals

Procedure


Step 1

Choose Organizations > My Approvals.

Step 2

Click My Approvals.

All approvals that are either already approved or pending approval are listed.

Step 3

In the Search field, enter your search term.

The service requests that match the search criteria are displayed.


Exporting a Report of Service Request Approvals

Procedure


Step 1

Choose Organizations > My Approvals.

Step 2

Click the row with the service request for which you want to export a report..

Step 3

Click Export Report.

Step 4

On the Export Report screen, choose the report format.

The report format can be PDF, CSV, or XLS.

Step 5

Click Generate Report.

After the report is generated, the Download option appears.

Step 6

Click Download to open the report and to save it on your system.


Service Request Budgeting

Viewing the Current Month Budget Availability

Procedure


Step 1

Choose Organizations > Service Requests.

Step 2

On the Service Requests page, choose the user group.

Step 3

On the Service Requests page, click Current Month Budget Availability.


Viewing Budget Entries

Procedure


Step 1

Choose Organizations > Summary.

Step 2

On the Summary page, choose the user group.

Step 3

On the Summary page, click Budget Entries.


Adding a Budget Entry

Procedure


Step 1

Choose Organizations > Summary.

Step 2

On the Summary page, choose the user group.

Step 3

On the Summary page, click Budget Entries.

Step 4

Click Add.

Step 5

On the Add Budget Entry screen, complete the following fields:

Name Description

Entry Name field

The name of the budget entry.

Budget Amount field

The amount of the budget per month.

Year drop-down list

Choose the year.

Month drop-down list

Choose the month.

Repeat Entries drop-down list

Choose the number of months for the same amount of budget to repeat.

Step 6

Click Add.