Understanding UCS Server Configuration Utility User Interface
The UCS-SCU GUI is a web-based management interface that allows you to perform tasks such as operating system installation, RAID configuration, and firmware updates.
License Agreement
After UCS-SCU boots up, the first interface is the End User License Agreement. Select I Accept and click Next to agree to this license.
UCS-SCU GUI Home Page
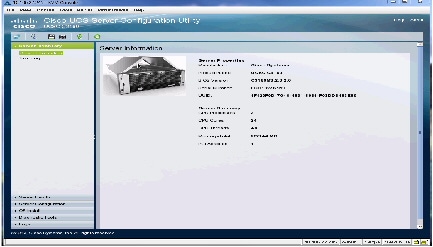
Figure 3-1 shows the UCS-SCU GUI and the different elements in the GUI and Table 3-1 shows the description of each element.
|
|
|
|---|---|
Displays on the left side in the UCS-SCU user interface. See Table 3-2 for a description of all the navigation pane elements. |
|
Displays on the left-hand top corner and has a set of icons. See Table 3-3 for a description of all the toolbar icons. |
|
Opens a window in the application that displays context-sensitive help for the displayed page. |
|
Displays on the right side of the GUI. Different pages appear on the content pane depending on the tab that you select in the Navigation Pane. |
This section includes the following topics:
Navigation Pane
Table 3-2 describes the elements in the Navigation Pane.
|
|
|
|---|---|
Displays the server information and inventory. Contains links to the following pages: For more information about Server Inventory, go to Chapter4, “Viewing Server Inventory” |
|
Displays the health of the subsystems on your server such as CPUs, memory, power supplies, fans, storage, PCI devices, BIOS, and CMC. For more information about Server Health, go to Chapter 5, “Viewing Server Health” |
|
Configures a RAID volume on attached hard drives of your server. Contains links to the RAID configuration pages: For more information about Server Configuration, go to Chapter 7, “Configuring RAID Levels” |
|
Installs the RHEL, SLES, Windows, and ESXi operating systems in a fully unattended mode. The most recent drivers for all onboard components are added from the Tools and Drivers CD or from other supported locations during the operating system installation. For more information about OS Install, go to Chapter 6, “Installing Operating Systems” |
Toolbar Pane
Table 3-3 lists and describes all the UCS-SCU icons that you can use to perform specific tasks.
|
|
|
|
|---|---|---|

|
Configures the IP address, DNS and Subnet mask, and Cisco.com credentials. |
|

|
||

|
||

|
||

|
Configuring a Network
To configure a network, follow these steps:
Step 1![]() Click the Network Configuration button on the toolbar.
Click the Network Configuration button on the toolbar.
The Network Configuration dialog box appears.
Step 2![]() In the Network Configuration dialog box, do the following:
In the Network Configuration dialog box, do the following:
a.![]() Select IP Address from DHCP server or Static IP Address. If you select Static IP Address, do the following:
Select IP Address from DHCP server or Static IP Address. If you select Static IP Address, do the following:
–![]() In the IP Address field, enter the IPv4 address.
In the IP Address field, enter the IPv4 address.
–![]() In the Subnet Mask field, enter the subnet IPv4 address.
In the Subnet Mask field, enter the subnet IPv4 address.
–![]() In the Gateway field, enter the gateway IPv4 address.
In the Gateway field, enter the gateway IPv4 address.
–![]() (Optional) In the DNS field, enter the DNS IPv4 address.
(Optional) In the DNS field, enter the DNS IPv4 address.

Note![]() Go to Step b. if you want to download software and drivers from cisco.com.
Go to Step b. if you want to download software and drivers from cisco.com.
b.![]() Select Direct Connection to internet or Manual Proxy. If you select Manual Proxy, do the following:
Select Direct Connection to internet or Manual Proxy. If you select Manual Proxy, do the following:
–![]() In the HTTP Proxy Server URL field, enter the URL of the proxy server. The maximum limit is 45 characters.
In the HTTP Proxy Server URL field, enter the URL of the proxy server. The maximum limit is 45 characters.
–![]() In the Port field, enter the port number. The maximum limit is 5 characters. By default, it is 8080.
In the Port field, enter the port number. The maximum limit is 5 characters. By default, it is 8080.
–![]() In the Proxy Server UserName field, enter the user name of the proxy server. The maximum limit is 45 characters.
In the Proxy Server UserName field, enter the user name of the proxy server. The maximum limit is 45 characters.
–![]() In the Proxy Server Password field, enter the password of the proxy server. The maximum limit is 45 characters.
In the Proxy Server Password field, enter the password of the proxy server. The maximum limit is 45 characters.
Step 3![]() Click Configure to save the settings.
Click Configure to save the settings.
Network configuration is a one-time process, and if you have not configured your network, you are prompted to configure it during the following procedures:
- When you are updating images to Cisco Flexible Flash.
- When you are downloading drivers from the network share or cisco.com during the operating system installation. (See “Installing Operating Systems” section).
Performing Server Health Check
The Probe Server functionality allows to perform a health check of the server subsystems. When you click the Probe Server icon, the server health check is initiated.
To view the health check results, click the Server Health tab in the navigation pane.
For more information about the Server Health tab, go to Chapter 5, “Viewing Server Health”.
Saving Logs
You can use the Save Logs functionality to save your log files. Before using Save Logs, you must insert a USB flash drive or vMedia for storing the log files.
Rebooting the Server
To reboot the server, follow these steps:
Step 1![]() Click the Reboot icon on the toolbar.
Click the Reboot icon on the toolbar.
The Reboot dialog box appears.
The server is rebooted, and the UCS-SCU GUI reappears.
 Feedback