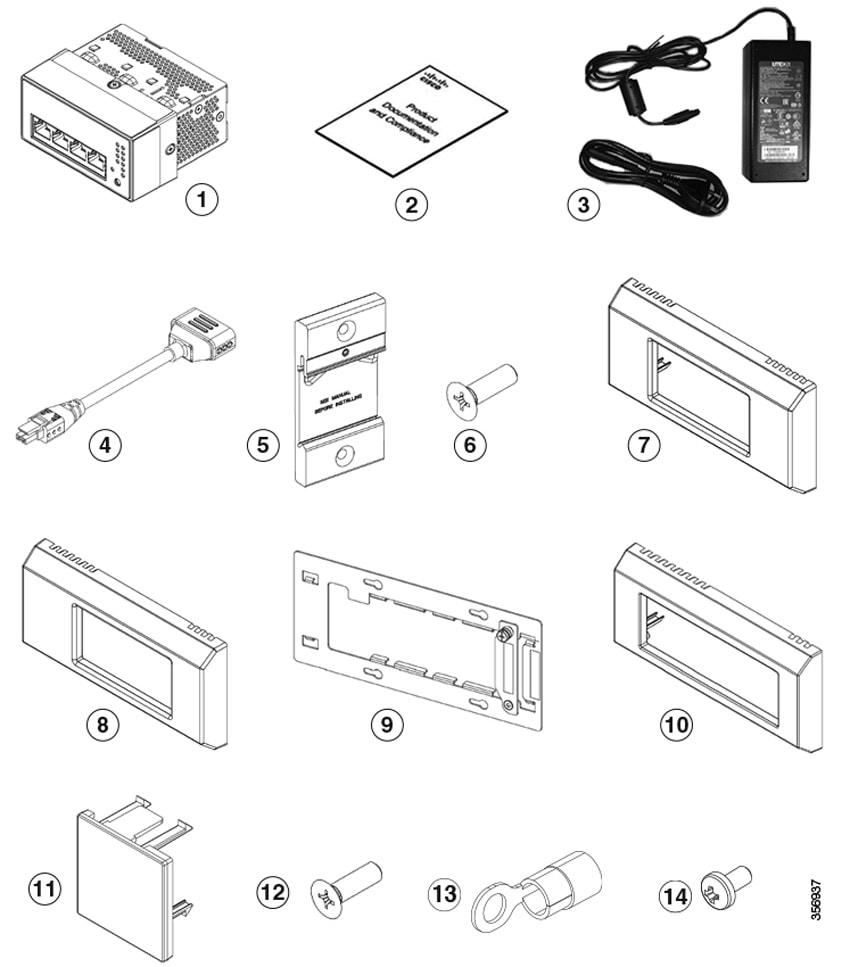
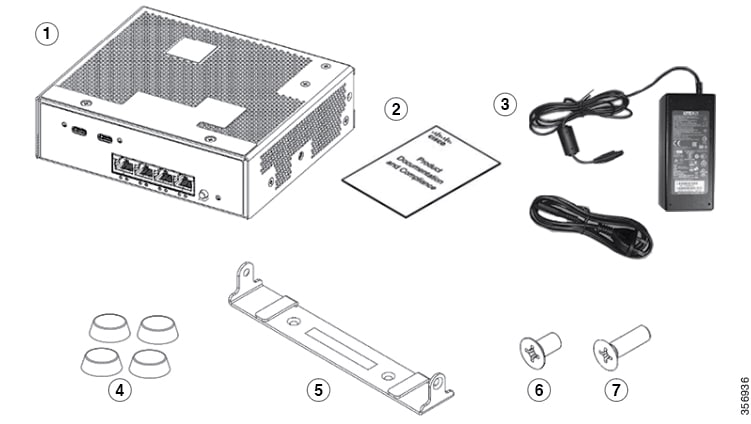
Switch Installation

Safety Warnings

This section includes the warning statements relating to basic installation. Read this section before you start the installation procedure.


Warning


Do not work on the system or connect or disconnect cables during periods of lightning activity. Statement 1001


Warning


Read the installation instructions before connecting the system to the power source. Statement 1004


Warning


Only trained and qualified personnel should be allowed to install, replace, or service this equipment. Statement 1030


Warning


Do not disconnect connections to this equipment unless power has been removed or you have verified that the area is nonhazardous. Secure any external connections that mate to this equipment by using screws, sliding latches, threaded connectors, or other means provided with this product.Statement 1062


Warning


This warning symbol means danger. You are in a situation that could cause bodily injury. Before you work on any equipment, be aware of the hazards involved with electrical circuitry and be familiar with standard practices for preventing accidents. Use the statement number provided at the end of each warning to locate its translation in the translated safety warnings that accompanied this device. Statement 1071


Warning


Voltages that present a shock hazard may exist on Power over Ethernet (PoE) circuits if interconnections are made using uninsulated exposed metal contacts, conductors, or terminals. Avoid using such interconnection methods, unless the exposed metal parts are located within a restricted access location and users and service people who are authorized within the restricted access location are made aware of the hazard. A restricted access area can be accessed only through the use of a special tool, lock and key or other means of security. Statement 1072


Warning


No user-serviceable parts inside. Do not open. Statement 1073


Warning


Installation of the equipment must comply with local and national electrical codes. Statement 1074


Warning


To prevent airflow restriction, allow clearance around the ventilation openings to be at least: 3 inches (7.6 cm). Statement 1076


Warning


Hot surface. Statement 1079


Warning


Explosion Hazard—The area must be known to be nonhazardous before installing, servicing, or replacing the unit.Statement 1082


Contents of the Shipping Box

The shipping box contains the model of the switch you ordered and other components needed for installation. Some components are optional.

To install the switch, you will need to order mounting accessories depending on the mounting option that you choose. You can order them when you order your switch, or you can order them later from your Cisco representative.

Figure 1. Shipping Box for CMICR-4PS and CMICR-4PC


1

CMICR-4PS or CMICR-4PC switch of Cisco Catalyst Micro Series Switches

8

(Optional) Bezel short off centered

2

Pointer Card

9

(Optional) Bracket short off centered

3

(Optional) AC power adapter and power cord

10

(Optional) Bezel long off centered

4

(Optional) Power adapter cable

11

(Optional) Blind cover

5

(Optional) DIN rail clip

12

(Optional) Four number M3 flat head screws

6

(Optional) Two number 6-32 DIN rail clip mounting screws

13

Grounding lug

7

(Optional) Bezel short centered

14

Flat head screw (6 mm length)

Figure 2. Shipping Box for CMICR-4PT


1

CMICR-4PT model of Cisco Catalyst Micro Series Switches

5

Mounting bracket

2

Pointer Card

6

Two M3.5 X 16 mm flat head screws

3

AC power adapter and power cord

7

Two M4 X 8 mm flat head screws

4

Four rubber mounting feet

-

-

Installation Guidelines

Supported Hardware

  • Up to 1 GB of Cisco SD memory card is supported.

  • USB to UART device driver from the Silicon Labs website. Download the device driver depending on the operating system installed.

General Guidelines

When determining where to install the switch, verify that these guidelines are met:

  • The operating environment is within the ranges listed in Technical Specifications.

  • Cabling is away from sources of electrical noise, such as radios, power lines, and fluorescent lighting fixtures. Make sure that the cabling is safely away from other devices that might damage the cables.

  • Airflow around the switch is unrestricted.

  • For 10/100 and 1 Gigabit Ethernet ports, the cable length from a switch to a connected device cannot exceed 328 feet (100 meters).

Mounting the Switch

Mounting CMICR-4PS and CMICR-4PC Switches

The following are the supported mounting options for CMICR-4PS and CMICR-4PC switches.

  • Direct mount on Rapid 45 duct

  • Box mount on cable duct

  • Anchor rail mount on cable duct

  • Front-locking mount on cable duct

  • DIN rail mount

For new installations, we recommend installing the switch using direct mount and box mount options. However, for existing installations, you can use your existing mounting accessories and install it using any of the supported mounting options.

The following sections explain the steps in detail.

How to Mount the Switch on a Rapid 45 Duct

This topic describes the installation procedure for mounting the switch on a rapid 45 duct.

Procedure

Step 1

Cut the front cover of the duct on both sides to make an opening corresponding to the width of the switch.


Step 2

Align and insert the switch in to the opening in the duct such that the four lancing features locks into the opening on the duct.


1

Rapid 45 Duct (OBO Bettermann GK-53100LGR/6113002)

2

Switch


Figure 3. Switch Mounted on a Rapid 45 Duct


How to Mount the Switch in a Cable Duct with Mounting Box

Before you begin

Ensure you have the following accessories available before starting the installation.


1

Rapid 80 duct (OBO Bettermann GS-S70110CW/ 6277001)

Off-the-shelf

2

Accessory mounting box, double (OBO Bettermann 71GD7 / 6288611)

Off-the-shelf

3

Switch

Supplied by Cisco

4

Short Off Centered Bracket (CMICR-BRKT-S-OC)

Supplied by Cisco

5

Flat head screw (14 mm length) - 4 Nos

Supplied by Cisco

6

Short Off Centered Bezel (CMICR-BZL-S-OC)

Supplied by Cisco

Procedure

Step 1

Assemble the mounting box into the duct. Ensure that the clips on the mounting box snaps into the profile on the duct thereby locking the box into the duct.


Step 2

Position the mounting bracket such that the screw holes on it are aligned to the screw holes on the mounting box.


Step 3

Slide the bracket to the right and fasten the four flat head screws to fix the bracket to the mounting box.


Step 4

Unscrew the locking plate on the mounting bracket and rotate it by 90 degrees clockwise to make enough space to install the switch.


Step 5

Insert the switch through the opening on the mounting bracket.


Step 6

Ensure that all the four lancing features of the unit are guided through the mounting bracket openings.


Step 7

Slide the switch to the left until the switch touches the other end of the bracket.

Step 8

Rotate the locking plate on the mounting bracket 90 degrees anticlockwise and fasten the screw.


Step 9

Snap the bezel into the mounting bracket.


Figure 4. Switch Mounted on a Cable Duct with Mounting Box


How to Mount the Switch in a Cable Duct with Anchor Rail

This topic describes the installation procedure for mounting the switch on a wall duct with anchor rail. This procedure assumes that you have an existing duct with device support and bracket installed.

Before you begin

Ensure you have the following accessories available before starting the installation.


1

Trunking base (Hager BR7010019010)

Off-the-shelf

2

Device support

Off-the-shelf

3

Mounting bracket

Off-the-shelf

4

Switch

Supplied by Cisco

5

Short Centered Bezel (CMICR-BZL-S-C)

Supplied by Cisco

Procedure

Step 1

Insert the switch into the mounting bracket installed on the duct.


Step 2

Make sure that all the four lancing features of the unit are guided through the mounting bracket openings.


Step 3

Slide the switch towards the left until it touches the end of the bracket. .


Step 4

Snap the plastic bezel into the mounting bracket.


Figure 5. Switch Mounted on a Cable Duct with Anchor Rail


How to Mount the Switch in a Front-Locking Cable Duct

This topic describes the installation procedure for mounting the switch on a front-locking duct. This procedure assumes that you have an existing duct with mounting bracket assembly installed.
Before you begin

Note


This mounting option is currently not supported. Support for front-locking duct will be available in a later release.


Ensure you have the following accessories available before starting the installation.


1

Trunking base (Hager, BR7010019010)

Off-the-shelf

2

Mounting bracket

Off-the-shelf

3

Switch

Supplied by Cisco

4

Long Off Centered Bezel and Blind cover (CMICR-BZL-L-OC)

Supplied by Cisco

Procedure

Step 1

Insert the switch into the duct through the opening on the mounting bracket assembly.


Step 2

Ensure that all the four lancing features of the switch are guided through the mounting bracket openings.


Step 3

Slide the switch to the left until the switch touches the other end of the bracket.


Step 4

Snap the bezel into the mounting bracket.


Step 5

Snap the blind cover into the space between the switch and the bezel.


Figure 6. Switch Mounted in a Front-Locking Cable Duct


How to Mount the Switch on a DIN Rail

Before you begin

Ensure you have obtained the following before proceeding with the mounting:

  • DIN rail clip

  • Two Phillips flat head screws

Procedure

Step 1

Attach the DIN rail clip to the rear of the switch using the two screws provided in the kit.


1

Switch

3

Phillips flat head screws (2 Nos)

2

DIN rail clip (CMICR-CLIP-DIN)

-

-

Step 2

Position and place the switch on the DIN rail at an angle where the spring on the DIN clip engages with the DIN rail.

Step 3

Press the switch at the bottom so that the spring compresses against the DIN rail and the hook clamps to the DIN rail.


Figure 7. Switch Mounted on a DIN Rail


Mounting CMICR-4PT Switches

The following are the supported mounting options for CMICR-4PT switches.

  • Table top mount

  • Table bottom mount

  • Wall mount

The following section explain the steps in detail.

How to Mount the Switch on a Table Top or a Table Bottom or a Wall

Before you begin

Ensure you have obtained the following accessories:

  • Mounting bracket

  • Two number M4 bracket mounting screws

  • Two number M4 switch mounting screws

Procedure

Step 1

Attach the mounting bracket to the table top or table bottom or on the wall and fasten it with the two M4 bracket mounting screws provided in the kit.


1

M4 bracket mounting screws

2

Mounting bracket

Step 2

Align the switch with the mounting holes in the bracket.


Step 3

Fasten the switch to the bracket using the 2 M4 switch mounting screws provided.


Figure 8. Switch Mounted on a Table


Installing SFP Modules

Installing an SFP or SFP+ Module

Before you begin

When installing SFP or SFP+ modules, follow these guidelines:

  • Do not remove the dust plugs from the modules or the rubber caps from the fiber-optic cable until you are ready to connect the cable. The plugs and caps protect the module ports and cables from contamination and ambient light.

  • To prevent ESD damage, follow your normal board and component handling procedures when connecting cables to the switch and other devices.


    Caution


    Removing and installing an SFP or SFP+ module can shorten its useful life. Do not remove and insert any module more often than is absolutely necessary.


Procedure


Step 1

Attach an ESD preventive wrist strap to your wrist and to a bare metal surface.

Step 2

Find the send (TX) and receive (RX) markings on the module top.

On some SFP or SFP+ modules, the send and receive (TX and RX) markings might be replaced by arrows that show the direction of the connection.

Step 3

If the module has a bale-clasp latch, move it to the open, unlocked position.

Step 4

Align the module in front of the slot opening, and push until you feel the connector snaps into place.

Step 5

If the module has a bale-clasp latch, close it.

Step 6

For fiber optic SFP or SFP+ modules, remove the dust plugs and save.

Step 7

Connect the SFP cables.


Removing an SFP or SFP+ Module

Procedure


Step 1

Attach an ESD preventive wrist strap to your wrist and to a bare metal surface.

Step 2

Disconnect the cable from the SFP module. For reattachment, notice which cable connector plug is send (TX) and which is receive (RX).

Step 3

Insert a dust plug into the optical ports of the SFP or SFP+ module to keep the optical interfaces clean.

Step 4

If the module has a bale-clasp latch, pull the bale out and down to eject the module. If the latch is obstructed and you cannot use your finger, use a small, flat-blade screwdriver or other long, narrow instrument to open the latch.

Step 5

Grasp the SFP or SFP+ module, and carefully remove it from the module slot.

Step 6

Place the module in an antistatic bag or other protective environment.


Installing a Grounding Lug

Before you begin

Ensure you have the following accessories available before starting the installation.

1

Switch

Supplied by Cisco

2

Ground lug

Supplied by Cisco

3

Flat head screw (6 mm length)

Supplied by Cisco

Procedure


Step 1

Strip the covering from the end of the power supply grounding wire.

Step 2

Insert the stripped end of the ground wire into the open end of the grounding lug and crimp the lug securely to the wire.

Step 3

Attach the grounding lug to the switch using the provided screw.