- Finding Feature Information
- Prerequisites for Flexible NetFlow
- Restrictions for Flexible NetFlow
- Information About Flexible Netflow
- How to Configure Flexible NetFlow
- Configuring a Flow Record
- Creating a Flow Exporter
- Creating a Flow Monitor
- Creating a Flow Sampler
- Applying a Flow to an Interface
- Configuring a Bridged NetFlow on a VLAN
- Configuring Layer 2 NetFlow
- Configuring WLAN to Apply Flow Monitor in Data Link Input/Output Direction
- Configuring WLAN to Apply Flow Monitor in IPV4 and IPv6 Input/Output Direction
- Monitoring Flexible NetFlow
- Configuration Examples for Flexible NetFlow
- Example: Configuring a Flow
- Example: Monitoring IPv4 ingress traffic
- Example: Monitoring IPv4 egress traffic
- Example: Configuring IPv4 Flexible NetFlow in WLAN (Ingress Direction)
- Example: Configuring IPv6 and Transport Flag Flexible NetFlow in WLAN (Egress Direction)
- Example: Configuring IPv6 Flexible NetFlow in WLAN (Both Ingress and Egress Directions)
- Example: Monitoring wireless ingress traffic
- Additional References
- Feature Information for Flexible NetFlow
Configuring Flexible NetFlow
Configuring Flexible NetFlow
- Finding Feature Information
- Prerequisites for Flexible NetFlow
- Restrictions for Flexible NetFlow
- Information About Flexible Netflow
- How to Configure Flexible NetFlow
- Monitoring Flexible NetFlow
- Configuration Examples for Flexible NetFlow
- Additional References
- Feature Information for Flexible NetFlow
Finding Feature Information
Your software release may not support all the features documented in this module. For the latest caveats and feature information, see Bug Search Tool and the release notes for your platform and software release. To find information about the features documented in this module, and to see a list of the releases in which each feature is supported, see the feature information table at the end of this module.
Use Cisco Feature Navigator to find information about platform support and Cisco software image support. To access Cisco Feature Navigator, go to www.cisco.com/go/cfn. An account on Cisco.com is not required.
Prerequisites for Flexible NetFlow
The following are prerequisites for your Flexible NetFlow configuration:
-
You must configure a source interface. If you do not configure a source interface, the exporter will remain in a disabled state.
-
You must configure a valid record name for every flow monitor.
-
You must enable IPv6 routing to export the flow records to an IPv6 destination server.
-
You must configure IPFIX export protocol for the flow exporter to export netflow records in IPFIX format.
-
You are familiar with the Flexible NetFlow key fields as they are defined in the following commands in the Cisco IOS Flexible NetFlow Command Reference :
-
You are familiar with the Flexible NetFlow non key fields as they are defined in the following commands in the Cisco IOS Flexible NetFlow Command Reference :
IPv4 Traffic
-
The networking device must be configured for IPv4 routing.
-
One of the following must be enabled on your router and on any interfaces on which you want to enable Flexible NetFlow: Cisco Express Forwarding or distributed Cisco Express Forwarding.
IPv6 Traffic
-
The networking device must be configured for IPv6 routing.
-
One of the following must be enabled on your router and on any interfaces on which you want to enable Flexible NetFlow: Cisco Express Forwarding IPv6 or distributed Cisco Express Forwarding.
Restrictions for Flexible NetFlow
The following are restrictions for Flexible NetFlow:
-
Traditional NetFlow (TNF) accounting is not supported.
-
Flexible NetFlow version 9 and version 10 export formats are supported. However, if you have not configured the export protocol, version 9 export format is applied by default.
-
Microflow policing feature shares the NetFlow hardware resource with FNF.
-
Only one flow monitor per interface and per direction is supported .
-
Layer 2, IPv4, and IPv6 traffic types are supported. Multiple flow monitors of different traffic types can be applied for a given interface and direction. Multiple flow monitors of same traffic type cannot be applied for a given interface and direction.
-
Layer 2, VLAN, WLAN and Layer 3 interfaces are supported, but the switch does not support SVI and tunnels.
-
The following NetFlow table sizes are supported:
Trim Level
Ingress NetFlow Table
Egress NetFlow Table
LAN Base
Not supported
Not supported
IP Base
8 K
16 K
IP Services
8 K
16 K
-
Depending on the switch type, a switch will have one or two forwarding ASICs. The capacities listed in the above table are on a per-ASIC basis.
-
The switch can support either one or two ASICs. Each ASIC has 8K ingress and 16 K egress entries, whereas each TCAM can handle up to 6K ingress and 12K egress entries.
-
The NetFlow tables are on separate compartments and cannot be combined. Depending on which ASIC processed the packet, the flows will be created in the table in the corresponding ASIC.
-
NetFlow hardware implementation supports four hardware samplers. You can select a sampler rate from 1 out of 2 to 1 out of 1024. Only random sampling mode is supported.
-
NetFlow hardware uses hash tables internally. Hash collisions can occur in the hardware. Therefore, in spite of the internal overflow Content Addressable Memory (CAM), the actual NetFlow table utilization could be about 80 percent.
-
Depending on the fields that are used for the flow, a single flow could take two consecutive entries. IPv6 flows also take two entries. In these situations, the effective usage of NetFlow entries is half the table size, which is separate from the above hash collision limitation.
-
The switch supports up to 15 flow monitors.
-
SSID-based NetFlow accounting is supported. SSID is treated in a manner similar to an interface. However, certain fields are not supported such as user ID .
-
The NetFlow software implementation supports distributed NetFlow export, so the flows are exported from the same switch in which the flow was created.
-
Ingress flows are present in the ASIC that first received the packets for the flow. Egress flows are present in the ASIC from which the packets actually left the switch set up.
-
The reported value for the bytes count field (called “bytes long”) is Layer-2-packet-size—18 bytes. For classic Ethernet traffic (802.3), this will be accurate. For all other Ethernet types, this field will not be accurate. Use the "bytes layer2” field, which always reports the accurate Layer 2 packet size. For information about supported Flexible NetFlow fields, see Supported Flexible NetFlow Fields.
-
Configuration of IPFIX exporter on an AVC flow monitor is not supported.
-
Flexible NetFlow export is not supported on the Ethernet management port, Gi0/0.
-
When a flow record has only Source Group Tag (SGT) and Destination Group Tag (DGT) fields (or only either of the two) and if both the values are not applicable, then a flow will still be created with zero values for SGT and DGT. The flow records are expected to include source and destination IP addresses, along with SGT and DGT fields.
-
The flow monitor with flow record, that contains the CTS field, cannot be attached on the WLAN (SSID).
-
When QoS marked packet is received on an interface which has NetFlow configured on the egress direction, the QoS value of the packet will be captured by the collector. However, when the packet is received on an interface which has NetFlow configured on the ingress direction, the QoS value of the packet will not be captured by the collector.
Information About Flexible Netflow
Flexible NetFlow Overview
Flexible NetFlow uses flows to provide statistics for accounting, network monitoring, and network planning.
A flow is a unidirectional stream of packets that arrives on a source interface and has the same values for the keys. A key is an identified value for a field within the packet. You create a flow using a flow record to define the unique keys for your flow.
The switch supports the Flexible NetFlow feature that enables enhanced network anomalies and security detection. Flexible NetFlow allows you to define an optimal flow record for a particular application by selecting the keys from a large collection of predefined fields.
All key values must match for the packet to count in a given flow. A flow might gather other fields of interest, depending on the export record version that you configure. Flows are stored in the Flexible NetFlow cache.
You can export the data that Flexible NetFlow gathers for your flow by using an exporter and export this data to a remote system such as a Flexible NetFlow collector. The Flexible NetFlow collector can use an IPv4 or IPv6 address.
You define the size of the data that you want to collect for a flow using a monitor. The monitor combines the flow record and exporter with the Flexible NetFlow cache information.
Wireless Flexible NetFlow Overview
The wireless Flexible NetFlow infrastructure supports the following:
- Flexible NetFlow Version 9.0
- User-based rate limiting
- Microflow policing
- Voice and video flow monitoring
- Reflexive access control list (ACL)
Microflow Policing and User-Based Rate Limiting
Microflow policing associates a 2-color 1-rate policer and related drop statistics to each flow present in the NetFlow table. When the flow mask comprises all packet fields, this functionality is known as microflow policing. When the flow mask comprises either source or destination only, this functionality is known as user-based rate limiting.
Voice and Video Flow Monitoring
Voice and video flows are full flow mask-based entries. The ASIC provides the flexibility to program the policer parameters, share policers across multiple flows and rewrite the IP address and Layer 4 port numbers of these flows.
 Note | For dynamic entries, the NetFlow engine will use the policer parameters that are derived for the flow based on the policy (ACL/QoS-based policies). Dynamic entries cannot share policer across multiple flows. |
Reflexive ACL
Reflexive ACLs allow IP packets to be filtered based on upper-layer session information. The ACLs allow outbound traffic and limit inbound traffic in response to the sessions that originate inside the trusted network. The reflexive ACLs are transparent to the filtering mechanism until a data packet that matches the reflexive entry activates it. At this time, a temporary ACL entry is created and added to the IP-named access lists. The information obtained from the data packet to generate the reflexive ACL entry is permit/deny bit, the source IP address and port, the destination IP address, port, and the protocol type. During reflexive ACL entry evaluation, if the protocol type is either TCP or UDP, then the port information must match exactly. For other protocols, there is no port information to match. After this ACL is installed, the firewall is then opened for the reply packets to pass through. At this time, a potential hacker could have access to the network behind the firewall. To narrow this window, an idle timeout period can be defined. However, in the case of TCP, if two FIN bits or an RST is detected, the ACL entry can be removed.
Benefits of Flexible NetFlow
Flexible NetFlow allows the flow to be user defined. The benefits of Flexible NetFlow include:
-
High-capacity flow recognition, including scalability and aggregation of flow information.
-
Enhanced flow infrastructure for security monitoring and dDoS detection and identification.
-
New information from packets to adapt flow information to a particular service or operation in the network. The flow information available will be customizable by Flexible NetFlow users.
-
Extensive use of Cisco’s flexible and extensible NetFlow Version 9 and version 10 export formats. With version 10 export format, support for variable length field for the wireless client's SSID is available.
-
A comprehensive IP accounting feature that can be used to replace many accounting features, such as IP accounting, Border Gateway Protocol (BGP) Policy Accounting, and persistent caches.
-
Support for ingress and egress NetFlow accounting.
-
Support for full flow accounting and sampled NetFlow accounting.
Flexible NetFlow allows you to understand network behavior with more efficiency, with specific flow information tailored for various services used in the network. The following are some example applications for a Flexible NetFlow feature:
-
Flexible NetFlow enhances Cisco NetFlow as a security monitoring tool. For instance, new flow keys can be defined for packet length or MAC address, allowing users to search for a specific type of attack in the network.
-
Flexible NetFlow allows you to quickly identify how much application traffic is being sent between hosts by specifically tracking TCP or UDP applications by the class of service (CoS) in the packets.
-
The accounting of traffic entering a Multiprotocol Label Switching (MPLS) or IP core network and its destination for each next hop per class of service. This capability allows the building of an edge-to-edge traffic matrix.
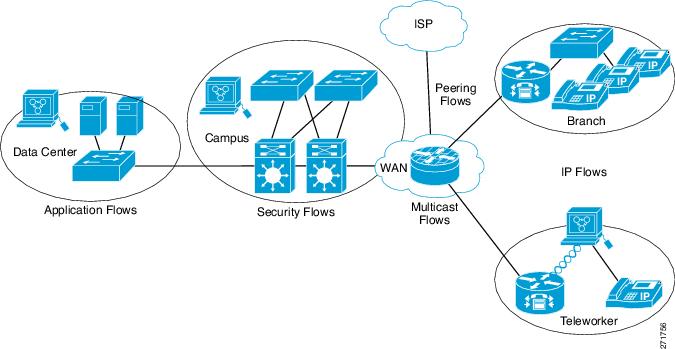
The figure below is an example of how Flexible NetFlow might be deployed in a network.

Flexible NetFlow Components
Flexible NetFlow consists of components that can be used together in several variations to perform traffic analysis and data export. The user-defined flow records and the component structure of Flexible NetFlow facilitates the creation of various configurations for traffic analysis and data export on a networking device with a minimum number of configuration commands. Each flow monitor can have a unique combination of flow record, flow exporter, and cache type. If you change a parameter such as the destination IP address for a flow exporter, it is automatically changed for all the flow monitors that use the flow exporter. The same flow monitor can be used in conjunction with different flow samplers to sample the same type of network traffic at different rates on different interfaces. The following sections provide more information on Flexible NetFlow components:
Flow Records
In Flexible NetFlow a combination of key and nonkey fields is called a record. Flexible NetFlow records are assigned to Flexible NetFlow flow monitors to define the cache that is used for storing flow data. Flexible NetFlow includes several predefined records that can help you get started using Flexible NetFlow.
A flow record defines the keys that Flexible NetFlow uses to identify packets in the flow, as well as other fields of interest that Flexible NetFlow gathers for the flow. You can define a flow record with any combination of keys and fields of interest. The switch supports a rich set of keys. A flow record also defines the types of counters gathered per flow. You can configure 64-bit packet or byte counters. The switch enables the following match fields as the defaults when you create a flow record:
- NetFlow Predefined Records
- User-Defined Records
- Flexible NetFlow Match Parameters
- Flexible NetFlow Collect Parameters
NetFlow Predefined Records
Flexible NetFlow includes several predefined records that you can use to start monitoring traffic in your network. The predefined records are available to help you quickly deploy Flexible NetFlow and are easier to use than user-defined flow records. You can choose from a list of already defined records that may meet the needs for network monitoring. As Flexible NetFlow evolves, popular user-defined flow records will be made available as predefined records to make them easier to implement.
The predefined records ensure backward compatibility with your existing NetFlow collector configurations for the data that is exported. Each of the predefined records has a unique combination of key and nonkey fields that offer you the built-in ability to monitor various types of traffic in your network without customizing Flexible NetFlow on your router.
Two of the predefined records (NetFlow original and NetFlow IPv4/IPv6 original output), which are functionally equivalent, emulate original (ingress) NetFlow and the Egress NetFlow Accounting feature in original NetFlow, respectively. Some of the other Flexible NetFlow predefined records are based on the aggregation cache schemes available in original NetFlow. The Flexible NetFlow predefined records that are based on the aggregation cache schemes available in original NetFlow do not perform aggregation. Instead each flow is tracked separately by the predefined records.
User-Defined Records
Flexible NetFlow enables you to define your own records for a Flexible NetFlow flow monitor cache by specifying the key and nonkey fields to customize the data collection to your specific requirements. When you define your own records for a Flexible NetFlow flow monitor cache, they are referred to as user-defined records. The values in nonkey fields are added to flows to provide additional information about the traffic in the flows. A change in the value of a nonkey field does not create a new flow. In most cases the values for nonkey fields are taken from only the first packet in the flow. Flexible NetFlow enables you to capture counter values such as the number of bytes and packets in a flow as nonkey fields.
Flexible NetFlow adds a new Version 9 export format field type for the header and packet section types. Flexible NetFlow will communicate to the NetFlow collector the configured section sizes in the corresponding Version 9 export template fields. The payload sections will have a corresponding length field that can be used to collect the actual size of the collected section.
Flexible NetFlow Match Parameters
The following table describes Flexible NetFlow match parameters. You must configure at least one of the following match parameters for the flow records.
Flexible NetFlow Collect Parameters
The following table describes the Flexible NetFlow collect parameters.
|
Command |
Purpose |
||
|---|---|---|---|
|
collect counter { bytes { layer2 { long } | long } | packets { long } } |
Collects the counter fields total bytes and total packets. |
||
|
collect interface {input | output} |
Collects the fields from the input or output interface. |
||
|
collect timestamp absolute {first | last} |
Collects the fields for the absolute time the first packet was seen or the absolute time the most recent packet was last seen (in milliseconds). |
||
|
collect transport tcp flags |
|
||
|
collect wireless ap mac address |
Collects the MAC addresses of the access points that the wireless client is associated with. |
Flow Exporters
Flow exporters export the data in the flow monitor cache to a remote system, such as a server running NetFlow collector, for analysis and storage. Flow exporters are created as separate entities in the configuration. Flow exporters are assigned to flow monitors to provide data export capability for the flow monitors. You can create several flow exporters and assign them to one or more flow monitors to provide several export destinations. You can create one flow exporter and apply it to several flow monitors.
NetFlow Data Export Format Version 10 (IPFIX)
Internet Protocol Flow Information Export (IPFIX) or version 10 is an Export Protocol that collects and exports predefined or user defined flow records. IPFIX is an IETF standard based on NetFlow version 9. The IPFIX format maintains the same principles of separate templates and records as NetFlow version 9. It supports variable length field for SSID of the wireless clients. For IPFIX exporting protocol, the default destination port is 4739, DSCP value is 0, and TTL is 255.
NetFlow Data Export Format Version 9
The basic output of NetFlow is a flow record. Several different formats for flow records have evolved as NetFlow has matured. The most recent evolution of the NetFlow export format is known as Version 9. The distinguishing feature of the NetFlow Version 9 export format is that it is template-based. Templates provide an extensible design to the record format, a feature that should allow future enhancements to NetFlow services without requiring concurrent changes to the basic flow-record format. Using templates provides several key benefits:
-
Third-party business partners who produce applications that provide collector or display services for NetFlow do not have to recompile their applications each time a new NetFlow feature is added. Instead, they should be able to use an external data file that documents the known template formats.
-
New features can be added to NetFlow quickly without breaking current implementations.
-
NetFlow is “future-proofed” against new or developing protocols because the Version 9 format can be adapted to provide support for them.
NetFlow Version 9 export format provides the following features and functionality:
-
Variable field specification format
-
Support for IPv4 or IPv6 destination address export
-
More efficient network utilization
The Version 9 export format consists of a packet header followed by one or more template flow or data flow sets. A template flow set provides a description of the fields that will be present in future data flow sets. These data flow sets may occur later within the same export packet or in subsequent export packets. Template flow and data flow sets can be intermingled within a single export packet, as illustrated in the figure below.
NetFlow Version 9 will periodically export the template data so the NetFlow collector will understand what data is to be sent and also export the data flow set for the template. The key advantage to Flexible NetFlow is that the user configures a flow record, which is effectively converted to a Version 9 template and then forwarded to the collector. The figure below is a detailed example of the NetFlow Version 9 export format, including the header, template flow, and data flow sets.
Note | The NetFlow Version 5 export format is a fixed export format that would provide limited information for Flexible NetFlow data. This is why Flexible NetFlow uses the Version 9 export format. |

For more information on the Version 9 export format, refer to the white paper titled Cisco IOS NetFlow Version 9 Flow-Record Format, available at this URL: http://www.cisco.com/en/US/tech/tk648/tk362/technologies_white_paper09186a00800a3db9.shtml.
Flow Monitors
Flow monitors are the Flexible NetFlow component that is applied to interfaces to perform network traffic monitoring.
Flow monitors consist of a user-defined record, an optional flow exporter, and a cache that is automatically created at the time the flow monitor is applied to the first interface.
Flow monitors consist of a user-defined or predefined record, an optional flow exporter, and a cache that is automatically created at the time the flow monitor is applied to the first interface.
Flow data is collected from the network traffic and added to the flow monitor cache during the monitoring process based on the key and nonkey fields in the flow record.
Flexible NetFlow can be used to perform different types of analysis on the same traffic. In the figure below, packet 1 is analyzed using a record designed for standard traffic analysis on the input interface and a record designed for security analysis on the output interface.
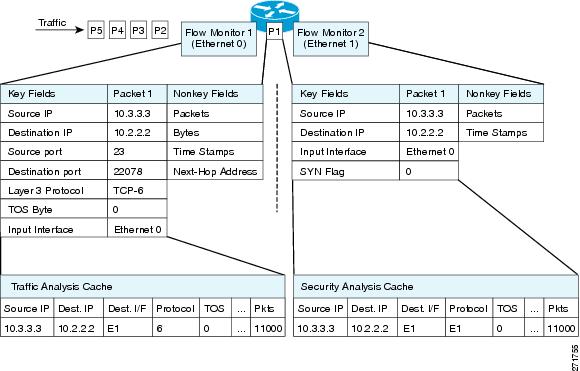
The figure below shows a more complex example of how you can apply different types of flow monitors with custom records.
Normal
The default cache type is “normal”. In this mode, the entries in the cache are aged out according to the timeout active and timeout inactive settings. When a cache entry is aged out, it is removed from the cache and exported via any exporters configured.
Flow Samplers
Flow samplers are created as separate components in a router’s configuration. Flow samplers are used to reduce the load on the device that is running Flexible NetFlow by limiting the number of packets that are selected for analysis.
Samplers use random sampling techniques (modes); that is, a randomly selected sampling position is used each time a sample is taken.
Flow sampling exchanges monitoring accuracy for router performance. When you apply a sampler to a flow monitor, the overhead load on the router of running the flow monitor is reduced because the number of packets that the flow monitor must analyze is reduced. The reduction in the number of packets that are analyzed by the flow monitor causes a corresponding reduction in the accuracy of the information stored in the flow monitor’s cache.
Samplers are combined with flow monitors when they are applied to an interface with the ip flow monitor command.
Supported Flexible NetFlow Fields
Note | If the packet has a VLAN field, then that length is not accounted for. |
|
Field |
Layer 2 In |
Layer 2 Out |
IPv4 In |
IP v4 Out |
IPv6 In |
IPv6 Out |
Notes |
|---|---|---|---|---|---|---|---|
|
Key or Collect Fields |
|||||||
|
Interface input |
Yes |
— |
Yes |
— |
Yes |
— |
If you apply a flow monitor in the input direction: |
|
Interface output |
— |
Yes |
— |
Yes |
— |
Yes |
If you apply a flow monitor in the output direction: |
|
Field |
Layer 2 In |
Layer 2 Out |
IPv4 In |
IP v4 Out |
IPv6 In |
IPv6 Out |
Notes |
|---|---|---|---|---|---|---|---|
|
Key Fields |
|||||||
|
Flow direction |
Yes |
Yes |
Yes |
Yes |
Yes |
Yes |
|
|
Ethertype |
Yes |
Yes |
— |
— |
— |
— |
|
|
VLAN input |
Yes |
— |
Yes |
— |
Yes |
— |
Supported only for a switch port. |
|
VLAN output |
— |
Yes |
— |
Yes |
— |
Yes |
Supported only for a switch port. |
|
dot1q VLAN input |
Yes |
— |
Yes |
— |
Yes |
— |
Supported only for a switch port. |
|
dot1q VLAN output |
— |
Yes |
— |
Yes |
— |
Yes |
Supported only for a switch port. |
|
dot1q priority |
Yes |
Yes |
Yes |
Yes |
Yes |
Yes |
Supported only for a switch port. |
|
MAC source address input |
Yes |
Yes |
Yes |
Yes |
Yes |
Yes |
|
|
MAC source address output |
— |
— |
— |
— |
— |
— |
|
|
MAC destination address input |
Yes |
— |
Yes |
— |
Yes |
— |
|
|
MAC destination address output |
— |
Yes |
— |
Yes |
— |
Yes |
|
|
IPv4 version |
— |
— |
Yes |
Yes |
Yes |
Yes |
|
|
IPv4 TOS |
— |
— |
Yes |
Yes |
Yes |
Yes |
|
|
IPv4 protocol |
— |
— |
Yes |
Yes |
Yes |
Yes |
Must use if any of src/dest port, ICMP code/type, IGMP type or TCP flags are used. |
|
IPv4 TTL |
— |
— |
Yes |
Yes |
Yes |
Yes |
|
|
IPv4 source address |
— |
— |
Yes |
Yes |
— |
— |
|
|
IPv4 destination address |
— |
— |
Yes |
Yes |
— |
— |
|
|
ICMP IPv4 type |
— |
— |
Yes |
Yes |
— |
— |
|
|
ICMP IPv4 code |
— |
— |
Yes |
Yes |
— |
— |
|
|
IGMP type |
— |
— |
Yes |
Yes |
— |
— |
|
Field |
Layer 2 In |
Layer 2 Out |
IPv4 In |
IP v4 Out |
IPv6 In |
IPv6 Out |
Notes |
|---|---|---|---|---|---|---|---|
|
Key Fields continued |
|||||||
|
IPv6 version |
— |
— |
Yes |
Yes |
Yes |
Yes |
Same as IP version. |
|
IPv6 protocol |
— |
— |
Yes |
Yes |
Yes |
Yes |
Same as IP protocol. Must use if any of src/dest port, ICMP code/type, IGMP type or TCP flags are used. |
|
IPv6 source address |
— |
— |
— |
— |
Yes |
Yes |
|
|
IPv6 destination address |
— |
— |
— |
— |
Yes |
Yes |
|
|
IPv6 traffic-class |
— |
— |
Yes |
Yes |
Yes |
Yes |
Same as IP TOS. |
|
IPv6 hop-limit |
— |
— |
Yes |
Yes |
Yes |
Yes |
Same as IP TTL. |
|
ICMP IPv6 type |
— |
— |
— |
— |
Yes |
Yes |
|
|
ICMP IPv6 code |
— |
— |
— |
— |
Yes |
Yes |
|
|
source-port |
— |
— |
Yes |
Yes |
Yes |
Yes |
|
|
dest-port |
— |
— |
Yes |
Yes |
Yes |
Yes |
|
Field |
Layer 2 In |
Layer 2 Out |
IPv4 In |
IP v4 Out |
IPv6 In |
IPv6 Out |
Notes |
|---|---|---|---|---|---|---|---|
|
Collect Fields |
|||||||
|
Bytes long |
Yes |
Yes |
Yes |
Yes |
Yes |
Yes |
Packet size = (Ethernet frame size including FCS - 18 bytes) Recommended: Avoid this field and use Bytes layer2 long. |
|
Packets long |
Yes |
Yes |
Yes |
Yes |
Yes |
Yes |
|
|
Timestamp absolute first |
Yes |
Yes |
Yes |
Yes |
Yes |
Yes |
|
|
Timestamp absolute last |
Yes |
Yes |
Yes |
Yes |
Yes |
Yes |
|
|
TCP flags |
Yes |
Yes |
Yes |
Yes |
Yes |
Yes |
Collects all flags. |
|
Bytes layer2 long |
Yes |
Yes |
Yes |
Yes |
Yes |
Yes |
Default Settings
The following table lists the Flexible NetFlow default settings for the switch.
|
Setting |
Default |
|---|---|
|
Flow active timeout |
1800 seconds |
|
Flow timeout inactive |
15 seconds |
How to Configure Flexible NetFlow
To configure Flexible NetFlow, follow these general steps:
-
Create a flow record by specifying keys and non-key fields to the flow.
-
Create an optional flow exporter by specifying the protocol and transport destination port, destination, and other parameters.
-
Create a flow monitor based on the flow record and flow exporter.
-
Create an optional sampler.
-
Apply the flow monitor to a Layer 2 port, Layer 3 port, or VLAN.
-
If applicable to your configuration, configure a WLAN to apply a flow monitor to.
- Configuring a Flow Record
- Creating a Flow Exporter
- Creating a Flow Monitor
- Creating a Flow Sampler
- Applying a Flow to an Interface
- Configuring a Bridged NetFlow on a VLAN
- Configuring Layer 2 NetFlow
- Configuring WLAN to Apply Flow Monitor in Data Link Input/Output Direction
- Configuring WLAN to Apply Flow Monitor in IPV4 and IPv6 Input/Output Direction
Configuring a Flow Record
Perform this task to configure a customized flow record.
Customized flow records are used to analyze traffic data for a specific purpose. A customized flow record must have at least one match criterion for use as the key field and typically has at least one collect criterion for use as a nonkey field.
There are hundreds of possible permutations of customized flow records. This task shows the steps that are used to create one of the possible permutations. Modify the steps in this task as appropriate to create a customized flow record for your requirements.
1.
enable
2.
configure
terminal
3.
flow
record
record-name
4.
description
description
5.
match
{ipv4 |
ipv6} {destination |
source}
address
6. Repeat Step 5 as required to configure additional key fields for the record.
7.
match flow
cts
{source |
destination}
group-tag
8.
collect
interface
{input |
output}
9. Repeat the above step as required to configure additional nonkey fields for the record.
10.
end
11.
show
flow
record
record-name
12.
show
running-config
flow
record
record-name
DETAILED STEPS
Creating a Flow Exporter
You can create a flow export to define the export parameters for a flow.
Note | Each flow exporter supports only one destination. If you want to export the data to multiple destinations, you must configure multiple flow exporters and assign them to the flow monitor. You can export to a destination using IPv4 or IPv6 address. |
2.
flow exporter
name
3.
description
string
4.
destination {ipv4-address|ipv6-address}
5.
dscp
value
6.
source { source type }
7.
transport
udp
number
8.
ttl
seconds
9.
export-protocol
{netflow-v9 |
ipfix}
11.
show flow exporter
[name
record-name]
DETAILED STEPS
| Command or Action | Purpose | |
|---|---|---|
| Step 1 | configure
terminal
Example: Switch# configure terminal | |
| Step 2 | flow exporter
name
Example:
Switch(config)# flow exporter ExportTest
|
Creates a flow exporter and enters flow exporter configuration mode. You can also use this command to modify an existing flow exporter. |
| Step 3 | description
string
Example:
Switch(config-flow-exporter)# description ExportV9
|
(Optional) Describes this flow record as a maximum 63-character string. |
| Step 4 | destination {ipv4-address|ipv6-address}
Example: Switch(config-flow-exporter)# destination 192.0.2.1 (IPv4 destination) Switch(config-flow-exporter)# destination 2001:0:0:24::10 (IPv6 destination) |
Sets the IPv4/IPv6 destination address or hostname for this exporter. |
| Step 5 |
dscp
value
Example:
Switch(config-flow-exporter)# dscp 0
|
(Optional) Specifies the differentiated services codepoint value. The range is from 0 to 63. The default is 0. |
| Step 6 | source { source type }
Example:
Switch(config-flow-exporter)# source gigabitEthernet1/0/1
|
(Optional) Specifies the interface to use to reach the NetFlow collector at the configured destination. The following interfaces can be configured as source:
|
| Step 7 | transport
udp
number
Example:
Switch(config-flow-exporter)# transport udp 200
|
(Optional) Specifies the UDP port to use to reach the NetFlow collector. The range is from 0 to 65535. For IPFIX exporting protocol, the default destination port is 4739. |
| Step 8 | ttl
seconds
Example: Switch(config-flow-exporter)# ttl 210
|
(Optional) Configures the time-to-live (TTL) value for datagrams sent by the exporter. The range is from 1 to 255 seconds. The default is 255. |
| Step 9 |
export-protocol
{netflow-v9 |
ipfix}
Example:
Switch(config-flow-exporter)# export-protocol netflow-v9
|
Specifies the version of the NetFlow export protocol used by the exporter. |
| Step 10 | end
Example: Switch(config-flow-record)# end | |
| Step 11 | show flow exporter
[name
record-name]
Example:
Switch show flow exporter ExportTest
|
(Optional) Displays information about NetFlow flow exporters. |
| Step 12 | copy
running-config startup-config
Example: Switch# copy running-config startup-config |
Define a flow monitor based on the flow record and flow exporter.
Creating a Flow Monitor
Perform this required task to create a customized flow monitor.
Each flow monitor has a separate cache assigned to it. Each flow monitor requires a record to define the contents and layout of its cache entries. These record formats can be one of the predefined formats or a user-defined format. An advanced user can create a customized format using the flow record command.
If you want to use a customized record, you must create the customized record before you can perform this task. If you want to add a flow exporter to the flow monitor for data export, you must create the exporter before you can complete this task.
Note | You must use the no ip flow monitor command to remove a flow monitor from all of the interfaces to which you have applied it before you can modify the parameters for the record command on the flow monitor. For information about the ip flow monitor command, refer to the Cisco IOS Flexible NetFlow Command Reference. |
1.
enable
2.
configure
terminal
3.
flow
monitor
monitor-name
4.
description
description
5.
record
{record-name |
netflow-original |
netflow {ipv4 |
ipv6}
record [peer]}
6.
cache
{timeout
{active |
inactive}
seconds |
type {
normal
}
7. Repeat Step 6 as required to finish modifying the cache parameters for this flow monitor.
8.
exporter
exporter-name
9.
end
10.
show
flow
monitor
[[name]
monitor-name
[cache [format {csv |
record |
table}]]
]
11.
show
running-config
flow
monitor
monitor-name
DETAILED STEPS
| Command or Action | Purpose | |||
|---|---|---|---|---|
| Step 1 |
enable
Example:
Switch> enable
|
Enables privileged EXEC mode. | ||
| Step 2 |
configure
terminal
Example:
Switch# configure terminal
|
Enters global configuration mode. | ||
| Step 3 |
flow
monitor
monitor-name
Example:
Switch(config)# flow monitor FLOW-MONITOR-1
|
Creates a flow monitor and enters Flexible NetFlow flow monitor configuration mode. | ||
| Step 4 |
description
description
Example:
Switch(config-flow-monitor)# description Used for basic ipv4 traffic analysis
|
(Optional) Creates a description for the flow monitor. | ||
| Step 5 |
record
{record-name |
netflow-original |
netflow {ipv4 |
ipv6}
record [peer]}
Example:
Switch(config-flow-monitor)# record FLOW-RECORD-1
|
Specifies the record for the flow monitor. | ||
| Step 6 |
cache
{timeout
{active |
inactive}
seconds |
type {
normal
}
Example: Device(config-flow-monitor)# cache type normal |
Associates a flow cache with the specified flow monitor. | ||
| Step 7 | Repeat Step 6 as required to finish modifying the cache parameters for this flow monitor. |
— | ||
| Step 8 |
exporter
exporter-name
Example:
Switch(config-flow-monitor)# exporter EXPORTER-1
|
(Optional) Specifies the name of an exporter that was created previously. | ||
| Step 9 |
end
Example:
Switch(config-flow-monitor)# end
|
Exits Flexible NetFlow flow monitor configuration mode and returns to privileged EXEC mode. | ||
| Step 10 |
show
flow
monitor
[[name]
monitor-name
[cache [format {csv |
record |
table}]]
]
Example:
Switch# show flow monitor FLOW-MONITOR-2 cache
|
(Optional) Displays the status for a Flexible NetFlow flow monitor.
| ||
| Step 11 |
show
running-config
flow
monitor
monitor-name
Example:
Switch# show running-config flow monitor FLOW_MONITOR-1
|
(Optional) Displays the configuration of the specified flow monitor. | ||
| Step 12 | copy running-config startup-config
Example: Switch# copy running-config startup-config |
Creating a Flow Sampler
Perform this required task to configure and enable a flow sampler.
1.
enable
2.
configure
terminal
3.
sampler
sampler-name
4.
description
description
5.
mode
{random}
1
out-of
window-size
6.
exit
7.
interface
type
number
8. {ip | ipv6} flow monitor monitor-name [[sampler] sampler-name] {input | output}
9.
end
10.
show
sampler
sampler-name
DETAILED STEPS
| Command or Action | Purpose | |
|---|---|---|
| Step 1 |
enable
Example: Device> enable |
Enables privileged EXEC mode. |
| Step 2 |
configure
terminal
Example: Device# configure terminal |
Enters global configuration mode. |
| Step 3 |
sampler
sampler-name
Example: Device(config)# sampler SAMPLER-1 |
Creates a sampler and enters sampler configuration mode. |
| Step 4 |
description
description
Example: Device(config-sampler)# description Sample at 50% |
(Optional) Creates a description for the flow sampler. |
| Step 5 |
mode
{random}
1
out-of
window-size
Example: Device(config-sampler)# mode random 1 out-of 2 |
Specifies the sampler mode and the flow sampler window size. |
| Step 6 |
exit
Example: Device(config-sampler)# exit |
Exits sampler configuration mode and returns to global configuration mode. |
| Step 7 |
interface
type
number
Example: Device(config)# interface GigabitEthernet 0/0/0 |
Specifies an interface and enters interface configuration mode. |
| Step 8 | {ip |
ipv6}
flow
monitor
monitor-name
[[sampler]
sampler-name]
{input |
output}
Example: Device(config-if)# ip flow monitor FLOW-MONITOR-1 sampler SAMPLER-1 input |
Assigns the flow monitor and the flow sampler that you created to the interface to enable sampling. |
| Step 9 |
end
Example: Device(config-if)# end |
Exits interface configuration mode and returns to privileged EXEC mode. |
| Step 10 |
show
sampler
sampler-name
Example: Device# show sampler SAMPLER-1 |
Displays the status and statistics of the flow sampler that you configured and enabled. |
Applying a Flow to an Interface
You can apply a flow monitor and an optional sampler to an interface.
2.
interface
type
3.
{ip flow monitor |
ipv6 flow
monitor}name
[|sampler
name] { input}
5.
show flow interface
[interface-type
number]
DETAILED STEPS
| Command or Action | Purpose | |
|---|---|---|
| Step 1 | configure
terminal
Example: Switch# configure terminal | |
| Step 2 | interface
type
Example:
Switch(config)# interface GigabitEthernet1/0/1
|
Enters interface configuration mode and configures an interface. Command parameters for the interface configuration include: |
| Step 3 | {ip flow monitor |
ipv6 flow
monitor}name
[|sampler
name] { input}
Example:
Switch(config-if)# ip flow monitor MonitorTest input
|
Associate an IPv4 or an IPv6 flow monitor, and an optional sampler to the interface for input or output packets. |
| Step 4 | end
Example: Switch(config-flow-monitor)# end | |
| Step 5 | show flow interface
[interface-type
number]
Example:
Switch# show flow interface
|
(Optional) Displays information about NetFlow on an interface. |
| Step 6 | copy
running-config startup-config
Example: Switch# copy running-config startup-config |
Configuring a Bridged NetFlow on a VLAN
You can apply a flow monitor and an optional sampler to a VLAN.
2.
vlan [configuration]
vlan-id
3.
ip flow monitor
monitor
name [sampler
sampler
name] {input
|output}
DETAILED STEPS
| Command or Action | Purpose | |
|---|---|---|
| Step 1 | configure
terminal
Example: Switch# configure terminal | |
| Step 2 | vlan [configuration]
vlan-id
Example: Switch(config)# vlan configuration 30 Switch(config-vlan-config)# |
Enters VLAN or VLAN configuration mode. |
| Step 3 | ip flow monitor
monitor
name [sampler
sampler
name] {input
|output}
Example:
Switch(config-vlan-config)# ip flow monitor MonitorTest input
|
Associates a flow monitor and an optional sampler to the VLAN for input or output packets. |
| Step 4 | copy
running-config startup-config
Example: Switch# copy running-config startup-config |
Configuring Layer 2 NetFlow
You can define Layer 2 keys in Flexible NetFlow records that you can use to capture flows in Layer 2 interfaces.
2.
flow record name
3.
match datalink {dot1q |ethertype | mac | vlan}
5.
show flow record [name ]
DETAILED STEPS
| Command or Action | Purpose | |
|---|---|---|
| Step 1 | configure
terminal
Example: Switch# configure terminal | |
| Step 2 | flow record name Example: Switch(config)# flow record L2_record Switch(config-flow-record)# | Enters flow record configuration mode. |
| Step 3 | match datalink {dot1q |ethertype | mac | vlan} Example: Switch(config-flow-record)# match datalink ethertype
| Specifies the Layer 2 attribute as a key. |
| Step 4 | end Example: Switch(config-flow-record)# end | |
| Step 5 | show flow record [name ] Example:
Switch# show flow record
| (Optional) Displays information about NetFlow on an interface. |
| Step 6 | copy running-config startup-config Example: Switch# copy running-config startup-config |
Configuring WLAN to Apply Flow Monitor in Data Link Input/Output Direction
1.
configure terminal
2.
wlan [wlan-name { wlan-id
SSID_NetworkName | wlan_id} | wlan-name | shutdown}
3.
datalink flow monitor
monitor-name {input | output}
4.
end
5.
show run wlan
wlan-name
DETAILED STEPS
| Command or Action | Purpose | |||
|---|---|---|---|---|
| Step 1 | configure terminal
Example:
Switch# configure terminal
|
Enters global configuration mode. | ||
| Step 2 |
wlan [wlan-name { wlan-id
SSID_NetworkName | wlan_id} | wlan-name | shutdown}
Example:
Switch (config) # wlan wlan1
|
Enters WLAN configuration submode. wlan-id is the wireless LAN identifier. The range is 1 to 64. SSID_NetworkName is the SSID which can contain 32 alphanumeric characters.
| ||
| Step 3 |
datalink flow monitor
monitor-name {input | output}
Example:
Switch (config-wlan) # datalink flow monitor flow-monitor-1 {input | output}
|
Applies flow monitor to Layer 2 traffic in the direction of interest. | ||
| Step 4 |
end
Example:
Switch (config) # end
|
Returns to privileged EXEC mode. | ||
| Step 5 |
show run wlan
wlan-name
Example:
Switch # show wlan mywlan
|
(Optional) Verifies your configuration. |
Configuring WLAN to Apply Flow Monitor in IPV4 and IPv6 Input/Output Direction
1.
configure terminal
2.
wlan {wlan-name { wlan-id
SSID_NetworkName | wlan_id} | wlan-name | shutdown}
3.
{ip | ipv6} flow monitor monitor-name {input |
output}
4.
end
5.
show run wlan
wlan-name
DETAILED STEPS
| Command or Action | Purpose | |||
|---|---|---|---|---|
| Step 1 | configure terminal
Example:
Switch# configure terminal
|
Enters global configuration mode | ||
| Step 2 |
wlan {wlan-name { wlan-id
SSID_NetworkName | wlan_id} | wlan-name | shutdown}
Example:
Switch (config) # wlan wlan1
|
Enters WLAN configuration submode. wlan-id is the wireless LAN identifier. The range is 1 to 64. SSID_NetworkName is the SSID which can contain 32 alphanumeric characters.
| ||
| Step 3 | {ip | ipv6} flow monitor monitor-name {input |
output}
Example:
Switch (config-wlan) # ip flow monitor flow-monitor-1 input
|
Associates a flow monitor to the WLAN for input or output packets. | ||
| Step 4 |
end
Example:
Switch (config) # end
|
Returns to privileged EXEC mode. | ||
| Step 5 |
show run wlan
wlan-name
Example:
Switch # show wlan mywlan
|
(Optional) Verifies your configuration. |
Monitoring Flexible NetFlow
|
Command |
Purpose |
|---|---|
|
show flow exporter [broker | export-ids | name | name | statistics | templates] |
Displays information about NetFlow flow exporters and statistics. |
|
show flow exporter [ name exporter-name] |
Displays information about NetFlow flow exporters and statistics. |
|
show flow interface |
Displays information about NetFlow interfaces. |
|
show flow monitor [ name exporter-name] |
Displays information about NetFlow flow monitors and statistics. |
|
show flow monitor statistics |
Displays the statistics for the flow monitor |
|
show flow monitor cache format {table | record | csv} |
Displays the contents of the cache for the flow monitor, in the format specified. |
|
show flow record [ name record-name] |
Displays information about NetFlow flow records. |
|
show flow ssid |
Displays NetFlow monitor installation status for a WLAN. |
|
show sampler [broker | name | name] |
Displays information about NetFlow samplers. |
|
show wlan wlan-name |
Displays the WLAN configured on the device. |
Configuration Examples for Flexible NetFlow
- Example: Configuring a Flow
- Example: Monitoring IPv4 ingress traffic
- Example: Monitoring IPv4 egress traffic
- Example: Configuring IPv4 Flexible NetFlow in WLAN (Ingress Direction)
- Example: Configuring IPv6 and Transport Flag Flexible NetFlow in WLAN (Egress Direction)
- Example: Configuring IPv6 Flexible NetFlow in WLAN (Both Ingress and Egress Directions)
- Example: Monitoring wireless ingress traffic
Example: Configuring a Flow
This example shows how to create a flow and apply it to an interface:
Switch# configure terminal
Enter configuration commands, one per line. End with CNTL/Z.

Switch(config)# flow export export1
Switch(config-flow-exporter)# destination 10.0.101.254
Switch(config-flow-exporter)# transport udp 2055
Switch(config-flow-exporter)# exit
Switch(config)# flow record record1
Switch(config-flow-record)# match ipv4 source address
Switch(config-flow-record)# match ipv4 destination address
Switch(config-flow-record)# match ipv4 protocol
Switch(config-flow-record)# match transport source-port
Switch(config-flow-record)# match transport destination-port

Switch(config-flow-record)# collect counter byte long
Switch(config-flow-record)# collect counter packet long
Switch(config-flow-record)# collect timestamp absolute first
Switch(config-flow-record)# collect timestamp absolute last
Switch(config-flow-record)# exit
Switch(config)# flow monitor monitor1
Switch(config-flow-monitor)# record record1
Switch(config-flow-monitor)# exporter export1
Switch(config-flow-monitor)# exit
Switch(config)# interface tenGigabitEthernet 1/0/1
Switch(config-if)# ip flow monitor monitor1 input
Switch(config-if)# end
Example: Monitoring IPv4 ingress traffic
This example shows how to monitor IPv4 ingress traffic (int g1/0/11 sends traffic to int g1/0/36 and int g3/0/11).
Switch# configure terminal
Enter configuration commands, one per line. End with CNTL/Z.
Switch(config)# flow record  fr-1
Switch(config-flow-record)# match ipv4 source address
Switch(config-flow-record)# match ipv4 destination address
Switch(config-flow-record)# match interface input
Switch(config-flow-record)# collect counter bytes long
Switch(config-flow-record)# collect counter packets long
Switch(config-flow-record)# collect timestamp absolute first
Switch(config-flow-record)# collect timestamp absolute last
Switch(config-flow-record)# collect counter bytes layer2 long
Switch(config-flow-record)# exit

Switch(config)# flow exporter fe-ipfix6
Switch(config-flow-exporter)# destination 2001:0:0:24::10
Switch(config-flow-exporter)# source Vlan106
Switch(config-flow-exporter)# transport udp 4739
Switch(config-flow-exporter)# export-protocol ipfix
Switch(config-flow-exporter)# template data timeout 240
Switch(config-flow-exporter)# exit

Switch(config)# flow exporter fe-ipfix
Switch(config-flow-exporter)# description IPFIX format collector 100.0.0.80
Switch(config-flow-exporter)# destination 100.0.0.80
Switch(config-flow-exporter)# dscp 30
Switch(config-flow-exporter)# ttl 210
Switch(config-flow-exporter)# transport udp 4739
Switch(config-flow-exporter)# export-protocol ipfix
Switch(config-flow-exporter)# template data timeout 240
Switch(config-flow-exporter)# exit

Switch(config)# flow exporter fe-1
Switch(config-flow-exporter)# destination 10.5.120.16
Switch(config-flow-exporter)# source Vlan105
Switch(config-flow-exporter)# dscp 32
Switch(config-flow-exporter)# ttl 200
Switch(config-flow-exporter)# transport udp 2055

Switch(config-flow-exporter)# template data timeout 240
Switch(config-flow-exporter)# exit

Switch(config)# flow monitor fm-1
Switch(config-flow-monitor)# exporter fe-ipfix6
Switch(config-flow-monitor)# exporter fe-ipfix
Switch(config-flow-monitor)# exporter fe-1
Switch(config-flow-monitor)# cache timeout inactive 60
Switch(config-flow-monitor)#  cache timeout active 180
Switch(config-flow-monitor)# record fr-1
Switch(config-flow-monitor)# end

Switch# show running-config interface g1/0/11
Switch# show running-config interface g1/0/36
Switch# show running-config interface g3/0/11
Switch# show flow monitor fm-1 cache format table
Example: Monitoring IPv4 egress traffic
Switch# configure terminal
Enter configuration commands, one per line. End with CNTL/Z.
Switch(config)# flow record  fr-1 out
Switch(config-flow-record)# match ipv4 source address
Switch(config-flow-record)# match ipv4 destination address
Switch(config-flow-record)# match interface output
Switch(config-flow-record)# collect counter bytes long
Switch(config-flow-record)# collect counter packets long
Switch(config-flow-record)# collect timestamp absolute first
Switch(config-flow-record)# collect timestamp absolute last
Switch(config-flow-record)# exit

Switch(config)# flow exporter fe-1
Switch(config-flow-exporter)# destination 10.5.120.16
Switch(config-flow-exporter)# source Vlan105
Switch(config-flow-exporter)# dscp 32
Switch(config-flow-exporter)# ttl 200
Switch(config-flow-exporter)# transport udp 2055
Switch(config-flow-exporter)# template data timeout 240
Switch(config-flow-exporter)# exit

Switch(config)# flow exporter fe-ipfix6
Switch(config-flow-exporter)# destination 2001:0:0:24::10
Switch(config-flow-exporter)# source Vlan106
Switch(config-flow-exporter)# transport udp 4739
Switch(config-flow-exporter)# export-protocol ipfix
Switch(config-flow-exporter)# template data timeout 240
Switch(config-flow-exporter)# exit

Switch(config)# flow exporter fe-ipfix
Switch(config-flow-exporter)# description IPFIX format collector 100.0.0.80
Switch(config-flow-exporter)# destination 100.0.0.80
Switch(config-flow-exporter)# dscp 30
Switch(config-flow-exporter)# ttl 210
Switch(config-flow-exporter)# transport udp 4739
Switch(config-flow-exporter)# export-protocol ipfix
Switch(config-flow-exporter)# template data timeout 240
Switch(config-flow-exporter)# exit

Switch(config)# flow monitor fm-1-output
Switch(config-flow-monitor)# exporter fe-1
Switch(config-flow-monitor)# exporter fe-ipfix6
Switch(config-flow-monitor)# exporter fe-ipfix
Switch(config-flow-monitor)# cache timeout inactive 50
Switch(config-flow-monitor)#  cache timeout active 120
Switch(config-flow-monitor)# record fr-1-out
Switch(config-flow-monitor)# end

Switch# show flow monitor fm-1-output cache format table
Example: Configuring IPv4 Flexible NetFlow in WLAN (Ingress Direction)
The following example shows how to configure IPv4 Flexible NetFlow on WLAN ingress direction:
Switch# configure terminal
Switch(config)# flow record fr_v4
Switch(config-flow-record)#	match ipv4 destination address
Switch(config-flow-record)#	match ipv4 source address
Switch(config-flow-record)#	match ipv4 protocol
Switch(config-flow-record)#	match ipv4 tos
Switch(config-flow-record)#	match ipv4 ttl
Switch(config-flow-record)#	match ipv4 version
Switch(config-flow-record)#	match wireless ssid
Switch(config-flow-record)#	collect wireless ap mac address
Switch(config-flow-record)#	collect counter packets long
Switch(config-flow-record)#	collect counter bytes long
Switch(config-flow-record)#	collect timestamp absolute first
Switch(config-flow-record)#	collect timestamp absolute last
Switch(config-flow-record)# exit

Switch(config)# flow monitor fm_v4
Switch(config-flow-monitor)#	record fr_v4
Switch(config-flow-record)# exit

Switch(config)#	wlan wlan_1
Switch(config-wlan)#	ip flow monitor fm_v4 in
Switch(config-wlan)# end

Switch# show flow monitor fm_v4 cache
Example: Configuring IPv6 and Transport Flag Flexible NetFlow in WLAN (Egress Direction)
The following example shows how to configure IPv6 and transport flag Flexible NetFlow on WLAN egress direction:
Switch# configure terminal
Switch(config)#	flow record fr_v6
Switch(config-flow-record)# match ipv6 destination address
Switch(config-flow-record)#	match ipv6 source address
Switch(config-flow-record)#	match ipv6 hop-limit
Switch(config-flow-record)#	match ipv6 protocol
Switch(config-flow-record)#	match ipv6 traffic
Switch(config-flow-record)#	match ipv6 version
Switch(config-flow-record)#	match wireless ssid
Switch(config-flow-record)#	collect wireless ap mac address
Switch(config-flow-record)#	collect counter bytes long
Switch(config-flow-record)#	collect transport tcp flags
Switch(config-flow-record)# exit

Switch(config)#	flow monitor fm_v6
Switch(config-flow-monitor)#	record fr_v6
Switch(config-flow-monitor)# exit

Switch(config)#	wlan wlan_1
Switch(config-wlan)#	ipv6 flow monitor fm_v6 out
Switch(config-wlan)# end

Switch# show flow monitor fm_v6 cache
Note | On the switch, you cannot specify which TCP flag to collect. You can only specify to collect transport TCP flags. |
Example: Configuring IPv6 Flexible NetFlow in WLAN (Both Ingress and Egress Directions)
The following example shows how to configure IPv6 Flexible NetFlow on WLAN in both directions:
Switch# configure terminal
Switch (config)# flow record fr_v6
Switch (config-flow-record)# match ipv6 destination address
Switch (config-flow-record)# match ipv6 source address
Switch (config-flow-record)# match ipv6 hop-limit
Switch (config-flow-record)# match ipv6 protocol
Switch (config-flow-record)# match ipv6 traffic
Switch (config-flow-record)# match ipv6 version
Switch (config-flow-record)#	match wireless ssid
Switch (config-flow-record)#	collect wireless ap mac address
Switch (config-flow-record)# collect counter packets long
Switch (config-flow-record)# exit

Switch (config)# flow monitor fm_v6
Switch (config-flow-monitor)# record fr_v6
Switch (config-flow-monitor)# exit

Switch (config)# wlan wlan_1
Switch (config-wlan)# ipv6 flow monitor fm_v6 in
Switch (config-wlan)# ipv6 flow monitor fm_v6 out
Switch (config-wlan)# end

Switch# show flow monitor fm_v6 cache
Example: Monitoring wireless ingress traffic
Switch# configure terminal
Enter configuration commands, one per line. End with CNTL/Z.
Switch(config)# flow record fr-wlan-input
Switch(config-flow-record)# match datalink mac source address input
Switch(config-flow-record)# match datalink mac destination address input
Switch(config-flow-record)# match ipv4 source address
Switch(config-flow-record)# match ipv4 destination address
Switch(config-flow-record)# match wireless ssid
Switch(config-flow-record)# collect counter bytes long
Switch(config-flow-record)# collect counter packets long
Switch(config-flow-record)# collect timestamp absolute first
Switch(config-flow-record)# collect timestamp absolute last
Switch(config-flow-record)# exit

Switch(config)# flow exporter fe-ipfix
Switch(config-flow-exporter)# description IPFIX format collector 100.0.0.80
Switch(config-flow-exporter)# destination 100.0.0.80
Switch(config-flow-exporter)# dscp 30
Switch(config-flow-exporter)# ttl 210
Switch(config-flow-exporter)# transport udp 4739
Switch(config-flow-exporter)# export-protocol ipfix
Switch(config-flow-exporter)# template data timeout 240
Switch(config-flow-exporter)# exit

Switch(config)# flow exporter fe-ipfix6
Switch(config-flow-exporter)# destination 2001:0:0:24::10
Switch(config-flow-exporter)# source Vlan106
Switch(config-flow-exporter)# transport udp 4739
Switch(config-flow-exporter)# export-protocol ipfix
Switch(config-flow-exporter)# template data timeout 240
Switch(config-flow-exporter)# exit

Switch(config)# flow monitor fm-wlan-input
Switch(config-flow-monitor)# exporter fe-ipfix
Switch(config-flow-monitor)# exporter fe-ipfix6
Switch(config-flow-monitor)# cache timeout inactive 30
Switch(config-flow-monitor)#  cache timeout active 180
Switch(config-flow-monitor)# record fr-wlan-input
Switch(config-flow-monitor)# end

Switch# show running-config wlan nfl_1
Switch# show flow monitor fm-wlan-input cache format table
Additional References
Related Documents
| Related Topic | Document Title |
|---|---|
|
Flexible NetFlow CLI Commands |
Cisco Flexible NetFlow Command Reference (Catalyst 3850 Switches) Flexible NetFlow Command Reference, Cisco IOS XE Release 3SE (Cisco WLC 5700 Series) |
Error Message Decoder
| Description | Link |
|---|---|
|
To help you research and resolve system error messages in this release, use the Error Message Decoder tool. |
https://www.cisco.com/cgi-bin/Support/Errordecoder/index.cgi |
Standards and RFCs
| Standard/RFC | Title |
|---|---|
|
RFC 3954 |
Cisco Systems NetFlow Services Export Version 9 |
MIBs
| MIB | MIBs Link |
|---|---|
|
All supported MIBs for this release. |
To locate and download MIBs for selected platforms, Cisco IOS releases, and feature sets, use Cisco MIB Locator found at the following URL: |
Technical Assistance
| Description | Link |
|---|---|
|
The Cisco Support website provides extensive online resources, including documentation and tools for troubleshooting and resolving technical issues with Cisco products and technologies. To receive security and technical information about your products, you can subscribe to various services, such as the Product Alert Tool (accessed from Field Notices), the Cisco Technical Services Newsletter, and Really Simple Syndication (RSS) Feeds. Access to most tools on the Cisco Support website requires a Cisco.com user ID and password. |
Feature Information for Flexible NetFlow
Release |
Modification |
|---|---|
Cisco IOS XE 3.2SE |
This feature was introduced. |
Cisco IOS XE 3.3SE |
The following new commands were added: |
 Feedback