Configuring TACACS+

Finding Feature Information

Your software release may not support all the features documented in this module. For the latest caveats and feature information, see Bug Search Tool and the release notes for your platform and software release. To find information about the features documented in this module, and to see a list of the releases in which each feature is supported, see the feature information table at the end of this module.

Use Cisco Feature Navigator to find information about platform support and Cisco software image support. To access Cisco Feature Navigator, go to http://www.cisco.com/go/cfn. An account on Cisco.com is not required.
Prerequisites for Controlling Switch Access with Terminal Access Controller Access Control System Plus (TACACS+)

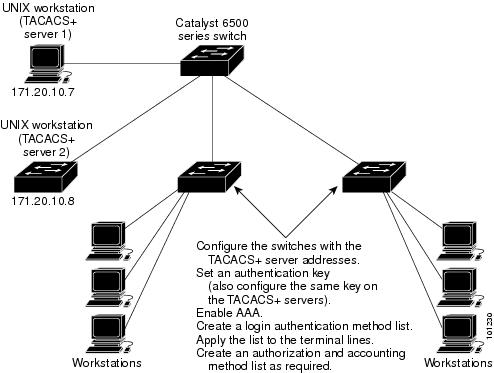
The following are the prerequisites for set up and configuration of switch access with Terminal Access Controller Access Control System Plus (TACACS+) (must be performed in the order presented):

  1. Configure the switches with the TACACS+ server addresses.

  2. Set an authentication key.

  3. Configure the key from Step 2 on the TACACS+ servers.

  4. Enable AAA.

  5. Create a login authentication method list.

  6. Apply the list to the terminal lines.

  7. Create an authorization and accounting method list.

The following are the prerequisites for controlling switch access with TACACS+:

  • You must have access to a configured TACACS+ server to configure TACACS+ features on your switch. Also, you must have access to TACACS+ services maintained in a database on a TACACS+ daemon typically running on a LINUX or Windows workstation.

  • We recommend a redundant connection between a switch stack and the TACACS+ server. This is to help ensure that the TACACS+ server remains accessible in case one of the connected stack members is removed from the switch stack.

  • You need a system running the TACACS+ daemon software to use TACACS+ on your switch.

  • To use TACACS+, it must be enabled.

  • Authorization must be enabled on the switch to be used.

  • Users must first successfully complete TACACS+ authentication before proceeding to TACACS+ authorization.

  • To use any of the AAA commands listed in this section or elsewhere, you must first enable AAA with the aaa new-model command.

  • At a minimum, you must identify the host or hosts maintaining the TACACS+ daemon and define the method lists for TACACS+ authentication. You can optionally define method lists for TACACS+ authorization and accounting.

  • The method list defines the types of authentication to be performed and the sequence in which they are performed; it must be applied to a specific port before any of the defined authentication methods are performed. The only exception is the default method list (which, by coincidence, is named default ). The default method list is automatically applied to all ports except those that have a named method list explicitly defined. A defined method list overrides the default method list.

  • Use TACACS+ for privileged EXEC access authorization if authentication was performed by using TACACS+.

  • Use the local database if authentication was not performed by using TACACS+.

Information About TACACS+

TACACS+ Overview

TACACS+ is a security application that provides centralized validation of users attempting to gain access to your switch.

TACACS+ provides for separate and modular authentication, authorization, and accounting facilities. TACACS+ allows for a single access control server (the TACACS+ daemon) to provide each service—authentication, authorization, and accounting—independently. Each service can be tied into its own database to take advantage of other services available on that server or on the network, depending on the capabilities of the daemon.

The goal of TACACS+ is to provide a method for managing multiple network access points from a single management service. Your switch can be a network access server along with other Cisco routers and access servers.

Figure 1. Typical TACACS+ Network Configuration
Typical TACACS+ Network Configuration

TACACS+, administered through the AAA security services, can provide these services:

  • Authentication—Provides complete control of authentication through login and password dialog, challenge and response, and messaging support.

    The authentication facility can conduct a dialog with the user (for example, after a username and password are provided, to challenge a user with several questions, such as home address, mother’s maiden name, service type, and social security number). The TACACS+ authentication service can also send messages to user screens. For example, a message could notify users that their passwords must be changed because of the company’s password aging policy.

  • Authorization—Provides fine-grained control over user capabilities for the duration of the user’s session, including but not limited to setting autocommands, access control, session duration, or protocol support. You can also enforce restrictions on what commands a user can execute with the TACACS+ authorization feature.

  • Accounting—Collects and sends information used for billing, auditing, and reporting to the TACACS+ daemon. Network managers can use the accounting facility to track user activity for a security audit or to provide information for user billing. Accounting records include user identities, start and stop times, executed commands (such as PPP), number of packets, and number of bytes.

The TACACS+ protocol provides authentication between the switch and the TACACS+ daemon, and it ensures confidentiality because all protocol exchanges between the switch and the TACACS+ daemon are encrypted.

TACACS+ Operation

When a user attempts a simple ASCII login by authenticating to a switch using TACACS+, this process occurs:

  1. When the connection is established, the switch contacts the TACACS+ daemon to obtain a username prompt to show to the user. The user enters a username, and the switch then contacts the TACACS+ daemon to obtain a password prompt. The switch displays the password prompt to the user, the user enters a password, and the password is then sent to the TACACS+ daemon.

    TACACS+ allows a dialog between the daemon and the user until the daemon receives enough information to authenticate the user. The daemon prompts for a username and password combination, but can include other items, such as the user’s mother’s maiden name.

  2. The switch eventually receives one of these responses from the TACACS+ daemon:

    • ACCEPT—The user is authenticated and service can begin. If the switch is configured to require authorization, authorization begins at this time.

    • REJECT—The user is not authenticated. The user can be denied access or is prompted to retry the login sequence, depending on the TACACS+ daemon.

    • ERROR—An error occurred at some time during authentication with the daemon or in the network connection between the daemon and the switch. If an ERROR response is received, the switch typically tries to use an alternative method for authenticating the user.

    • CONTINUE—The user is prompted for additional authentication information.

    After authentication, the user undergoes an additional authorization phase if authorization has been enabled on the switch. Users must first successfully complete TACACS+ authentication before proceeding to TACACS+ authorization.

  3. If TACACS+ authorization is required, the TACACS+ daemon is again contacted, and it returns an ACCEPT or REJECT authorization response. If an ACCEPT response is returned, the response contains data in the form of attributes that direct the EXEC or NETWORK session for that user and the services that the user can access:

    • Telnet, Secure Shell (SSH), rlogin, or privileged EXEC services

    • Connection parameters, including the host or client IP address, access list, and user timeouts

Method List

A method list defines the sequence and methods to be used to authenticate, to authorize, or to keep accounts on a user. You can use method lists to designate one or more security protocols to be used, thus ensuring a backup system if the initial method fails. The software uses the first method listed to authenticate, to authorize, or to keep accounts on users; if that method does not respond, the software selects the next method in the list. This process continues until there is successful communication with a listed method or the method list is exhausted.

TACACS+ Configuration Options

You can configure the switch to use a single server or AAA server groups to group existing server hosts for authentication. You can group servers to select a subset of the configured server hosts and use them for a particular service. The server group is used with a global server-host list and contains the list of IP addresses of the selected server hosts.

TACACS+ Login Authentication

A method list describes the sequence and authentication methods to be queried to authenticate a user. You can designate one or more security protocols to be used for authentication, thus ensuring a backup system for authentication in case the initial method fails. The software uses the first method listed to authenticate users; if that method fails to respond, the software selects the next authentication method in the method list. This process continues until there is successful communication with a listed authentication method or until all defined methods are exhausted. If authentication fails at any point in this cycle—meaning that the security server or local username database responds by denying the user access—the authentication process stops, and no other authentication methods are attempted.

TACACS+ Authorization for Privileged EXEC Access and Network Services

AAA authorization limits the services available to a user. When AAA authorization is enabled, the switch uses information retrieved from the user’s profile, which is located either in the local user database or on the security server, to configure the user’s session. The user is granted access to a requested service only if the information in the user profile allows it.

TACACS+ Accounting

The AAA accounting feature tracks the services that users are accessing and the amount of network resources that they are consuming. When AAA accounting is enabled, the switch reports user activity to the TACACS+ security server in the form of accounting records. Each accounting record contains accounting attribute-value (AV) pairs and is stored on the security server. This data can then be analyzed for network management, client billing, or auditing.

Default TACACS+ Configuration

TACACS+ and AAA are disabled by default.

To prevent a lapse in security, you cannot configure TACACS+ through a network management application. When enabled, TACACS+ can authenticate users accessing the switch through the CLI.


Note

Although TACACS+ configuration is performed through the CLI, the TACACS+ server authenticates HTTP connections that have been configured with a privilege level of 15.


How to Configure TACACS+

This section describes how to configure your switch to support TACACS+.

Identifying the TACACS+ Server Host and Setting the Authentication Key

Follow these steps to identify the TACACS+ server host and set the authentication key:

SUMMARY STEPS

  1. enable
  2. configure terminal
  3. tacacs server server-name
  4. address {ipv4 | ipv6} ip address
  5. exit
  6. aaa new-model
  7. aaa group server tacacs+ group-name
  8. server ip-address
  9. end
  10. show running-config
  11. copy running-config startup-config

DETAILED STEPS

  Command or Action Purpose
Step 1

enable

Example:


Switch> enable

Enables privileged EXEC mode. Enter your password if prompted.

Step 2

configure terminal

Example:


Switch# configure terminal

Enters the global configuration mode.

Step 3

tacacs server server-name

Example:


Switch(config)# tacacs server yourserver

Identifies the IP host or hosts maintaining a TACACS+ server. Enter this command multiple times to create a list of preferred hosts. The software searches for hosts in the order in which you specify them.

For server-name , specify the server name.

Step 4

address {ipv4 | ipv6} ip address

Example:


Switch(config-server-tacacs)# address ipv4 10.0.1.12

Configures the IP address for the TACACS server.

Step 5

exit

Example:


Switch(config-server-tacacs)# exit

Exits the TACACS server mode and enters the global configuration mode.

Step 6

aaa new-model

Example:


Switch(config)# aaa new-model

Enables AAA.

Step 7

aaa group server tacacs+ group-name

Example:


Switch(config)# aaa group server tacacs+ your_server_group

(Optional) Defines the AAA server-group with a group name.

This command puts the Switch in a server group subconfiguration mode.

Step 8

server ip-address

Example:


Switch(config)# server 10.1.2.3

(Optional) Associates a particular TACACS+ server with the defined server group. Repeat this step for each TACACS+ server in the AAA server group.

Each server in the group must be previously defined in Step 3.

Step 9

end

Example:


Switch(config)# end

Returns to privileged EXEC mode.

Step 10

show running-config

Example:


Switch# show running-config 

Verifies your entries.

Step 11

copy running-config startup-config

Example:


Switch# copy running-config startup-config 

(Optional) Saves your entries in the configuration file.

Configuring TACACS+ Login Authentication

Follow these steps to configure TACACS+ login authentication:

Before you begin

To configure AAA authentication, you define a named list of authentication methods and then apply that list to various ports.


Note

To secure the switch for HTTP access by using AAA methods, you must configure the switch with the ip http authentication aaa global configuration command. Configuring AAA authentication does not secure the switch for HTTP access by using AAA methods.


For more information about the ip http authentication command, see the Cisco IOS Security Command Reference, Release 12.4.

SUMMARY STEPS

  1. enable
  2. configure terminal
  3. aaa new-model
  4. aaa authentication login {default | list-name} method1 [method2...]
  5. line [console | tty | vty] line-number [ending-line-number]
  6. login authentication {default | list-name}
  7. end
  8. show running-config
  9. copy running-config startup-config

DETAILED STEPS

  Command or Action Purpose
Step 1

enable

Example:


Switch> enable

Enables privileged EXEC mode. Enter your password if prompted.

Step 2

configure terminal

Example:


Switch# configure terminal

Enters the global configuration mode.

Step 3

aaa new-model

Example:


Switch(config)# aaa new-model

Enables AAA.

Step 4

aaa authentication login {default | list-name} method1 [method2...]

Example:


Switch(config)# aaa authentication login default tacacs+ local

Creates a login authentication method list.

  • To create a default list that is used when a named list is not specified in the login authentication command, use the default keyword followed by the methods that are to be used in default situations. The default method list is automatically applied to all ports.

  • For list-name , specify a character string to name the list you are creating.

  • For method1... , specify the actual method the authentication algorithm tries. The additional methods of authentication are used only if the previous method returns an error, not if it fails.

Select one of these methods:

  • enable —Use the enable password for authentication. Before you can use this authentication method, you must define an enable password by using the enable password global configuration command.

  • group tacacs+ —Uses TACACS+ authentication. Before you can use this authentication method, you must configure the TACACS+ server.

  • line —Use the line password for authentication. Before you can use this authentication method, you must define a line password. Use the password password line configuration command.

  • local —Use the local username database for authentication. You must enter username information in the database. Use the username password global configuration command.

  • local-case —Use a case-sensitive local username database for authentication. You must enter username information in the database by using the username name password global configuration command.

  • none —Do not use any authentication for login.

Step 5

line [console | tty | vty] line-number [ending-line-number]

Example:


Switch(config)# line 2 4

Enters line configuration mode, and configures the lines to which you want to apply the authentication list.

Step 6

login authentication {default | list-name}

Example:


Switch(config-line)# login authentication default

Applies the authentication list to a line or set of lines.

  • If you specify default , use the default list created with the aaa authentication login command.

  • For list-name , specify the list created with the aaa authentication login command.

Step 7

end

Example:


Switch(config-line)# end

Returns to privileged EXEC mode.

Step 8

show running-config

Example:


Switch# show running-config 

Verifies your entries.

Step 9

copy running-config startup-config

Example:


Switch# copy running-config startup-config 

(Optional) Saves your entries in the configuration file.

Configuring TACACS+ Authorization for Privileged EXEC Access and Network Services

You can use the aaa authorization global configuration command with the tacacs+ keyword to set parameters that restrict a user’s network access to privileged EXEC mode.


Note

Authorization is bypassed for authenticated users who log in through the CLI even if authorization has been configured.


Follow these steps to specify TACACS+ authorization for privileged EXEC access and network services:

SUMMARY STEPS

  1. enable
  2. configure terminal
  3. aaa authorization network tacacs+
  4. aaa authorization exec tacacs+
  5. end
  6. show running-config
  7. copy running-config startup-config

DETAILED STEPS

  Command or Action Purpose
Step 1

enable

Example:


Switch> enable

Enables privileged EXEC mode. Enter your password if prompted.

Step 2

configure terminal

Example:


Switch# configure terminal

Enters the global configuration mode.

Step 3

aaa authorization network tacacs+

Example:


Switch(config)# aaa authorization network tacacs+

Configures the switch for user TACACS+ authorization for all network-related service requests.

Step 4

aaa authorization exec tacacs+

Example:


Switch(config)# aaa authorization exec tacacs+

Configures the switch for user TACACS+ authorization if the user has privileged EXEC access.

The exec keyword might return user profile information (such as autocommand information).

Step 5

end

Example:


Switch(config)# end

Returns to privileged EXEC mode.

Step 6

show running-config

Example:


Switch# show running-config 

Verifies your entries.

Step 7

copy running-config startup-config

Example:


Switch# copy running-config startup-config 

(Optional) Saves your entries in the configuration file.

Starting TACACS+ Accounting

Follow these steps to start TACACS+ Accounting:

SUMMARY STEPS

  1. enable
  2. configure terminal
  3. aaa accounting network start-stop tacacs+
  4. aaa accounting exec start-stop tacacs+
  5. end
  6. show running-config
  7. copy running-config startup-config

DETAILED STEPS

  Command or Action Purpose
Step 1

enable

Example:


Switch> enable

Enables privileged EXEC mode. Enter your password if prompted.

Step 2

configure terminal

Example:


Switch# configure terminal

Enters the global configuration mode.

Step 3

aaa accounting network start-stop tacacs+

Example:


Switch(config)# aaa accounting network start-stop tacacs+

Enables TACACS+ accounting for all network-related service requests.

Step 4

aaa accounting exec start-stop tacacs+

Example:


Switch(config)# aaa accounting exec start-stop tacacs+

Enables TACACS+ accounting to send a start-record accounting notice at the beginning of a privileged EXEC process and a stop-record at the end.

Step 5

end

Example:


Switch(config)# end

Returns to privileged EXEC mode.

Step 6

show running-config

Example:


Switch# show running-config 

Verifies your entries.

Step 7

copy running-config startup-config

Example:


Switch# copy running-config startup-config 

(Optional) Saves your entries in the configuration file.

What to do next

To establish a session with a router if the AAA server is unreachable, use the aaa accounting system guarantee-first command. It guarantees system accounting as the first record, which is the default condition. In some situations, users might be prevented from starting a session on the console or terminal connection until after the system reloads, which can take more than 3 minutes.

To establish a console or Telnet session with the router if the AAA server is unreachable when the router reloads, use the no aaa accounting system guarantee-first command.

Establishing a Session with a Router if the AAA Server is Unreachable

To establishing a session with a router if the AAA server is unreachable, use the aaa accounting system guarantee-first command. It guarantees system accounting as the first record, which is the default condition. In some situations, users might be prevented from starting a session on the console or terminal connection until after the system reloads, which can take more than 3 minutes.

To establish a console or Telnet session with the router if the AAA server is unreachable when the router reloads, use the no aaa accounting system guarantee-first command.

Monitoring TACACS+

Table 1. Commands for Displaying TACACS+ Information
Command Purpose

show tacacs

Displays TACACS+ server statistics.

Additional References

Related Documents

Related Topic Document Title

Configuring Identity Control policies and Identity Service templates for Session Aware networking.

Session Aware Networking Configuration Guide, Cisco IOS XE Release 3SE (Catalyst 3850 Switches)

http://www.cisco.com/en/US/docs/ios-xml/ios/san/configuration/xe-3se/3850/san-xe-3se-3850-book.html

Configuring RADIUS, TACACS+, Secure Shell, 802.1X and AAA.

Securing User Services Configuration Guide Library, Cisco IOS XE Release 3SE (Catalyst 3850 Switches)

http://www.cisco.com/en/US/docs/ios-xml/ios/security/config_library/xe-3se/3850/secuser-xe-3se-3850-library.html

Error Message Decoder

Description Link

To help you research and resolve system error messages in this release, use the Error Message Decoder tool.

https://www.cisco.com/cgi-bin/Support/Errordecoder/index.cgi

MIBs

MIB MIBs Link

All supported MIBs for this release.

To locate and download MIBs for selected platforms, Cisco IOS releases, and feature sets, use Cisco MIB Locator found at the following URL:

http://www.cisco.com/go/mibs

Technical Assistance

Description Link

The Cisco Support website provides extensive online resources, including documentation and tools for troubleshooting and resolving technical issues with Cisco products and technologies.

To receive security and technical information about your products, you can subscribe to various services, such as the Product Alert Tool (accessed from Field Notices), the Cisco Technical Services Newsletter, and Really Simple Syndication (RSS) Feeds.

Access to most tools on the Cisco Support website requires a Cisco.com user ID and password.

http://www.cisco.com/support