The documentation set for this product strives to use bias-free language. For the purposes of this documentation set, bias-free is defined as language that does not imply discrimination based on age, disability, gender, racial identity, ethnic identity, sexual orientation, socioeconomic status, and intersectionality. Exceptions may be present in the documentation due to language that is hardcoded in the user interfaces of the product software, language used based on RFP documentation, or language that is used by a referenced third-party product. Learn more about how Cisco is using Inclusive Language.
Your software release may not support all the features documented in
this module. For the latest caveats and feature information, see Bug Search
Tool and the release notes for your platform and software release. To find
information about the features documented in this module, and to see a list of
the releases in which each feature is supported, see the feature information
table at the end of this module.
Use Cisco Feature Navigator to find information about platform support
and Cisco software image support. To access Cisco Feature Navigator, go to
http://www.cisco.com/go/cfn. An account on Cisco.com is
not required.
Information About
TelePresence E911 IP Phone Support
You can use a Cisco IP
phone as a user interface in a Cisco TelePresence System. In this
configuration, the IP phone must always be on and available for emergency
calls. If the power to the codec in the Cisco TelePresence System fails, is
disrupted or if the codec fails, the IP phone is not available.
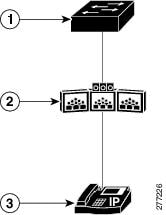
Figure 1. Phone-Codec-Switch Connection
Table 1.
Term
Switch
Cisco
TelePresence System with a codec
IP phone
Use the TelePresence
E911 IP phone support feature to ensure that the IP phone is always on and
available for emergency calls. When a CDP-enabled IP phone is connected to the
codec through a switch, you can configure the switch to forward CDP packets
from the IP phone only to the codec in the Cisco TelePresence System. The
switch adds
ingress-egress port
pairs to the CDP forwarding table. An ingress-egress port pair is a
one-to-one mapping between an ingress switch port connected to the IP phone and
an egress switch port connected to the codec.
The IP phone and the
codec communicate through the IP network. If power to the codec fails, is
disrupted or if the codec fails, the IP phone is still connected to the IP
network and is available for emergency calls.
The switch forwards
all CDP packets received on the ingress port to the egress port. If multiple IP
phones are connected to the codec through a single port on the switch, only one
phone communicates with it through the IP network. This phone is usually the
one that sent the first CDP packet received by the codec.
Figure 2. Phone-Codec-Switch Connection
Table 2.
Term
Switch
Cisco
TelePresence System with a codec
CDP-enabled IP phone
How to Configure
TelePresence E911 IP Phone Support
Configuration
Guidelines
You must use only CDP-enabled phones with TelePresence E911 IP phone
support.
You can connect the IP phone and codec in the Cisco TelePresence
System through any two ports in a switch stack.
Enabling
TelePresence E911 IP Phone Support
SUMMARY STEPS
enable
configure terminal
cdp forward ingress port-idegress port-id
end
show cdp forward
show running-config
copy running-config
startup-config
DETAILED STEPS
Command or Action
Purpose
Step 1
enable
Example:
Switch> enable
Enables
privileged EXEC mode. Enter your password if prompted.
Step 2
configure terminal
Example:
Switch# configure terminal
Enters the global
configuration mode.
Step 3
cdp forward ingress port-idegress port-id
Configures an
ingress-egress port pair.
ingressport
-id - Specifies the port connected to the CDP-enabled IP phone.
egressport
-id - Specifies the port connected to the codec in the Cisco TelePresence
System.
Repeat this step to configure additional ingress-egress port
pairs.
Step 4
end
Example:
Switch(config)# end
Returns to
privileged EXEC mode.
Step 5
show cdp forward
Verifies the
ingress-egress port pairs. The command output also shows the number of
forwarded and dropped packets.
Step 6
show running-config
Example:
Switch# show running-config
Verifies your entries.
Step 7
copy running-config
startup-config
Example:
Switch# copy running-config startup-config
(Optional) Saves your entries
in the configuration file.
 Feedback